Office Lens or CamScanner, which will prevail?

While many of us are trying to live in a completely digital world, much of civilization has yet to catch up with us trendy hipsters. Whether you are a student trying to manage the stacks of papers that your professors throw at you or you are a business person trying to clear off your desk – digitizing your papers are a great way to simplify your life.
Up until recently, CamScanner has been seen as the number one application to scan your physical documents on the go, but Microsoft’s recent release of Office Lens might change the landscape. The Office Lens application has already hit the top of the Windows Phone Marketplace, but we are going to take a detailed look at the two competitors to see who really deserves the number one spot.
CamScanner
As CamScanner came first to the marketplace, we will begin with it in our comparison of the two apps. In fact, CamScanner’s own origins began before it landed on Microsoft’s Windows Phone platform; it is also currently available on Android, iPhone, and iPad. Downloading CamScanner is completely free, but premium features are available as we will mention shortly.
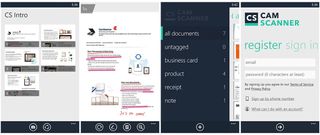
Upon opening the application, you will be prompted to sign in or create a new account for the CamScanner website. If you have never used the app, the setup process is quick and simple – otherwise, hit the login button to access your current account.
The menu system within the app is quite simple and easy to use. The application opens with a list of all of your currently scanned documents, but you can swipe to the side to view your documents via various tags. If you notice some of your past documents missing, you can open the settings menu at the bottom and select the “sync” ability.

One of our favorite features of CamScanner is the fact that your documents can be grouped into different collections; this ability can be extremely useful when scanning a packet of information or if you wish to keep specific scans grouped together.
To begin a scan, simply hit the “plus” button at the bottom of the app’s home screen and you will be launched into camera mode. There are two buttons at the bottom of the screen allowing you to control flash operation or import photos from your phone’s library.
Get the Windows Central Newsletter
All the latest news, reviews, and guides for Windows and Xbox diehards.
Taking shots of documents is extremely quick and once you scan a single document it moves on and allows you to take the next shot. Using this method, you can easily scan through a large amount of information. Once you are done taking photos, you can select the “checkmark” symbol at the bottom of the screen.
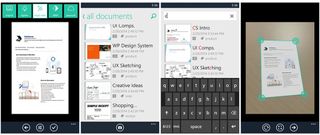
You will then be brought through a review phase, where you can size and crop the photos you have just taken. CamScanner automatically attempts to find the edges of the document you are scanning and while it does not work all the time, we found it worked for the vast majority. You can also easily rotate photos for correct alignment if you happened to take a photo with your phone upside down.

Once you have finished cropping your photos and you select the “checkmark” symbol, this is where the magic beings. CamScanner automatically applies a high contrast filter to the documents you scan, which makes the text extremely readable. Besides the default “Magic Color” mode that the application applies by default, there are also “lighten”, “black and white”, and “greyscale” modes. If you are extremely picky, you can adjust the exact amount of brightness, contrast, and “magic” (which, appears to also be a form of contrast control). Once finished, hit the “checkmark” button and you are finished.
While viewing collections of previously scanned documents, you can sort files or share them with friends via a PDF in an email or via an image using the default Windows Phone share menu. CamScanner is designed to be a completely one stop solution for your document managing needs and provides safe backup to the CamScanner website.
While the service is free and users are given 200 MB of free cloud storage, you can also upgrade your account to premium for $4.99 a month or $49.99 a year. The premium ability adds automatic OCR conversion, allows you to share documents with up to 50 people, removes all ads and watermarking, enables text extraction, unlimited annotations, password protected document sharing links, and much more.

For more details on CamScanner you can visit their website by clicking here. Additionally, you can download the application from the Windows Phone Marketplace by clicking here or scanning the QR code above.
Office Lens
Microsoft’s addition to the document scanning space comes in the form of the recently released, Office Lens. While CamScanner can be seen as a completely independent app for scanning and document storage, the Office Lens app serves as more of a companion app to OneNote.
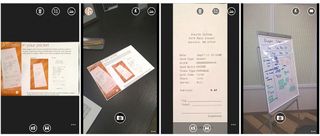
When you launch Office Lens, you are immediately presented with the camera. There are no menus to go through or buttons to click – opening the app gives you access to the scanning function right away. Four buttons are present on the screen: a library button to view your previously scanned content, a flash control button, a mode button, and the camera shutter button. You can also access the settings menu below to easily change settings, save snapshots, and import photos from your device’s library.

Unlike CamScanner, which simply takes a photo of your document and begins conversion, you can set a specific mode within Office Lens to allow the app to know what you are scanning. Three modes are bundled including photo mode, whiteboard mode, and document mode. Photo mode seems to boost contrast and saturation, while the latter two modes seem to boost mainly contrast. The whiteboard mode is supposed to remove glare that could be caused by plastic whiteboards, and while it seems to work most of the time, your mileage may vary.
After taking a photo in document mode, you are given the ability to crop the document out, but the method is not as precise as within CamScanner. Office Lens also includes the ability to automatically detect your scanned document and we found it to work just as well as CamScanner.

As far as the changes made to the photo we took – we were not impressed. While the application did increase the contrast a bit, shadows and paper cringes were still evident. In many ways, while CamScanner actually seemed to create a digital version of the document, Office Lens simply looks like a picture taken with any phone (app or no app).
When it comes to sharing your content and managing it, as we stated above, you are going to be plugged completely into OneNote. Office Lens does not feel like a complete application, but instead compliments Microsoft’s OneNote software. You can share your photographed document via the standard Windows Phone share menu, but if you wish to save your content – OneNote is the direct one click option.

If you are interested in checking out the Microsoft Office Lens application, click here to download it for free from the Windows Phone Marketplace or scan the QR code above.
Conclusion
While Microsoft’s Office Lens app has been openly received by the Windows Phone community, we cannot help to feel that the features it offers are a bit lacking and under whelming.
Office Lens might make a nice companion for heavy OneNote users, but we believe that CamScanner is a much better alternative. Not only does CamScanner deliver a better end result, but it allows you to sort and tag documents in an efficient manner. In the end, if you really want pair the app with OneNote, you can always share the image via the Windows Phone share option.
As always, we recommend downloading both application and trying them for yourselves, while the author of this article feels that CamScanner is the winner by a large margin, I’m sure some of you will find more comfort within Office Lens’ simplicity.
Do you use one of the two applications we just compared – which do you prefer, CamScanner or Office Lens? Or is there a third option out there you'd recommend?

