How to add new Cortana search file locations on Windows 10
If some files are not showing up on search results, it's probably because Cortana doesn't know where to look. Here's how to add alternative search locations on Windows 10.

Cortana is your personal digital assistant in Windows 10. It's a feature designed to help you accomplish many tasks, including reminding you of important appointments, track packages and flights, and sync notifications between devices.
In addition, Cortana shares a deep integration with Windows Search and search on the web using Bing. If there is anything you need (e.g., image, document, or another type of file), you simply enter the query in the search box in the taskbar, and Cortana will return the best results based on local and online searches. However, if you store files on an external hard drive or in different folders other than the defaults (Downloads, Documents, Music, Pictures, etc.), you'll notice that the digital assistant will never bring up those files in the results.
The reason is that Cortana relies on Windows Search for local files, and Windows Search uses a set of default configurations that specify which folders are indexed for search. And these default settings don't include additional storage locations you may have added to your computer or alternative folder paths.
In this Windows 10 guide, we'll walk you through the steps to enable Cortana to search all your drives connected to your computer, and how to remove those locations you want to prevent from indexing.
How to add new storage locations for indexing on Windows 10
Use the following steps to modify the default local search configurations, which Cortana can use respond accordingly to your search queries.
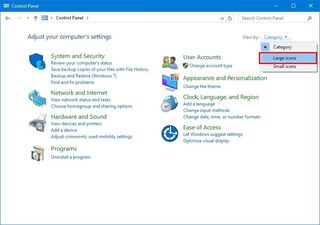
- Use the Windows key + X to open the Power User menu and select Control Panel.
- Change the view to Large Icons.
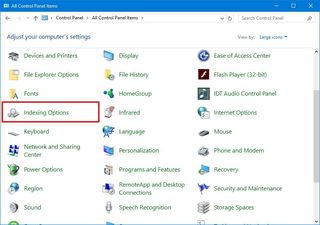
- Click on Indexing Options.
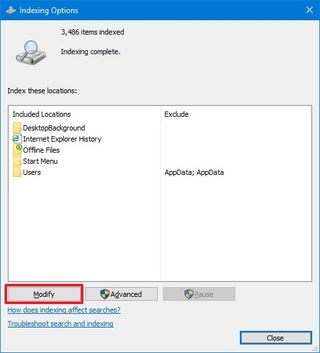
- Click Modify.
- Click Show all locations .
- On Indexed Locations, select the folders and drives you want to give Cortana permission to search.
- Quick Tip: If you have sensitive files (or videos), in this step, you can also exclude the locations you don't want Cortana to use to show search results.
- Getting Granular: If you want to index a folder, but you don't want a subfolder to be indexed, expand the folder and remove the checkmark for those files and folders inside it you don't want Cortana to consider during a search.
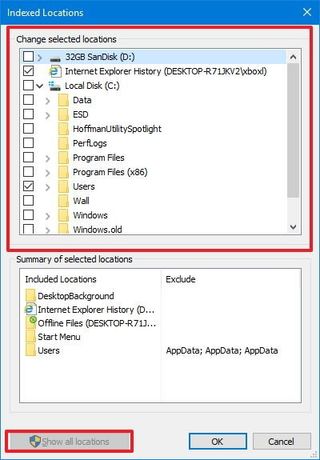
- Click the OK button to complete the task.
Once you completed the task, Windows 10 will automatically begin indexing the new files, but it may take some time. If you don't want to wait, or it's been too long and search isn't working correctly, while in the Indexing Options settings page do the following.
- Click Advanced.
- Click Rebuild.
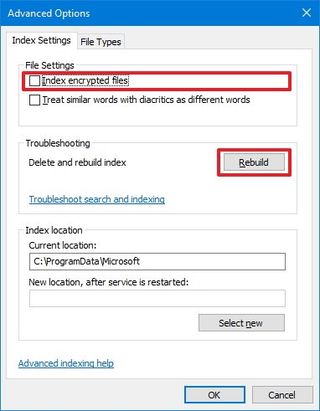
- Click OK to confirm.
If you have encrypted files stored on your computer, you always want to check the Index encrypted files option under Advanced Options.
Get the Windows Central Newsletter
All the latest news, reviews, and guides for Windows and Xbox diehards.
You can even go to the File Types tab and configure which files extensions you want to see in search results.
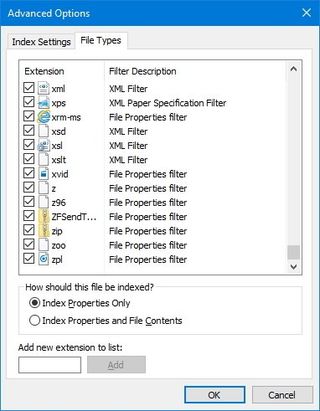
Once you completed your new customization, click the OK button to commit the changes.
Wrapping things up
As you can see, Cortana may know many nifty tricks, but when it comes to search certain options have to be customized manually before getting the best results. If you have been wondering why certain files didn't show in search -- well, this is why.
Do you think that Cortana should be able to search your entire computer by default, or this is the right approach? Tell us what you think in the comments below.
More Windows 10 resources
For more help articles, coverage, and answers on Windows 10, you can visit the following resources:
- Windows 10 on Windows Central – All you need to know
- Windows 10 Anniversary Update
- Windows 10 help, tips, and tricks
- Windows 10 forums on Windows Central
Mauro Huculak is technical writer for WindowsCentral.com. His primary focus is to write comprehensive how-tos to help users get the most out of Windows 10 and its many related technologies. He has an IT background with professional certifications from Microsoft, Cisco, and CompTIA, and he's a recognized member of the Microsoft MVP community.

