There's no doubt about it; your photos are precious. To keep them safe, your best bet is to back them up to either a cloud storage service or an external hard drive. Here's how to back up your photos on Windows 10.
How to back up your photos with OneDrive
The easiest way to back up your photos on Windows 10 is to use OneDrive. You can sync certain folders on your PC to back up to OneDrive automatically, so you won't have to worry about losing your photos. Here's how to set up and sync using OneDrive whether you're just starting out or you're already an established user.
If you need more OneDrive space than the introductory 5GB, a variety of plans are available and come bundled with Office 365.
If you're using OneDrive for the first time on your PC
Haven't yet opened the OneDrive app on your PC? No worries; setup takes less than a minute, and at the end, your photos will be synced.
- Click the Start button.
- Click OneDrive — you might have to scroll down a bit to find it.

- Type your email address.
- Click Sign in.

- Type your password.
- Click Sign in.

- Click Next.
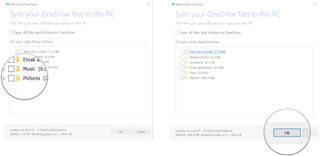
- Click the checkbox next to any folders you want to sync with OneDrive. Make sure you check the box next to the folder holding your photos.

- Click Next.
- Click Open my OneDrive folder.

If you've already set up OneDrive on your PC
Have you already set up OneDrive on your PC but don't have it set to sync your photos? No problem; here's how to change which folders sync to OneDrive.
- Launch File Explorer from your Start menu, taskbar, or desktop.
- Right-click OneDrive from the left-side menu.
- Click Choose OneDrive folder to sync.

- Click the checkbox next to any folders you want to sync. Make sure you check the box next to the folder holding your photos.
- Click OK.

Any photos in the folder you chose can now be found on OneDrive.
How to transfer individual photos to OneDrive
Not wanting to sync entire folders to OneDrive is understandable — sometimes you just want to safeguard a few photos in your collection. The easiest way to sync individual photos, and indeed any file, is to drag and drop it on the OneDrive folder.
Get the Windows Central Newsletter
All the latest news, reviews, and guides for Windows and Xbox diehards.
- Launch File Explorer from your Start menu, taskbar, or desktop.
- Click the dropdown arrow next to OneDrive so that you can see the folder you want to transfer photos to. You can also transfer photos straight to OneDrive and organize them later.

- Navigate to the picture you want to back up to OneDrive.
- Click the picture and drag it to the OneDrive folder or the subfolder of choice.

That's it! If you want to get fancy, use the Ctrl + Click shortcut to select multiple files before dragging them over to OneDrive.
How to back up your photos to an external hard drive
Those of you who'd rather have a harder copy of your photos might want to back them up to an external hard drive. Windows 10 makes this as easy as possible.
If you don't yet have an external hard drive, we've made choosing one easy — just check out our best external hard drive buyer's guide.
How to set up an automatic backup to an external hard drive
Before starting these steps, make sure you plug an external hard drive into your PC.
- Click the Start button.
- Click the Settings button — it looks like a gear.

- Click Update & security.
- Click Backup.

- Click Add a drive.
- Click a drive.

- Click More options. Here you will see all subfolders in your user folder are backed up by default.
- Click any folder in the Back up these folders list that you don't want backed up.

- Click Remove. Continue removing folders until you have only the photos and files you want backed up remaining.
- Click Back up now to back up your photos immediately. You might have to scroll up a bit to find the button.

How to change the frequency of automatic backups
By default, your files will be backed up every hour as long as the external hard drive is plugged into your PC. Here's how to change how often files are synced.
- Click the Start button.
- Click the Settings button — it looks like a gear.
- Click Update & security.

- Click Backup.
- Click More options.

- Click the dropdown arrow beneath Back up my files.
- Click a backup option.

How to manually transfer photos to your external hard drive
If you don't want to set up an automatic backup — almost useless unless you always have an external hard drive plugged in — you can always move files manually. Before starting, make sure you have your external hard drive plugged into your PC.
- Launch File Explorer from your Start menu, taskbar, or desktop.
- Click the dropdown arrow next to your external drive so that you can see the folder you want to transfer photos to. You can also just transfer photos straight to your drive and worry about organization later.

- Navigate to the picture you want to back up to your external hard drive.
- Click the picture and drag it to the drive or the subfolder of choice.

If you want to transfer multiple files, use the Ctrl + Click shortcut to select multiple files before dragging them over to your external drive.
How do you back up your photos?
Do you use an external hard drive or do you use OneDrive? Let us know in the comments section!

Cale Hunt brings to Windows Central more than eight years of experience writing about laptops, PCs, accessories, games, and beyond. If it runs Windows or in some way complements the hardware, there’s a good chance he knows about it, has written about it, or is already busy testing it.
