How to display last sign-in information during logon on Windows 10
Keep tabs of successful and unsuccessful sign-in interactions by displaying the previous sign-in information during logon on Windows 10.
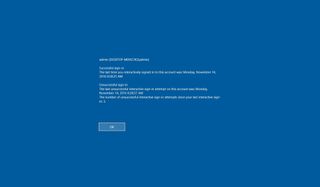
Windows 10 comes with a lot of security features to keep your account and data safe from prying eyes. You get features like your standard password protection, two-factor authentication when using a Microsoft account, and you can even use a PIN as a secondary method of authentication, which you can make very hard to crack, just to name a few.
However, even with all the security features that the operating system has to offer, if you're sharing your PC or you're in a place where other people may have physical access to your device, there is not an easy way to tell if someone gained access to your computer.
Fortunately, on Windows 10 using a local account, you can view if someone successfully signed in to your PC (and failed attempts), which can help to determine if you need to yell at someone for trying to access your PC without authorization and if you have to reinforce your device security.
In this Windows 10 guide, we'll walk you through the steps to use the Local Group Policy Editor and the Registry to display the last sign-in information and failed attempts to your account since the last interactive logon.
How to display last sign-in information using Local Group Policy
If you're running Windows 10 Pro, Enterprise, or Education, you can use the Local Group Policy Editor to quickly enable a policy to display the last sign-in information during logon.
To view the previous sign-in information and unsuccessful attempts, do the following:
- Use the Windows key + R keyboard shortcut to open the Run command.
- Type gpedit.msc and click OK to open the Local Group Policy Editor.
- Browse the following path:
Computer Configuration > Administrative Templates > Windows Components > Windows Logon Options - On the right side, double-click the Display information about previous logons during user logon policy.
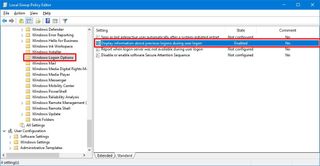
- On the top-left, make sure to select Enabled to enforce the policy.
- Click Apply.
- Click OK to complete the task.
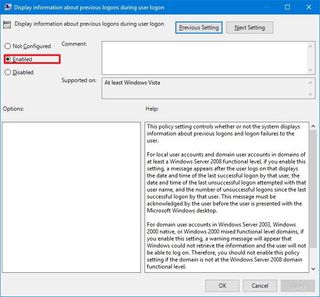
At any time you can revert the changes by following the same steps, but this time on step 5, you'll need to select the Not Configured option.
Get the Windows Central Newsletter
All the latest news, reviews, and guides for Windows and Xbox diehards.
How to display last sign-in information using the Registry
In the case your computer is running Windows 10 Home, you won't have access to the Local Group Policy Editor, but if you're up to the challenge, you can tweak the Registry to achieve the same result.
Important: As always, this is a friendly reminder to let you know that editing the registry is risky, and it can cause irreversible damage to your installation if you don't do it correctly. It's recommended to make a full backup of your PC before proceeding.
- Use the Windows key + R keyboard shortcut to open the Run command.
- Type regedit, and click OK to open the registry.
- Browse the following path:
HKEY_LOCAL_MACHINE\SOFTWARE\Microsoft\Windows\CurrentVersion\Policies\System - Select the System (folder) key, and right-click on the right side, select New, and click on DWORD (32-bit) Value.
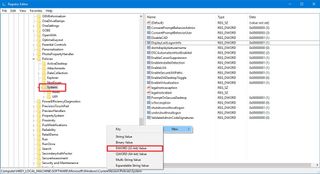
- Name the new DWORD DisplayLastLogonInfo and press Enter.
- Double-click the newly created DWORD and change its value from 0 to 1.
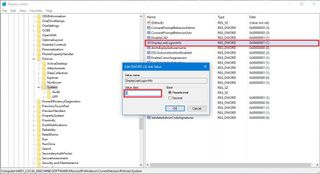
- Close the Registry to complete the task.
If you're tweaking the Registry, you can revert the changes by following the same steps, but this time on step 6 change the DWORD value from 1 to 0.
Once you completed the steps, you can restart your computer, and when you sign back in to your local account, you'll now see a first message about interactively signing in to your computer.

Then during the second time and moving forward, you'll see the previous logon information (see image above).
Wrapping things up
While this won't prevent other people from trying to access your computer, now you have at least one way to review if someone broke into your local account or if anyone tried to guess your password but failed in the process.
Keep in mind that even though we're focusing this guide for Windows 10, displaying the previous sign-in information during logon is a feature that has been around for a long time, which means that this should also work in Windows 7 and Windows 8.1.
More Windows 10 resources
For more help articles, coverage, and answers on Windows 10, you can visit the following resources:
- Windows 10 on Windows Central – All you need to know
- Windows 10 help, tips, and tricks
- Windows 10 forums on Windows Central
Mauro Huculak is technical writer for WindowsCentral.com. His primary focus is to write comprehensive how-tos to help users get the most out of Windows 10 and its many related technologies. He has an IT background with professional certifications from Microsoft, Cisco, and CompTIA, and he's a recognized member of the Microsoft MVP community.

