How to manage site permissions on the new Microsoft Edge
You can control permissions for websites to improve security and privacy on Microsoft Edge, and in this guide, we'll show you the steps to perform this task.
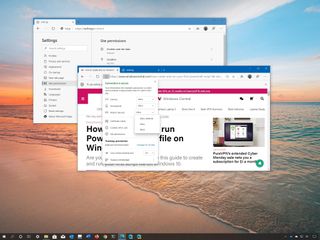
Nowadays, almost every website you visit wants some sort of access to your device, such as access to push notifications to alert you about new content, location to show local information, camera, and microphone for video calls, and they even want permission to store data to personalize your experience.
Although trying to control permissions for every site can be overwhelming, if you're using the new version of Microsoft Edge based on the Chromium engine, you can easily decide the level of access that every website has as they render in the browser to improve privacy and security on Windows 10.
In this Windows 10 guide, we'll walk you through the steps to manage site permissions with the Chromium version of Microsoft Edge.
- How to set permissions per website on Microsoft Edge
- How to manage permissions for all websites on Microsoft Edge
- How to allow or block cookies and site data on Microsoft Edge
- How to allow or block location detection on Microsoft Edge
- How to allow or block camera and microphone access on Microsoft Edge
- How to allow or block site notifications on Microsoft Edge
- How to allow or block site media autoplay on Microsoft Edge
How to set permissions per website on Microsoft Edge
To set permissions for a website on Microsoft Edge Chromium, use these steps:
- Open Microsoft Edge.
- Navigate to the website you want to manage.
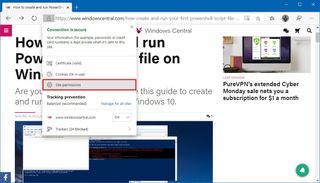
- Click the Lock icon next to the website link in the address bar.
- Click the Site permissions option.
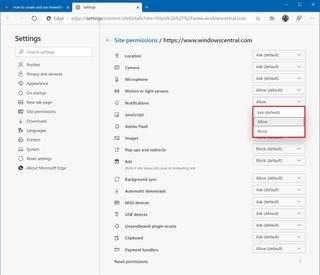
- Use the drop-down menus to allow or deny permissions (such as location, camera, microphone, notifications, Adobe Flash, etc.).
- (Optional) Click the Reset permissions option.
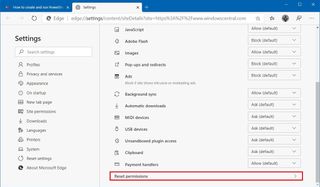
- Click the Reset button to restore the default settings.
- Click the Refresh button on the site to apply the changes.
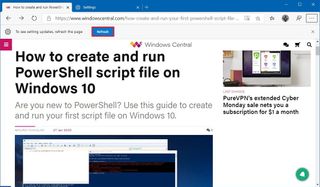
Once you complete the steps, the website will only have access to the permissions you specified.
Changing site permissions
If you want to modify previously configured permissions for a particular website, use these steps:
- Open Microsoft Edge.
- Navigate to the website you want to manage.
- Click the Lock icon next to the website link in the address bar.
- Use the drop-down menus to change the permissions.
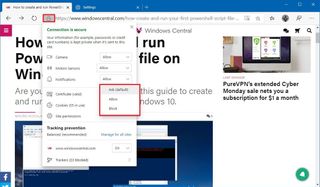
- Click the Refresh button on the site to apply the changes.
After you complete the steps, the new settings will apply to the site.
Get the Windows Central Newsletter
All the latest news, reviews, and guides for Windows and Xbox diehards.
How to manage permissions for all websites on Microsoft Edge
To manage site permissions globally on Chromium Edge, use these steps:
- Open Microsoft Edge.
- Click the Settings and more (three-dotted) button from the top-right.
- Click on Site permissions.
- Select the permission you want to control.
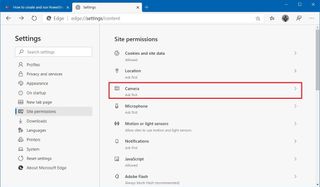
- Turn on the Ask before accessing toggle switch to prevent websites from accessing your device information without your consent.
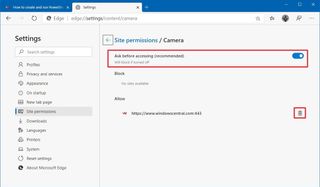
- Under the "Block" section, click the Trash button to restore the default setting for the domain.
- Under the "Allow" section, click the Trash button to restore the default setting for the domain.
Once you complete the steps, you may need to repeat steps No. 4 through 7 to adjust different permissions.
Although the above instructions outline the steps to control the access level, depending on the permission you want to control, you will have different options. For example, Cookies and site data, Camera, Microphone, Notifications, JavaScript, Images, Pop-ups and redirects, Background sync, Automatic downloads, Unsandboxed plugin access, Clipboard, and Payment handlers, all of them have additional customizable options.
How to allow or block cookies and site data on Microsoft Edge
To customize cookies and site data permissions for websites, use these steps:
- Open Microsoft Edge.
- Click the Settings and more (three-dotted) button from the top-right.
- Click on Site permissions.
- Click the Cookies and site data option.
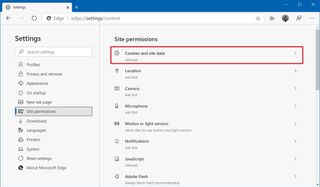
- Turn on the Allow sites to save and read cookie data toggle switch.
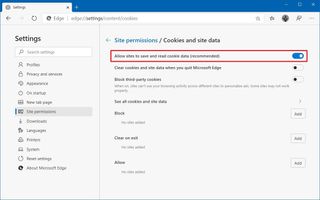
- (Optional) Turn on Clear cookies and site data when you quit Microsoft Edge toggle switch.
- (Optional) Turn on Block third-party cookies toggle switch to prevent websites from using your online activities to target you with ads.
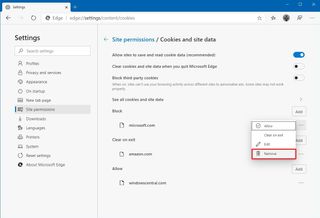
- Under the "Block" section, click the menu (three-dotted) button and select the Remove button to restore the default settings for the domain.
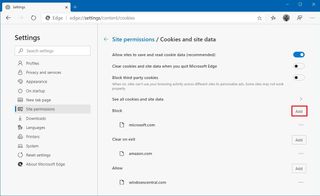
- (Optional) Under the "Block" section, click the Add button to block websites from saving and reading cookies
- Under the "Clear on exit" section, click the menu (three-dotted) button and select the Remove button to restore the default settings for the domain.
- (Optional) Under the "Clear on exit" section, click the Add button to define the websites that Microsoft Edge will clear cookies upon closing the browser.
- Under the "Allow" section, click the menu (three-dotted) button and select the Remove button to restore the default settings for the domain.
- (Optional) Under the "Allow" section, click the Add button to specify the websites allowed to save and read cookies information.Quick note: You should only use this option if you were disabling the Allow sites to save and read cookies data option.
After you complete the steps, only the websites you specified will have permission to save and read cookies data.
Viewing and deleting site cookies
To view or delete cookies stored on your browser, use these steps:
- Open Microsoft Edge.
- Click the Settings and more (three-dotted) button from the top-right.
- Click on Site permissions.
- Click the Cookies and site data option.

- Click the See all cookies and site data option.
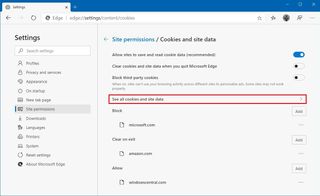
- Use the search box to find a specific cookie.
- Click the right arrow button to get more details about the cookie.
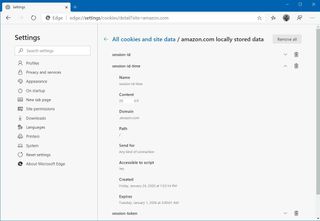
- Click the Trash button to delete it.
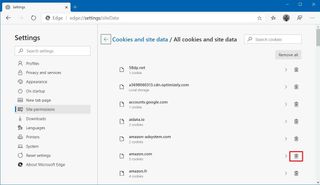
- (Optional) Click the Remove all button.
- Click the Clear button
Once you complete the steps, you'll be able to see and remove one or all the cookies stored on your instance of Microsoft Edge.
How to allow or block location detection on Microsoft Edge
To allow or block location access per website on Microsoft Edge, use these steps:
- Open Microsoft Edge.
- Navigate to the website you want to manage location settings.
- Click the Lock icon next to the website link in the address bar.
- Click the Site permissions option.

- Use the "Location" drop-down menu to allow or deny permission.
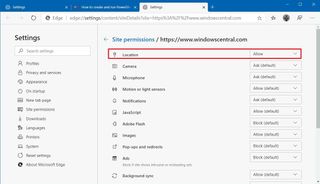
After you complete the steps, you may need to repeat the steps to control location access for other websites.
Managing site location access
To manage website access to your location, use these steps:
- Open Microsoft Edge.
- Click the Settings and more (three-dotted) button from the top-right.
- Click on Site permissions.
- Click the Location option.
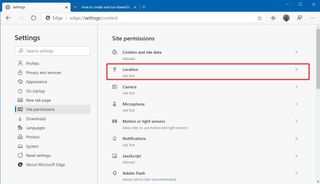
- Turn on the Ask before accessing toggle switch.
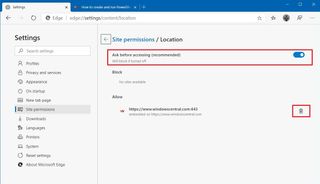
- Under the "Block" section, click the Trash button to restore the default setting for the domain.
- Under the "Allow" section, click the Trash button to restore the default setting for the domain.
After you complete the steps, only sites in the "Allow" list will be able to access your location automatically. If the site isn't in either list, then you'll get a prompt to allow or deny the access.
How to allow or block camera and microphone access on Microsoft Edge
To allow or block website access to your device camera and microphone, use these steps:
- Open Microsoft Edge.
- Navigate to the website you want to manage location settings.
- Click the Lock icon next to the website link in the address bar.
- Click the Site permissions option.

- Use the "Camera" or "Microphone" drop-down menu to allow or deny permission.
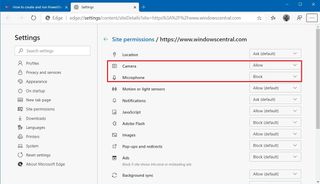
Once you complete the steps, only the websites you specified will be able to access the device camera and microphone. If the site isn't in either of the lists, then you'll get a prompt to allow or deny the access.
Managing site camera and microphone access
To control access to camera and microphone on Microsoft Edge, use these steps:
- Open Microsoft Edge.
- Click the Settings and more (three-dotted) button from the top-right.
- Click on Site permissions.
- Click the Camera or Microphone option.
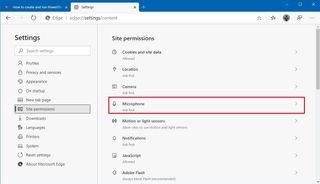
- Use the drop-down menu and select the default device.
- Turn on the Ask before accessing toggle switch.
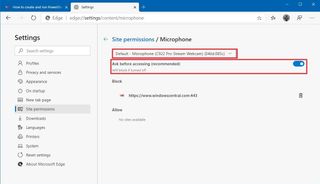
- Under the "Block" section, click the Trash button to restore the default setting for the domain.
- Under the "Allow" section, click the Trash button to restore the default setting for the domain.
After you complete the steps, only the websites in the "Allow" list will have access to the camera and microphone. If the domain isn't in either list, then you'll see a prompt to allow or deny the access.
How to allow or block site notifications on Microsoft Edge
To allow or block site notifications on Microsoft Edge, use these steps:
- Open Microsoft Edge.
- Navigate to the website you want to manage location settings.
- Click the Lock icon next to the website link in the address bar.
- Click the Site permissions option.

- Use the "Notifications" drop-down menu to allow or deny permission.
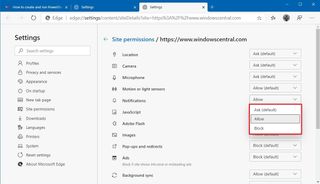
Once you complete the steps, only the sites you specified will be able to push notifications. If the website wants to display notifications, and it's not on the allow or block list, then you'll see a prompt to allow or deny the access.
Managing site notifications permissions
To manage notifications permissions for websites on Chromium Edge, use these steps:
- Open Microsoft Edge.
- Click the Settings and more (three-dotted) button from the top-right.
- Click on Site permissions.
- Click the Notifications option.
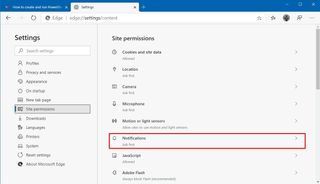
- Turn on the Ask before accessing toggle switch.
- Under the "Block" section, click the menu (three-dotted) button and select the Remove button to restore the default settings for the domain.
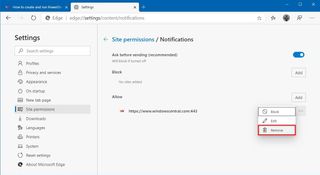
- (Optional) Under the "Block" section, click the Add button to block websites from pushing notifications.
- Under the "Block" section, click the menu (three-dotted) button and select the Remove button to restore the default settings for the domain.
- (Optional) Under the "Allow" section, click the Add button to permit site to push notifications.
After you complete the steps, sites in the "Allow" list will be able to push notifications, but the domain isn't in either list, then you'll receive a prompt to allow or deny the access.
How to allow or block site media autoplay on Microsoft Edge
To allow or limit sites from playing media automatically on Microsoft Edge, use these steps:
- Open Microsoft Edge.
- Click the Settings and more (three-dotted) button from the top-right.
- Click on Site permissions.
- Click the Media autoplay option.
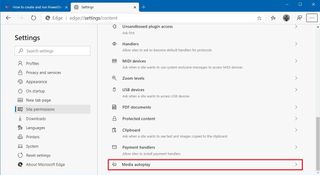
- Use the Control if audio and video play automatically on sites drop-down menu to Allow or Limit access.
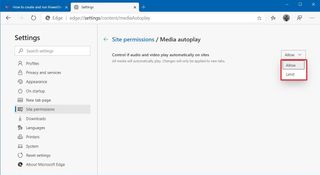
Once you complete the steps, websites will be able to play media automatically, depending on your configuration.
We're focusing this guide on Windows 10, but the above instructions will also work for Microsoft Edge on Windows 7, Windows 8.1, and macOS.
Mauro Huculak is technical writer for WindowsCentral.com. His primary focus is to write comprehensive how-tos to help users get the most out of Windows 10 and its many related technologies. He has an IT background with professional certifications from Microsoft, Cisco, and CompTIA, and he's a recognized member of the Microsoft MVP community.

