How to prepare your PC for the Windows 10 upgrade
On July 29, Microsoft's goal of having Windows 10 running on a billion devices in the next three years begins.
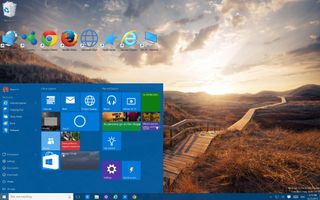
It's been a long ride, but at the end of July, millions of users around the world will finally get their hands on Windows 10. In this new release, Microsoft is going back to the drawing board to make Windows better. The company is doing this by bringing back many of the familiarities of Windows 7 with a mix of Windows 8.1 functionality, brand new features, such as Cortana, Settings, and universal Windows apps, and changing the way people upgrade to the next operating system. So far things are looking very good.
Below you will find everything you need to know to prepare your computer to upgrade to Windows 10. From making sure all your system's components are compatible with the new operating system, to preparing a recovery plan, to making the necessary changes to prevent possible hiccups during the process.
Making sure Windows 10 is compatible with your PC
One of the efforts to put Windows 10 on a billion devices is by making the operating system free for the first year after the release, for everyone running a genuine version of Windows 7 Service Pack 1 and Windows 8.1 Update. Recently an important update (KB3035583) has rolled out adding the "Get Windows 10" app on qualifying PCs to allow users to reserve their free copy of Windows 10.
However, the app offers more than just a way to reserve a copy of the operating system; it also includes a tool to check your PC to see if it's compatible with Windows 10. While almost every computer running Windows 7 or Windows 8 will be compatible, the app is very handy to detect if certain applications or hardware currently installed on your computer will work after the upgrade.
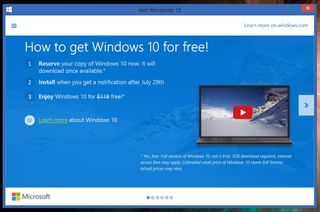
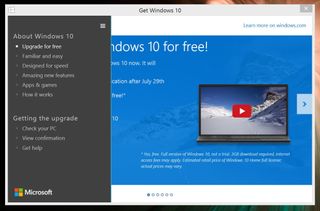
If you already see the Start button icon in the notification area (bottom-right corner), click it to launch the "Get Windows 10" app. From the top-left, click the hamburger button, and then from the menu, click Check your PC. If everything is good, you'll see a green message saying "This PC meets the system requirements", and you can now safely click the Reserve button to complete the reservation.
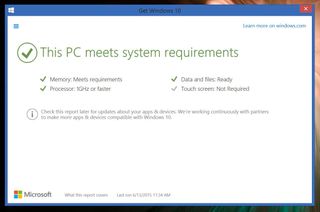
If there is an issue, you will see it listed under Devices and Apps. For more information about the what the report covers, check this support page from Microsoft.
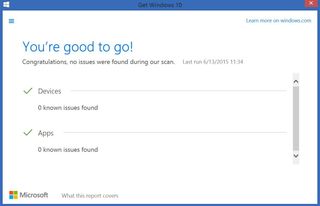
While most hardware and software should work without a problem, typical compatibility issues could include wireless and Bluetooth adapters, outdated drivers, and very old applications.
Get the Windows Central Newsletter
All the latest news, reviews, and guides for Windows and Xbox diehards.
If you find something that isn't compatible, it doesn't necessarily mean that you cannot install Windows 10. But, you should halt the reservation, go to your PC manufacturer's support website and see if there are any updates or drivers available for that particular product.
Even though Windows can detect and install most device drivers, it's a good idea to always update to the latest and just to have them handy in case you need to reinstall any of them after the upgrade. (Trust me, you don't want a network adapter problem after the upgrade and without a network connection to find a solution.)
Here is a list of the most common PC manufacturer websites support to download drivers and software:
In the case you're dealing with an old application, see if there is an update available or decide if it's time to upgrade. If the app ends up being not compatible, but you want to use Windows 10, you can also opt to create a virtual machine running Windows 7 (keep in mind that a license may be required) to run the app. To do this, you can use free tools such as VirtualBox or Microsoft's Hyper-V (available on Windows 10 Pro).
You can always find more detailed information about Windows 10 compatibility for a particular application or hardware at the Windows Compatibility Center, but remember that the database is currently small, so results are limited.
There could be the case where you'll see the notification that you won't be able to restore factory settings. If you get this message, it means that the manufacturer has set up your PC to run from a compressed Windows image and included an option to restore factory settings. After the upgrade, you will not be able to restore to the original factory settings, but there will be other recovery options.
If you don't see the "Get Windows 10" app, chances are that one of following cases is true:
- Your PC doesn't have installed update KB3035583
- Your PC is having an issue with update KB3035583. Try uninstalling and reinstalling the update again.
- Your PC is not running Windows 7 Service Pack 1 or Windows 8.1 Update
- Your PC is not compatible with Windows 10
- Your PC is not running a genuine version of Windows
Note: Microsoft will offer Windows 10 as a free upgrade, which means that you'll have to install the new version on top of Windows 7 or Windows 8.1 in order to have a fully activated installation, but the company will also allow users to upgrade doing a clean install of the operating system. However, users will be forced to do the upgrade via Windows Update first, then being allowed to perform a clean install of Windows 10.
Now that you know your PC is ready, it's time to make sure you don't lose any settings, files, and you have a bulletproof recovery option.
The next step is to make a full backup of your system
I cannot stress this enough, but before even considering pressing the upgrade button, you have to understand that software could always fail and if something bad happens, you could lose many important files. To prevent such a nightmare, you need a recovery plan, but luckily, both Windows 7 and Windows 8.1 come with a System image backup tool.
The System image backup can be found in the Control Panel and it's a tool that will help you to create a bit-by-bit copy of your entire system's hard drive, including operating system, settings, programs, and files.
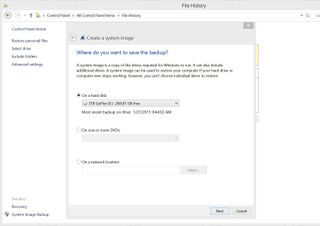
You can check out our previous guide on how to create a full backup. The instructions applies for Windows 7, Windows 8.x, and Windows 10.
Once you have the backup created, you can move to the next step.
Knowing your Windows product key
Another step I personally like to do before modifying an installation of Windows is to make sure I have the product key of my current install. The product key could come in handy if for some reason the installation gets corrupted and I have to start from scratch by installing the previous version of Windows again. Or sometimes it could even happen that the setup process could ask you for the product key during the upgrade, even though it shouldn't. Also, you'll need the product key if you are planning to perform a clean installation of Windows 10.
Now, chances are that you probably have the product key on the original box that came with a copy of the operating system, or it's printed out on a label attached to your computer, or you have this information sent to you via email after you purchased Windows. However, if you don't have this information, you'll have to resort to specific tools that can allow you to pull the product key from the current installation.
One of the tools that can help you with this task is Enchanted Keyfinder tool. This is a free tool (use it at your own risk) that is easy to download and use. There is not installation required, just extract the files and run.
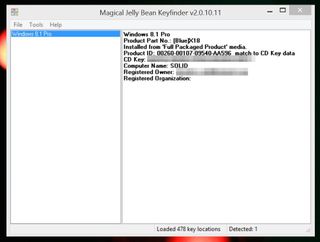
Once you open the app, you can easily save all the information on a text file for later use. If you're using OneDrive, you can save it there and this file will then be accessible from your phone or a secondary computer.
Keep in mind the minimum requirements to install Windows 10
While most machines running Windows 7 and Windows 8.1 are likely to run Windows 10 flawlessly, Microsoft has a minimum spec requirement to install the new operating system:
- Processor: 1 gigahertz (GHz) or faster processor or SoC
- RAM: 1 gigabyte (GB) for 32-bit or 2 GB for 64-bit
- Hard disk space: 16 GB for 32-bit OS 20 GB for 64-bit OS
- Graphics Card: DirectX 9 or later with WDDM 1.0 driver
- Display: 1024x600
Disabling unnecessary security software during the upgrade
While your computer should never be without security protection, sometimes antivirus, spyware, and other security software may be the common causes for an unsuccessful installation of an operating system. During the installation process try to disable any antivirus, firewall, and other security software you may have installed in your computer. Even better, many times it is recommended to uninstall this type of software and then reinstall again after the upgrade.
For example, to disable Microsoft's free antivirus, open Control Panel, click Windows Defender, then navigate to the Settings tab, uncheck the Turn on real-time protection (recommended), and click Save changes.
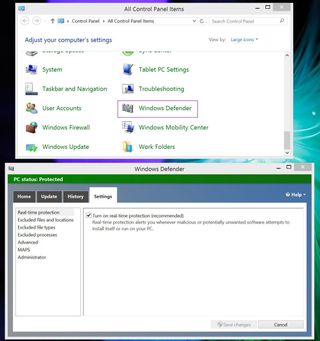
And to disable Windows Firewall, open Control Panel, click Windows Firewall, from the left pane click Turn Windows Firewall on or off, and turn off the firewall on "Private network settings" and "Public network settings".
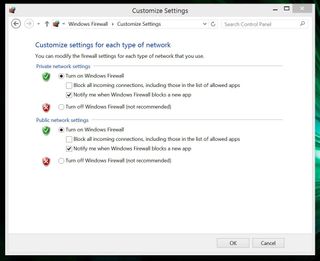
In other cases, some programs that start in the background also be the cause of an unsuccessful installation. To prevent this, disable and/or uninstall any application that starts at boot during the upgrade process. In addition, before beginning with the installation process, close all running applications as this could also issues during the installation.
Making space for the upgrade
Although your computer is likely to have enough space to perform the upgrade, you're required to have at least 5GB free. If you don't have enough disk space available, you can make more space by moving files, such as Documents, Videos, Pictures, and Music, to an alternate location.
You can also uninstall programs that you don't need or rarely use. In addition, you can run the Windows Disk Cleanup tool to delete unnecessary files like Temporary Internet Files, Debug Dump Files, Recycle Bin, Temporary Files, System error memory dump files, old updates, and pretty much any else in the list.
The cleanup task is straightforward:
1- Open File Explorer and navigate to This PC
2- Right-click the Windows drive (typically the C:/ drive), and click on Properties
3- Then click the Disk Cleanup button and after you're shown the results, click the Clean up system files button

4- From the list check all files you want to delete, click OK, and Delete Files
If that isn't enough to free up disk space, the Windows 10 installation process allows you to connect an external drive that the setup can use for temporary storage, but again it has to have at least 5GB of free space. Then, after the upgrade process completes, you can disconnect the drive.
Disconnect unnecessary peripherals
Another factor that can prevent a successful installation are peripherals connected to the computer. These devices could interrupt the installation because Windows 10 is trying to install them, but they are either not compatible or the latest drivers are not available at the time of installation.
Before beginning with the upgrade process, disconnect all the peripherals that are not necessary, you'll probably be OK by having connected only a mouse, keyboard, and monitor.
Windows 10, Windows Insiders, and Windows 10 Preview
There has been some miscommunication between Microsoft and Windows Insiders, but now the information is clear how the upgrade process will work with insiders, so you can be prepare.
If you installed any of the Windows 10 Previews on a computer running Windows 7 or Windows 8.1 as an upgrade, you'll be able to upgrade to the final release of Windows 10 and the operating system will stay fully activated.
If you've performed a clean installation of Windows 10 Preview, you'll have to roll back to your previous version, before upgrading to the final version of Windows 10 and have the operating system fully activated.
If you have performed a clean installation using Windows 10 Preview and you don't have an eligible version of Windows to upgrade for free, you can upgrade to Windows 10 RTM, but it will be just another pre-release build. It will be activated with a pre-release product key and it will expire after a certain amount of time, so as long you signed in with your Microsoft Account, you can continue to get new builds. Basically, while you can use Windows 10 for free, the Windows Insider program is not a path to obtain a product key of the operating system.
For those still wondering, you can find out which version of Windows 10 you will get when you upgrade for free here.
Wrapping things up
While the upgrade process should be as easy as pressing a single upgrade button, you can see that there are a number of steps you have to make sure you follow to prepare your PC for a new operating system and minimize any issues.
Windows 10 is set to launch on July 29, 2015, and those who reserve a free copy will begin receiving the bits via Windows Update, so make sure to also check that Windows Update is enabled in Control Panel.
Finally, remember that you'll also need a Microsoft Account if you want to take full advantage of the new operating system and be able to install apps from the Windows Store.
How are you preparing for Windows 10? If you have extra tips, let us know in the comments below.
Happy Windows 10 upgrade!
More Resources
Remember that we have many other articles on Windows 10, if you need help you always check these other resources:
Mauro Huculak is technical writer for WindowsCentral.com. His primary focus is to write comprehensive how-tos to help users get the most out of Windows 10 and its many related technologies. He has an IT background with professional certifications from Microsoft, Cisco, and CompTIA, and he's a recognized member of the Microsoft MVP community.

