How to uninstall Windows 10 and go back to Windows 7 or 8.1
If Windows 10 isn't for you, there are a few options you can use to uninstall the it and go back to Windows 7 or Windows 8.1, and here we show you how.
While Windows 10 is widely considered Microsoft's best OS ever, a lot of users have their reasons for disliking it. If you used the free upgrade offer and realized that it's not for you, or you installed Windows 10 by mistake, there are a few ways you can uninstall the operating system, and return to Windows 7 or Windows 8.1.
In this guide, we'll walk you through the different ways you can uninstall Windows 10 from your computer and go back to your previous version.
Important: Before modifying your installation, make sure to understand that you'll be doing significant changes to your system, and there is always a chance that things can go wrong. It's recommended that you do a full backup of your system before proceeding. You've been warned!
The Easy Way
How to uninstall Windows 10 using the recovery option
When you upgrade to Windows 10 through the free upgrade offer or manual upgrade process, you're technically installing a trial version of the operating system. This means that after the upgrade, a copy of the previous version will stay on your computer for 30 days in case you want to rollback.
After the month ends, Windows 10 assumes that you have decided to keep the new version, as such it'll proceed to delete the previous version to free up storage space on your hard drive.
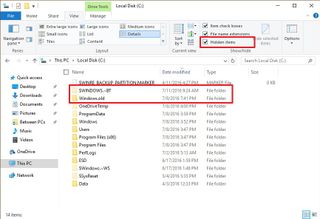
During the upgrade process, everything you need to revert to the previous version is located in the Windows.old and $WINDOWS.~BT folders. These folders are located on the main installation drive (usually the C: drive).
Before you can uninstall the operating system, you want to verify that the two folders exist. On File Explorer, inside the C: drive, you'll find the Windows.old folder, but you'll need to click the View tab, and check the Hidden items option to see the $WINDOWS.~BT folder.
Get the Windows Central Newsletter
All the latest news, reviews, and guides for Windows and Xbox diehards.
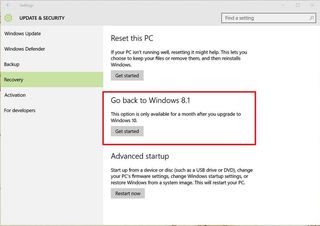
Once you know you have the necessary files to uninstall Windows 10, do the following:
- Use the Windows key + I keyboard shortcut to open the Settings app.
- Click Update & security.
- Click Recovery.
- If you're still within the first month since you upgraded to Windows 10, you'll see the "Go back to Windows 7" or "Go to back to Windows 8" section. If you do, click the Get started button.
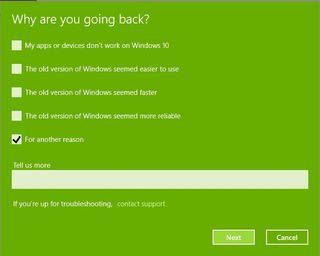
- Answer the question why you're going back and click Next.
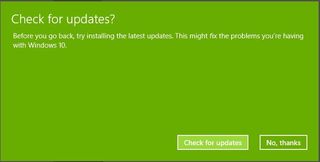
- Before you go back, you'll get the choice to install updates (if available) to try to fix any issues. However, if you're ready to go back, click No, thanks to continue.
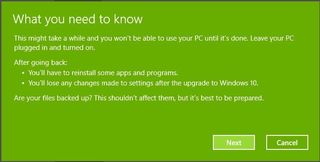
- Carefully read what will happen with your apps and settings during this process and click Next.
- If you used a different password to sign in to your account on the previous installation, you will need that password to sign in after you go back. Make sure you have the required password, and click Next.

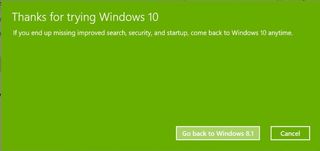
- Click the Go back to Windows 7 or Go back to Windows 8.1 button to complete the process.
Keep in mind that uninstalling Windows 10 from your computer will remove apps and settings configured after the upgrade. If you need those settings or apps back, you'll have to go install them again.
If you don't see the option on the Settings app to go back to the previous version, you're either trying to uninstall Windows 10 after the first month you performed the upgrade or there is something else wrong with your computer. In that case, you still have some choices: You can go back using a previous backup, or you can do a clean install of the operating system.
The Slightly Less Easy Way
How to uninstall Windows 10 using the full backup option
There are no excuses: No matter what, you should periodically make a full backup of your computer -- you never know when it will come in handy. If you have previously created a full backup, you can now use it to go back to the previous version of the operating system.
You'll need a repair disc to boot your computer into the Windows Recovery Environment to restore the previous version. If you didn't create one during backup, follow these instructions:
- Right-click the Start menu and select Control Panel.
- Click System and Security.
- Click Backup and Restore (Windows 7).
- On the left pane, click Create a system repair disc.
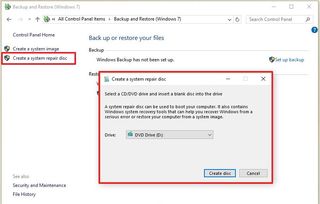
- Follow the on-screen instructions to create the repair disc.
Once you have the repair disc created use the following steps to go back:
- Connect the drive that contains the backup with your previous installation to your computer.
- Reboot your computer with the repair disc.
- On the Setup screen, click Next.
- Click the Repair your computer link.
- Click Troubleshoot.
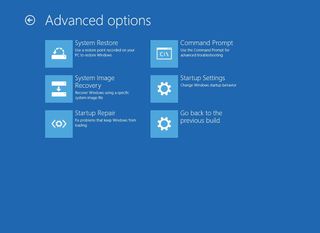
- Click Advanced options.
- Click System Image Recovery.
- Sign-in with your user account.
- Select the backup you want to recover, and click Next.

- If applicable, follow the on-screen instructions, and click Finish to complete the process.
After the recovery process completes, you'll be back in your previous version of Windows. Remember to reinstall any applications you installed when you upgraded to Windows 10 and do not forget to restore any new files from backup as well.
It's worth mentioning that if your PC manufacturer included a recovery option, you might be able to use it to restore your computer using the factory settings.
The Hard Way
How to uninstall Windows 10 using the clean installation option
If the option to go back to the previous version of Windows isn't available in the Settings app, and you don't have a full backup that you can use to revert, you can use the third option.
The third option is uninstalling Windows 10 by doing a clean install of Windows 7 or Windows 8.1. This process will require you to supply the product key for your copy of the operating system. It'll erase everything on your computer, including settings, apps, and data. And you'll have to reinstall all your apps and recover your personal files from backup.
This option requires more time and more steps, but it's the best choice that will get you back to your previous version with the least number of issues.
Acquiring the Windows installation files
You'll need the installation files to go through this process. Thankfully, Microsoft now makes it easier for anyone to download the installation files for any major version of the operating system.
If you need to reinstall Windows 7, you can head over to the Microsoft support website to download the Windows 7 ISO file. Then you can use the Windows USB/DVD Download Tool to create a bootable media.
While you can download the install files for free, Microsoft will ask you to verify your genuine product key before you can proceed with the download.
If you're trying to go back to Windows 8.1, you can head over to the Microsoft support website to download the Media Creation Tool to create a bootable media.
Configuring the Boot order on your PC
You need to make sure your computer can boot from a USB flash drive or DVD drive. This process typically requires hitting one of the function keys (F1, F2, F3, F10, or F12), the ESC, or Delete key.
Once you're in the BIOS find the Boot options and change it to the Windows installation media.
On Windows 8.1 computer and newer, you're likely to have a UEFI BIOS, which are not as easy to access as the traditional BIOS. If this is your case, go to PC Settings > Update and recovery > Recovery > Advanced Startup and click Restart now.
The operating system will load the boot menu, click Troubleshoot > Advanced options > UEFI Firmware Settings > Restart. Windows 8.1 will then boot into the BIOS, which will give you access to change the boot order of the system.
Finding your product key
Unlike Windows 10 that uses a digital license to reinstall the operating system without the need for entering a product key, you'll need the original product key to reinstall Windows 7 or Windows 8.1 on your PC.
If you own a Windows 7 computer, you'll find the product key on the "Proof of License Certificate of Authenticity" sticker. Often times, the sticker is attached to the back of your computer.
On laptops, you may be able to find the sticker underneath the device, inside the replaceable battery slot, on the power supply brick, or in a compartment also located underneath the device.
If it's an older computer, sometimes the product key can be found in the recovery discs package or on the actual disc.
On newer Windows 8.1 devices, you may not be able to find it, because the product key may be embedded on the device BIOS chip, which the operating system can retrieve automatically during installation.
You could try using a product key finder software, but they may only retrieve a generic product key, which won't work to reinstall Windows 7 or Windows 8.1. The reason is that Microsoft is moving away from the product key to a product key-less model.
Doing a clean install of Windows
Once you have the installation files, follow these steps to do a clean install:
- Restart your computer using either the Windows 7 or Windows 8.1 installation media.
- On the Setup screen, click Next.
- Click Install now.
- Accept the licensing agreement, and click Next.
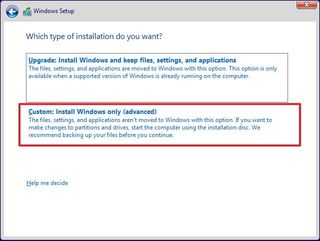
- Click the Custom: Install Windows only (Advanced) option.
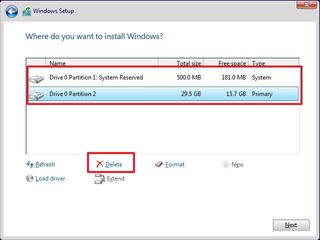
- Select and delete the system partitions. Generally you want to delete: Drive 0 Partition 1 and Drive 0 Partition 2.
- Click Next and follow the on-screen instructions to complete the installation.
After the installation completes and you go through the out-of-box experience, remember to use Control Panel > System and Security > Windows Update to download the latest patches for your version of the operating system. Then reinstall all your applications, and restore your files from backup.
Wrapping things up
Even though Windows 10 is a great operating system with a lot of new changes, improvements, and features, it may still not be good enough for many people. Reasons can include problems with device drivers, to features not working correctly, compatibility issues, or the simple fact that a lot of people just don't like the new operating system.
There is no doubt that Microsoft wants customers to upgrade, but it also understands that Windows 10 may not be for everyone, and for this reason the company offers a number of supported ways to revert to the previous version.
Did you upgrade to Windows 10 and reverted to Windows 7 or Windows 8.1? Tell us your story in the comments below.
More Windows 10 resources
For more help articles, coverage, and answers on Windows 10, you can visit the following resources:
- Windows 10 on Windows Central – All you need to know
- Windows 10 Anniversary Update coverage
- Windows 10 help, tips, and tricks
- Windows 10 forums on Windows Central
Mauro Huculak is technical writer for WindowsCentral.com. His primary focus is to write comprehensive how-tos to help users get the most out of Windows 10 and its many related technologies. He has an IT background with professional certifications from Microsoft, Cisco, and CompTIA, and he's a recognized member of the Microsoft MVP community.

