How to get started with Windows Recall on Windows 11 and give your Copilot+ PC a secure photographic memory
Here's everything you need to know to get started using Recall on Windows 11.
All the latest news, reviews, and guides for Windows and Xbox diehards.
You are now subscribed
Your newsletter sign-up was successful
Windows Recall is an AI-powered feature that tracks and remembers everything you do on your Copilot+ PC running the latest version of Windows 11.
This feature can be thought of as a photographic memory. It works by taking screenshots of your on-screen activities every few seconds, using several on-device AI models to analyze the information, and making everything searchable using natural language with the "Recall" app.
Although the feature is straightforward for the most part, it's important to familiarize yourself with the interface and settings to get the most out of the experience.
It's important to clarify that this feature is exclusive to Copilot+ PCs powered by the latest AI processors from Qualcomm, AMD, and Intel, and it comes disabled by default.
In this how-to guide, I will explain the steps you need to know to start using the Windows Recall feature correctly on Windows 11.
How to configure and manage settings on Windows Recall
If you have a Copilot+ PC, the operating system offers various settings to manage Windows Recall, including the ability to opt in or out of the feature, change storage allocation, delete snapshots, and filter apps and websites.
Enable Windows Recall
Windows 11 won't automatically turn on the AI feature on your computer. It will be up to you to decide and turn it on manually.
To turn Windows Recall on or off, use these steps:
- Open Settings.
- Click on Privacy & security.
- Click the Recall & snapshots page from the right side.
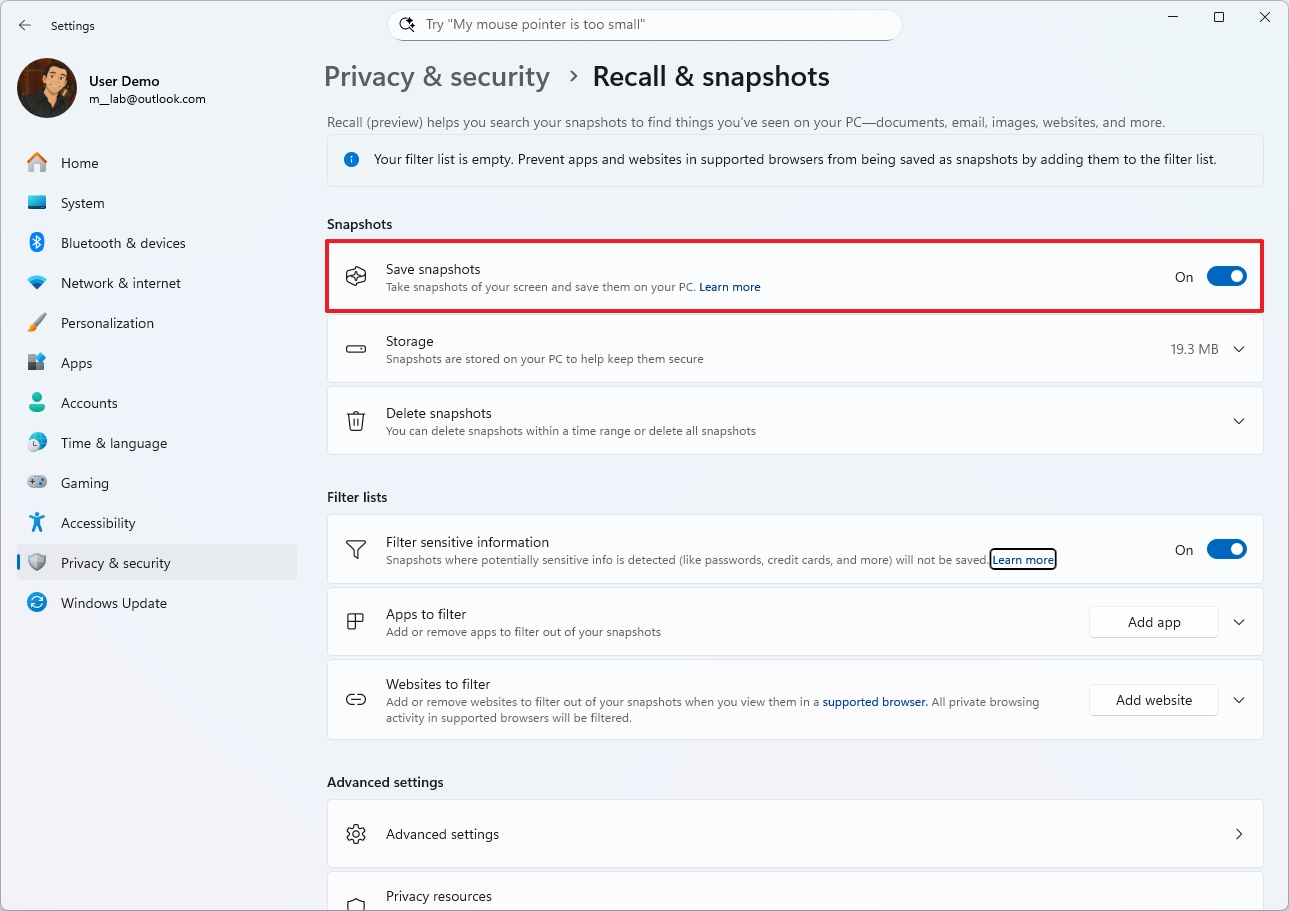
- Turn on the "Save snapshots" toggle switch to enable the feature.
Once you complete the steps, the feature will start tracking your activities on your computer.
You can also turn on the feature by launching the "Recall" app and opting in to save snapshots on your computer.
It's important to note that you can only enable the feature if you have a device configured for Windows Hello authentication, and BitLocker must also be enabled.
Change storage settings
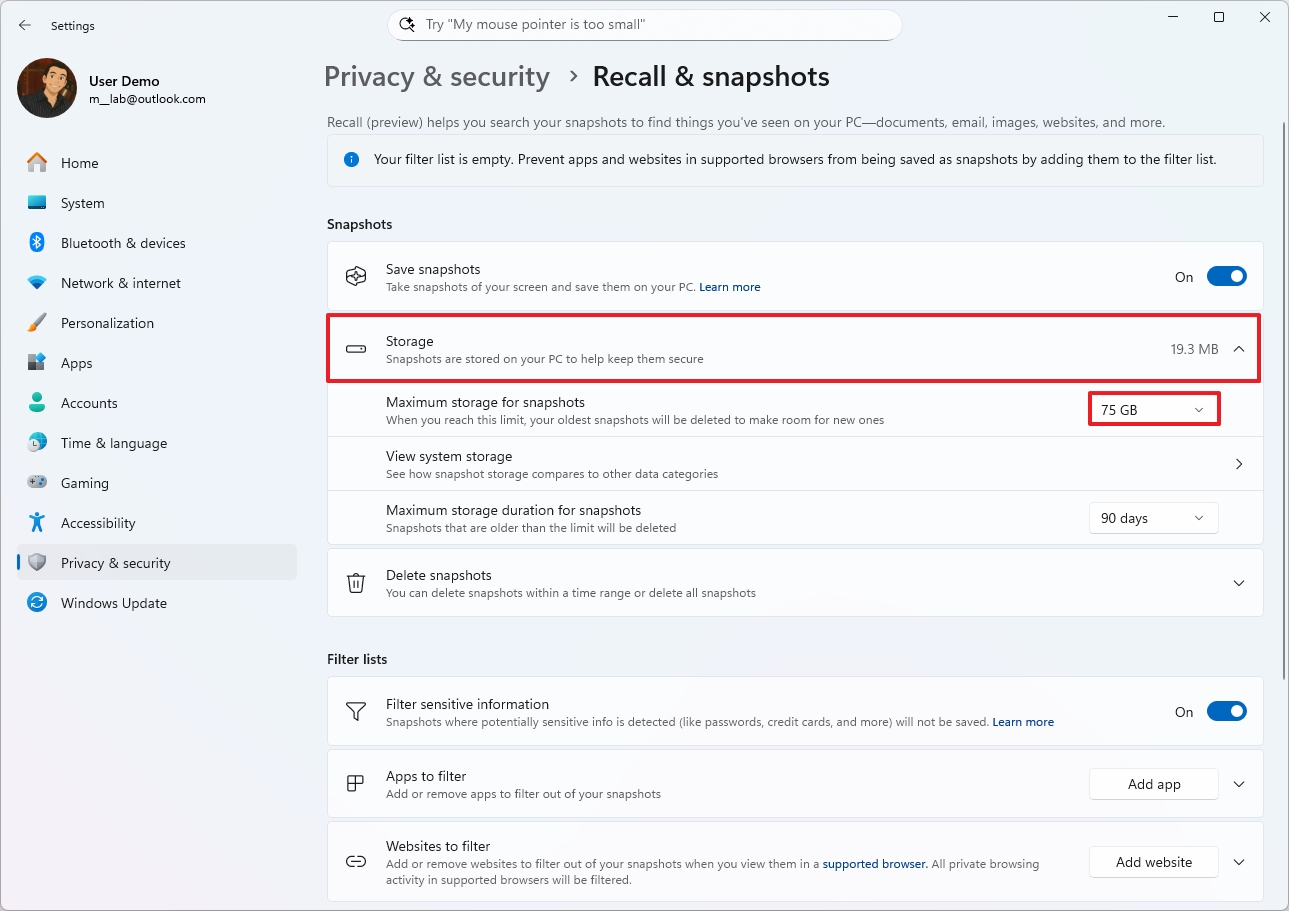
Windows Recall, by default, reserves 25GB of storage on devices with a 256GB SSD, 75GB on devices with a 512GB SSD, and 150GB on devices with a 1TB SSD. However, you can increase or decrease the allocation with the instructions below.
To change the storage allocation for Windows Recall, use these steps:
- Open Settings.
- Click on Privacy & security.
- Click the Recall & snapshots page from the right side.
- Click the Storage setting.
- Choose the storage allocation size using the "Maximum storage for snapshots" setting.
- (Optional) Click the "View system storage" settings to open the Storage settings to view the drive usage of Recall AI.
- Quick tip: The Storage settings in the "Recall & snapshots" page show this information.
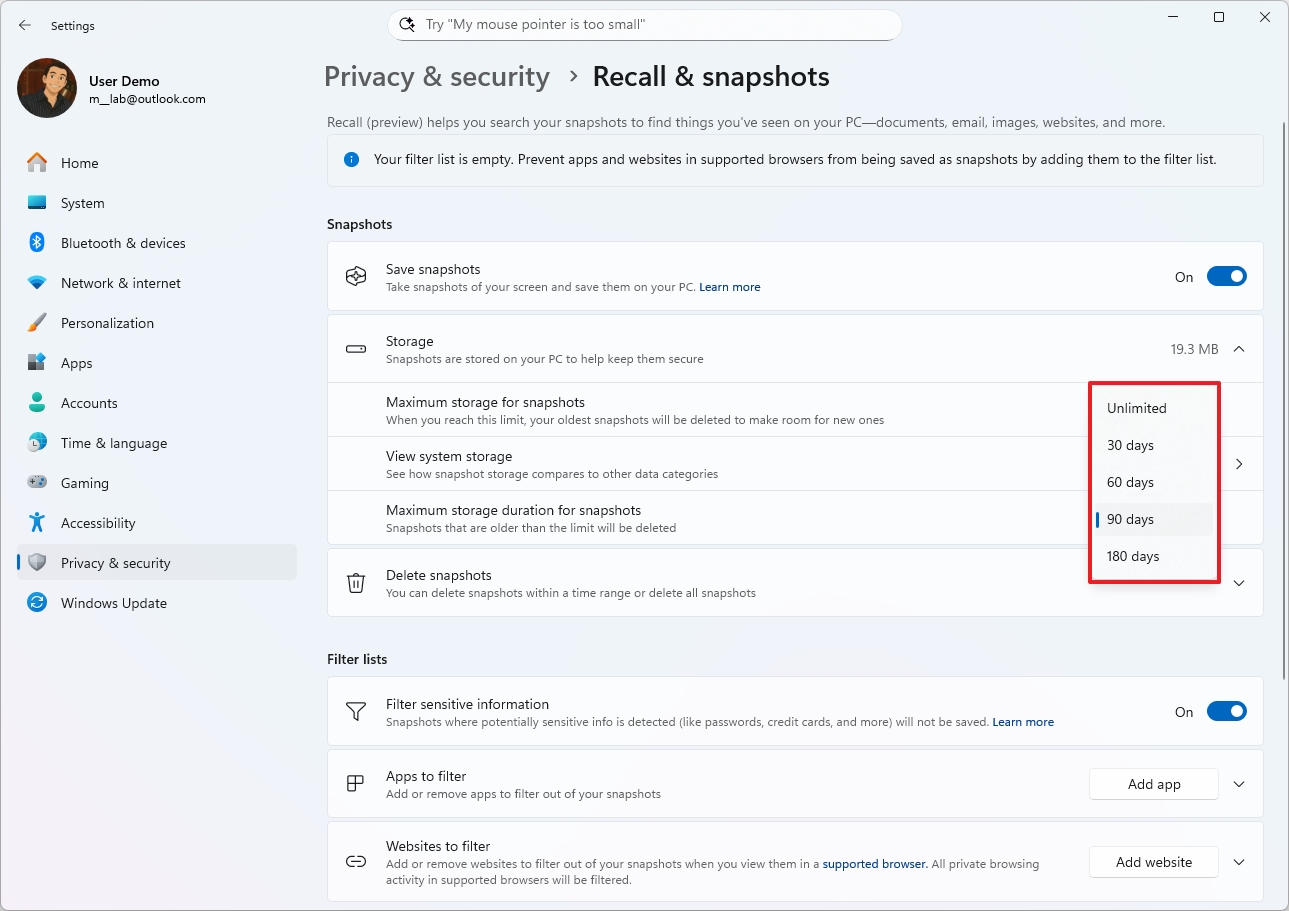
- Choose the data retention time range (Unlimited, 30, 60, 90, or 180 days) in the "Maximum storage duration for snapshots" setting.
- Quick note: The default value is 90 days.
After you complete the steps, the system will apply the new storage allocation.
Delete snapshots
Windows Recall takes screenshots every few seconds to analyze screen activity and build the new Windows Semantic Search. However, since these snapshots can contain sensitive data, Microsoft has built a control that allows you to delete some or all of the snapshots the feature has taken and store them on your computer.
To delete Windows Recall snapshots on Windows 11, use these steps:
- Open Settings.
- Click on Privacy & security.
- Click the Recall & snapshots page from the right side.
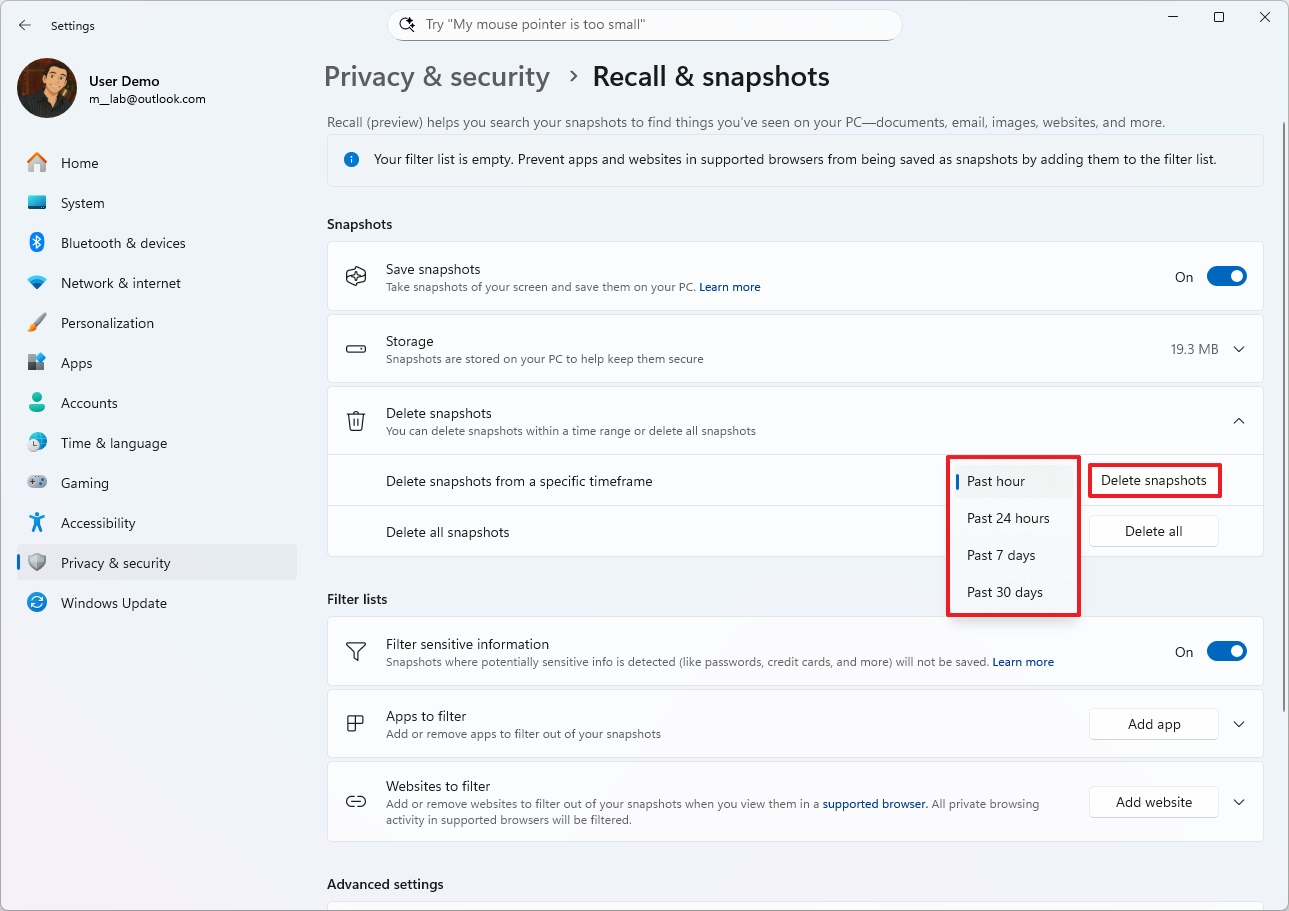
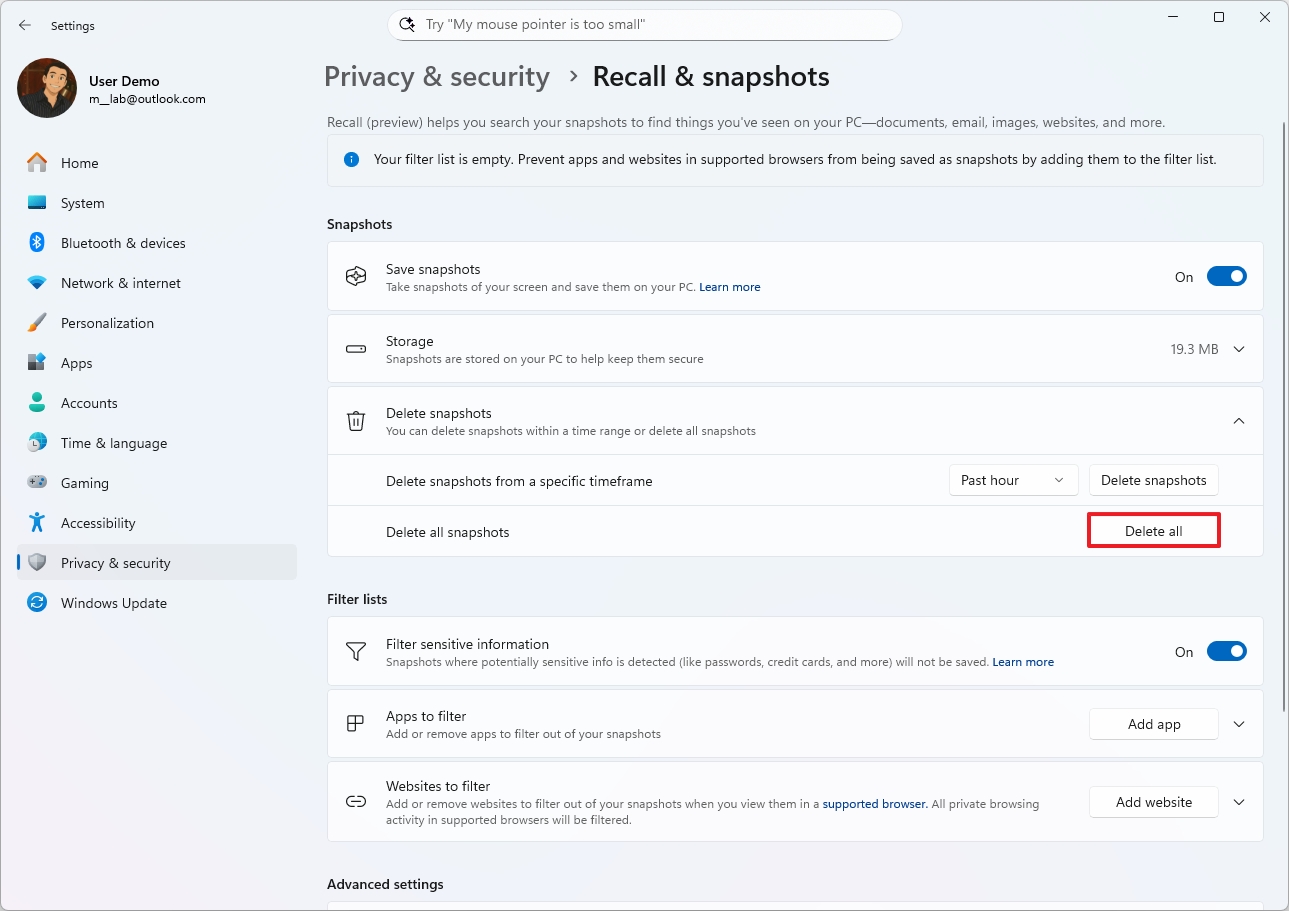
- Click the Delete snapshots setting.
- (Option 1) Choose the timeframe to delete snapshots from the "Delete snapshots from a specific timeframe" setting.
- Click the Delete snapshots button.
- Click the Delete button again to confirm.
- (Option 2) Click the "Delete all" button to remove the snapshots stored on your computer.
- Click the Delete button again to confirm.
Once you complete the steps, the data stored by the feature will be deleted according to your configuration.
Filter sensitive information
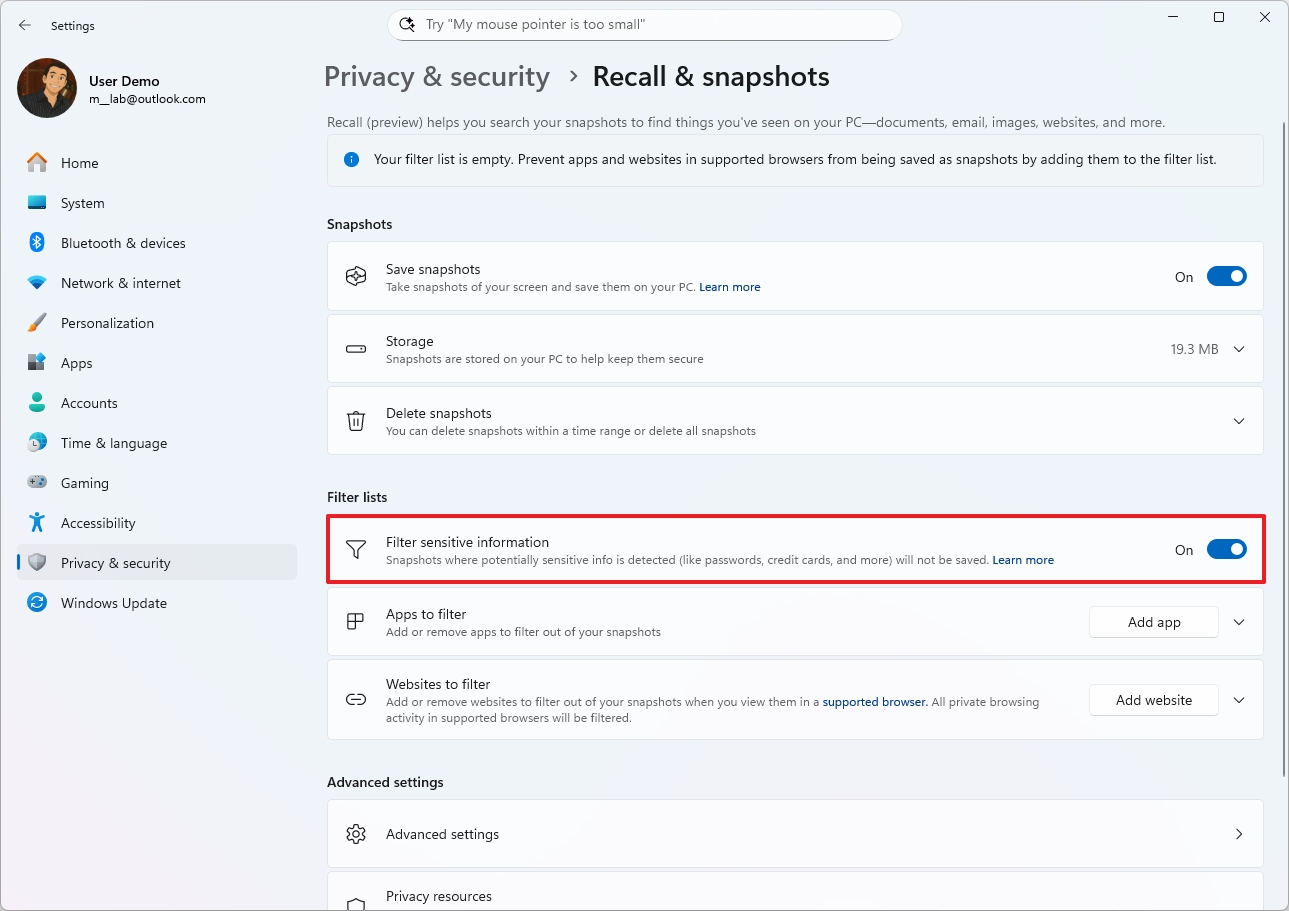
As part of the strategy to improve privacy and security, the AI feature includes a mechanism to detect and filter sensitive information (such as passwords, credit card numbers, etc.). The feature should be turned on by default, but you can always manage the option from the "Recall & snapshots" settings.
To enable or disable the filter for sensitive information, use these steps:
- Open Settings.
- Click on Privacy & security.
- Click the Recall & snapshots page from the right side.
- (Option 1) Turn on the "Filter sensitive information" toggle switch to enable the feature.
- (Option 2) Turn off the "Filter sensitive information" toggle switch to disable the feature.
Once you complete the steps, the feature will stop saving snapshots with sensitive information on your computer.
Apps to filter by Recall
Although Windows Recall records virtually everything you do on your computer, the company is also adding a couple of settings to filter specific apps and websites from being part of the experience.
However, by default, the feature won't monitor activities when you use a Chromium-based web browser, such as Microsoft Edge or Google Chrome, and browsers like Mozilla Firefox and Opera, in InPrivate or Incognito mode. Also, Windows Recall doesn't snapshot anything with DRM (Digital Rights Management).
To exclude apps from being recorded by Windows Recall, use these steps:
- Open Settings.
- Click on Privacy & security.
- Click the Recall & snapshots page from the right side.
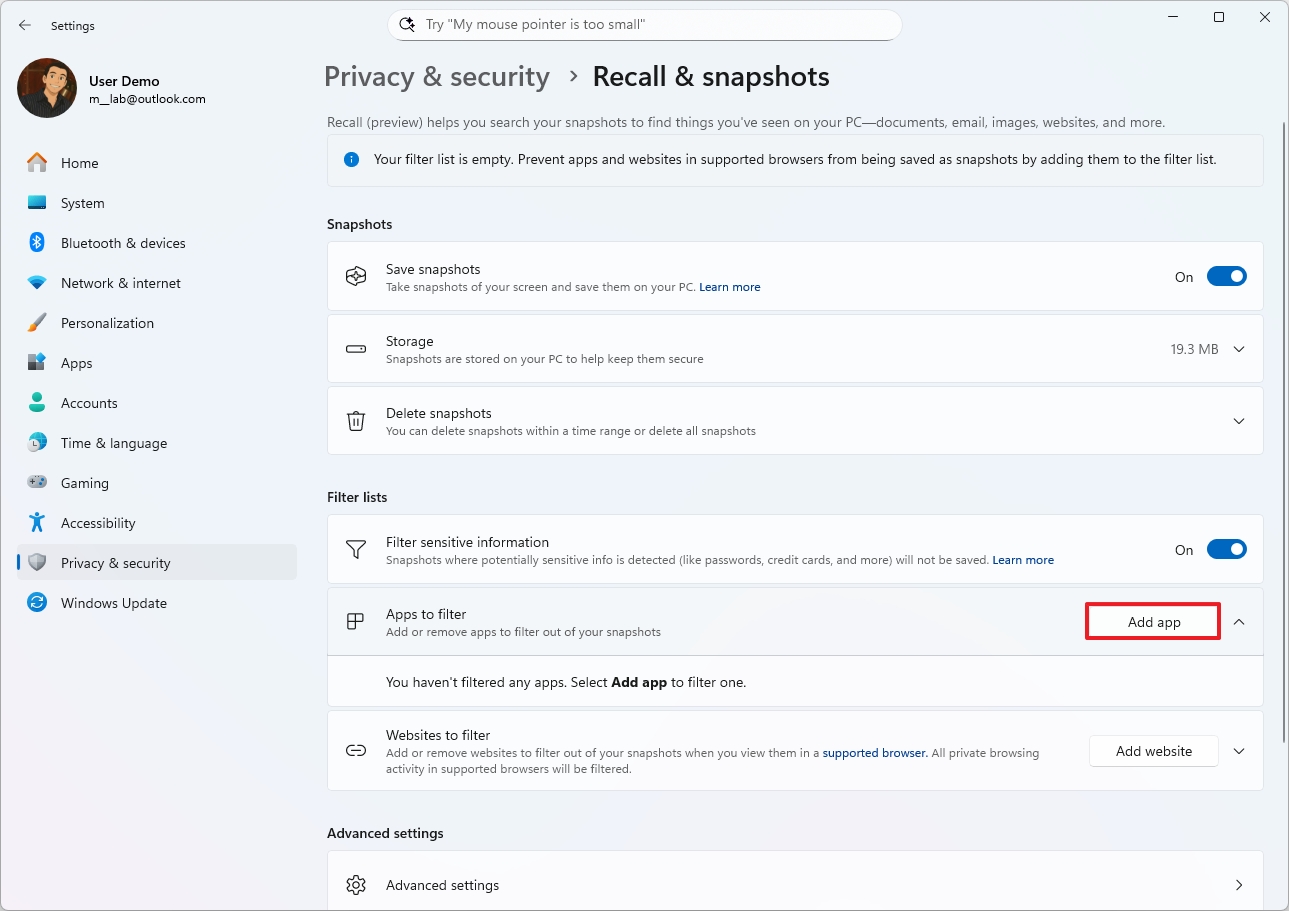
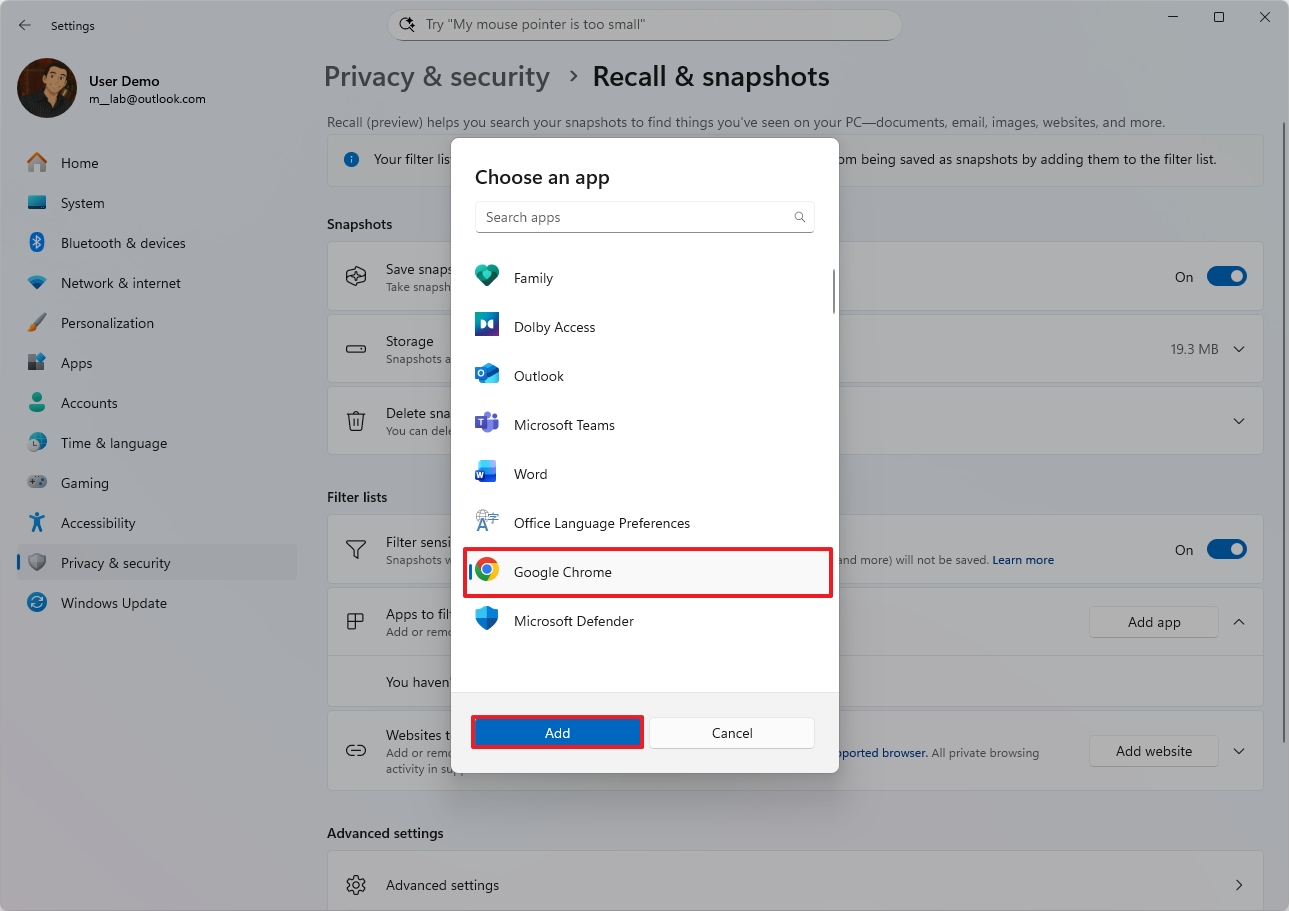
- Click the Add app button to filter an app.
- Select the app from the list.
- Click the Add button.
You can remove apps using the same instructions, but in step 4, click the "Apps to filter" setting, then click the "Remove" button for the app you want to remove.
Websites to filter by Recall
To exclude websites from being recorded by Windows Recall, use these steps:
- Open Settings.
- Click on Privacy & security.
- Click the Recall & snapshots page from the right side.
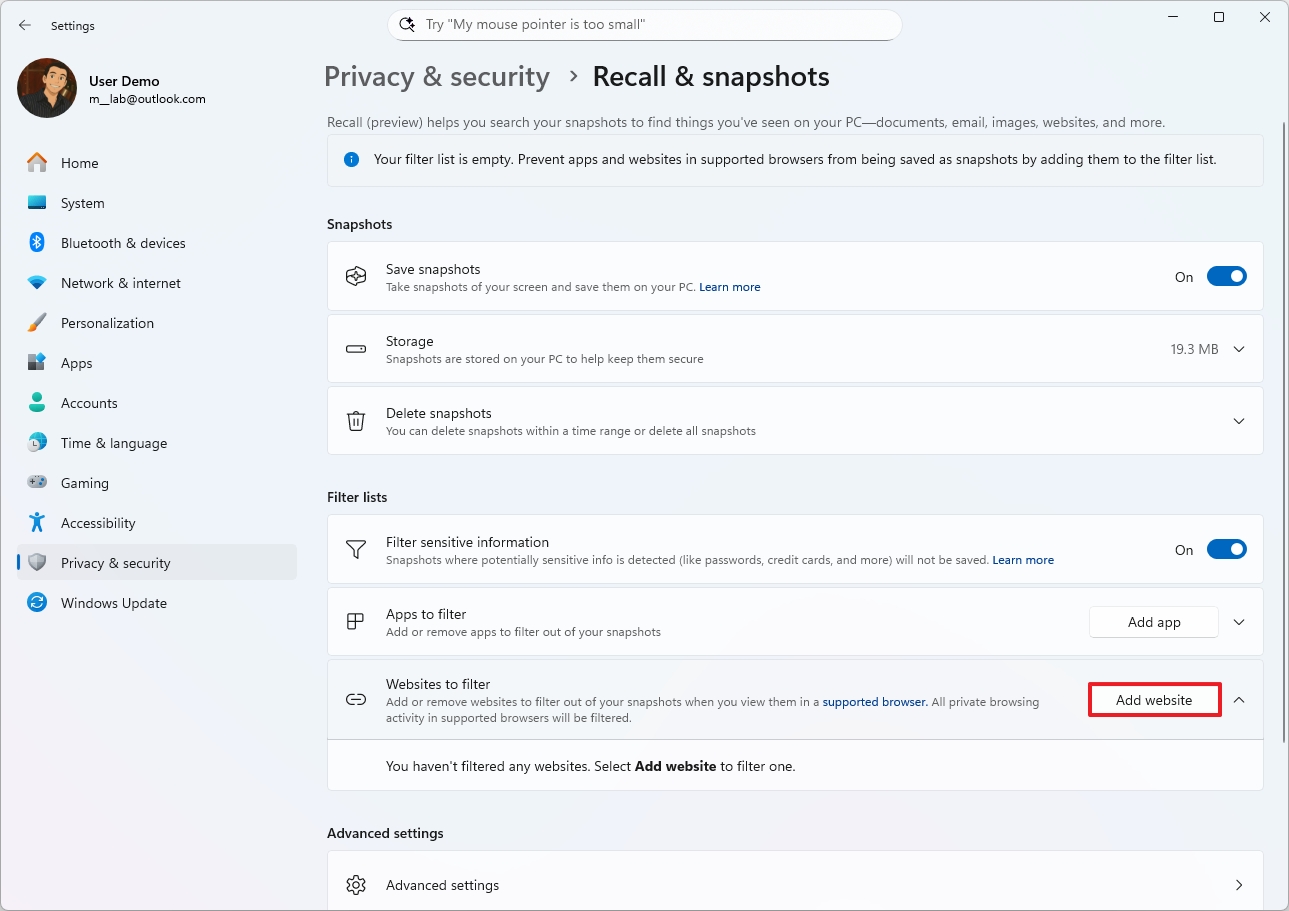
- Click the Add website button to filter an app.
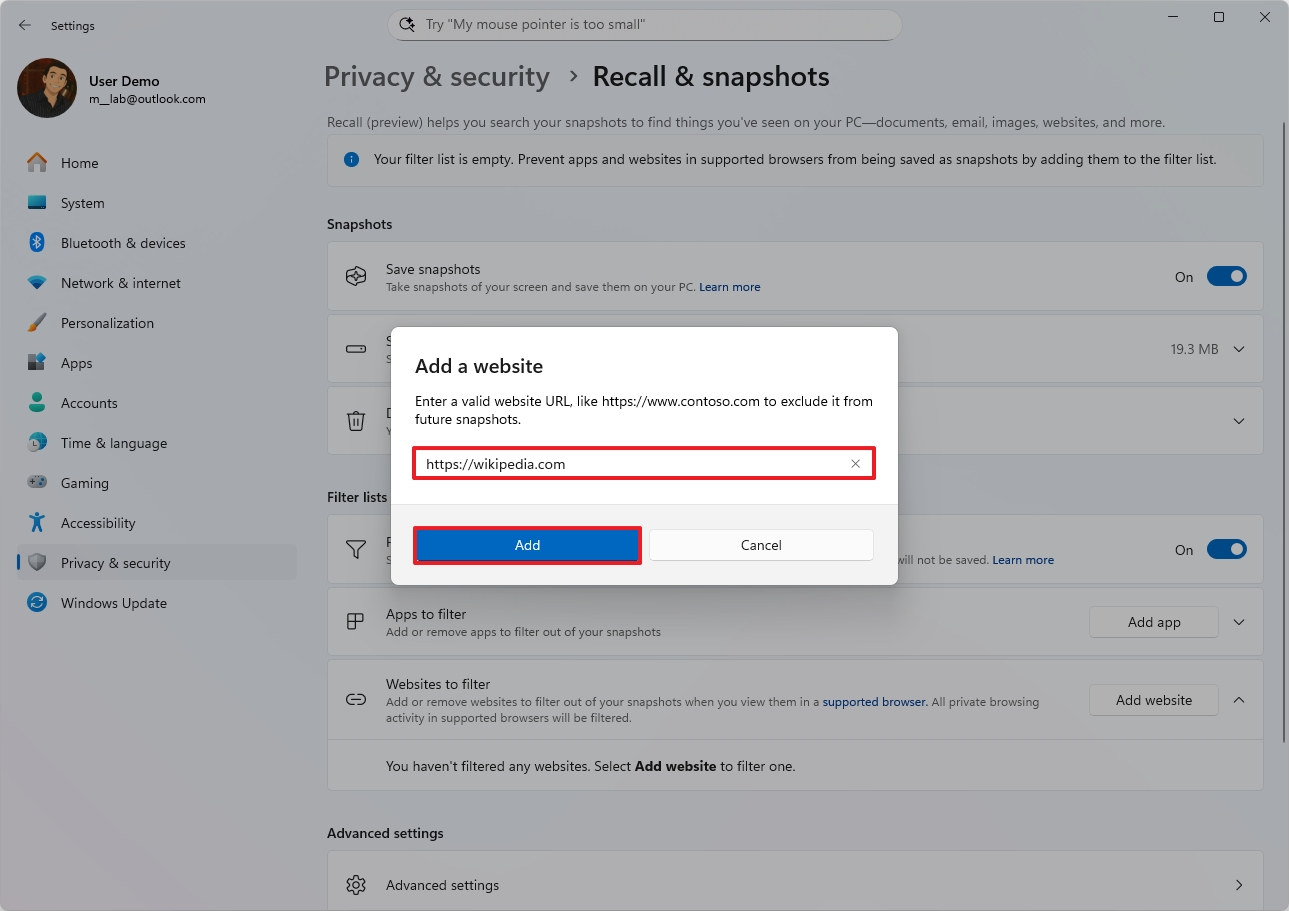
- Confirm the website to exclude.
- Click the Add button.
You can remove apps using the same instructions, but in step 4, click the "Websites to filter" setting, then click the "Remove" button for the website you want to remove.
Pause and resume
It's also possible to pause and resume the feature with these instructions:
- Click the Windows Recall button from the System Tray.
- (Option 1) Click the "Pause until tomorrow" button to turn off the feature until the next day at 12AM.
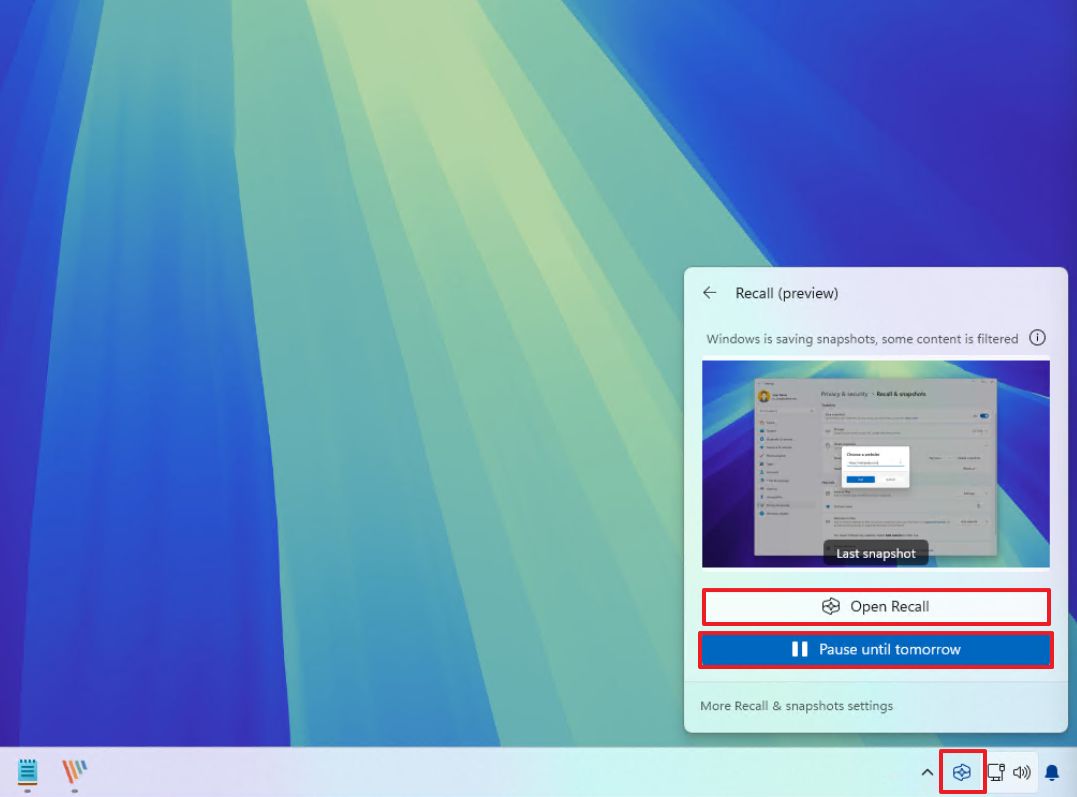
- (Option 2) Click the "Resume snapshots" button to manually turn on the feature.
In the Recall flyout menu, you will also find the last snapshot that the feature has taken and its status.
You can also click the "More Recall & snapshots settings" to open the feature page in the Settings app.
Reset and disable Windows Recall
If Recall isn't for you or you're noticing problems, you can always reset and start from scratch, or reset and turn the feature off.
To reset Windows Recall, use these steps:
- Open Settings.
- Click on Privacy & security.
- Click the Recall & snapshots page from the right side.
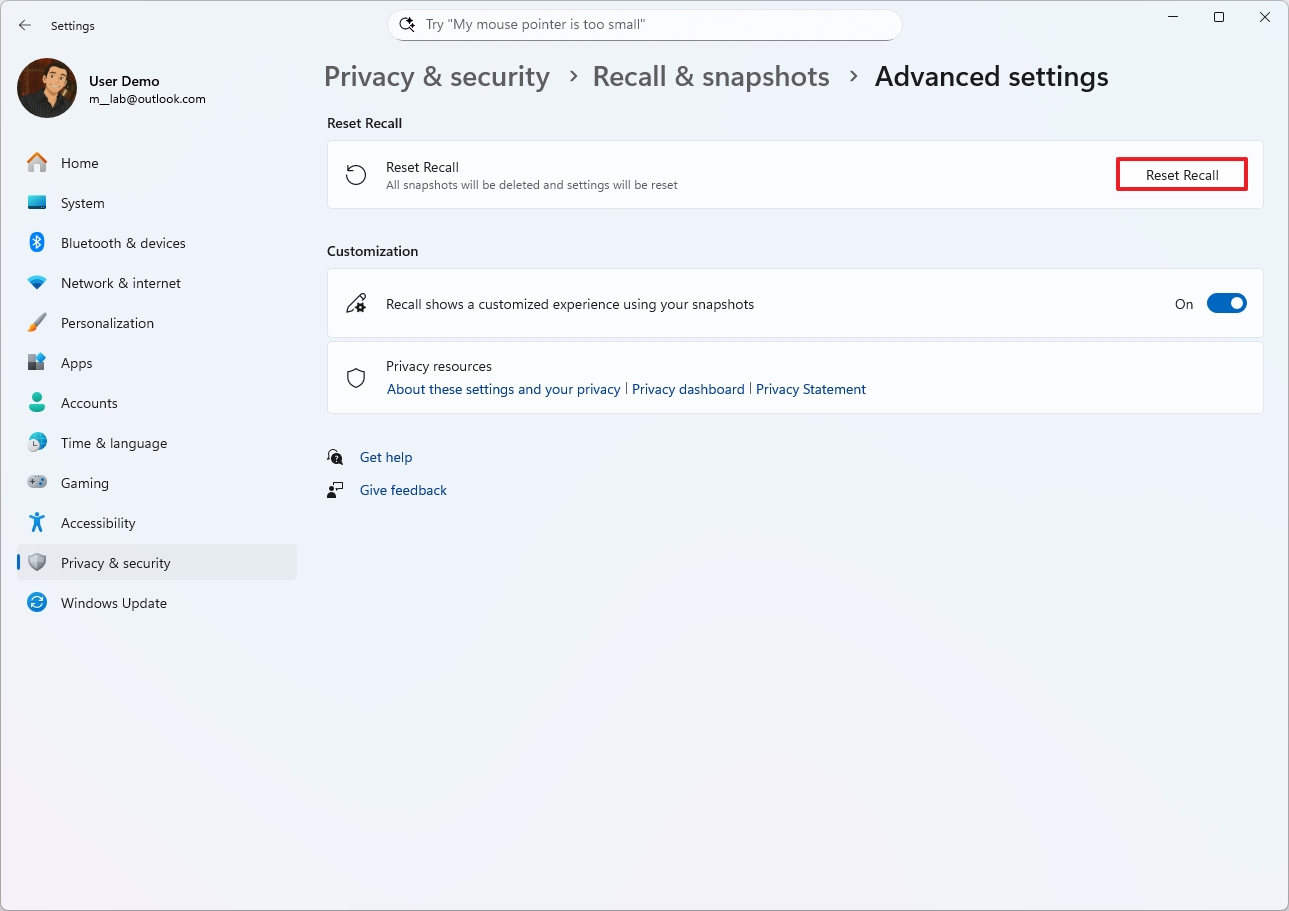
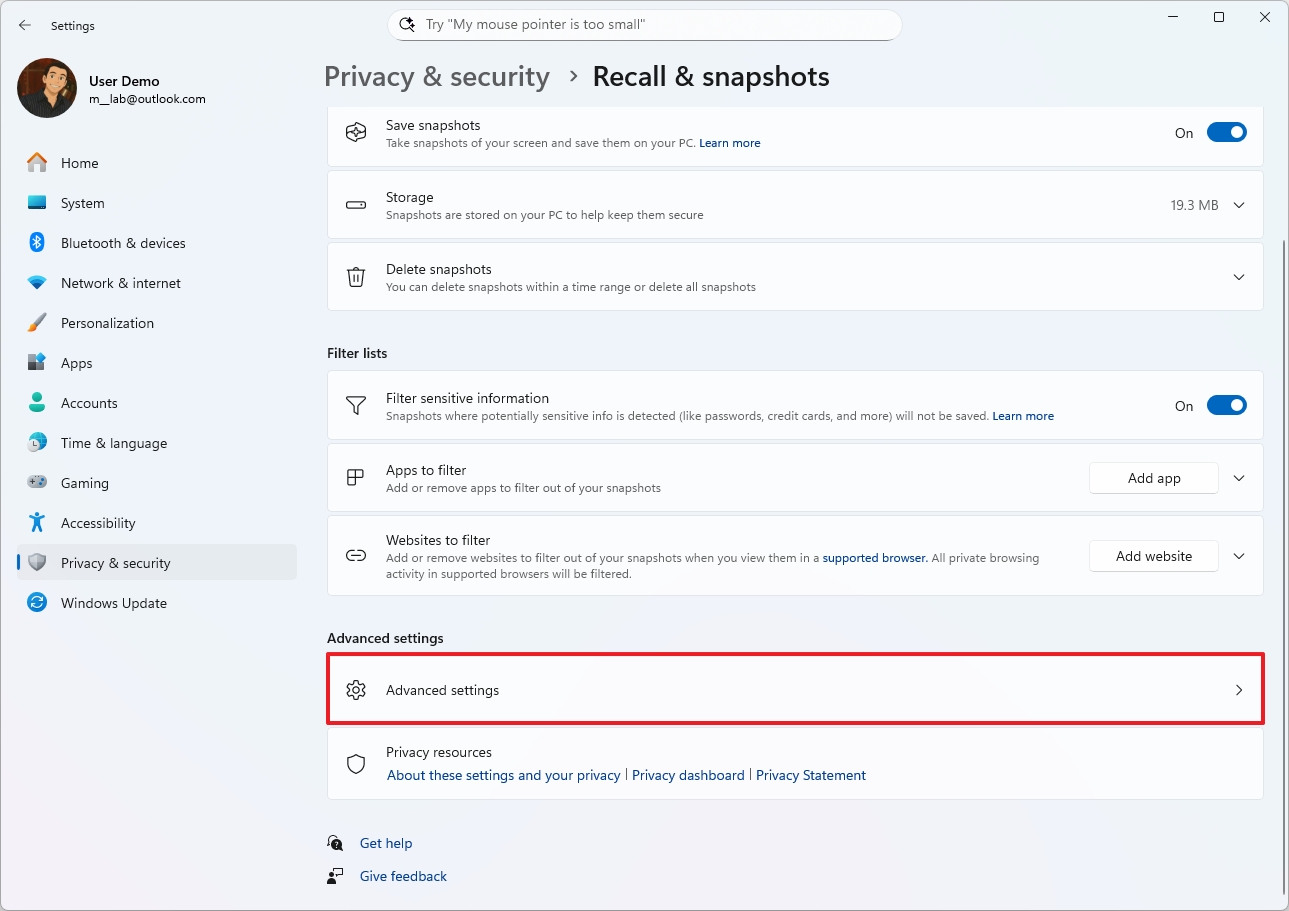
- Click on Advanced settings.
- Click the Reset Recall button.
- Click the Reset button again.
Once you complete the steps, the system will delete all the data stored about the Recall feature, and the Recall settings will be reset to factory defaults, which means the feature will also be disabled, as this is the default configuration.
Export data from Windows Recall
If you are in the European Economic Area (EEA), you can now export your data from Windows Recall to share with other websites and apps (as needed).
When you first set up the feature on your Copilot+ PC, you'll receive a unique code to export your data from the "Advanced settings" page.
Since the data is encrypted, the unique code serves as a key to unlock the snapshots stored on your device, making them available for other apps and websites. Microsoft notes that it doesn't store export code anywhere, so there's no way to retrieve it if you lose it.
If you want another export code, you must reset the feature and start from scratch, which will delete everything, including your snapshots, settings, and other data related to the feature.
To use this feature, follow these instructions:
- Open Settings.
- Click on Privacy & security.
- Click the Recall & snapshots page from the right side.
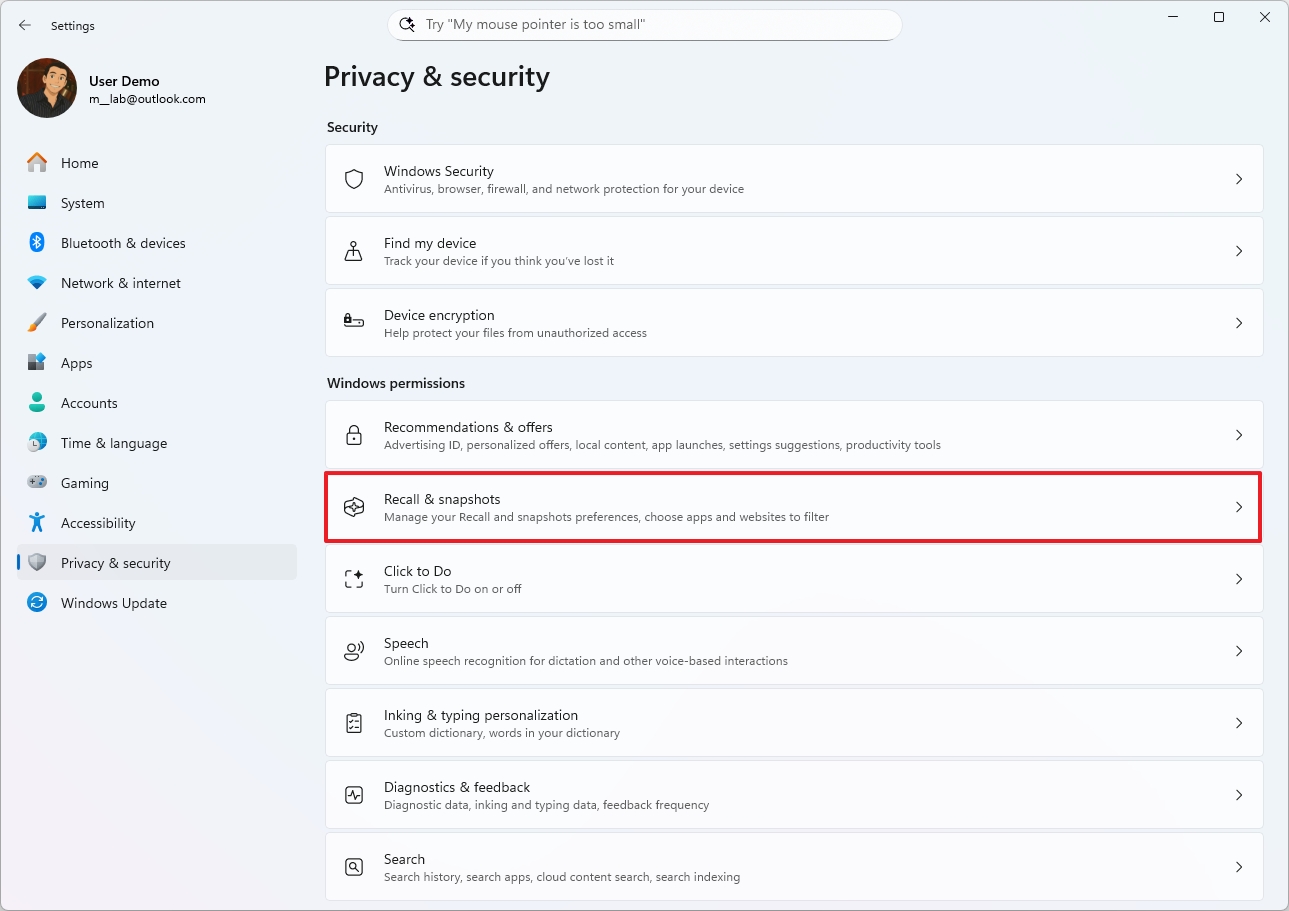
- Click on Advanced settings.
- Click the Export snapshots setting.
- (Option 1) Click the Export button to export your data from last week, last month, or all your snapshots.
- (Option 2) Turn on the "Export snapshots from now on" toggle switch to continue exporting data from the time you turn it on.
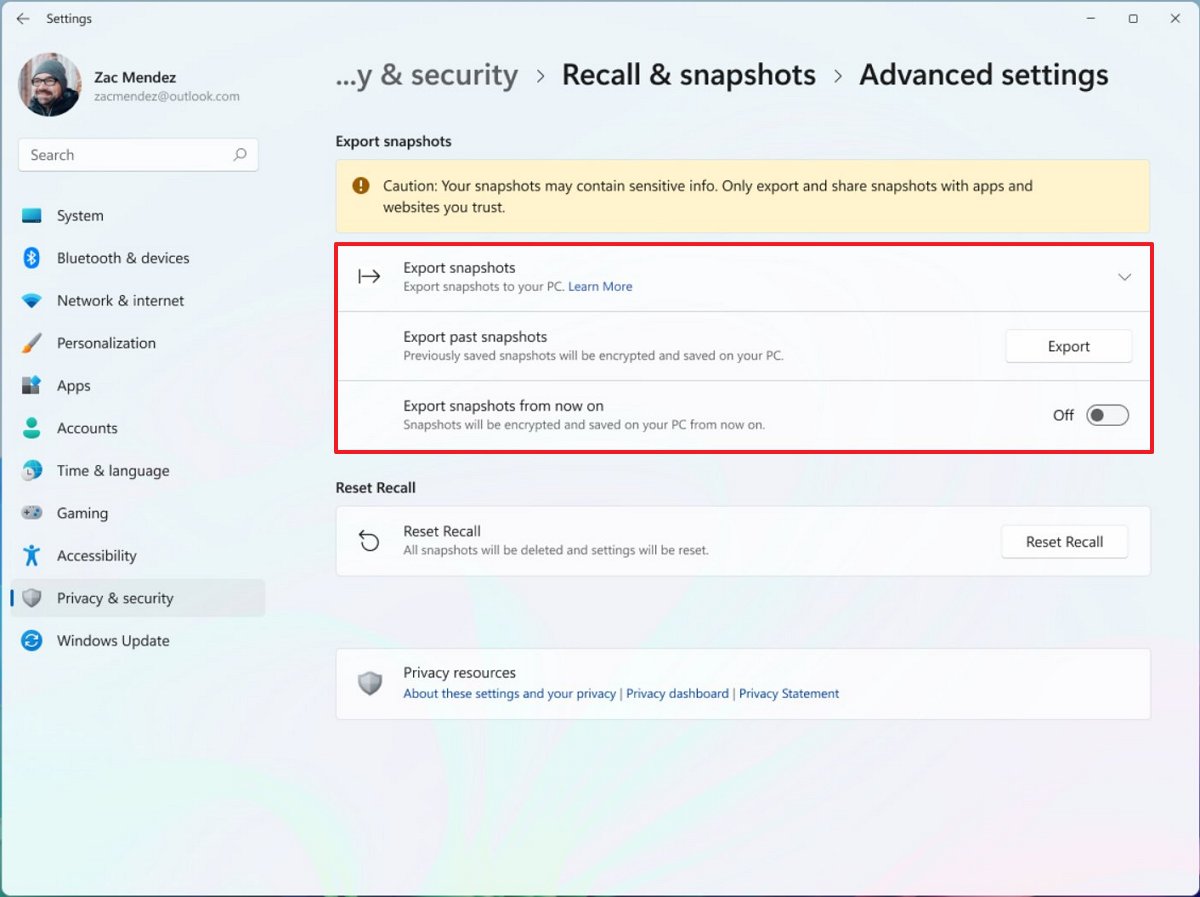
Microsoft says that the feature exports snapshots in an encrypted form, and you will need to provide the export code to decrypt the data and make it accessible from other apps or websites.
How to search and find activities on Windows Recall
Windows Recall is a straightforward feature once it's configured, but there are some details you need to know.
Home in Recall
After launching the app, you'll be directed to the "Home" page, which is similar to the "new tab" page typically found in browsers.
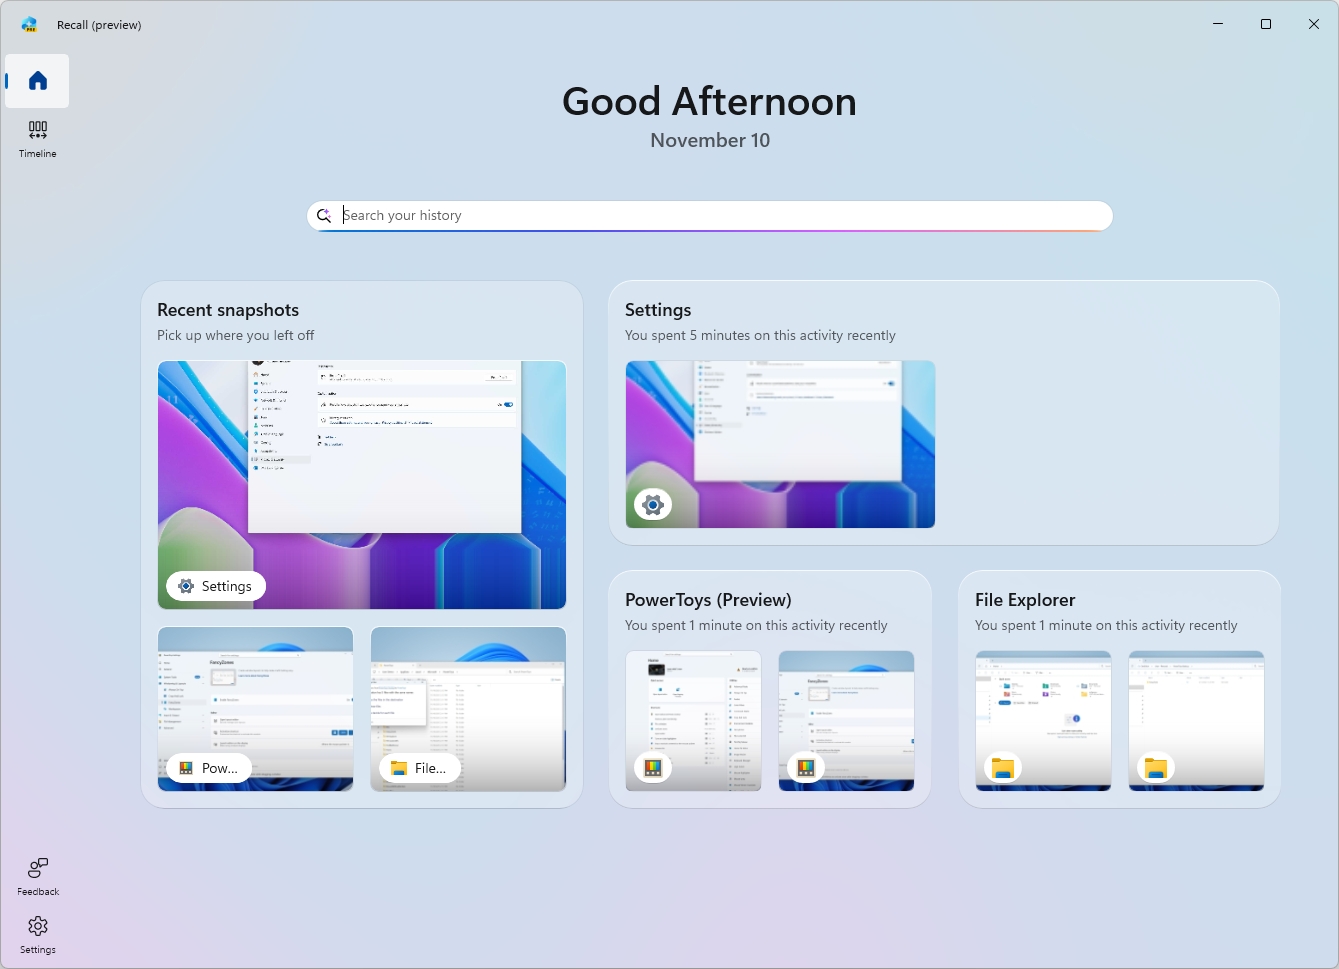
The Recall app will display a greeting and date at the top and a search box, which uses AI to help you find activities.
Then, the page groups your recent activities and top-used content to make it easier to find.
In the "Recent Snapshots" group, you'll find the most recent snapshots, and when you click this card, it'll take you to the "Timeline" page. However, if you click the icon for a specific snapshot, then the associated app will open.
If you click on the other groups, you'll be taken to a page with all the snapshots for that particular app.

On this page, the feature will try to group the snapshots logically, and it'll tell you the time you spent in that specific activity.

Finally, there's a menu button at the bottom of the left pane that includes options to pause the feature, open settings, clear the search history, and even turn off search history.
Start a search
To use search with Recall AI, use these steps:
- Click the Windows Recall button in the System Tray.
- Sign in with your Microsoft account credentials to access the app.
- Click the Open Recall button.
- Quick tip: You can also find the app from the Start menu, and you can right-click the app and pin it to the Taskbar.
- (Option 1) Use the search box to search for an activity using natural language.
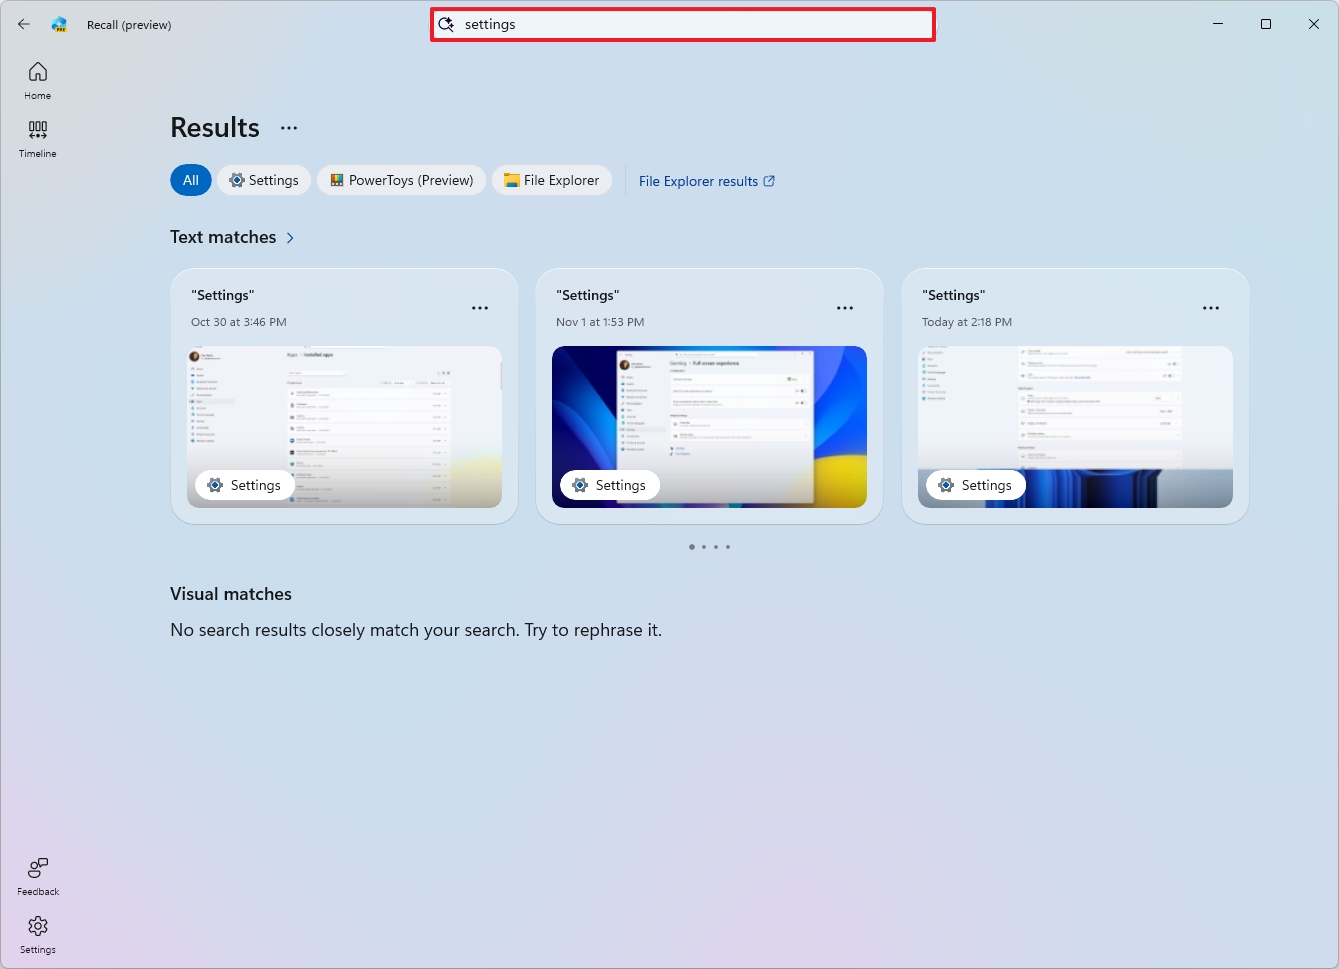
- Select the snapshot from the result.
- Quick tip: If the feature can't find any matches, you can click the "File Explorer results" option to perform a traditional Windows Search.
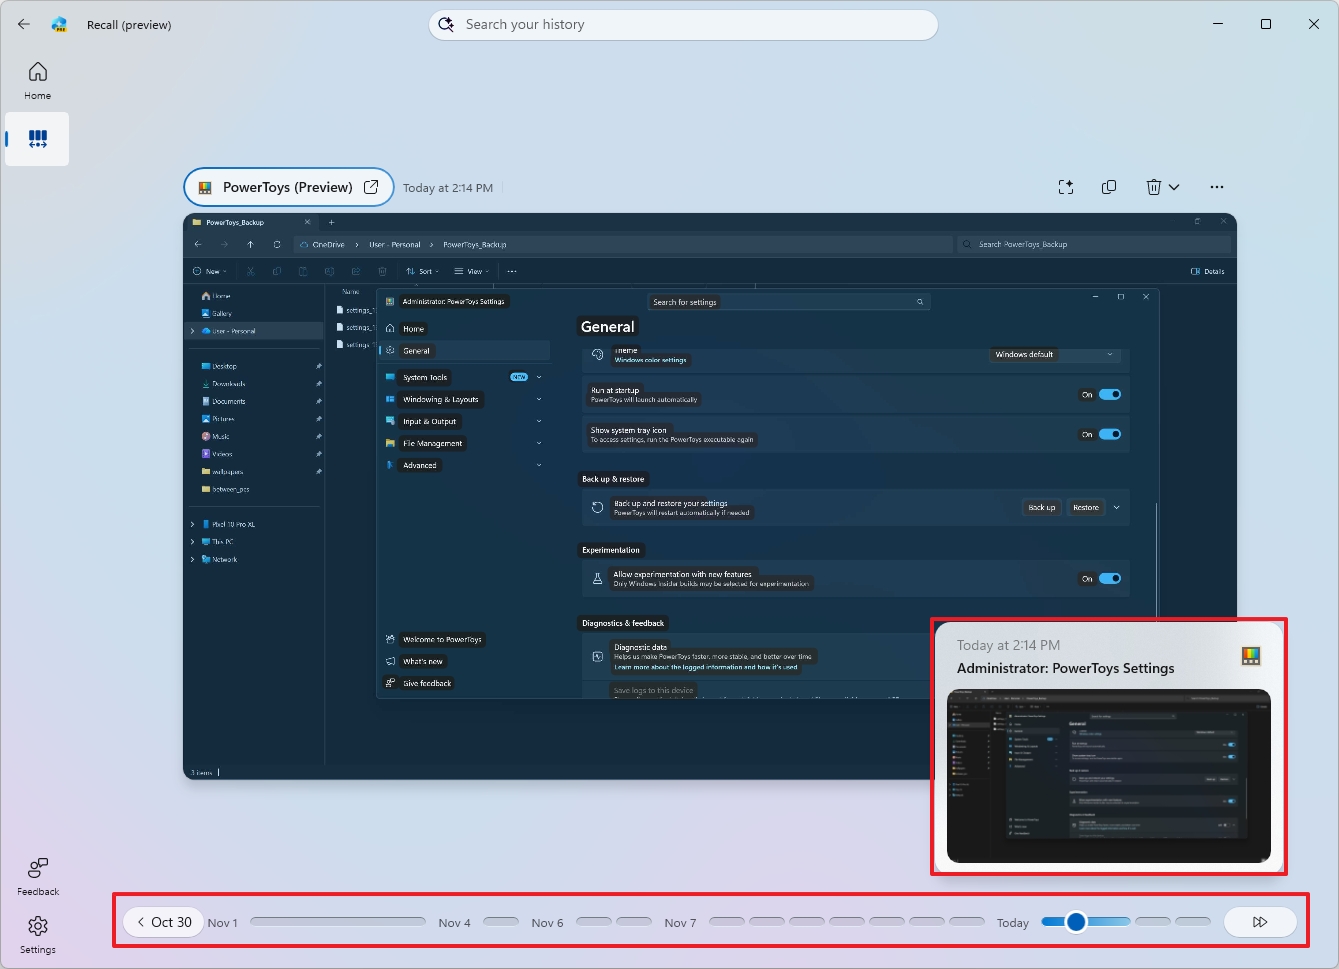
- (Option 2) Use the slider to scroll back in time to find a particular snapshot.
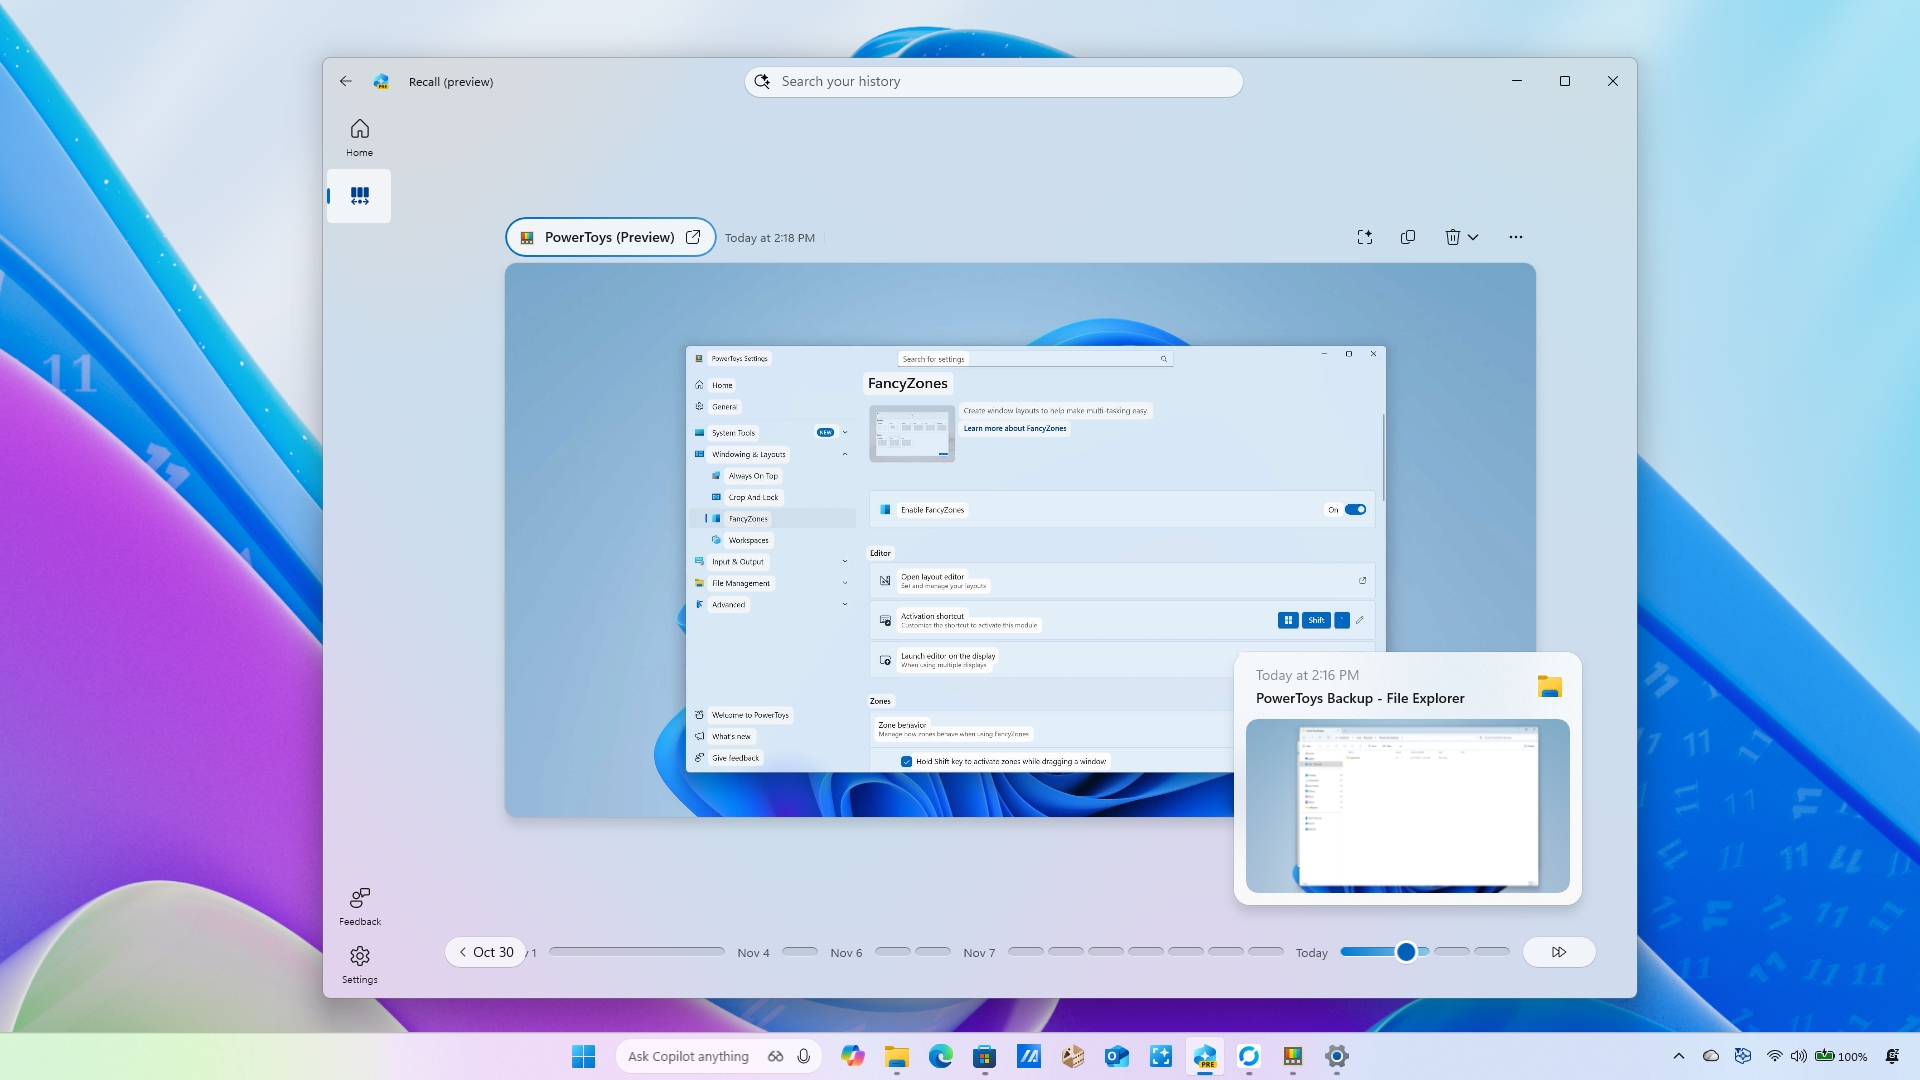
For example, in the search box, you can type a question in the same way you would ask another person using natural language. For example, "find the PowerToys setting for FancyZones."
When you press Enter, the feature will review your past activities and display a snapshot that includes the activity when I was checking the FancyZones settings.
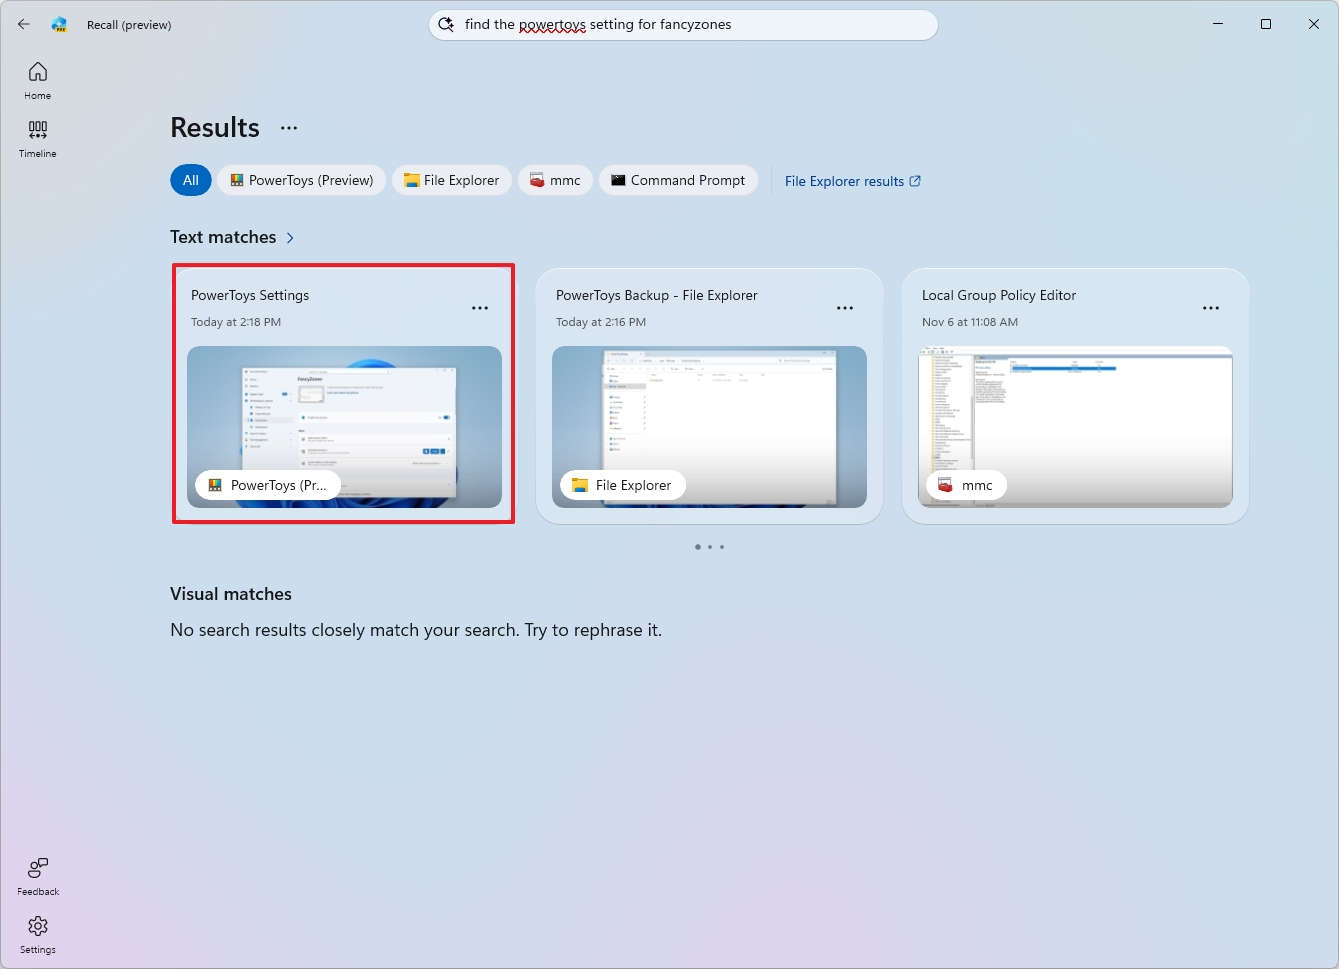
The default behavior is to show all results from all apps. You can then use the available controls to narrow down the search.
If you use the timeline, you can scroll back to precisely the moment you were performing a specific activity. The timeline is divided into different segments and time periods. You can hover over the timeline to preview each activity from your selected period. (If the slider isn't available, click the "Timeline" button next to the search box.)
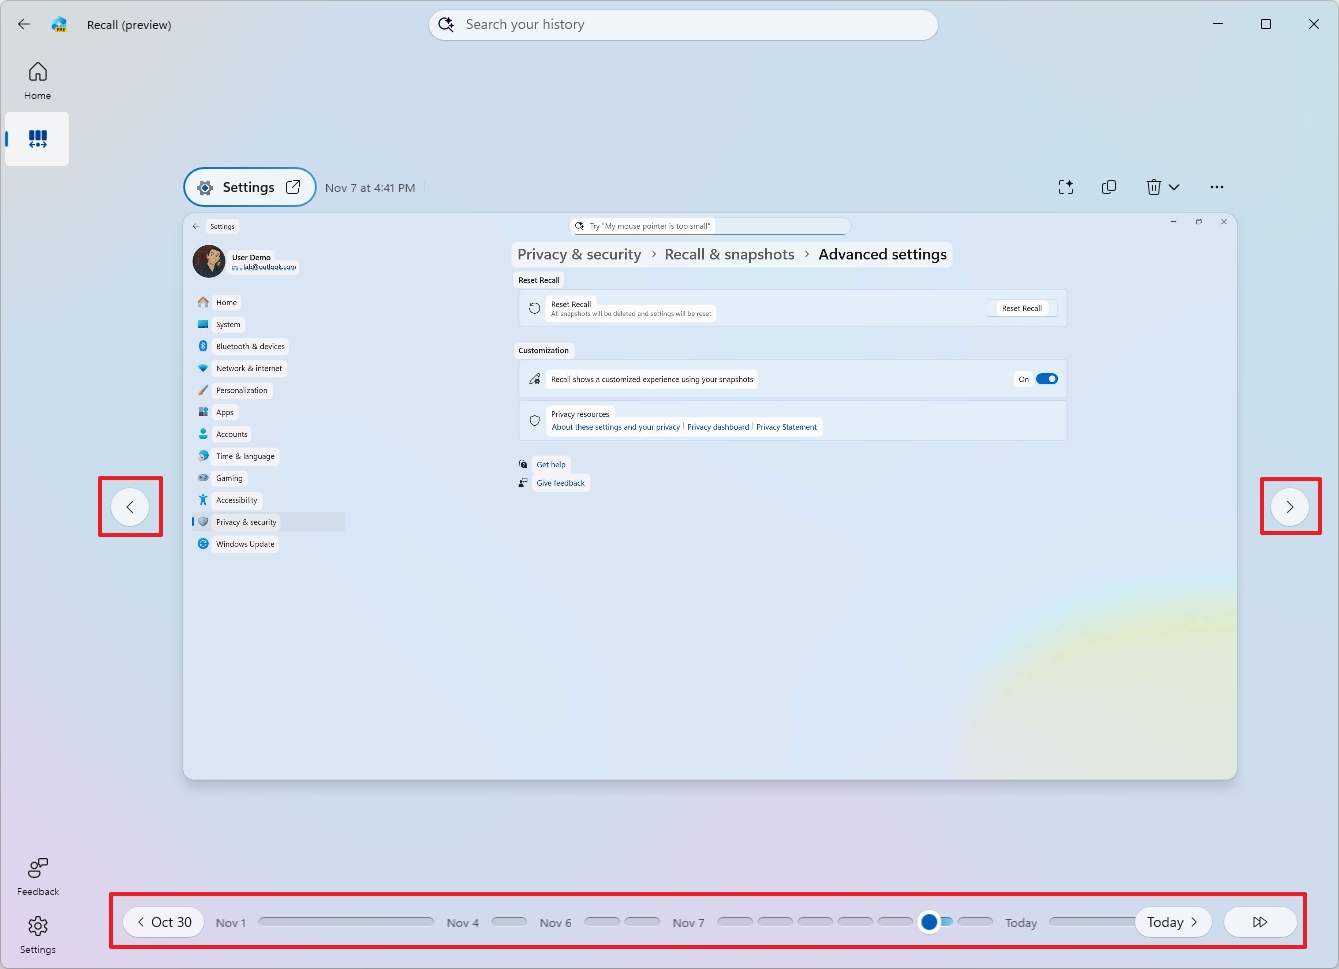
You can also use the navigation buttons on either side of the app to go between snapshots.
When selecting a part of the timeline or specific activities, Windows Recall will load the snapshot.
Interact with snapshots (Click to Do)
It's important to note that when you interact with snapshots, you are actually using the "Click to Do" feature.
Click to Do is a feature that scans screenshots with on-device AI models to surface additional options for performing different actions on the text and elements found in the screenshots you're viewing.
To interact with a Recall snapshot with Click to Do, use these steps:
- Open the Windows Recall app.
- Sign in using Windows Hello to access the app.
- Perform a search with a text prompt or the timeline slider.
- Select the snapshot from the result.
- In the snapshot, you will notice an animation around the element. This is the Click to Do feature, analyzing the contents of the element. The snapshot also includes a date and time stamp in the bottom-right corner.
Now, Click to Do offers different actions, depending on the object you're selecting.
For example, if you select an object, you'll access common actions (such as Copy, Share, Save As, and Open with). In addition, the "Ask Microsoft 365 Copilot" option sends the selection to the Copilot app, where you can ask different questions.
Click to Do also offers an option to describe the image with AI and do a Bing visual search.
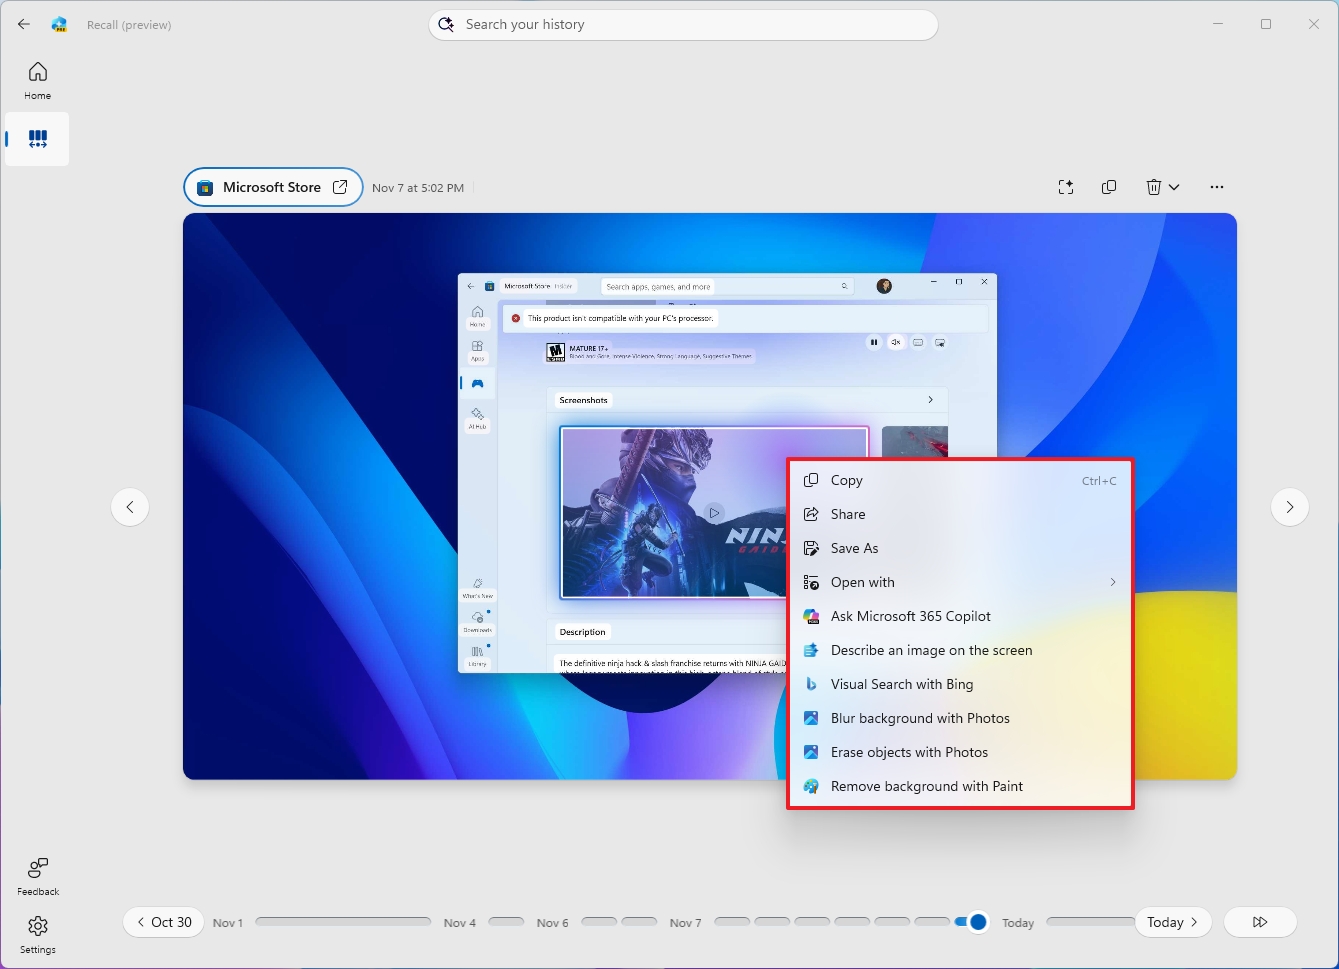
Finally, you'll notice actions to add blur, remove background, and erase objects.
When using the Click to Do feature on an object, the options to blur and erase the background will open the screenshot with the Photos app, and the option to remove the background will open with the Microsoft Paint app.
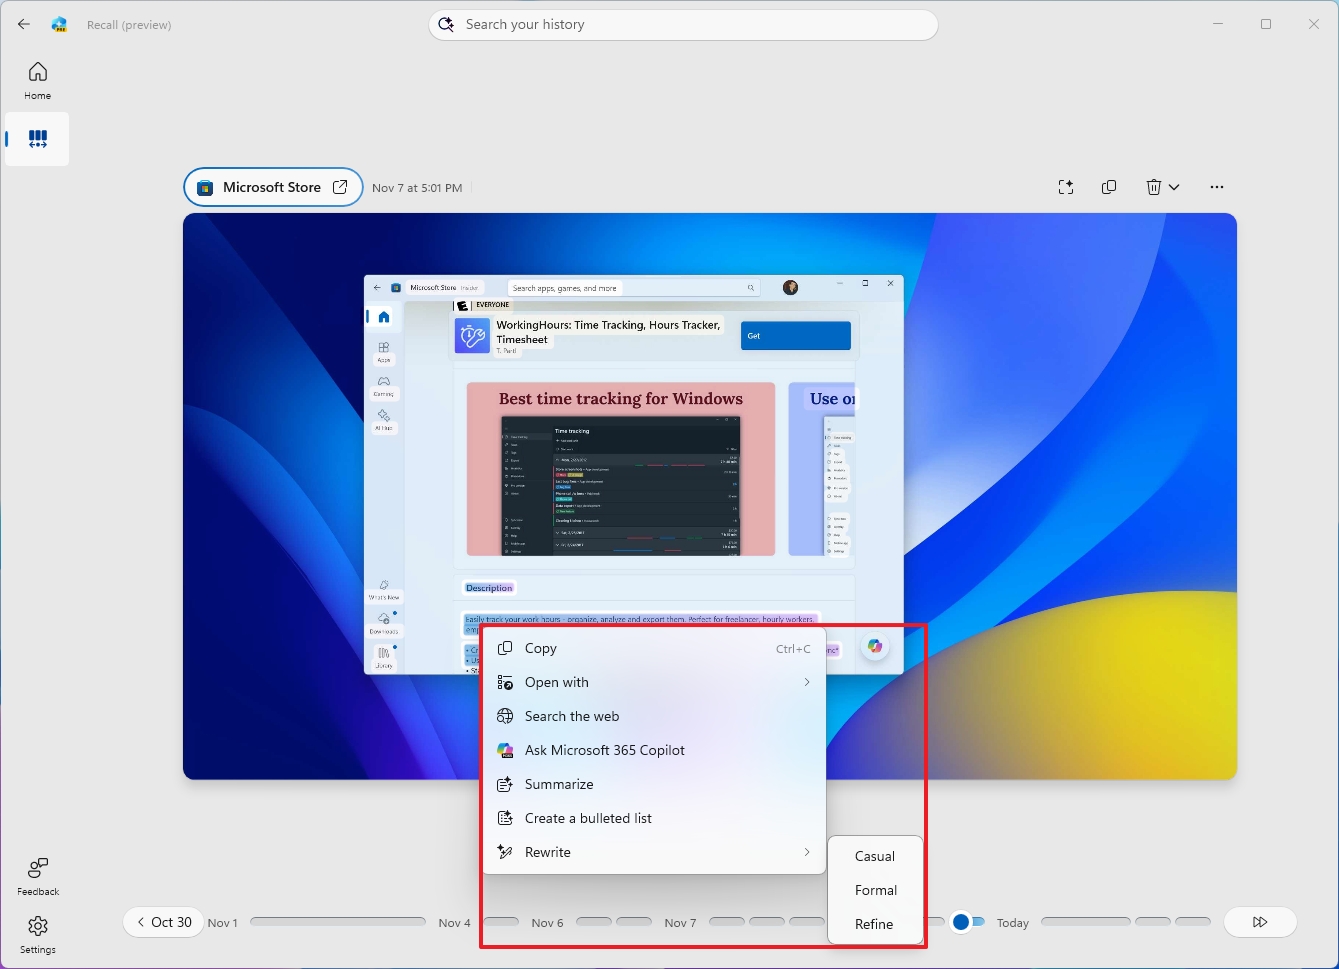
You can also find controls directly from the snapshot. For example, in the top-left, you'll find an option to open the application in the activity, along with the snapshot's date and time.
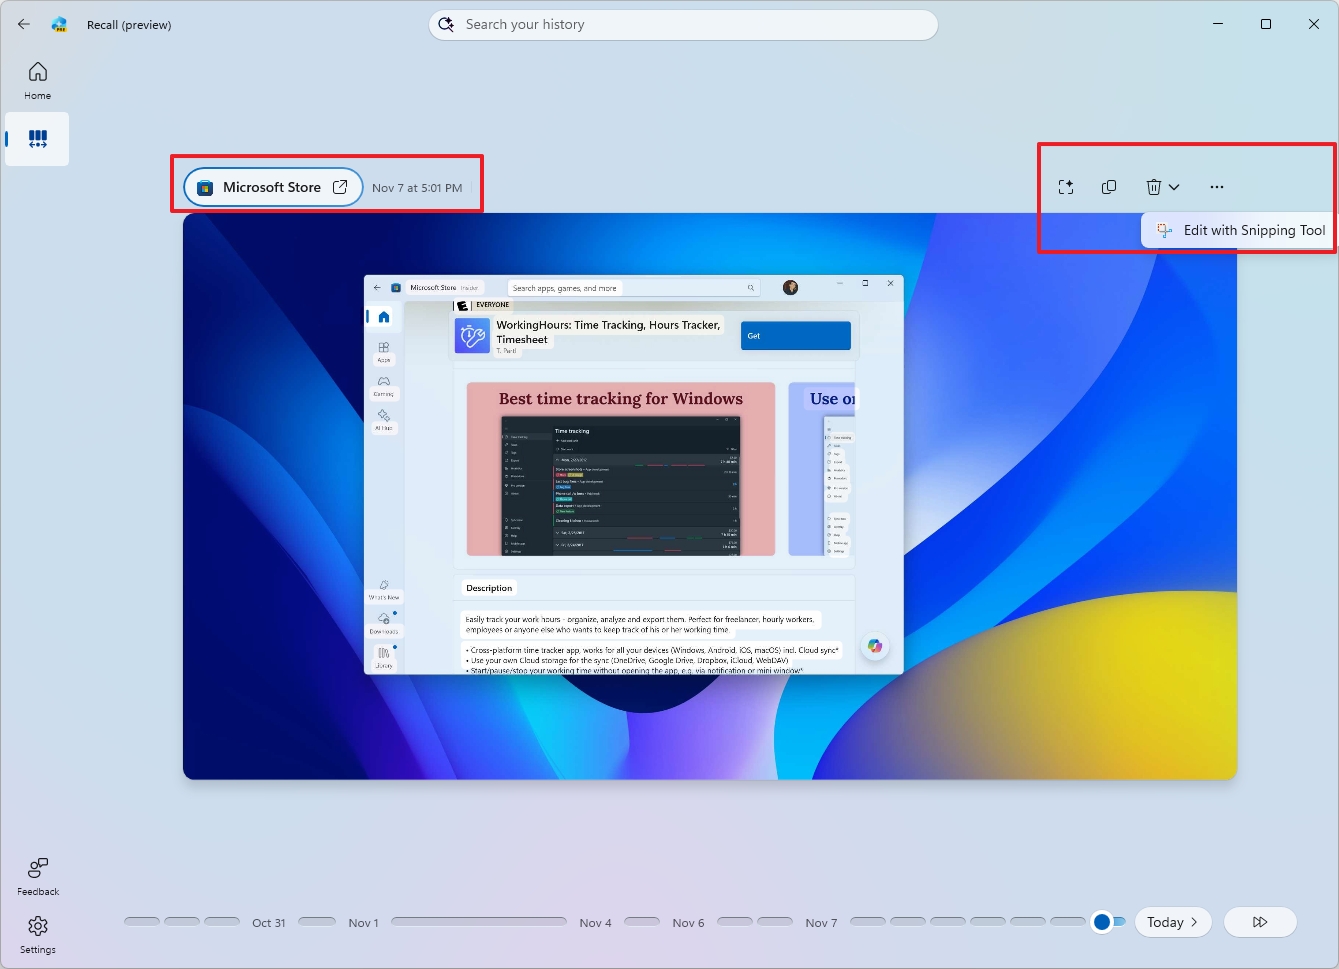
On the top-right, you can show or hide the Click to Do feature for that particular snapshot. You'll also find options to copy, delete, or open the snapshot with the Snipping Tool.
Although I'm focusing this guide on Windows Recall, when invoking Click to Do, you'll now find new controls known as "Selection Modes," including "Freeform Selection," "Rectangle Selection," and "Ctrl + Click," to make it easier to select objects on the screen.
Other details about Windows Recall
If you reached this point, you should now have a good idea of how to use the Windows Recall feature. However, there are some additional details that you want to know.
For example, the feature will only run while the device is in use. If the computer goes idle for a while, the feature will automatically turn off until you resume an activity. You will notice this because the Recall icon in the System Tray will change to a disabled state.
The System Tray icon is the indicator that lets you know that Windows Recall is enabled on the computer. You cannot move or hide this icon, similar to the location icon that appears when an app is accessing your location.
If you turn off the Windows Recall feature, it'll be turned off permanently. The icon won't appear in the System Tray, and the Recall app will no longer appear in the Start menu.
Also, if you turn off the feature, the data won't be deleted automatically from your computer. If you re-enable the feature, the previous history will continue to be available.
If you want to disable and clear the data at the same time, you want to use the reset feature.
This feature is exclusive to Copilot+ PCs, and it comes disabled by default. If you're setting up a new device or installation, you'll be prompted whether you want to opt into this feature during the Out-of-Box Experience (OOBE).
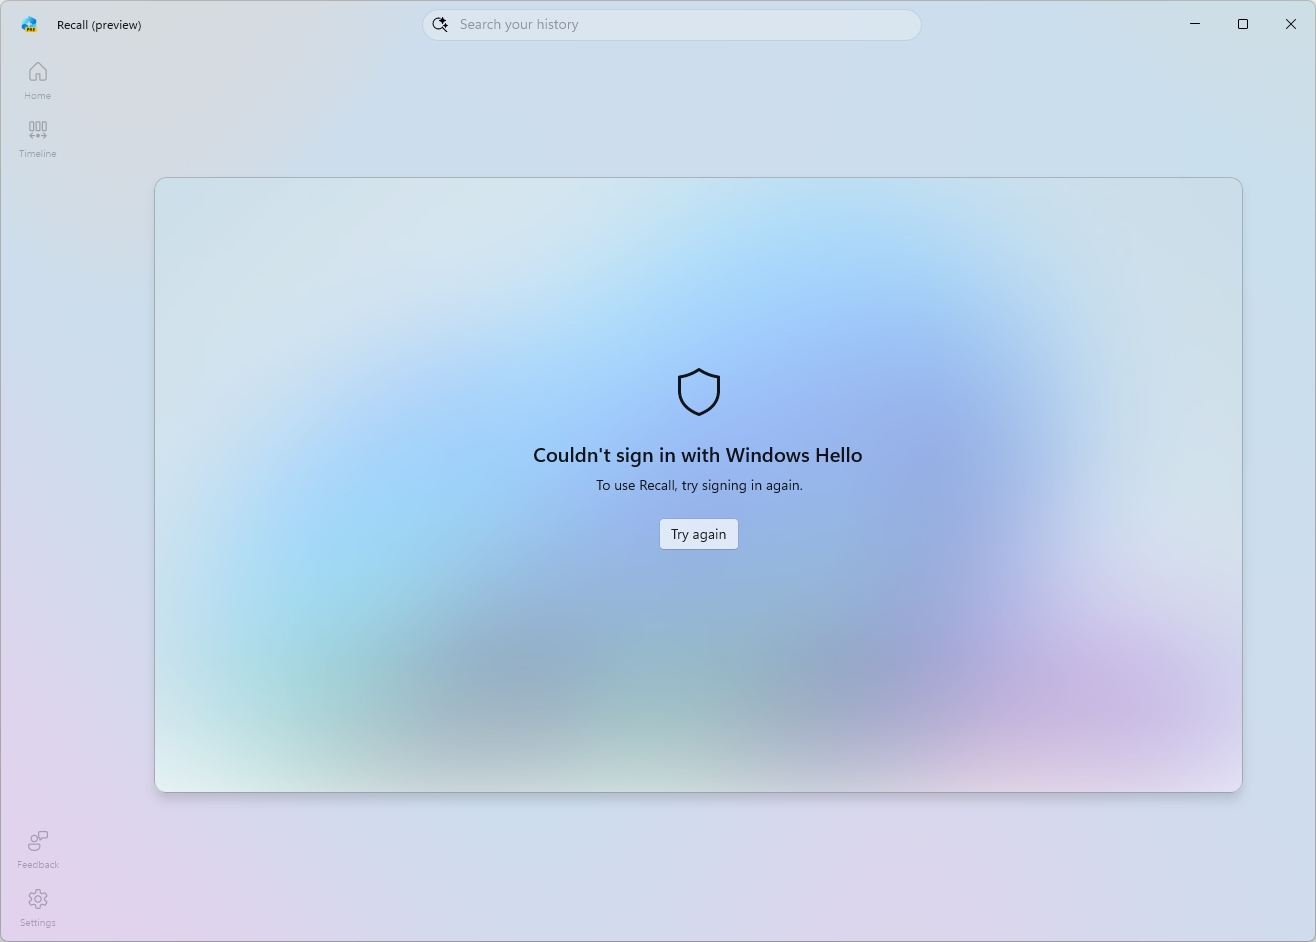
However, you'll only be able to turn on the feature if BitLocker (or Device Encryption) is configured on your computer and only if you're using Windows Hello PIN, Face, or Fingerprint as an authentication method.
Furthermore, Microsoft assures that the data collected by Recall will stay on your computer, nothing will be uploaded to the cloud, and the company won't use any data to train its AI models.
More resources
Explore more in-depth how-to guides, troubleshooting advice, and essential tips to get the most out of Windows 11 and 10. Start browsing here:
- Windows 11 on Windows Central — All you need to know
- Windows 10 on Windows Central — All you need to know

Follow Windows Central on Google News to keep our latest news, insights, and features at the top of your feeds!

Mauro Huculak has been a Windows How-To Expert contributor for WindowsCentral.com for nearly a decade and has over 22 years of combined experience in IT and technical writing. He holds various professional certifications from Microsoft, Cisco, VMware, and CompTIA and has been recognized as a Microsoft MVP for many years.
You must confirm your public display name before commenting
Please logout and then login again, you will then be prompted to enter your display name.
