3 Tips to help you get the most out of OneDrive in Windows 10

There is no doubt that OneDrive is perhaps the best cloud storage service for a Windows 10 PC. Yes, there are many different cloud storage services out there, such as Google Drive, Dropbox, Apple's iCloud, Box, and others. However, if we can move past the placeholder dilemma for some users, you'll see that OneDrive offers the best integration with Windows 10.
On a previous article, Richard gave us a number of very good reasons why you should OneDrive. Today, we're going to go through a few tips you can use to get the most out of the cloud storage service from Microsoft.
Tip #1 - Remote access to your files at home
Of course, the purpose of OneDrive is to offer online storage, a place where we can safely sync files between devices – computers, tablets, or smartphones. However, what happens when you forget to upload the presentation you have created at home and you need it for the next meeting at work? Or you happen to need an application on another computer and the only installation files are located on your computer at home?
If you don't like to upload every file to OneDrive, or you simply forgot to upload specific files to the service, Microsoft has your back with the Fetch feature in OneDrive. When you enable Fetch, you can have access to all your computer files on the OneDrive website. Even more interesting, you can also access network locations, such as those included in the libraries and mapped drives.
The Fetch feature is very impressive, as it allows you to download a copy of any files from anywhere, and you can also stream videos and view pictures remotely right from the web browser. But remember, it all works as long you have your computer turned on and connected to the internet.
If you like the idea of accessing your private files from the internet, you also need to make sure the feature is enabled:
- From the notification area right-click the OneDrive icon and click Settings.
- Then make sure to check Let me use OneDrive to fetch any of my files on this PC.
- Click OK to finish.

That all you have to do, you don't have to configure your router or firewall -- it just works.
Get the Windows Central Newsletter
All the latest news, reviews, and guides for Windows and Xbox diehards.
Now, open your web browser sign-in to your Microsoft Account, and under PCs, click the name of your computer. Then, you should be able to see the location available to you, including Favorites, Libraries, and This PC. These allow you to have access to the **C:**, internal and external connected drives.

Quick Tip: Make sure you enable Fetch and test the feature by trying to access the files. If it doesn't work, right-click the OneDrive icon in the notification area, click Exit, and launch the app again from the Start menu.
It's a great feature that can save your day at any moment, but there are a few things to keep in mind. For example, Fetch is not supported on PCs running Windows 8.1, and you can use access files from Mac computer, but you can't access files on a Mac computer using OneDrive. Also, you may also be asked to enter a verification code. So, fetching works best on PCs running Windows 10.
Tip #2 - Accessing OneDrive files from a different account in Windows 10
If you don't have an Office 365 subscription, or you're not paying to get more storage in OneDrive, or you don't want to keep all your files in one account, you probably have multiple OneDrive accounts. However, because you're likely using your main Microsoft Account to sign-in to Windows 10, you only have access one OneDrive account at a time through File Explorer.
What you probably did not know is that the OneDrive app allows you to connect to a different account while staying logged in with your main Microsoft Account in the operating system.
Connecting a different OneDrive account to your computer without changing your current Microsoft Account in Windows 10 is very straight forward process:
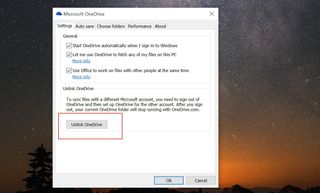
1- From the notification area right-click the OneDrive icon and click Settings.
2- On the Unlink OneDrive section, click the Unlink OneDrive button.

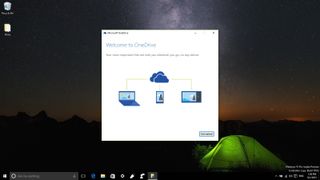
3- Then you'll be presented with OneDrive setup wizard, click Get started.
4- Sign-in with new Microsoft Account you want to access to OneDrive. Keep in mind that this process won't change your current profile settings, you'll be able to sign-in with your old credentials.
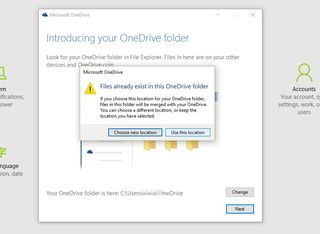
5- Next, change the location to store the new OneDrive files or keep the same path, and click Next. Make also sure you understand that if you don't change the folder location, and the folder already exists, files will merge with OneDrive.

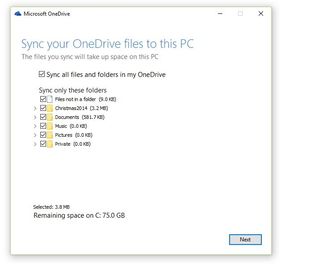
*6- Click Next, choose the folders you want to sync, and don't forget to enable the fetch feature if you want to access the files remotely.

7- Click Done to finish.
This useful OneDrive feature allows users to keep things separate. Or perhaps, you're main Microsoft Account doesn't have enough space, and then you can use that secondary account with more storage.
While this is a good feature, in my opinion, it would be nice if Microsoft had the option to access multiple OneDrive accounts without having to log out from your primary OneDrive account.
Tip #3 - Restoring files and emptying your Recycle Bin
If you're using OneDrive to sync files between computers, you typically create, access, and delete your files through File Explorer. But what happen when you accidentally delete a file and empty the Recycle Bin? If you didn't have a backup, you probably think that your files are gone forever.
Well, here is something that not too many people know. If you delete a file from your OneDrive folder, a copy of the file goes to the Recycle Bin in Windows, and another copy goes to the OneDrive's Recycle bin. Emptying your computer's bin, doesn't delete the bin on OneDrive. As such, you can always restore files you have deleted on OneDrive, and it's as easy as:
- Signing into your OneDrive account using your web browser.
- From the left OneDrive menu, click the Recycle bin link.
- Find and select the file you want, and click Restore from the menu on the top.

Now according to Microsoft the files in the Recycle bin do not count as part of your storage. However, if your Recycle bin hits the 10% of your allowed storage, then files will begin to get deleted from the oldest to the newest. The company also warns that files will get permanently deleted after a minimum of 3 days and max of 60 days.
If you want files to get permanently deleted right away, you will need to delete the file or files in questions. Next, head over the OneDrive Recycle bin on the web, and empty the trash can.
Wrapping thing up
OneDrive isn't just about storing your files in the cloud. The service also provides some features to have access to your files no matter where they are located, even when they're not stored online. And if you happen to delete a file accidentally, no worries, you can always get it back.
Do you have a favorite feature of OneDrive? Let us know in the comments below.
More Resources
Remember that we have many other articles on Windows 10, if you need help you always check these other resources:
Mauro Huculak is technical writer for WindowsCentral.com. His primary focus is to write comprehensive how-tos to help users get the most out of Windows 10 and its many related technologies. He has an IT background with professional certifications from Microsoft, Cisco, and CompTIA, and he's a recognized member of the Microsoft MVP community.

