


Lenovo's Legion Y7000 (also labeled as the Y7000P depending on the configuration you buy), is a cost-effective alternative to the pricier Legion Y700-series gaming laptops. One of our favorite features involves removing the back panel, where you have access to the RAM and storage for relatively easy upgrades. If you're looking to add more random-access memory, we've laid out everything you need to know right here.
Hardware to get the job done
- Compatible SODIMM RAM: Crucial DDR4 (From $52 at Amazon)
- Prevent damage: Rosewill anti-static wristband ($6 at Amazon)
- All required tools: ORIA PC toolkit ($34 at Amazon)
- Mid-range gaming laptop: Lenovo Legion Y7000{.speciallink} ($1,100 at Costco)
How to upgrade the RAM in your Lenovo Legion Y7000
Note: Before beginning any upgrades on a PC, it's a good idea to back up your data in the unlikely event something should go wrong. You'll also want to ensure you're not working in a static-filled environment, as it can cause damage to a PC's internal hardware. Consider investing in an anti-static wristband to avoid unnecessary damage.
The Legion Y7000 and Y7000P have a few available configurations when it comes to RAM, so you might have a laptop with 8GB or 16GB of DDR4 SODIMM RAM. There are two channels to work with, so if you started with 8GB, chances are you can just add another 8GB or 16GB stick for improved performance. If your laptop came with 16GB to start (dual 8GB sticks), however, you'll probably either want to shop for a single stick of 16GB or go big and upgrade to dual 16GB sticks for a total of 32GB.

The Crucial DDR4-2666MHz we recommend here is high quality and competitively priced, and it should have no compatibility issues with your system. Once you've set up a clean workspace and have done any necessary backups, you can proceed with the steps below to upgrade RAM. Be sure to power off your laptop before removing the back panel.
- Unscrew the 11 fasteners on the back panel of the Legion Y7000 using a Philips-head screwdriver. There are also two screws in the black venting along the back edge, but they can remain in place.

- Pry up the bottom panel using a thumb or pry tool. Start with a front corner and carefully work your way around so as to not damage the panel or keyboard deck.

- Carefully pull up the black cover that extends across the RAM shielding. It's held down by adhesive, and pulling it up will also remove the silver RAM shielding. You should now be able to see both sticks of RAM.

- Slide the side clips off of the first stick of RAM. Upon releasing both clips, the RAM should pop up and remain at an angle.

- Remove the RAM from the slot by carefully pulling it away.

- Slide the side clips off of the second stick of RAM. Upon releasing both clips, the RAM should pop up and remain at an angle.

- Remove the RAM from the slot by carefully pulling it away.

- Insert the new stick of RAM into the first slot. Notice that it is keyed and will only fit one way.
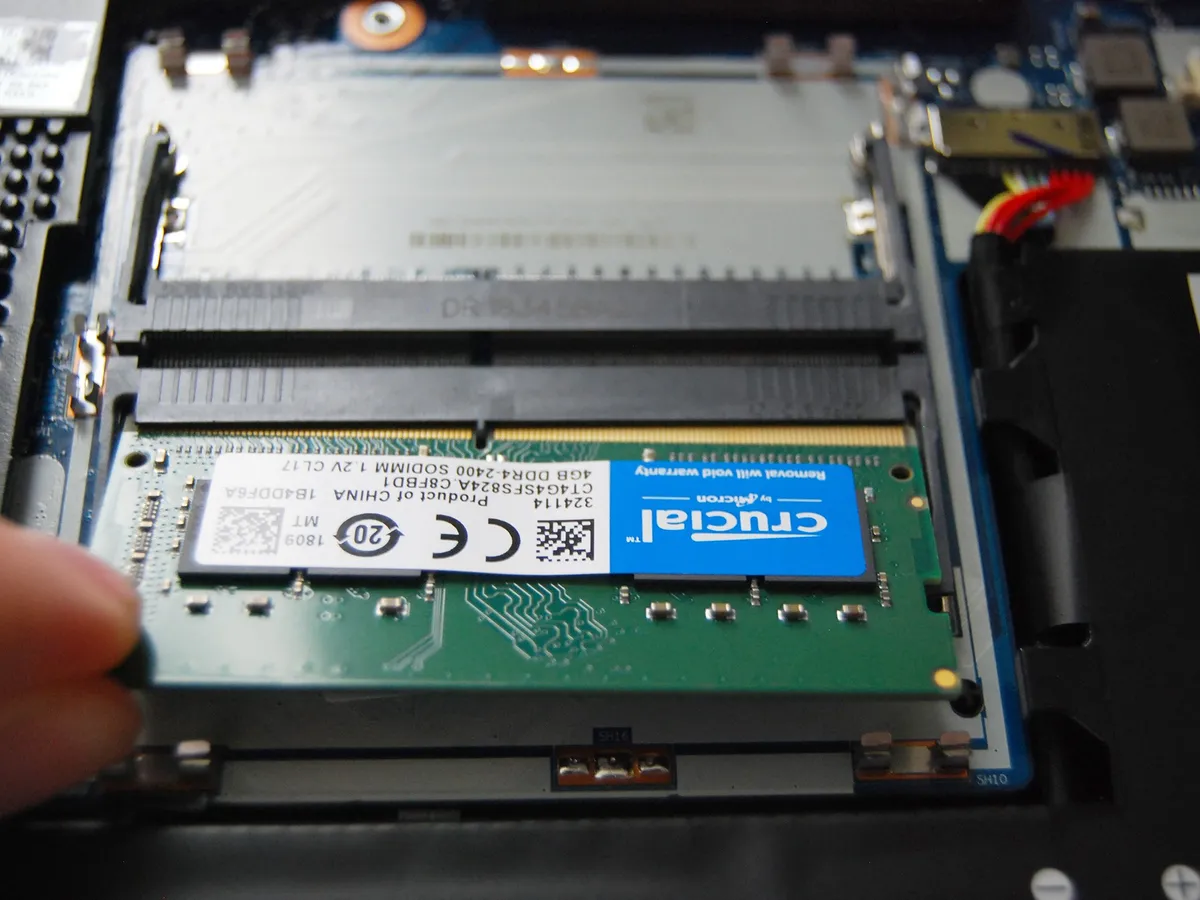
- Press down on the RAM so that the side clips click into place. This secures the RAM.

- Insert the new stick of RAM into the second slot. Notice that it is keyed and will only fit one way.

- Press down on the RAM so that the side clips click into place.

- Replace the RAM shielding and black cover by applying pressure. The shield should clip into place and the black cover's adhesive will stick it down.

- Replace the bottom panel of the laptop by applying pressure around the edges. You should hear the panel snap back into place when it's seated properly.

- Screw in the eleven fasteners on the back panel.

You can now power on your Legion Y7000 and verify that the RAM you've installed is recognized by the system.
- Right-click the Start button.
- Click System.

You should now be able to see the total amount of installed RAM in the Device specifications section. As long as it matches the total amount you have installed, your upgrade was a success.

Note: We didn't actually add any RAM to the laptop, so it still reads 16GB. In your own case, add up what should be installed and ensure it matches the information here.
Our top hardware picks
It's not the only option when it comes to buying RAM for your Legion Y7000 or Y7000P, but the Crucial SODIMM RAM we recommend is reliable, relatively affordable, and will work in your system. It matches the DDR4-2666MHz RAM that comes standard in the Legion Y7000, and it's available in single 8GB sticks all the way up to dual 16GB sticks for 32GB total.

Reliable and affordable
If you're looking for extra RAM for your Legion Y7000, we've had much success with Crucial. It's competitively priced and it's reliable, checking two of the big boxes when it comes to buying hardware for your PC.
Not only does the Legion Y7000 come with impressive specs straight from the factory, the RAM, SSD, and HDD can also be upgraded to keep it relevant longer.
Lenovo Legion Y7000

$1,100 at Costco
Gaming laptop with GTX 1060 and hexa-core Intel CPU
Lenovo's Legion Y7000 is a worthwhile alternative to the Legion 700 series, focusing more on power than on extra features that don't contribute to overall performance.
Powerful but affordable
Additional Equipment

ORIA PC toolkit ($34 at Amazon)
Having the proper gear to work on your PC will always make the job much easier. Here you get a plethora of tools contained in a portable case.

Rosewill anti-static wristband ($6 at Amazon)
Static electricity can damage sensitive PC parts, so remove the risk with an anti-static wristband. Fasten it around your wrist and clip it onto your PC for peace of mind.

