


The Razer Blade 14 is a fantastic laptop that came out a couple of years ago. It costs a lot to send the device back to Razer for a battery replacement, but you can always buy a third-party battery and replace it at home. Below, you'll find a step-by-step guide on how to do exactly that. When you're looking for a third-party battery, you'll want to find one that provides screwdrivers because Razer uses some unique screw holes.
Before you begin, remember to shut down your laptop completely and remove the charger.
Step 1

Remove the 10 screws with the appropriate screwdriver provided in the kit. You may have to try a couple because the size of the grooves may be different depending on your region. This will allow you to lift the cover to expose the battery and other circuitry.

Step 2
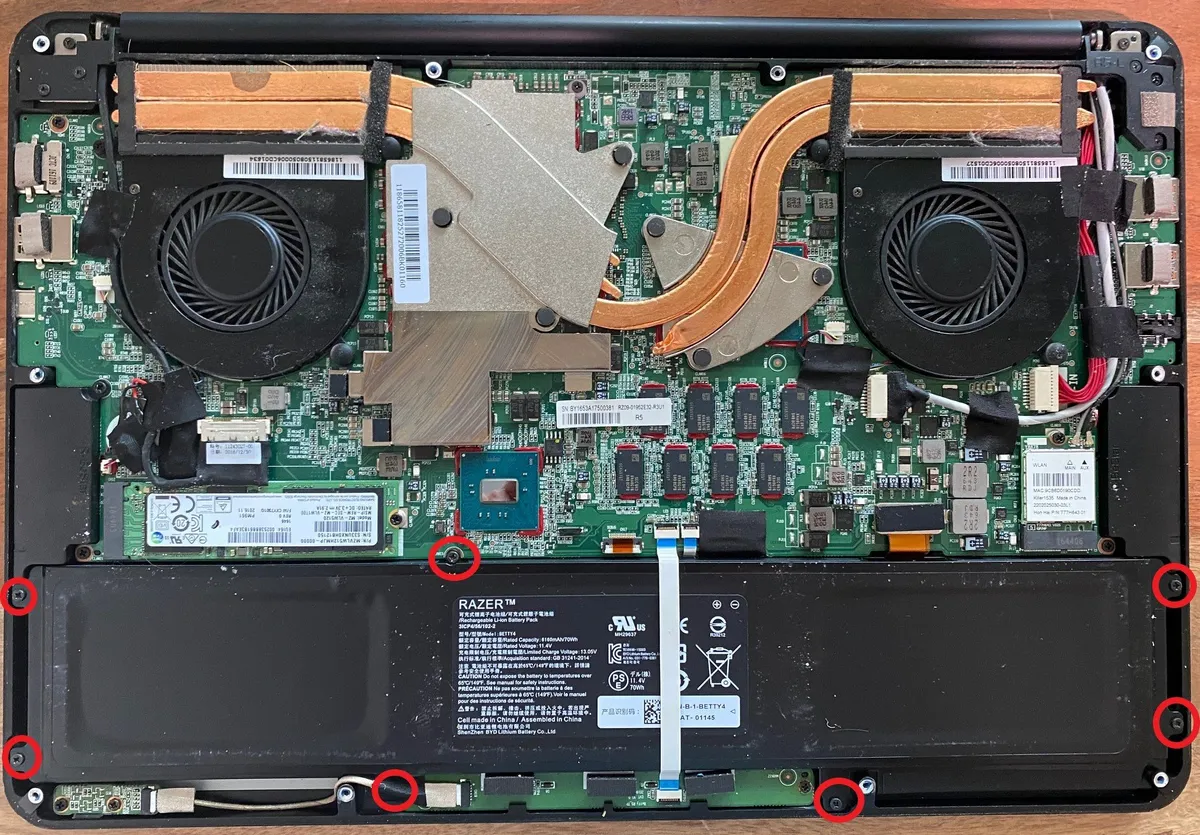
Remove the 7 screws with the appropriate screwdriver provided in the kit. This will be different than the one you used to remove the cover. One of the screws is hidden behind a wire so you'll have to push the wire aside.
Step 3

Remove the battery connector by pulling up on the orange and black connector. You may have to nudge it a little bit to get it loose.
Step 4

Remove the white and blue connector blocking you from lifting up the battery.

To do this, you have to lift up the tiny black clip first and then pull out the blue tab only on one side. Use tweezers if you have them because this is a delicate process.
Step 5

Lift up the old battery and place the new one in. Make sure you align the screw holes accordingly and that it doesn't wiggle around.
Step 6
Insert the new battery connector into the same slot you removed the old battery connector from. You'll have to apply light pressure to make sure it's firmly in place.
Step 7
Reconnect the white and blue connector.

To do this, you'll have to insert the blue tab in first and then flip the black holder down.
Step 8
Replace all the screws you removed when taking out the battery.
Step 9
Put back the bottom cover and replace all the screws you removed when removing the cover. Your laptop is ready to use now so you can plug it into the charger and turn it on. The manufacturer recommends that you charge your battery for 12 hours the first time.
Hopefully, this guide helped you. This was my first time replacing the Razer Blade 14's battery and I found it to be quite easy.

Comes with screwdrivers
This replacement battery costs a fraction of what it would take for Razer to replace it on your Razer Blade from 2016. You'll need to get a kit that includes the special screwdrivers if you don't have them already.

