The 9 Destiny 2 Legend Onslaught builds I'm using to crush Into the Light's horde mode
With these builds, you'll be clearing Wave 50 in Destiny 2's new mode in no time.

The huge free-to-play Destiny 2: Into the Light update is here, and the highlight of the patch is its new PvE wave-based defense mode Onslaught. In it, you and two other Guardians are tasked with defending a special objective called the ADU from hordes of enemies. You can build turrets, traps, and distraction decoys with scrap collected from slain foes to help you, but ultimately, your fireteam will need to do the heavy lifting — and while pretty much any setup will get you through the normal version of Onslaught, you'll need a strong build to succeed in its more challenging (and more rewarding) Legend difficulty version.
I've been experimenting with several different loadouts in the horde mode since its release, and have put together three for each Destiny 2 class that have proven to be very effective in Legend Onslaught. You'll find a complete overview for all nine of those builds below, including subclasses, Aspects, Fragments, Exotics, recommended gear, armor mods, and playstyle explanations.
Destiny 2: Best Hunter builds for Onslaught
These are three of the best Hunter builds you can take into Onslaught. Two of them take advantage of how stealthy Hunters can be with Void Invisibility, while one features Stasis and a fan-favorite Exotic to simultaneously debuff enemy damage while making your entire fireteam significantly tankier.
Article continues belowVoid Hunter Nightstalker build
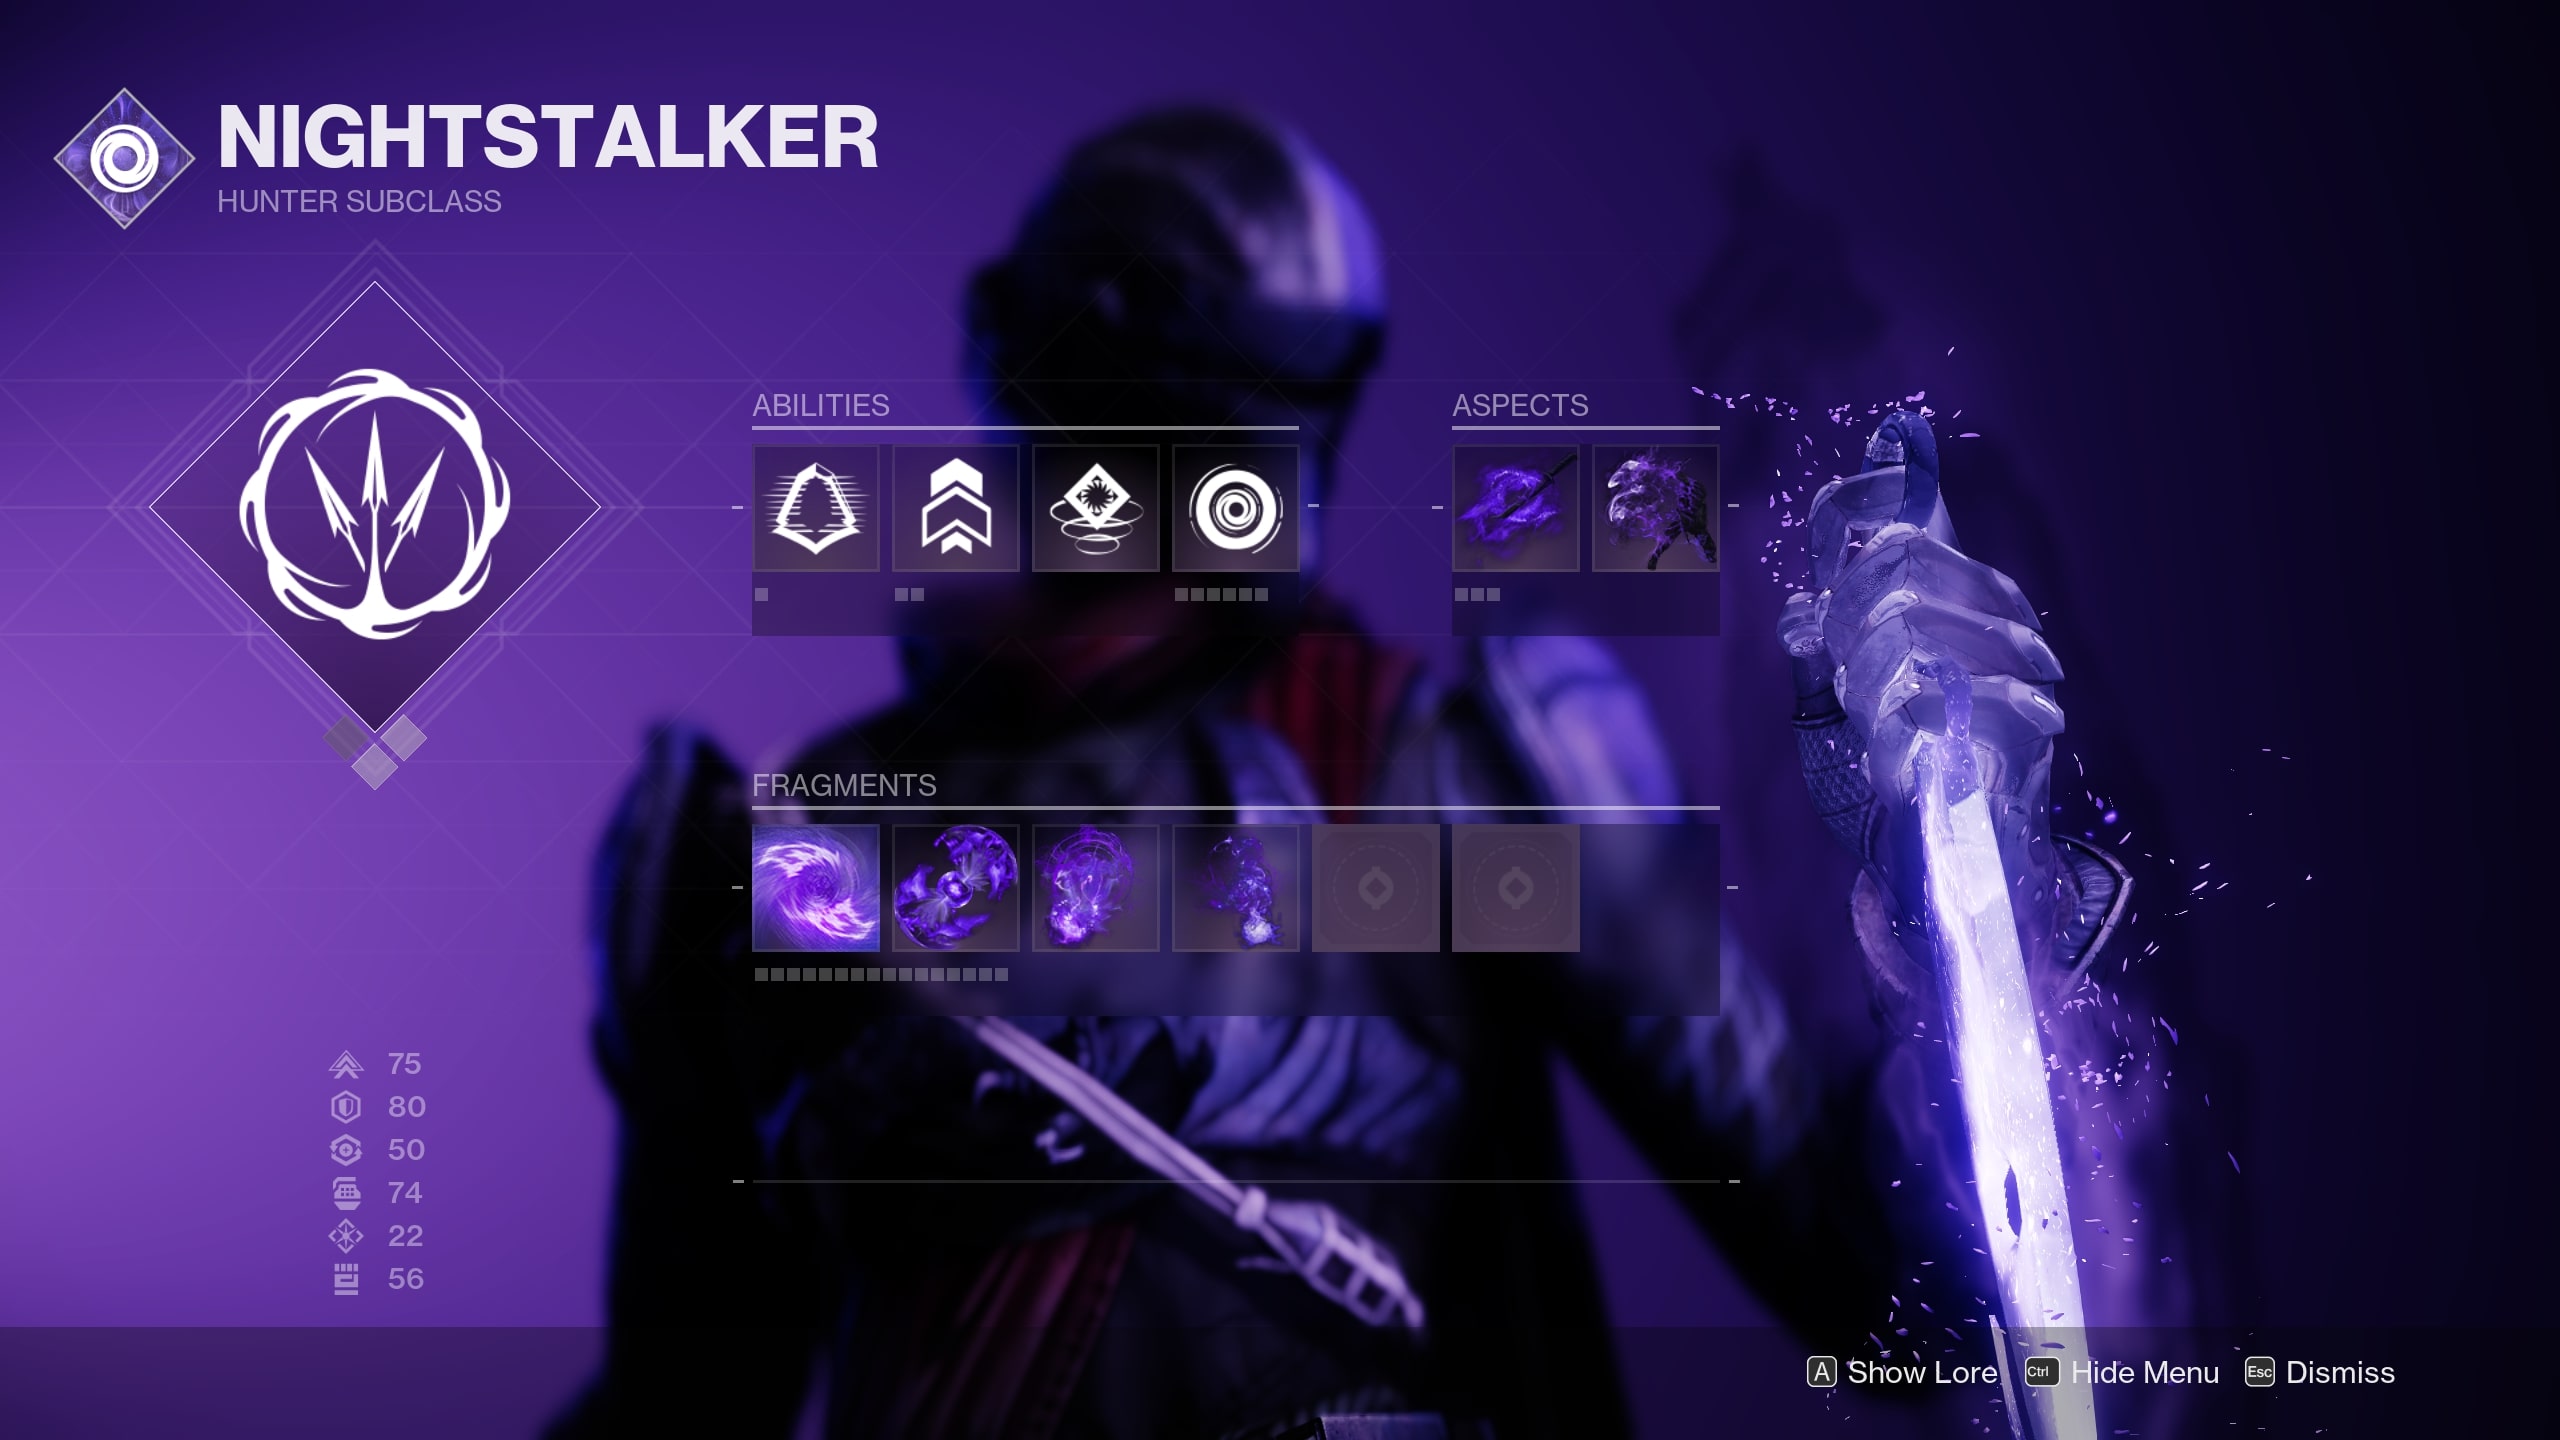
- Abilities: Shadowshot (Deadfall or Moebius Quiver), Gambler's Dodge, Triple Jump, Snare Bomb, Vortex Grenade
- Aspects: Stylish Executioner, Vanishing Step
- Fragments: Echo of Cessation, Echo of Starvation, Echo of Persistence, Echo of Obscurity
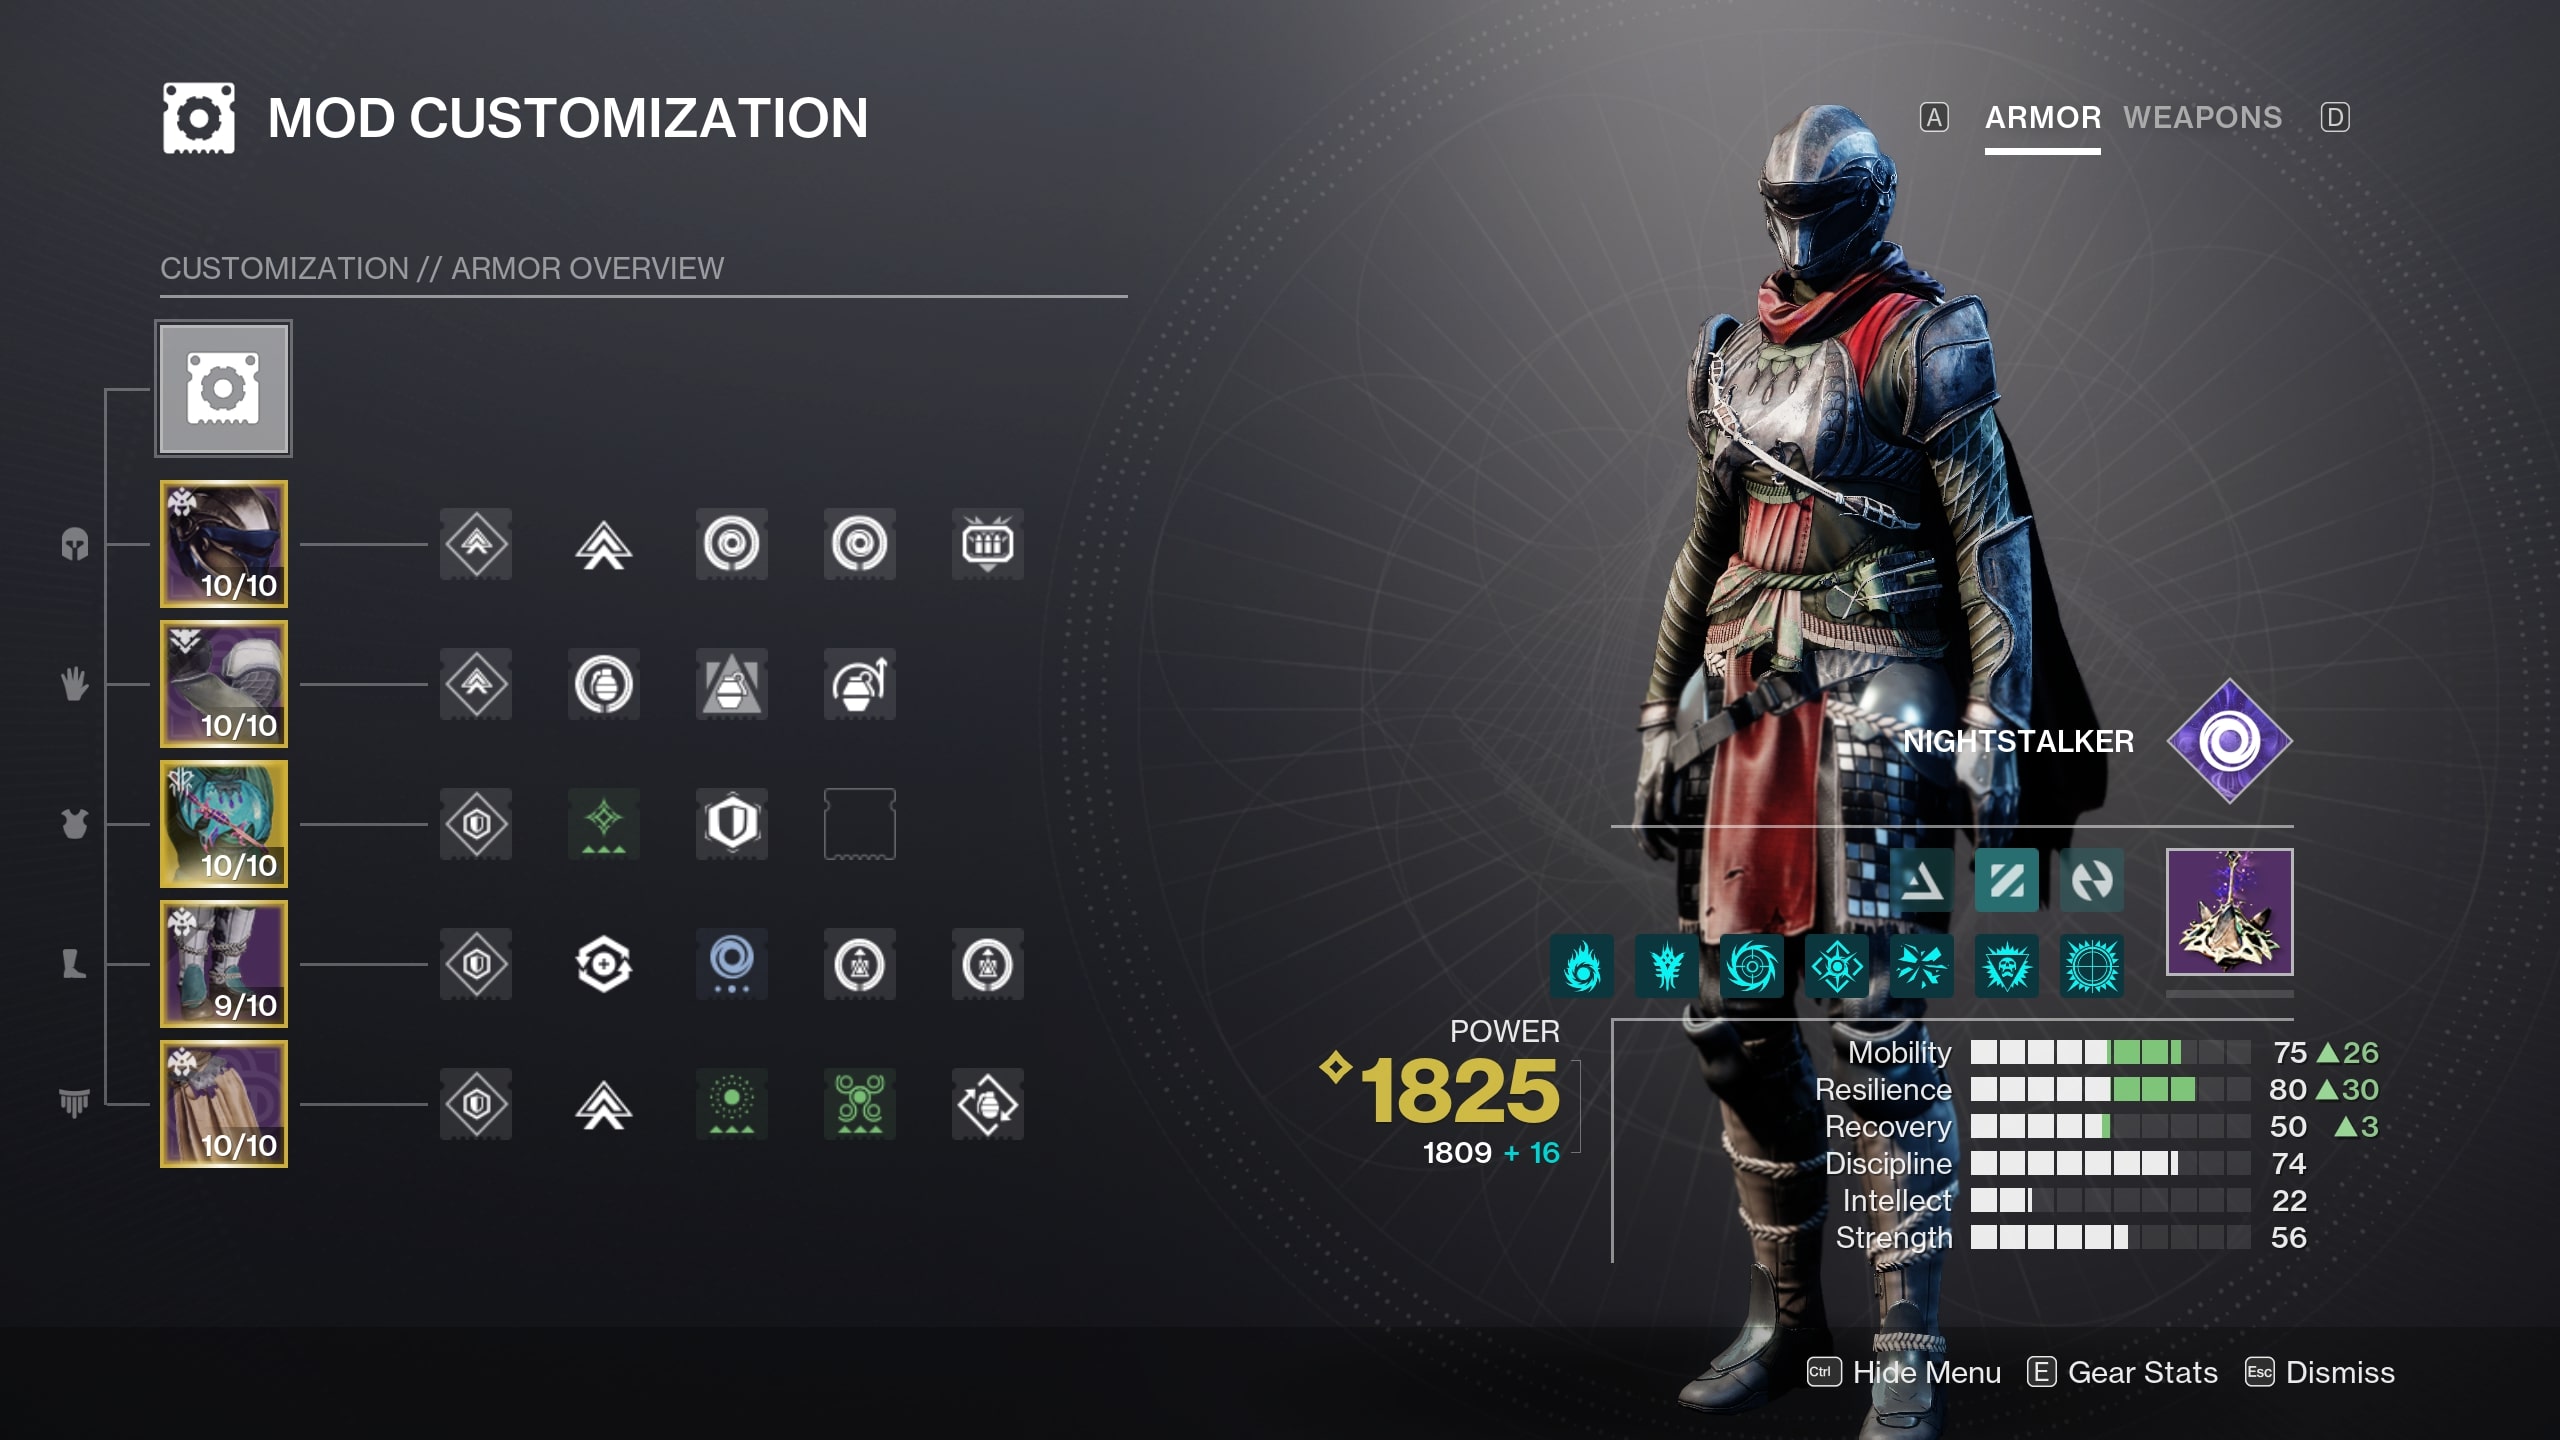
- Exotic: Gyrfalcon's Hauberk
- Armor mods: Harmonic/Void Siphon, Firepower, Bolstering Detonation, Impact Induction, Charged Up, Void Weapon Surge, Insulation, Time Dilation, Powerful Attraction, Bomber
- Important stats: Resilience, Mobility, Discipline
- Weapons: Void weapons; The Manticore, Graviton Lance, or Collective Obligation recommended
This build uses the Exotic chest armor Gyrfalcon's Hauberk, which gives Volatile Rounds to your Void weapons whenever you shoot to come out of Invisibility. It pairs perfectly with Stylish Executioner since it allows you to go invisible whenever you kill an enemy affected by Volatile, and with Vanishing Step, you have an easy way to go invisible in the first place. Essentially, what you're getting with this core combo is an infinite loop of Invisibility and Volatile Rounds, which makes this setup one of the safest and deadliest Hunter builds for enemy dense activities like Onslaught. Dodging to go invisible will also refresh your Smoke Bomb as long as you do it relatively close to enemies, so in addition to keeping every threat you encounter permanently Volatile until it dies, you can also Weaken many of them, too.
Gyrfalcon's Hauberk also gives you and nearby allies a reserve Void Overshield whenever you use a finisher on an enemy, which can then be deployed by using your class ability. The Fragments used here empower your finishers to make this element of the build even better, while also allowing you to create Void Breaches by killing Volatile enemies and get Devour from them as well as any Orbs of Power you or your teammates make. Devour's heal-on-kill and improved grenade regeneration effects round out this setup nicely and make it even stronger, so it's worth building into.
Using specific armor mods isn't crucial to get this build to work well, but you'll be using your Void weapons constantly, so make sure you use a Harmonic/Void Siphon to create Orbs of Power on multikills as well as a Void Weapon Surge to improve their damage. Time Dilation will make that surge last longer whenever you get Armor Charge from Orbs, Charged Up allows you to have more Armor Charges at once, and Powerful Attraction gives you an easy way to collect Orbs by dodging while close to them (you'll be doing that often to go invisible or deploy your reserve Void Overshield).
Arc Hunter Arcstrider build
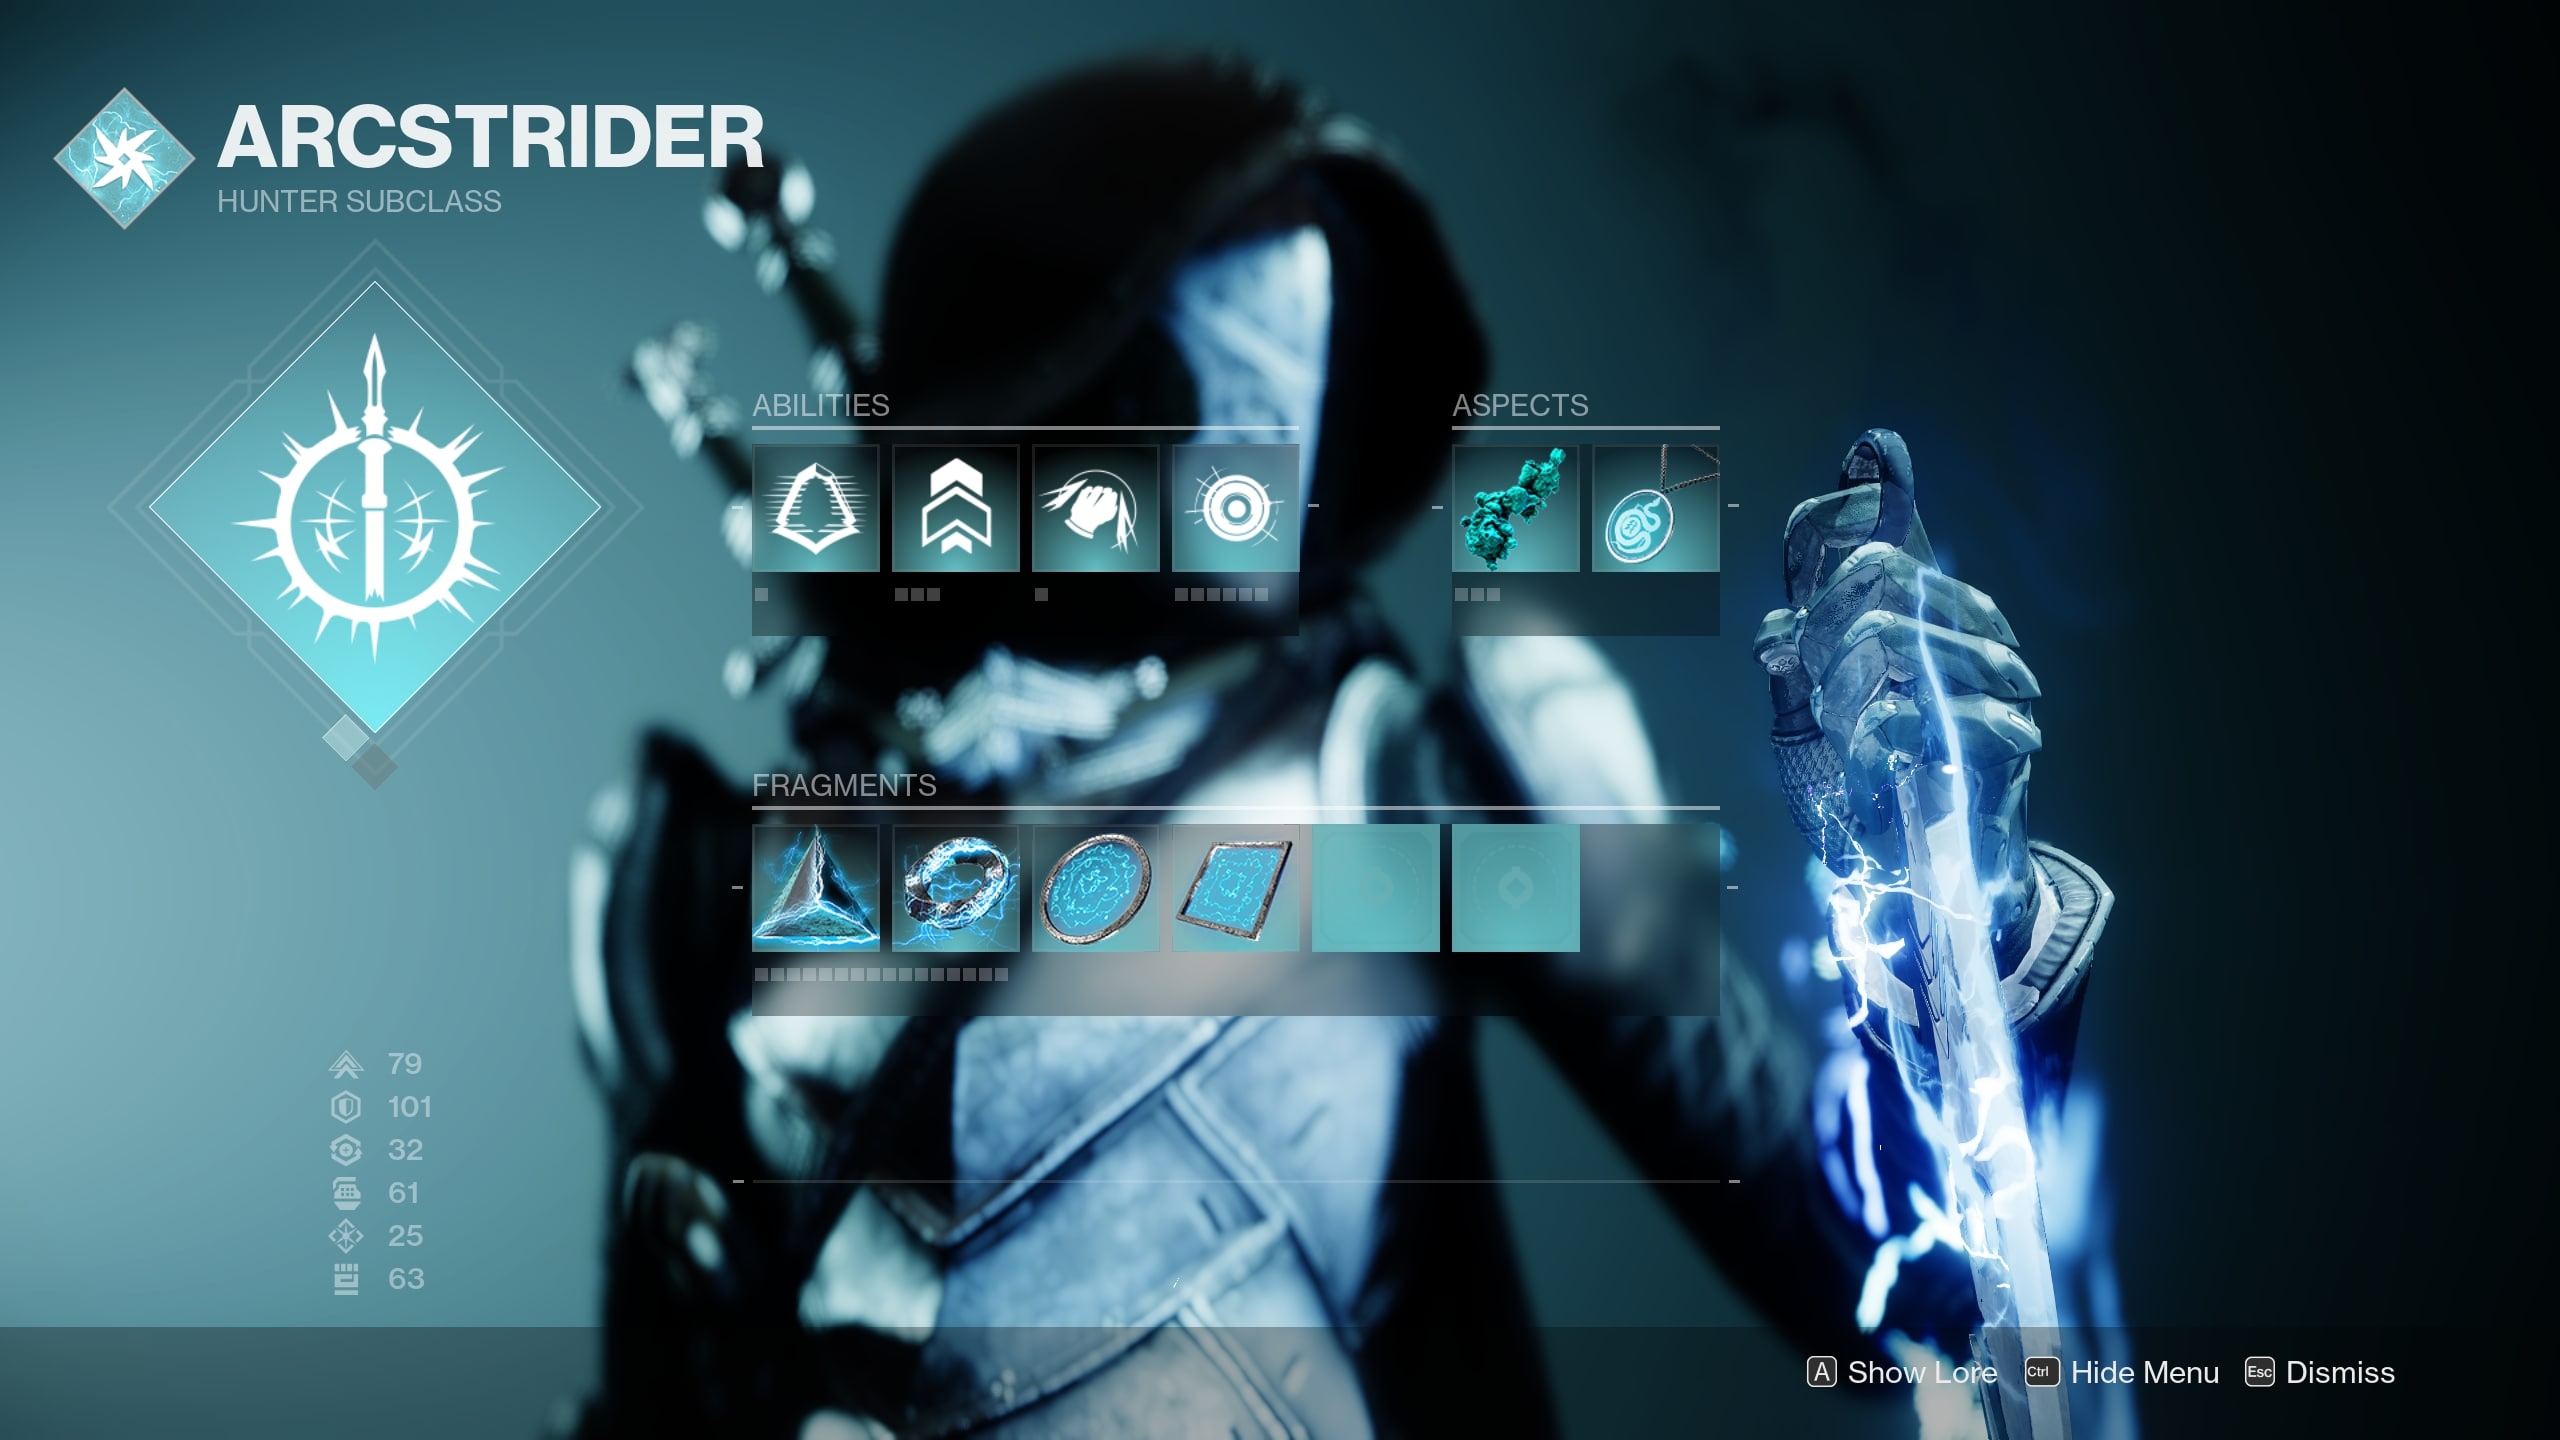
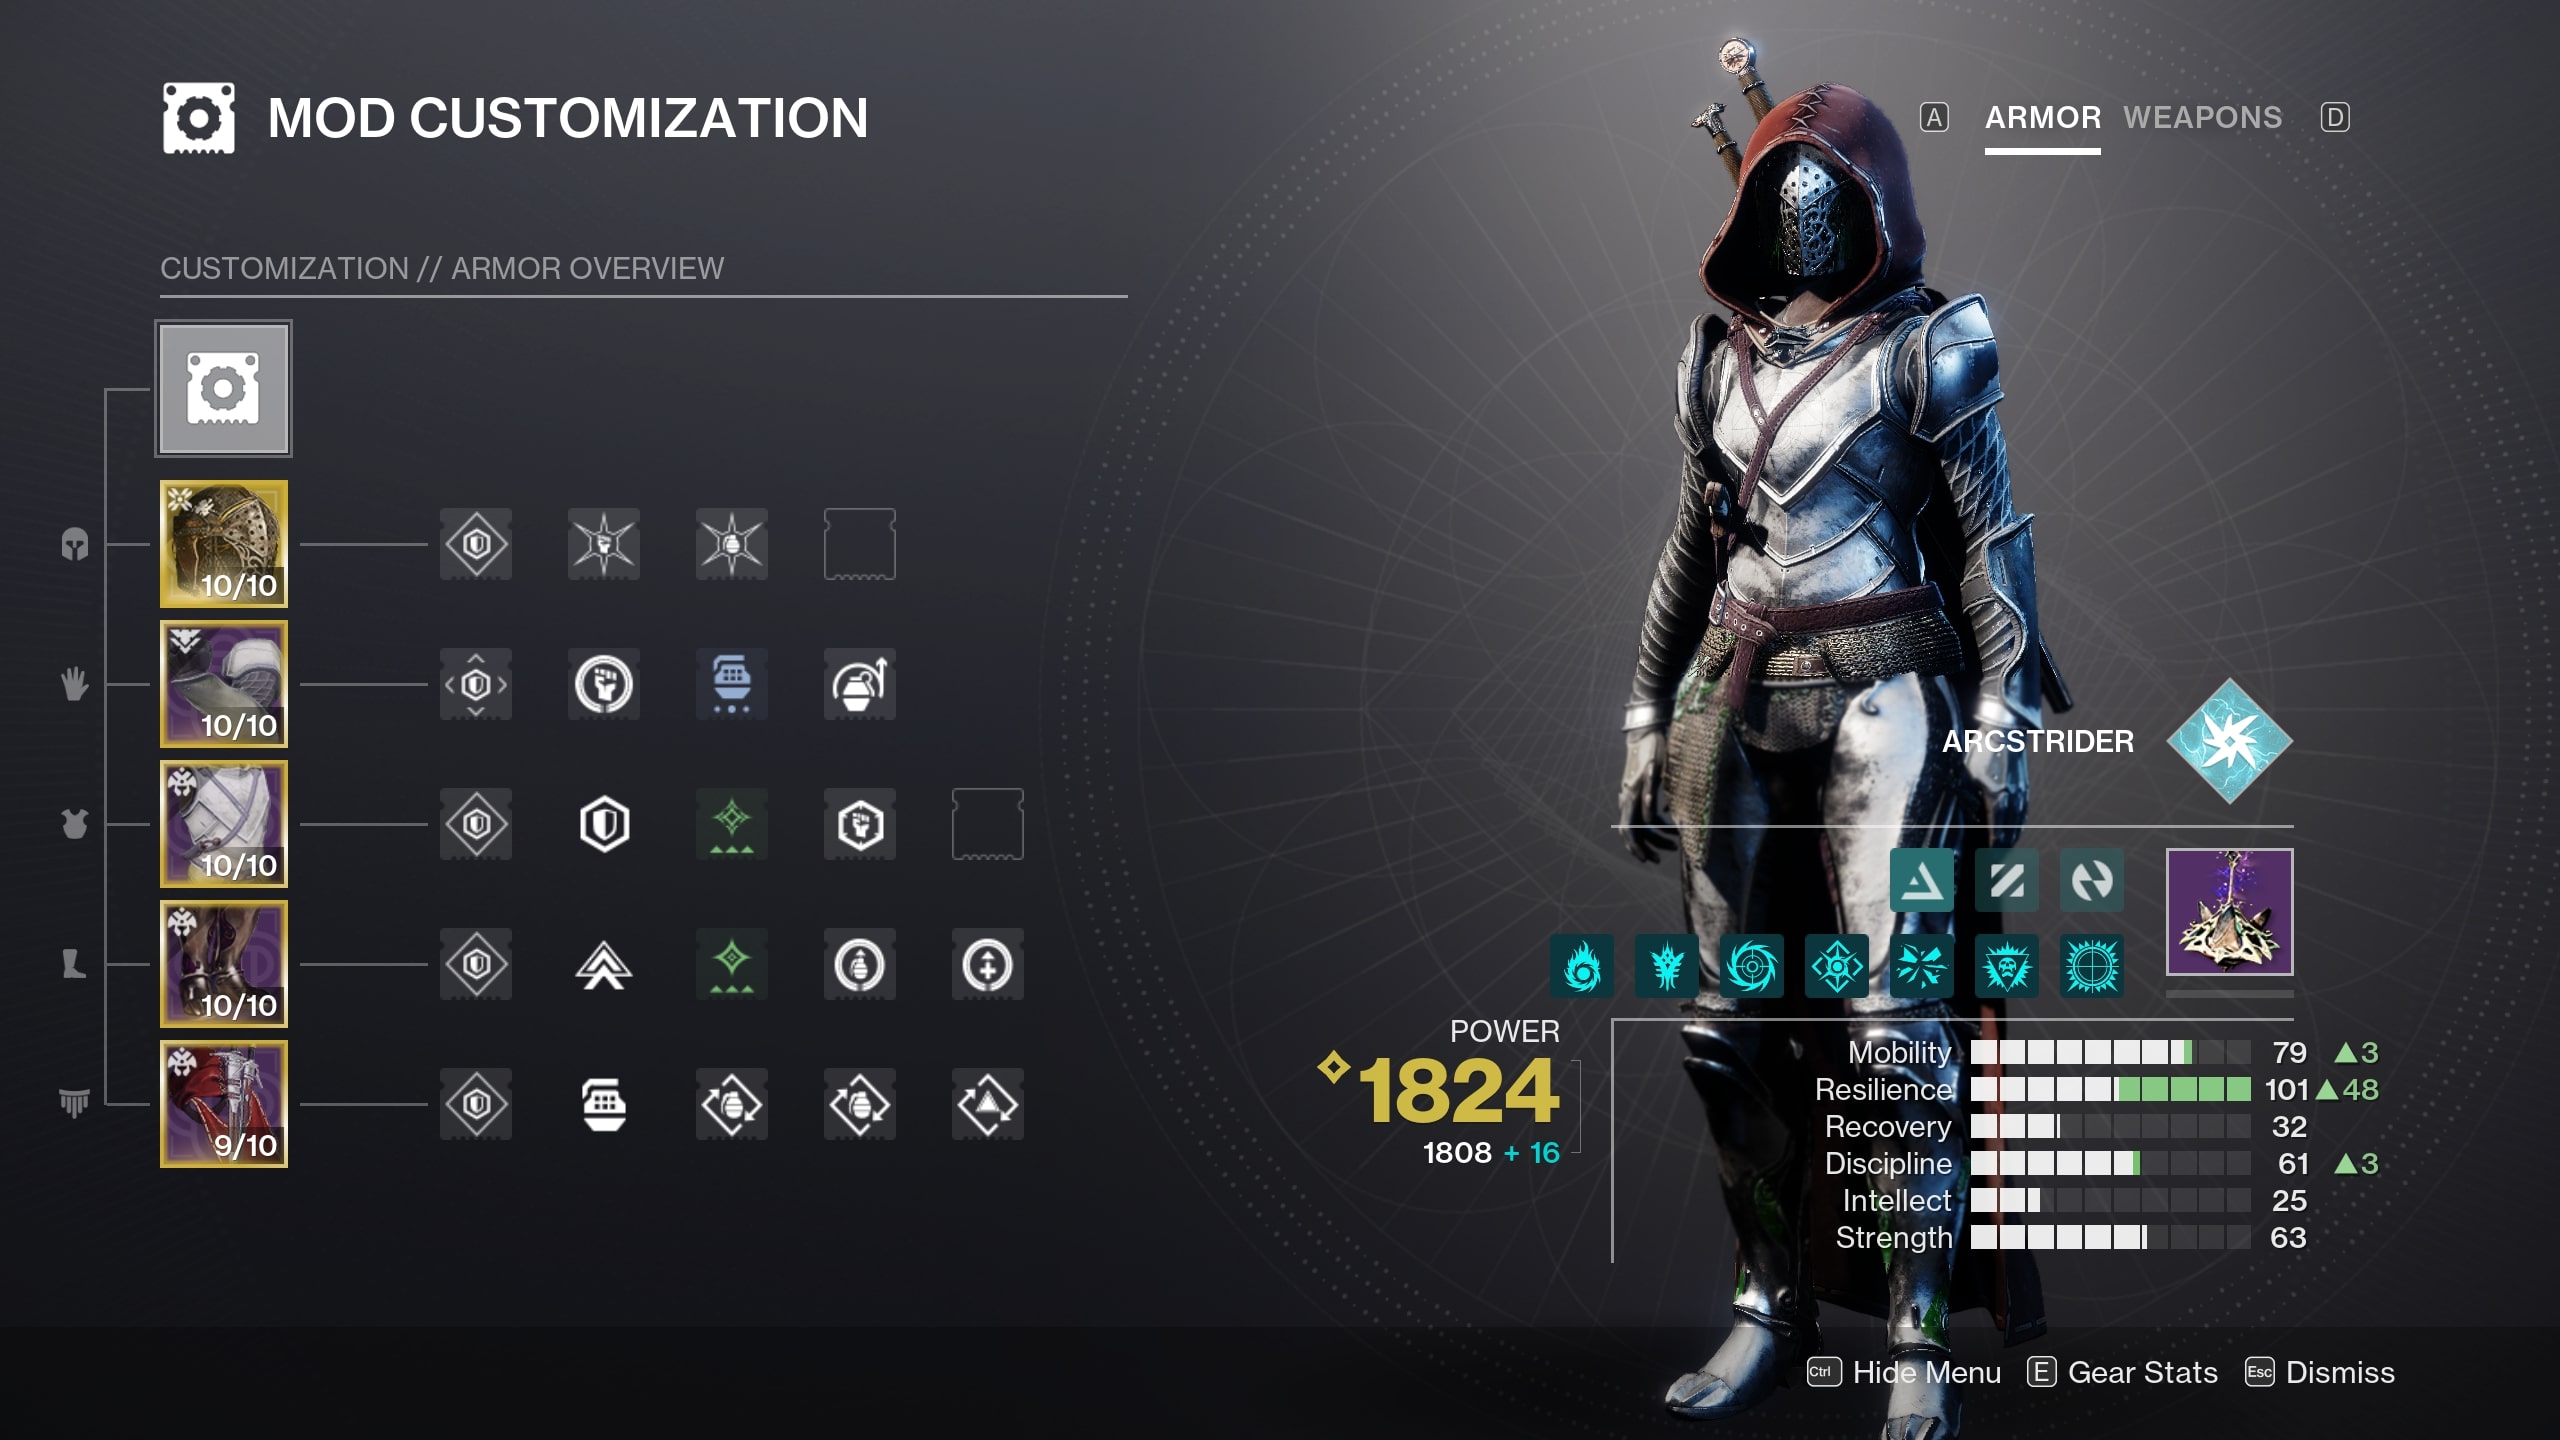
- Abilities: Gathering Storm, Triple Jump, Gambler's Dodge, Combination Blow, Pulse Grenade
- Aspects: Lethal Current, Flow State
- Fragments: Spark of Resistance, Spark of Shock, Spark of Magnitude, Spark of Feedback
- Exotic: Assassin's Cowl
- Armor mods: Hands-On, Heavy Handed, Impact Induction, Innervation, Recuperation, Bomber
- Important stats: Resilience, Discipline, Mobility
- Weapons: Shotgun w/ One-Two Punch
Arc Hunter builds centered around the Combination Blow melee have been popular for years, but have historically struggled due to survivability issues. By using the Assassin's Cowl Exotic helmet, though, you can solve this problem completely, as it both heals and gives you Void Invisibility whenever you get a powered melee or finisher kill. This invisibility ensures you can safely stay close to groups of enemies while punching them, and whatever damage you do take will be mitigated by the health-on-kill effect.
All the latest news, reviews, and guides for Windows and Xbox diehards.
The build works like this: first, weaken a low-tier foe and then punch them with your Combination Blow, which both gives you a Combination Blow damage buff stack and makes you invisible thanks to Assassin's Cowl. Then, perform a Gambler's Dodge near enemies while you're invisible to get Combination Blow back (you'll always have your dodge after getting a Combination Blow kill, since each one fully refunds class ability energy). Rinse and repeat from there; you'll soon have three Combination Blow stacks that make your melees hit like a truck, making it very easy to continue this loop indefinitely.
Armor mods aren't important at all here, but Hands-On and Heavy Handed are optimal choices since you'll be getting tons of powered melee kills. The Lethal Current Aspect is also ideal, since the Jolt effect and damaging aftershocks it gives your melee attacks hard-hitting area-of-effect capabilities — perfect for Onslaught. The suggested Fragments improve your overall survivability and the power of your Pulse Grenades, while the use of a shotgun with One-Two Punch gives you another way to buff your melee damage whenever you're up against tanky foes. Note that the ad clear-focused Arc Staff super won't get much value here since you'll already be clearing everything with melees, so take Gathering Storm instead and save it for bosses.
Stasis Hunter Revenant build

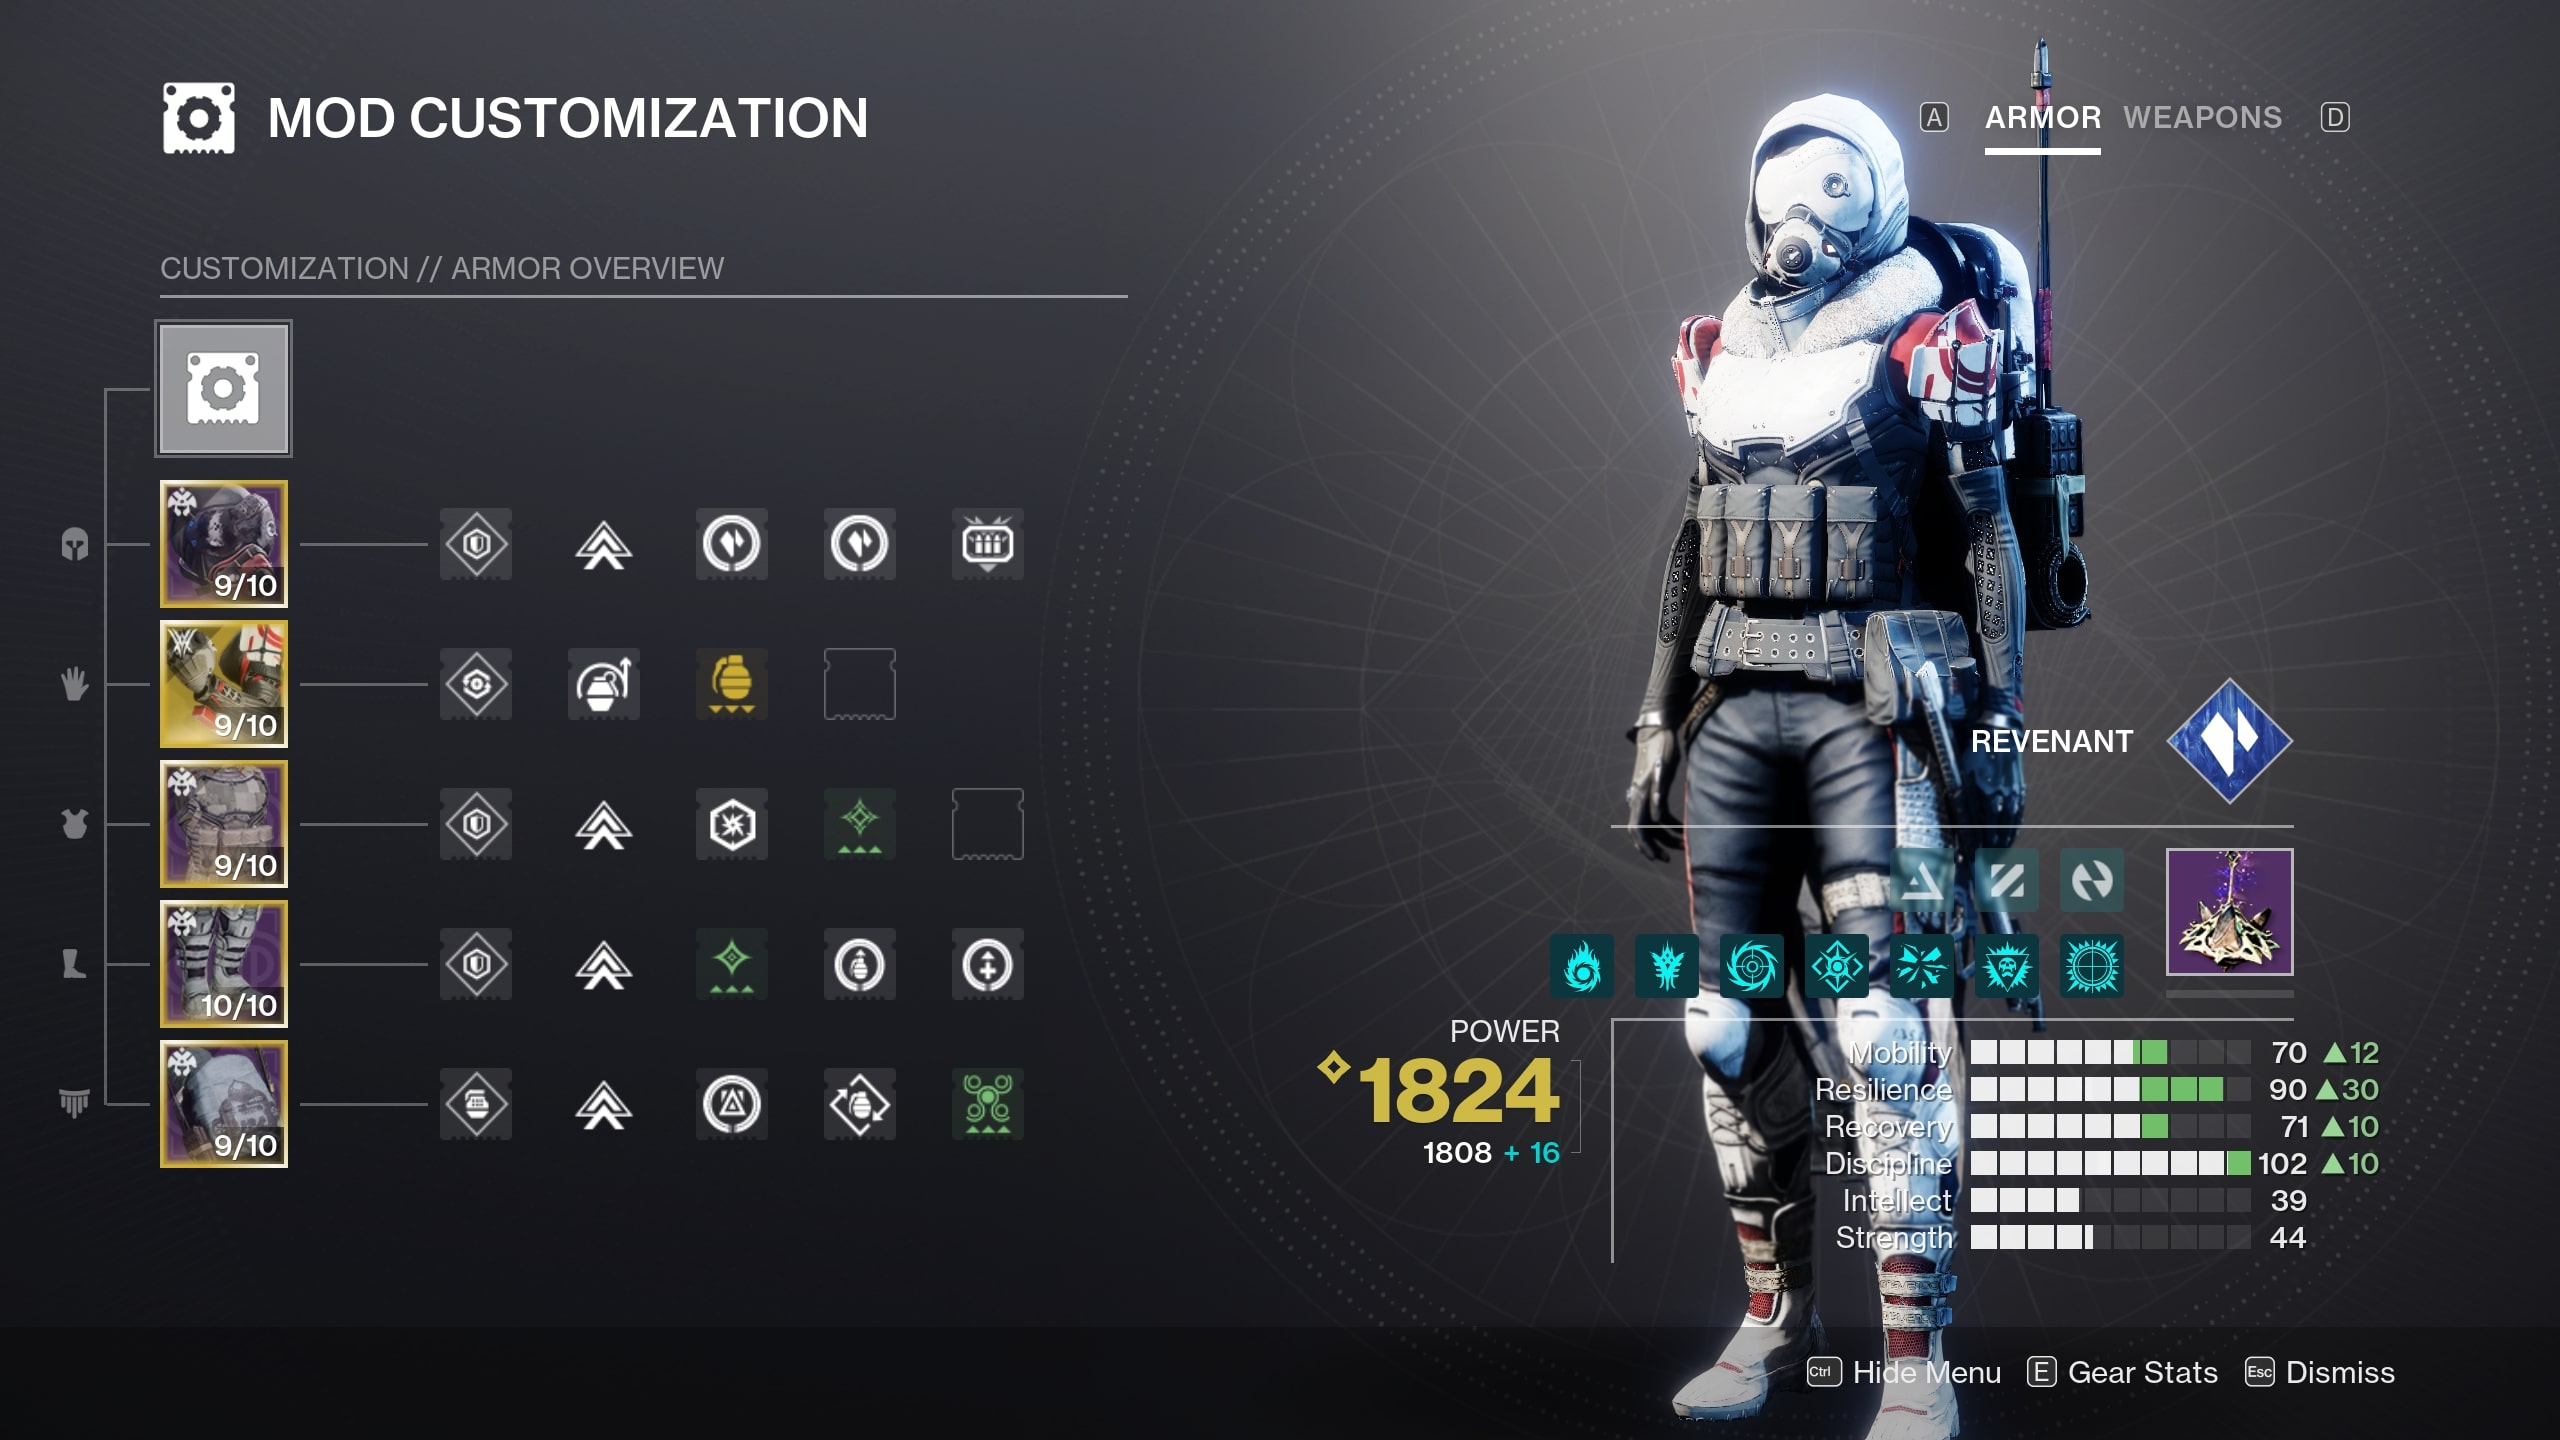
- Abilities: Silence and Squall, Gambler's Dodge, Triple Jump, Withering Blade, Duskfield Grenade
- Aspects: Touch of Winter, Grim Harvest
- Fragments: Whisper of Chains, Whisper of Durance, Whisper of Shards, Whisper of Conduction, Whisper of Rime
- Exotic: Renewal Grasps
- Armor mods: Harmonic/Stasis Siphon, Impact Induction, Grenade Kickstart, Charged Up, Stacks on Stacks, Innervation, Recuperation, Reaper, Bomber, Powerful Attraction
- Important stats: Resilience, Discipline, Mobility
- Weapons: Stasis primary w/ Headstone, Demolitionist weapons, Winterbite (situationally)
Players were unhappy when Bungie nerfed the grenade regeneration of the Renewal Grasps Exotic gauntlets a while back, but ever since the developer reverted that nerf last year, they — and Stasis Hunter, by extension — have become top-tier in difficult PvE content like Legend Onslaught. This build I've made with them is great in all three Onslaught maps, but it's particularly effective on Midtown since it's got tons of tight chokepoints you can take advantage of.
Renewal Grasps give your Duskfield Grenades the unique ability to significantly reduce damage dealt by enemies within their radius while also buffing you and your allies' damage resistance while you're inside it. It also makes that radius larger, and that effect stacks with the one from the Touch of Winter Aspect, which is why we're using it here. We also take Grim Harvest, which generates Stasis shards that restore melee energy for your Withering Blade shurikens; with some of the listed Fragments, these will track to you and give you a small amount of health/overshield, too. The other ones improve your Slow so it crowd controls enemies longer, gives you even more damage resistance while near a Stasis crystal — Touch of Winter creates one at the center of each Duskfield you create — and boosts your grenade recharge rate whenever you shatter one of these crystals.
As you can see, this entire build is focused on using Duskfield Grenades to clog up chokepoints, Slow and Freeze everything, and make your fireteam nigh-unkillable. For that, you'll need to spam as many grenades as you can, which is why I've chosen armor mods that either help you quickly get them back directly or give you a chunk of grenade energy when you use your other abilities. I also recommend using weapons with the Headstone and/or Demolitionist perk to get extra Stasis crystals or grenade energy, respectively. For your heavy weapon, consider the Exotic Winterbite Glaive, which can help Freeze any foes not in your Duskfields, dish out high melee damage to anything that is in them, and create a tanky shield you and your teammates can use for cover.
Destiny 2: Best Warlock builds for Onslaught
Warlocks are Destiny 2's masters of support and crowd control, which is what you'll get with all three of these builds. In an activity like Onslaught, you'll get tons of value no matter which one you're using.
Solar Warlock Dawnblade build
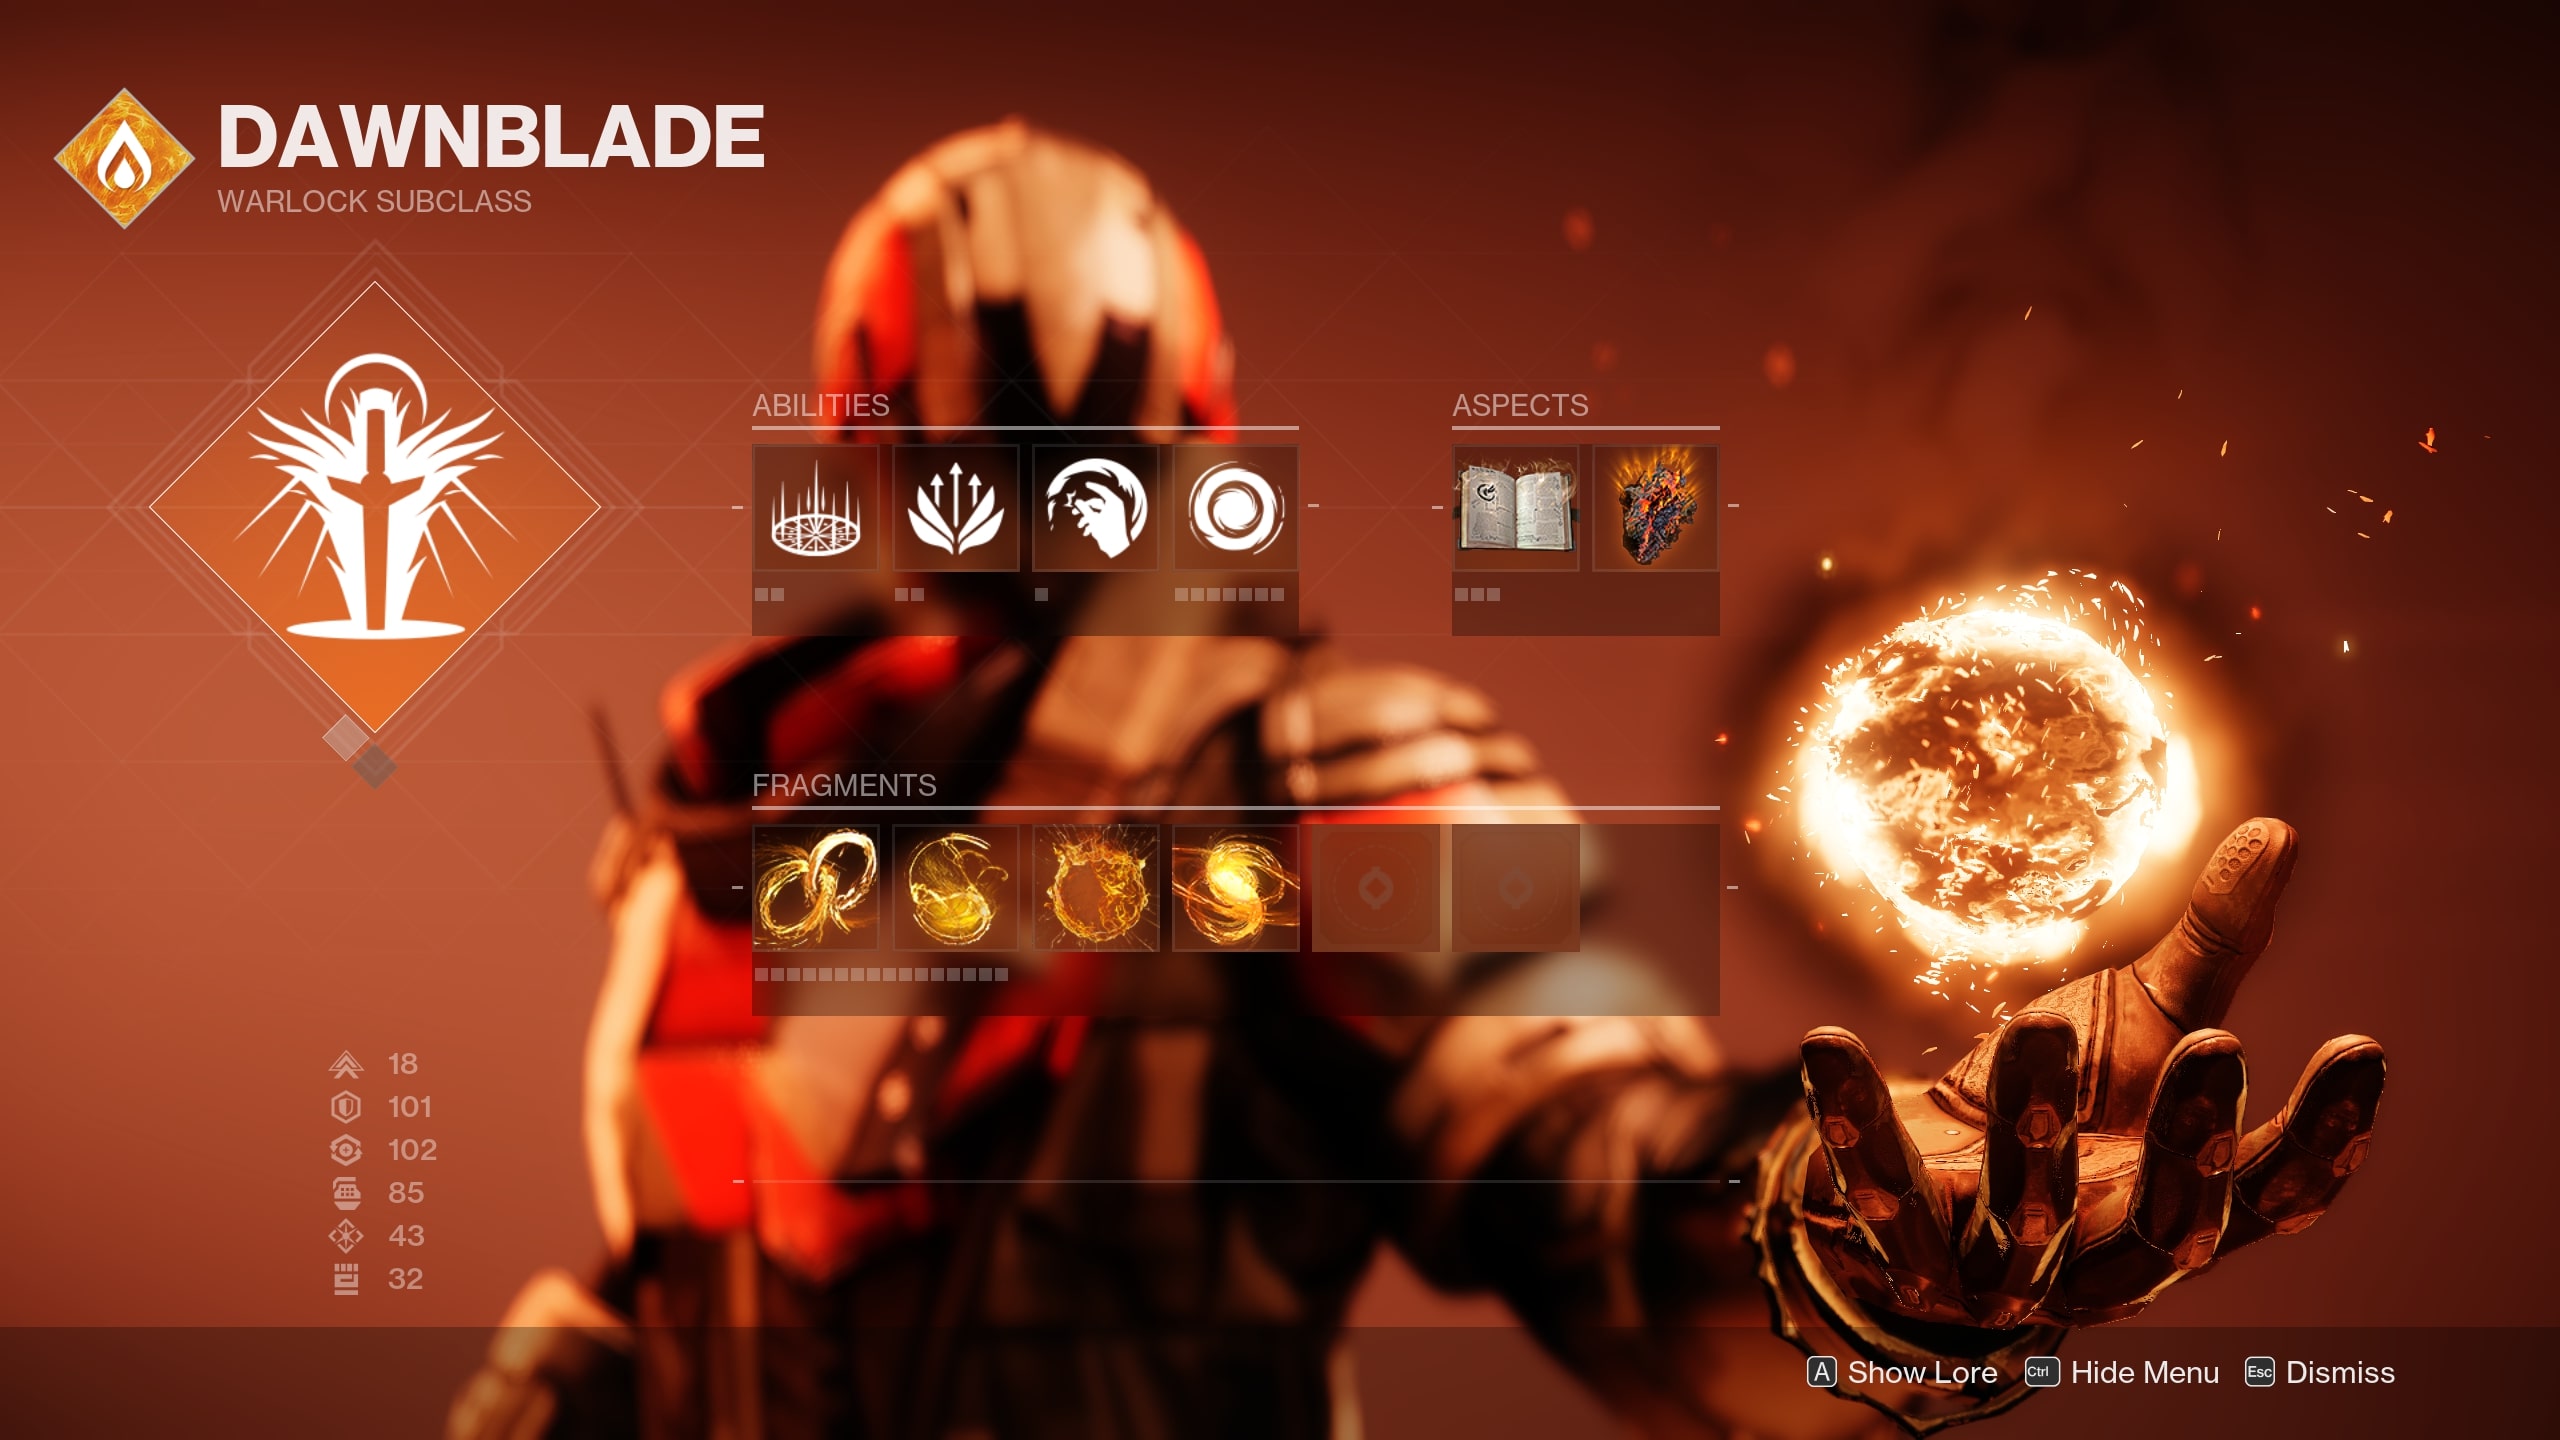
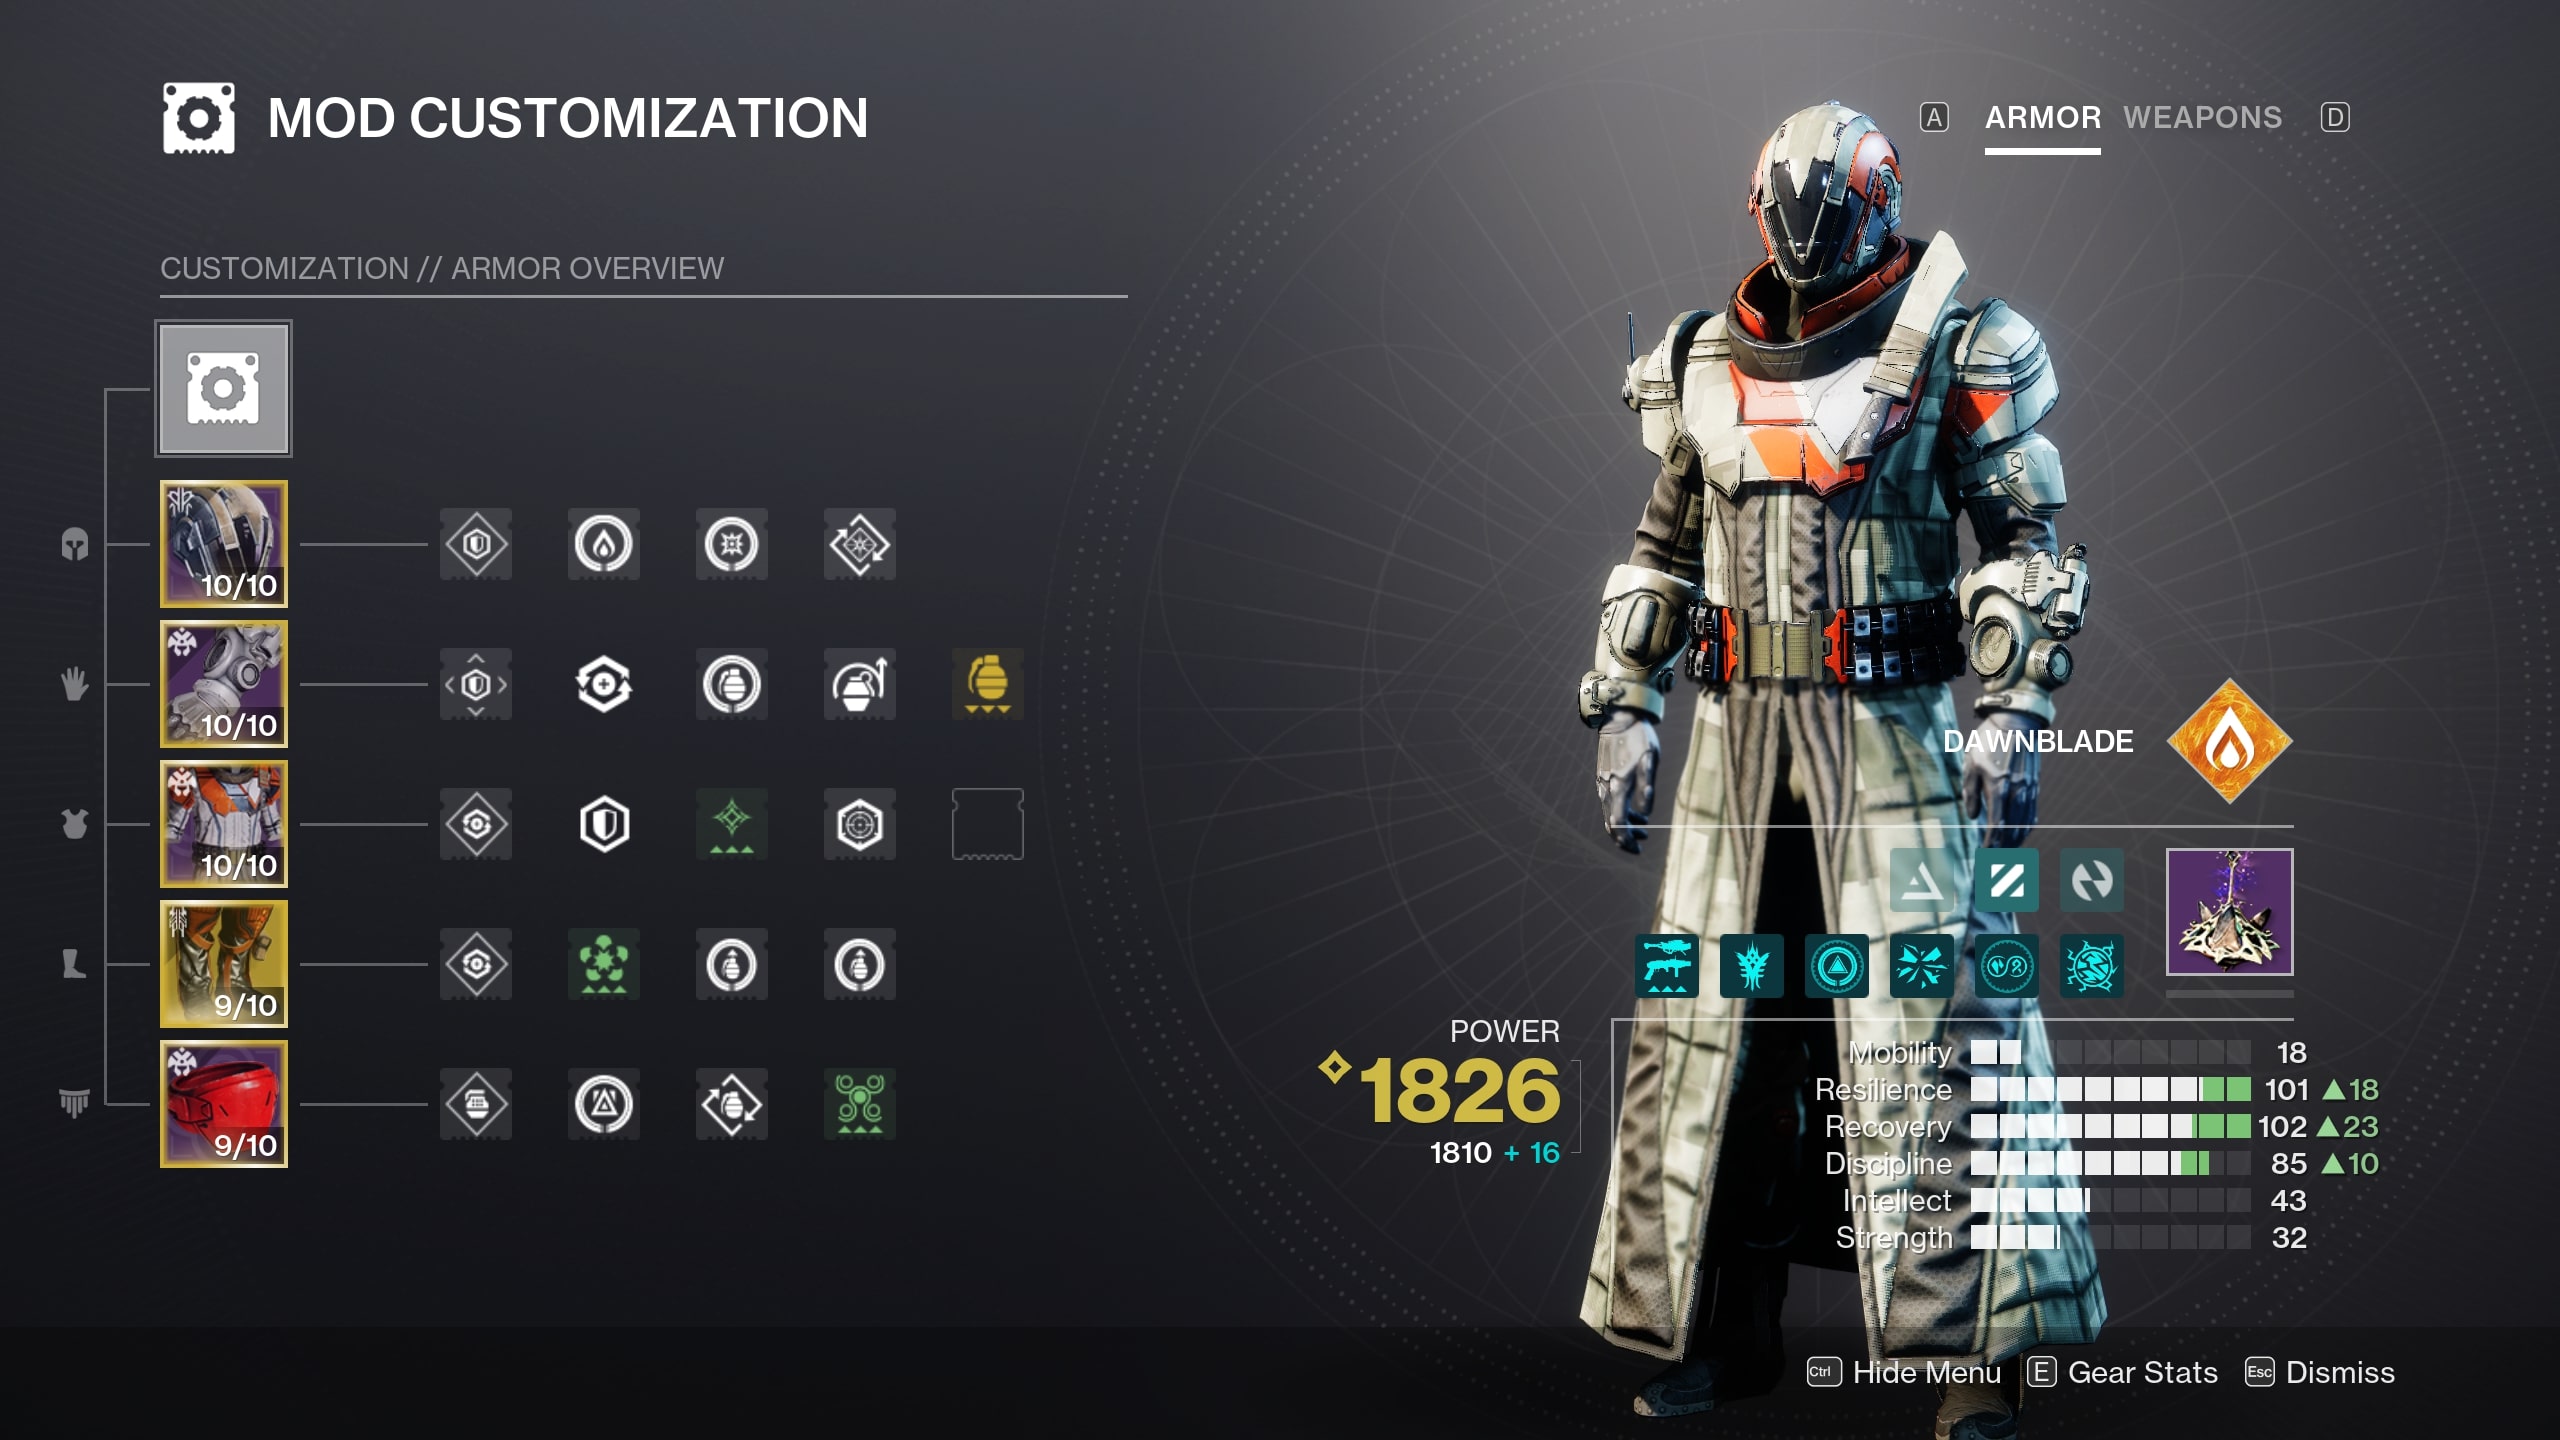
- Abilities: Well of Radiance, Balanced Glide, Incinerator Snap, Solar Grenade
- Aspects: Heat Rises, Touch of Flame
- Fragments: Ember of Torches, Ember of Singeing, Ember of Searing, Ember of Mercy
- Exotic: Boots of the Assembler
- Armor mods: Kinetic Siphon, Dynamo, Firepower, Impact Induction, Grenade Kickstart, Charged Up, Elemental Charge, Innervation, Reaper, Bomber, Powerful Attraction
- Important stats: Resilience, Recovery, Discipline
- Weapons: Lumina, Solar weapons w/ Incandescent (optional)
While using a Phoenix Protocol build that maximizes Well of Radiance uptime is never a bad idea as a Solar Warlock, I prefer using this loadout that takes advantage of the synergy between the Exotic Hand Cannon Lumina and the Exotic armor piece Boots of the Assembler to provide consistent healing and damage buffs to my teammates. Standing in your Healing Rift with Boots of the Assembler will create Noble Seekers that fly to allies and heal them, and these also give your Lumina Noble Rounds, eliminating the need to get kills with it first. You can then hipfire your Lumina at teammates to shoot these Noble Rounds at them, which gives them additional healing as well as a meaty 35% Blessing of the Sky damage buff.
The build is incredibly strong at baseline with these two Exotics, but by using the suggested Fragments, you'll make it even better. The Scorch caused by your Incinerator Snap and Solar Grenade will boost the regen rate of your Healing Rift, and killing enemies affected by it will improve your melee regen and create Firesprite pickups that both heal you and give you grenade energy. Notably, Lumina's Blessing of the Sky buff also counts as Radiant, which procs Ember of Benevolence and temporarily increases the regeneration of all of your abilities.
The main downside here is that you won't have Well of Radiance up as much as you will with a traditional Solar Warlock support setup, but honestly, the Super charges up pretty fast even without Phoenix Protocol. Also, this build gives your fireteam more overall flexibility, as you can provide strong healing and damage buffs from afar without having to have everyone group up in a Well all the time.
Stasis Warlock Shadebinder build
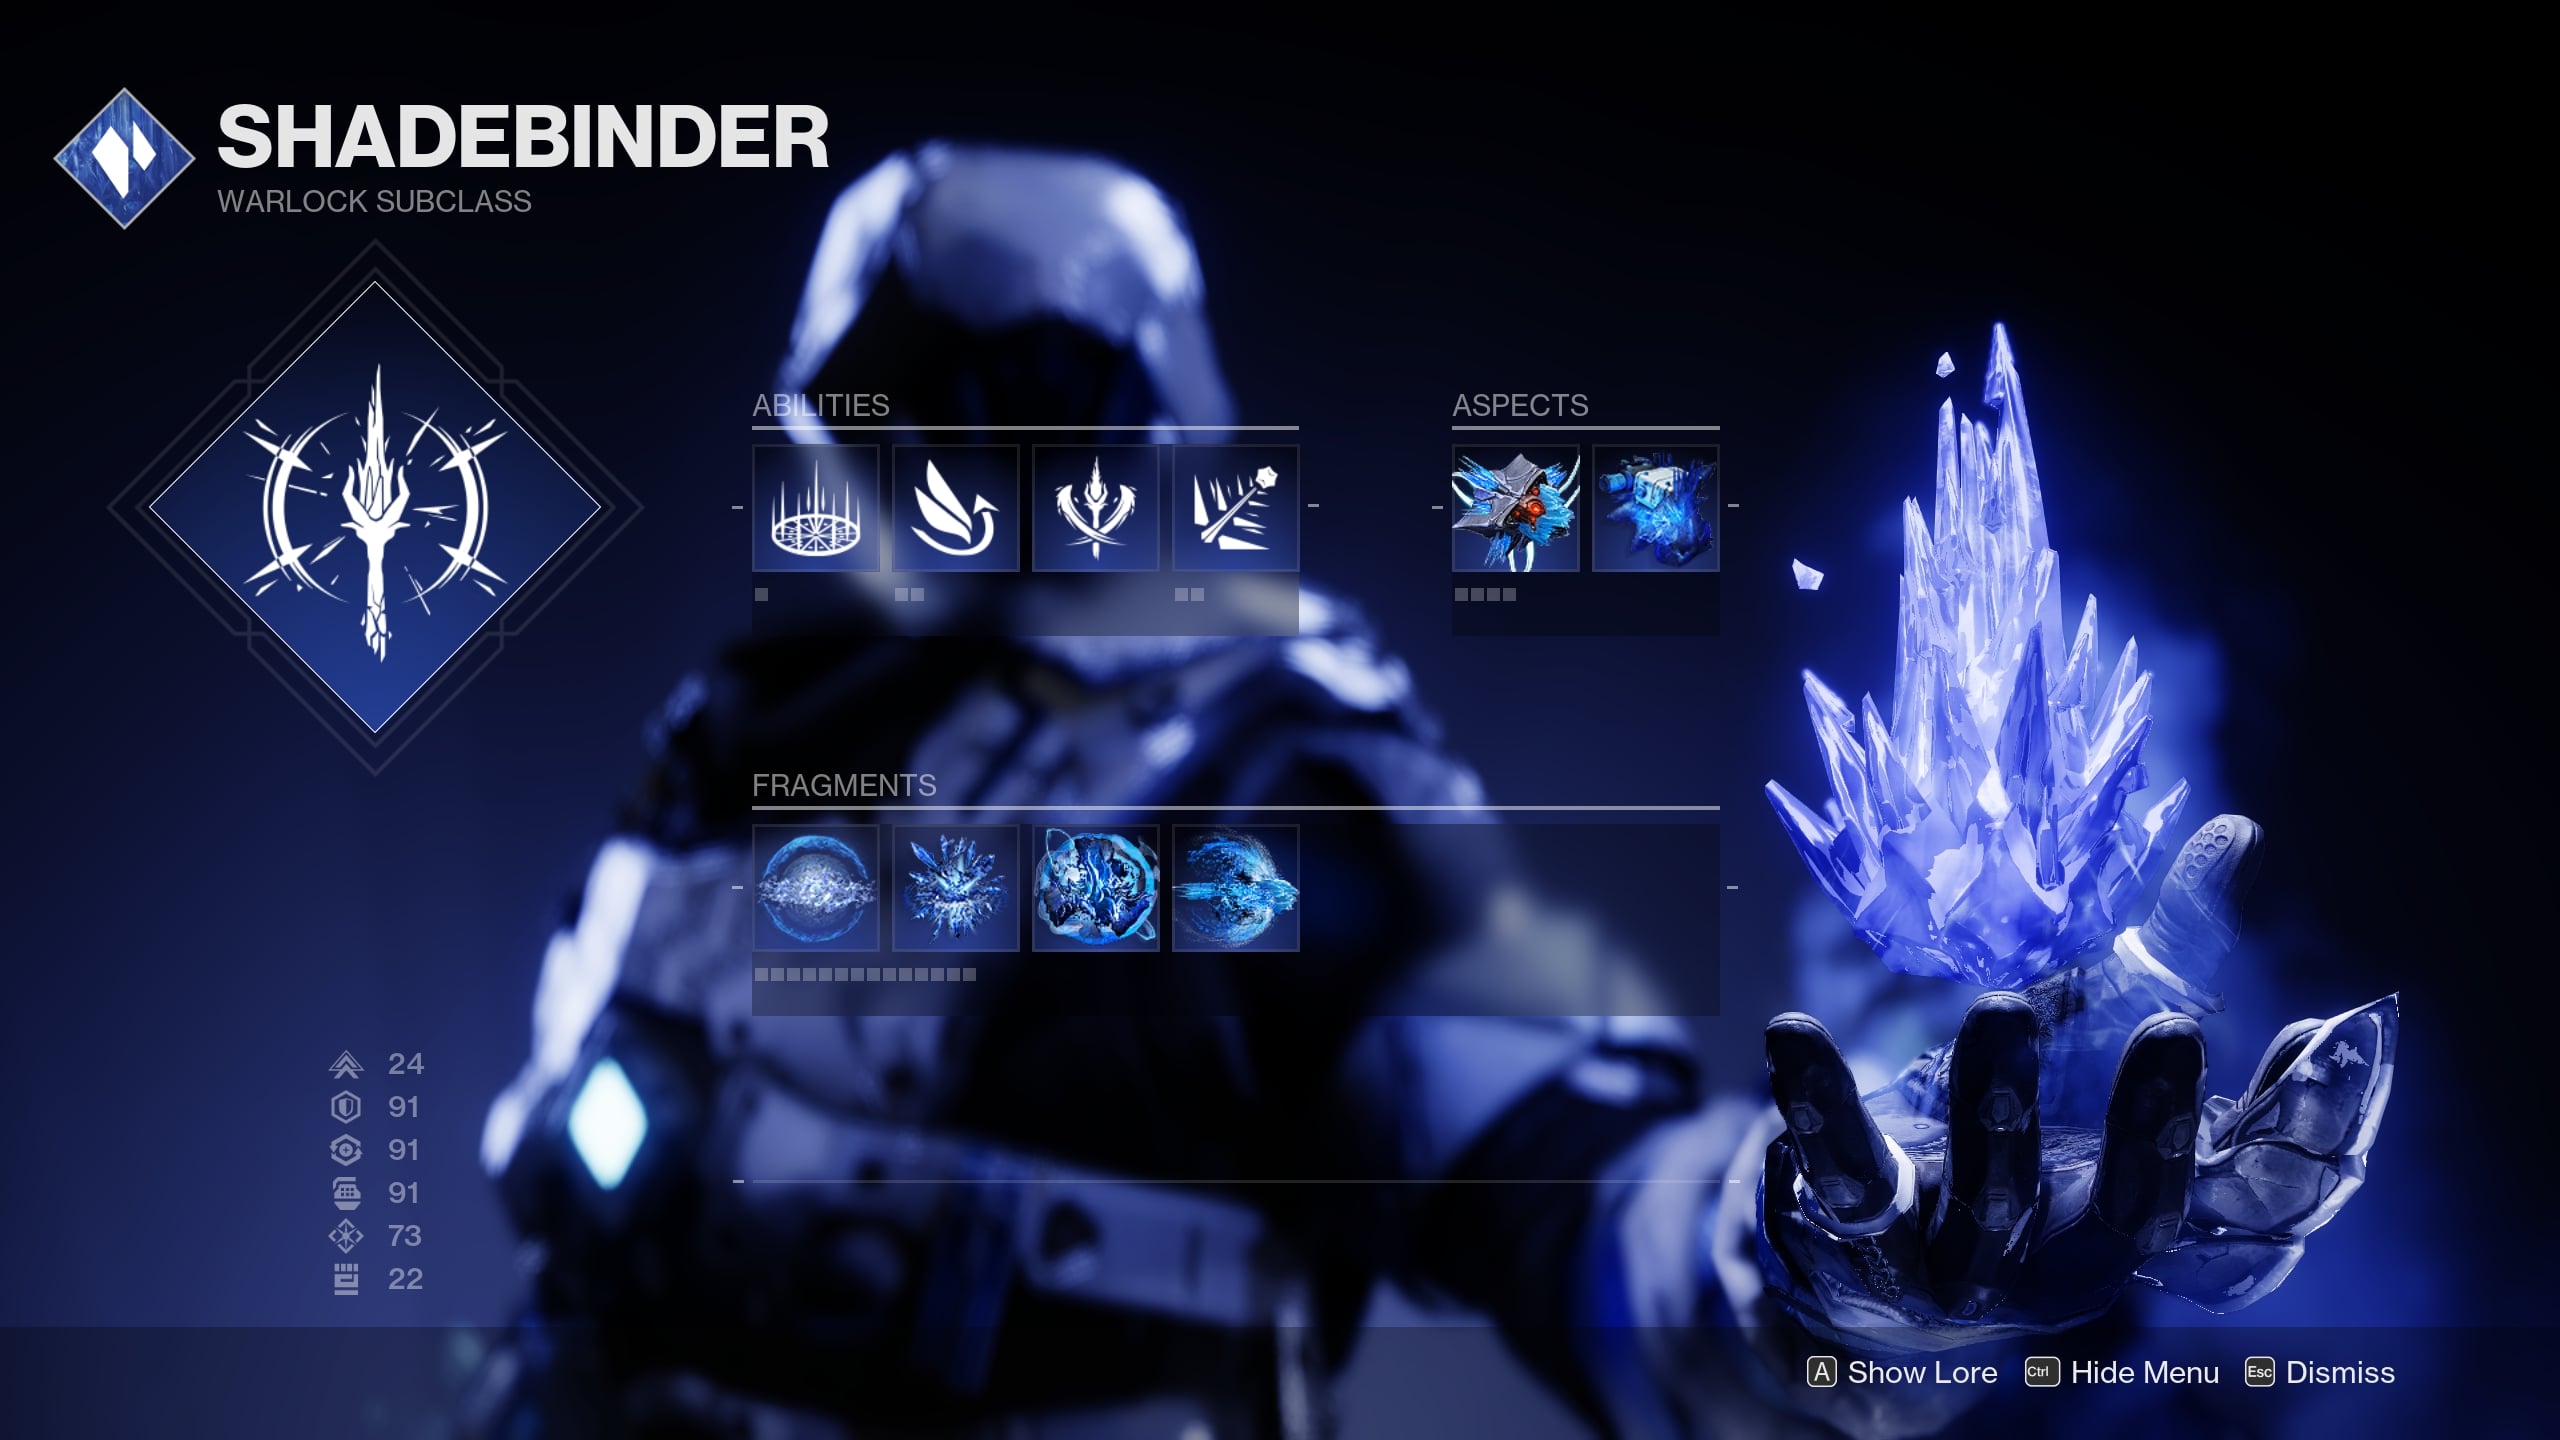
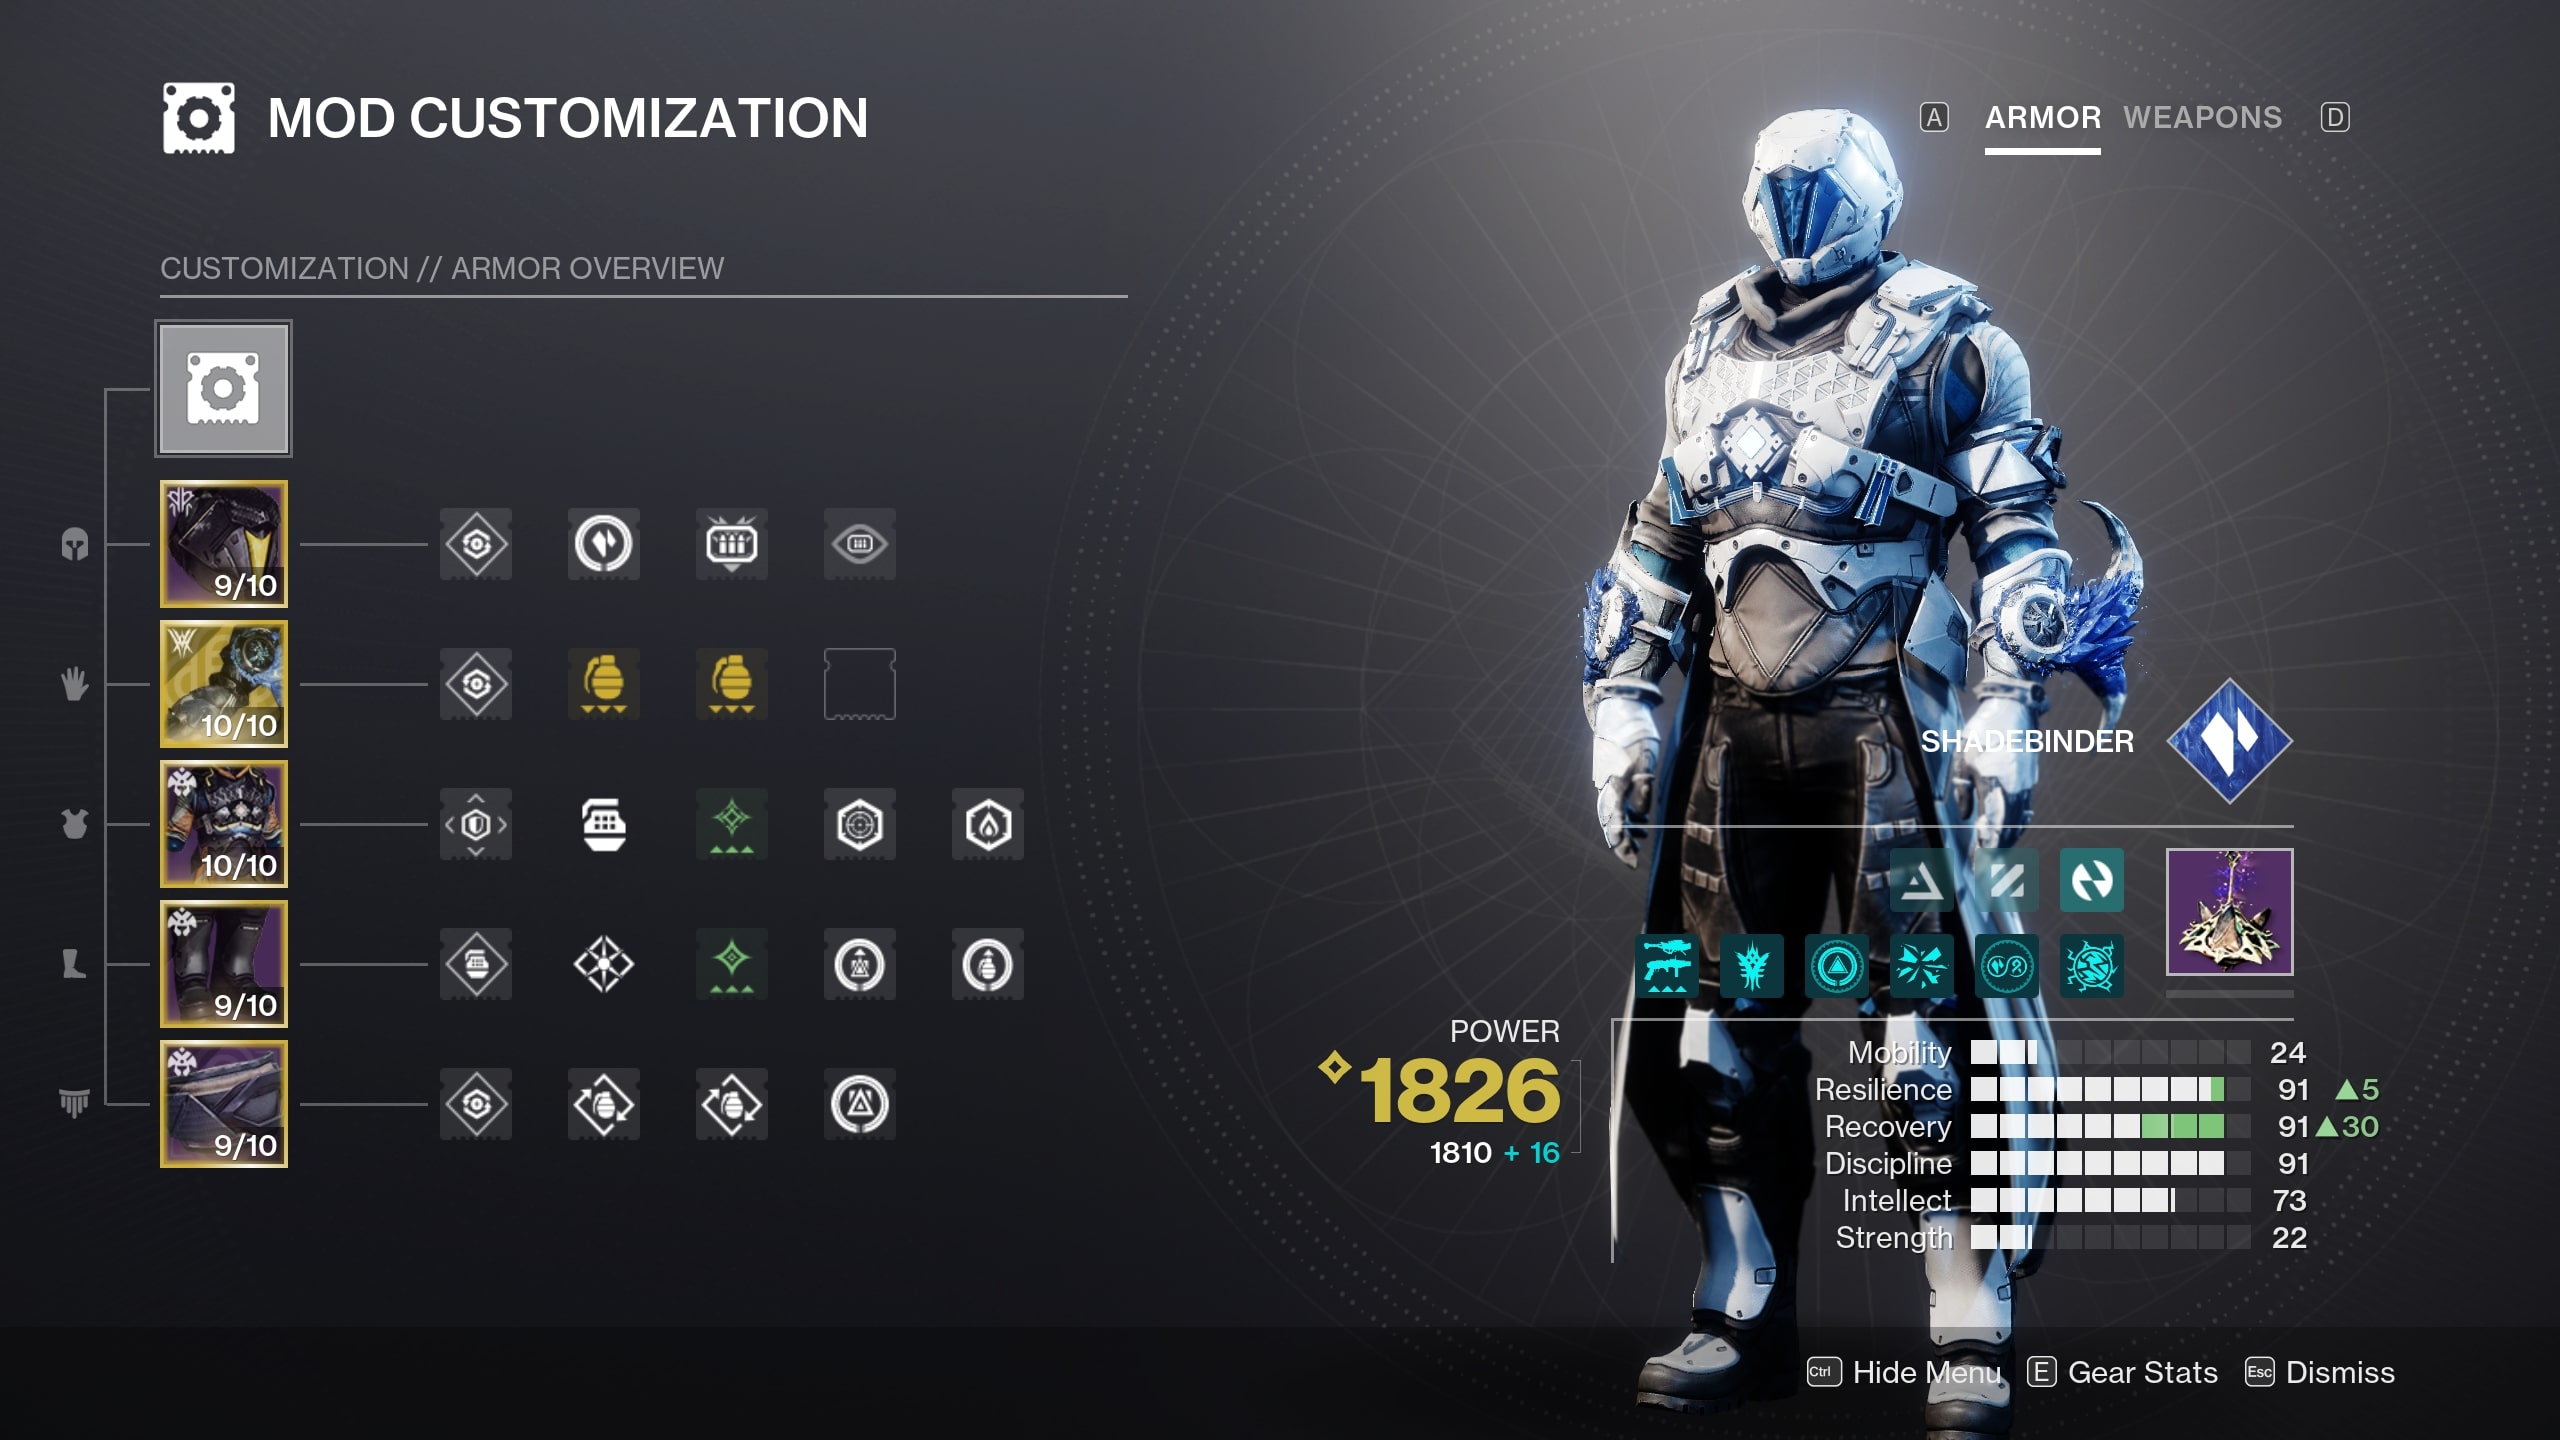
- Abilities: Winter's Wrath, Healing Rift, Balanced Glide, Penumbral Blast, Coldsnap Grenade
- Aspects: Glacial Harvest, Bleak Watcher
- Fragments: Whisper of Torment, Whisper of Shards, Whisper of Rime, Whisper of Conduction
- Exotic: Osmiomancy Gloves
- Armor mods: Harmonic/Stasis Siphon, Grenade Kickstart x2, Charged Up, Stacks on Stacks, Innervation, Bomber x2, Reaper
- Important stats: Resilience, Discipline, Recovery
- Weapons: Stasis weapons w/ Headstone
If you're looking to put together the ultimate crowd control setup for Onslaught, look no further than this build that uses the Osmiomancy Gloves Exotic and Stasis Warlock's Bleak Watcher turrets. The former gives you two Coldsnap Grenades you can hold to transform into the latter, which can then be thrown to deploy. These will then automatically shoot bolts of Stasis energy at nearby enemies that Slow and Freeze them, making them easy for you and your allies to pick off.
With high Discipline from your armor, as well as the Fragments and armor mods I've suggested along with a Stasis weapon with Headstone you can use to make and then shatter Stasis crystals (a Disparity Pulse Rifle with Rapid Hit/Headstone is my personal favorite), you should be able to easily get your grenades back and keep multiple Bleak Watcher turrets on the field at all times. Note that while enemies won't target them, their attacks can destroy them, so try to throw them on an elevated position where they'll be out of harm's way.
While the Bleak Watcher Aspect and the Whisper of Torment and Shards Fragments are core parts of this build, there's room for flexibility with the second Aspect and the other two Fragments. I went with Glacial Harvest, Whisper of Rime, and Whisper of Conduction to get lots of bonus healing/shielding from Stasis shards, but Iceflare Bolts and something like Whisper of Durance to extend the duration of each turret you make will work great, too. Think about what you'd prefer and make adjustments accordingly.
Arc Warlock Stormcaller build


- Abilities: Chaos Reach, Healing Rift, Balanced Glide, Ball Lightning, Pulse Grenade
- Aspects: Electrostatic Mind, Arc Soul
- Fragments:
- Exotic: Vesper of Radius
- Armor mods: Spark of Shock, Spark of Ions, Spark of Discharge, Spark of Resistance
- Important stats: Ashes to Assets, Dynamo, Firepower, Bolstering Detonation, Charged Up, Stacks on Stacks, Innervation x2, Bomber, Powerful Attraction, Utility Kickstart
- Weapons: Arc weapon w/ Voltshot
Compared to the previous two builds, this one is more aggressive, and is a bit riskier to play as a result. However, it's also capable of much higher damage, especially around chokepoints. At its core is Vesper of Radius, an Exotic chest piece that makes your rifts release powerful Arc shockwaves every few seconds; while using the Arc Stormcaller subclass, these shockwaves also Blind, which is an effect that disorients enemies and prevents them from shooting you.
This Blind debuff, along with the Spark of Resistance Fragment and the healing from your Healing Rifts themselves, will make survival in close-to-medium range much easier — and since Vesper of Radius also dramatically boosts your class ability regen while you're surrounded by enemies, you'll be able to spam plenty of rifts to Blind and shock incoming waves. The rest of your Fragments and your Electrostatic Mind Aspect are geared towards causing extra grenade damage with Jolt and getting Ionic Traces to boost the regen of all your abilities, while Arc Soul augments your firepower with an auto-turret that sits on your shoulder and shoots what you're fighting (allies can get one by running through your Healing Rifts, too).
The armor mods I recommended will give you maximum rift uptime, while also helping to collect Orbs of Power easily and get grenade energy back. For weapons, use some good Arc ones to take advantage of Spark of Discharge, especially ones that have Voltshot since that perk causes Jolt and synergizes with both Electrostatic Mind and Spark of Ions.
Destiny 2: Best Titan builds for Onslaught
Titans excel at direct frontline fighting, and with these three builds, you'll provide incredible value to your team by either holding the line with defensive Strand crowd control, dishing out huge Solar boss damage, or blowing through enemy lines with an explosive Void setup.
Strand Titan Berserker build
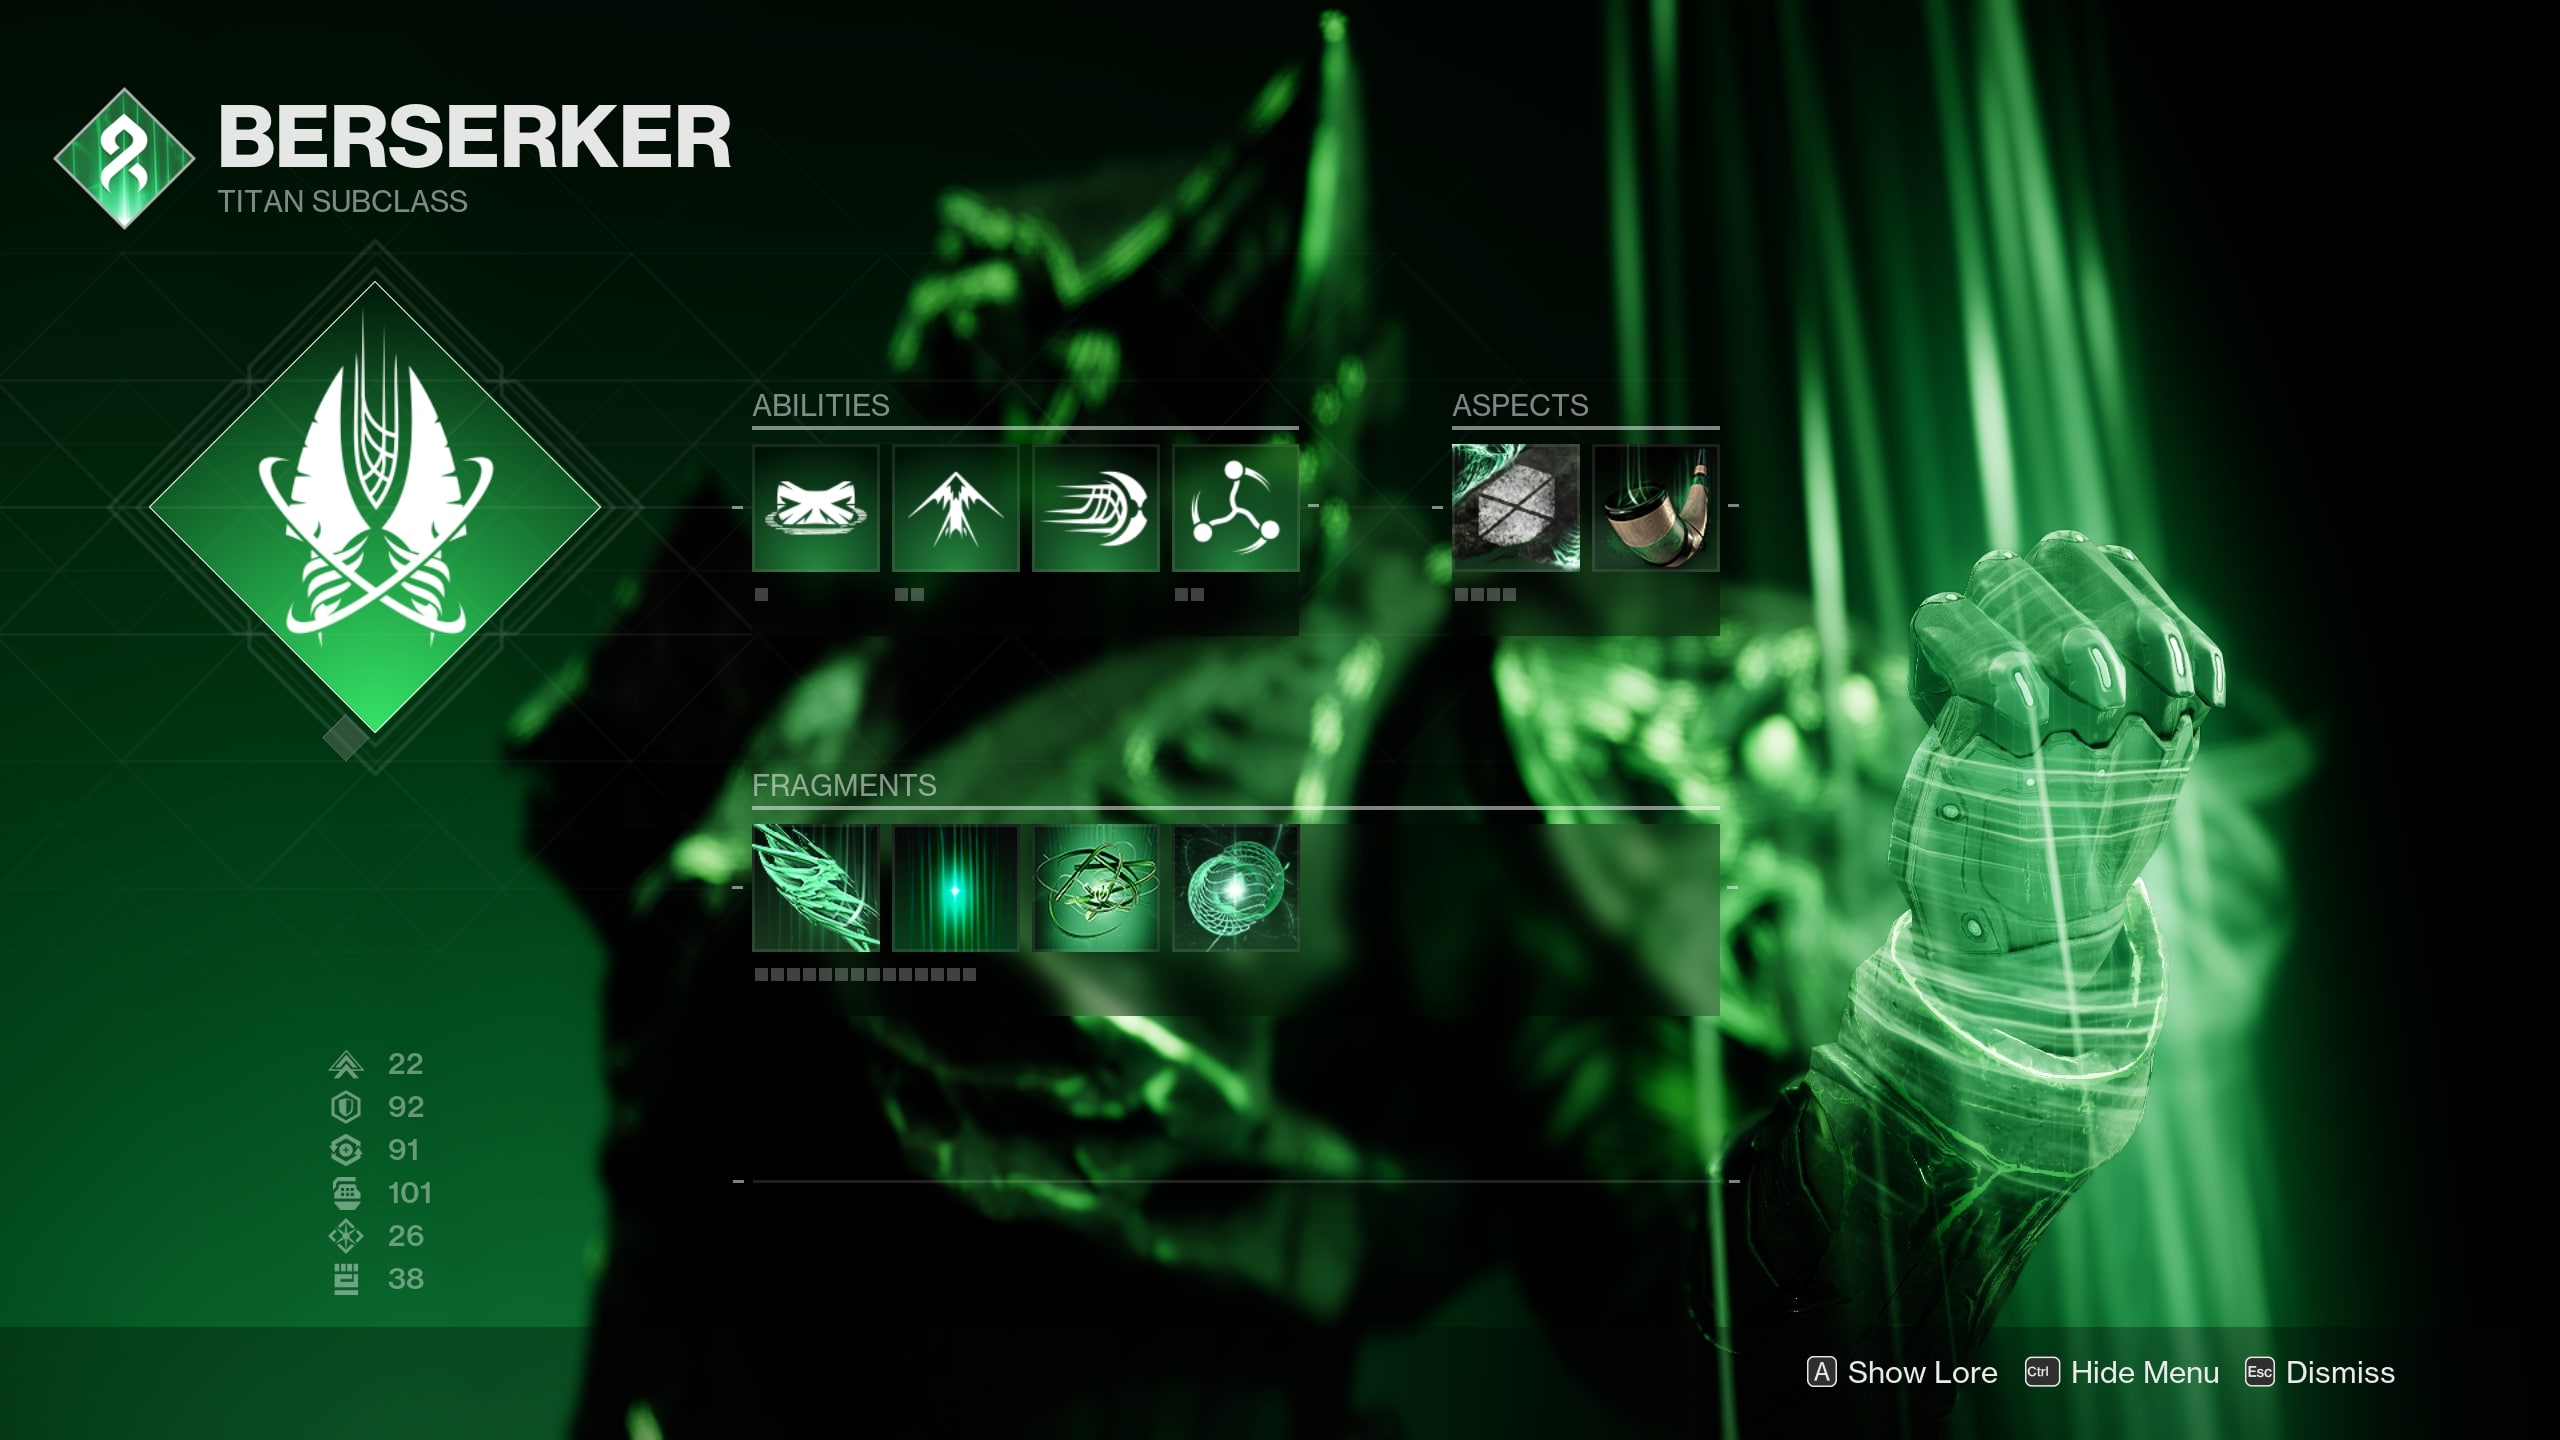
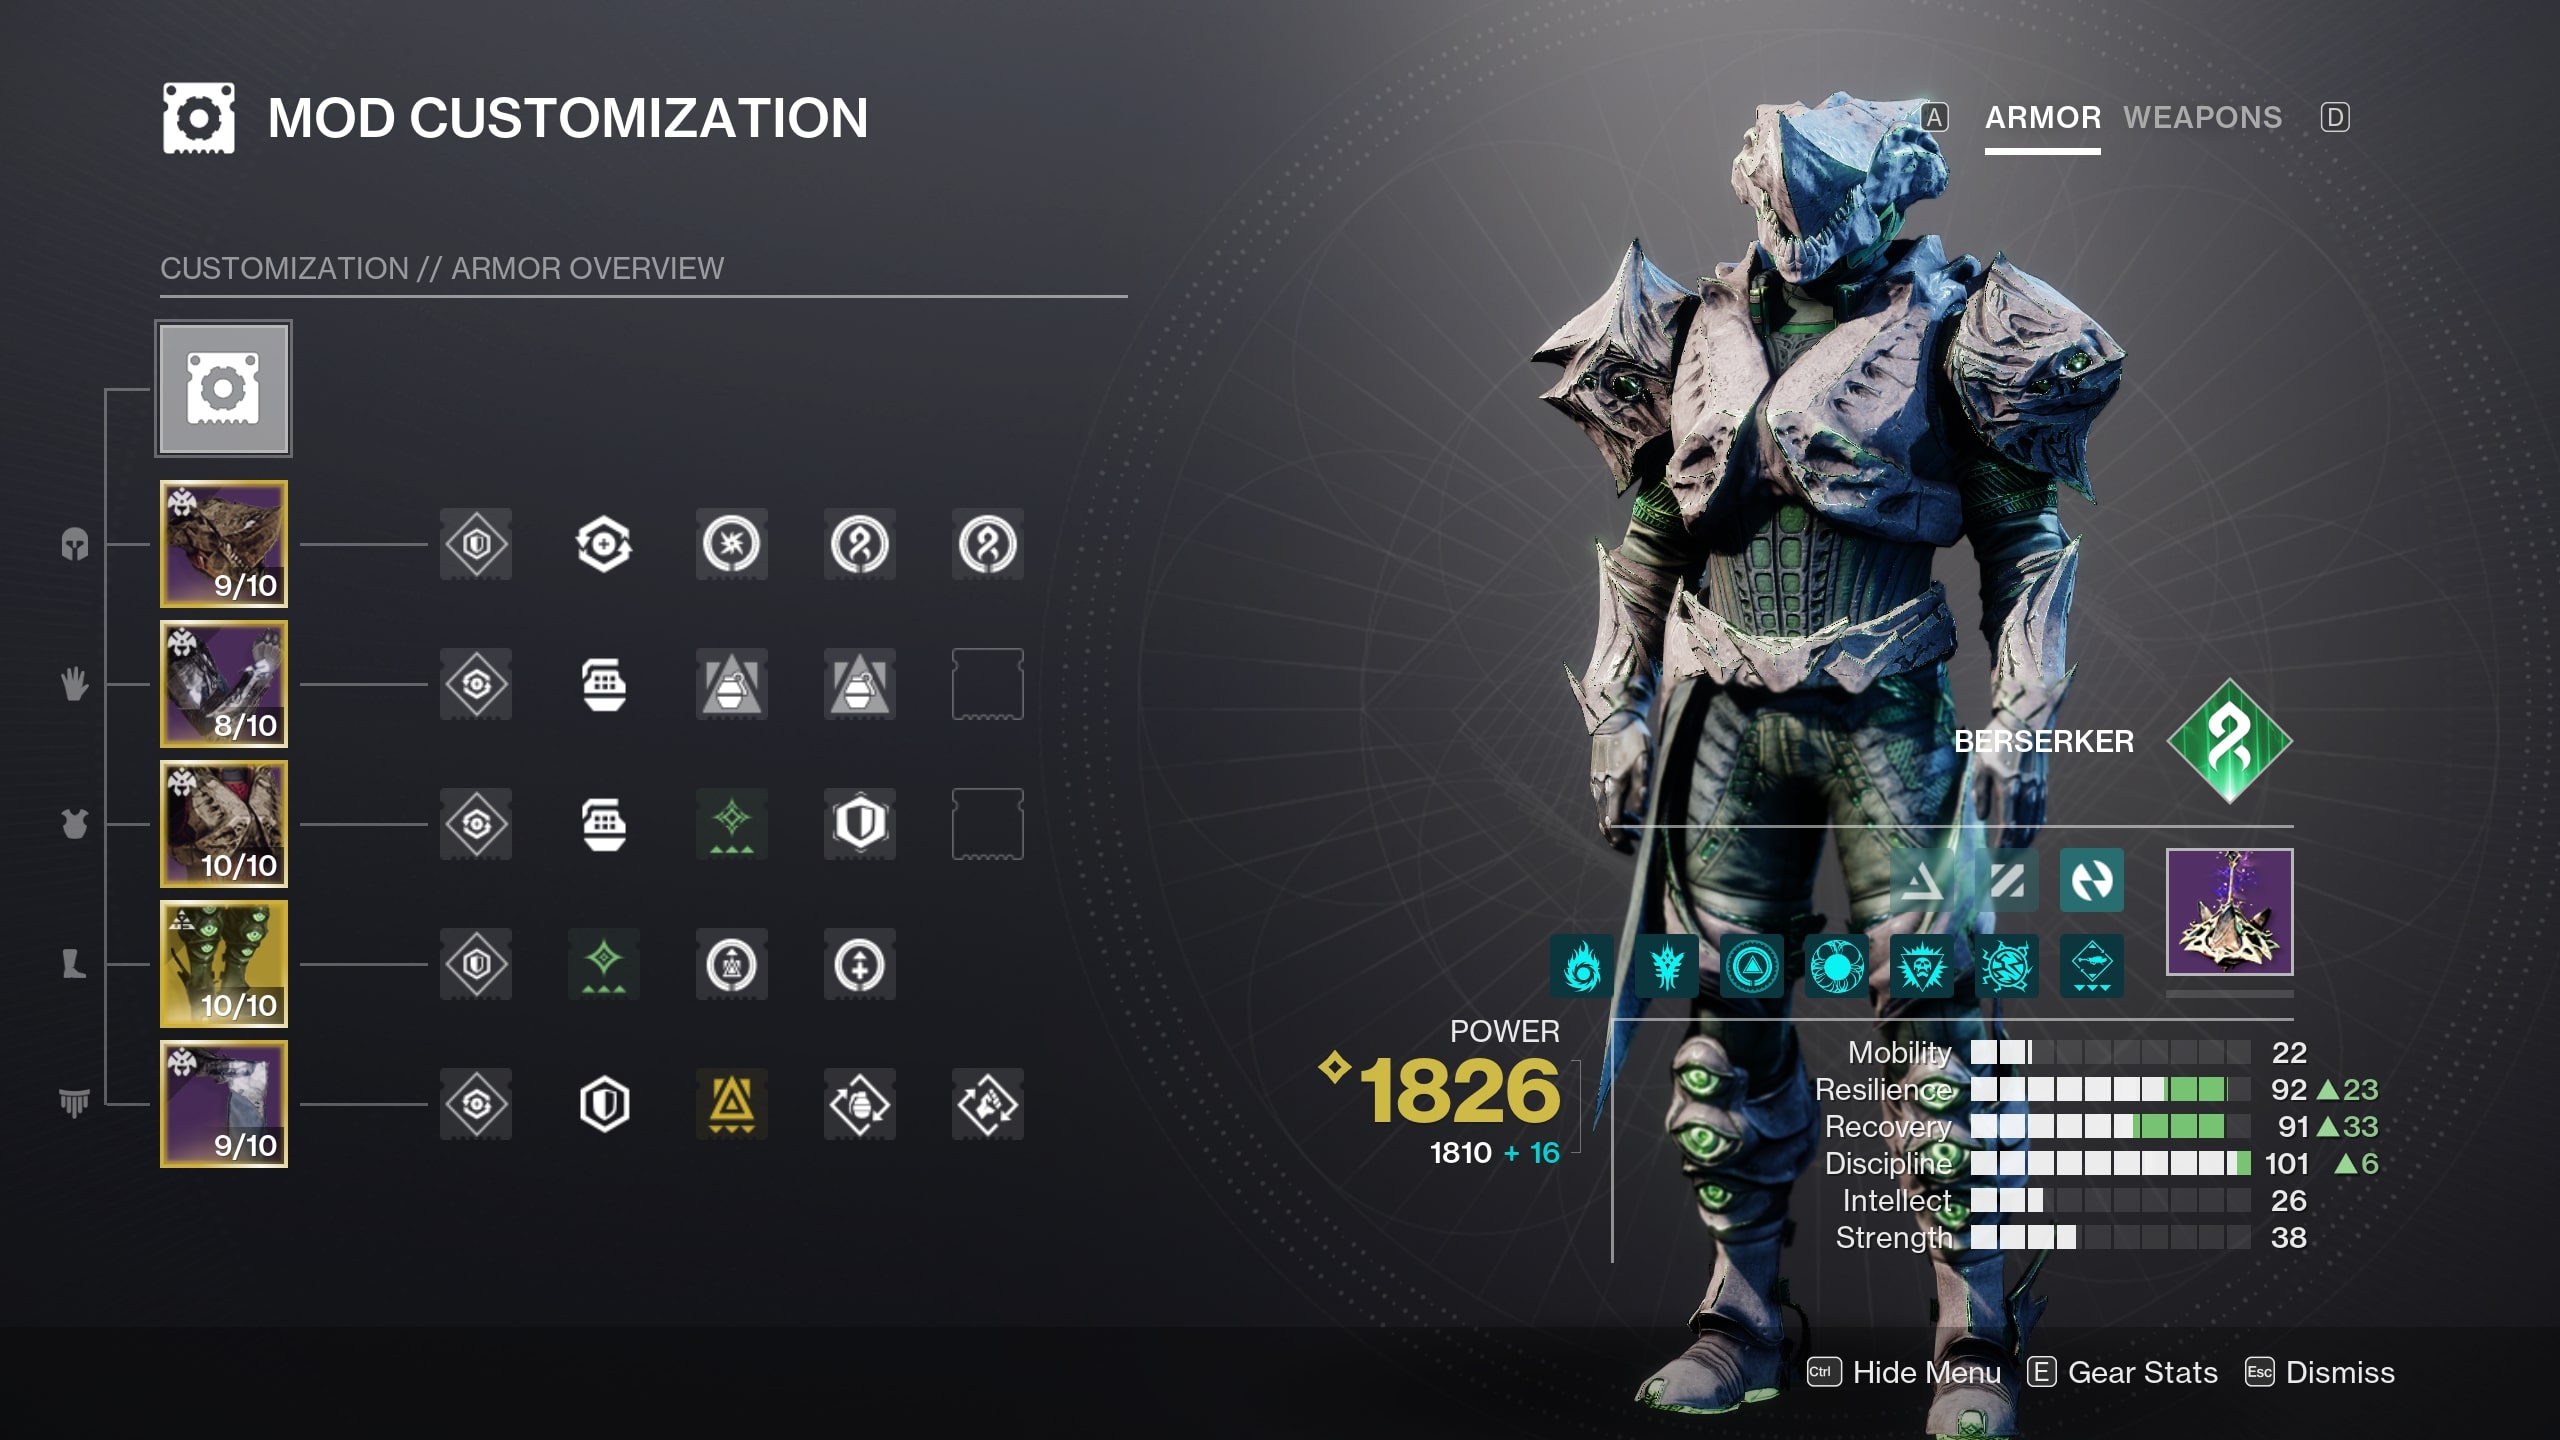
- Abilities: Bladefury, Rally Barricade, Catapult Lift, Frenzied Blade, Shackle Grenade
- Aspects: Drengr's Lash, Banner of War OR Into the Fray
- Fragments: Thread of Mind, Thread of Wisdom, Thread of Continuity, Thread of Warding
- Exotic: Abeyant Leap
- Armor mods: Weapon-matching Siphon mod, Bolstering Detonation x2, Charged Up, Stacks on Stacks, Insulation, Recuperation, Bomber, Utility Kickstart
- Important stats: Resilience, Discipline, Recovery
- Weapons: Quicksilver Storm (optional)
Ever since Destiny 2: Lightfall released last year and players got access to Strand and the Abeyant Leap Exotic leg armor, Strand Titan has stood tall as one of the best subclasses to play when you need to hold the line against legions of incoming foes. Essentially, it supercharges the Drengr's Lash Aspect so that casting your barricade sends out three projectiles that Suspend enemies instead of one, and also gives you Woven Mail each time you Suspend something. Since Suspend is so powerful — you can keep entire crowds stuck in mid-air for several seconds, unable to fight back as you pick them off — Abeyant Leap is undeniably a meta pick, and it's absolutely perfect for something like Onslaught.
Your Shackle Grenade allows you to Suspend whatever your barricades don't, though by using Rally Barricade (it has a shorter cooldown than Towering Barricade), Thread of Mind, a high Resilience stat, and Utility Kickstart, you'll almost always have a new barricade ready to go anyway. The rest of your Fragments help you make Orbs of Power, give you another source of Woven Mail damage resistance, and extend the duration of your Suspend effects.
For your second Aspect, both Banner of War and Into the Fray are excellent choices. The former gives you and allies near you periodical healing and stacking melee and Sword damage buffs when you get melee, finisher, or Sword kills, while Into the Fray lets you give Woven Mail to teammates by throwing or detonating a Tangle near them. Go with Banner of War if you want stronger offense, or Into the Fray if you'd prefer to be more supportive and defensive.
Solar Titan Sunbreaker build
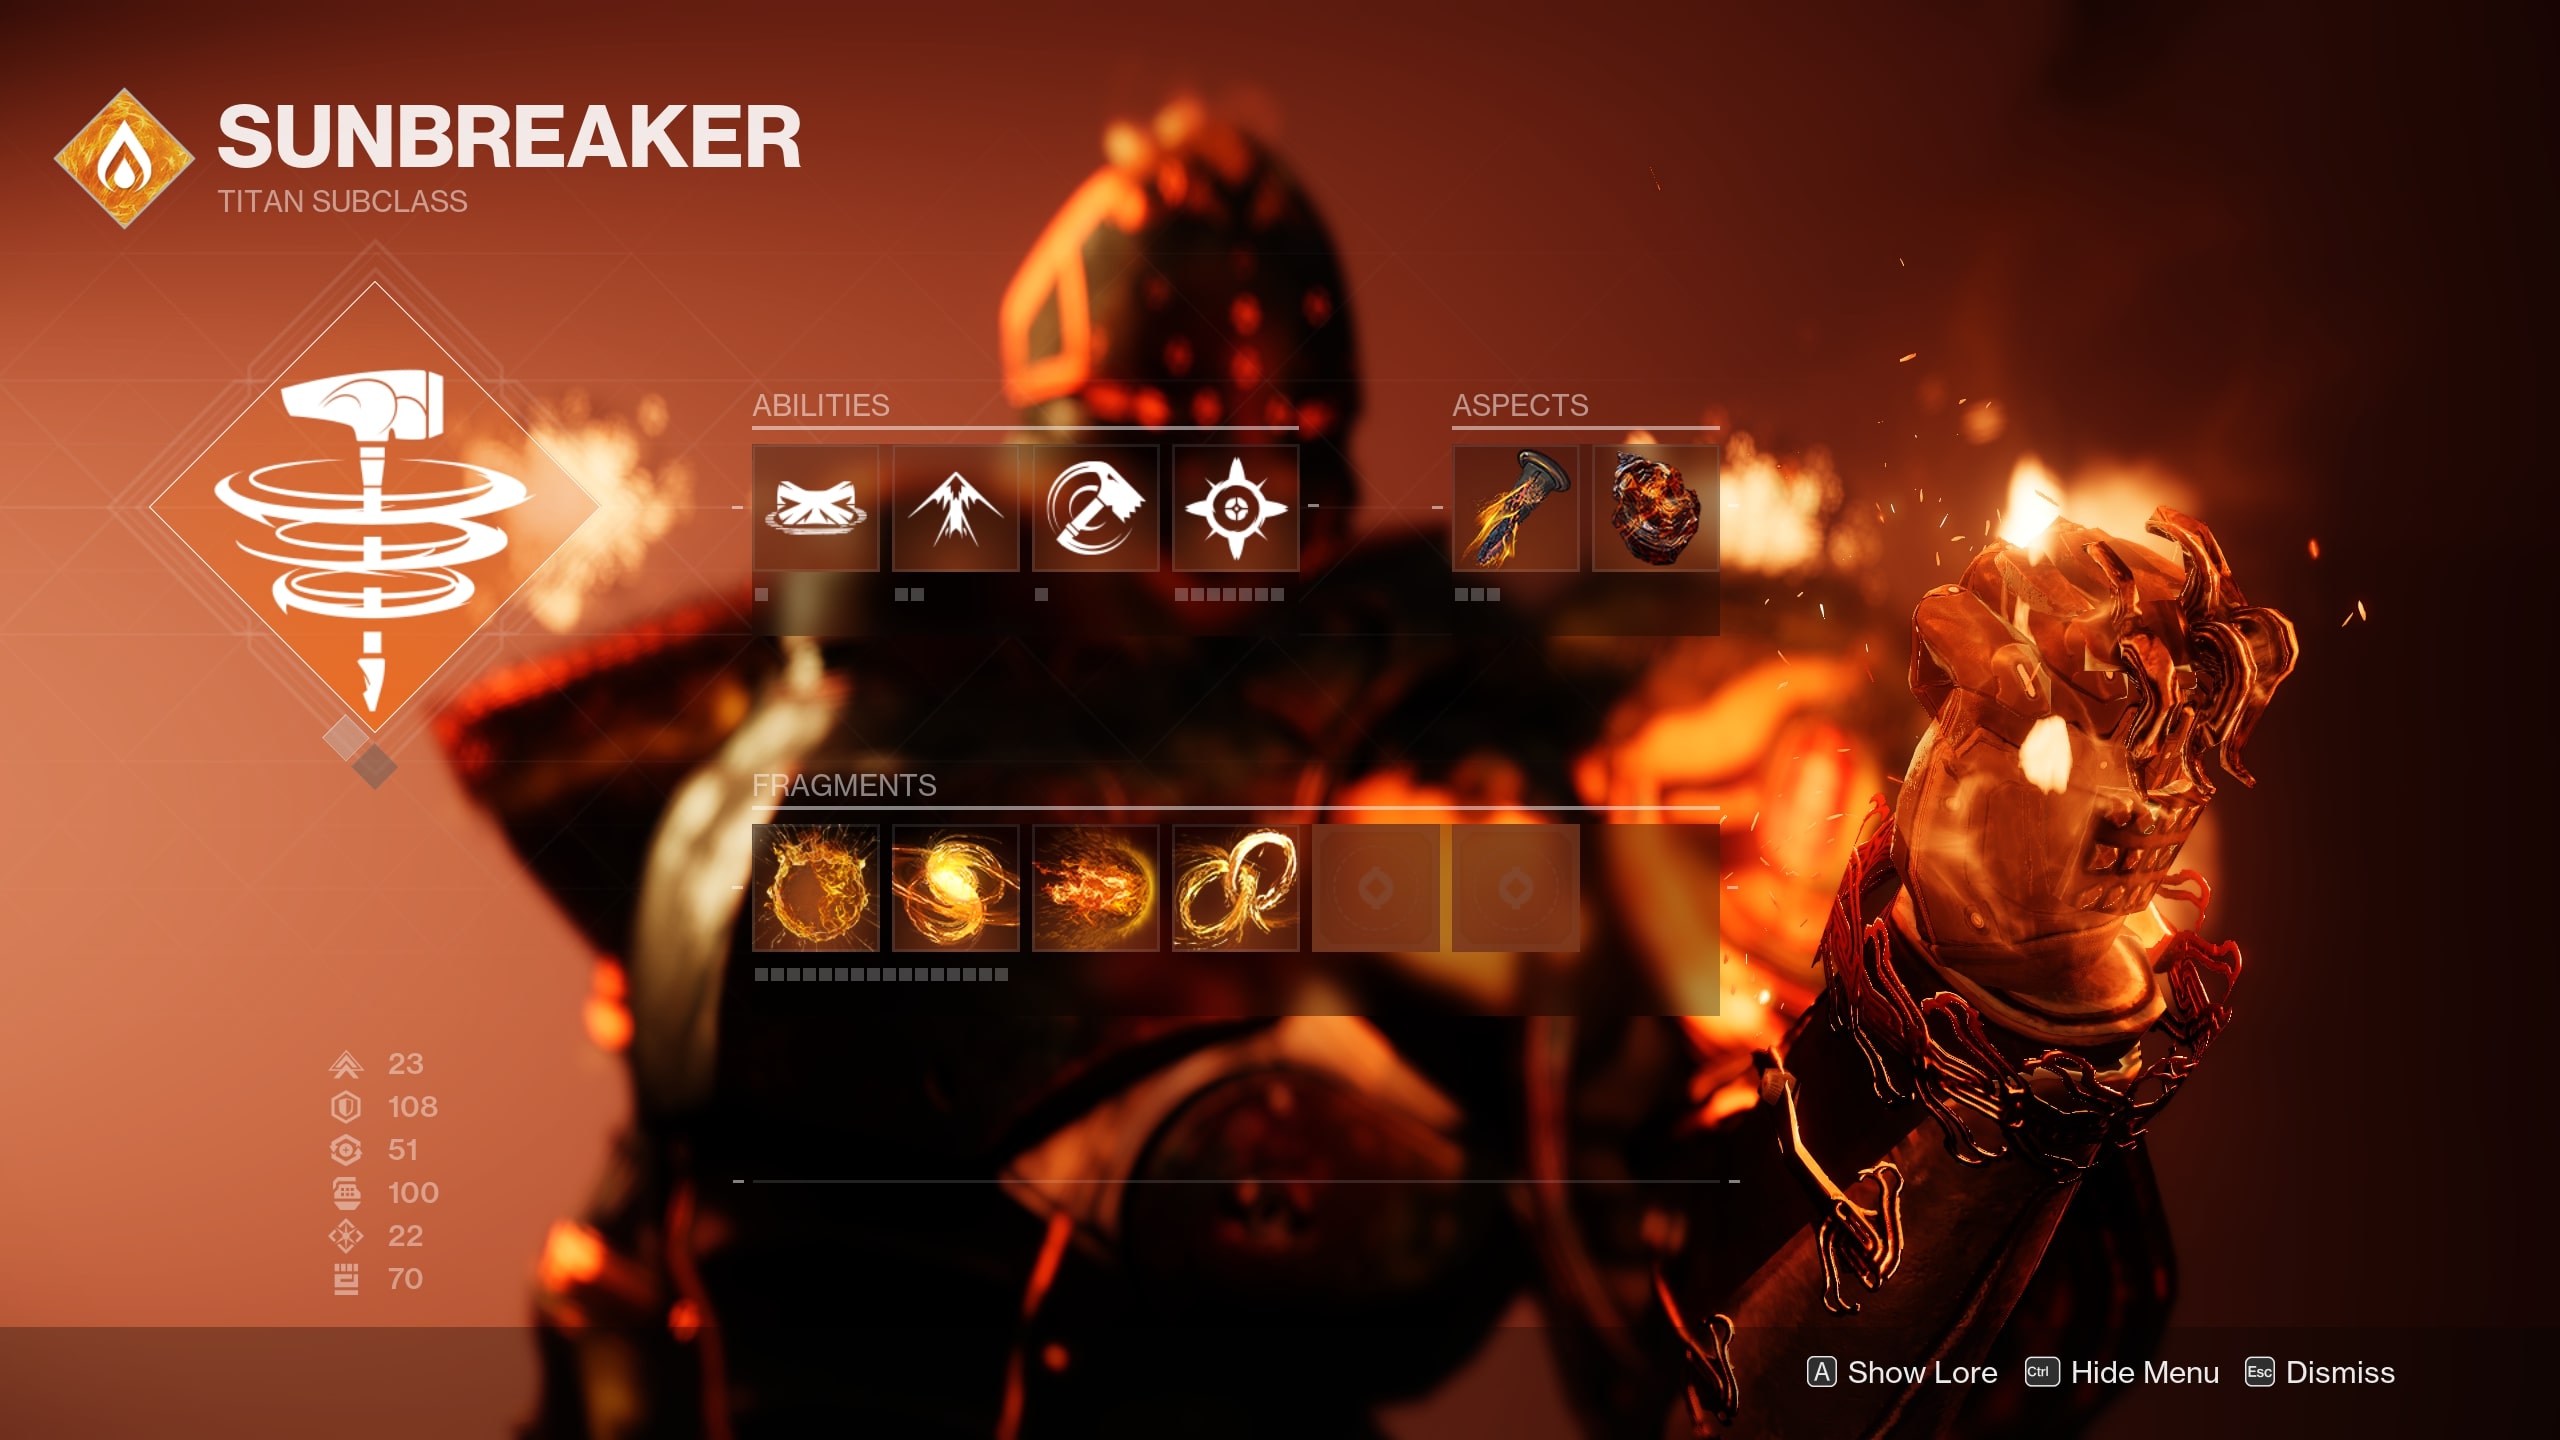
- Abilities: Burning Maul, Rally Barricade, Catapult Lift, Throwing Hammer, Healing Grenade
- Aspects: Consecration, Roaring Flames
- Fragments: Ember of Searing, Ember of Mercy, Ember of Torches, Ember of Benevolence
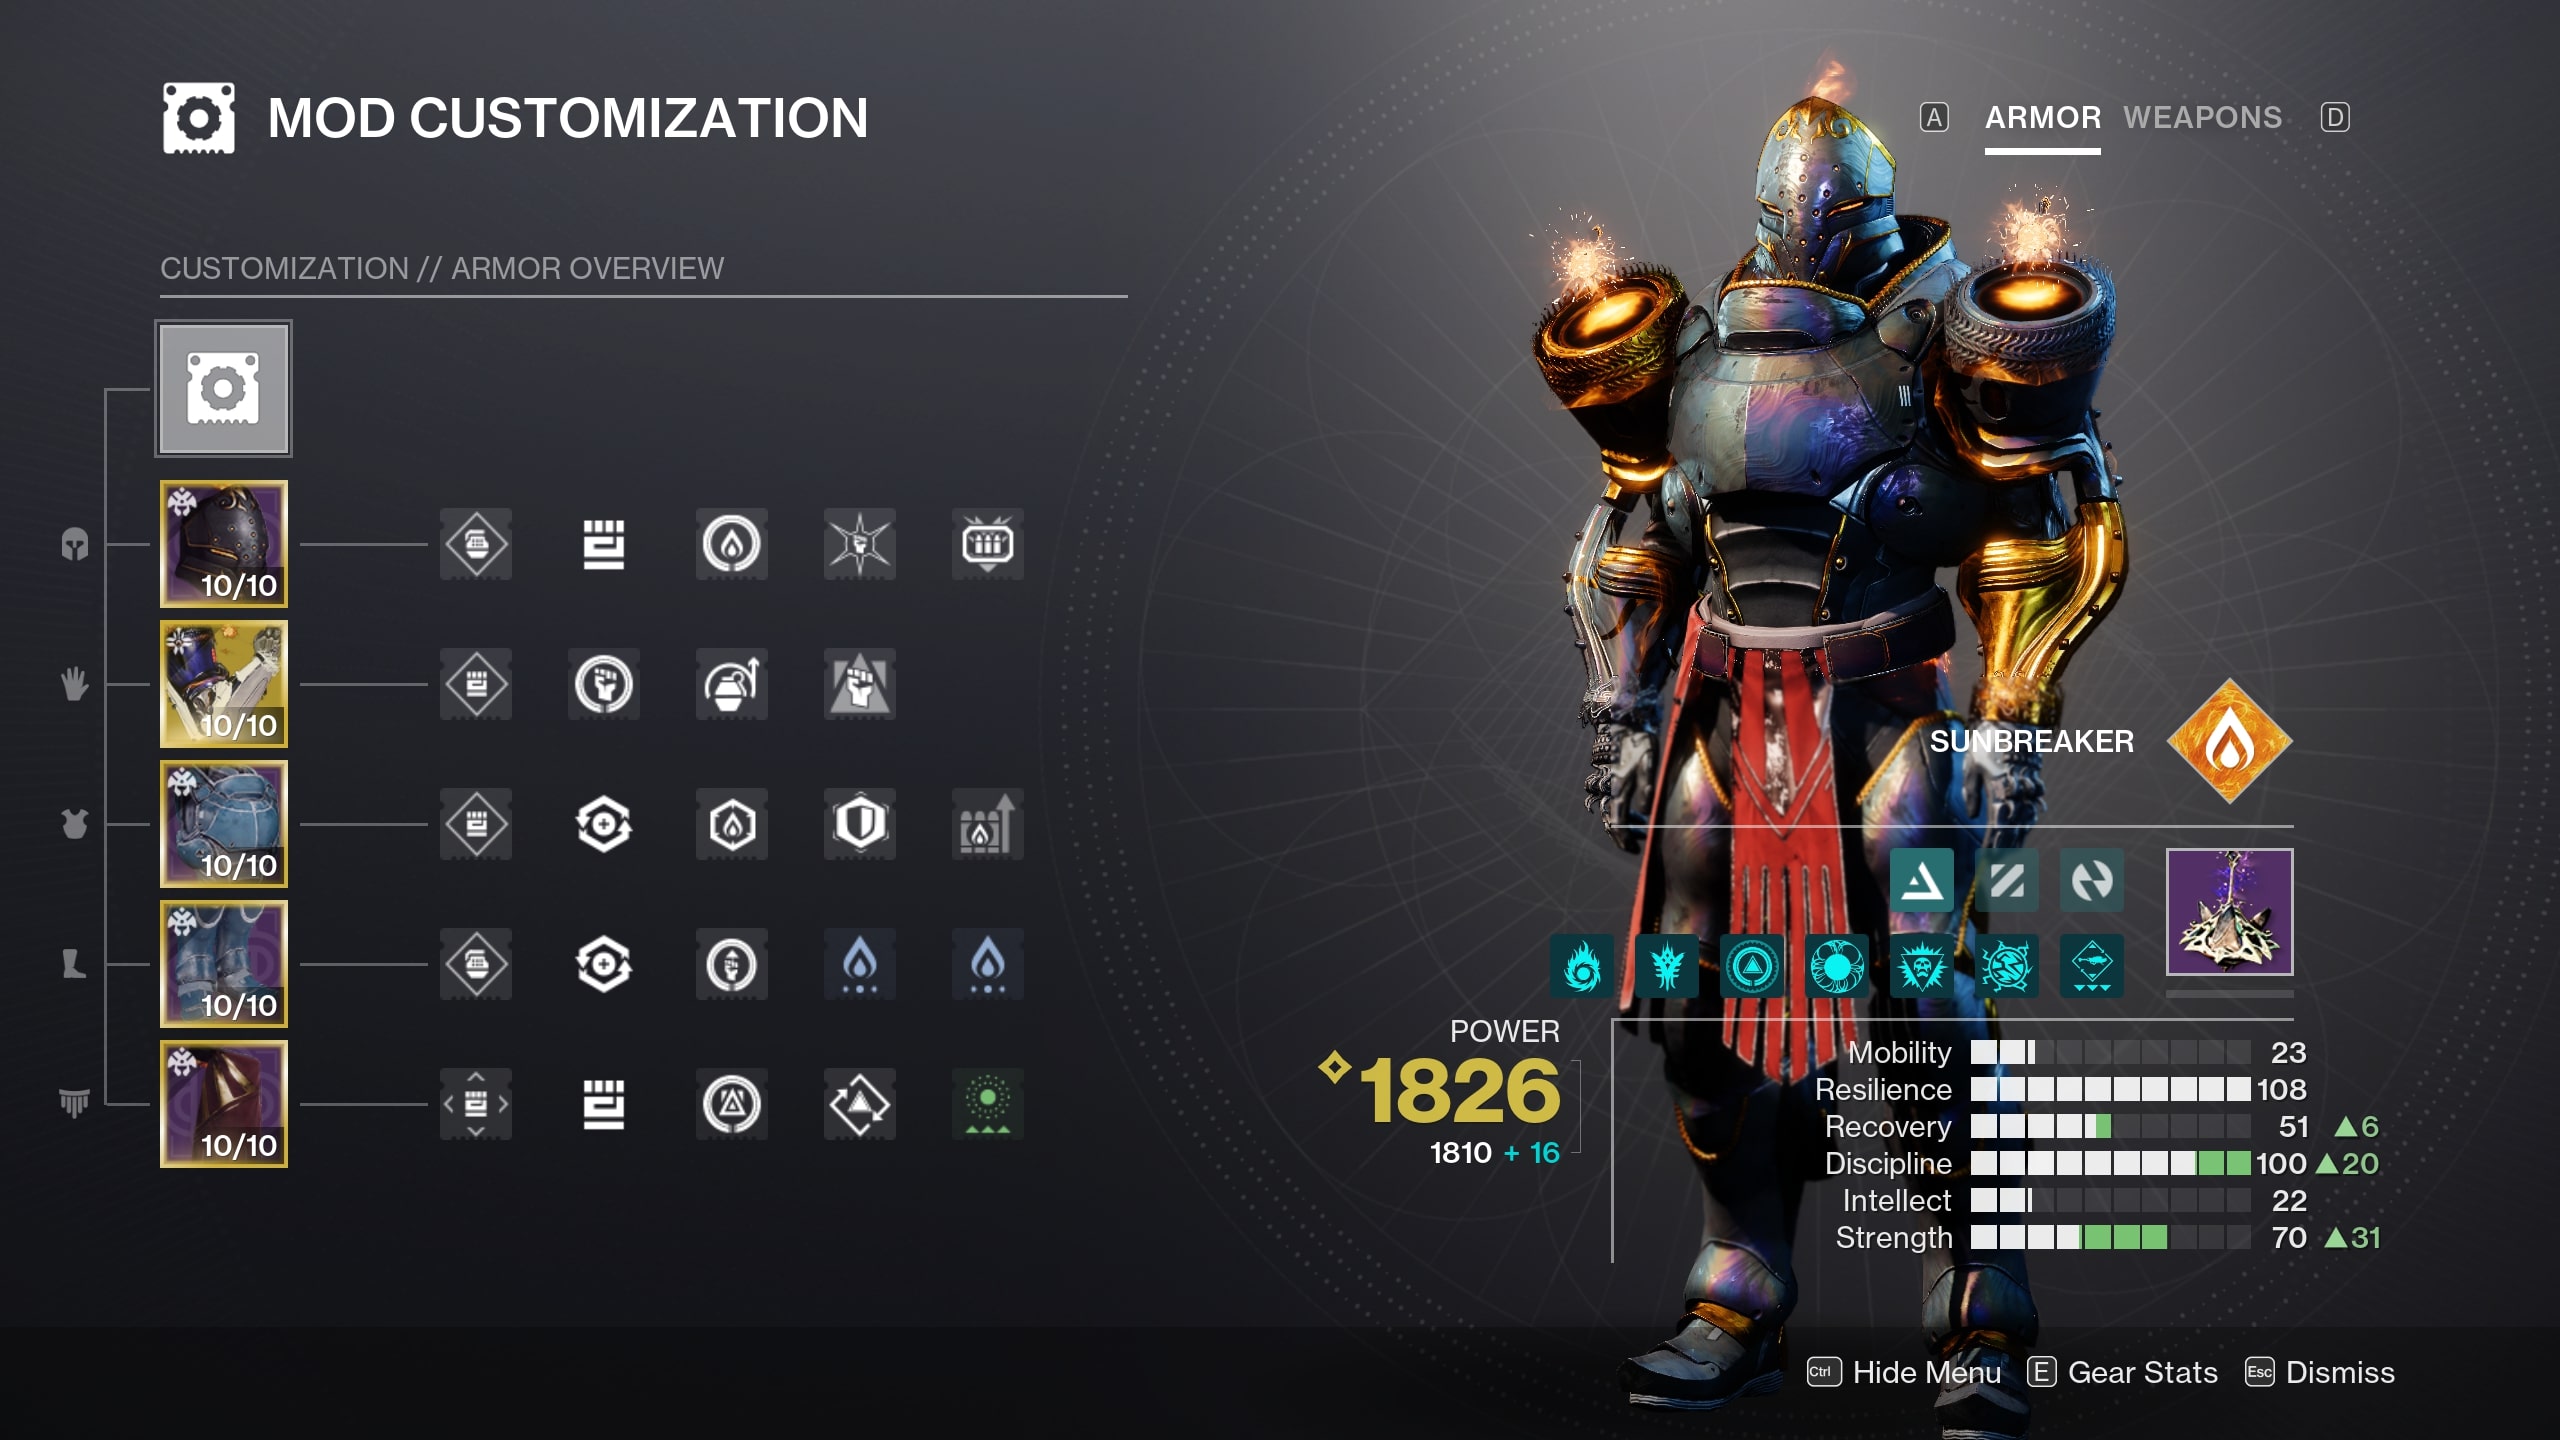
- Exotic: Pyrogale Gauntlets
- Armor mods: Harmonic/Solar Siphon, Hands-On, Heavy Handed, Impact Induction, Focusing Strike, Invigoration, Solar Weapon Surge x2, Reaper, Distribution, Time Dilation
- Important stats: Resilience, Discipline, Recovery
- Weapons: Solar weapons w/ Incandescent
This Solar Titan build doesn't have the utility that some of the others I've listed do, but makes up for it by having the best overall damage output. As a result, it's an exceptional boss-killer, and will also help your team burn down priority targets like Saboteurs or Skybombers. It features the Pyrogale Gauntlets, a pair of Exotic gauntlets that turns the Burning Maul Super into a single hammer slam that dishes out ridiculous damage and creates multiple lingering flame cyclones. It also adds a cyclone of fire to the slam of Consecration as well, which is one of the Aspects I've chosen for this setup.
Consecration got buffed recently, and hits significantly harder than it did when it was introduced. To use it, you start by using your powered melee while sliding, which creates an initial wave of fire that inflicts Scorch to whatever it hits; then, while mid-air, press the powered melee input again to slam down and launch a second wave that Ignites whatever's Scorched. It's excellent at baseline, but it gets even better when you add the Roaring Flames Aspect that allows you to stack up to three ability damage buffs by getting Solar ability kills (including kills with Consecration).
Normally, it'd be difficult to get your Consecration back before those Roaring Flames stacks wear off, but thanks to Ember of Searing, Ember of Torches, and Ember of Benevolence, you'll get your melee energy back extremely fast by killing Scorched enemies and giving your allies Radiant. In fact, the regen is so strong that you can basically spam Consecration over and over to infinitely refresh Roaring Flames as long as there are enemies to kill, which notably applies to Burning Maul and lets it hit bosses for over 500,000 damage. Ember of Searing and Mercy also combo together to create Firesprites that give you Restoration, which, alongside your Healing Grenade, covers your healing needs.
Void Titan Sentinel build
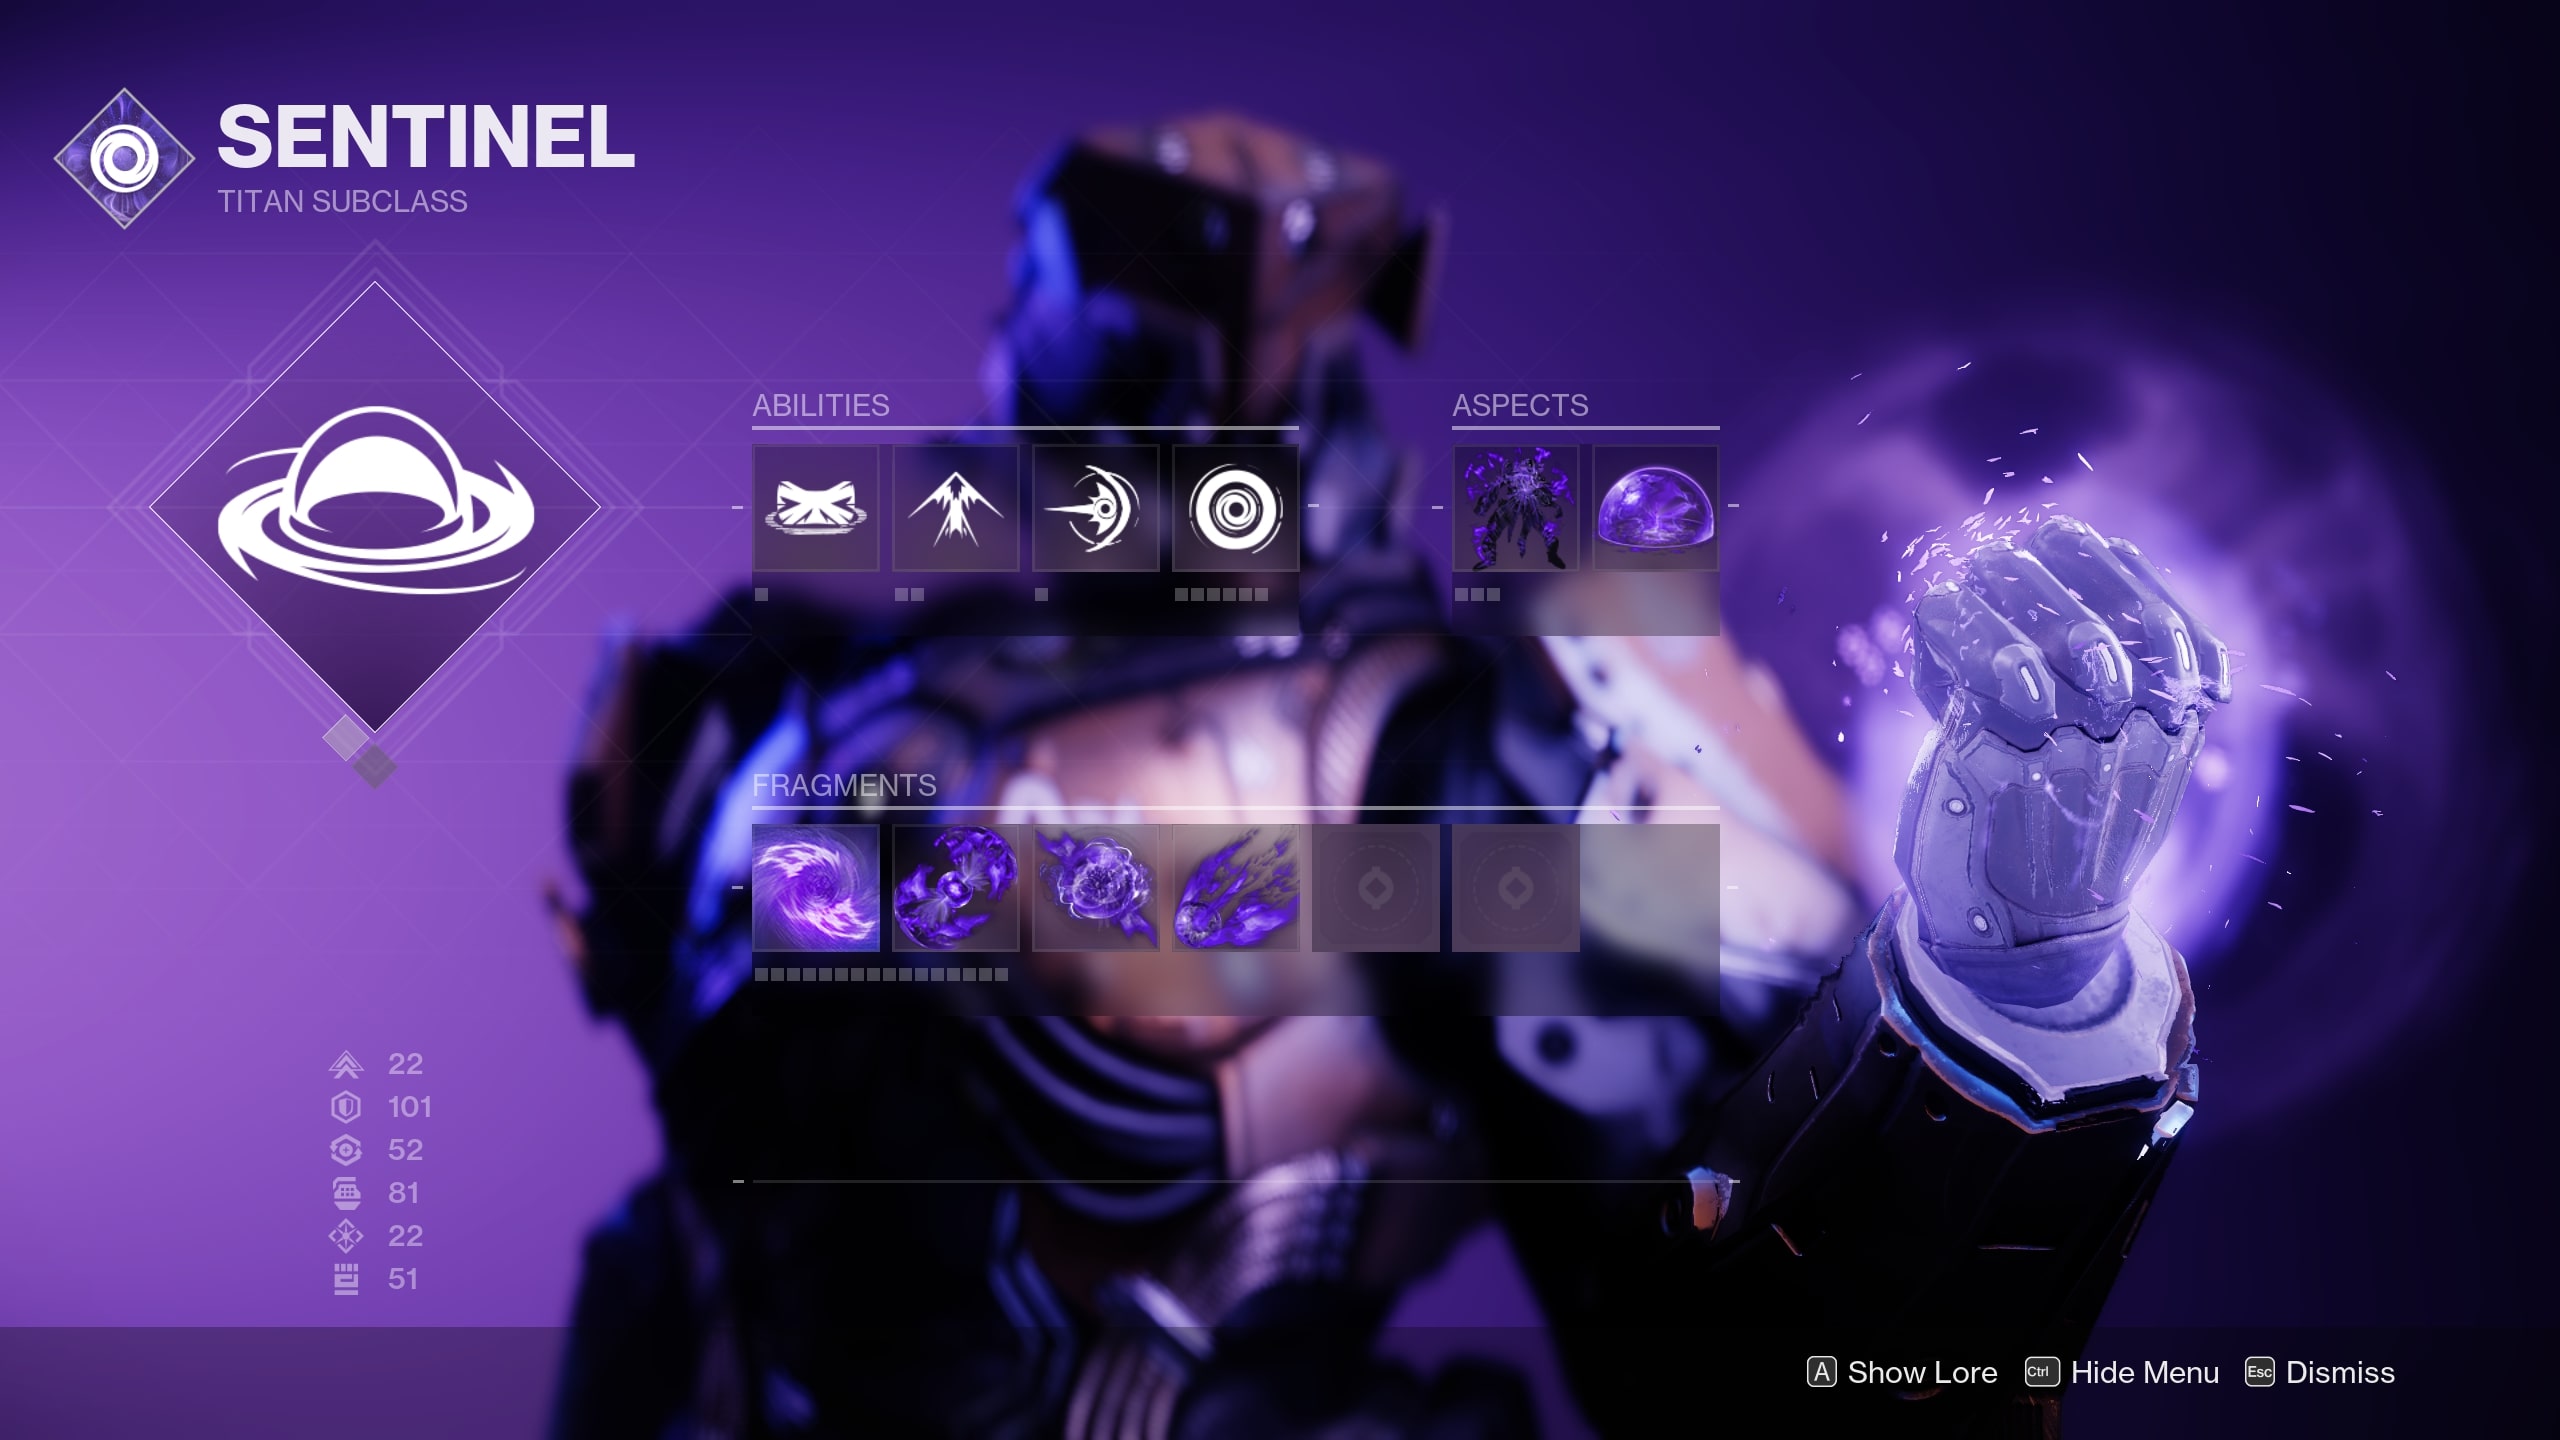
- Abilities: Ward of Dawn, Rally Barricade, Catapult Lift, Shield Bash, Vortex Grenade
- Aspects: Controlled Demolition, Offensive Bulwark
- Fragments: Echo of Cessation, Echo of Starvation, Echo of Instability, Echo of Undermining
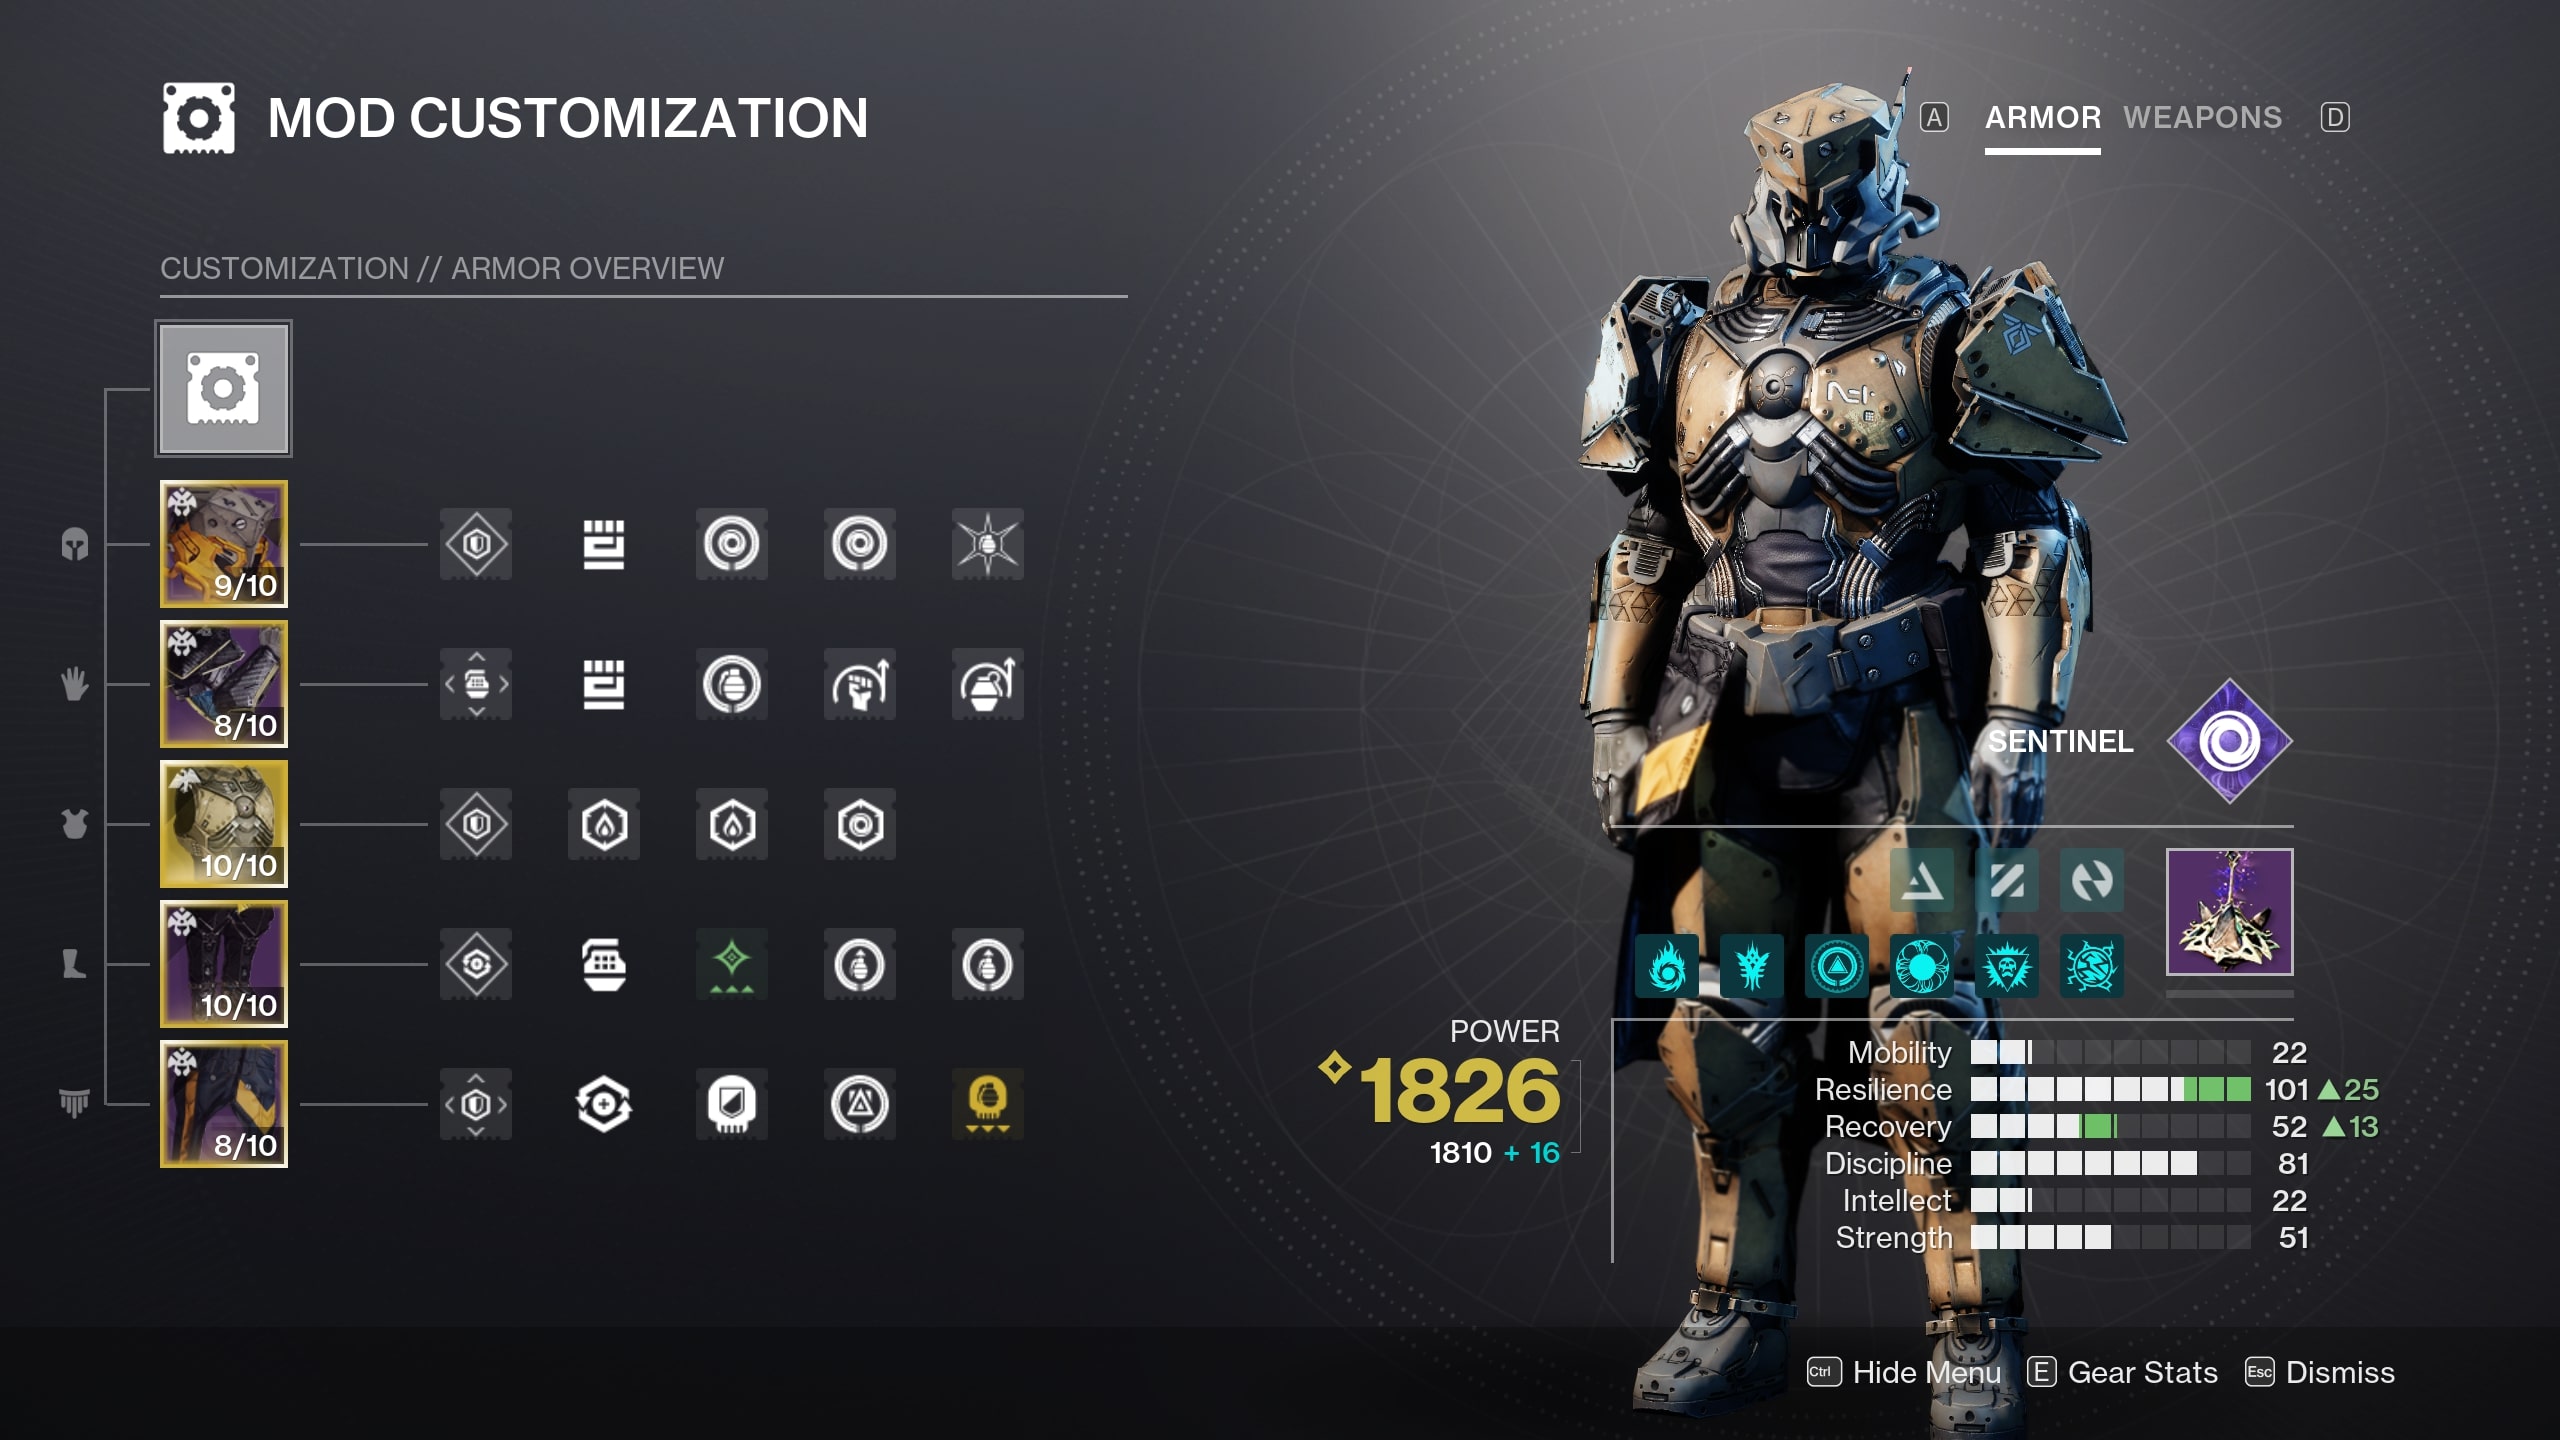
- Exotic: Severance Enclosure
- Armor mods: Harmonic/Void Siphon, Ashes to Assets, Firepower, Momentum Transfer, Impact Induction, Stacks on Stacks, Innervation x2, Proximity Ward, Reaper, Explosive Finisher
- Important stats: Resilience, Discipline, Strength
- Weapons: Void weapons w/ Repulsor Brace
Void Sentinel Titan is generally thought of as a defensive subclass, so how about we flip the script with this last build? Using Severance Enclosure — a wildly underrated Exotic chest armor that creates powerful explosions when you get powered melee or finisher final blows — it's possible to transform the Sentinel into a highly disruptive and tanky offensive juggernaut.
The primary components of the build that work with Severance Enclosure are the Controlled Demolition Aspect and the Echo of Cessation Fragment. Echo of Cessation makes every enemy affected by your finisher explosions Volatile, while Controlled Demolition gives you burst healing whenever those Volatile targets explode from being shot or hit by follow-up Severance Enclosure blasts. Cessation also creates Void Breaches when Volatile enemies are slain, which give you the healing and grenade regen powers of Devour when picked up thanks to Echo of Starvation; the final two Fragments, Echo of Instability and Undermining, strengthen your grenades by having kills with them give your Void weapons Volatile Rounds and making them Weaken foes, respectively.
You'll then want to equip a Void weapon with Repulsor Brace so that every Volatile enemy you defeat with it (AKA, every enemy on the map, with this build) gives you a Void Overshield, which ties into the build's second Aspect Offensive Bulwark to grant you tons of grenade energy and a damage buff to your Shield Bash. Finally, with your armor mods, use a Void/Harmonic Siphon and Firepower to make plenty of Orbs of Power for Armor Charge, then use Proximity Ward and Explosive Finisher to get big chunks of grenade energy back when finishing enemies while simultaneously making you near-invincible when performing a finisher.
Ultimately, this build makes use of everything Void is capable of other than Invisibility, and is — quite literally — an absolute blast. Running around the battlefield spamming finishers like a maniac doesn't seem like a safe or effective way to play, but it's incredible with this setup, and it might just be my favorite Destiny build of any I've ever used. Give it a try.
Destiny 2 is one of the best Xbox games and best PC games for fans of multiplayer and looter shooters, and The Final Shape — the final expansion in the Light and Darkness Saga — looks to be the biggest DLC that Bungie's popular live service game has ever gotten. It's scheduled to release on June 4, 2024.

Brendan Lowry is a Windows Central writer and Oakland University graduate with a burning passion for video games, of which he's been an avid fan since childhood. He's been writing for Team WC since the summer of 2017, and you'll find him doing news, editorials, reviews, and general coverage on everything gaming, Xbox, and Windows PC. His favorite game of all time is probably NieR: Automata, though Elden Ring, Fallout: New Vegas, and Team Fortress 2 are in the running, too. When he's not writing or gaming, there's a good chance he's either watching an interesting new movie or TV show or actually going outside for once. Follow him on X (Twitter).

 Windows Central Insider


