All the latest news, reviews, and guides for Windows and Xbox diehards.
You are now subscribed
Your newsletter sign-up was successful
Battlefield 6 launch day has finally arrived, and many PC gamers will soon find out that Secure Boot must be enabled in Windows 10 or Windows 11 before playing.
Secure Boot is designed to keep your PC clear of malware that gets hold of your system before Windows can load, but it's also a requirement for several anti-cheat measures, including EA's Javelin system.
Here's a quick and painless guide on how to check for and enable Secure Boot in Windows 10 and Windows 11 so that you can play Battlefield 6 on day one.
Update October 10, 2025: Battlefield 6 launches today, and I know that many gamers will be finding out that Secure Boot must be enabled for the game's anticheat. I've gone through the steps to ensure they remain accurate. Happy fragging! — Cale Hunt
How to verify if Secure Boot is enabled in Windows 10 and Windows 11
Secure Boot is a requirement for installing or upgrading to Windows 11, but that doesn't necessarily mean that it's currently enabled on your PC. For Windows 10, it's not a requirement. Either way, this is a crucial part of Battlefield 6.
Here's how to verify if Secure Boot is enabled on your Windows PC.
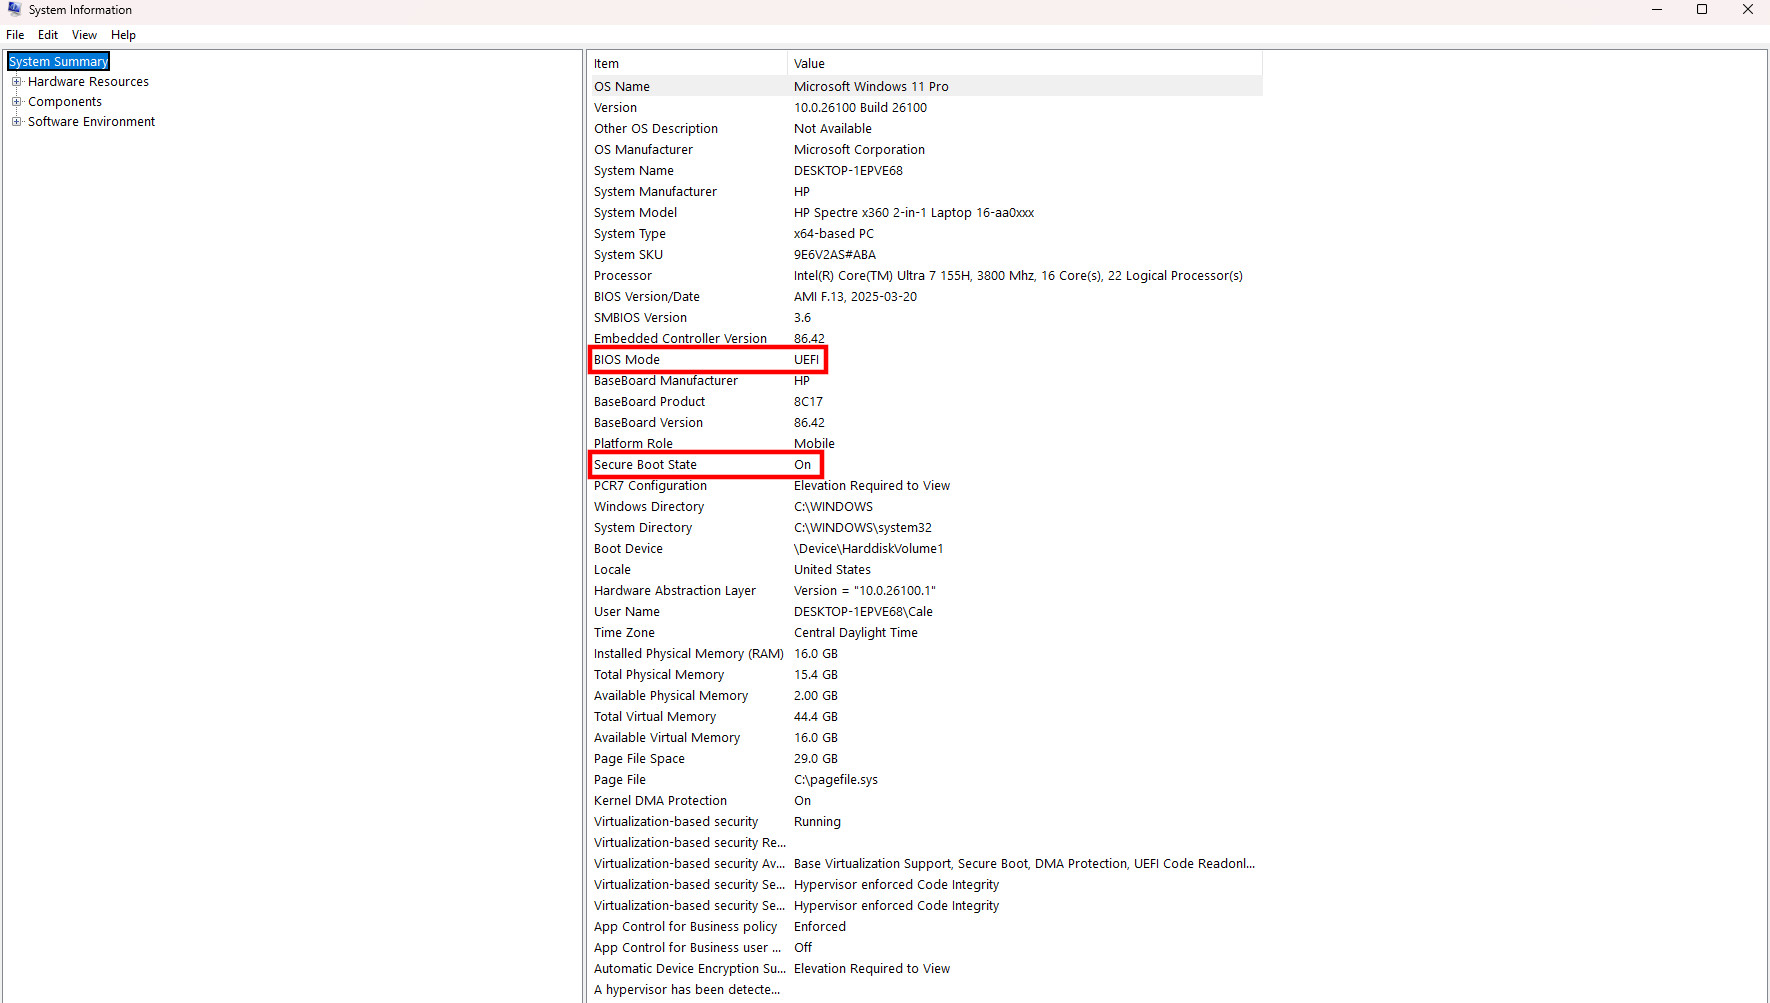
- Type msinfo into your Windows search bar and hit Enter. No search bar visible? Right-click the Start button and click Search before typing.
- Verify in the System Summary section that Secure Boot State reads On.
- Verify in the same System Summary section that BIOS Mode reads UEFI.
If your system has Secure Boot State set to On and the BIOS Mode set to UEFI, you shouldn't need to do much else to enjoy Battlefield 6 with its Javelin anti-cheat.
If the Secure Boot State reads Off and your BIOS Mode reads Legacy, please skip to the section on how to change your BIOS Mode to UEFI.
All the latest news, reviews, and guides for Windows and Xbox diehards.
If your system has Secure Boot State set to Off and the BIOS Mode set to UEFI, please skip to the section on how to enable Secure Boot in Windows 10 and Windows 11.
If your system's Secure Boot State reads Unsupported, you'll need to check with your individual motherboard manufacturer to see if there are any workarounds or BIOS updates available.
How to change your BIOS Mode to UEFI
There are a few hoops to jump through before you can swap your BIOS Mode from Legacy to UEFI, but nothing that will take too long.
First, you must ensure that TPM 2.0 is enabled on your system. Here's how to do it.
- Tap the Windows key + R shortcut to show the Run window.
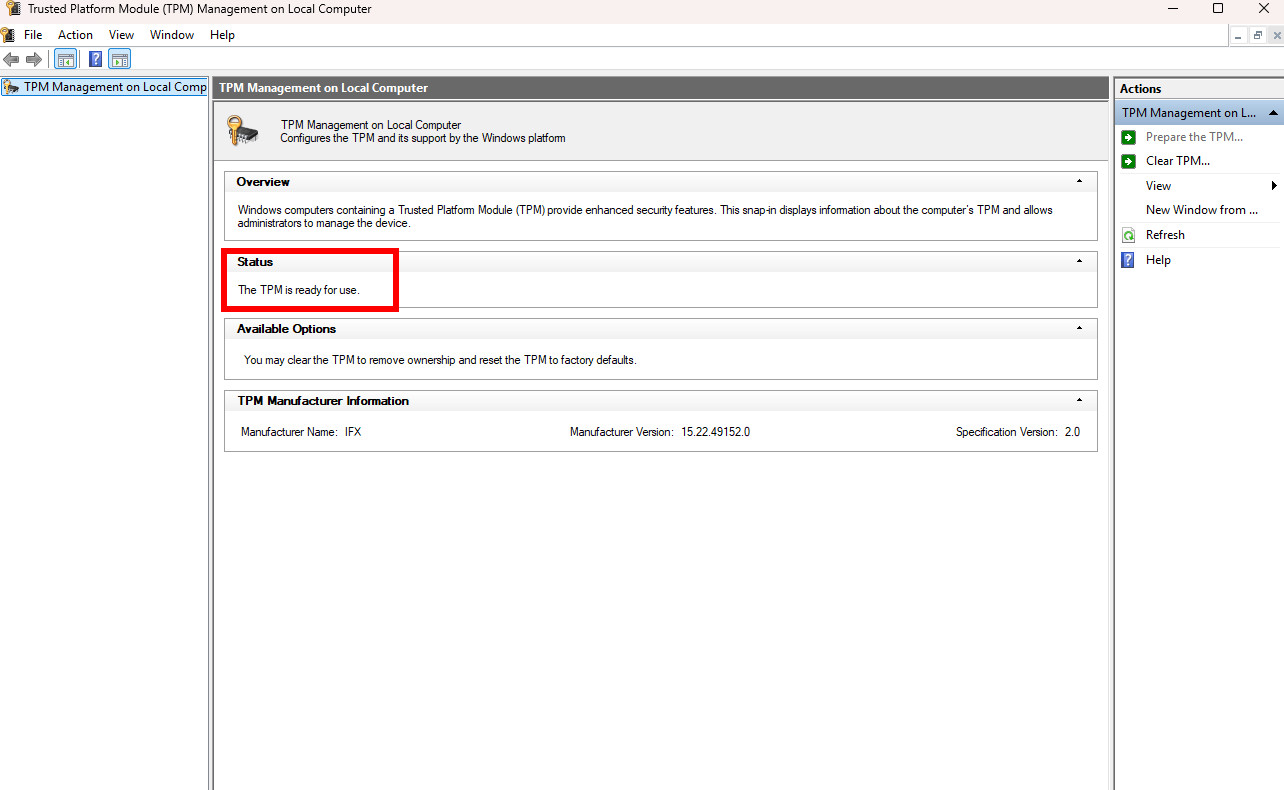
- Type tpm.msc and hit Enter.
- Verify that the Status section in the middle window pane reads The TPM is ready for use.
If your TPM is not ready for use, you'll have to check with your motherboard vendor on how to enable it before continuing. TPM 2.0 is required to run Windows 11, so this is going to be a potential problem for those still running Windows 10.
Let's assume that your TPM 2.0 chip is ready to go. You now must verify whether your Windows boot drive is MBR or GPT. Here's how to do it.
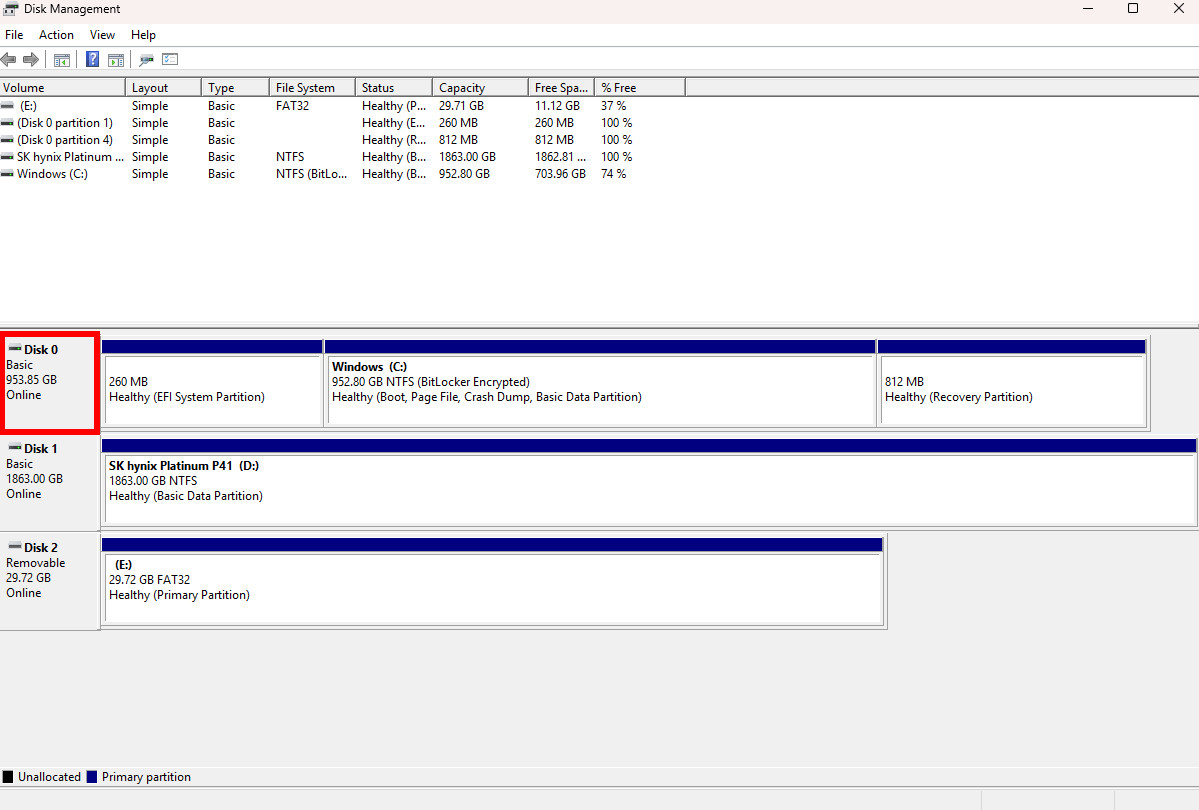
- Right-click the Start button and click Disk Management.
- Right-click the drive that includes the Windows (C:) partition in the bottom section of the Disk Management window. In my case, this reads Disk 0.
- Click Properties.
- Click the Volumes tab in the window that appears.
- Verify that the Partition style reads GPT.
If your drive's Partition style reads GPT, you don't have to do anything more to your drive, and you should be ready to enable Secure Boot.
If your drive's Partition style reads MBR, there are a few more steps to tackle. Only follow these next steps if your drive is using the MBR partition style.
- Tap the Windows key + R shortcut, type cmd, and hit Ctrl + Shift + Enter to launch the Command Prompt in admin mode.
- Type mbr2gpt /validate /disk:0 /allowFullOS. Note that your PC might have a different disk:0 value — this is seen in the Disk Management section I laid out above. Use whatever number is assigned to your Windows boot drive.
- Hit Enter to complete the command.
The command prompt should now validate your drive to ensure it can be converted from MBR to GPT safely. This is a great time to remind you that you should have a backup of your drive already sorted, as this next move has a bit of risk involved.
Once you're ready to convert, follow these steps using the same command prompt window.
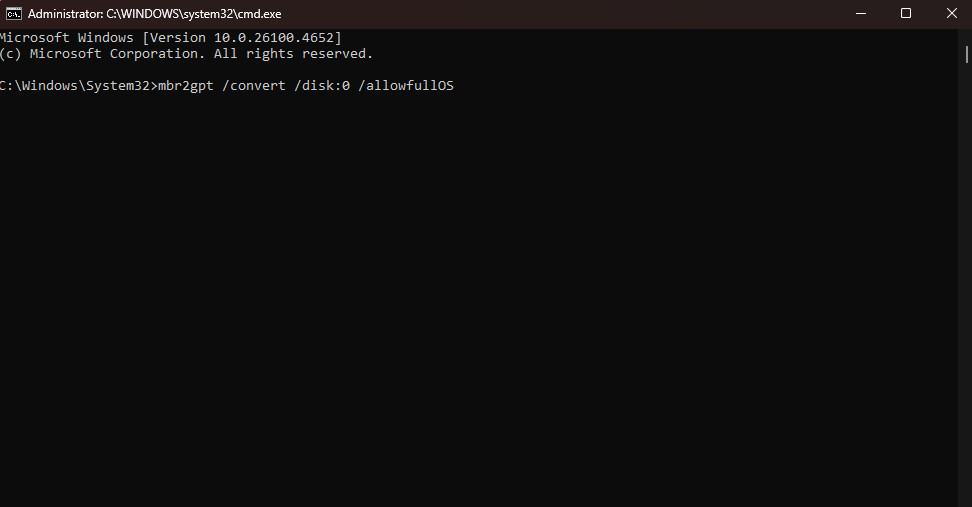
- Type mbr2gpt /convert /disk:0 /allowfullOS. Again, use whatever disk number your PC lists in Disk Management.
- Hit Enter to run the command.
Your drive should now be converted to GPT. A successful conversion will read something like "Completed successfully."
👉 Related: How to enter UEFI (BIOS) on Windows 10 PCs
If instead it says the conversion failed, you'll likely see a few lines regarding the steps required to complete the conversion. If it mentions that you need to switch to UEFI mode before the conversion can be completed, follow these steps.
- Restart your PC and enter the BIOS by hitting the appropriate key on your keyboard (usually F11, F12, or Delete).
- Navigate to the Advanced mode in your motherboard's BIOS.
- Navigate to the Boot menu in the BIOS.
- Find the Compatibility Support Module (CSM) section in the BIOS and disable it.
Your motherboard's BIOS might not have quite the same steps as I've laid out above, but at least you know what to look for while you're digging around. Feel like you made some unnecessary changes? Just exit the BIOS, choose not to save anything, and restart your PC to enter the BIOS fresh.
Disabling CSM will kick your PC into UEFI mode. You should now be ready to complete the final step to enable Secure Boot on Windows.
How to enable Secure Boot in Windows 10 and Windows 11
Now that your PC has its UEFI requirements sorted out, you should be ready to enable Secure Boot in Windows 10 and Windows 11. Here's how to do it.
- Restart your PC and enter the BIOS by hitting the appropriate key on your keyboard (usually F11, F12, or Delete).
- Navigate to the Advanced mode in your motherboard's BIOS.
- Navigate to the Boot or Secure Boot menu in the BIOS.
- Ensure that the Secure Boot state is set to enabled. The status might also simply read Windows UEFI mode rather than mentioning anything about enabled or disabled.
- Save your BIOS changes and restart your PC.
Secure Boot is also a requirement for Call of Duty: Black Ops 6 and 7
The Call of Duty team announced that it was adding new hardware-level cheat detection to its RICOCHET anti-cheat, which coincided with the launch of Black Ops 6 Season 5 on August 7.
We also know that Call of Duty: Black Ops 7 is arriving on November 14, 2025, with the same Secure Boot requirements. I've put together a separate guide to getting Secure Boot enabled for Black Ops 7, but it's ultimately the same process.
RICOCHET has the same TPM 2.0 and Secure Boot requirements as Javelin anti-cheat in Battlefield 6. If you can play Battlefield 6, you should also have no issues with Black Ops 7.
It's worth noting that following the Black Ops 7 beta, the RICOCHET anti-cheat team posted on X that by Day 5 of the play test, 98.8% of matches were free of cheaters. I personally hate to give kernel-level access to anti-cheat methods, but if it works, it works.

Cale Hunt brings to Windows Central more than nine years of experience writing about laptops, PCs, accessories, games, and beyond. If it runs Windows or in some way complements the hardware, there’s a good chance he knows about it, has written about it, or is already busy testing it.
You must confirm your public display name before commenting
Please logout and then login again, you will then be prompted to enter your display name.
