How to get started with Microsoft Copilot — your new AI assistant that’s everywhere and nowhere
Copilot is Microsoft’s new AI assistant for Windows 11 — here’s how to summon it, tame it, and maybe even trust it.
All the latest news, reviews, and guides for Windows and Xbox diehards.
You are now subscribed
Your newsletter sign-up was successful
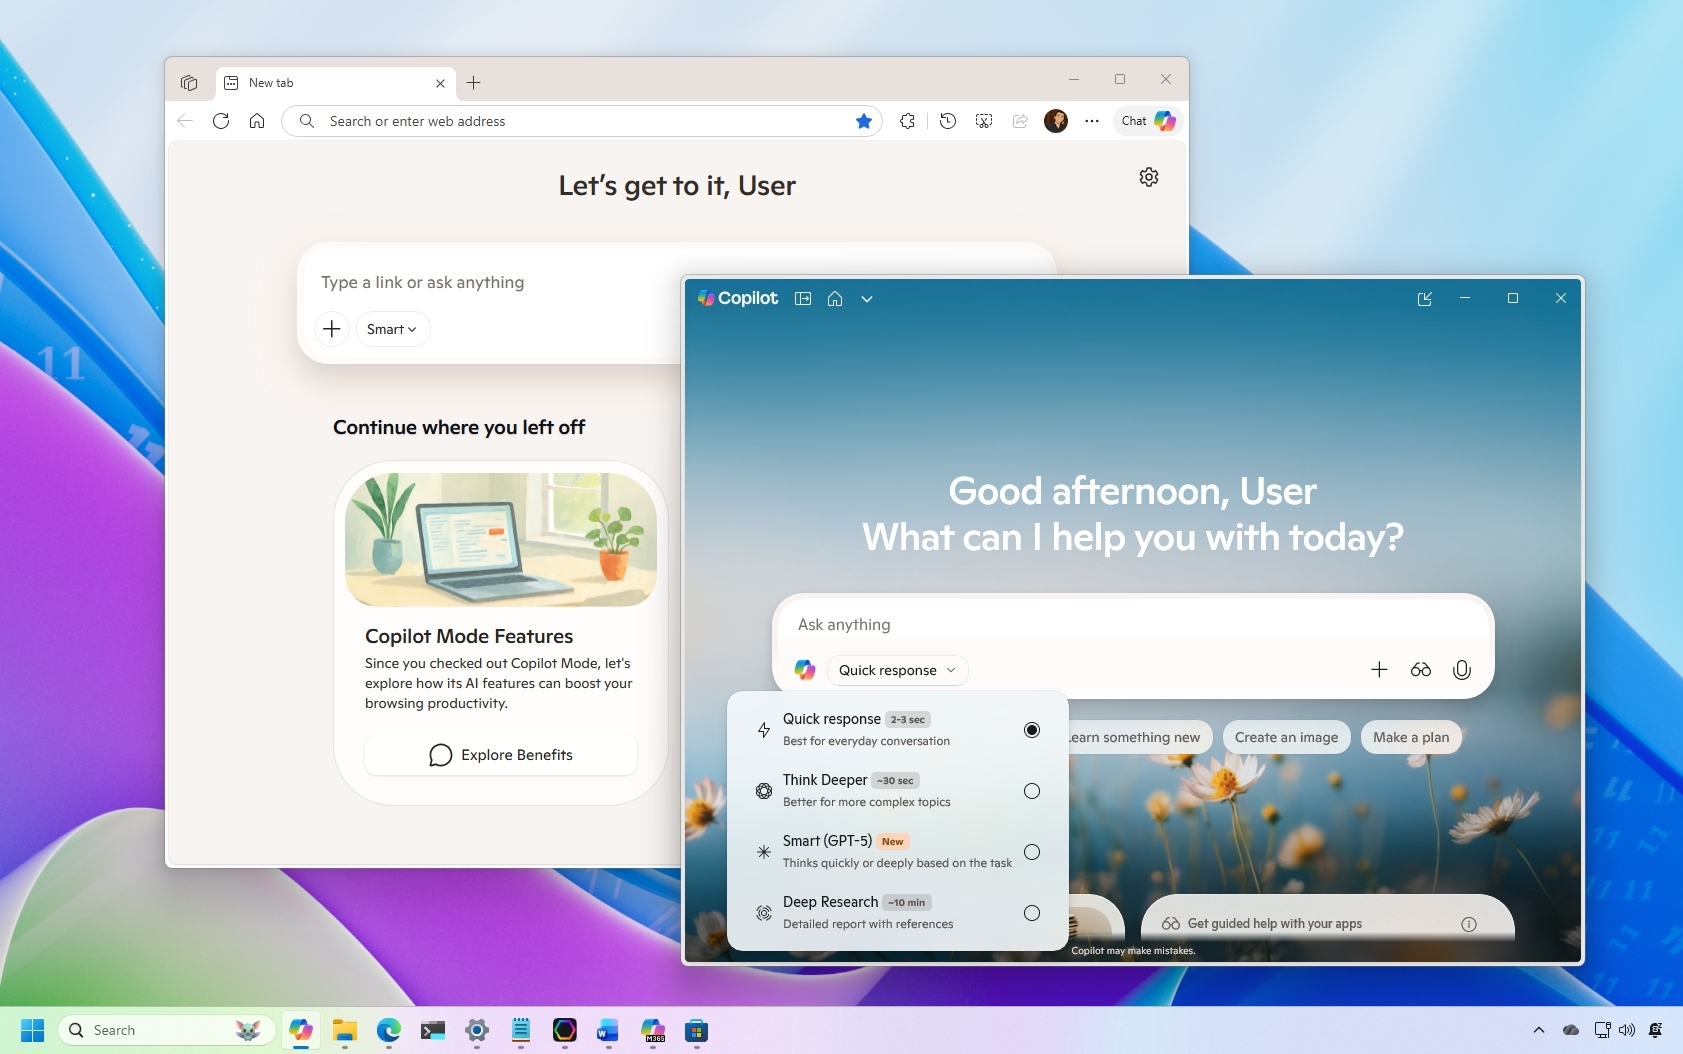
On Windows 11, you can use Copilot with the official native app or through integration within other apps, and in this guide, I'll help you get started with the chatbot.
Copilot is a personal assistant (similar to Cortana) that uses AI to understand your query using natural language and produce an answer or action. However, unlike other AI features on Windows 11, this chatbot doesn't rely on AI models locally available on the device. Instead, it depends on large language models available through the Microsoft cloud.
In addition, Microsoft has been proactively updating this application to further integrate the experience into the operating system with Connector, Vision, file search, and the ability to interact with the assistant hands-free with the "Hey Copilot" voice command.
Furthermore, Copilot is available as a separate integration through the different apps, including Notepad, File Explorer, Photos, Paint, Microsoft 365 (Office) apps, and Microsoft Edge.
In this how-to guide, I'll outline the steps to get started with the Copilot experience available on Windows 11.
How to navigate the Copilot app
On Windows 11, the Copilot app experience is minimal and straightforward. You can access the chatbot in multiple ways and configure a few settings.
Sign in account
To log in to your account (if required), use these steps:
- Click the Sign in button at the bottom left.
- Quick tip: If you don't see the option, click the "Open Sidebar" button in the top left corner.
- Click the Sign in button again.
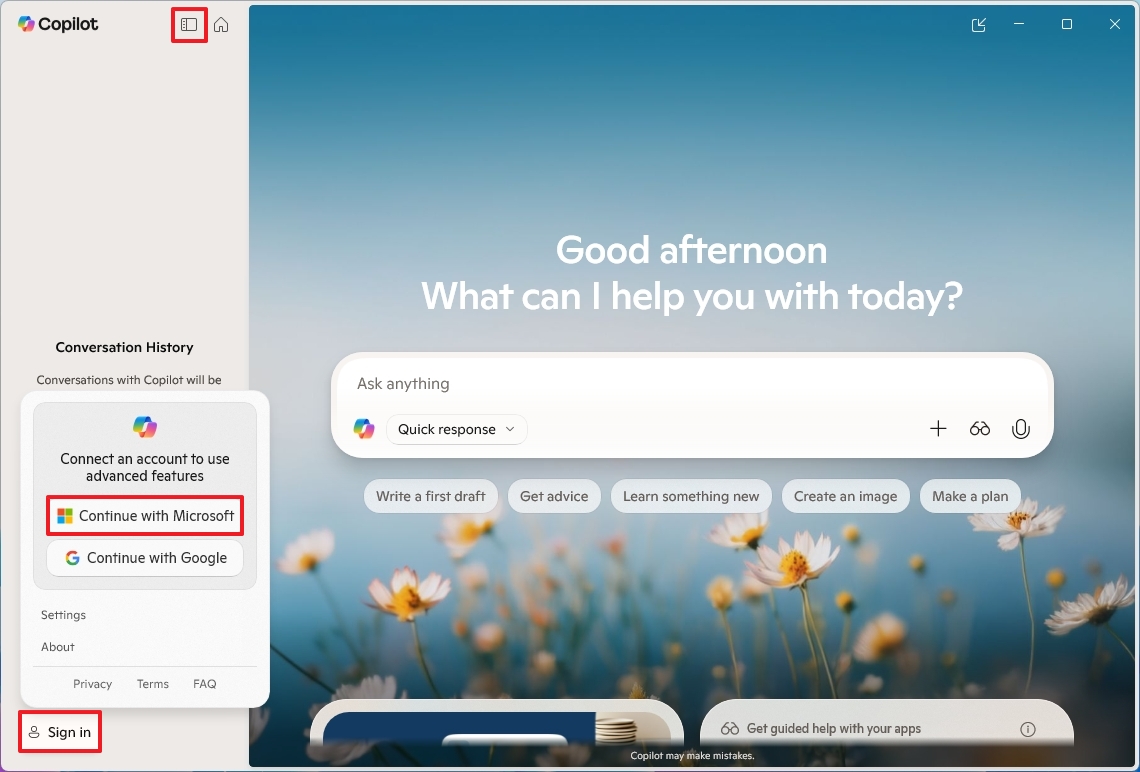
- Complete your credentials to access your account.
Once you complete the steps, you can start interacting with Copilot using natural language.
Launch Copilot
In addition to using the button in the Taskbar, you can launch the Copilot chatbot in several ways.
From Start
To launch the Copilot experience on Windows 11, use these steps:
- Open Start.
- Search for Copilot and click the top result to open the app.
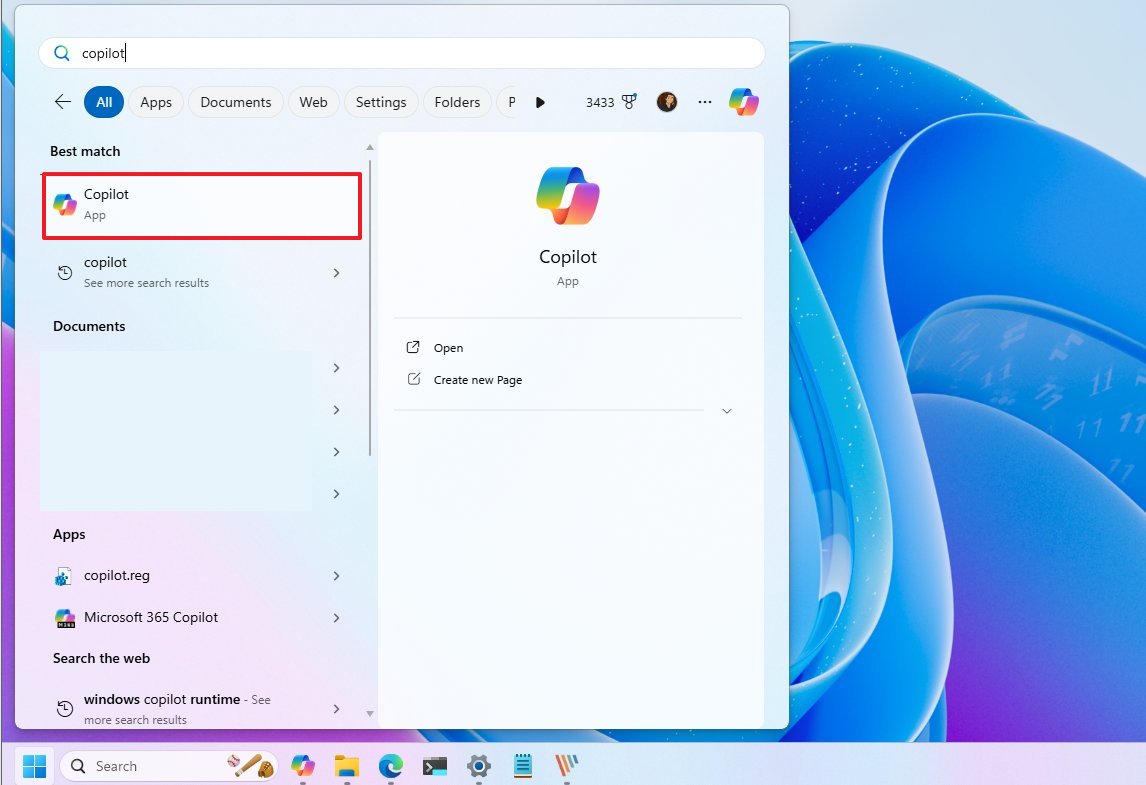
You may also find the Copilot button already pinned to the Taskbar. If it's not available, launch the chatbot from the Start menu, right-click the button, and choose the pin option.
From Search
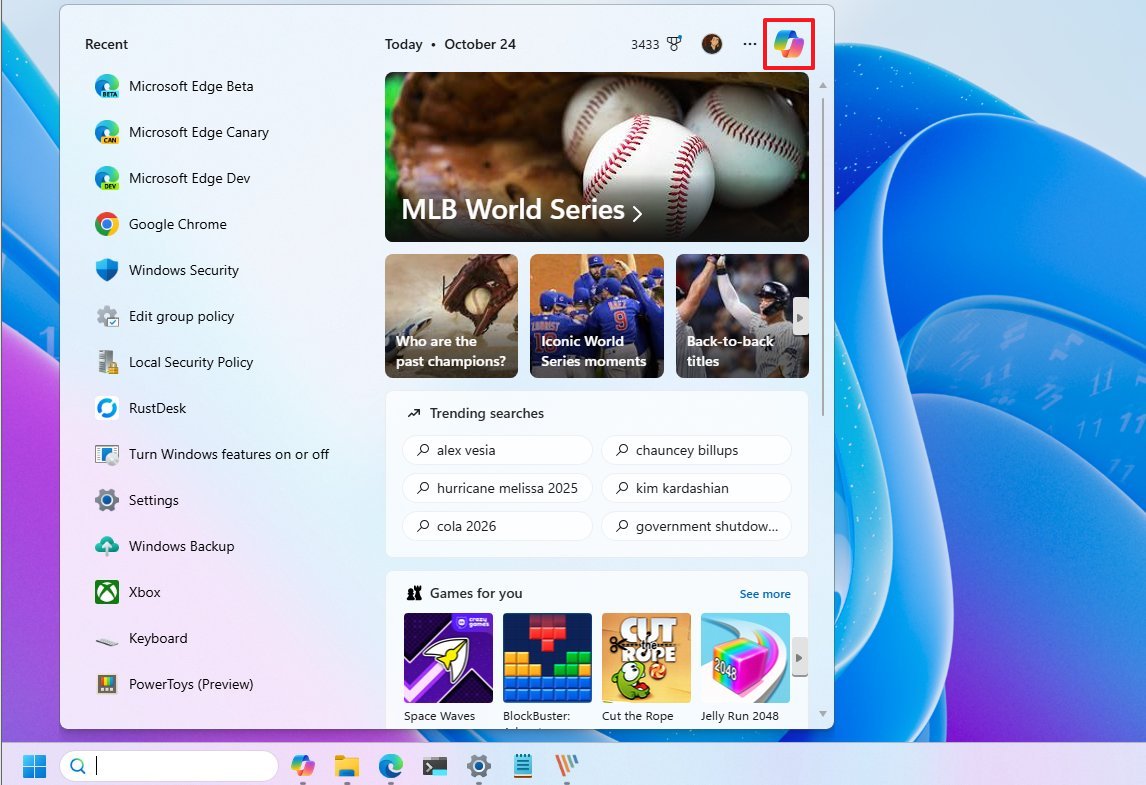
You can also invoke the chatbot with the Copilot button when performing a query in the Windows Search experience. However, when you click this button, it will access the chatbot website (at Copilot.Microsoft.com) using the Microsoft Edge browser.
From voice command
If the "Listen for 'Hey, Copilot'" is available, you can interact with the chatbot hands-free using the "Hey Copilot" voice command.
Customize Copilot app experience
From the Copilot settings, you can configure most of the features available with the chatbot on Windows 11.
Control Copilot app on startup
To customize the experience of Copilot, use these steps:
- Click the account menu from the top left.
- Quick tip: If you don't see the menu, click the top-left menu icon to open the sidebar.
- Click the Settings option.
- Under the "App" section, turn on the "Auto start on log in" toggle switch to launch the app automatically when the computer starts.
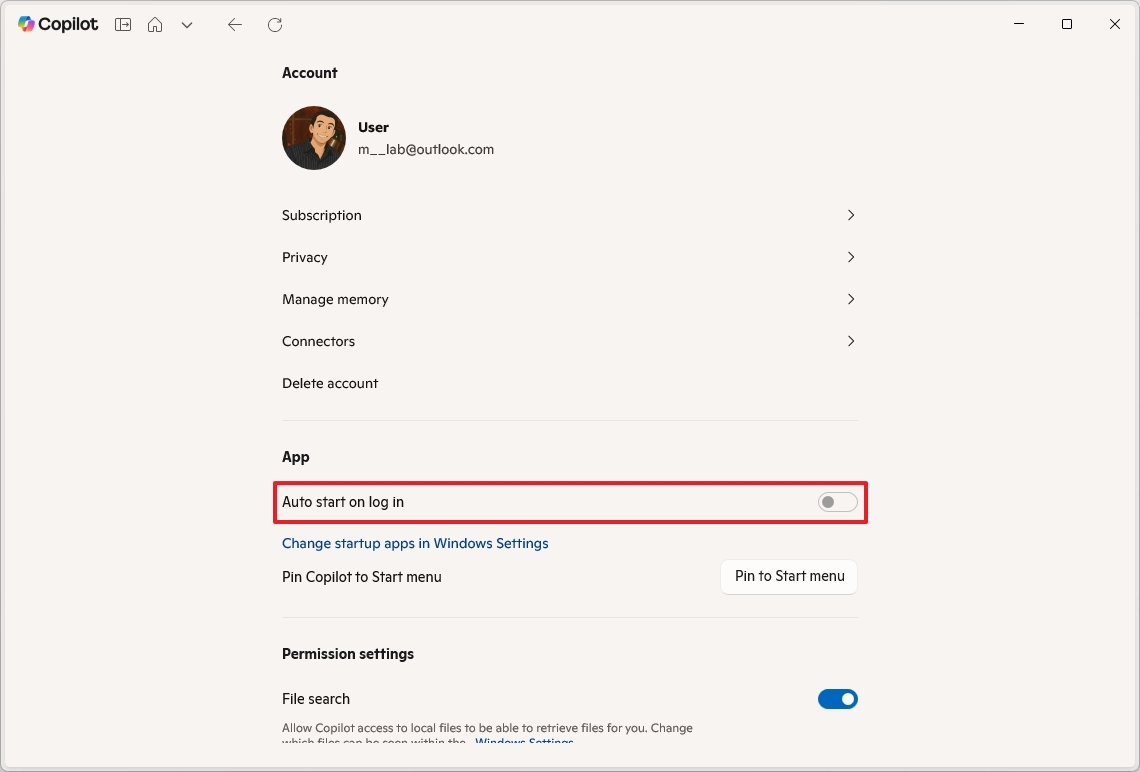
Once you complete the steps, Copilot will start minimizing during startup.
If the option is grayed out, open Settings > Apps > Startup, and turn Copilot on or off on startup.
Configure file search permissions
On Windows 11, you can allow Copilot to access your files to work like Windows Search, but using AI.
To enable search permissions in Copilot, use these steps:
- Click the account menu from the top left.
- Click the Settings option.
- Under the "Permission settings" section, turn on the "File search" toggle to allow access to local files.
- Turn on the "File read" toggle switch to give Copilot permission to analyze the data in the files to answer questions using AI.
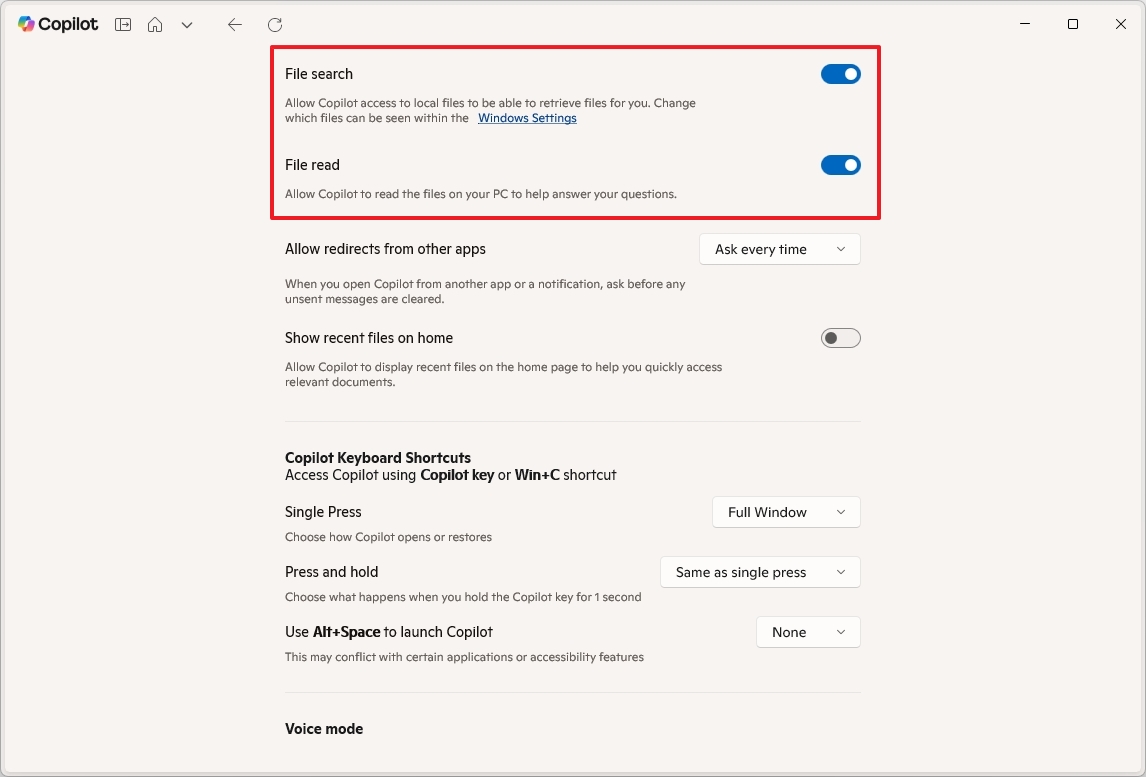
- (Optional) Turn off the "Show recent files on home" toggle switch to prevent the app from showing recent files on the main page.
After you complete the steps, the assistant will have to search local files stored on your computer.
Set up Copilot shortcut
You can also control the action for the keyboard shortcut that opens and closes the Copilot app.
To manage Copilot shortcut behaviors, use these steps:
- Click the account menu from the top left.
- Click the Settings option.
- Under the "Copilot Keyboard Shortcuts" section, choose what happens when opening and restoring the chatbot using the Copilot or "Windows key + C" keyboard shortcut. For example, a normal full window or compact view.
- Choose the "Press and hold" action when invoking the shortcut.
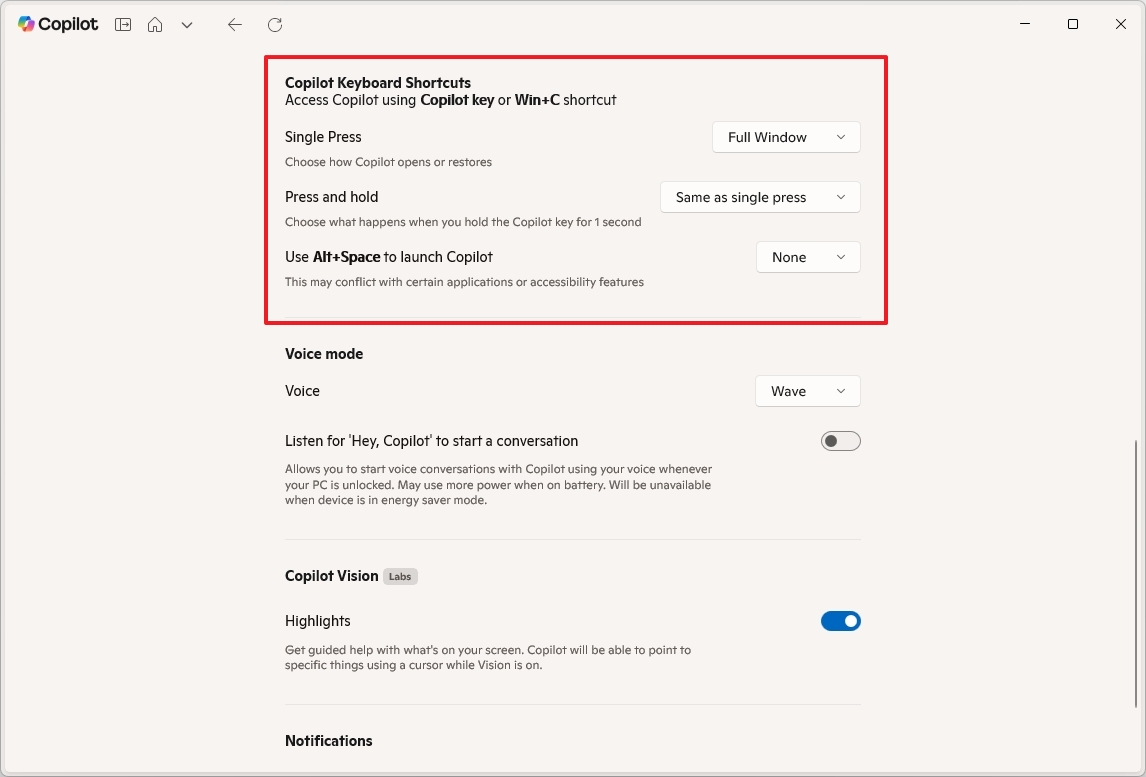
Once you complete the steps, the new configuration will apply to the Copilot shortcut behavior.
Enable Hey Copilot voice command
Microsoft now lets you interact with Copilot hands-free, as you could with Cortana, but the idea is that you'll be able to use natural language to interact with an AI assistant.
To enable the Hey Copilot command, use these steps:
- Click the account menu from the top left.
- Click the Settings option.
- (Option 1) Under the "Voice mode" section, turn on the "Listen 'Hey Copilot' to start a conversation" toggle switch.
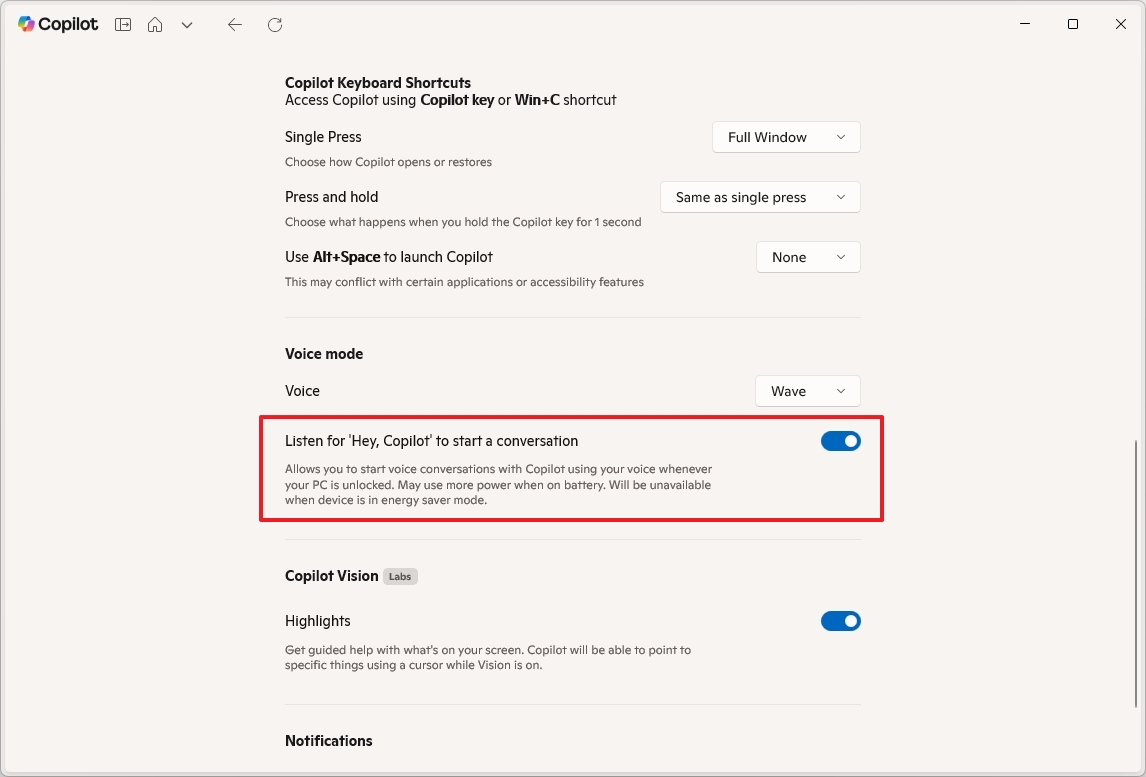
- (Option 2) Turn off the "Listen 'Hey Copilot' to start a conversation" toggle switch to disable the feature.
Although it isn't required, you can also use the "Voice" setting to change the chatbot's voice for conversations.
Enable Copilot Vision
Copilot Vision lets you share any application with the Copilot app. Once you grant permission, the chatbot can view and make sense of the content on the screen, enabling it to offer help with virtually anything you may need.
To enable Copilot Vision on Windows 11, use these steps:
- Click the account menu from the top left.
- Click the Settings option.
- (Option 1) Under the "Copilot Vision" section, turn on the "Highlights" toggle switch to enable the feature.
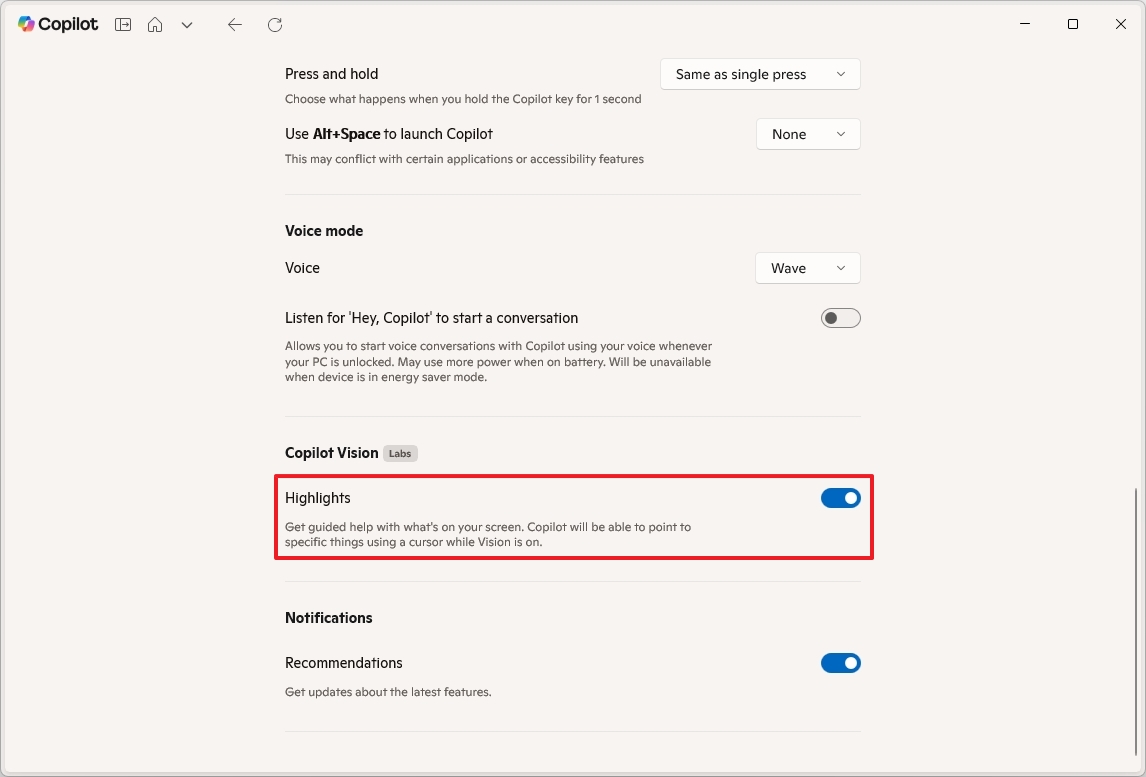
- (Option 2) Turn off the "Highlights" toggle switch to disable the feature.
Once you complete the steps, you'll see a goggle button in the Copilot app. When you click the button, you can select an app to share with Copilot, then interact with it by voice.
Change Copilot app privacy settings
To prevent Microsoft from using your data to train its AI models, use these steps:
- Click the account menu from the top left.
- Click the Settings option.
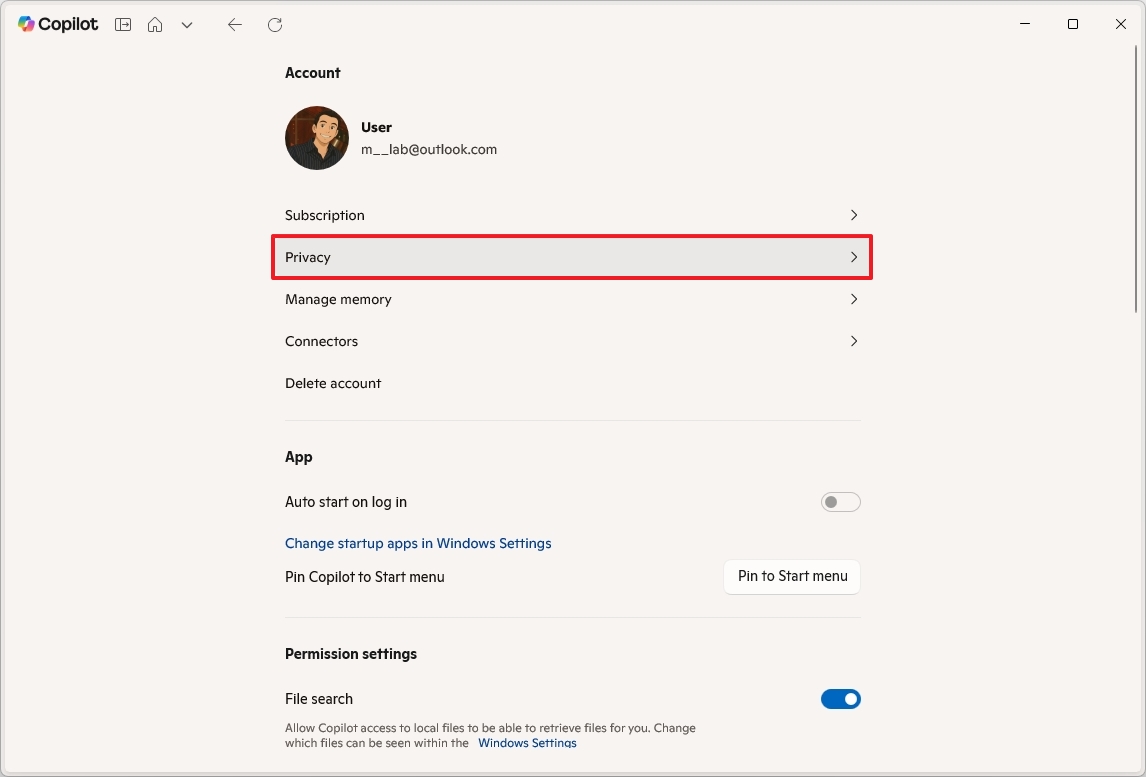
- Click the Privacy page.
- Turn off the "Diagnostic Data Sharing" toggle switch.
- Turn off the "Model training on text" toggle switch.
- Turn off the "Model training on voice" toggle switch.
- Turn off the "Personalization and memory" toggle switch.
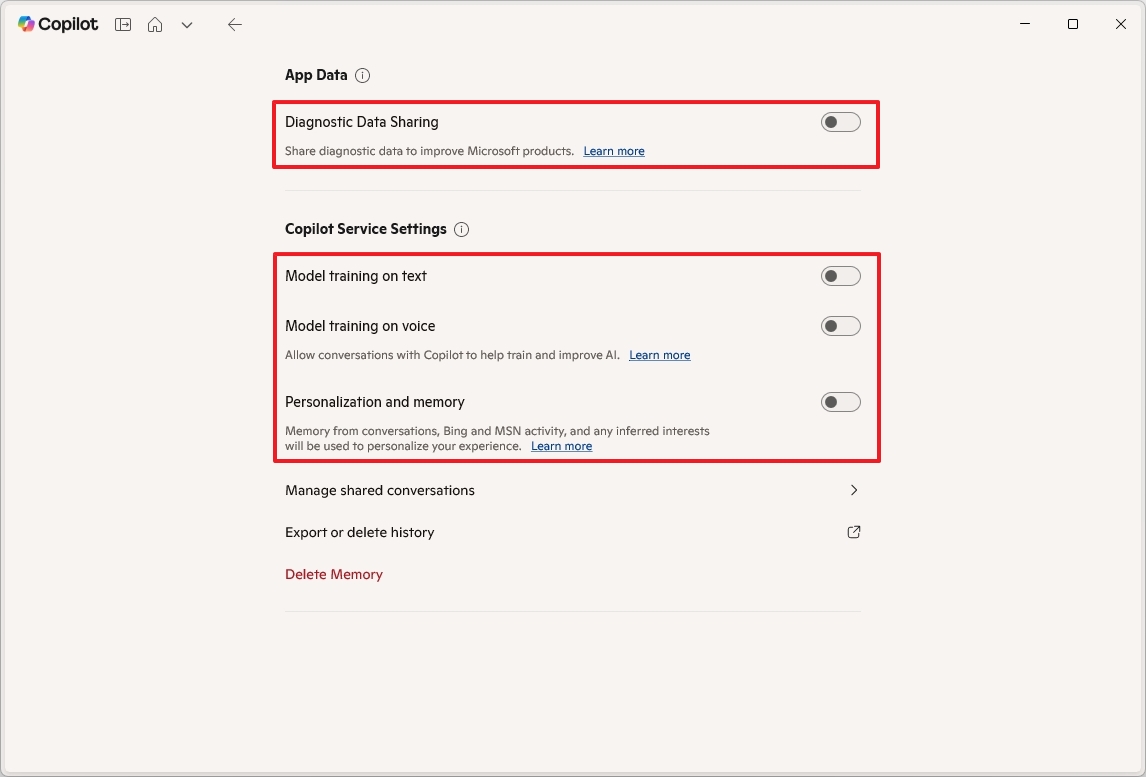
- (Optional) Click the Delete Memory to clear the information that the chatbot knows about you.
Once you complete the steps, when using Copilot on Windows 11, mobile, or web, you will no longer be sending your data for training and personalization to the Microsoft servers.
Manage Copilot's memory
Similar to OpenAI's ChatGPT, Copilot can also store helpful details you’ve shared across conversations so it can offer more personalized support. Usually, you only want to feed facts like your name, preferences, interests, or goals, and then the assistant can use them to tailor its responses to you.
To add or remove items from memory, use these steps:
- Click the account menu from the top left.
- Click the Settings option.
- Click the Manage memory page.
- Quick note: This option is only available if the "Personalization and memory" option is turned on in the privacy settings.
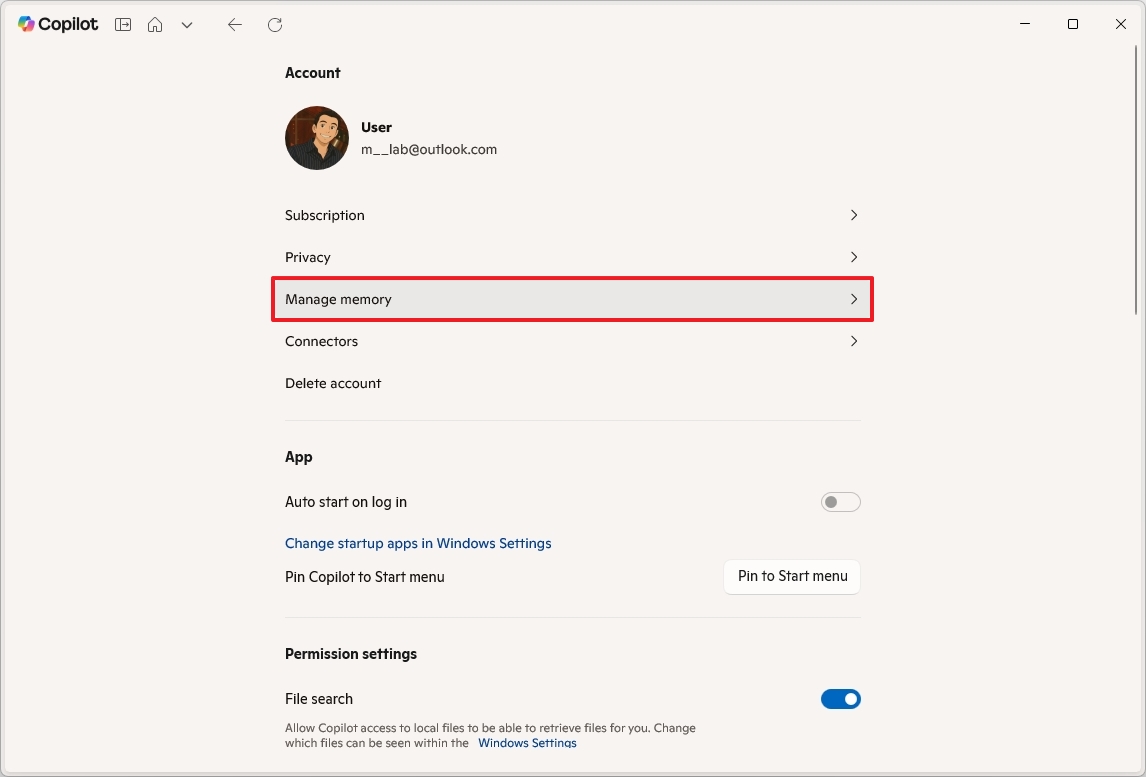
- Click the delete button for the information you want Copilot to forget.
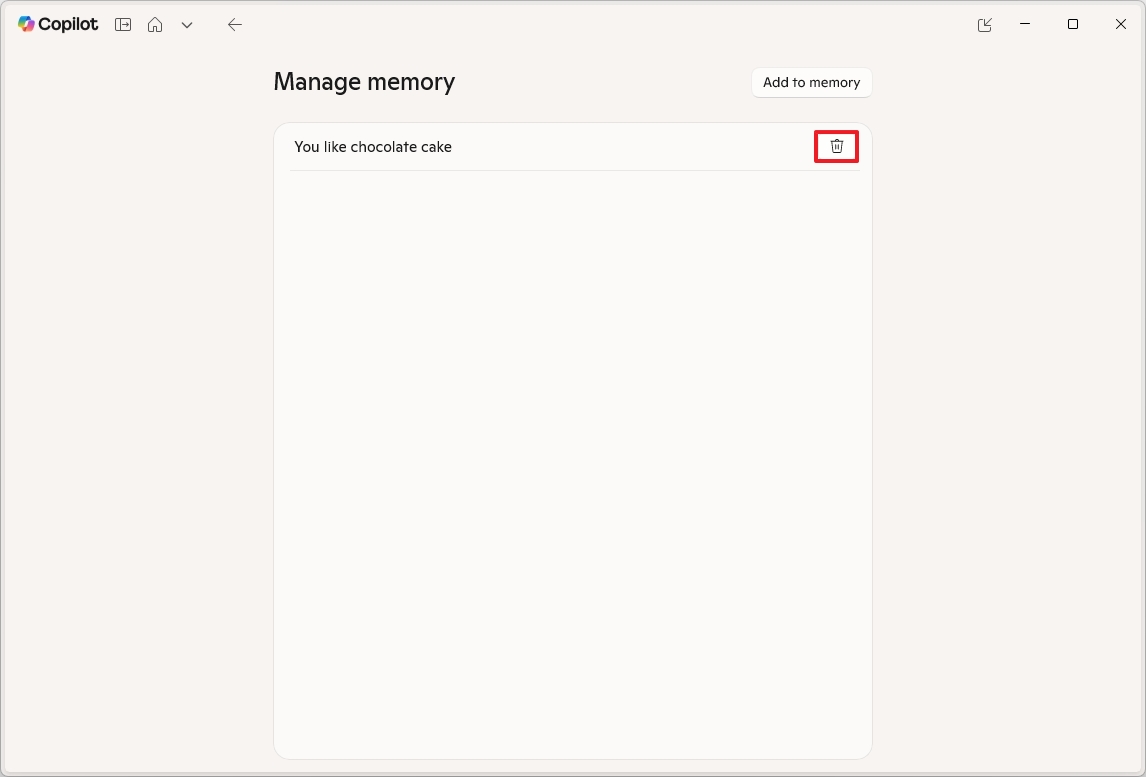
- (Optional) Click the "Add to memory" button to bring up the prompt to store more information you want the assistant to remember.
After you complete the steps, Copilot will only remember the information left in memory.
Configure Copilot Connectors
Copilot connectors are integration tools that allow the Copilot app on Windows 11 to access and understand external data sources.
You can connect Copilot to your personal services, such as OneDrive, Outlook, Google Drive, Gmail, and Google Calendar.
To connect external services to Copilot, use these steps:
- Click the account menu from the top left.
- Click the Settings option.
- Click the Connectors page.
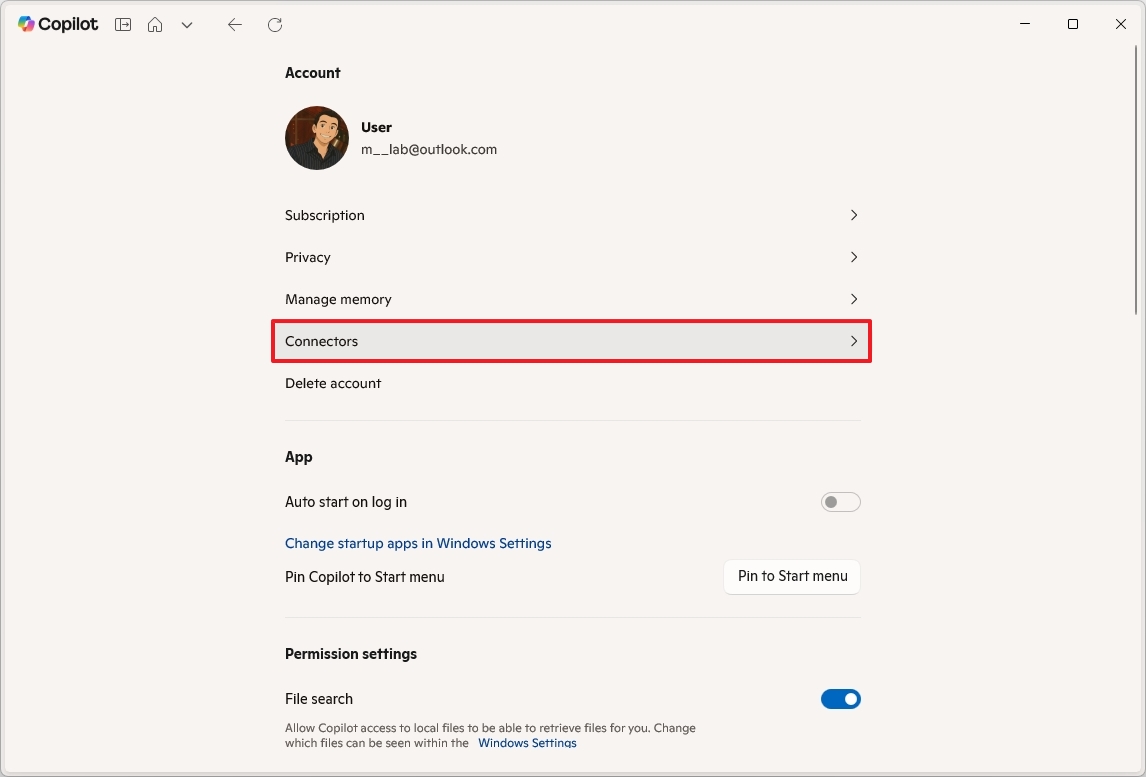
- Turn on the Microsoft services that you want Copilot to have access to, such as OneDrive and Outlook.
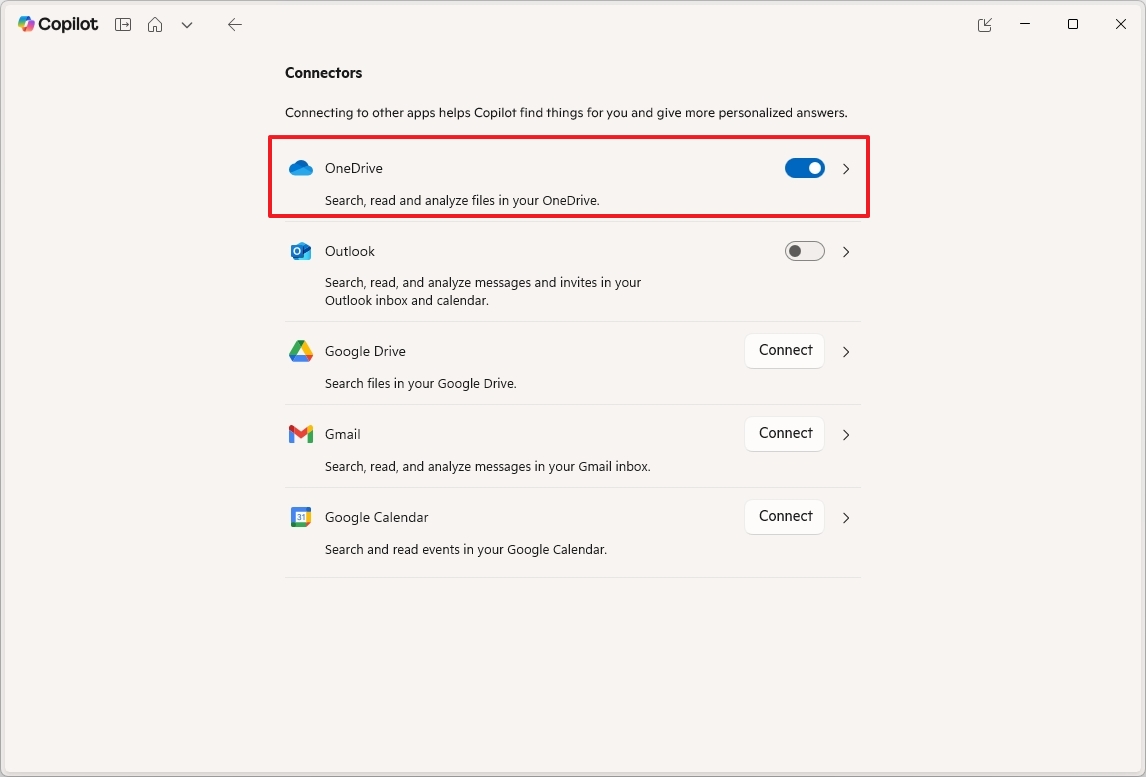
- Click the Connect button and continue with the on-screen directions to connect Google services.
Once you complete the steps, you can use natural language to ask Copilot anything about the contents on those services.
How to interact with Copilot app
Getting started with Copilot is straightforward, thanks to the new, warmer, cozy interface that only includes a message box at the bottom of the page. You will also notice that the latest experience no longer includes the option to change the conversation style like before.
Text prompt
To use text prompts with Copilot, use these steps:
- Open the Copilot app.
- (Option 1) Choose the Quick response option for everyday questions.
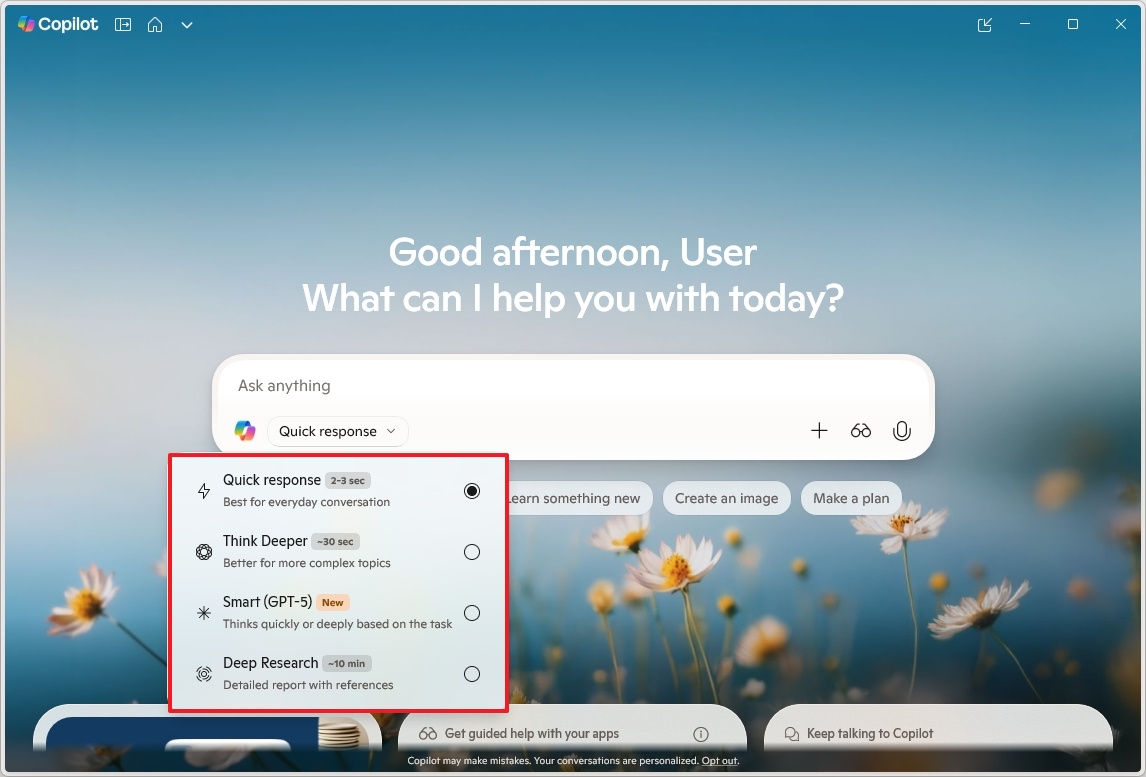
- (Option 2) Choose the Think Deeper option to allow the chatbot to create answers for more complex topics.
- (Option 3) Choose the Smart (GPT-5) option if you want the chatbot to adapt automatically for fast, simple tasks and deep for complex ones.
- (Option 4) Select the Deep Research option allows you to generate detailed reports, comparisons, or multi-source answers. This option is best when you need citations, context, and thorough exploration.
- Compose your prompt in the "Message Copilot" box and press Enter.
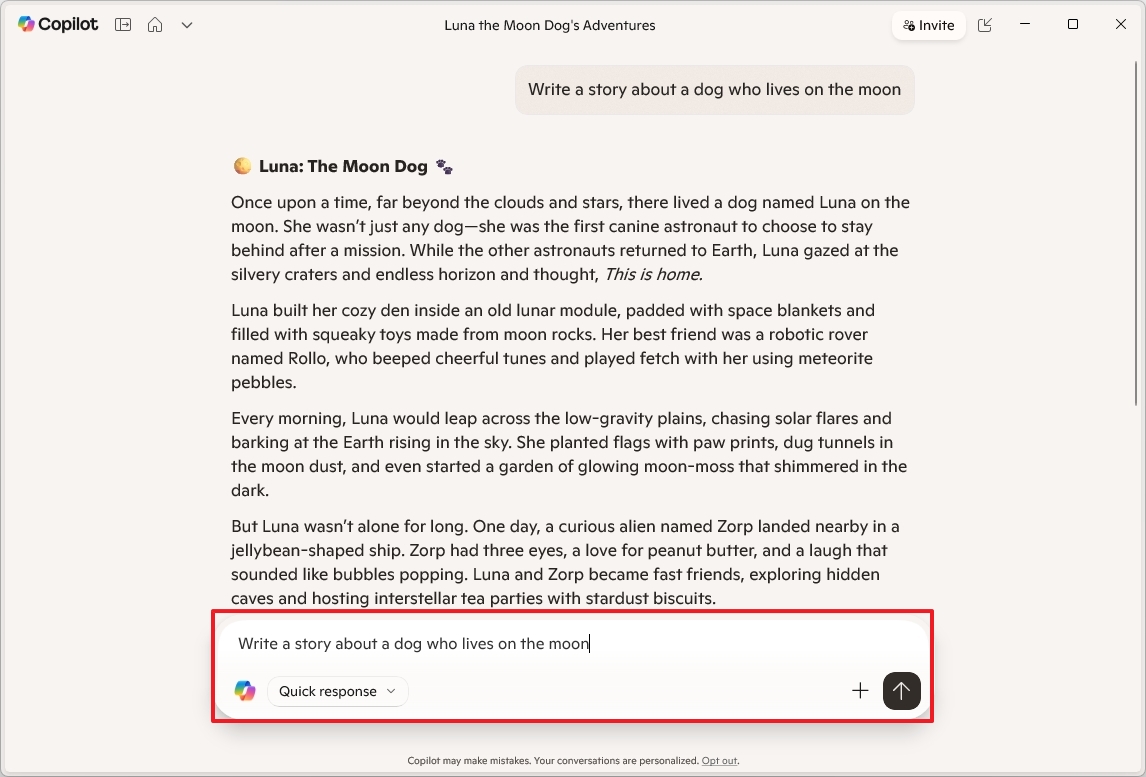
- Quick tip: In the box, you can ask anything using natural language. For instance, you can ask questions like "Make me a picture of a serene koi fish pond with lily pads," "Write a story about a dog who lives on the moon," or "Create a five-day itinerary to visit Chicago in November."
- Copilot understands the context, so you can ask additional questions about the same topic without repeating specific keywords.
- Click the plus (+) button to upload an image to the AI, and then you can ask it for more information about that piece of content.
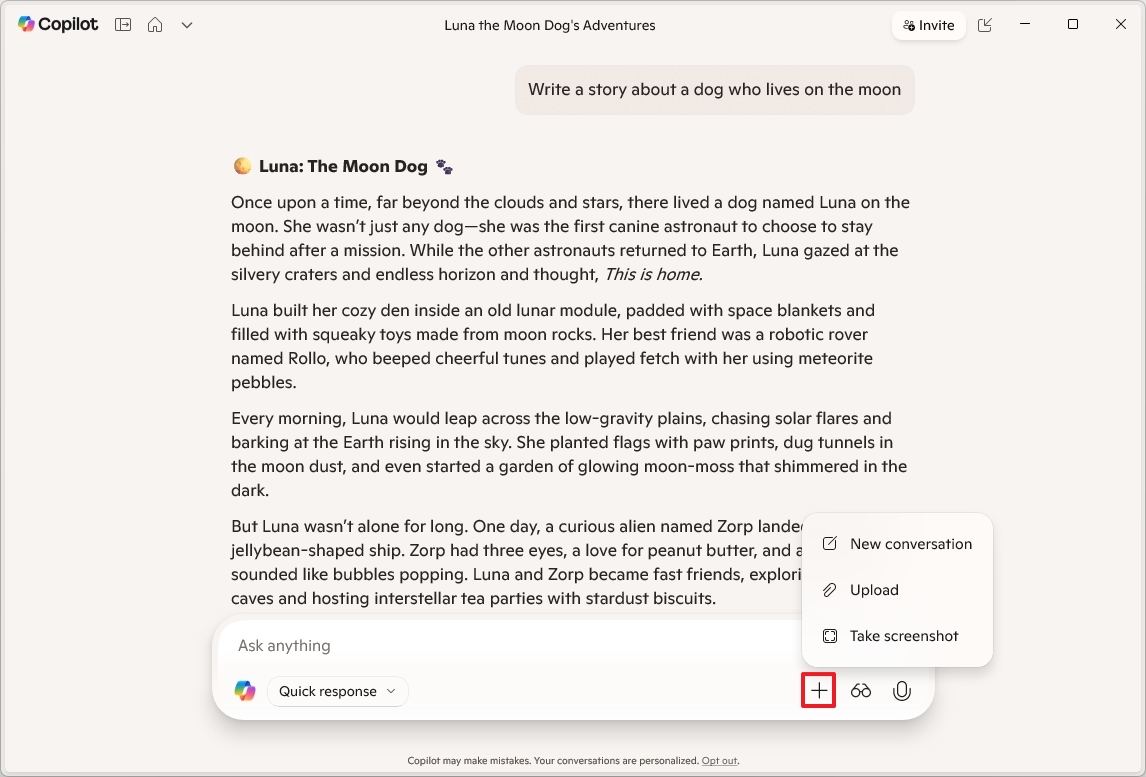
Once you complete the steps, it's recommended to check the answer, as AI usually makes mistakes.
If you're using Copilot Mode in Microsoft Edge, the "Smart (GPT-5)" option will appear as "Smart," which is also the default configuration.
Also, you'll find the "Real talk" mode for honest answers, and the "Study and learn" option is more for guided learning and educational tasks.
Voice prompt
To start a voice conversation with Copilot, follow these steps:
- Open the Copilot app.
- Click the microphone button.
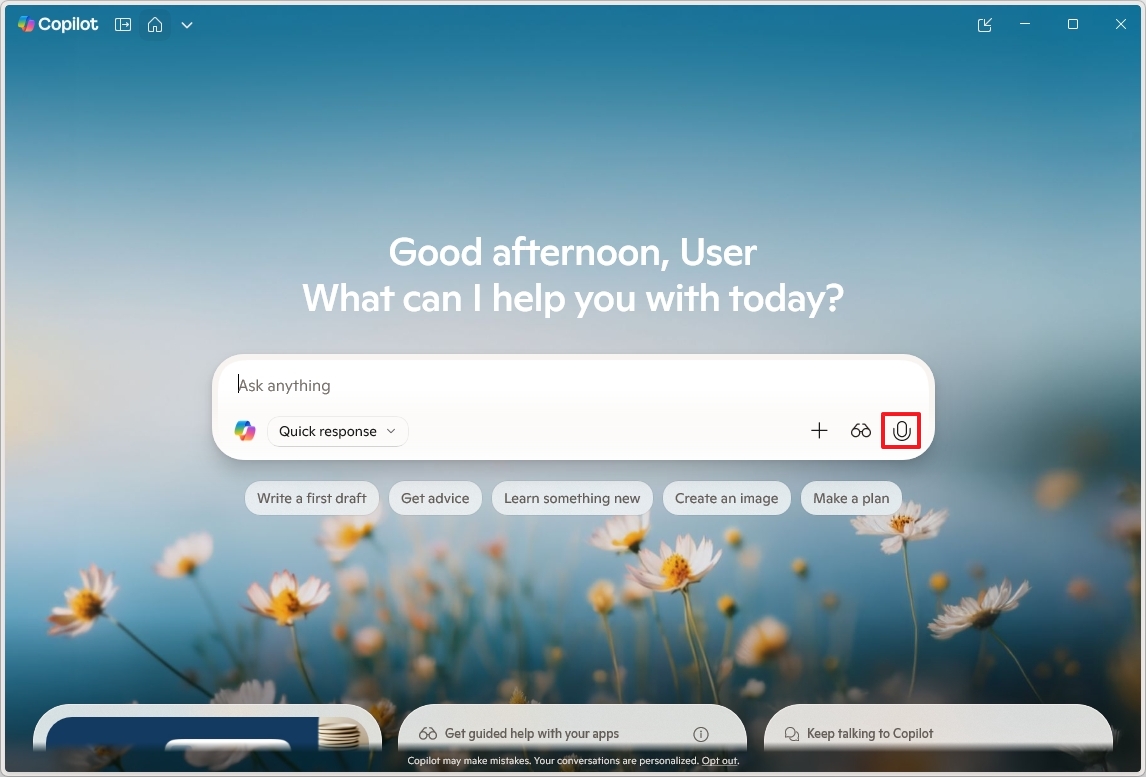
- Quick note: Although it might be obvious, this feature requires access to a microphone. If your device doesn't have one, you won't be able to use it.
- Start a conversation using natural language with the chatbot.
- (Optional) Click the Settings (gear) button to change the chatbot's voice.
- Click the Close (X) button to open the main interface again.
You can ask the chatbot anything and interrupt it like during a normal conversation with another human.
Copilot Vision on the desktop
Copilot Vision lets you share your screen with the chatbot to get assistance with virtually any activity you're doing.
To get started with Vision on Copilot while working on an application, use these steps:
- Open the Copilot app.
- Click the glasses button.
- Click the Share button to request that the AI assist you.
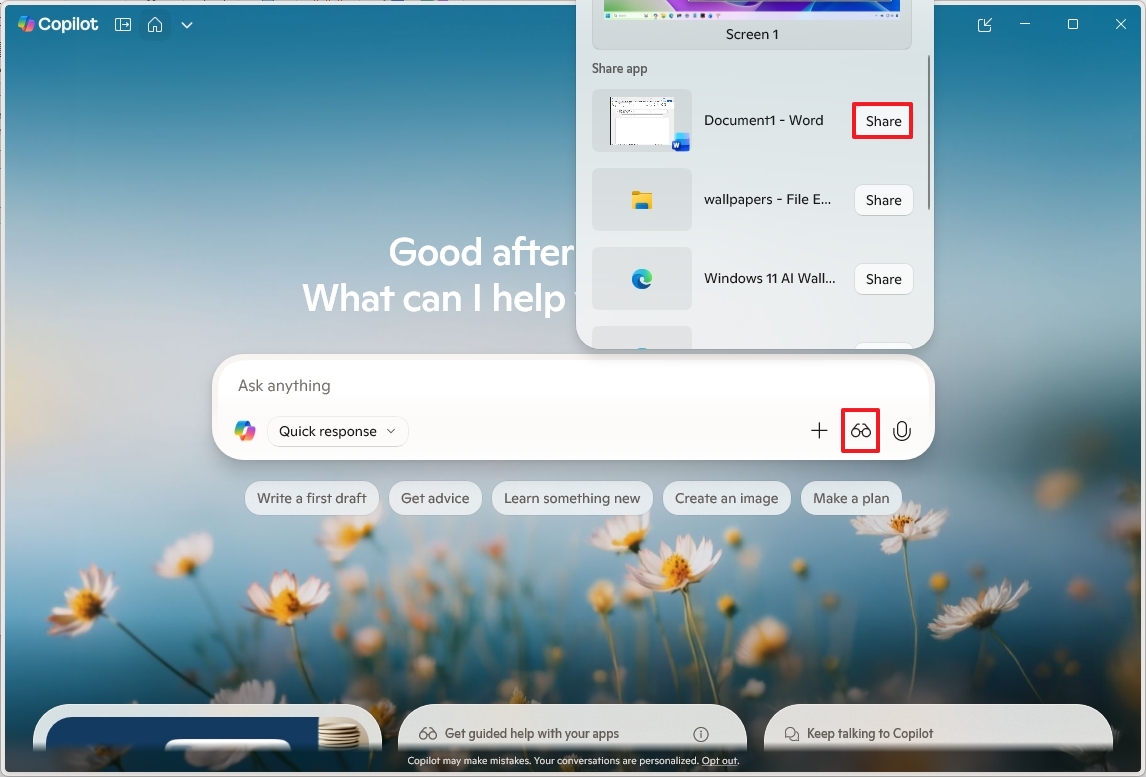
- Chat with the chatbot to get assistance with the application.
For example, if you're in the Settings app, you can say something like: Can you show me where I can check for system updates? And Copilot will be able to highlight where you need to go to change the settings.
It's important to note that the chatbot can guide you through the process, but it can't take actions automatically.
Also, even though the technology is impressive, in my experience, it's not very accurate.
File Search with Copilot
You can also use Copilot to search for files on your computer instead of using the Windows Search feature, but you have to enable the feature manually.
To allow Copilot to search files locally stored on your device, use these steps:
- Open the Copilot app.
- Compose your search query using natural language. For example, what files did I work on this week? And the chatbot should be able to surface the files you're looking for.
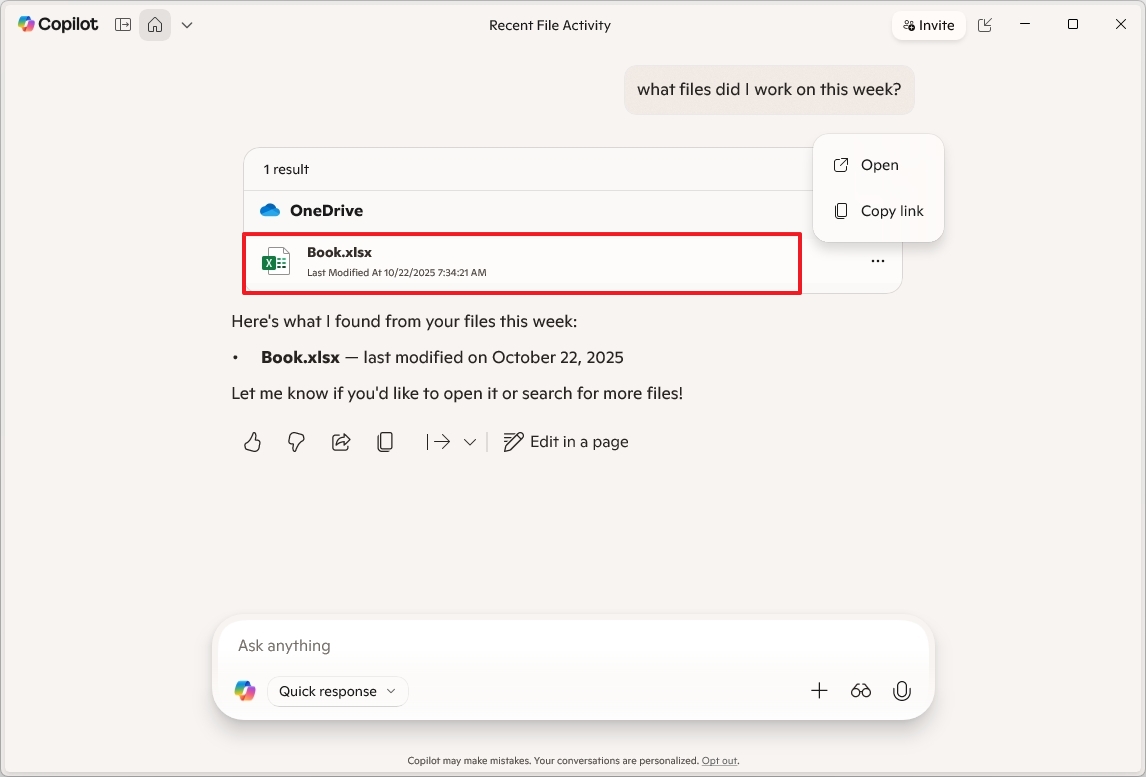
If you click the file, the corresponding application will open. You can also click the "View all files" button (if applicable) to open the search result in File Explorer.
How to get started with inbox apps Copilot integration
Copilot integrates with various apps, including Notepad, File Explorer, Paint, Photos, and Click to Do.
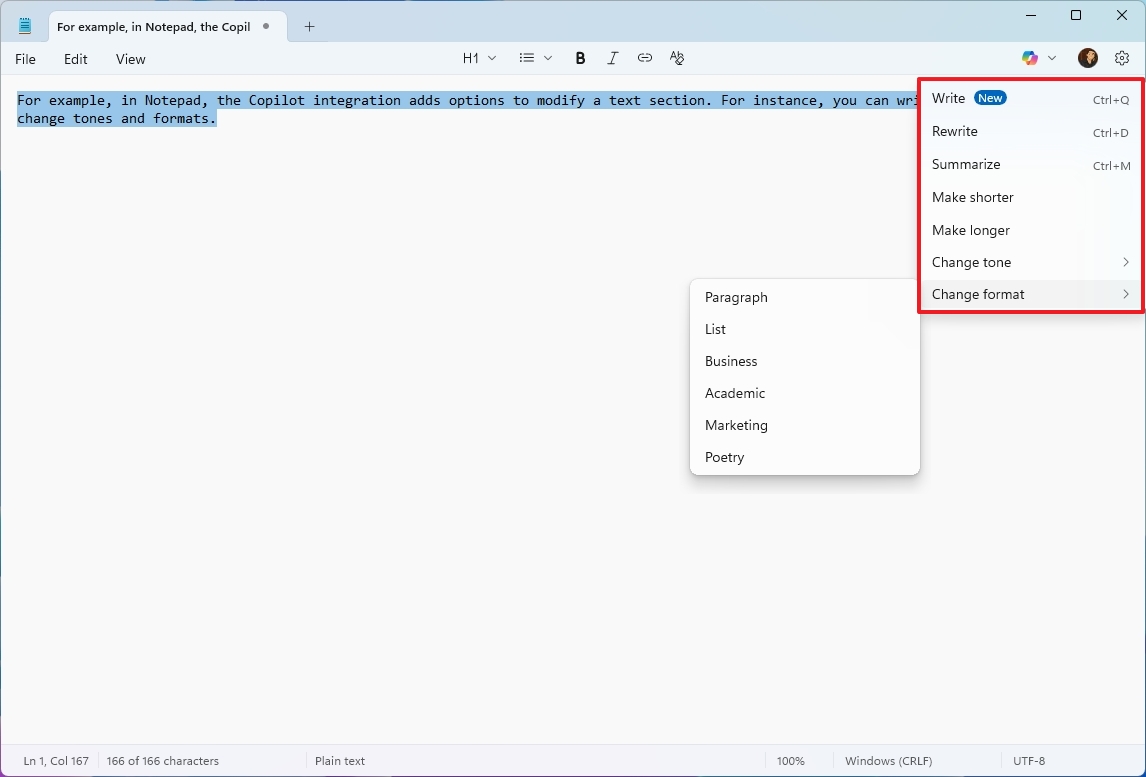
For example, in Notepad, the Copilot integration adds options to modify a text section. For instance, you can write, rewrite, summarize, and change tones and formats.
In File Explorer, the integration is subtle, with an "Ask Copilot" option in the context menu that lets you send an image or document to the Copilot app to ask any question you have about the file.
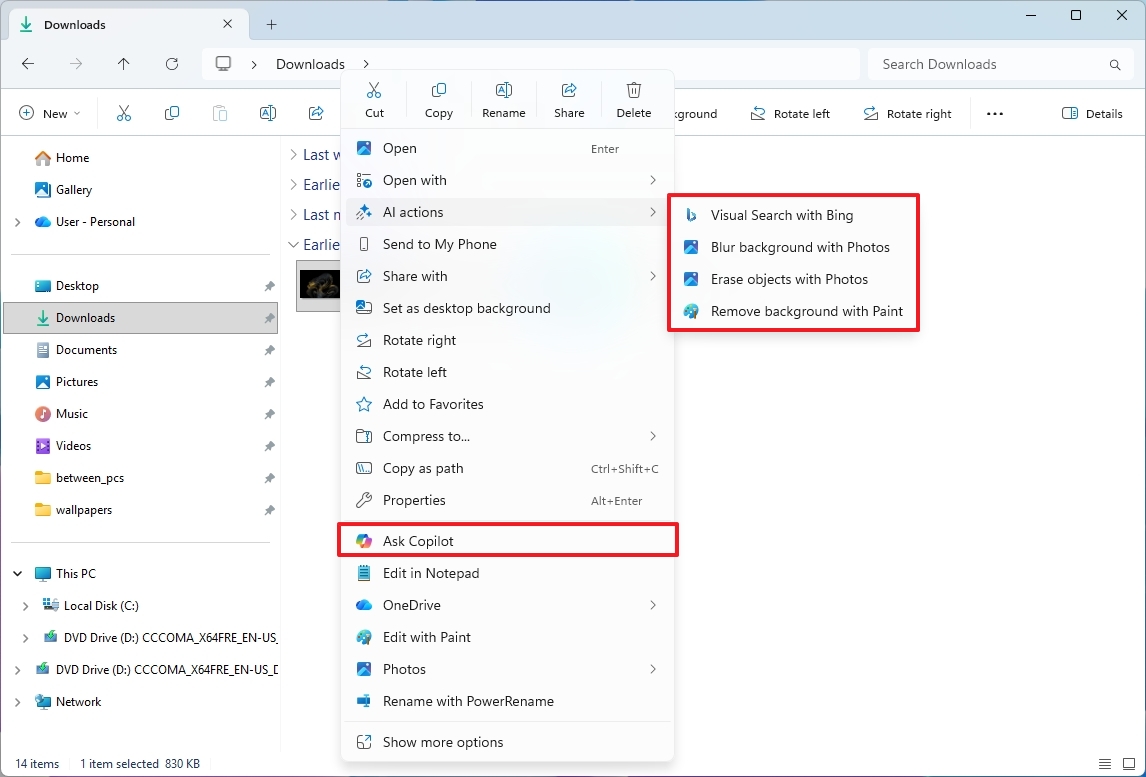
It's worth noting that File Explorer now also includes AI actions, which let you perform various actions on images and Office documents.
In the Paint, you'll find a deeper Copilot integration. For example, you can use the AI assistant to create an image using a simple text prompt. You also get an option to remove the background or erase an object within an image with a single click.
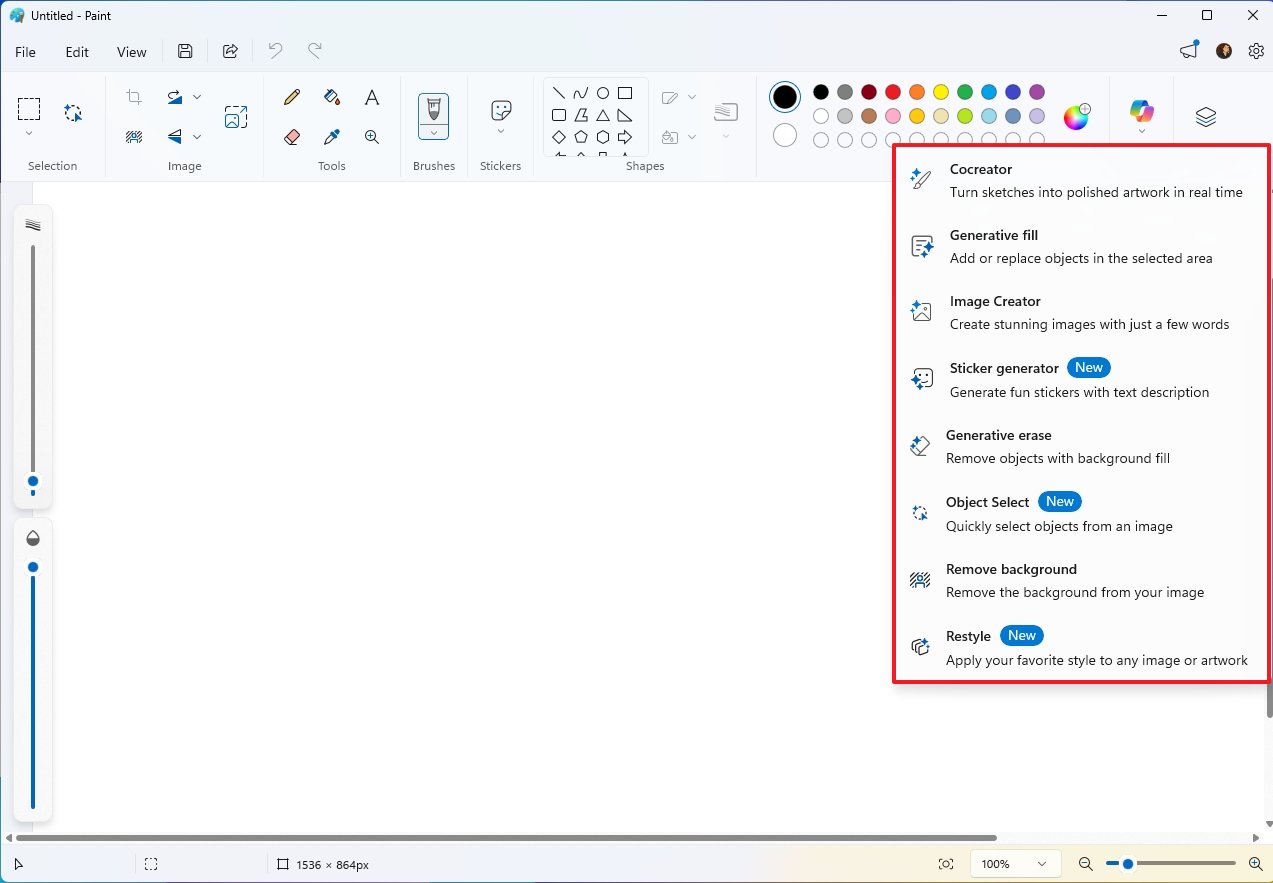
Also, if you have a Copilot+ PC, you'll have access to the "Cocreator" feature to turn a hand-made sketch into a polished artwork in real-time.
The "Sticker generator" feature lets you create stickers with AI, and the "Restyle" feature enables you to transform the art style of an image already on the canvas. It's one of the new generative AI features being integrated into the app.
Finally, on Copilot+ PCs, when using Click to Do, you can access different Copilot actions, including the "Ask Copilot" button to send selected text or objects to the Copilot app.
In addition, you will find options to rewrite, summarize, and create bulleted lists from selected text.
On the other hand, if you're selecting an object, the options will be slightly different.
How to get started with inbox apps Copilot integration
If you use the Microsoft 365 (Office) apps, you'll also find Copilot on Word, Excel, OneNote, and PowerPoint.
To use Copilot in Word, use these steps:
- Open Microsoft Word.
- Click the Home tab.
- Click the Copilot button.
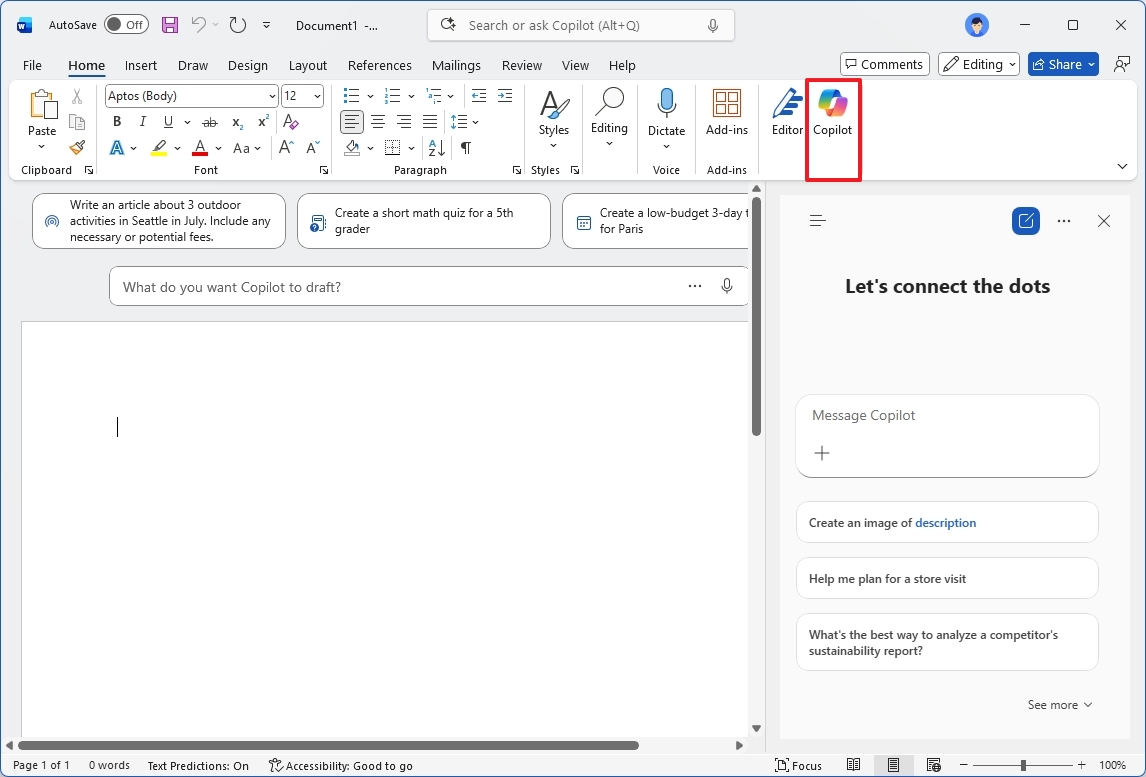
- Compose the prompt for the task you want the AI to assist you with.
For example, you can ask the chatbot to summarize the document, generate an audio overview of the document's contents, or even ask it to create an image based on a text description.
The steps to use Copilot in Excel, OneNote, and PowerPoint are virtually the same. The only difference is that your conversation and responses will be tailored to the application you're using.
How to manage the Copilot integration on Windows 11
On Windows 11, how you manage Copilot depends on the application you're using to access the assistant.
For example, if you uninstall the Copilot app, it will remove the app and the "Ask Copilot" integration from most places. However, in the Microsoft 365 apps and Edge, you can only turn off the integration.
In the case of Notepad, you only have access to some Copilot AI actions. You cannot chat with the assistant, and if you want to turn off the feature, you have to do so from within the settings page.
Remove Copilot integration
If you want to remove the Copilot integration across the operating system and apps, you will have to perform some extra steps in addition to uninstalling the app, due to how the AI integrates into the different applications.
Uninstall Copilot app
To uninstall the Copilot app, use these steps:
- Open Settings.
- Click on Apps.
- Click the Installed apps page on the right side.
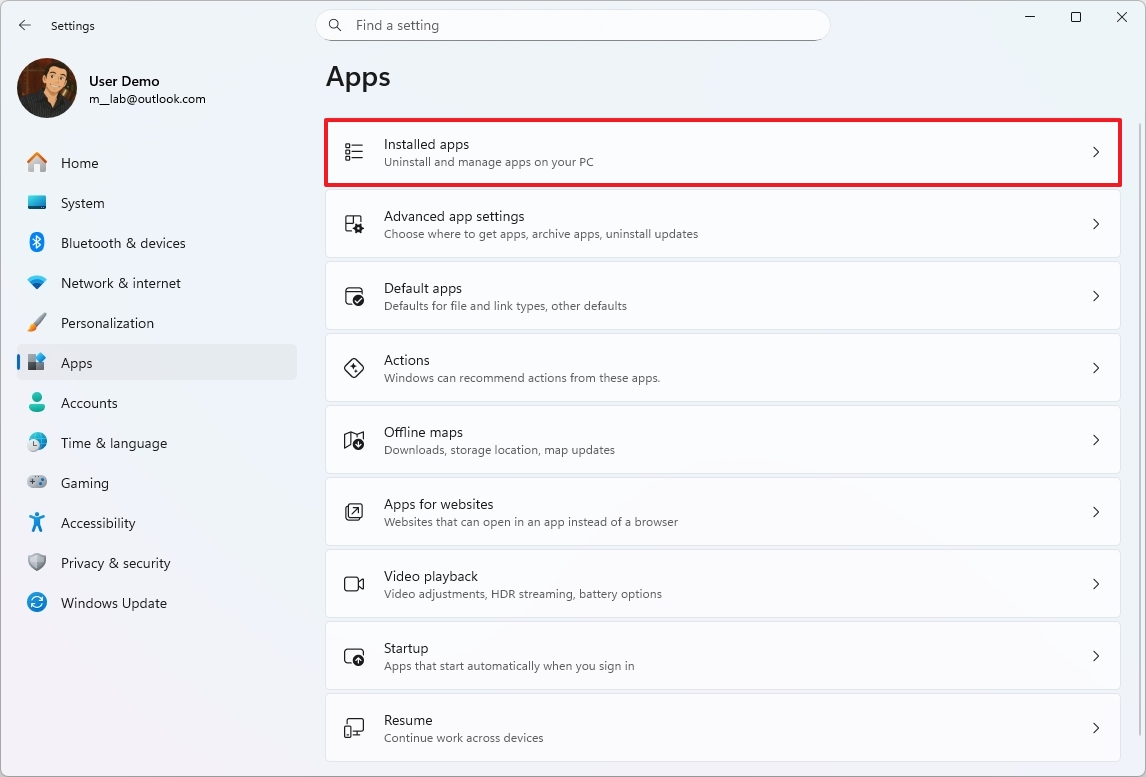
- Open the main menu (three dots) to the right of the Copilot app.
- Click the Uninstall button.
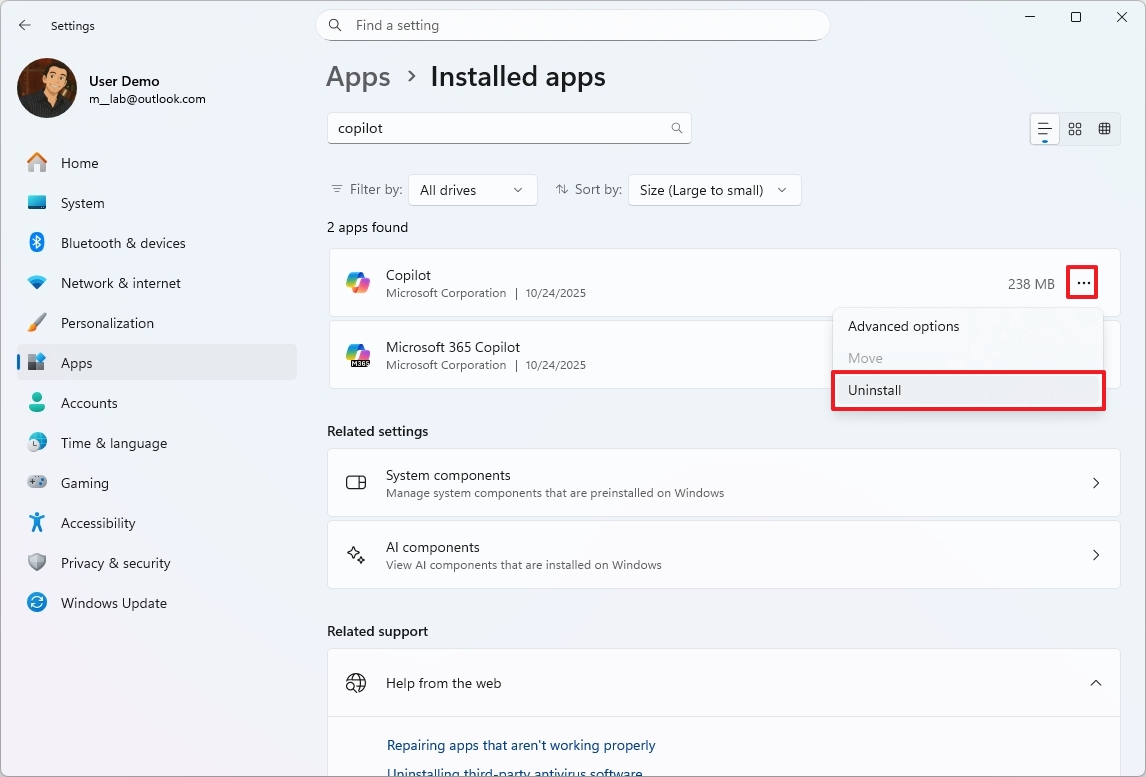
- Click the Uninstall button again.
- (Optional) Open the main menu (three dots) to the right of the Microsoft 365 Copilot app.
- Click the Uninstall button to uninstall the Copilot app for Microsoft 365 apps..
Once you complete the steps, the Copilot app will be removed from your computer. However, you will still see the button inside the Windows Search experience from the Taskbar.
Disable Copilot on Microsoft Edge
Also, the Copilot feature from Microsoft Edge is independent of the dedicated app available in the operating system. If you want to turn off this feature, use these steps:
- Open Microsoft Edge.
- Open the "Settings and more" (three dots) menu and choose the Settings option.
- Click on Copilot and sidebar.
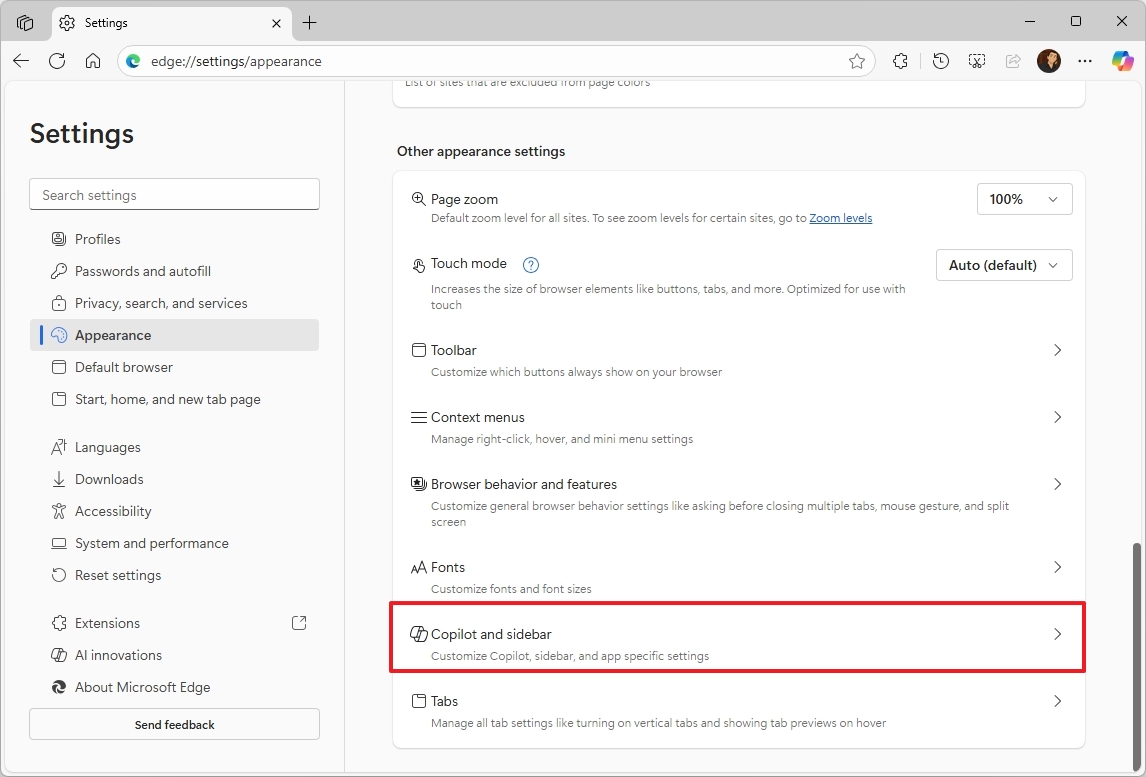
- Click the Copilot setting.
- Turn off the "Show Copilot button on the toolbar" toggle switch.
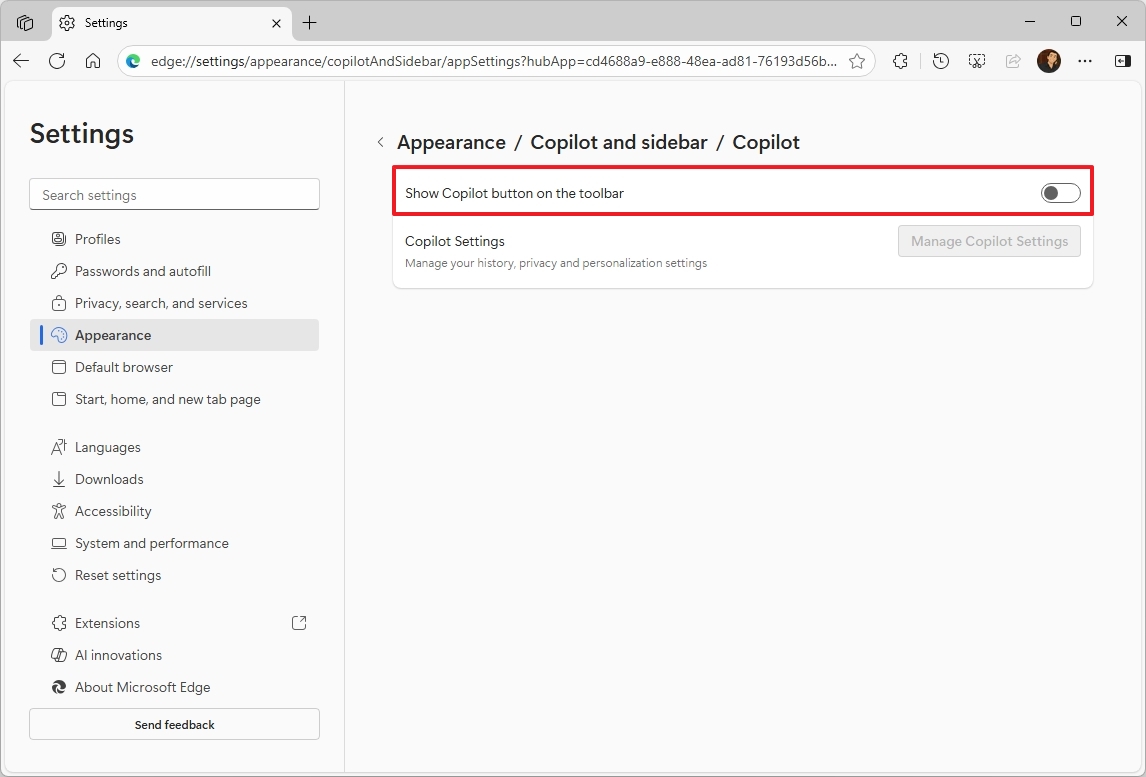
After you complete the steps, the assistant will no longer be available through the web browser.
Disable Copilot on Notepad
If you don't want to use Copilot in Notepad, use these steps:
- Open Notepad.
- Click the Settings button.
- Turn off the Copilot toggle switch.
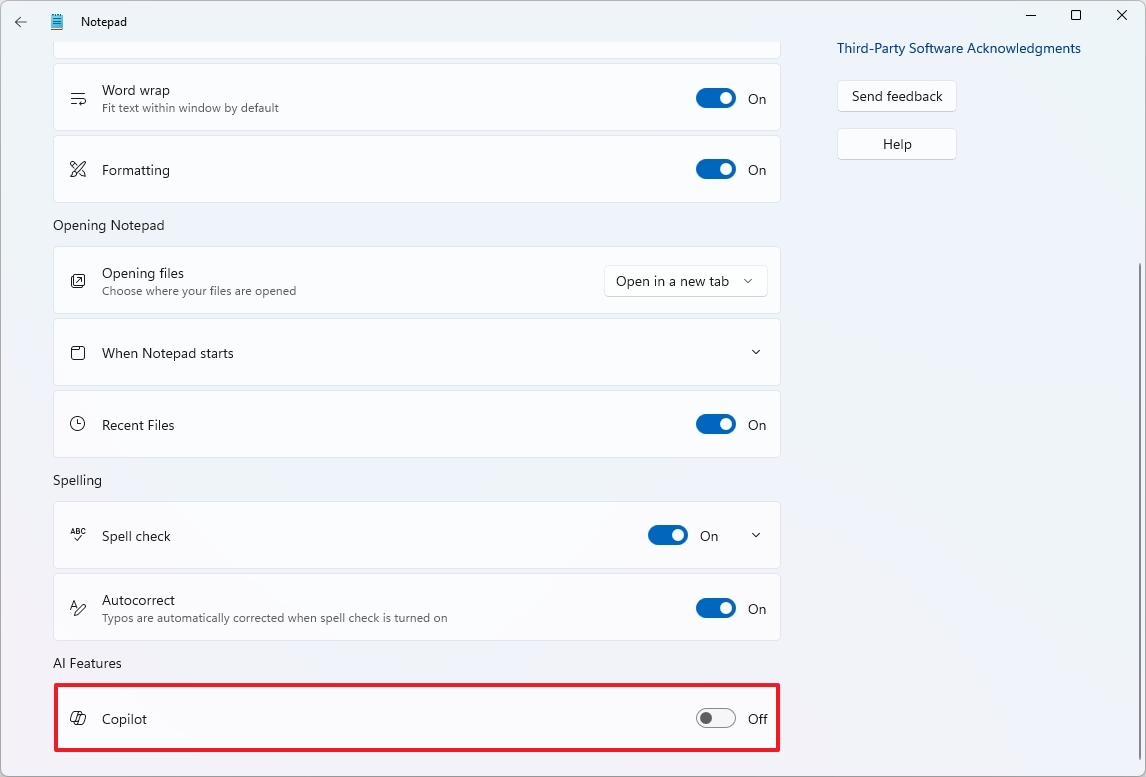
Once you complete the steps, Copilot and the profile menu will be disabled from Notepad.
Disable Copilot on Microsoft 365 apps
You can also disable Copilot from the Microsoft 365 apps with these steps:
- Open Word, Excel, OneNote, or PowerPoint.
- Click on File.
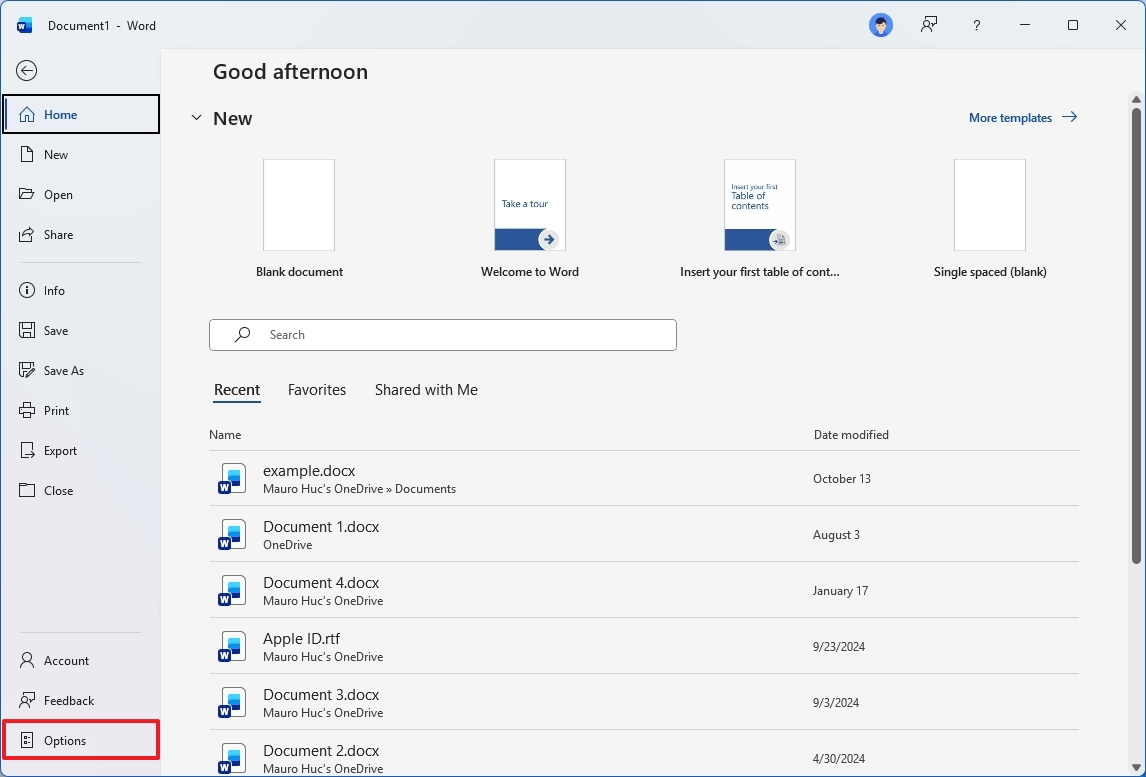
- Click on Options.
- Clear the Enable Copilot option.
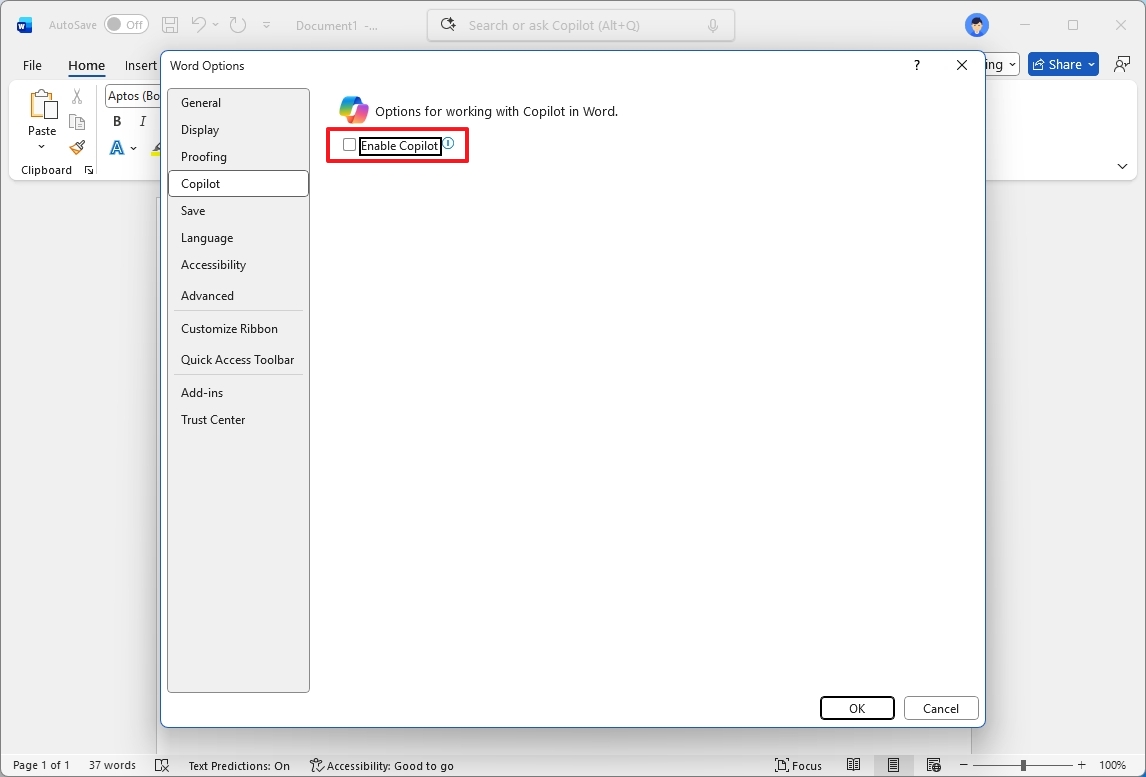
- Click the OK button.
- Restart the app.
After you complete the steps, the Copilot will be turned off on the application, but you will have to repeat the steps on each application for which you want to disable the chatbot.
Re-enable Copilot integration
At any time, you can always reinstall the Copilot app and re-enable the chatbot and actions on apps.
Install the Copilot app
To install the Copilot app, use these steps:
- Open the Copilot app page.
- Click the "View in Store" button.
- Click the Get (or Install) button.
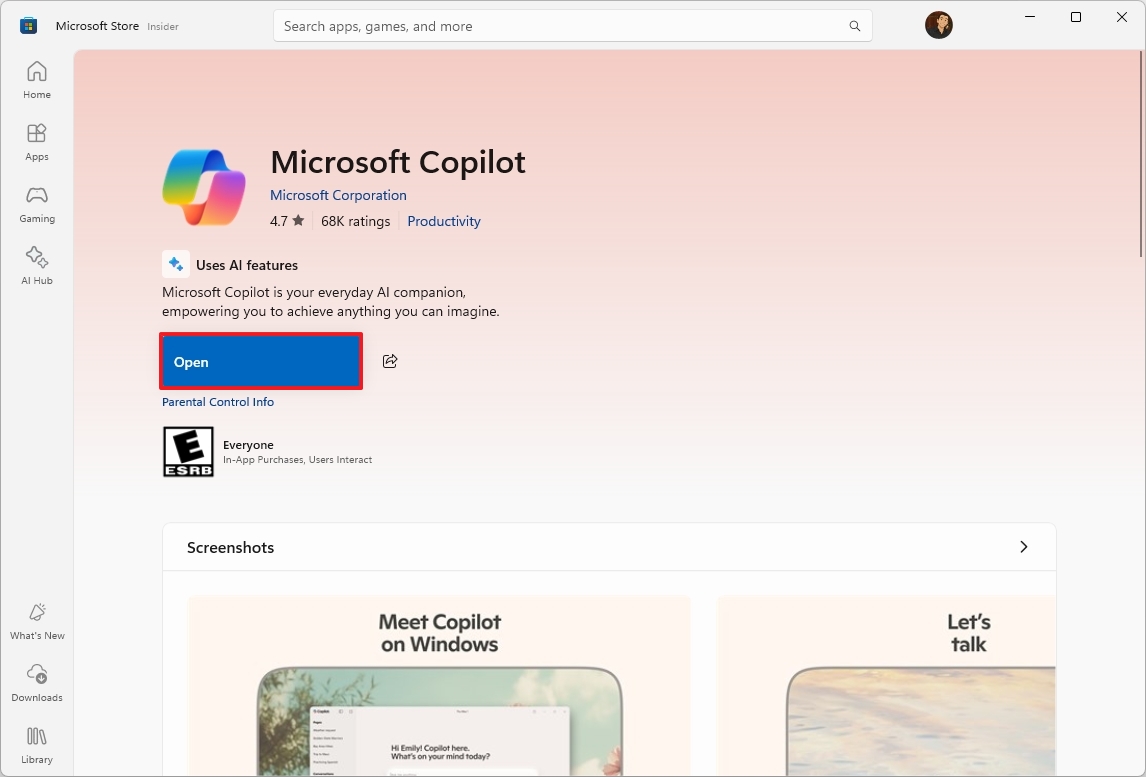
Once you complete the steps, the Copilot will be available from the Start menu.
Re-enable Copilot on Microsoft Edge
To enable the chatbot on the browser, use these steps:
- Open Microsoft Edge.
- Open the "Settings and more" (three dots) menu and choose the Settings option.
- Click on Appearance.
- Click the "Copilot and sidebar" setting under the "Other appearance settings" section.
- Click the Copilot setting.
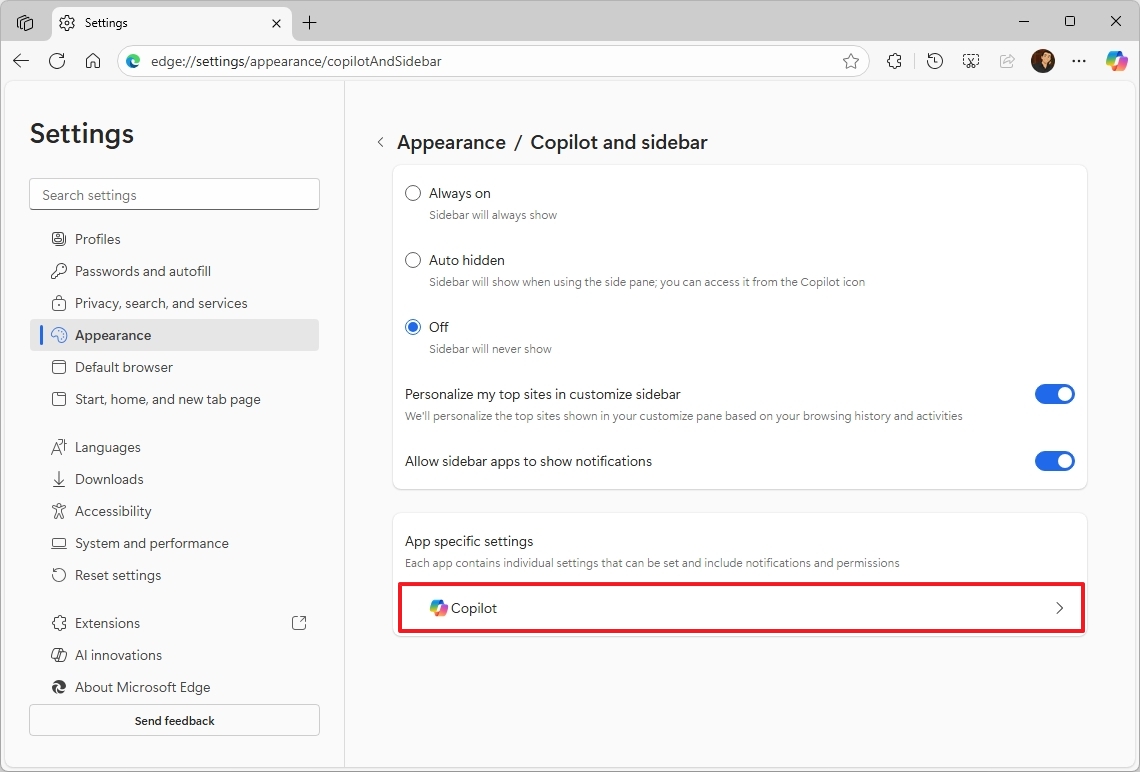
- Turn on the "Show Copilot button on the toolbar" toggle switch.
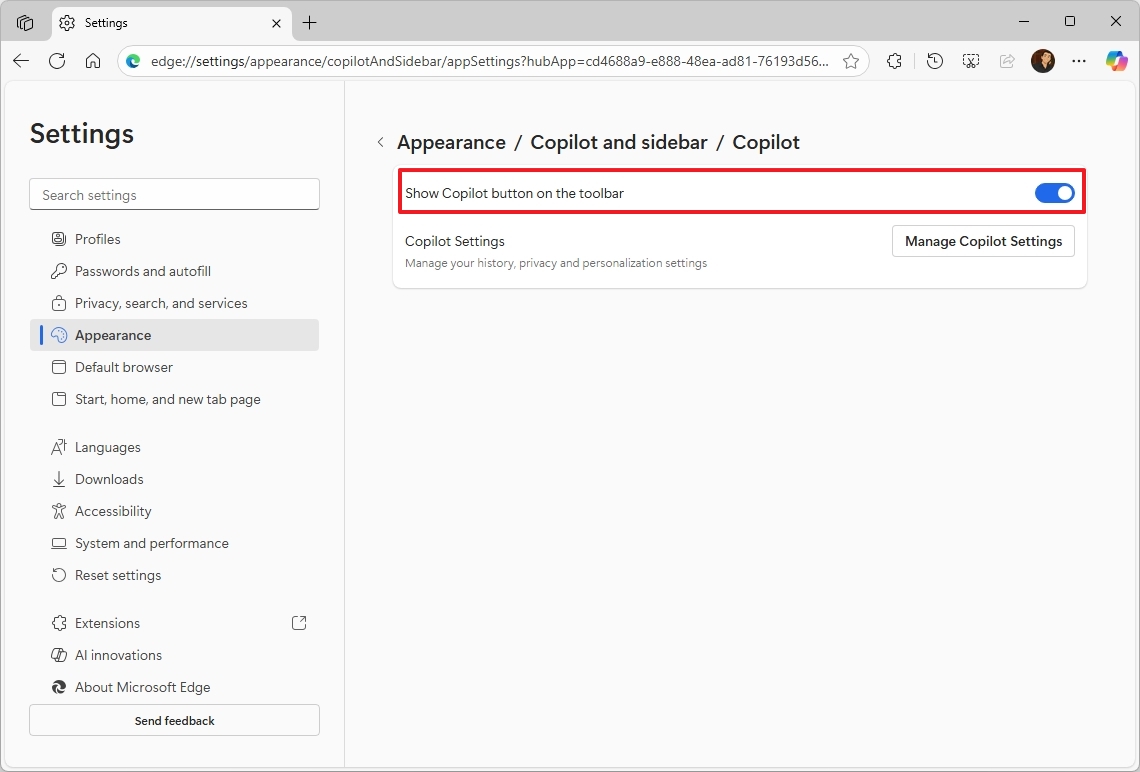
After you complete the steps, the chatbot will be enabled again on the web browser.
Re-enable Copilot on Notepad
To re-enable the Copilot actions in Notepad, use these steps:
- Open Notepad.
- Click the Settings button.
- Turn on the Copilot toggle switch.
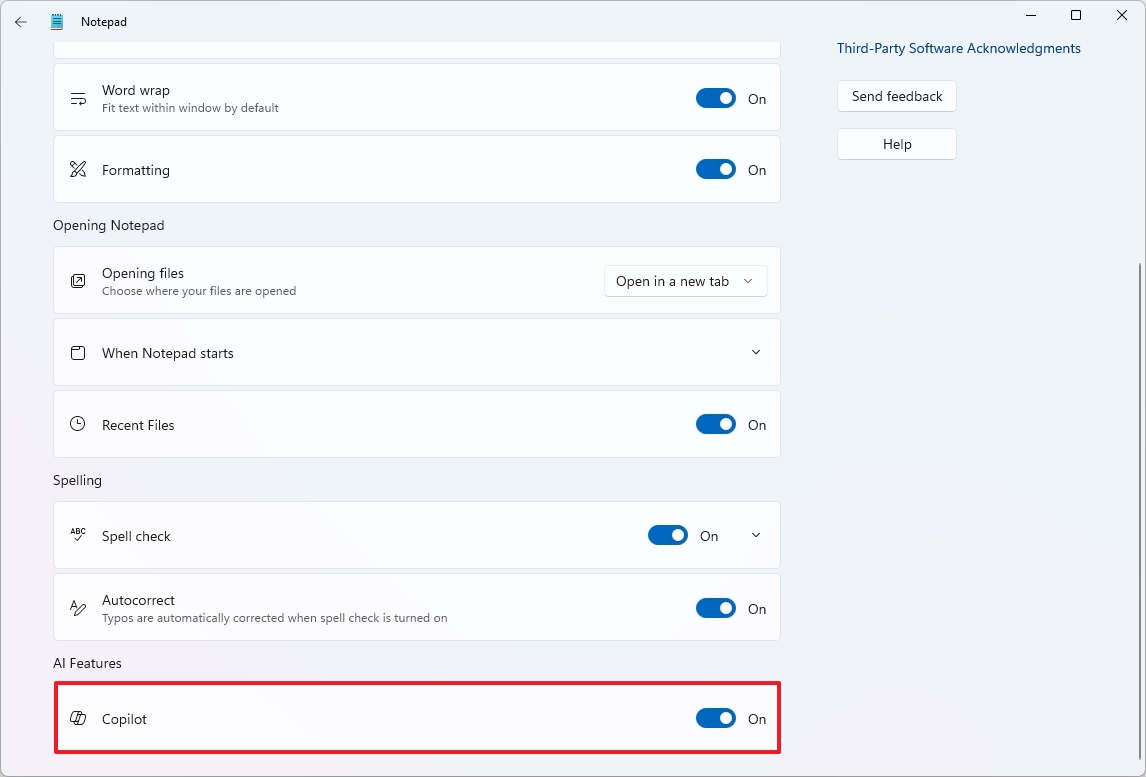
Once you complete the steps, the AI actions will enable one more time in Notepad.
How to access Copilot on Microsoft Edge
On Microsoft Edge, Copilot is a little different, since the assistant offers a more tailored experience for the web.
Before getting started, you want to enable "Copilot Mode" in the browser. You can do this from "edge://settings/ai" and turn on the AI mode experience across the browser and the new tab page. Alternatively, you can enable this mode on this Microsoft page.
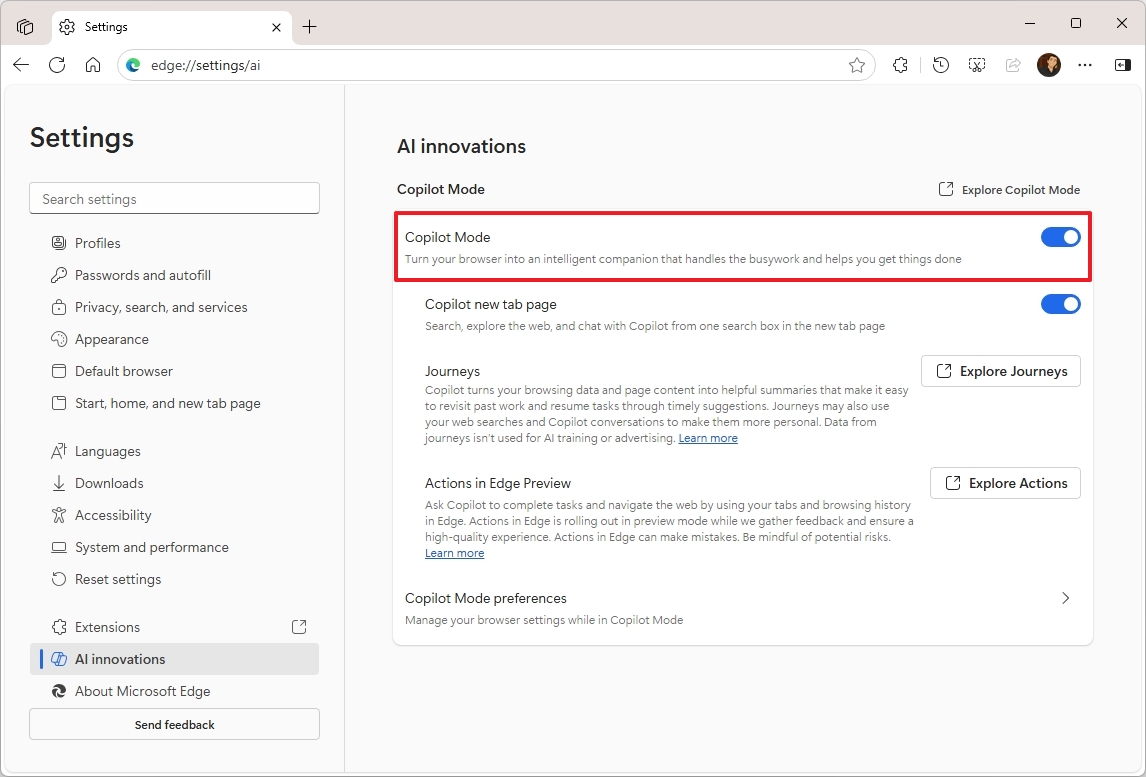
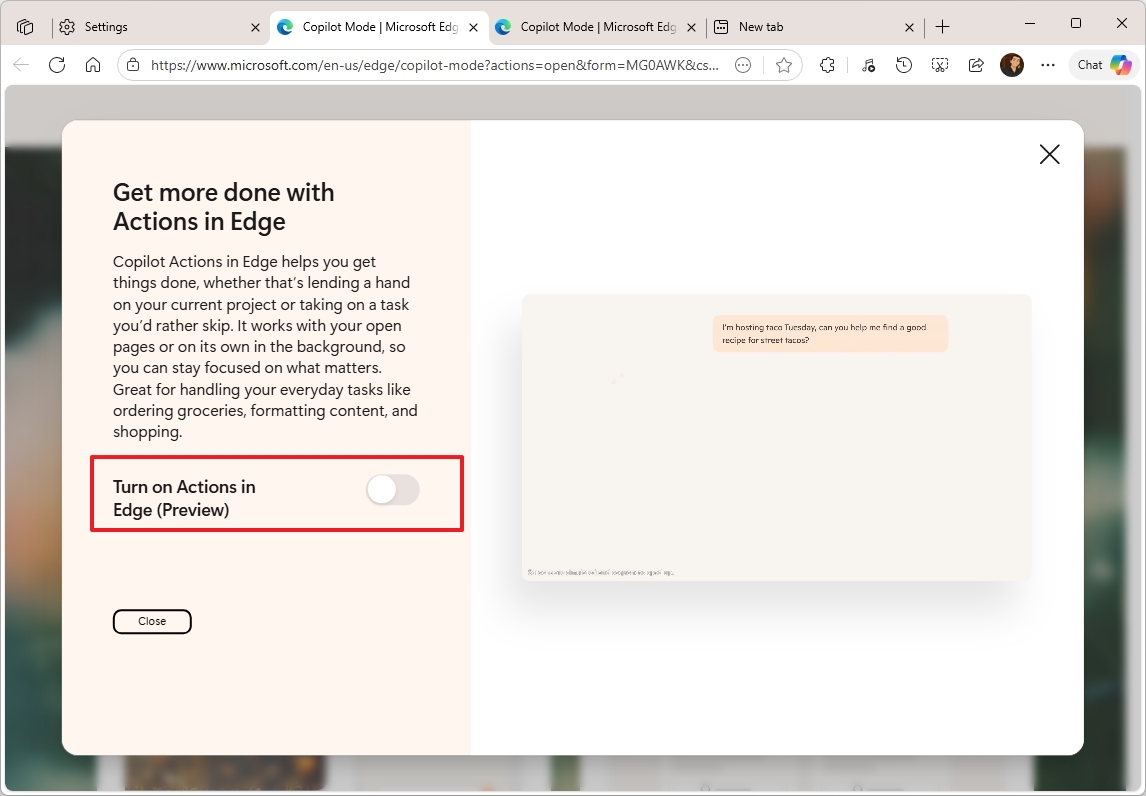
Once you enable the experience, on the "AI innovations" page, you'll notice a few more options, including Journeys and Actions. You can click each option to enable it. (These last two features are in limited preview at the time of writing.)
New tab page with Copilot
The Copilot Mode will transform the new tab page into an AI prompt, identical to the Copilot home on the web.
The prompt box is smart enough to understand when you want a web result, open a website, or an answer with AI.
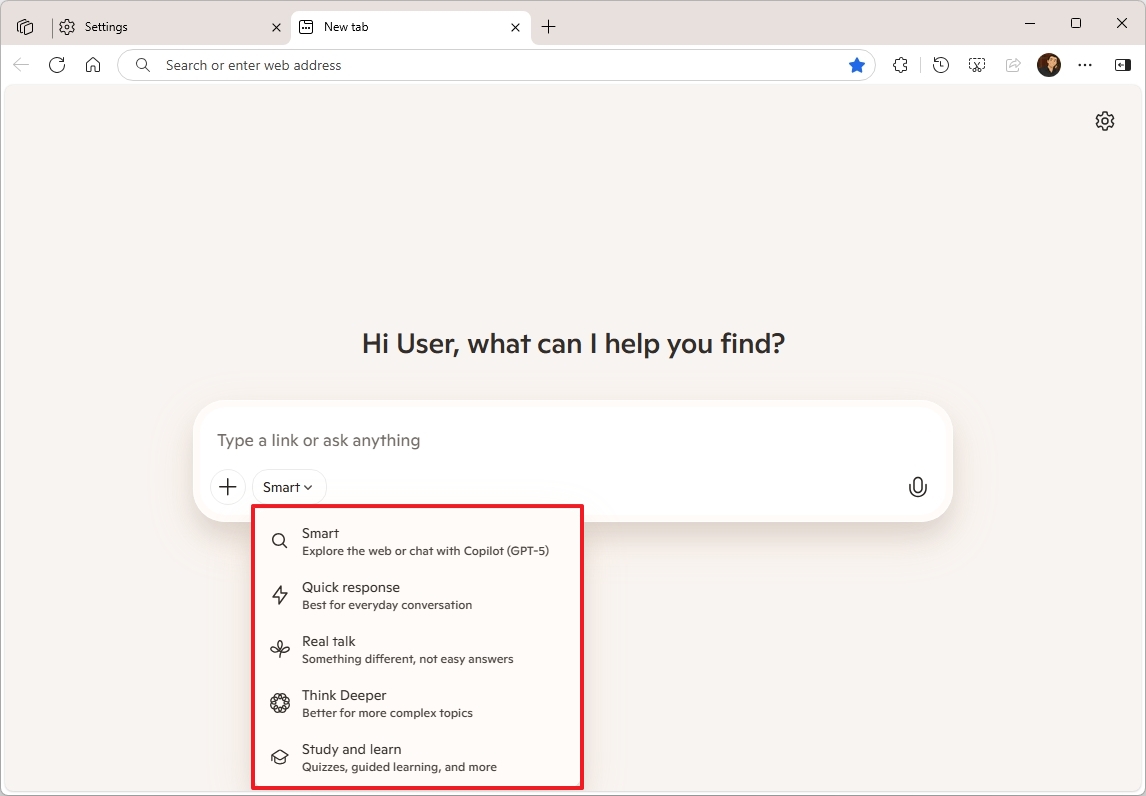
The default mode is "Smart," which tries to make the best decision about the action intent and uses the GPT-5 model.
The "Think Deeper" option allows the chatbot to create answers for more complex topics.
The "Deep Research" option allows you to generate detailed reports, comparisons, or multi-source answers. This option is best when you need citations, context, and thorough exploration.
Also, you'll find the "Real talk" mode for honest answers, and the "Study and learn" option is more for guided learning and educational tasks.
The "Quick response" option is best suited for everyday conversation.
Copilot Vision on Edge
The integration of Copilot on Microsoft Edge also includes Vision to assist with anything you're doing on the web.
To get started with Vision on Copilot, use these steps:
- Open Microsoft Edge.
- (Option 1) Open a new tab page to access the Copilot prompt.
- (Option 2) Click the Chat button in the top-right.
- Click the microphone button.
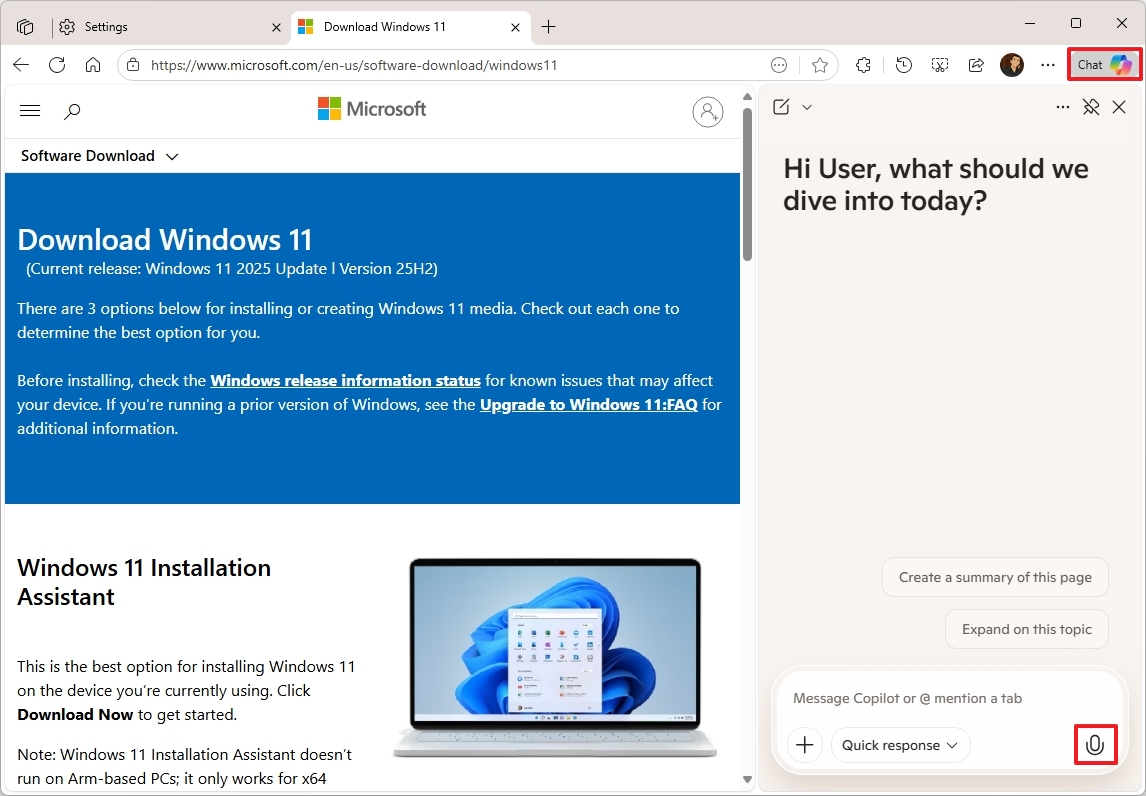
Once you complete the steps, Vision will activate, and you can start asking questions about anything you see on the screen.
Chat with Copilot on a web page
You can also invoke Copilot from any web page using the "Chat" option from the top-right side of the screen.
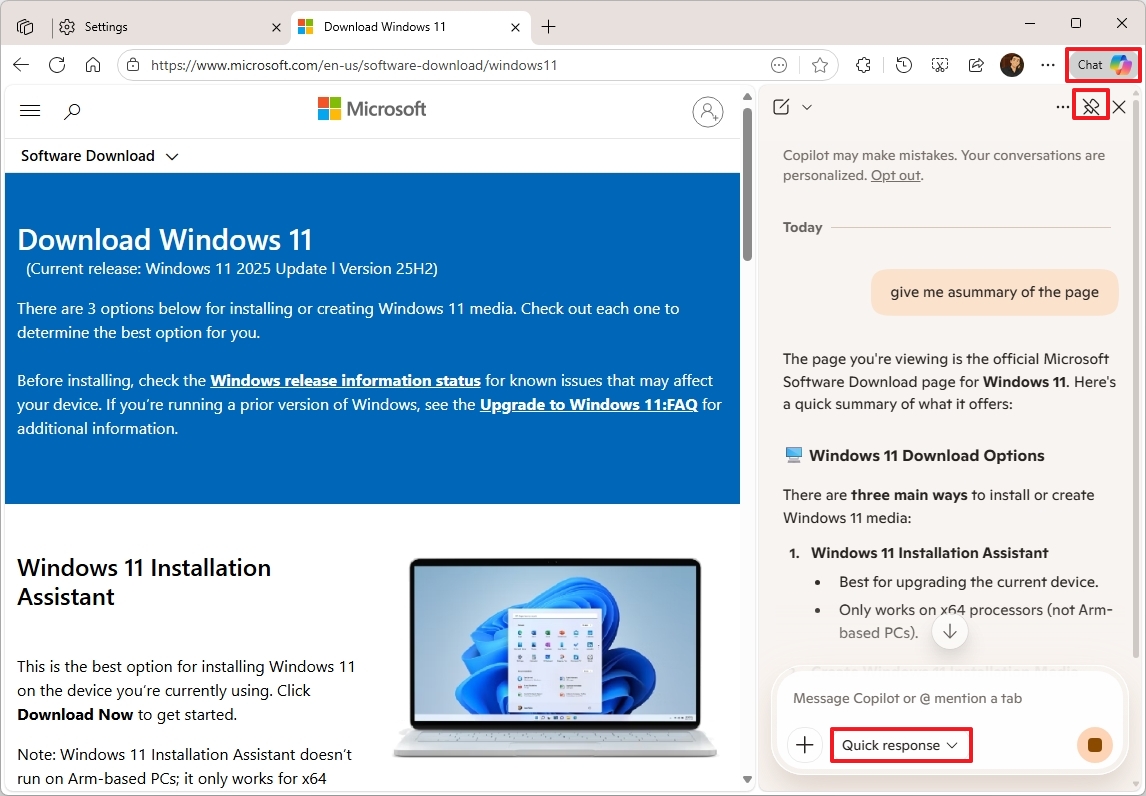
While in this experience, you can use the chatbot to ask questions about the content you're viewing.
If the default size of the flyout is limited, you can also click the "Pin" button to dock it to the side.
The default configuration for the prompt box is "Quick response," which is appropriate for everyday conversations.
Copilot Journeys
The "Journeys" feature allows Copilot to analyze your browsing history and habits to automatically group related past browsing projects into specific, task-focused storylines called "Journeys."
When you turn on this feature, the assistant will create a summary of each page you visit, and it'll store other details, such as page title, URL, searches, chats, and more.
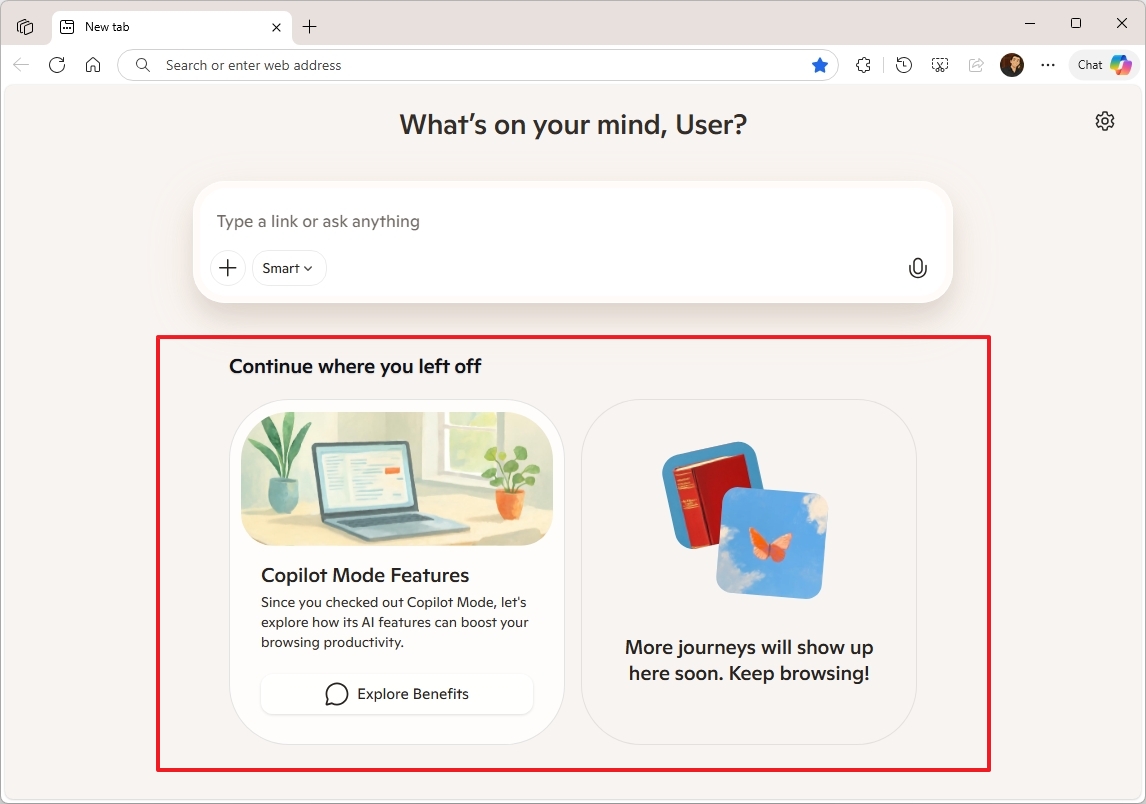
This feature not only lets you pick up quickly where you left off, but in a way, it improves the bookmarking experience.
Copilot Actions
The "Actions" is a feature that goes beyond generating text or summarizing information. It enables the AI to take direct action on your behalf to complete tasks.
On Microsoft Edge, this feature turns the AI into an "agent" that can interact with websites and the browser itself to complete multi-step tasks.
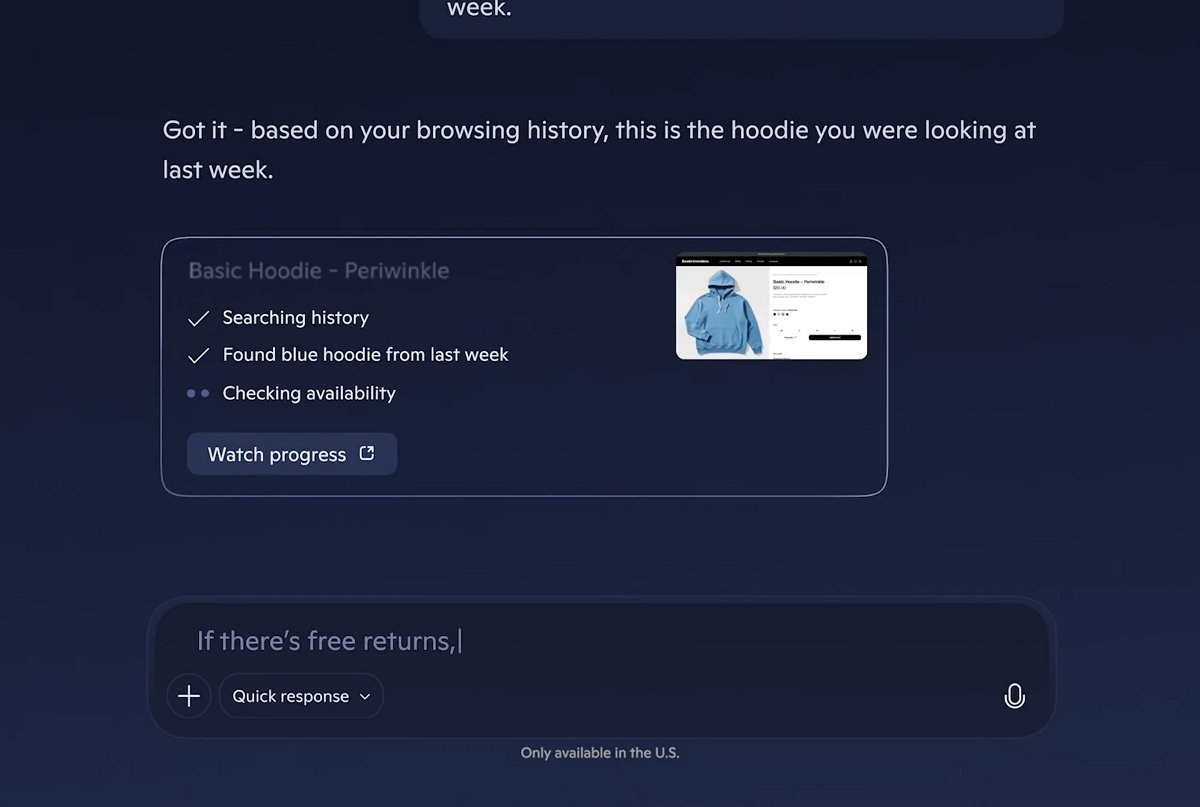
Copilot Actions is a feature that is still in development, but you can use it for actions like booking a restaurant, unsubscribing from email newsletters, and more.
Journeys and Actions are opt-in features, and they require confirmation before finalizing an action to ensure security and user permission. Also, it's worth repeating that these features are in preview and limited to users in the United States.
FAQs about getting started with Copilot
These are common questions regarding Copilot on Windows 11.
What is Copilot on Windows 11?
Copilot is a built-in AI assistant for Windows 11 that uses large language models in the Microsoft cloud to understand and respond to natural-language prompts. It can perform actions, generate content, answer questions, and integrate with apps like Notepad, Paint, File Explorer, and Microsoft Edge.
How can I open Copilot on Windows 11?
You can launch Copilot by clicking the "Copilot" button on the Taskbar, from the Start menu, using the "Windows + C" keyboard shortcut, or saying “Hey Copilot” if voice activation is enabled.
Can I use Copilot hands-free with my voice?
Yes. If you enable the “Hey Copilot” voice command from the Copilot settings. Once active, you can start interacting with the assistant hands-free using natural language.
How do I enable or disable Copilot’s auto-start feature?
Open the Copilot app, click your account menu > Settings, and toggle "Auto start on log in." If the option is grayed out, you can manage it from Settings > Apps > Startup.
What are Copilot Connectors?
Connectors allow Copilot to access and analyze information from your online services like OneDrive, Outlook, Gmail, Google Drive, and Google Calendar. This enables the chatbot to provide more personalized and context-aware responses.
Can Copilot search my local files?
Yes. You can enable file search from the account menu > Settings > Permissions, then turn on "File search" and "File read" to let the assistant locate and understand your local files when you ask questions about them.
What is Copilot Vision?
Copilot Vision allows the assistant to "see" and understand what’s on your screen. It can analyze apps, highlight elements, and help guide you through tasks, though it can’t perform actions automatically.
How do I control what data Copilot collects?
You can manage privacy settings by going to (Copilot) Settings > Privacy and turning off options like Diagnostic Data Sharing, Model training on text and voice, and Personalization and memory. You can also delete any stored data manually.
Does Copilot remember my information?
Yes, if the "Personalization and memory" feature is turned on. You can view, add, or remove memory items from (Copilot) Settings > Manage memory. This data helps the chatbot provide more personalized answers.
How do I uninstall the Copilot app?
Open (Windows 11) Settings > Apps > Installed apps, find Copilot, click the three-dot menu, and select "Uninstall." You can also uninstall Microsoft 365 Copilot separately. Some integrations in other apps (like Edge or Notepad) must be turned off individually.
How do I disable Copilot in Microsoft Edge?
Open Microsoft Edge > Settings > Copilot and sidebar, then turn off "Show Copilot button on the toolbar." You can re-enable it anytime from the same menu.
What is Copilot Mode in Microsoft Edge?
Copilot Mode enables the full AI experience in Microsoft Edge. It turns the new tab page into an AI prompt and adds features like Journeys (browsing history analysis), Vision (screen context awareness), and Actions (task automation). You can enable it from edge://settings/ai.
Does Copilot work offline?
No. Copilot relies entirely on Microsoft’s cloud-based AI models, so it requires an active internet connection to function.
Is Copilot free to use on Windows 11?
Yes, the core Copilot experience is free. However, certain features tied to Microsoft 365 (like Copilot for Word or Excel) require a Microsoft 365 subscription.
More resources
Find in-depth guides, troubleshooting tips, and the latest updates on Windows 11 and 10 here:
- Windows 11 on Windows Central — All you need to know
- Windows 10 on Windows Central — All you need to know

Follow Windows Central on Google News to keep our latest news, insights, and features at the top of your feeds!

Mauro Huculak has been a Windows How-To Expert contributor for WindowsCentral.com for nearly a decade and has over 22 years of combined experience in IT and technical writing. He holds various professional certifications from Microsoft, Cisco, VMware, and CompTIA and has been recognized as a Microsoft MVP for many years.
You must confirm your public display name before commenting
Please logout and then login again, you will then be prompted to enter your display name.
