How to manage Microsoft Yammer groups
While Yammer groups help bring like-minded colleagues together, they are also an effective way to engage teams in communication, wherever they have internet access.

In a previous look at Microsoft's Yammer, a social network for the enterprise, we shared basic navigation tips to help get you started. If you followed those tips, you should have identified a few groups that you find interesting or beneficial. Through these groups, your connections can partake in a multitude of conversations.
Depending on policies in your organization, you'll see Yammer groups that are focused on tasks, while others take on the form of a virtual water cooler. Let's take a look at how to create a group, as well as common tasks a group admin can tackle to make sure groups remains productive.
Before you start up a group of your own, you should consider why you want to create it. What would be the purpose of the group? How would you like to see it used? It would be advisable to perhaps offer assistance on an existing group as an admin in order to gain insight into the inner workings. Once you have that knowledge, you can solidify your plan.
Here are some tips on the basic functions of running a Yammer group.
How to create a Yammer group
Depending on your group needs, you have to decide if this group will be open to the entire organization or a private group meant for a smaller audience. Each has its own benefits, such as encouraging feedback or a controlled environment.
Creating your Yammer group
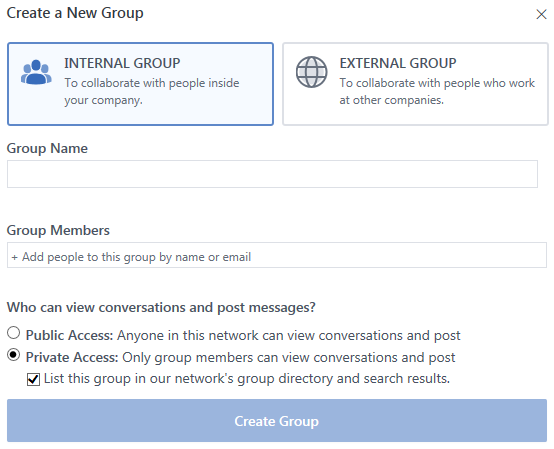
- Log into your corporate Yammer account.
- Access the option to create a group in two ways:
- Option one: From the Yammer home screen, locate and click on + Create a new group option, located at the bottom of the left Groups column.
- Option two In the left column, click Groups to be redirected to Discover Groups. Click Create New Group in the top right corner.
- In the popup, choose between internal group (for intercompany collaboration) or external group (to connect with individuals outside of your company). (The external group option may be disabled by your organization.)
- In the Group Name field, input the title of the group. You will see a warning if you have picked a name that is currently being used by another group.
- In the Group members field, enter the names or email addresses of those you wish to invite to the group. (optional)
- Select the level of access to the group:
- Public access: Anyone within the network can join and post.
- Private access: Requires permission to join the group. If you choose private access, you can also exclude the group from the corporate directory and search results.
- Click Create Group to finish.
This process creates a basic landing page for the group. If you wish, further customization options are available to give your group page a unique appearance.
How to further customize a Yammer group
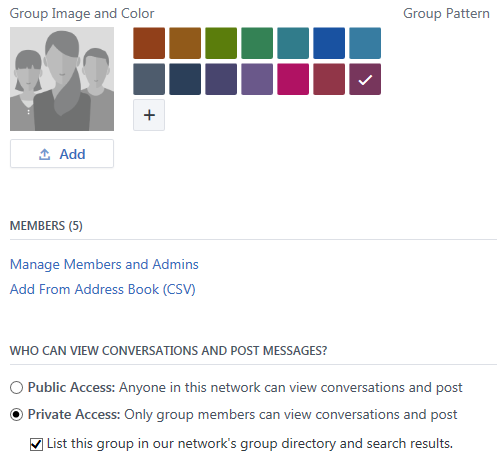
- Click on the Settings icon located at the top-right corner of the group banner.
- Use the Group Name field to edit the name.
- Input text in the Group Description field.
- Under Group Image and Color, click Add to upload an image for the group's avatar.
- Use Group Image and Color to also choose a banner color.
- Under Group Pattern, select from eight banner images.
- Under Members select Manage Members and Admins to invite, remove members and grant or disable their admin status.
- Under Who Can View Conversations and Post Messages, change the access to or from public or private.
- Under Who Decides if Someone Can Become a Member, choose from the following:
- Group-Monitored Membership: Allows any member to add members.
- Closed Membership: Only allows admins to add and manage requests for invites.
- Click Save Changes to finish.
Managing Yammer members and invites
Once the functionality of the group is set, it's time to populate the ranks. As the admin for the group, you can invite anyone from your organization. If your group is private, you will need to approve or deny all requests.
All the latest news, reviews, and guides for Windows and Xbox diehards.
To invite members
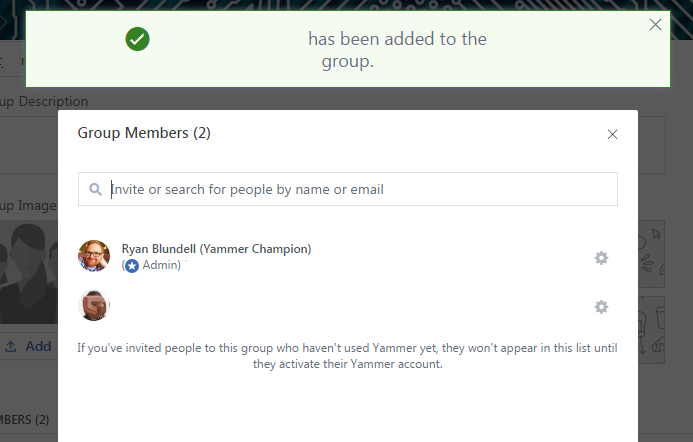
- From the group landing page, click on Members in the right column.
- Input a name or email address in the search field.
- Locate the correct member from the results list.
- Click Add to Group to invite automatically.
How to manage requests to join Yammer groups
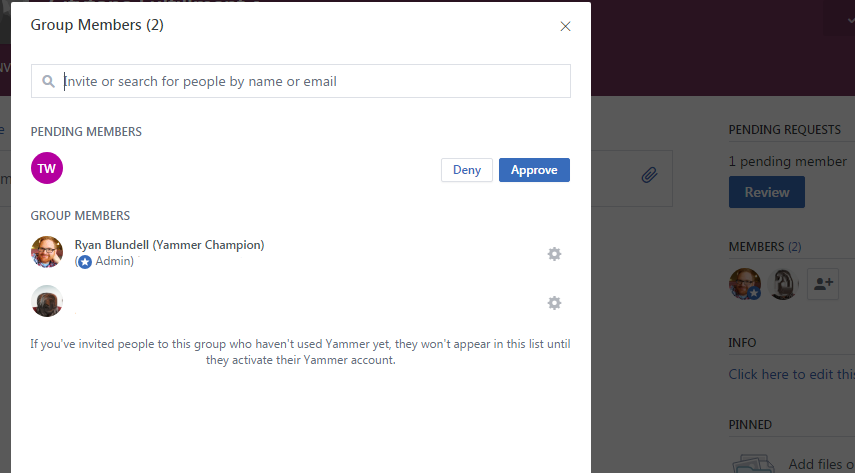
- If a member has requested to join, a new entry is displayed in the right column called Pending Requests.
- Under Pending Requests, click review. The popup will display current members and requests.
- Click on the name of the requestor to view their Yammer profile. (optional)
- Click Deny or Approve as required.
How to manage members of a Yammer group
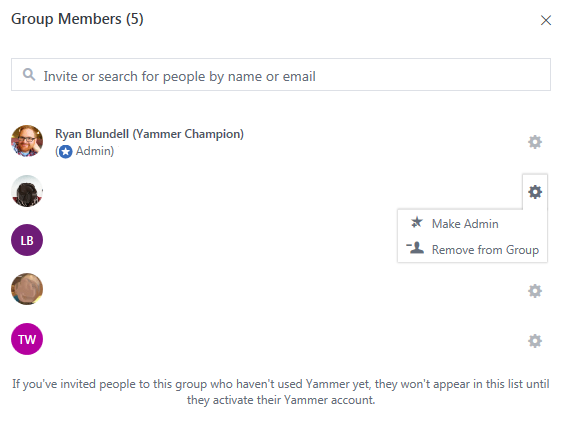
- Click on Members.
- Click on the settings icon for a member.
- As an admin, choose to make or revoke admin permissions.
- Click on Remove from Group to delete a member from the list.
Group admins are permitted to alter the group's name, image, and description. This is currently an "all-or-nothing" option, as group creators cannot pick and choose specific access for each admin. Admins are able to post announcements within the group, rather than basic updates. Unlike updates, announcements generate an email to all members of the group, which ensures the message is received.
Yammer content management
Yammer groups make it easy to house and share files that members can access and contribute to. As an admin, you can control which files to keep and which ones to protect from editing. The latter is referred to as making a file "official," which locks the content and prevents any future changes. These official files are marked with a star, and the option to edit is removed.
How to upload or create a file

- Click Files in the group banner.
- Click Upload to add an existing file.
- Click New to create a new file. Choose from a Word document, PowerPoint presentation or Excel workbook.
- For upload, select Choose file.
- Select a file and click Open.
- Select Upload to finish.
- For New, enter a file name and click Create.
How to create a note
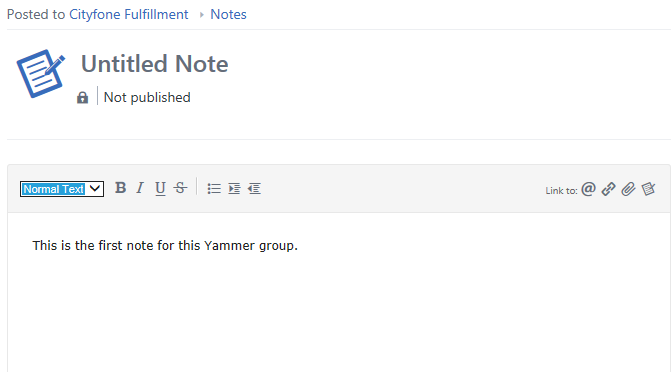
- Select Note from the group banner.
- Enter a title for the note.
- Input any values, including text and links.
- Click Publish to finish.
How to delete a note
- Open the note in question.
- Under Note Actions, select Delete this Note.
How to manage a file
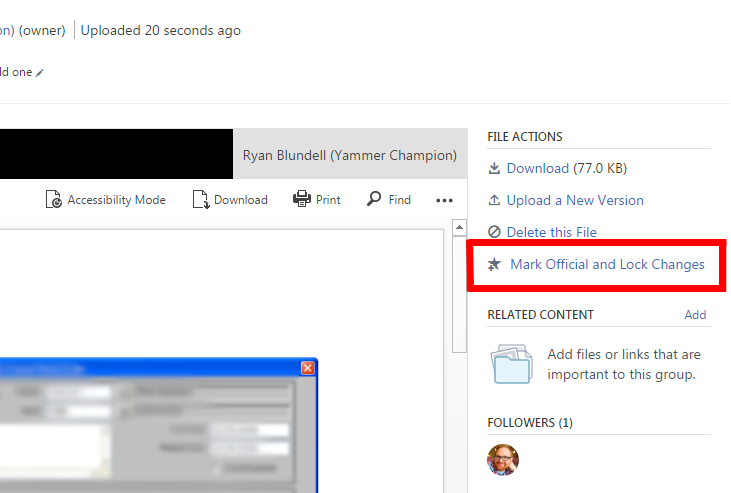
- Click on a file to open it.
- Locate file options in the right menu under File Actions. Choose from Download, Edit File, Delete this File and Mark Official and Lock Changes.
- Under Related Content, click add to add a link or a file in SharePoint, that is related to the material.
- Click Add Topic to tag content with searchable terms. (optional)
- Use the share field below the file to add it as an attachment to a post. (optional)
How to delete a post or reply
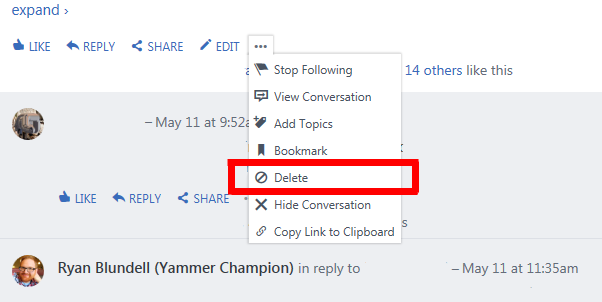
- Locate and click on the more options icon to the right of the edit option.
- In the drop-down list, click Delete.
Closing thoughts ...
A Yammer group, if managed correctly, can be a hub of effective communication for teams of any size. They help your colleagues stay in the loop on trending topics and provide quick access to important files that can be read and revised collectively. As the admin of the Yammer group, you can make sure the team stays on course.
Are you a Yammer group admin? How do you keep your team connected? Let us know in the comments.
You can also visit our Office 101 help hub for more related articles.
- Microsoft Office 101: Help, how-tos and tutorials

Ryan is a Former Contributor for Windows Central.
