How to download and clean install Windows 11 on a spare PC (preview)
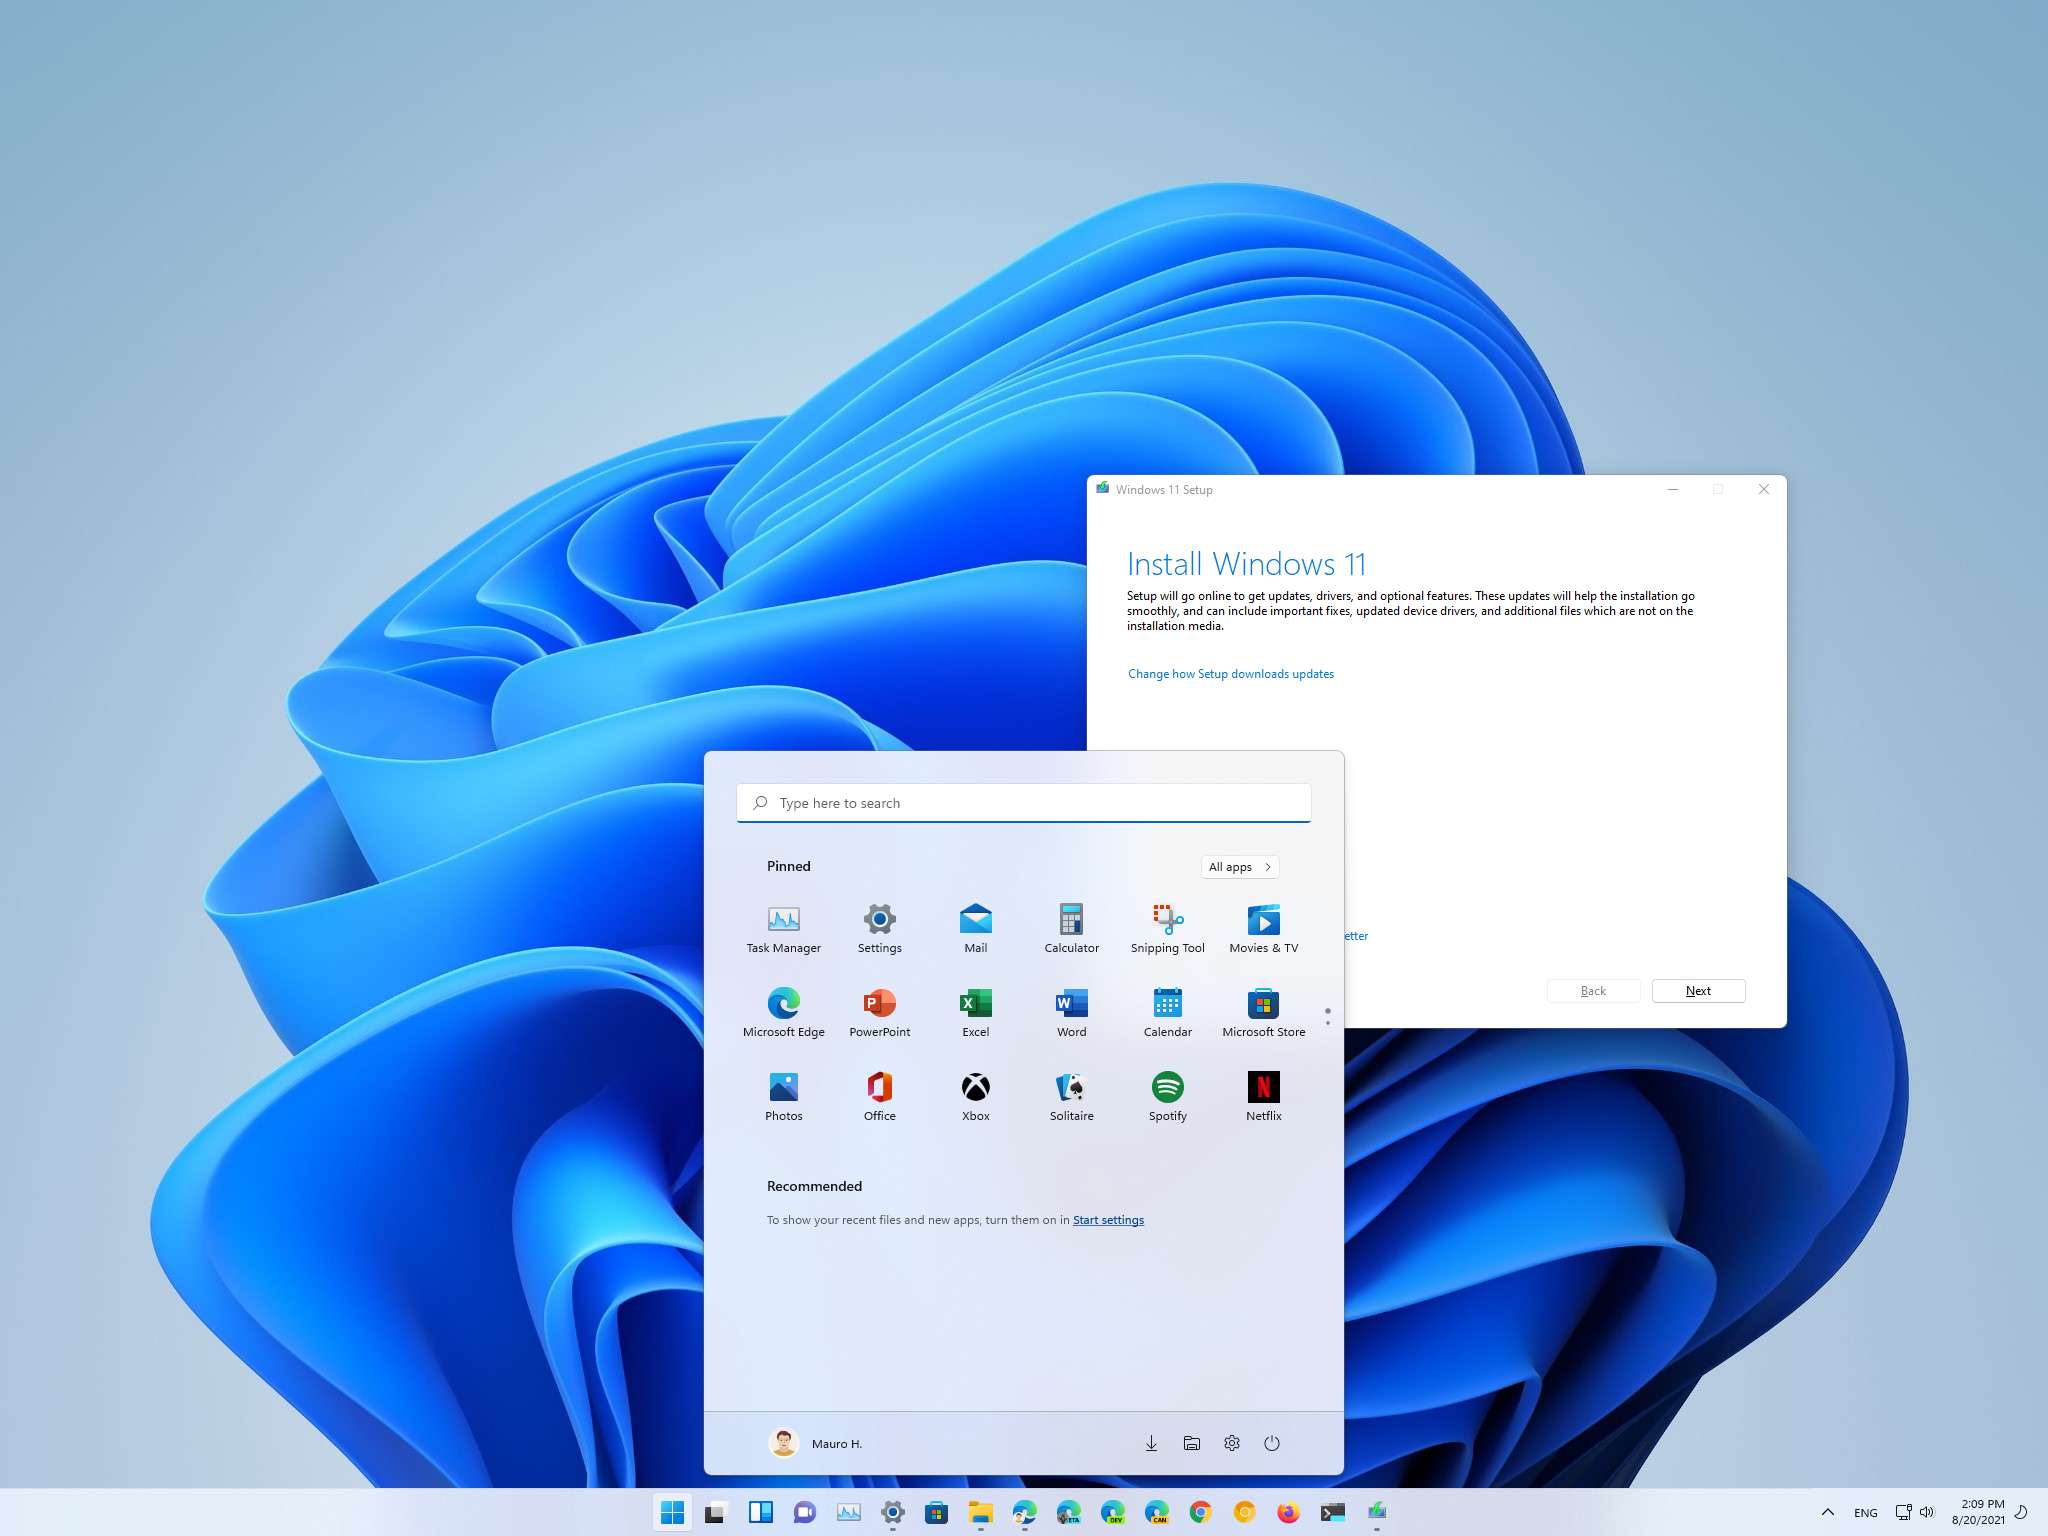
You can now test the latest preview of Windows 11 using a clean installation, and in this guide, we'll show you everything you need to do to complete the task.
All the latest news, reviews, and guides for Windows and Xbox diehards.
You are now subscribed
Your newsletter sign-up was successful
Windows 11 is the next major release that Microsoft plans to start rolling out to compatible and new devices before the end of the year. As part of the development process, the company is now offering the ISO file through the Windows Insider Program, which you can use for a clean installation or in-place upgrade.
A clean installation defines the process of erasing the hard drive to start fresh with a copy of Windows 11. Usually, you would use this method to resolve system problems and improve performance and battery life. However, since the OS is not officially available, you can use the ISO file to install Windows 11 on a spare or virtual machine to try the out-of-box experience (OOBE) and get hands-on the new features and design changes to provide feedback to shape the future of Windows.
If you are already a tester, you do not need to reinstall anything since the latest release will download and install through Windows Update automatically. Also, if you will be installing a clean copy of Windows 11 on a new computer or virtual machine, you will need a (Windows 10) product key to activate the setup. Unless, of course, the device previously had a Windows 10 installation properly activated.
In this Windows 11 guide, we will walk you through the steps to download and do a clean installation of the latest preview on a (non-primary) computer.
- Windows 11 prerequisites
- How to download the ISO file of Windows 11
- How to create a USB bootable media of Windows 11
- How to do a clean installation of Windows 11
- How to complete the OOBE of Windows 11
Windows 11 prerequisites
Windows 11 has some new requirements that you want to check to ensure the new OS will install without problems.
System requirements
Here are the minimum hardware requirements to install the latest preview of Windows 11:
- Processor: 1GHz or faster CPU or System on a Chip (SoC) with two or more cores
- Memory: 4GB
- Storage: 64GB or larger
- System firmware: UEFI with Secure Boot enabled
- Graphics: Compatible with DirectX 12 or later with WDDM 2.0 driver
- TPM: Trusted Platform Module (TPM) version 2.0
- Display resolution: High definition (720p) display greater than 9 inches diagonally, 8 bits per color channel
Check compatibility
To check the basic hardware specs of your computer, use these steps:
All the latest news, reviews, and guides for Windows and Xbox diehards.
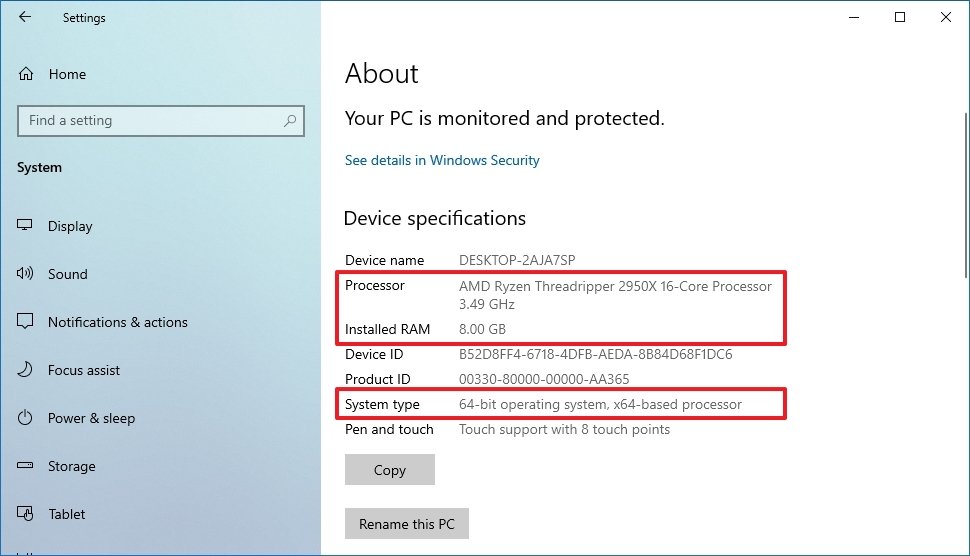
- Open Settings.
- Click on System.
- Click on About.
- Confirm the processor, memory, and system type.Quick note: The RAM has to be larger than 4GB, and the processor must be an Intel's 8th Gen or newer or an AMD Zen 2 or newer. You can find more information on the processor compatibility in this guide. Also, the system type must be 64-bit, since the OS no longer comes in 32-bit.
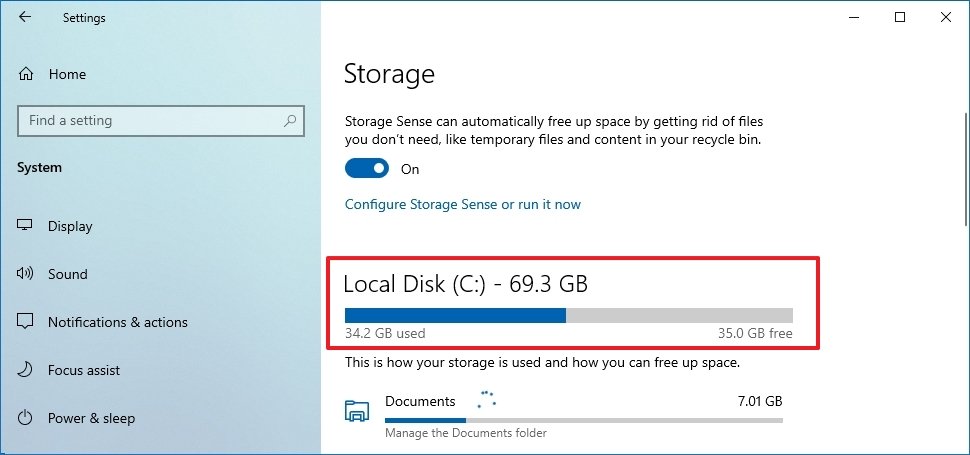
- Click on Storage.
- Confirm the hard drive is larger than 64GB.
You can also check your laptop or desktop hardware specification on the manufacturer's support website.
In addition, you will also need to make sure that your device has a Trusted Platform Module (TPM) version 2.0, and that it's enabled. You can complete this task with these instructions.
Furthermore, Windows 11 also requires Secure Boot to be enabled. You can use this guide to check the feature state and the steps to turn it on as necessary.
Alternatively, you can use a third-party tool known as WhyNotWin11, which can precisely tell you if your computer is compatible.
Change computer boot order
In addition, to check the hardware compatibility, you also need to make sure the laptop or desktop can start from a USB flash drive.
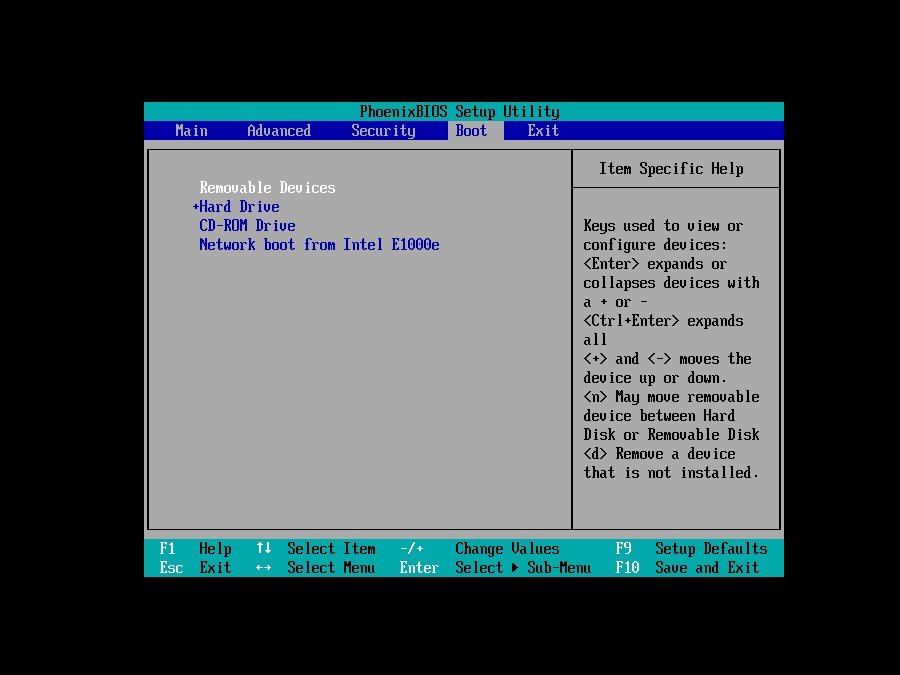
UEFI settings from boot
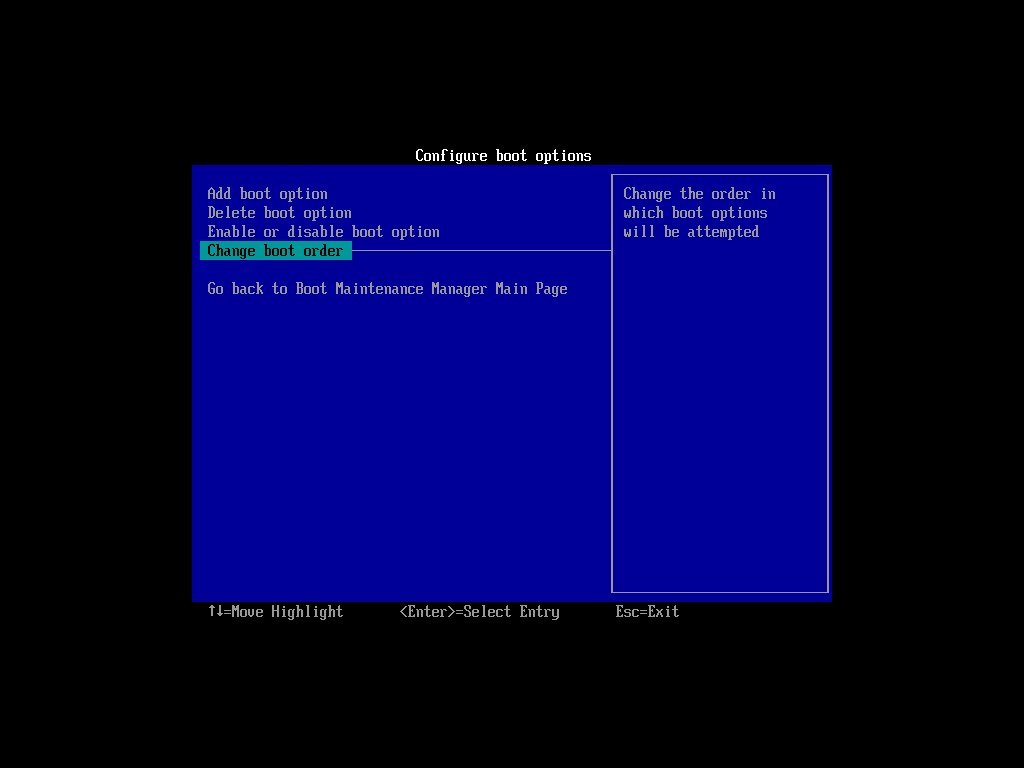
To change the boot order of your computer, use these steps:
- Start the computer.
- As soon as the computer starts booting up, press one of the function keys (F1, F2, F3, F10, or F12), Esc, or the Delete key.
- While in the motherboard firmware settings, open the Boot page.
- Set the boot order to start from the USB media with the Windows 10 installation files.
- Save the changes.
Once you complete the steps, the computer should be able to start from the bootable USB flash drive.
UEFI settings from Windows 10
Alternatively, if you have a device running Windows 10, you can use the Settings app to access the UEFI settings.
To change the UEFI boot settings on Windows 10, use these steps:
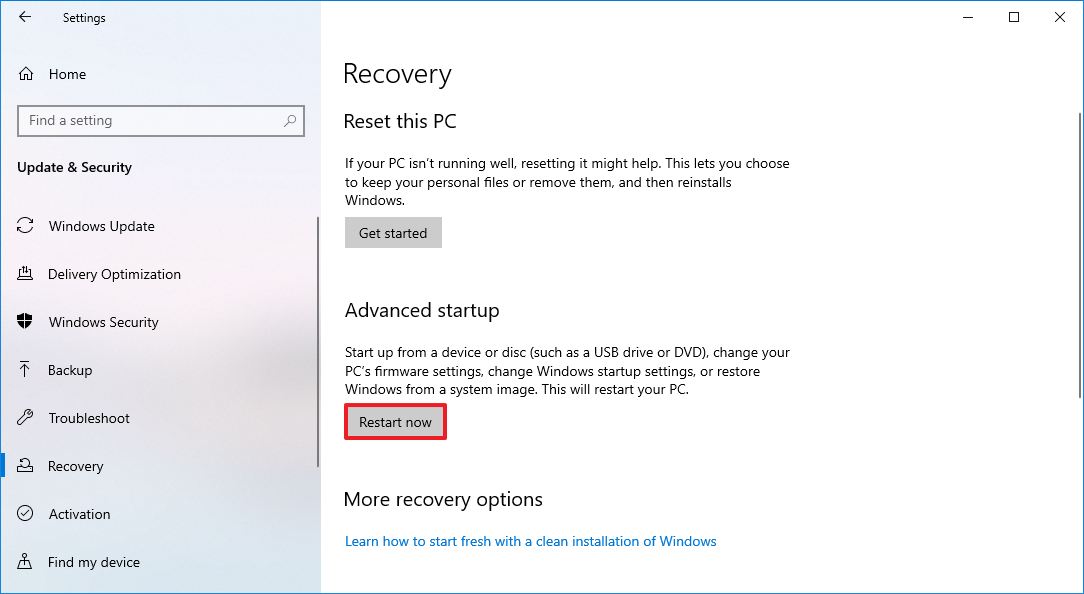
- Open Settings.
- Click on Update & Security.
- Click on Recovery.
- Under the "Advanced Startup" section, click the Restart now button.
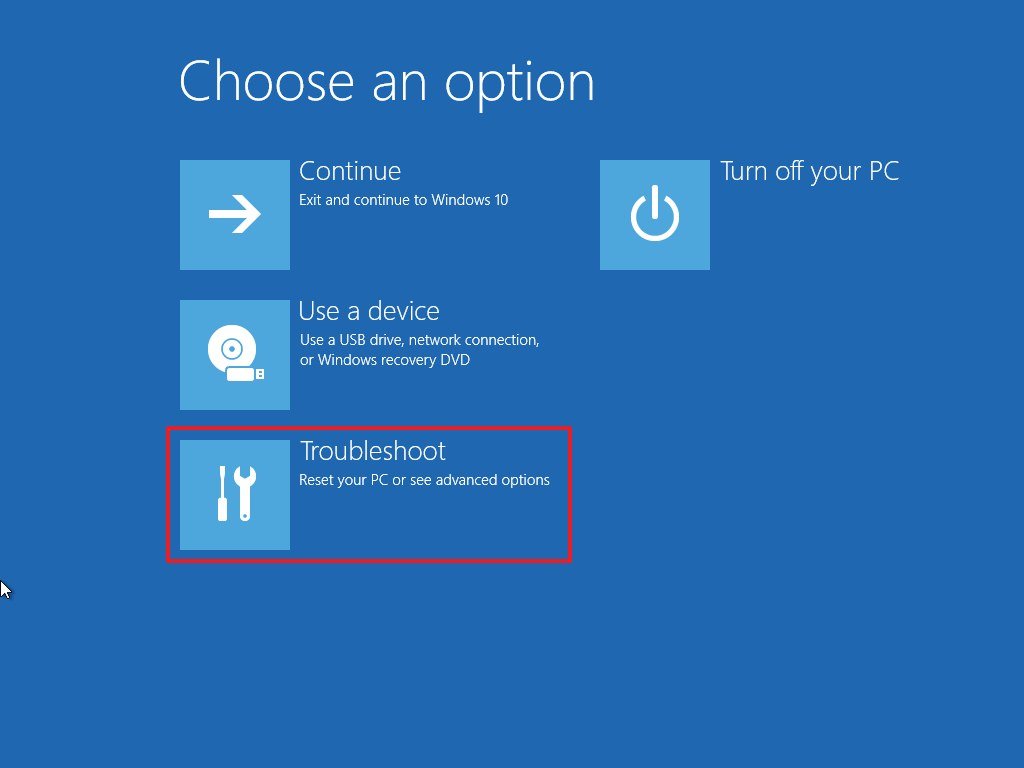
- Click the Troubleshoot button.
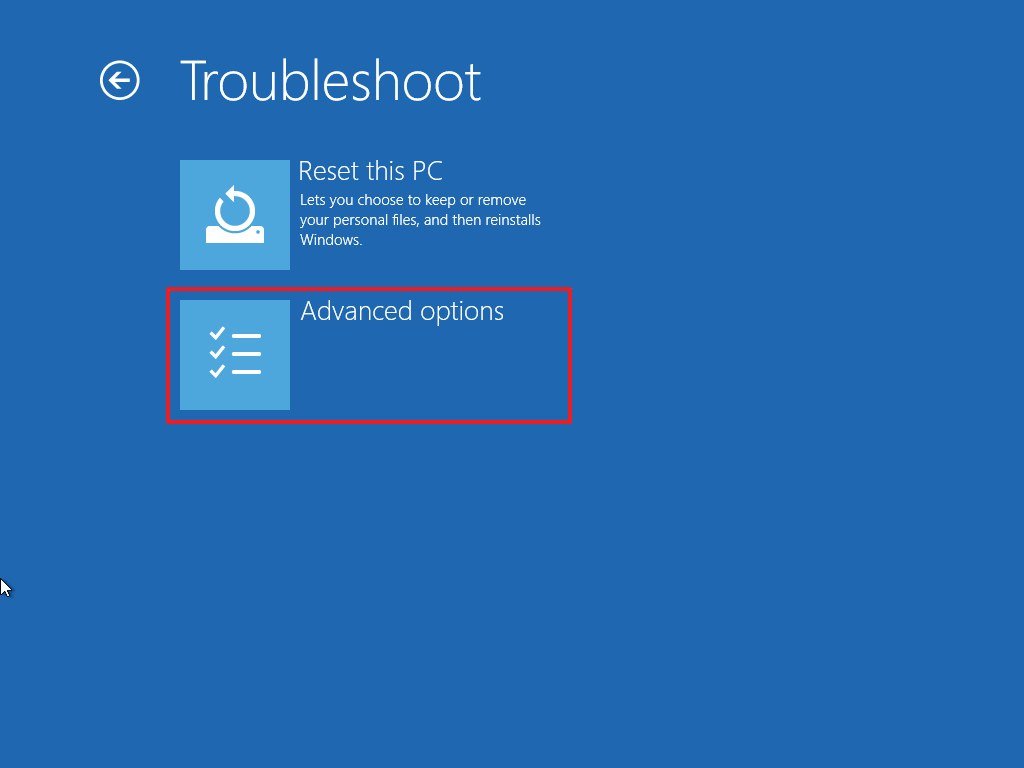
- Click on Advanced options.
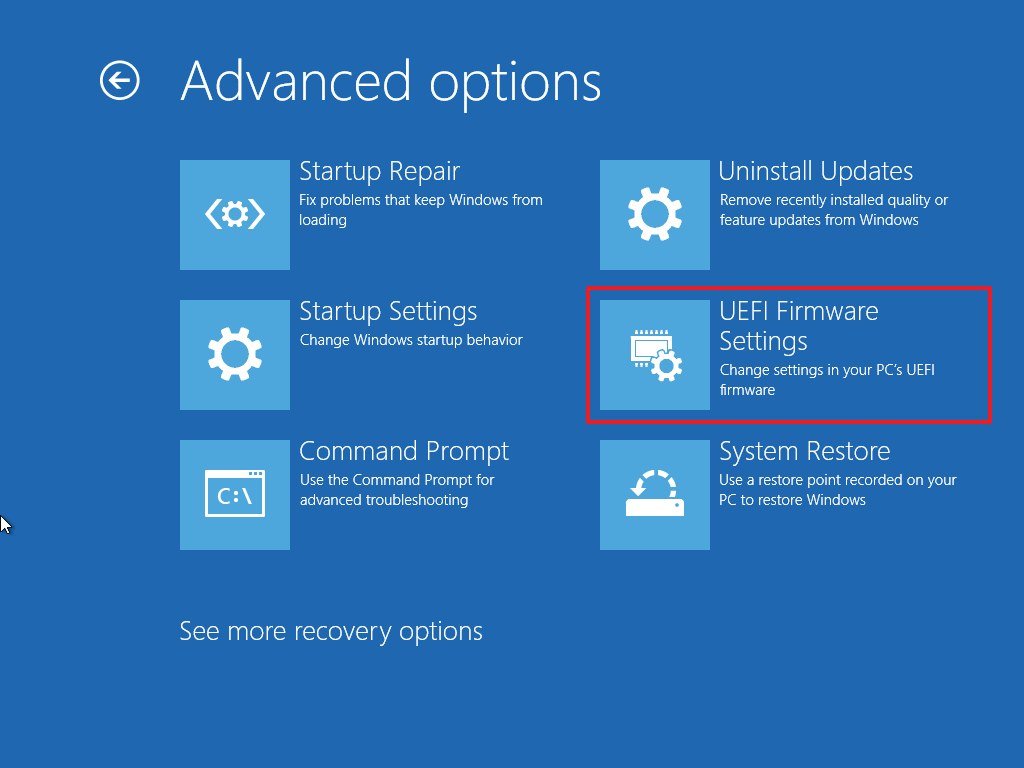
- Click the UEFI Firmware Settings option.
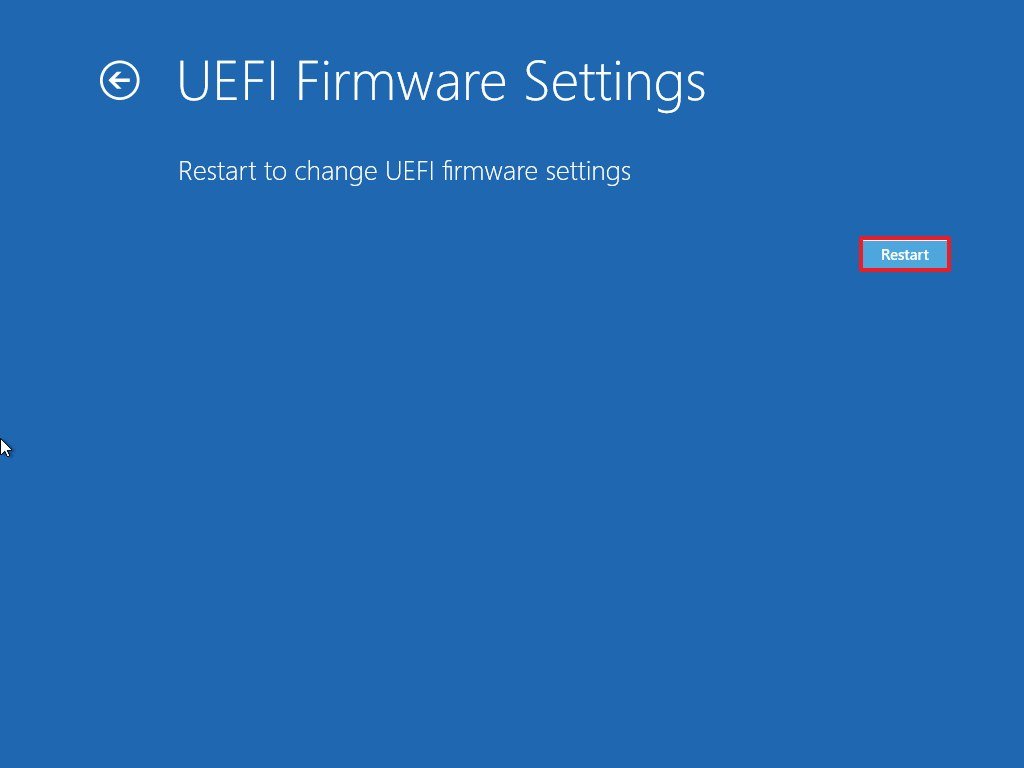
- Click the Restart button.
- While in the motherboard firmware settings, open the Boot page.
- Set the boot order to start from the USB flash drive with the Windows 10 installation files.
- Save the changes.
After you complete the steps, the computer should now be able to start from a USB bootable media.
How to download the ISO file of Windows 11
To download the ISO file preview of Windows 11, use these steps:
- Open Windows Insider Preview Downloads page.
- Sign in with your Microsoft account.
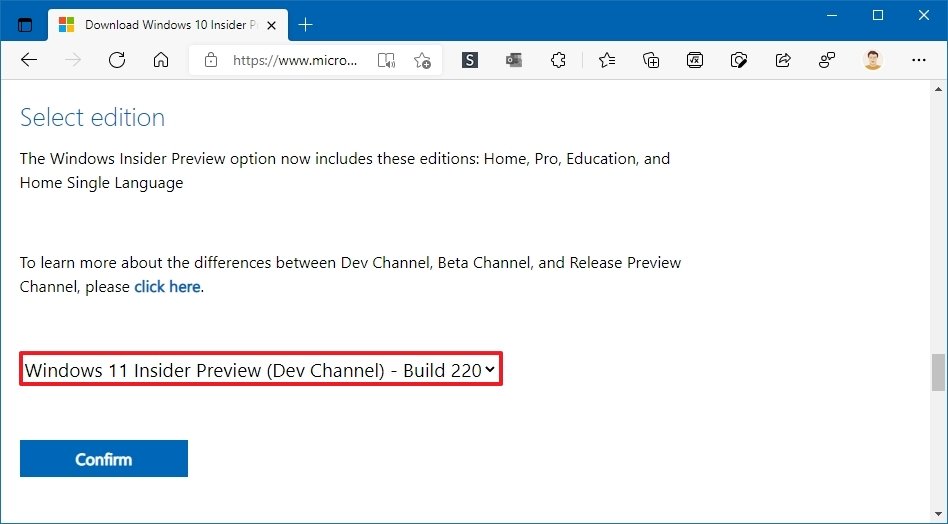
- Under the "Select edition" section, use the drop-down menu and select the latest builds of Windows 11 — for example, build 22000.132.
- Click the Confirm button.
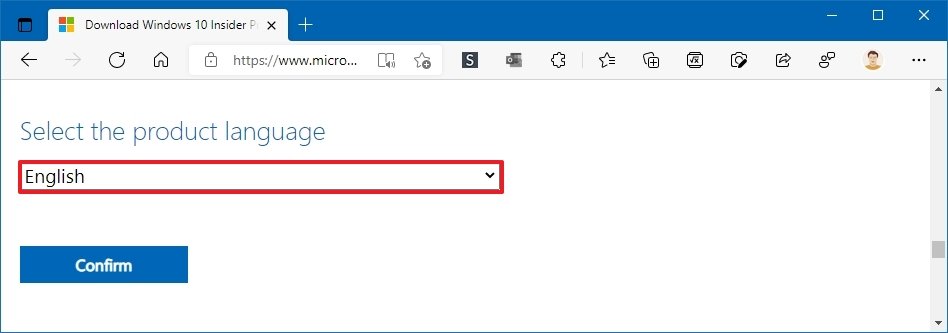
- Select your installation language — for example, English.
- Click the Confirm button.
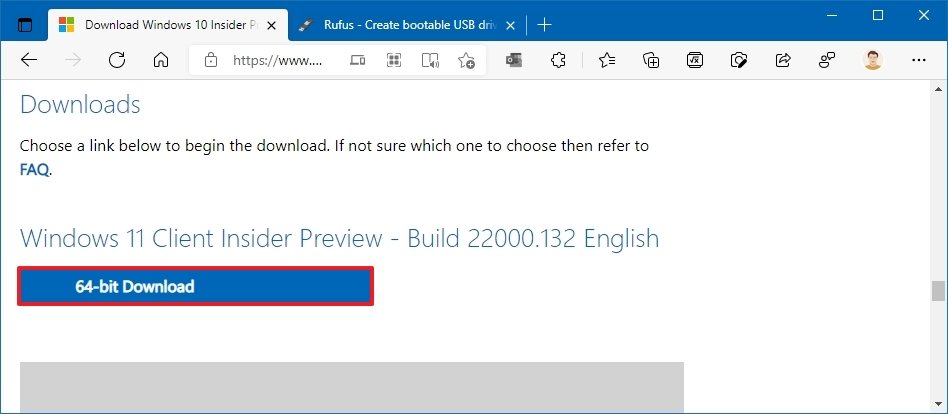
- Click the 64-bit Download button.
Once you complete the steps, the Windows 11 ISO file will download on your computer.
How to create a USB bootable media of Windows 11
Since the new version of the OS is not officially available, you can use a tool like Rufus to create a USB flash drive that you can use to start your laptop or desktop to install Windows 11.
To create a USB media with an existing Windows 11 ISO file, connect a flash drive of at least 8GB of space, and use these steps:
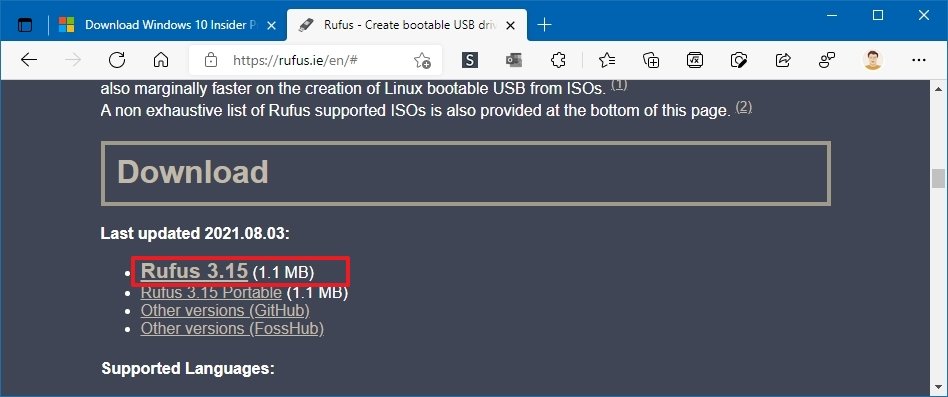
- Open Rufus download page.
- Under the "Download" section, click the latest release (first link) and save the file.
- Double-click the Rufus-x.xx.exe file to launch the tool.
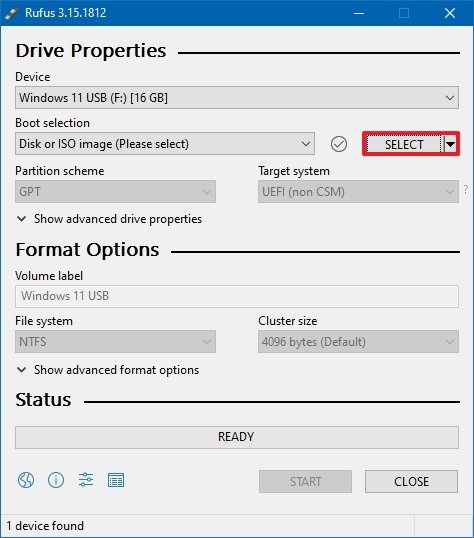
- Under the "Device" section, select the USB flash drive.
- Under the "Boot selection" section, click the Select button on the right side.
- Select the Windows 11 ISO file from the folder location.
- Click the Open button.
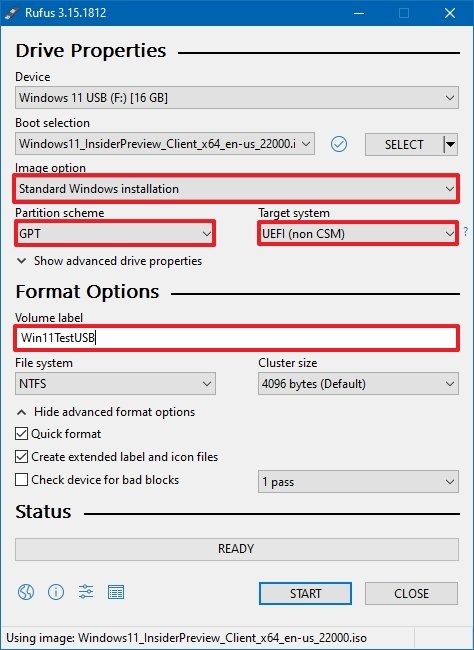
- Use the "Image option" drop-down menu and select the Standard Windows installation option.
- Use the "Partition scheme" drop-down menu and select the GPT option.
- Use the "Target system" drop-down menu and select the UEFI (non-CSM) option.
- Under the "Show Advanced drive properties" section, do not change the default settings.
- Under the "Volume label" field, confirm a name for the drive — for example, "Win11TestUSB."
- In the "File system" and "Cluster size" options do not change the default settings.
- Click the Show advanced format options button.
- Check the Quick format option.
- Check the Create extended label and icon files option.
- Click the Start button.
- Click the OK button to confirm.
- Click the Close button.Quick tip: If you receive a message about disabling Secure Boot, ignore it and try to proceed with the installation as you normally would.
After you complete the steps, Rufus will create a USB flash drive to install Windows 11 on a compatible computer.
How to do a clean installation of Windows 11
To do a clean installation of Windows 11, use these steps:
Warning: This is another friendly reminder that this process will erase everything on the computer. Before proceeding, it's always recommended to make a temporary full backup of your PC.
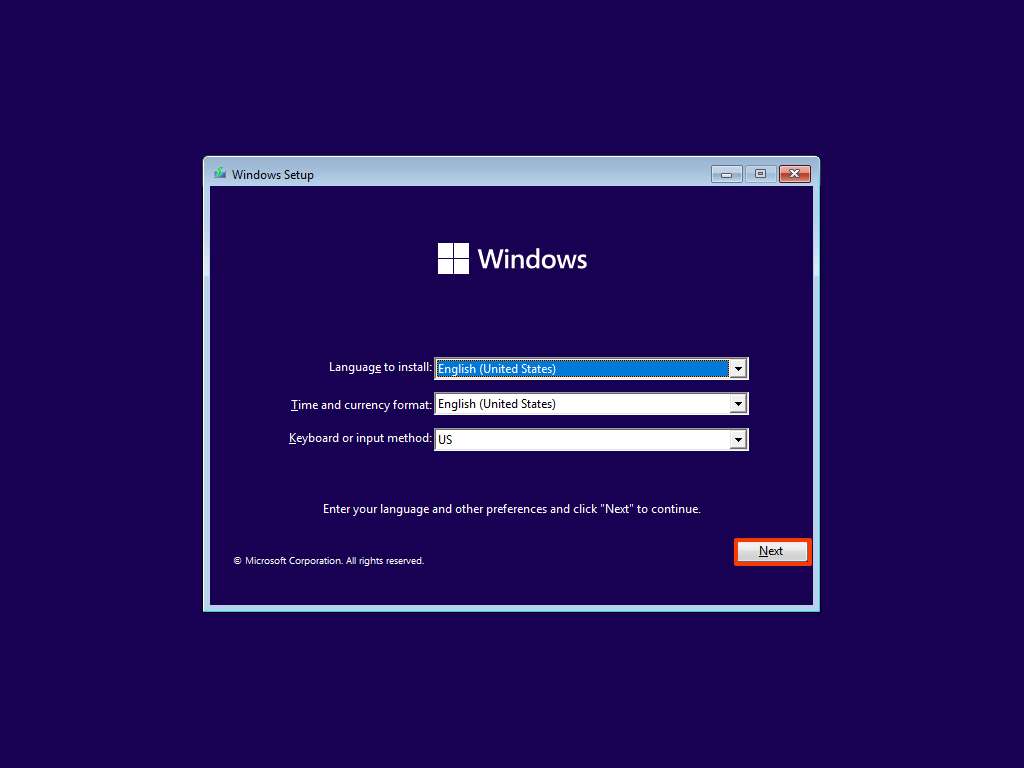
- Start the device with Windows 11 USB media.
- On prompt, press any key to boot from the device.
- On the "Windows Setup," click the Next button.
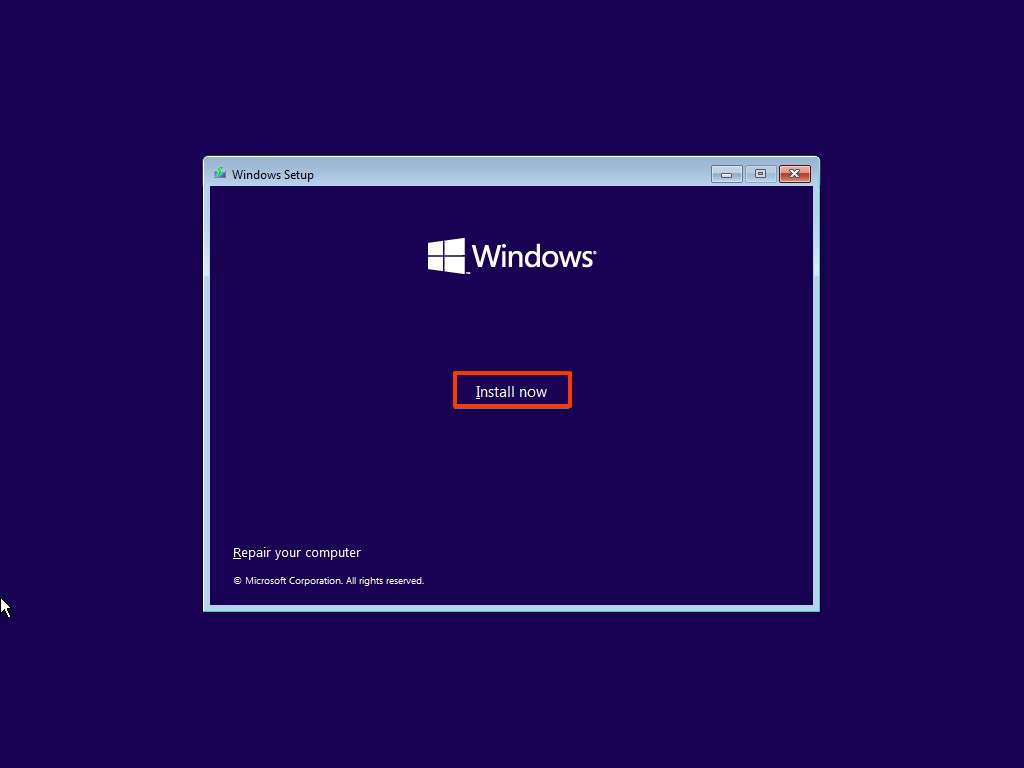
- Click the Install now button.
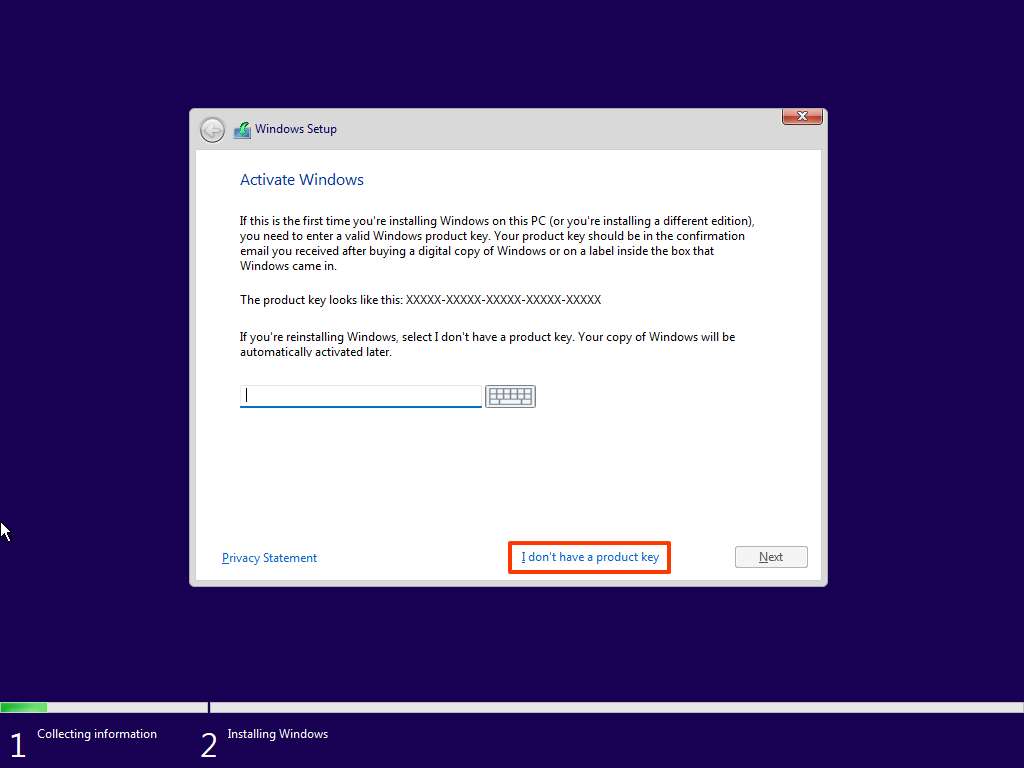
- Click the I don't have a product key option to continue (assuming that your device was already activated). Otherwise, if this is the first time installing Windows 11, you will need a product key.
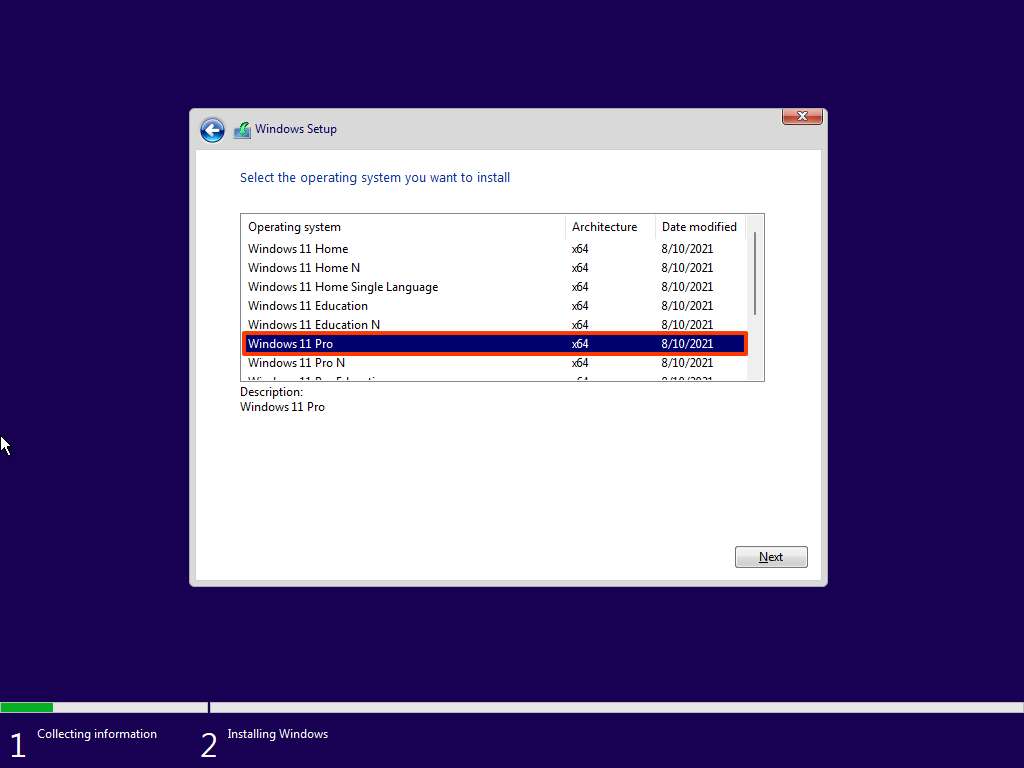
- Select the edition of Windows 11 (If applicable).Quick note: This selection must match the edition that the product key activates. If you do not select the correct edition, Windows 11 won't activate, and you will have to do the entire process again.
- Click the Next button.
- Select the I accept the license terms option to continue.
- Click the Next button.
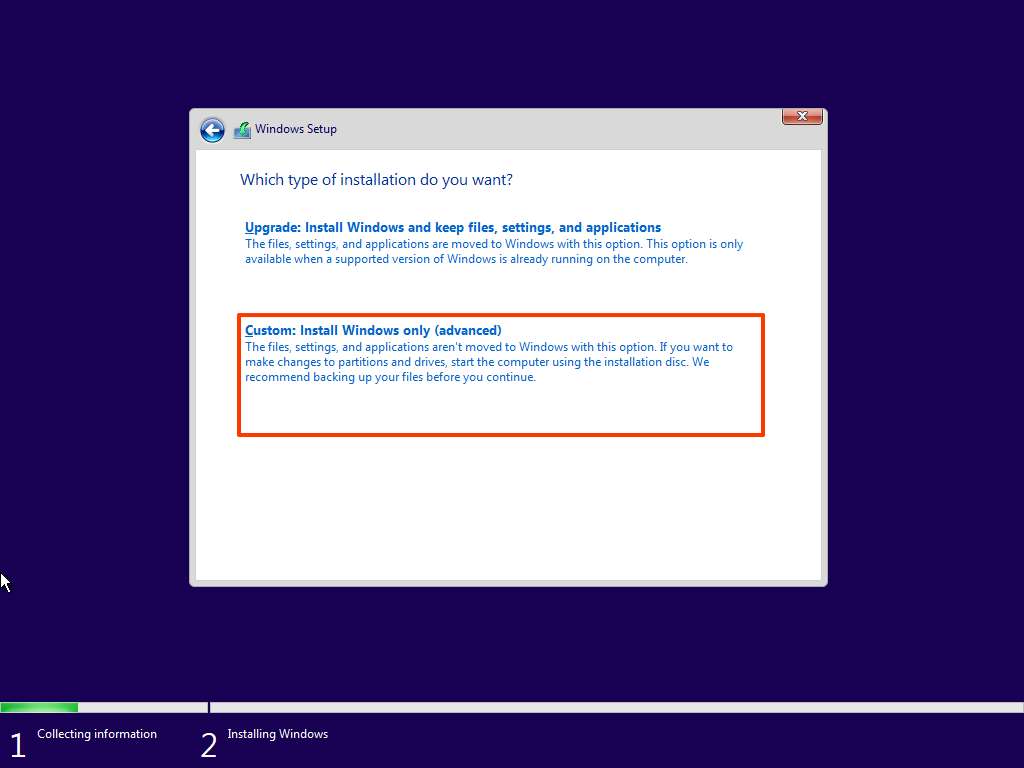
- Click the Custom: Install Windows only (advanced) option to continue with a clean installation.
- Select the partition with the current installation (usually "Drive 0"), and click the Delete button.Quick tip: If "Drive 0" has multiple partitions, you have to select and delete each partition to allow the setup to use the entire drive for the new installation. The Windows 11 setup will create the required partitions automatically during the process. Also, it's not necessary to delete the partitions on secondary drives. If the device has an empty hard drive, select it and click the Next button.
- Click the Yes button.
- Select the empty drive (Drive 0 Unallocated Space).
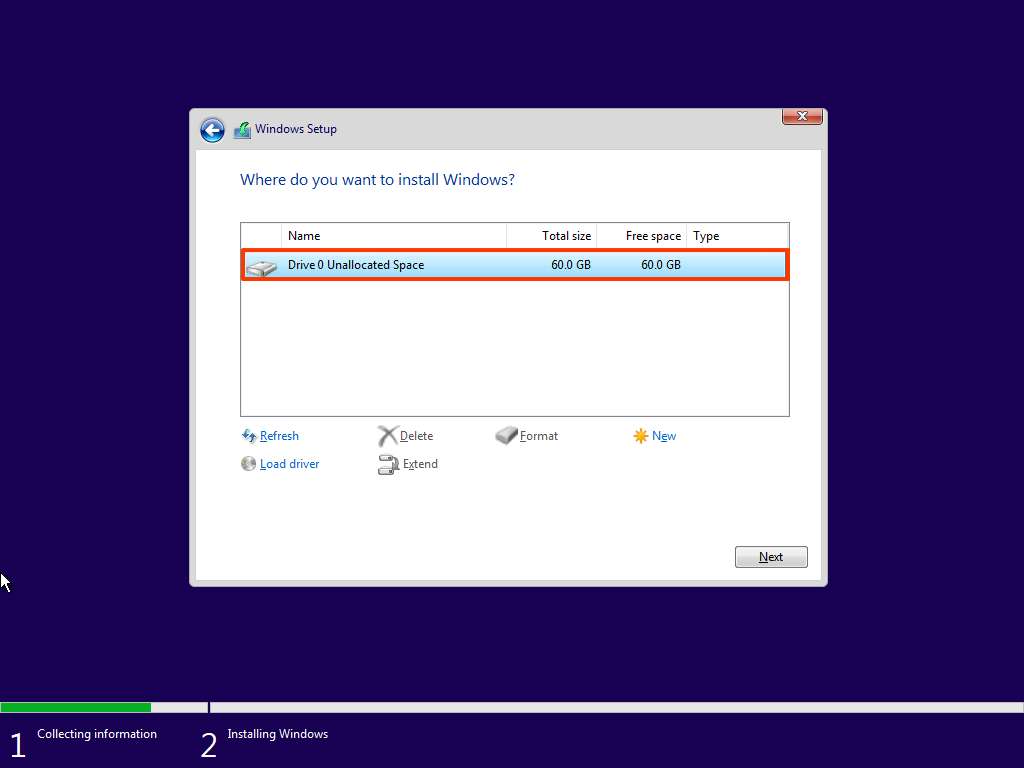
- Click the Next button.
Once you complete the steps, the Windows 11 Setup will install a fresh copy of the new OS on the laptop or desktop computer.
How to complete the OOBE of Windows 11
After the setup, you have to continue with the out-of-box experience to configure your preferences and create a new account.
To complete the initial setup of Windows 11, use these steps:
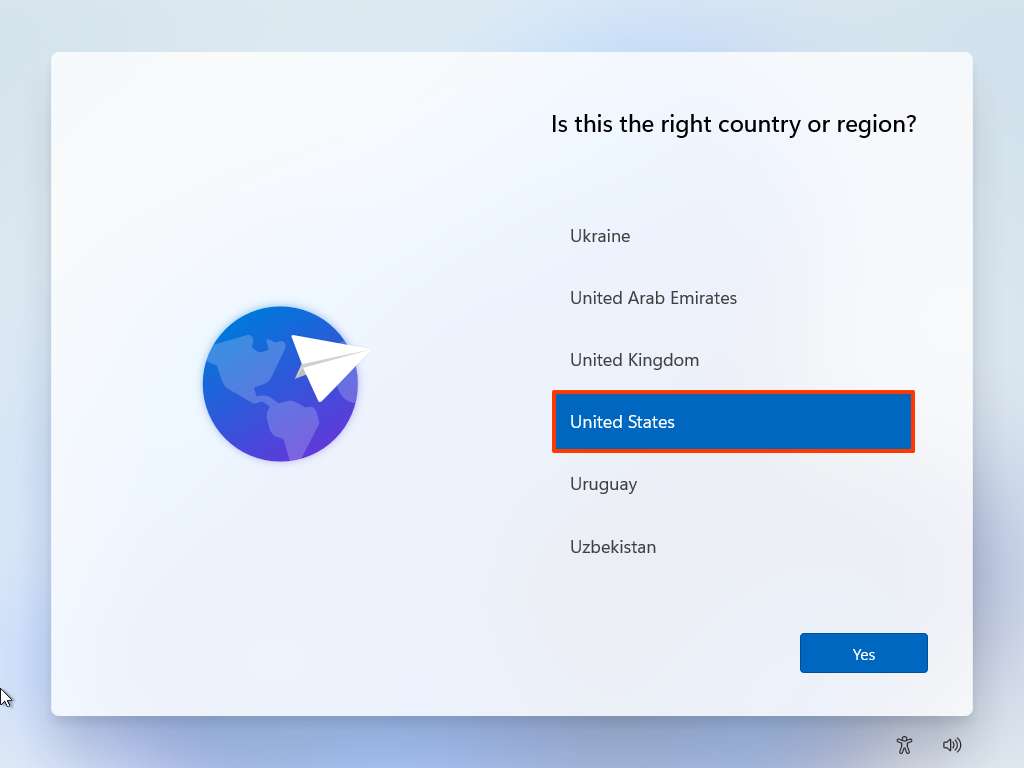
- Select your region preference.
- Click the Yes button.
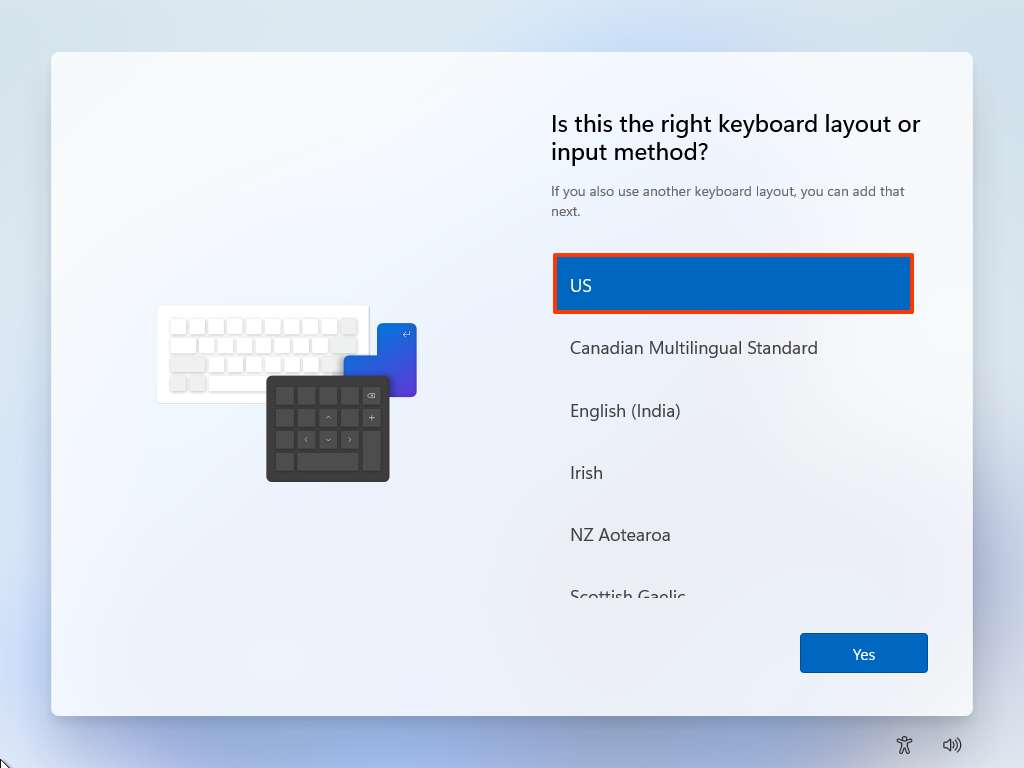
- Select your keyboard layout setting.
- Click the Yes button.
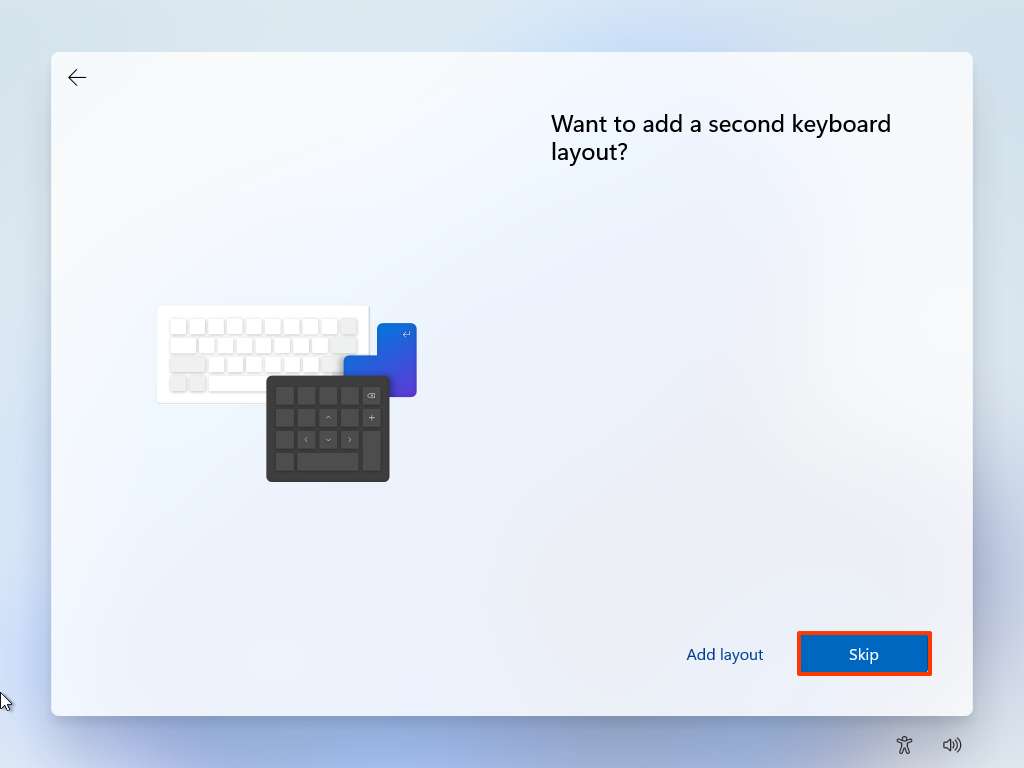
- Click the Skip button (if applicable).
- If you have a Wi-Fi connection, set up the connection manually (a security key may be required).
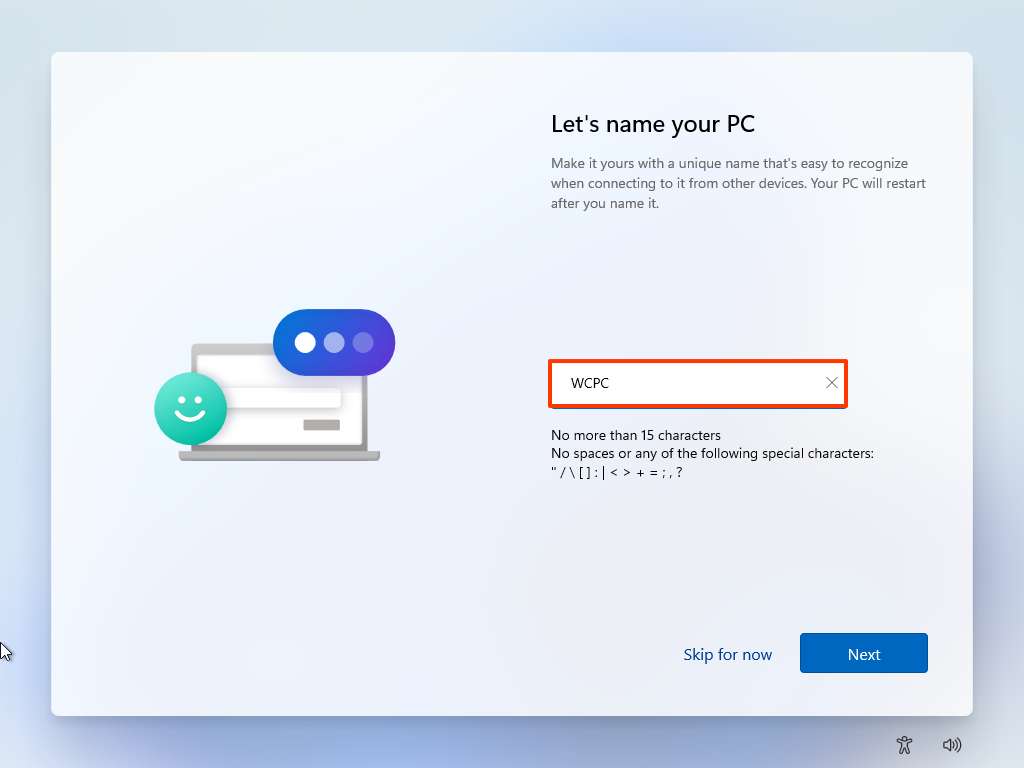
- Confirm a name for your computer that's fewer than 15 characters.Quick tip: If you want a random name to be assigned, click the Skip for now option. If you specify a name, the computer will reboot to apply the changes.
- Click the Next button.
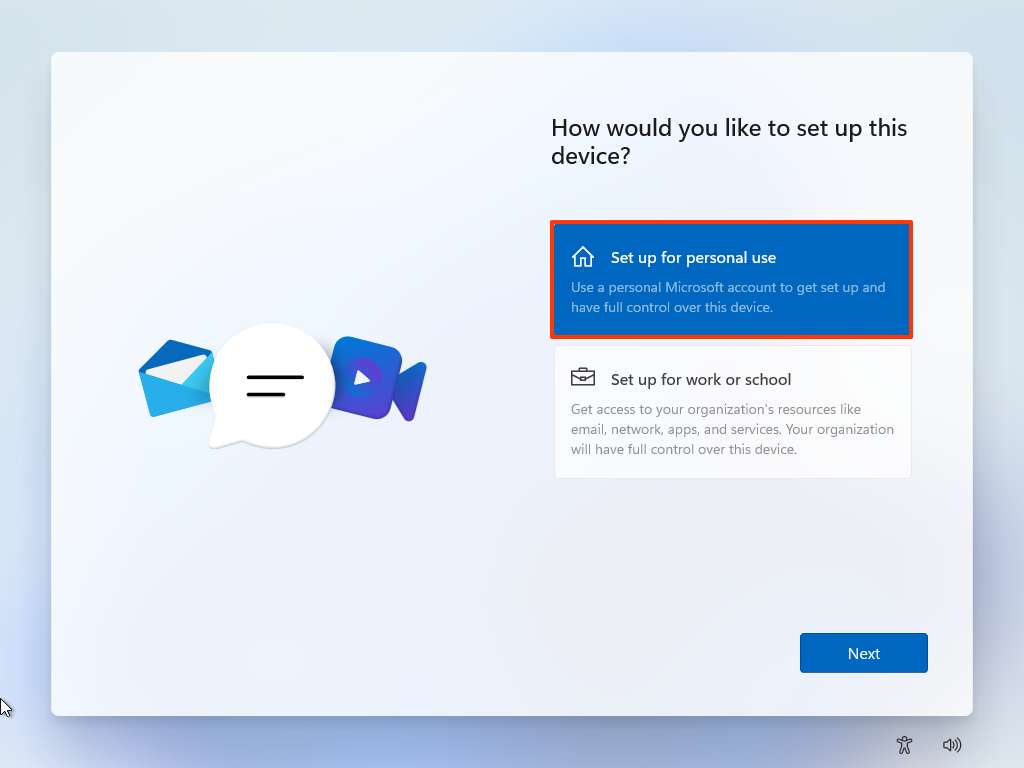
- Select the Set up for personal use option if you are setting Windows 11 Pro.
- Click the Next button.
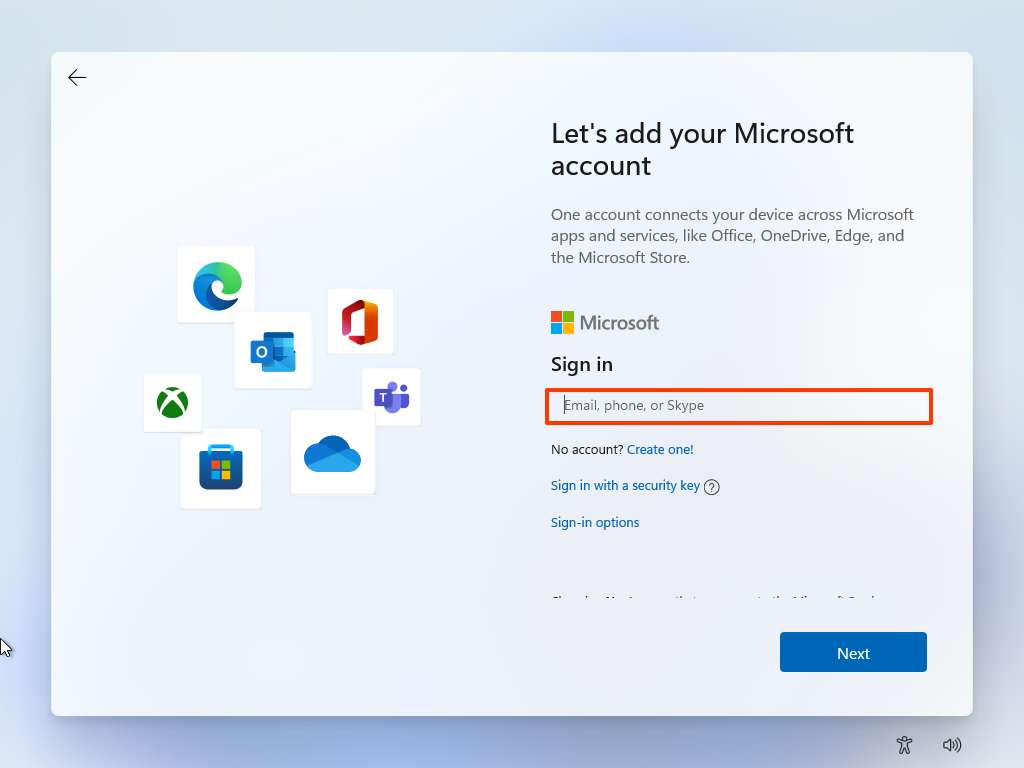
- Confirm your Microsoft account information to create an account.
- Click the Next button.
- Confirm the account password.
- Click the Next button.
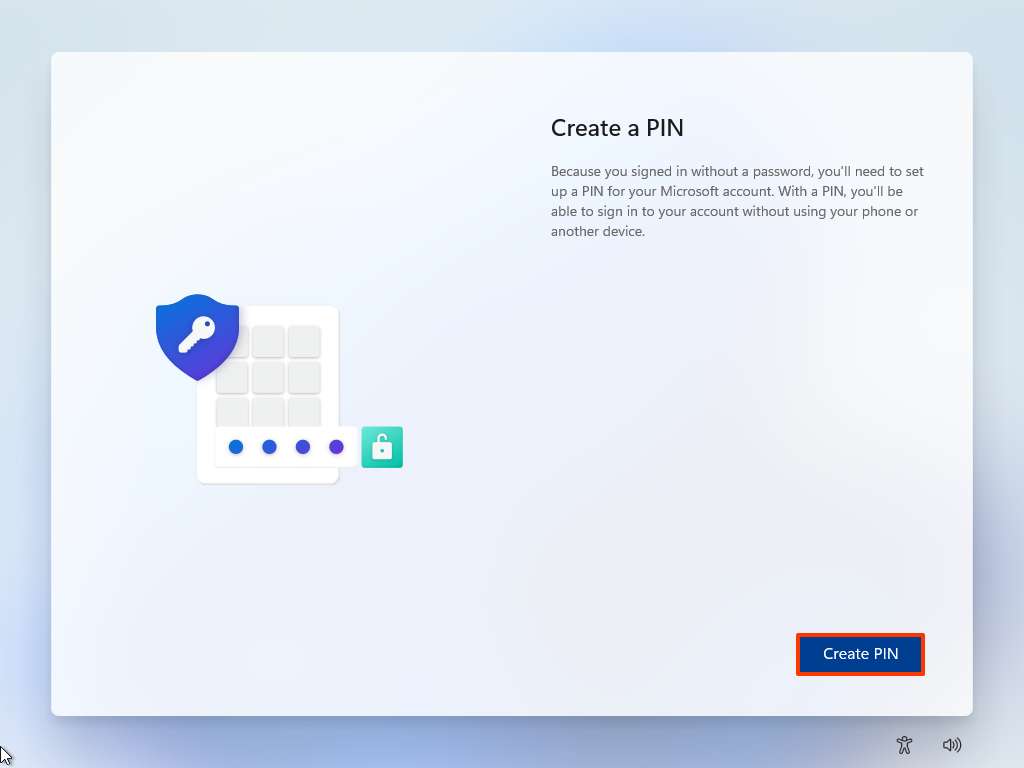
- Click the Create PIN button.
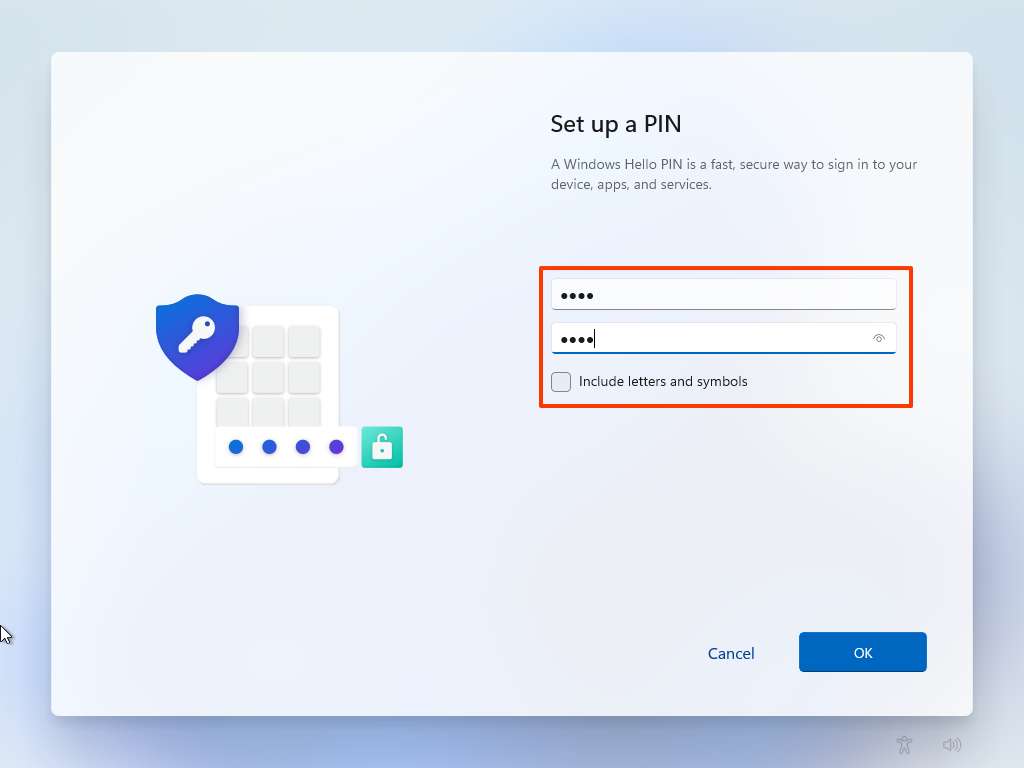
- Create a new four-digit PIN.
- Click the OK button.
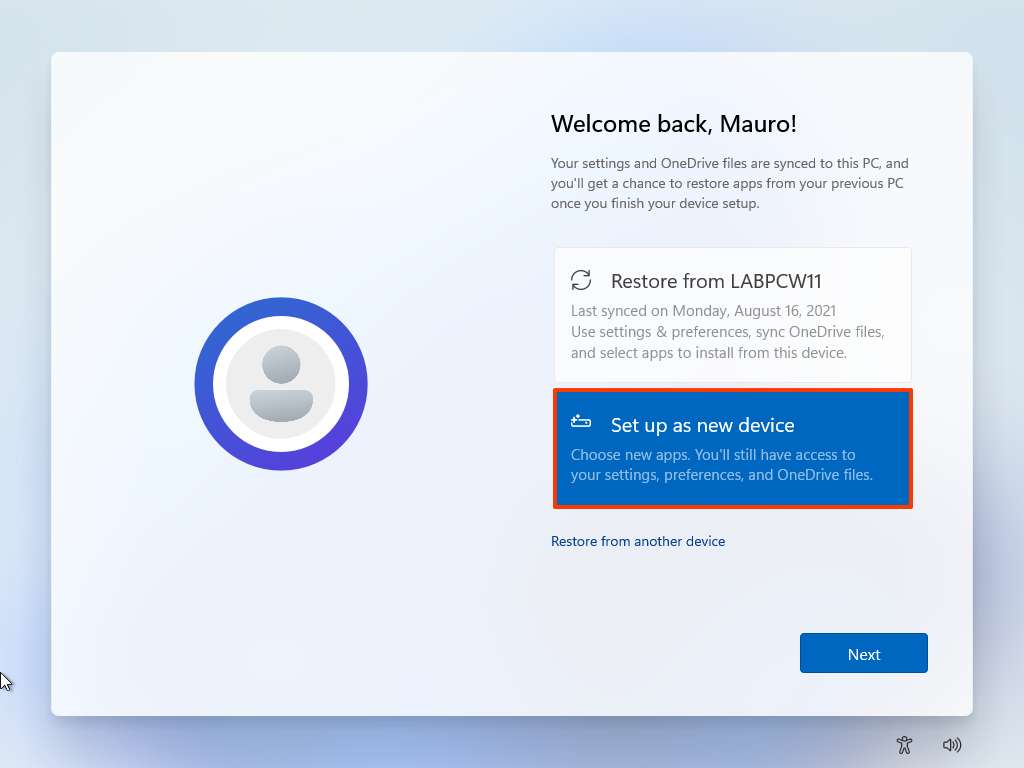
- Select the Set up as new device option.
- Click the Next button.
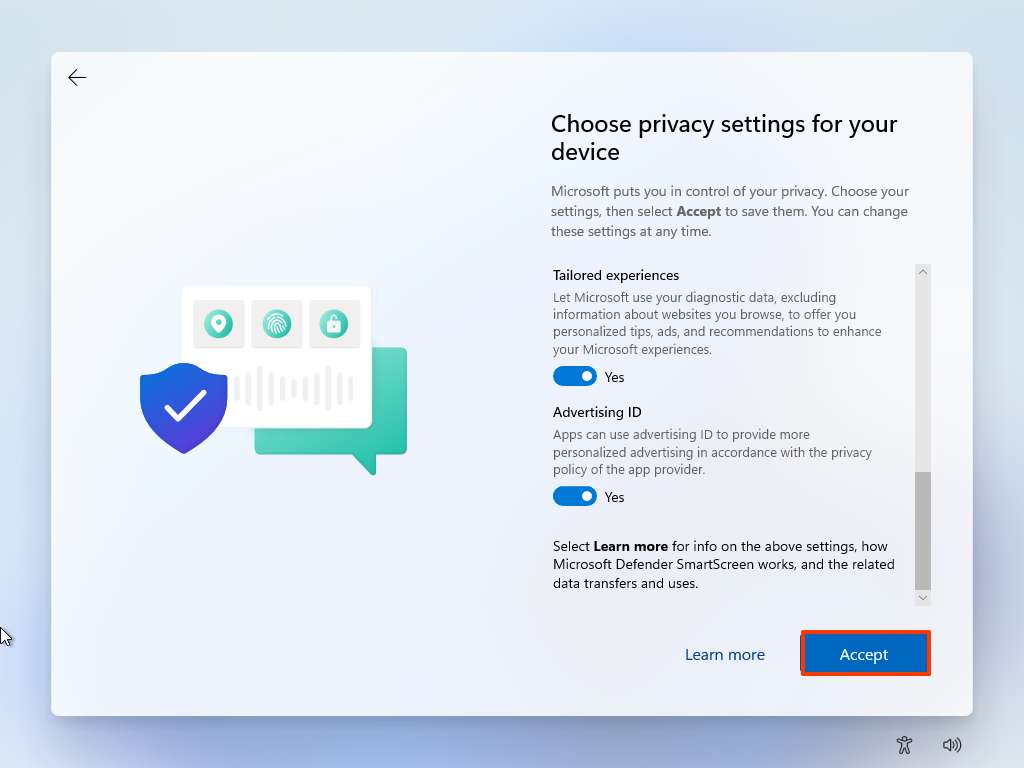
- Confirm your privacy settings.
- Click the Accept button.
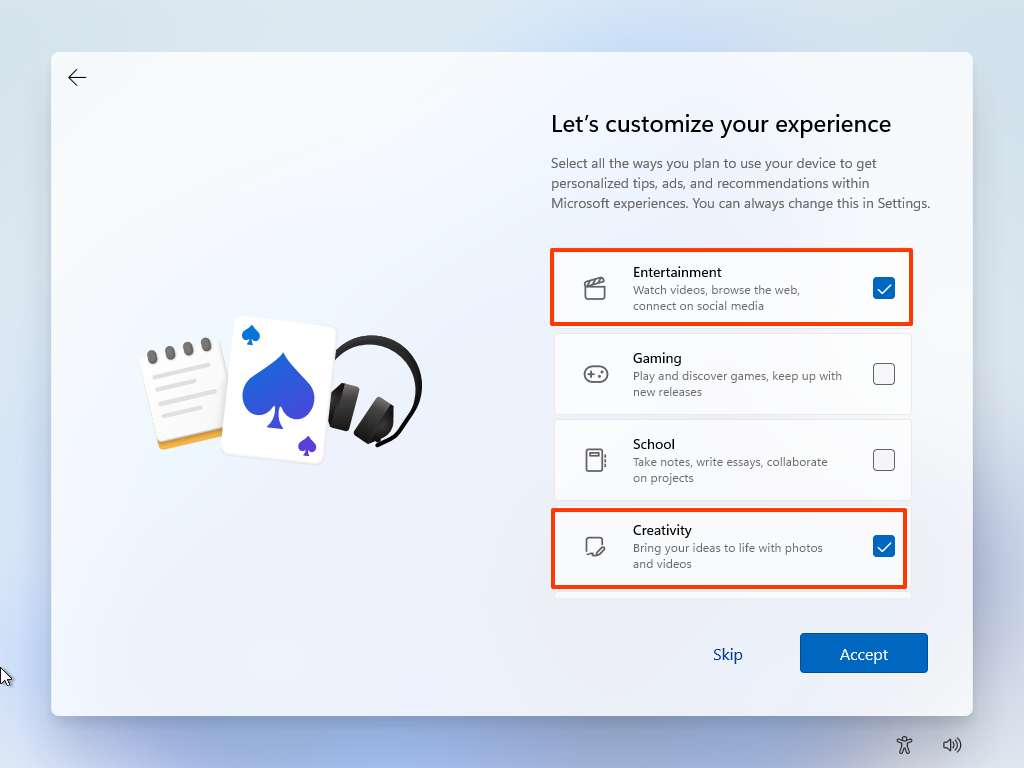
- Select one or more ways you plan to use the device to allow Windows 11 to suggest tools and services customization experience.
- Click the Accept button to continue. (You can also skip this option.)
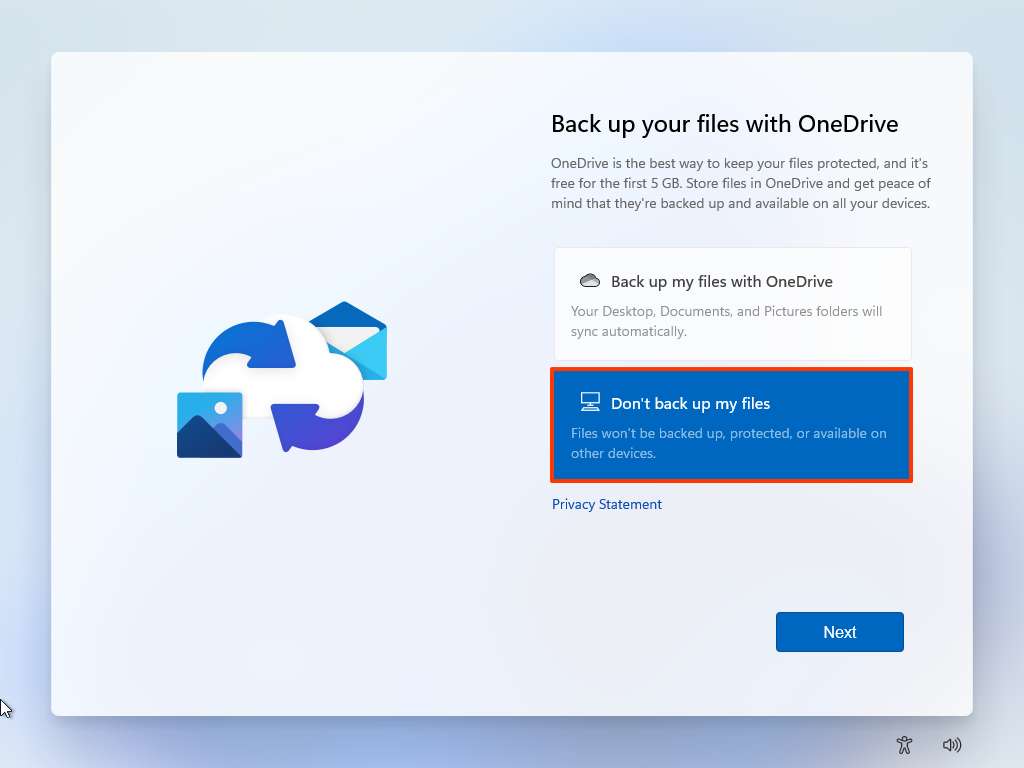
- Select either the Back up my files with OneDrive or Only save file to this PC option.
- Click the Next button.
- Click the No, thanks button to skip the Microsoft 365 setup.
Once you complete the steps, the setup of Windows 11 will be completed.
More Windows resources
For more helpful articles, coverage, and answers to common questions about Windows 10 and Windows 11, visit the following resources:
- Windows 10 on Windows Central — All you need to know
- Windows 10 help, tips, and tricks
- Windows 11 on Windows Central — All you need to know
- Windows 11 help, tips, and tricks

Mauro Huculak has been a Windows How-To Expert contributor for WindowsCentral.com for nearly a decade and has over 22 years of combined experience in IT and technical writing. He holds various professional certifications from Microsoft, Cisco, VMware, and CompTIA and has been recognized as a Microsoft MVP for many years.
