How to change system language on Windows 11 or Windows 10
Do you need to change the default language on Windows 11 or 10? In this guide, we'll show you how without reinstallation.
All the latest news, reviews, and guides for Windows and Xbox diehards.
You are now subscribed
Your newsletter sign-up was successful
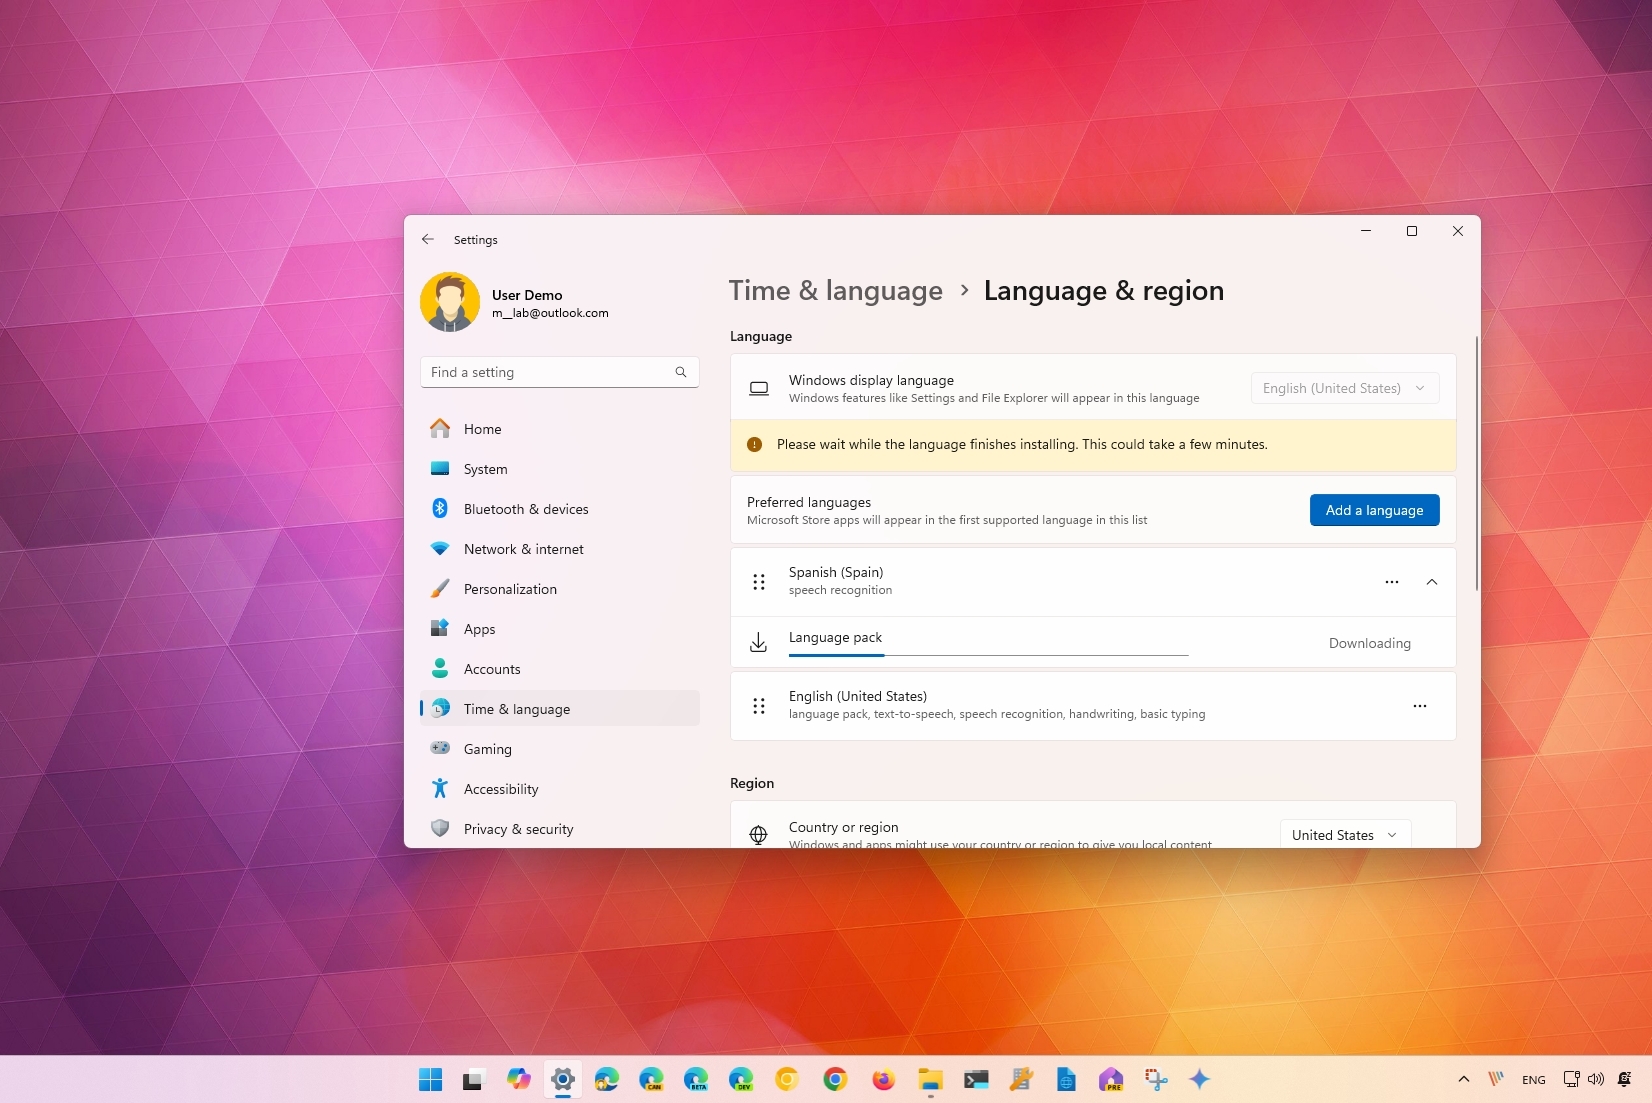
On Windows 11, Microsoft makes it easy to change the system language settings if you made a mistake during the initial setup or the device came with the wrong language.
Regardless of the reason, if you must change the language settings, you can download, install, and apply a new configuration through the "Time & language" settings without reinstalling Windows 11.
In this how-to guide, I will walk you through the steps to change the computer's default language.
These instructions have been updated to reflect changes in the latest version of the operating system. This guide has been updated to include Windows 10 as well.
How to change default language on Windows 11
If the computer's language is incorrect, you can change the settings without reinstalling anything with these instructions.
Disable sync for language settings
Since the language preferences will sync across devices, if you only want to update the settings on a particular device, you will have to disable the language settings synchronization option. Of course, you can skip these instructions if you want the new settings to sync across devices.
To turn off syncing the language preferences on Windows 11, use these steps:
- Open Settings.
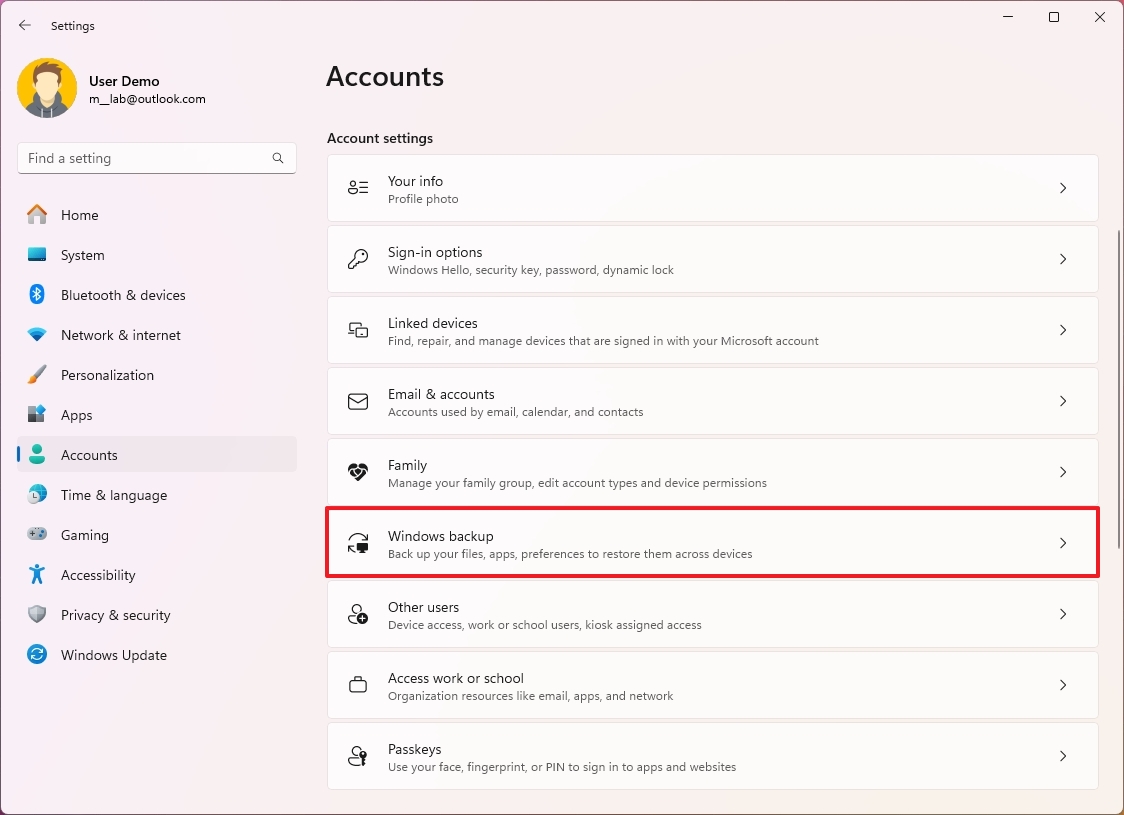
- Click on Accounts.
- Click the Windows backup page in the right side.
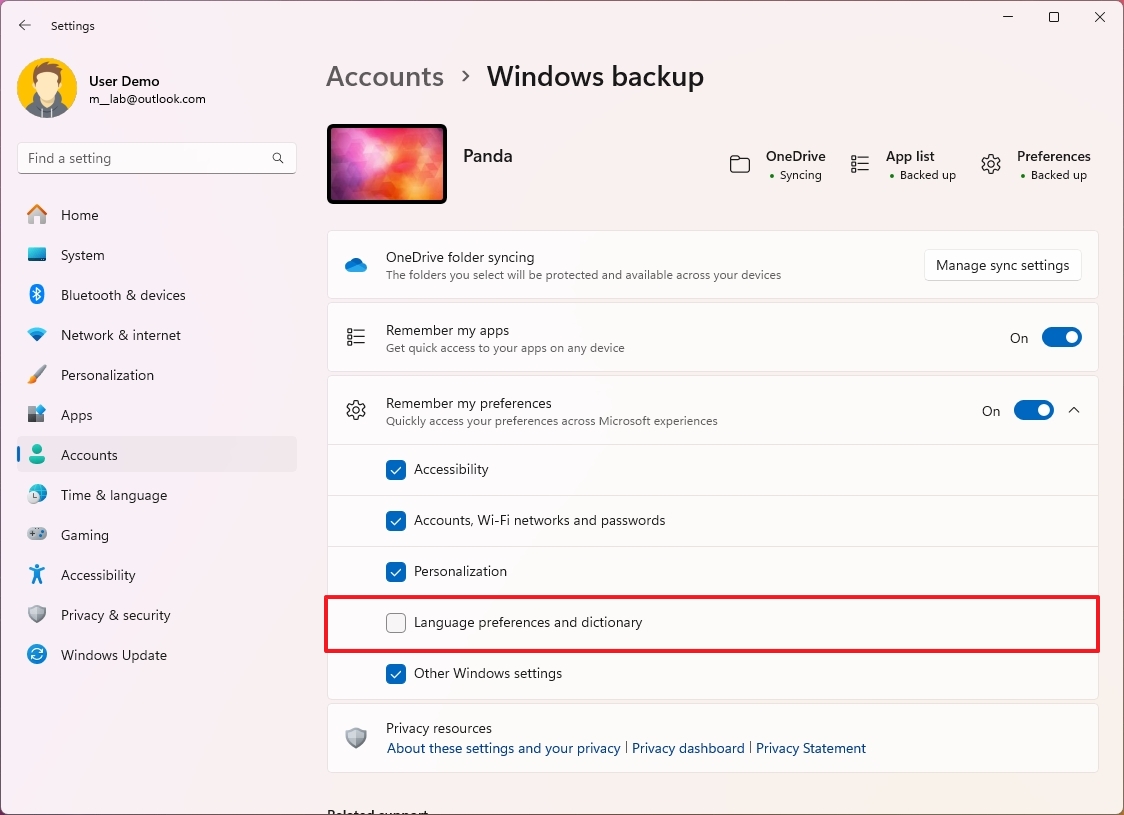
- Click the "Remember my preferences" setting.
- Clear the "Language preferences and dictionary" option.
Once you complete the steps, you can change the language settings without affecting all the other computers connected to the same Microsoft account.
All the latest news, reviews, and guides for Windows and Xbox diehards.
Change language settings
To change the Windows 11 default language, use these steps:
- Open Settings.
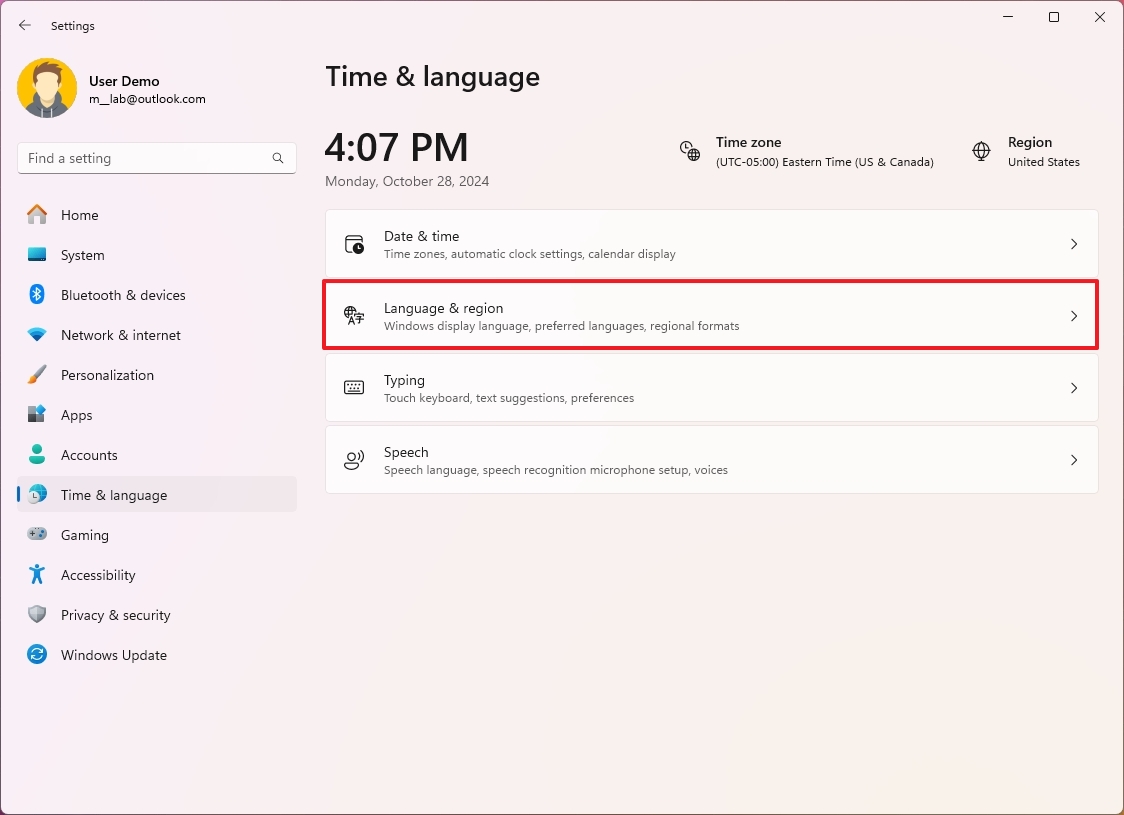
- Click on Time & language.
- Click the Language & region page in the right side.
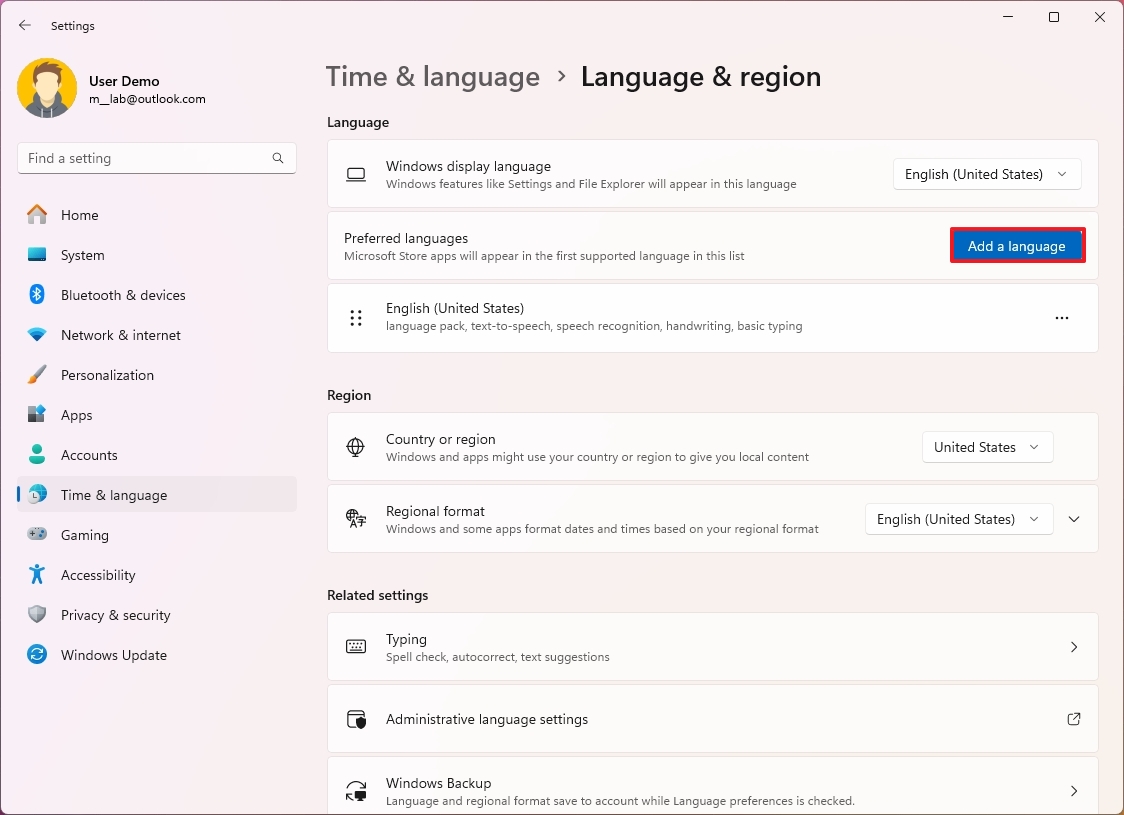
- Click the Add a language button for the "Preferred languages" setting under the "Language" section.
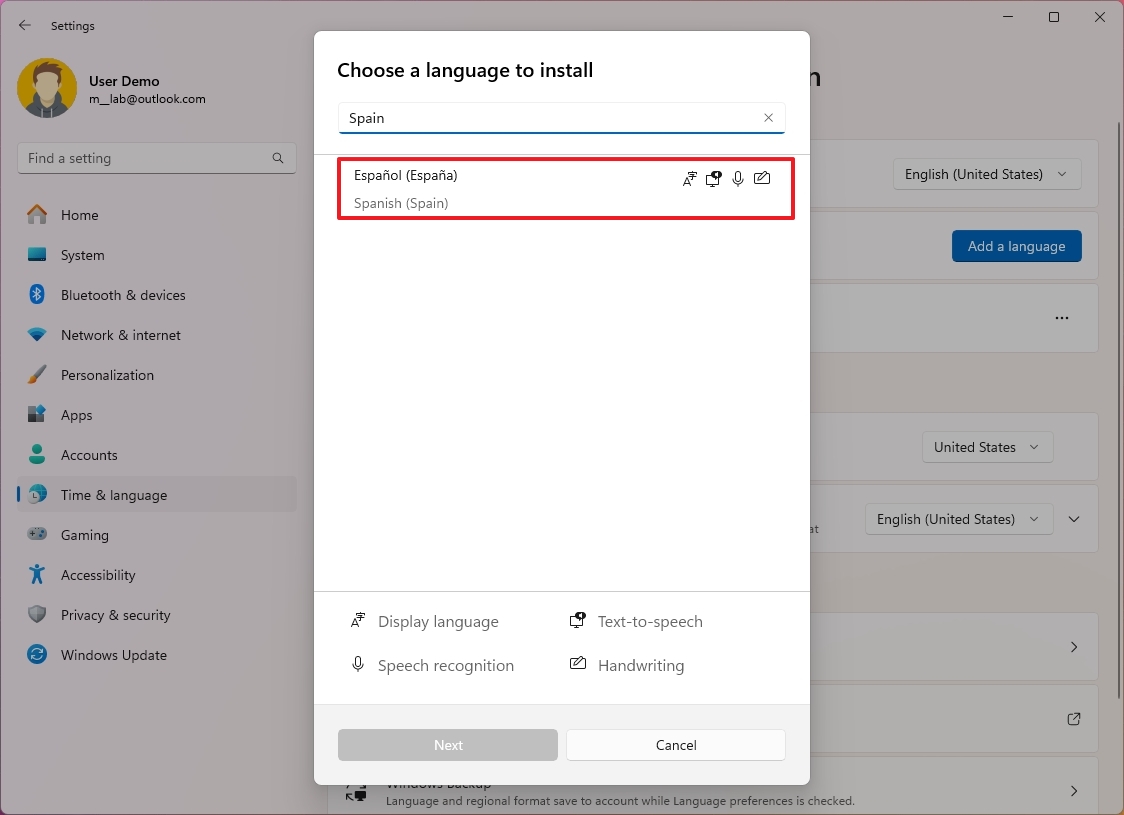
- Search for the new language.
- Quick tip: You can search the country's name to find the language faster.
- Select the language.
- Click the Next button.
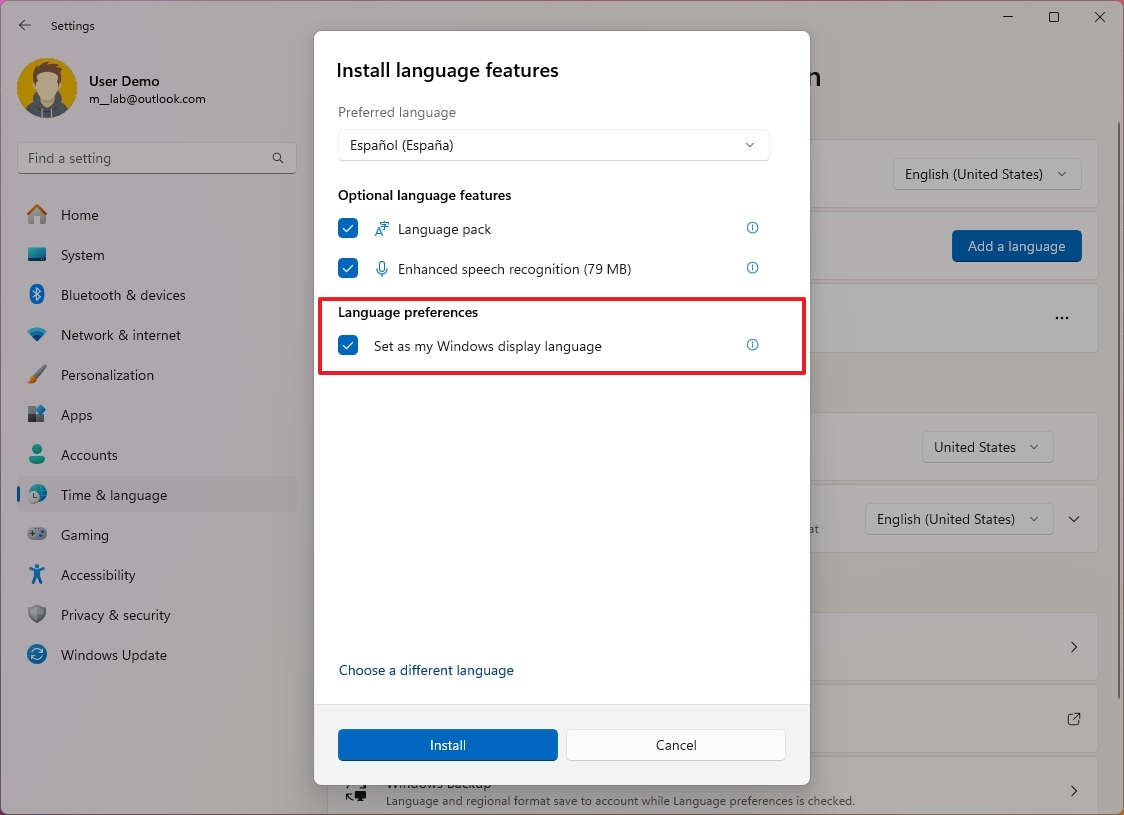
- (Optional) Check the optional language features to install on Windows 11.
- Check the "Set as my Windows display language" option.
- Click the Install button.
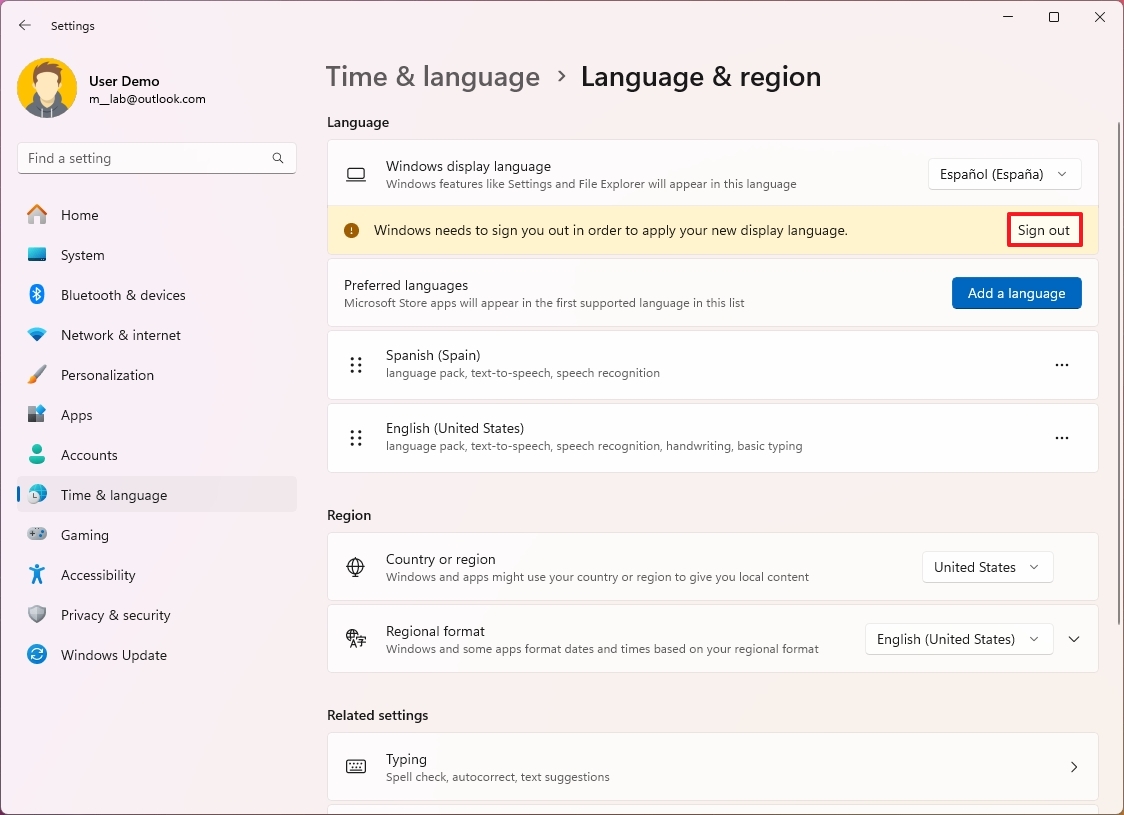
- Click the Sign out button.
- Sign into the account to start using the new language.
After you complete the steps, the display language will apply throughout the experience, including the Sign-in screen, Settings app, File Explorer, Desktop, apps, browser, and the web.
Configure region settings
Also, if you are changing the language settings because you are in a different location, you may also need to adjust the region settings.
To set different region settings on Windows 11, use these steps:
- Open Settings.
- Click on Time & language.
- Click the Language & region page in the right side.
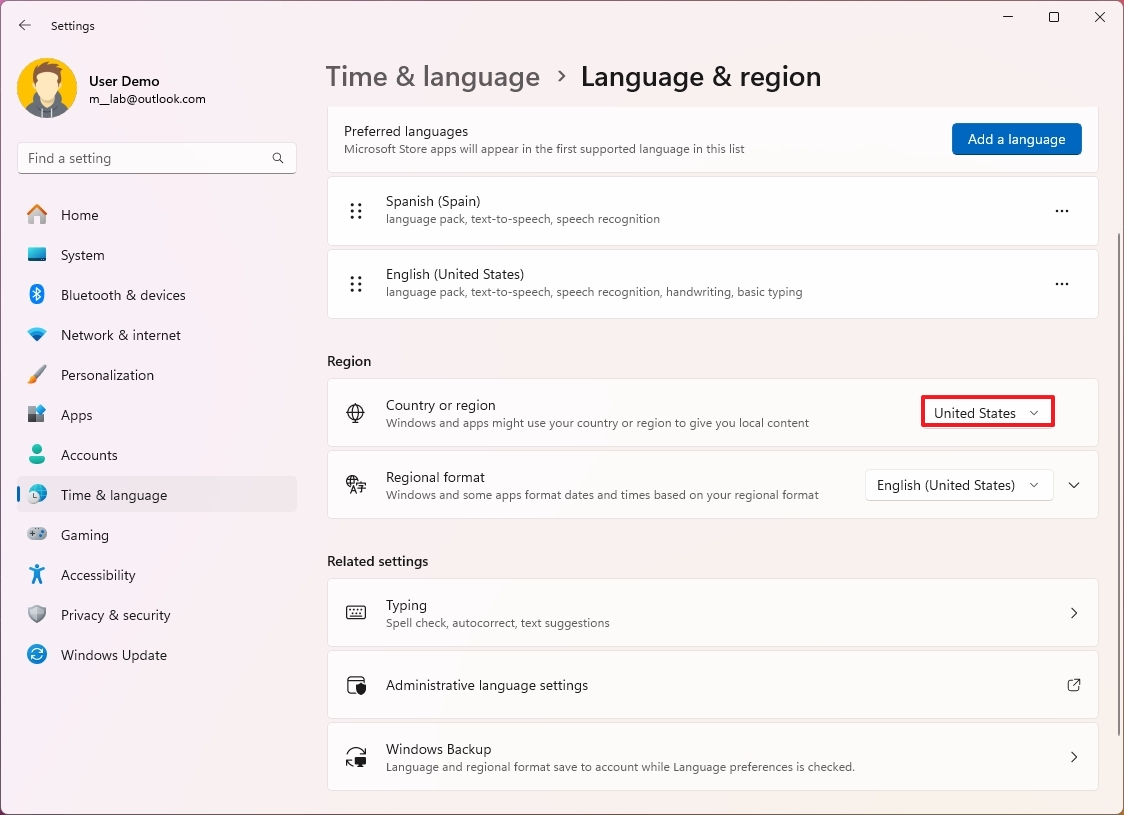
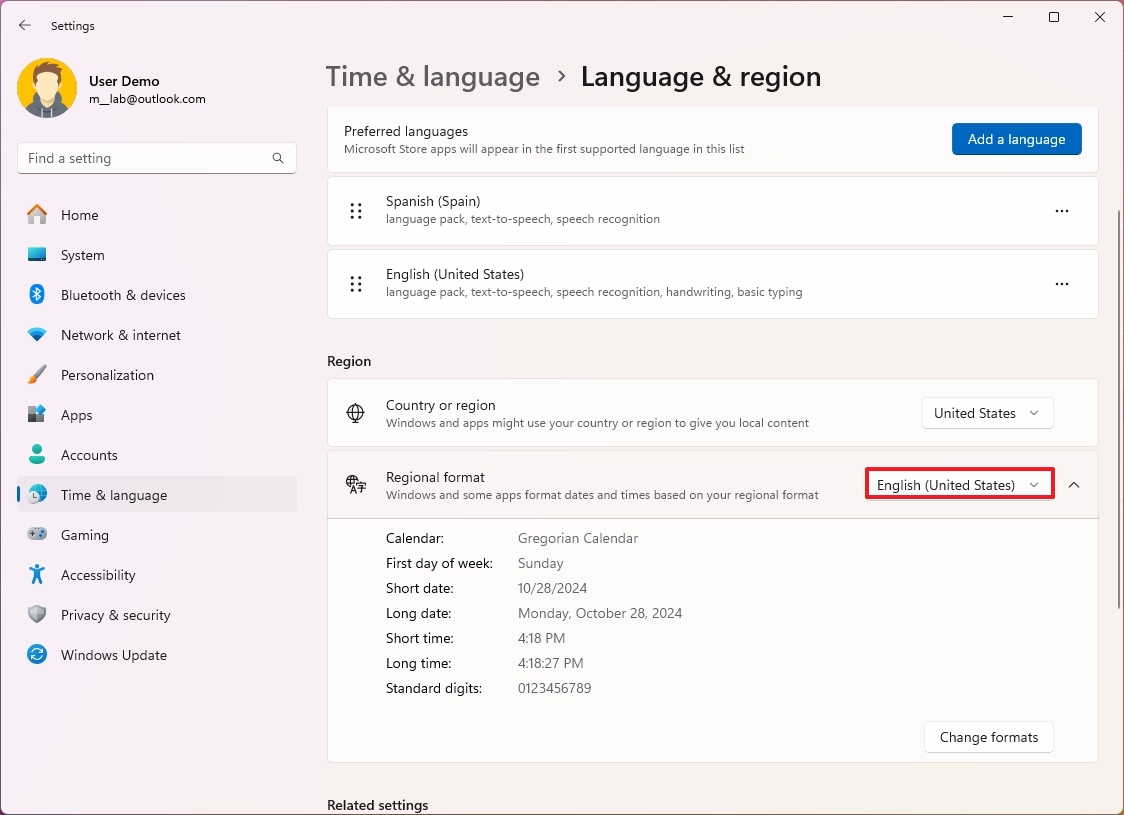
- Use the Country or region setting to select the current location under the "Region" section (if applicable).
- Use the "Regional format" setting to select the correct formats for the new region's date and time (if applicable).
- Quick tip: You can also expand the setting and click the "Change formats" button to change other regional settings, including calendar, first day of the week, short date, and time format.
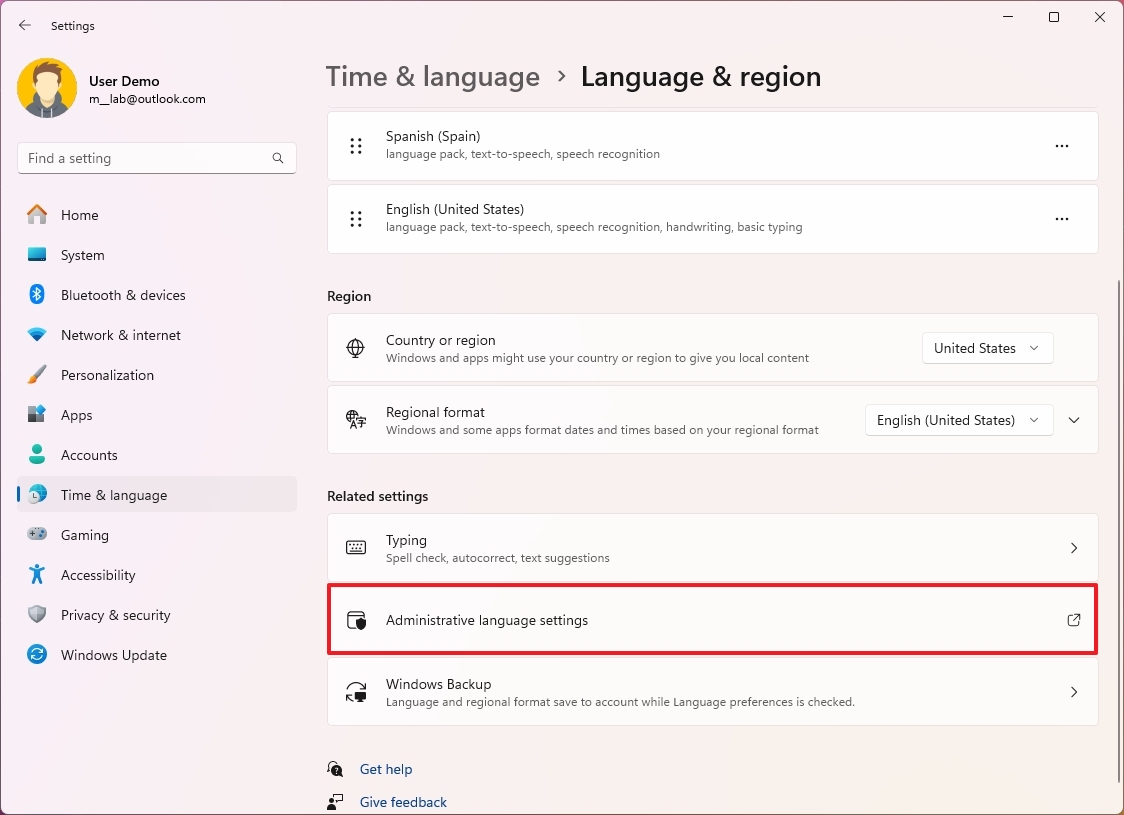
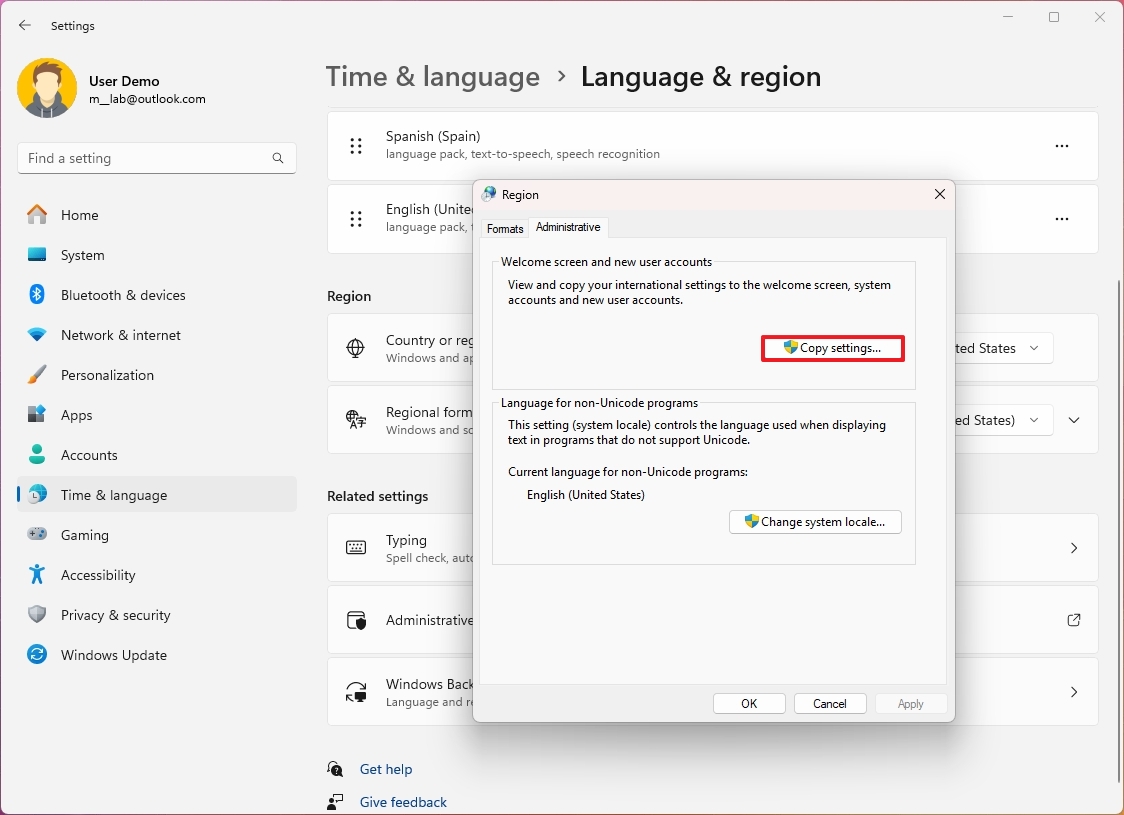
- Click the "Administrative language settings" option under the "Related settings" section.
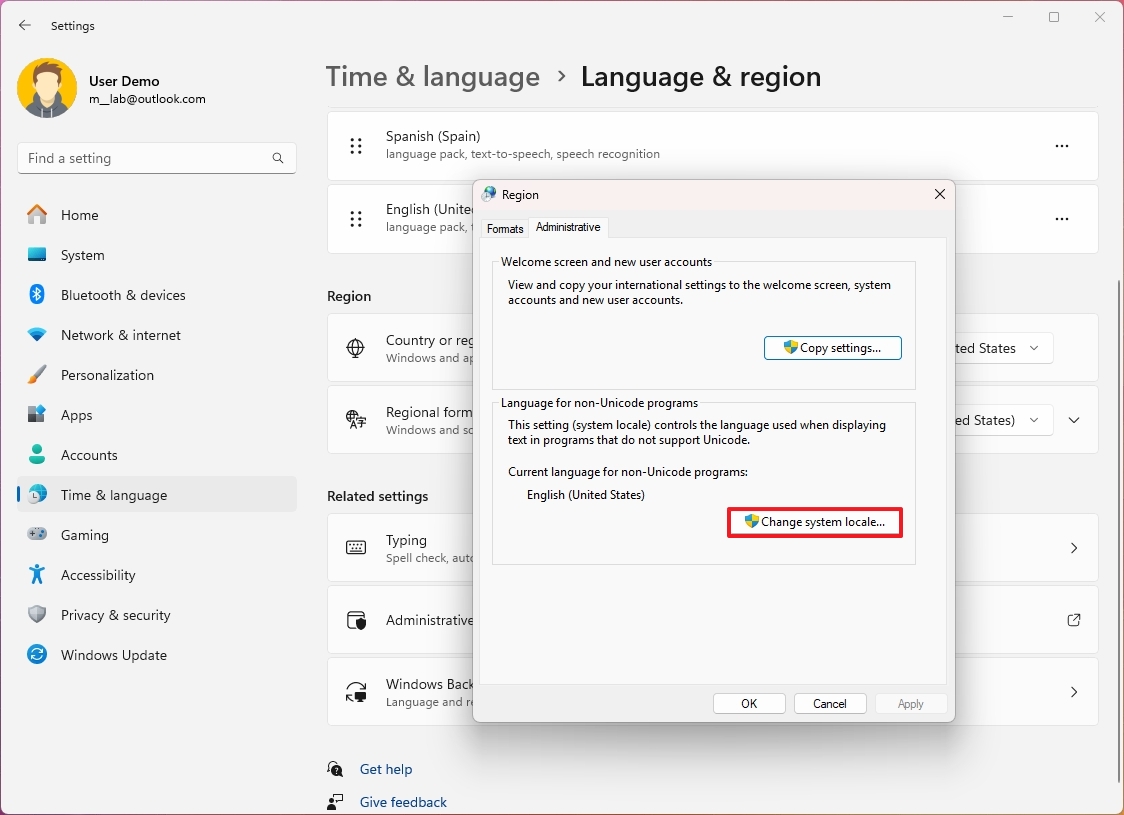
- Click the Administrative tab.
- Click the "Change system locale" button under the "Language for non-Unicode programs" section.
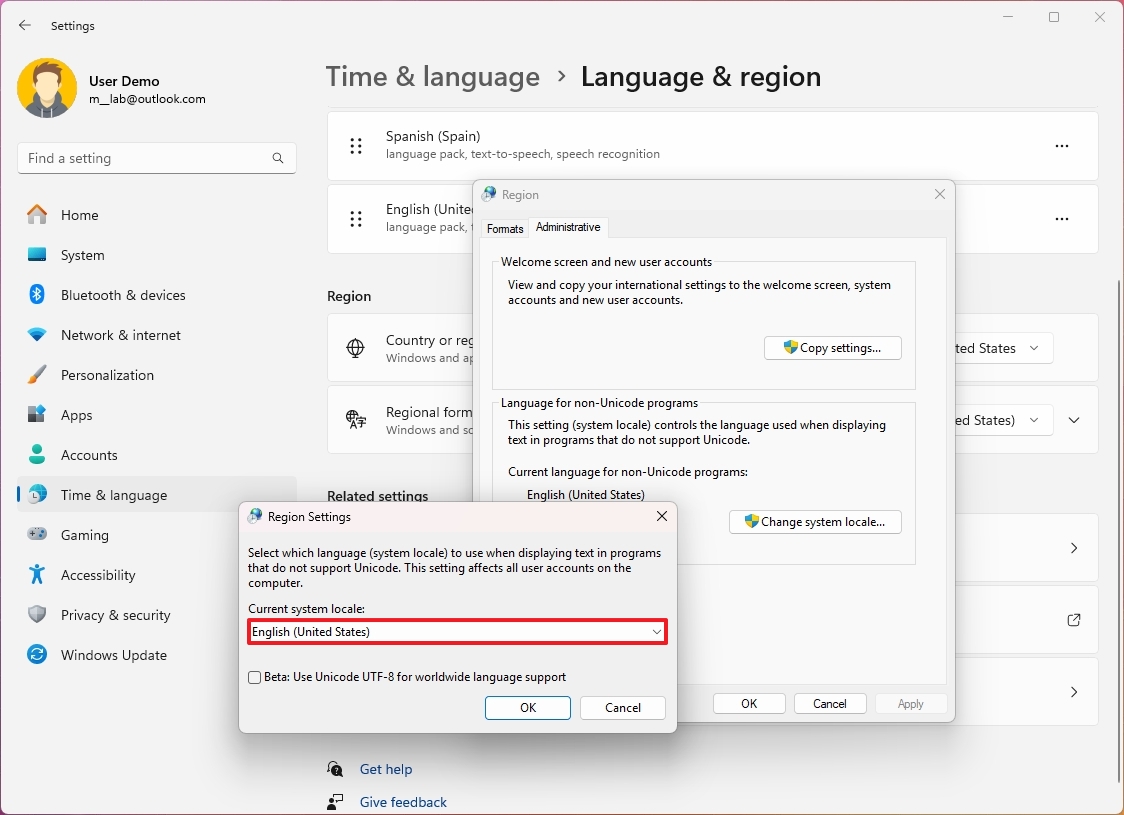
- Select the new system locale by specifying the new language.
- Click the OK button.
- Click the Cancel button.
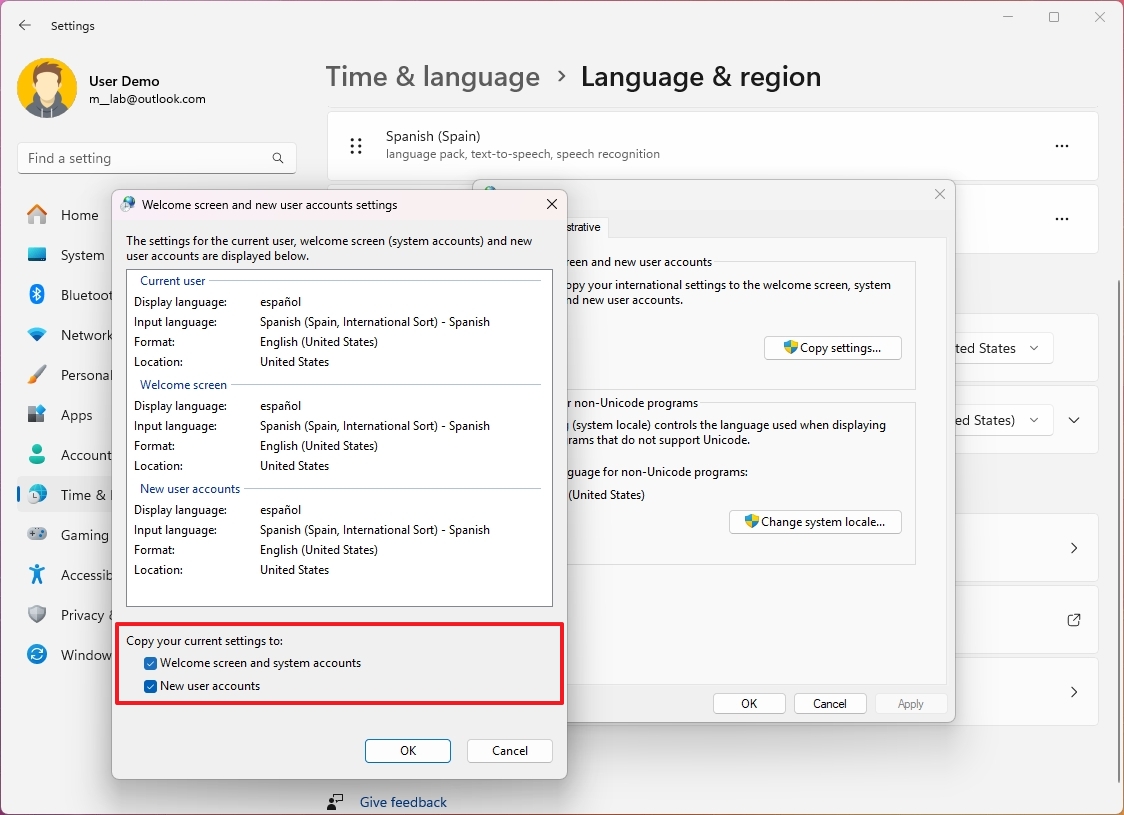
- Click the Copy settings button.
- Check the "Welcome screen and system accounts" and "New user accounts" options under the "Copy your current settings to" section.
- Click the OK button.
- Click the OK button again.
- Click the Restart now button.
Once you complete the steps, the laptop or desktop computer will display the correct region settings.
Although you would rarely have to adjust or add more languages to Windows 11, these settings can come in handy to match the local settings if you are in a different region of the globe or when getting a computer that comes with various settings. You only need to remember that changing the language settings will cause the Microsoft Store and web browsers to show content based on those settings.
More resources
For more helpful articles, coverage, and answers to common questions about Windows 10 and Windows 11, visit the following resources:
- Windows 10 on Windows Central — All you need to know
- Windows 11 on Windows Central — All you need to know
How to change default system language on Windows 10
Windows 10 will guide you through configuring your preferred language during the initial setup, but if you didn't select the correct option or use a device already configured with a different language, you don't have to struggle when your requirements are different, nor do you have to reinstall the operating system.
If you have to change the device's default language settings, you can do this using the Settings app without reinstalling Windows 10.
In this how-to guide, I will walk you through the steps to change the system's default language on Windows 10.
If the incorrect language is configured on Windows 10, you can adjust the system settings to configure the correct language without reinstallation.
Disable language sync
On Windows 10, when using a Microsoft account, some of your preferences (including language) will sync across the device. If you only plan to change the settings on the computer, you should turn off the option to sync your language settings to prevent changing the same settings on other devices.
To disable language preference sync on Windows 10, use these steps:
- Open Settings.
- Click on Accounts.
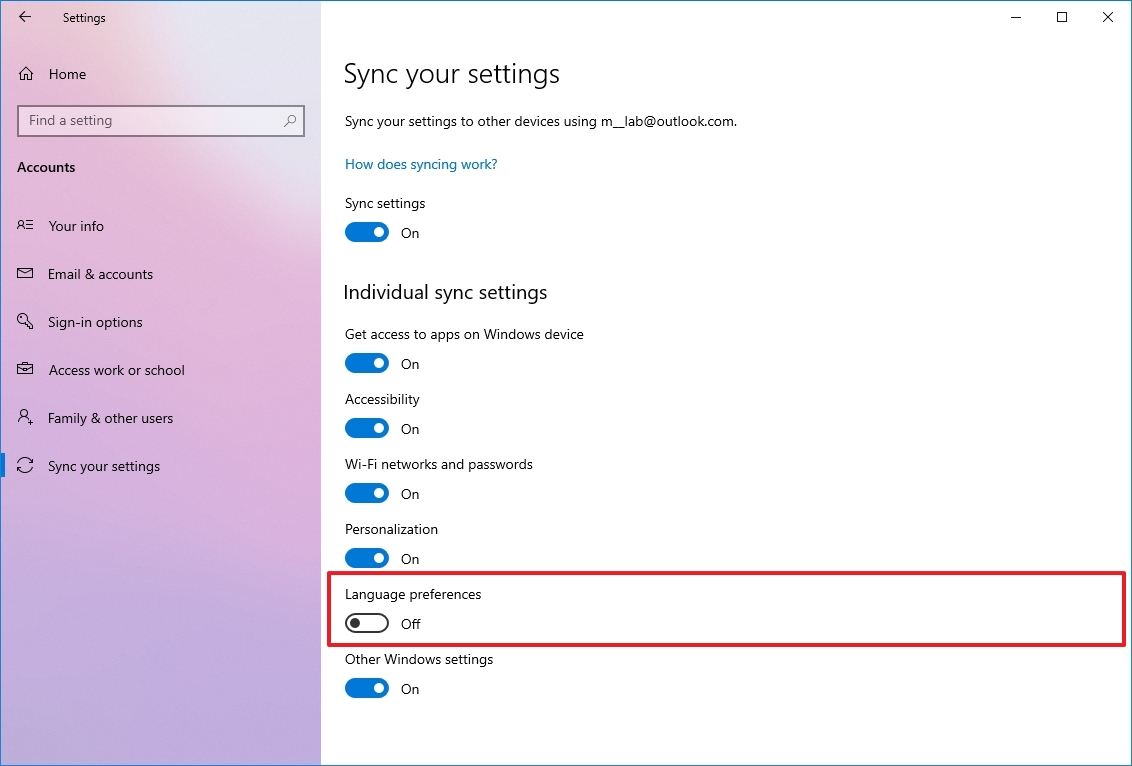
- Click on Sync your settings.
- Under the "Individual sync settings" section, turn off the Language preferences toggle switch.
Once you complete the steps, you can change the language settings without affecting the other devices connected with the same Microsoft account.
Change system language settings
To change the system default language, close your apps, and use these steps:
- Open Settings.
- Click on Time & Language.
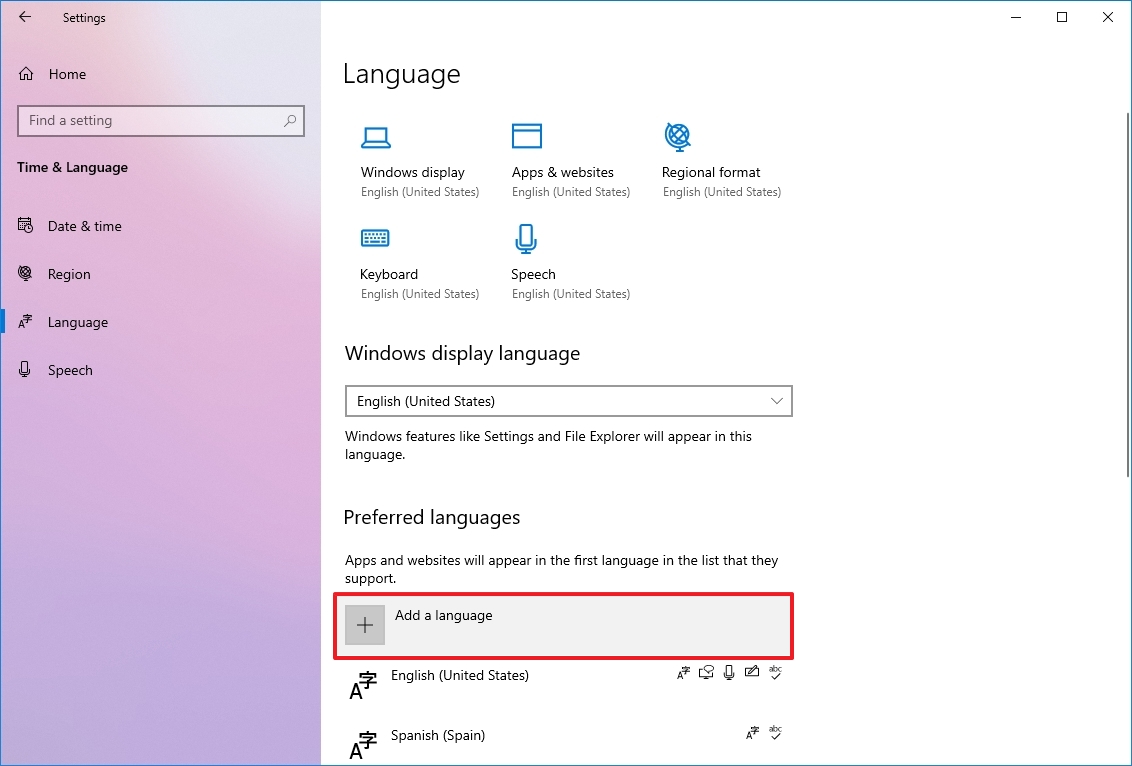
- Click on Language.
- Under the "Preferred languages" section, click the "Add a language" button.
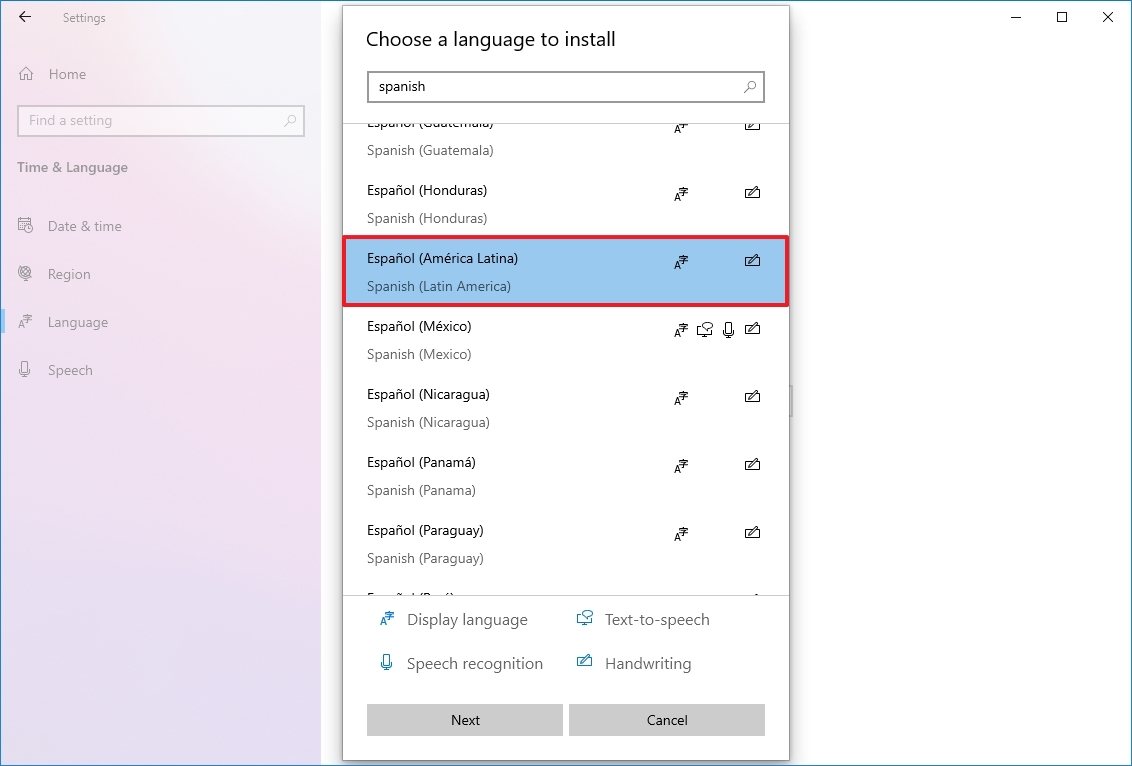
- Search for the correct setting using the language or country name.
- Select the package from the result.
- Click the Next button.
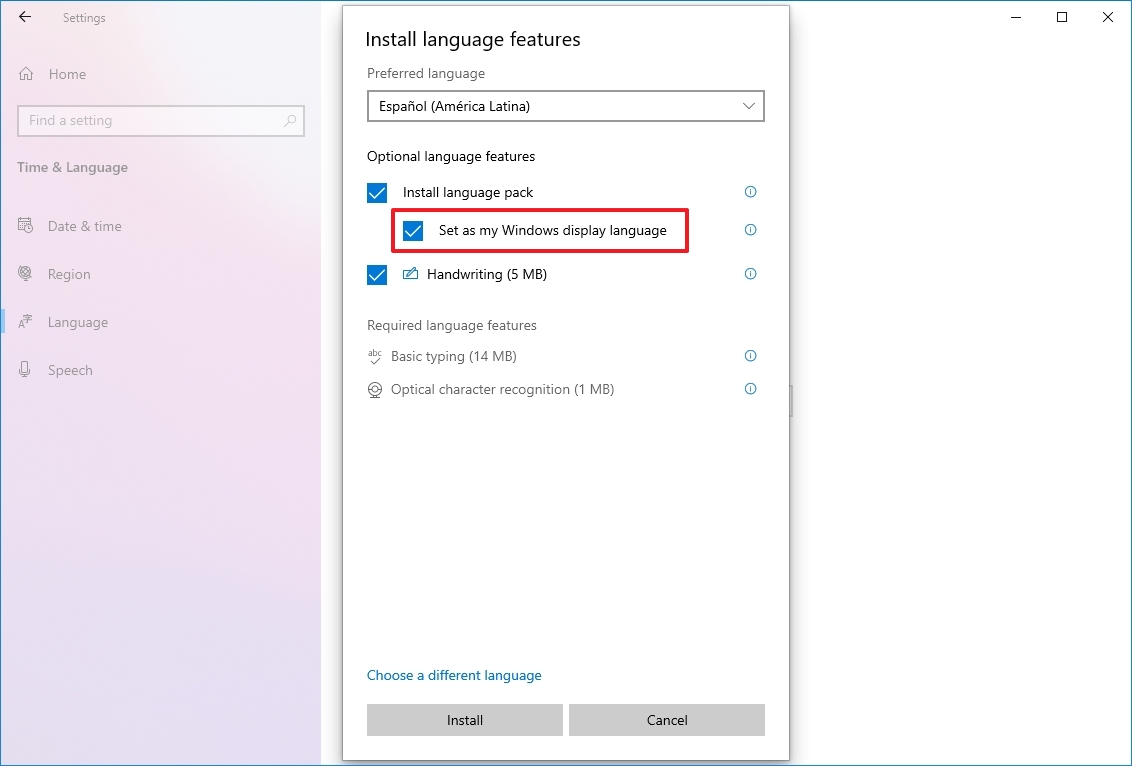
- Check the "Install language pack" option.
- Check the "Set as my Windows display language" option.
- Check the additional features as needed — for example, "Text-to-speech" and "Handwriting."
- Click the Install button.
- Click the "Yes, sign out now" button.
- Sign back into the account.
After you complete the steps, the Windows 10 language will change across the experience, including the Sign-in screen, Settings app, File Explorer, Desktop, apps, browser, and websites you visit.
Change system region settings
You will also have to change the region settings if you need to adjust the language settings because you are in a different region.
To change the local region settings, use these steps:
- Open Settings.
- Click on Time & Language.
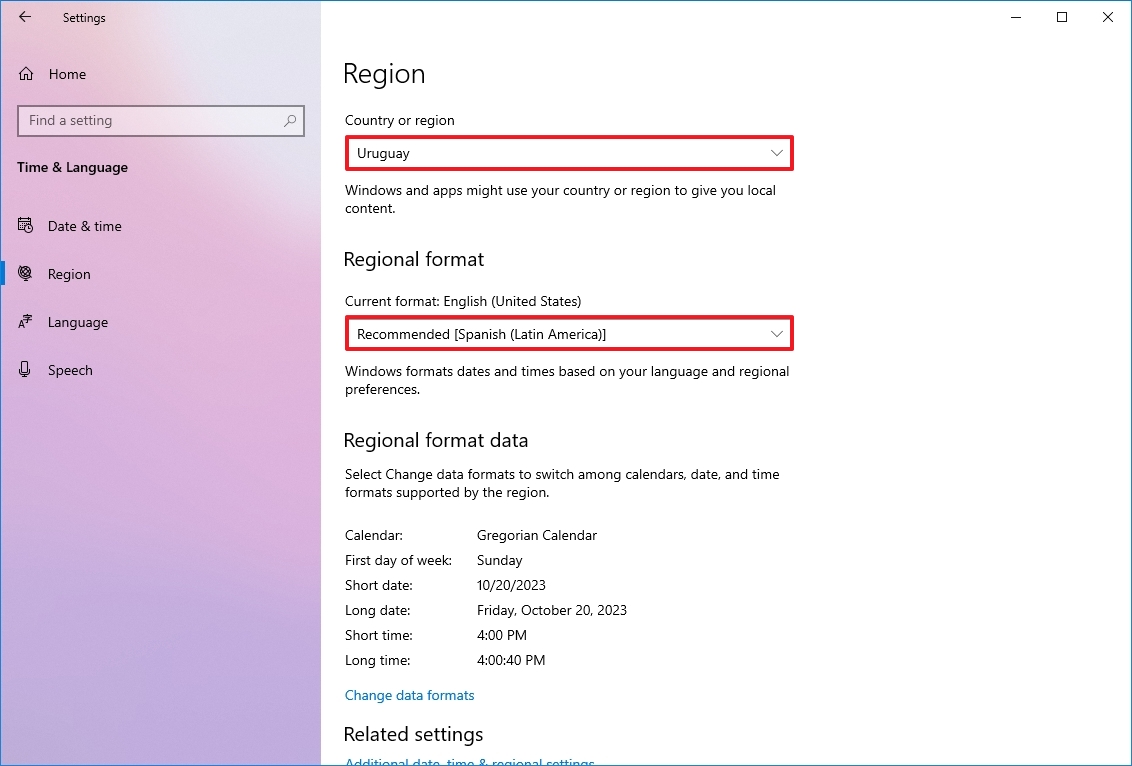
- Click on Region.
- Under the "Region" section, select the current location with the "Country or region" drop-down menu (if applicable).
- Under the "Regional format" section, select the formats for the region's date and time with the "Current format" drop-down menu (if applicable).
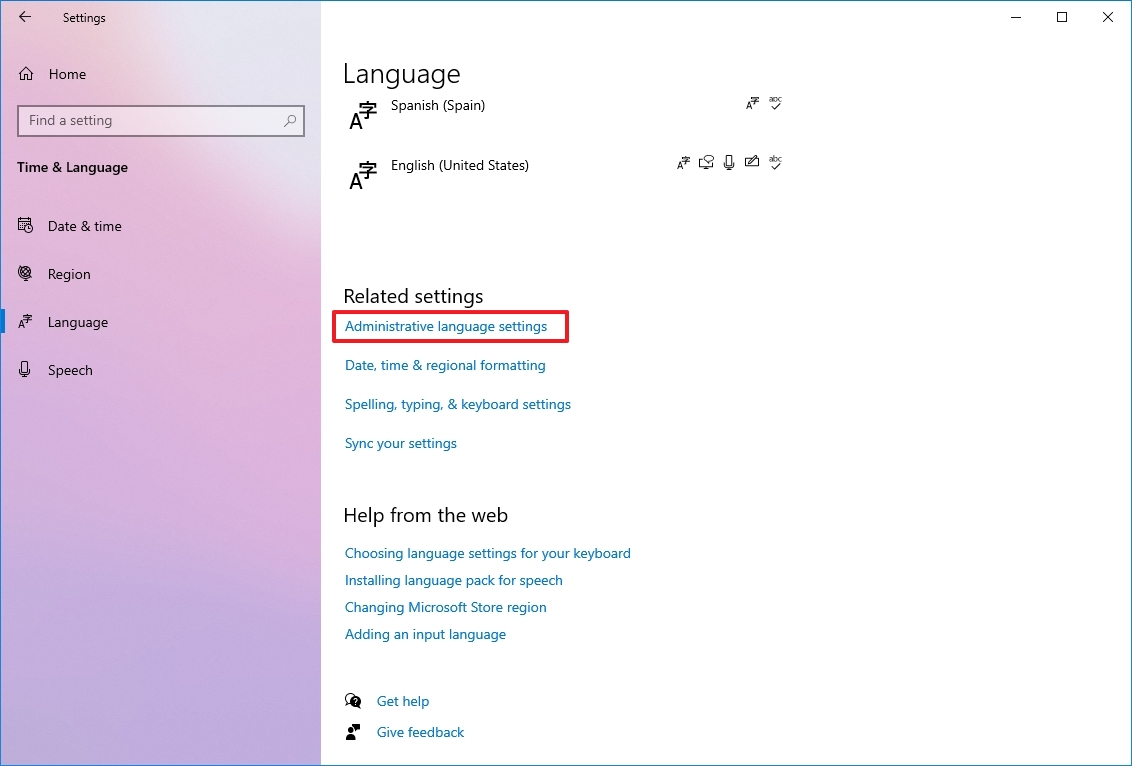
- Click on Language.
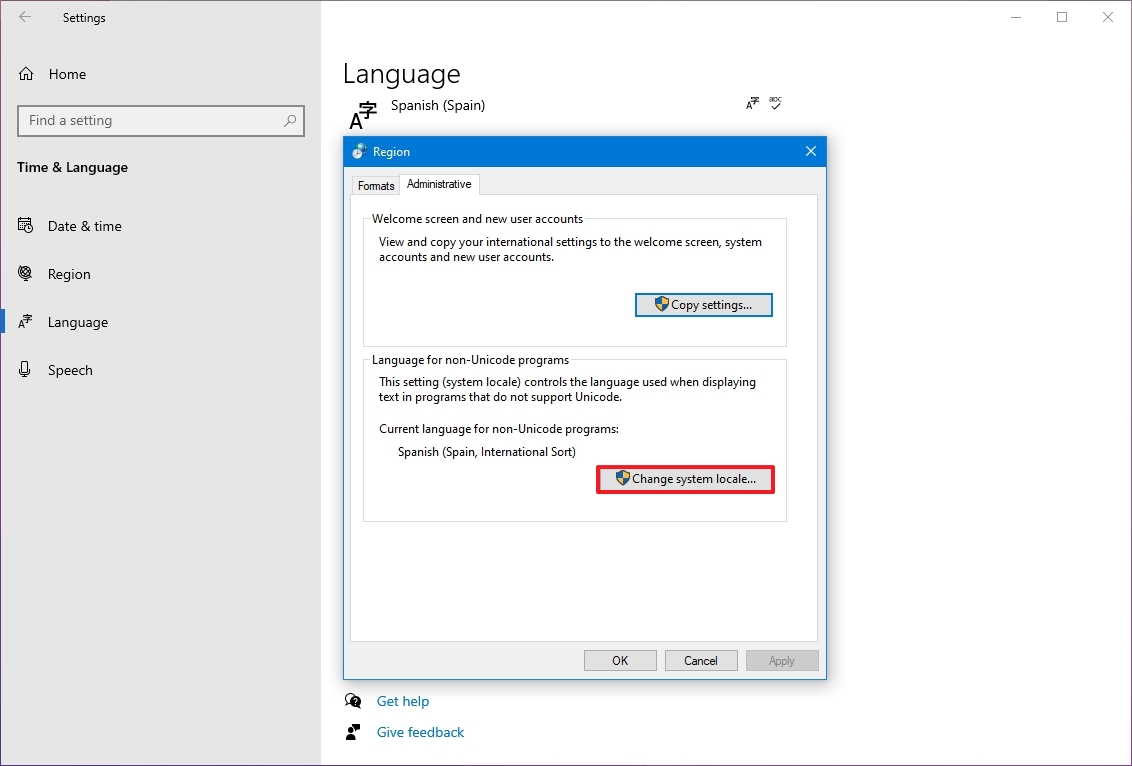
- Under the "Related settings" section, click the "Administrative language settings" option.
- Click the Administrative tab.
- Under the "Language for non-Unicode programs" section, click the "Change system locale" button.
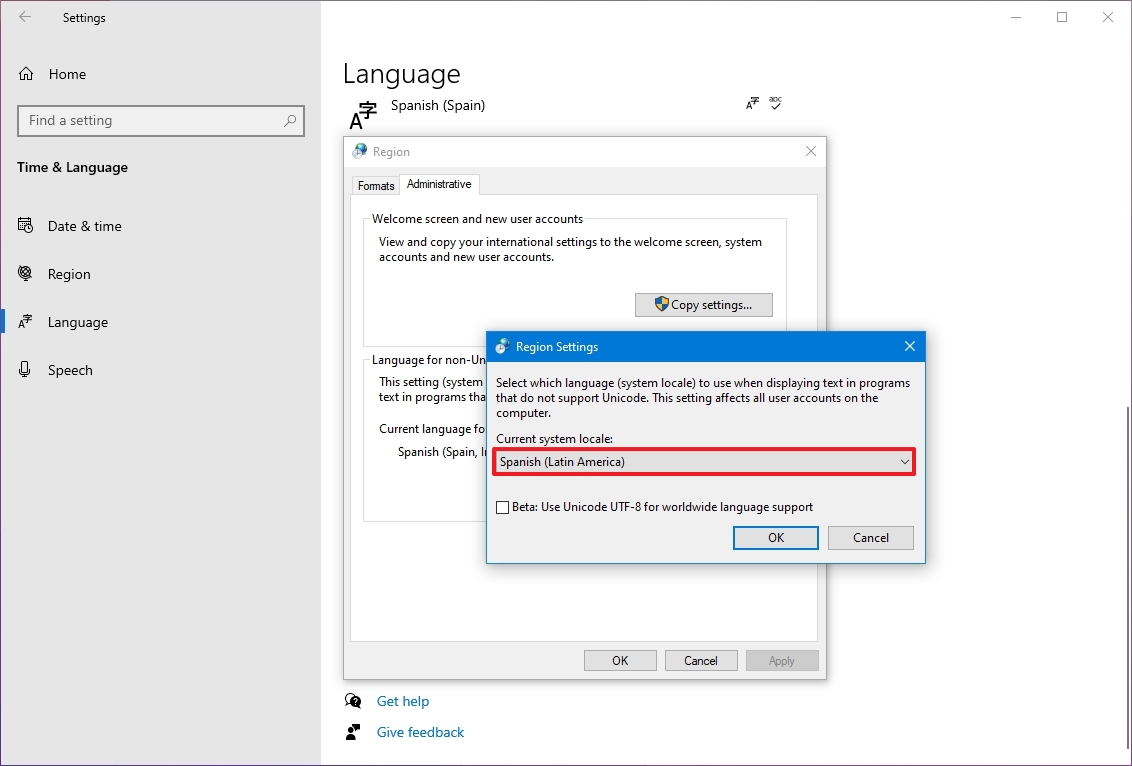
- Select the new system locale language with the "Current system locale" drop-down menu.
- Click the OK button.
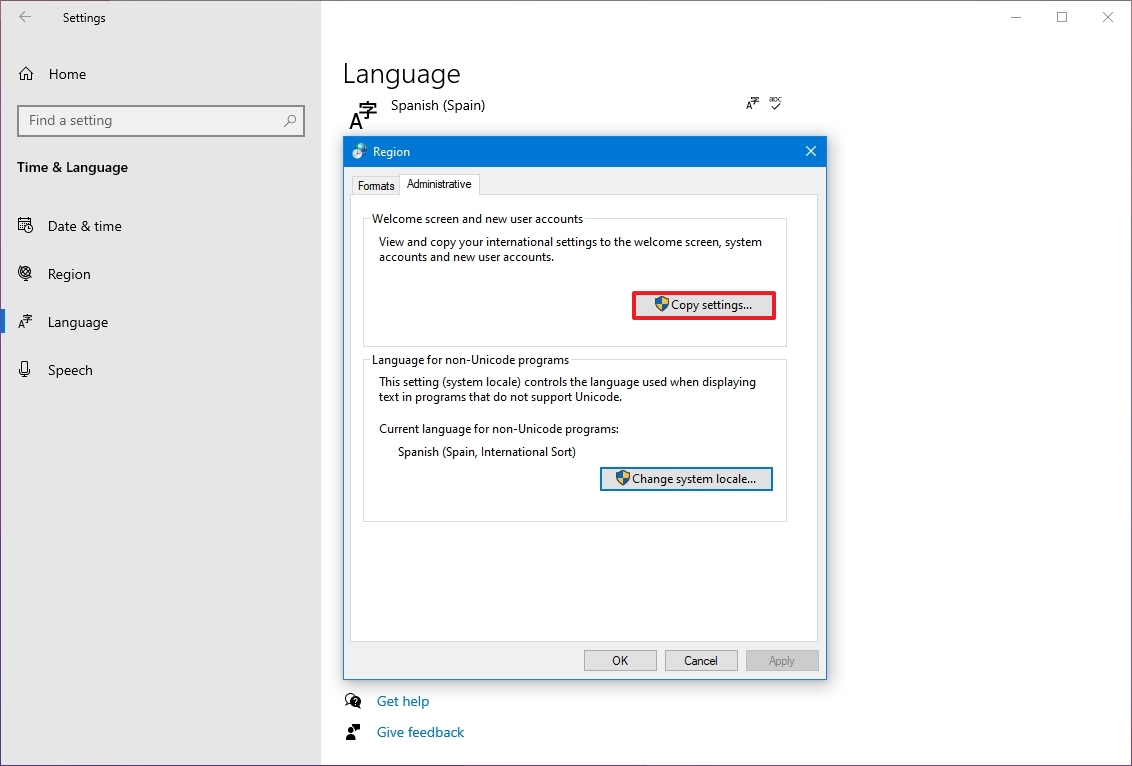
- Click the Copy settings button in the "Administrative" tab.
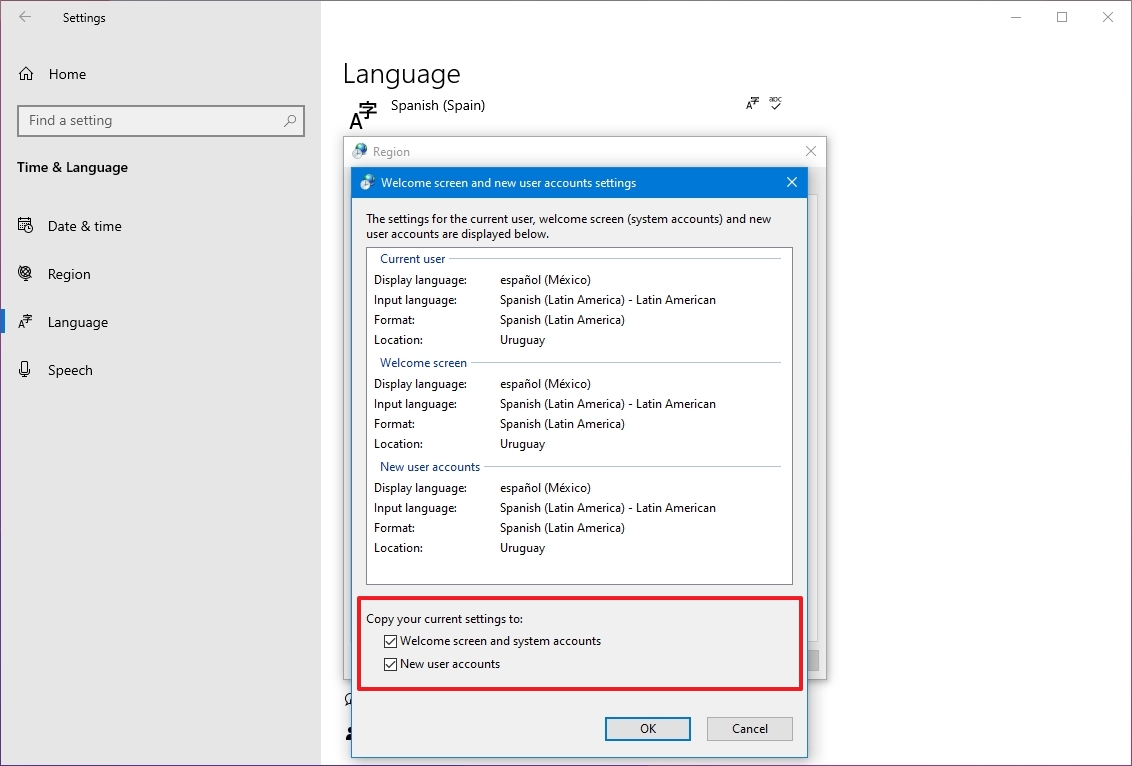
- Under the "Copy your current settings to" section, check the "Welcome screen and system accounts" and "New user accounts" options.
- Click the OK button.
- Click the OK button again.
- Click the Restart now button.
Once you complete the steps, the settings will apply, and the computer will use the correct region settings.
You rarely have to change or add other languages on Windows 10. However, changing these settings may come in handy in organizations working with people who need to use different preferences. It's also a helpful feature to match the locale settings if you relocate to another region or when buying a new laptop that ships from a different country.
The only caveat with changing the region settings is that it will also change the settings for the Microsoft Store, which may block access to certain apps and services, depending on the location. In the same way, you can change the region settings to access an application from the Microsoft Store that is only available in a specific region.
More resources
For more helpful articles, coverage, and answers to common questions about Windows 10 and Windows 11, visit the following resources:
- Windows 11 on Windows Central — All you need to know
- Windows 10 on Windows Central — All you need to know

Mauro Huculak has been a Windows How-To Expert contributor for WindowsCentral.com for nearly a decade and has over 22 years of combined experience in IT and technical writing. He holds various professional certifications from Microsoft, Cisco, VMware, and CompTIA and has been recognized as a Microsoft MVP for many years.
You must confirm your public display name before commenting
Please logout and then login again, you will then be prompted to enter your display name.
