How to use SetupDiag to determine upgrade problems on Windows 10
Did an upgrade or update fail to install, and Windows 10 didn't show an error? Use the SetupDiag tool to find out the root of the cause.
All the latest news, reviews, and guides for Windows and Xbox diehards.
You are now subscribed
Your newsletter sign-up was successful
Although Windows 10 usually provides an error code about an upgrade or update failure, sometimes, it won't show anything, leaving you guessing the root of the problem. This can be very frustrating, especially if you're trying to install a new version of the operating system.
However, Microsoft offers an optional tool known as SetupDiag, which is available for free and designed to diagnose and determine the exact reason an update or upgrade failed to install.
SetupDiag works by analyzing the Windows Setup logs (left behind by the installation process) and checking the information against a database of known issues to determine the reason for the installation failure, which you can use to find a solution for the problem.
At the time of this writing, the SetupDiag tool includes a database (rules.xml) with many rules to match known issues, but the rules are updated as new tool versions roll out.
In this how-to guide, I will walk you through the steps to use the SetupDiag tool to understand why an update or upgrade failed to install and help you find a solution.
How to check Windows 10 upgrade failure using SetupDiag
The process of using SetupDiag is straightforward. You only need to make sure that the required version of the .NET Framework is installed, then run the tool, and review the results.
Confirm .NET Framework version
To confirm that the device meets the minimum .NET Framework requirements, use these steps:
All the latest news, reviews, and guides for Windows and Xbox diehards.
- Open Start.
- Search for Command Prompt, right-click the top result, and select the Run as administrator option.
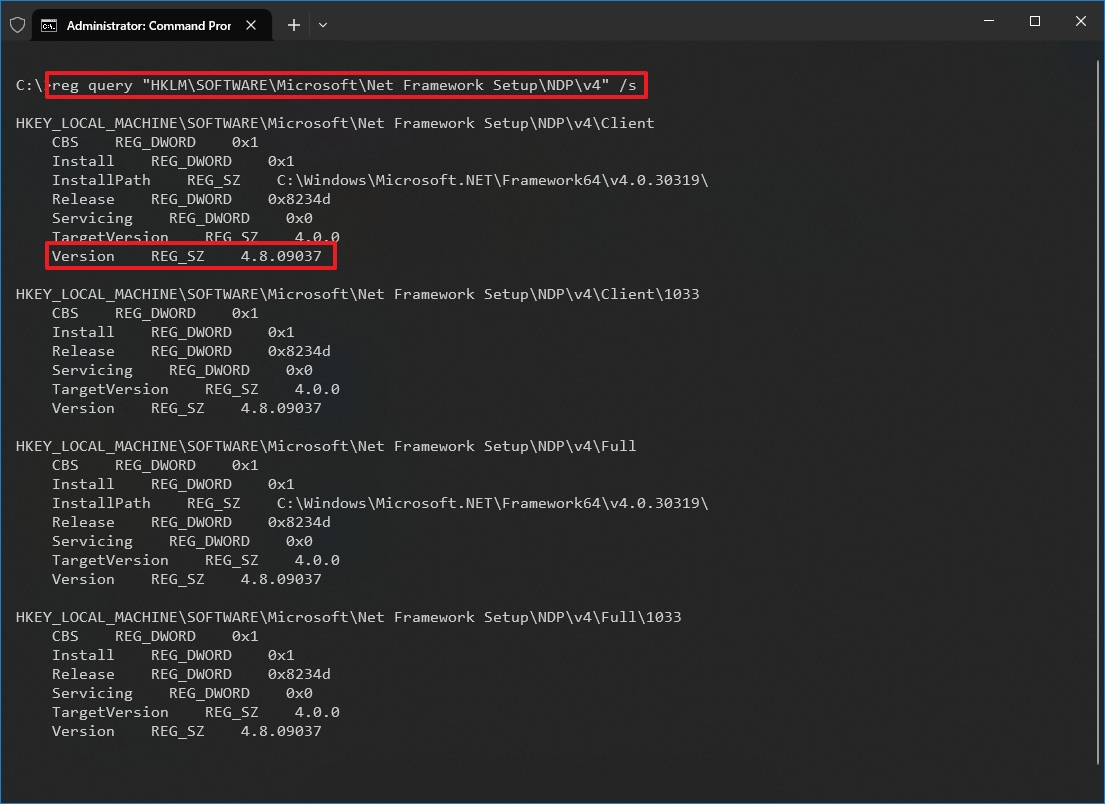
- Type the following command to reveal the version of .NET installed and press Enter: reg query "HKLM\SOFTWARE\Microsoft\Net Framework Setup\NDP\v4" /s
- Check the "Version" field to see if it reads something higher than 4.8.xxxxx to confirm you can run the tool.
If the device includes .NET 4.6 or higher, then continue with the steps below. Otherwise, download the .NET version 4.8 or higher offline installer, and double-click the file to install the software.
Run SetupDiag tool
To run the SetupDiag tool on Windows 10, use these steps:
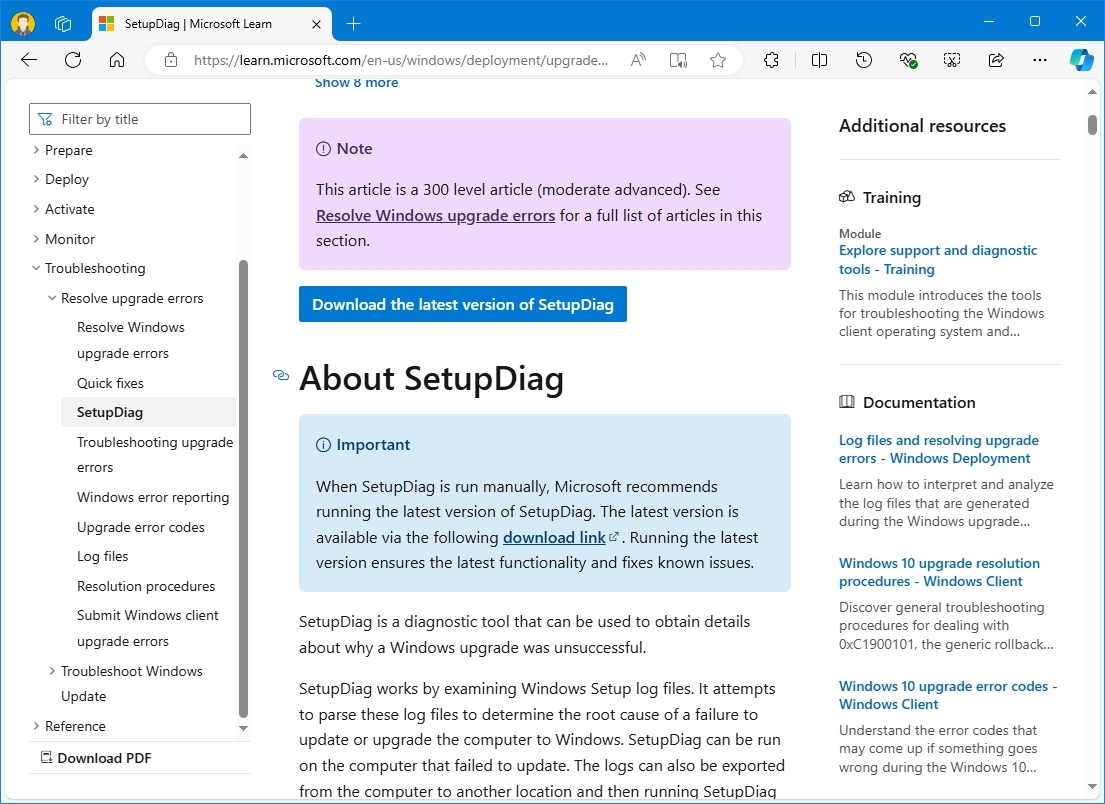
- Open SetupDiag download page.
- Click the Download SetupDiag button.
- Select an empty folder to download the files.
- Quick tip: You can always create a new folder using the "New folder" button from the "Save As" dialog box and name it: "SetupDiag".
- Click the Save button.
- Open File Explorer.
- Browse to the downloaded file location.
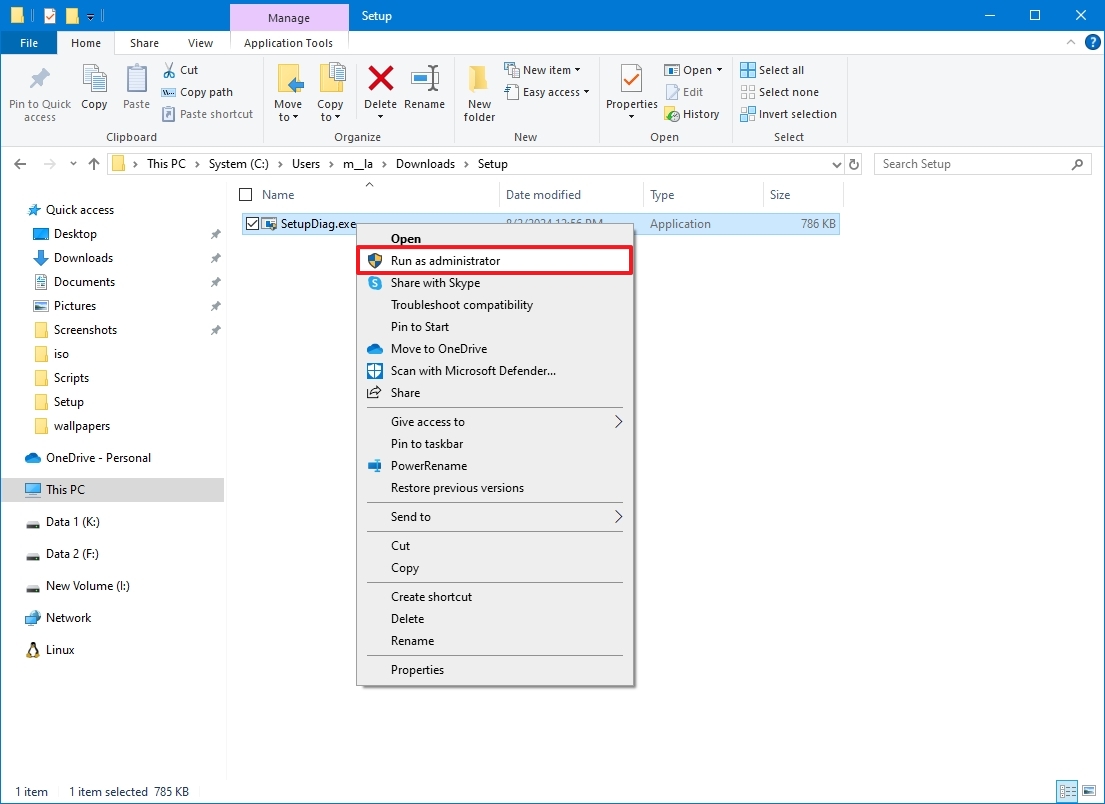
- Right-click the "SetupDiag.exe" and select the Run as administrator option.
Once you complete the steps, the tool will run immediately without the need for installation or user interaction. It'll check the available rules against the logs of the failed installation, and the SetugDiag will close automatically.
After the process completes, you'll have three new files, including the "Log.zip," "SetupDiag.exe.config," and "SetupDiagResults.log," inside the folder where you downloaded the "SetupDiag.exe" file.
Run SetupDiag from Command Prompt
If after running the tool, you can't find the log files, then you may have to run the tool through Command Prompt. Here's how:
- Open Start.
- Search for Command Prompt, right-click the top result, and select the Run as administrator option.
- Type the following command to open the folder directory where you downloaded the tool and press Enter: cd %USERPROFILE%\Downloads\SetupDiag
In the command, update the path according to the folder location where you saved the tool.
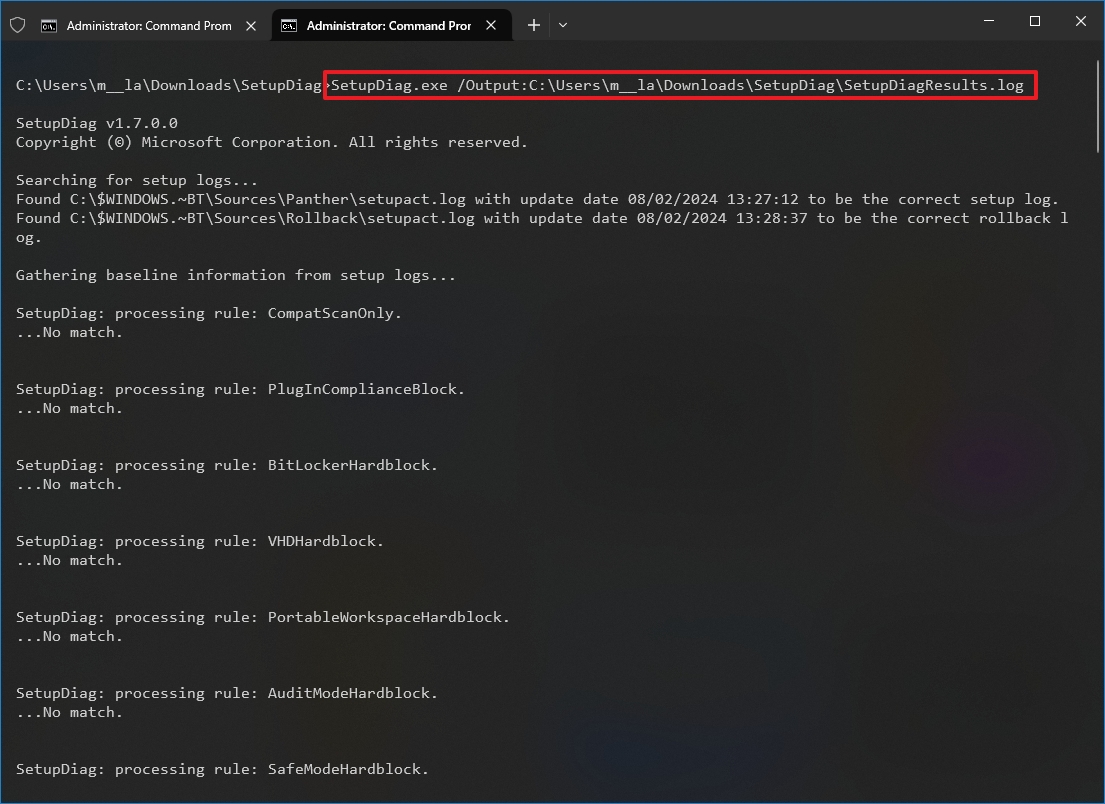
- Type the following command to run the tool and create a log file with the results and press Enter: SetupDiag.exe /Output:%USERPROFILE%\Downloads\SetupDiag\SetupDiagResults.log
In the command, update the path to the location where you saved the tool.
After you complete the steps, the tool will run and create a log file with all the results. This Microsoft support page has more command samples for using this tool.
Check SetupDiag results
To review the SetupDiag results, use these steps:
- Open File Explorer.
- Browse to the downloaded file location.
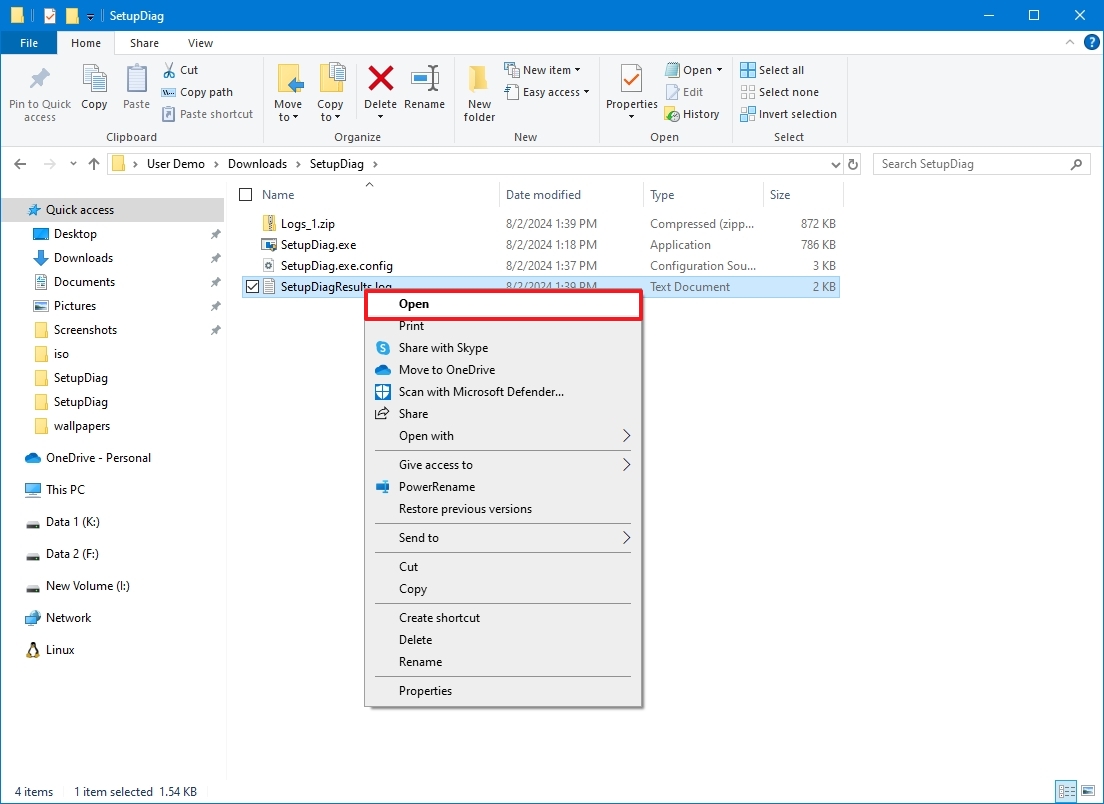
- Right-click the SetupDiagResults.log file and select the Open option.
After you complete the steps, the log file will open with the results that the tool was able to identify based on the known rules.
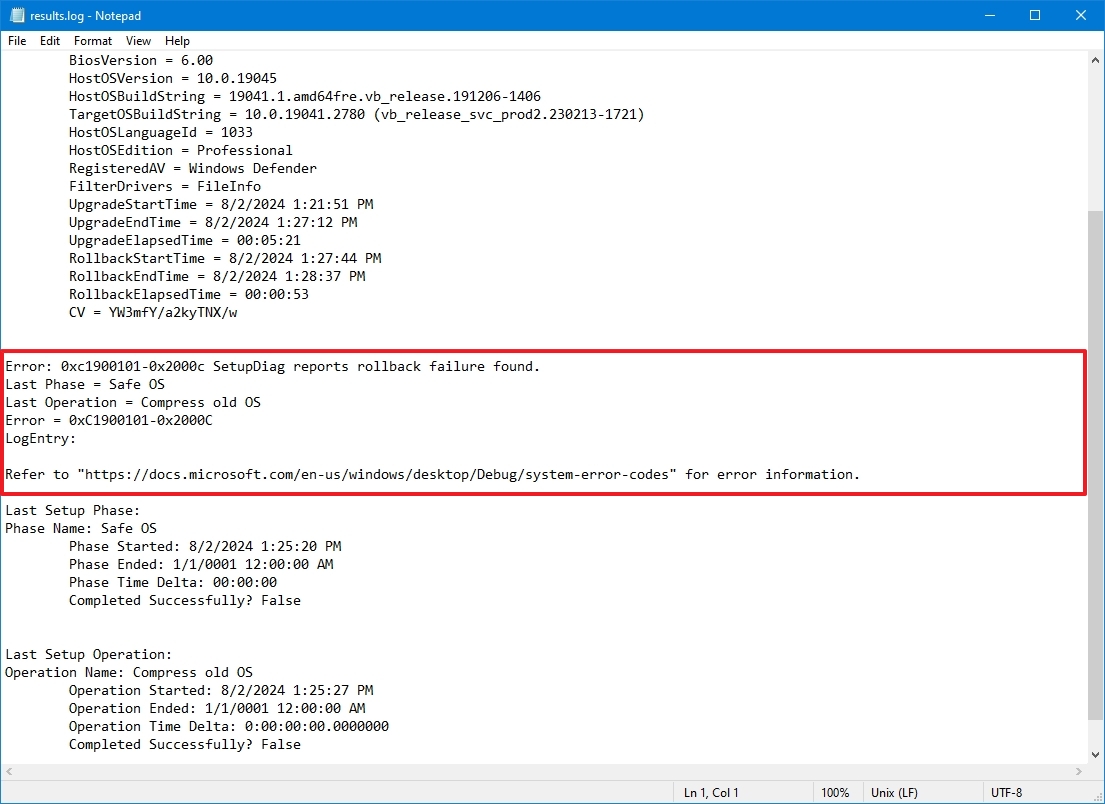
For example, for this guide, I started the upgrade process to a newer version of Windows 10 and then forced the device to shut down. The setup process reverted to the previous version, and error logs were saved on the device.
The first part of the file contains system information about your computer, including device name, manufacturer, BIOS (UEFI) version, the original version of Windows 10, registered antivirus, upgrade date, and more.
Then, you'll find the details of the error below the system information. In this case, we can see that the installation process failed while applying the new files since the device was forced to shut down, and we can see the error code (0xC1900101-0x2000C) of the problem.
Depending on the error, you'll see different details that will help you determine the root cause and steps to resolve the problem.
If you don't see recommendations to fix the issue, follow the link provided, use the error code, or research the problem online using any information available.
More resources
For more helpful articles, coverage, and answers to common questions about Windows 10 and Windows 11, visit the following resources:
- Windows 11 on Windows Central — All you need to know
- Windows 10 on Windows Central — All you need to know

Mauro Huculak has been a Windows How-To Expert contributor for WindowsCentral.com for nearly a decade and has over 22 years of combined experience in IT and technical writing. He holds various professional certifications from Microsoft, Cisco, VMware, and CompTIA and has been recognized as a Microsoft MVP for many years.
