How to create automated tasks on Windows 11
You can automate routine tasks with the Task Scheduler, and in this guide, we'll show you how on Windows 11.
All the latest news, reviews, and guides for Windows and Xbox diehards.
You are now subscribed
Your newsletter sign-up was successful
On Windows 11, Task Scheduler is an application that makes it easy to create and run routines automatically on your computer. For instance, you can create tasks to run commands, scripts, and programs at a specific date or when a condition is met.
The app monitors the time and events occurring on Windows 11 and triggers a task as soon as the condition matches. The system and many apps already use Task Scheduler to automate maintenance routines (for updates, storage maintenance, etc.). You can use it to create basic and advanced tasks to perform different actions at a specific time or when an event happens.
This guide will walk you through the steps to get started with the Task Scheduler experience to automate tasks on your computer.
How to create a basic task from Task Scheduler
To create a basic automated task on Windows 11, use these steps:
- Open Start.
- Search for Task Scheduler, and click the top result to open the app.
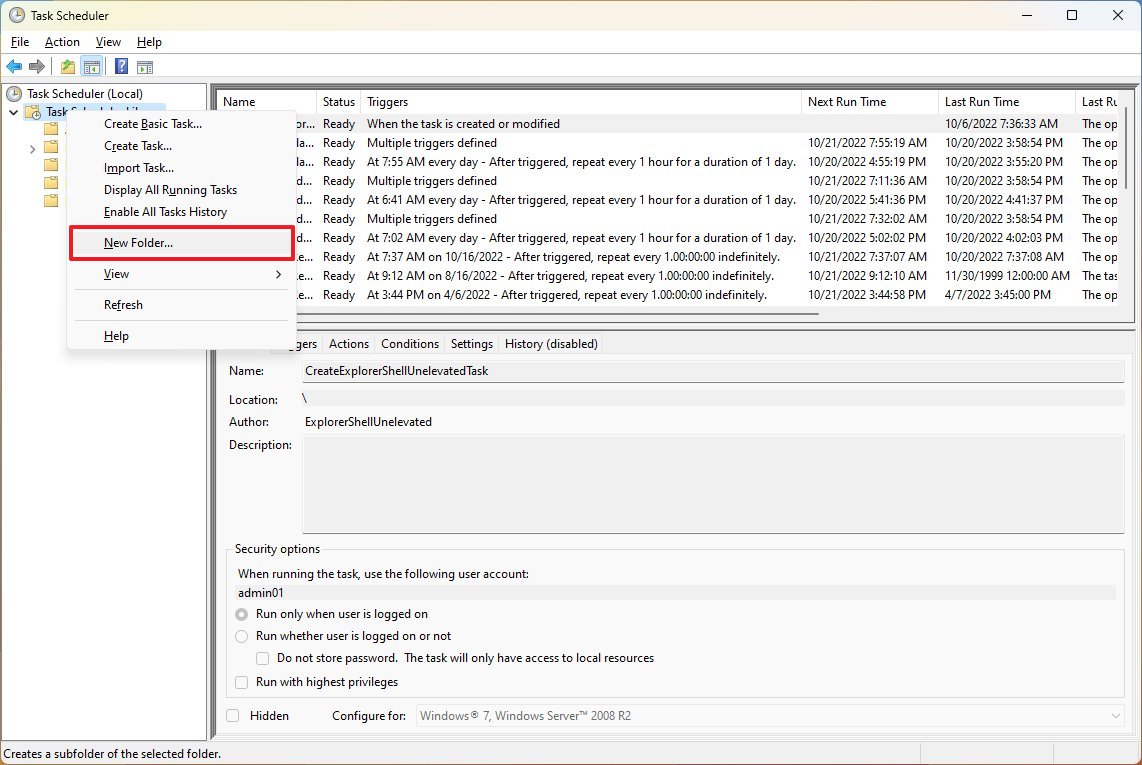
- Right-click the "Task Scheduler Library" branch, and select the New Folder option.
- Type a name for the folder — for example, MyTasks.
- Quick note: This step is recommended to keep the tasks separate from the system and apps tasks.
- Click the OK button.
- Expand the "Task Scheduler Library" branch, and select the MyTasks folder.
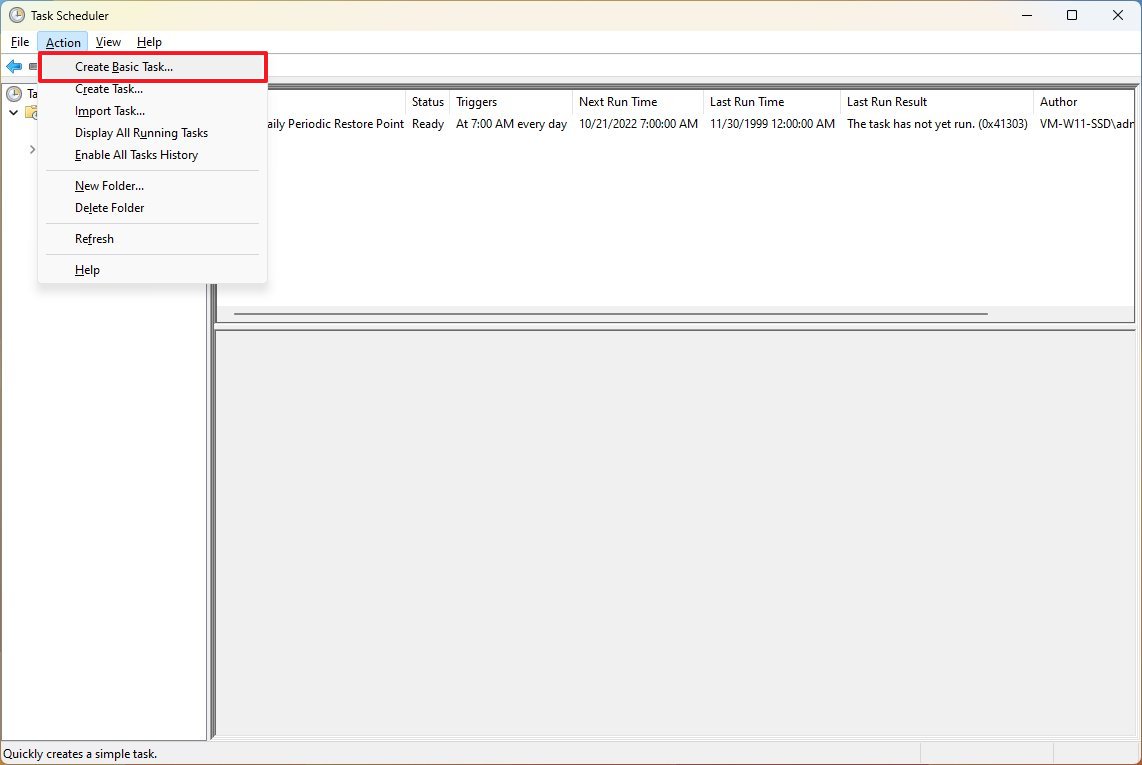
- Click the Action menu and choose the "Create Basic Task" option.
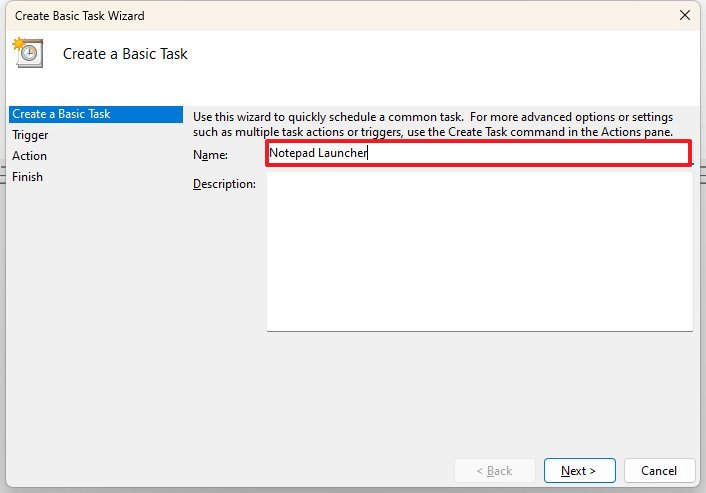
- Type a short descriptive name for the task, for example, Notepad Launcher, in the "Name" field.
- (Optional) Compose a description for the task in the "Description" field.
- Click the Next button.
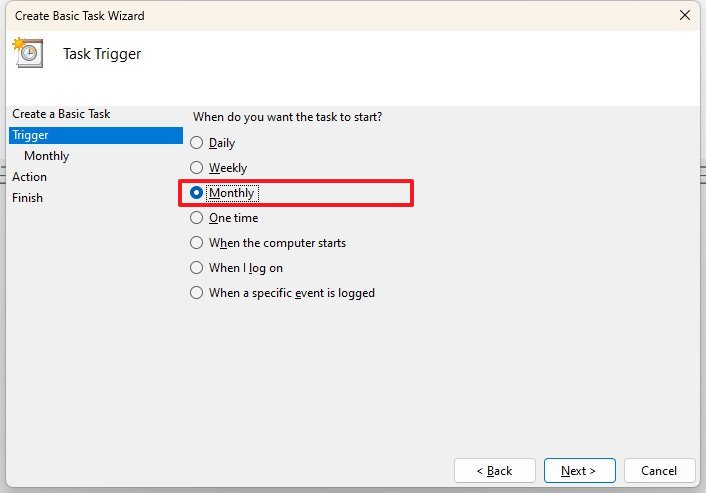
- Select the Monthly option.
- Quick note: Task Scheduler includes a number of triggers, including on a specific date, during startup, or when you or a particular user signs in. Depending on the trigger, you'll need to configure additional parameters. In this case, we'll select the option to run a task every month.
- Click the Next button.
- Specify when the task should start running and the time using the "Start" setting.
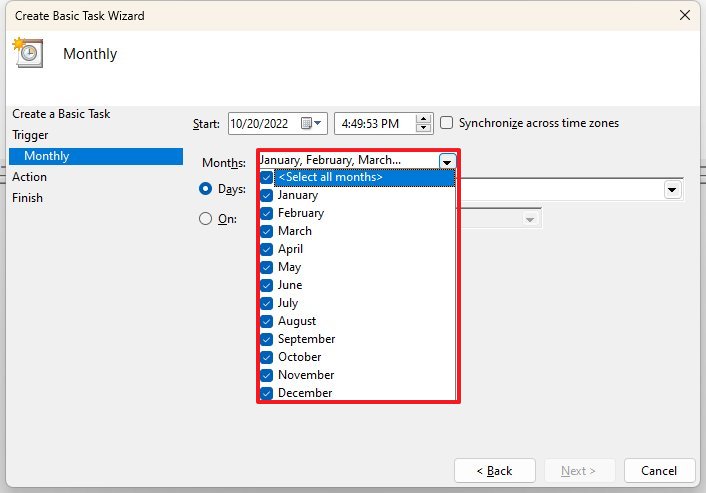
- Select the months of the year to run the task using the "Monthly" drop-down menu.
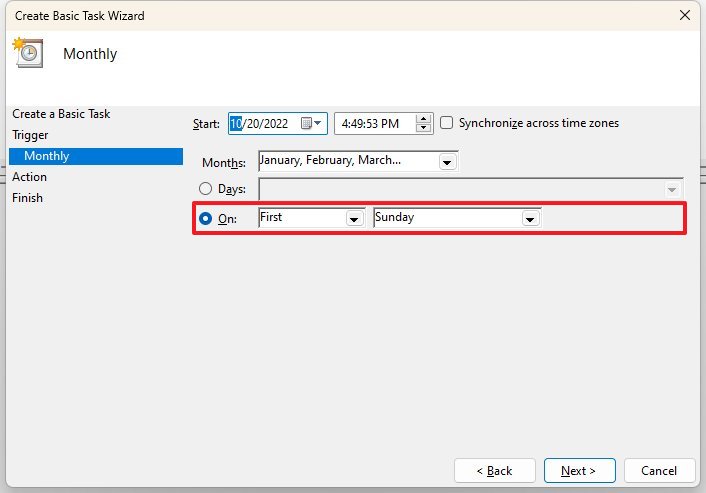
- Specify the days the task will run using the "Days" or "On" drop-down menus.
- Click the Next button.
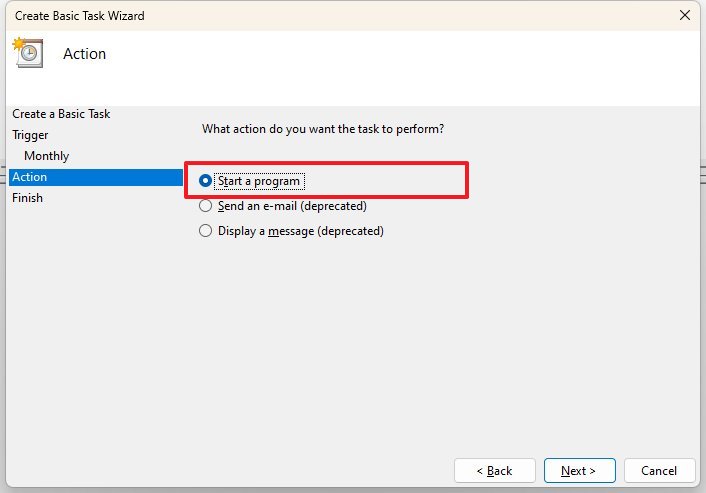
- Select the Start a program option to launch an app, run a command, or execute a script file. The "Send an e-mail" or "Display a message" options are deprecated features. You can still use them, but they may not work.
- Send an e-mail: Triggers an email notification with a custom message on schedule, but it requires to specify an email server to work.
- Display a message: Displays a text message on the screen on schedule.
- Click the Next button.
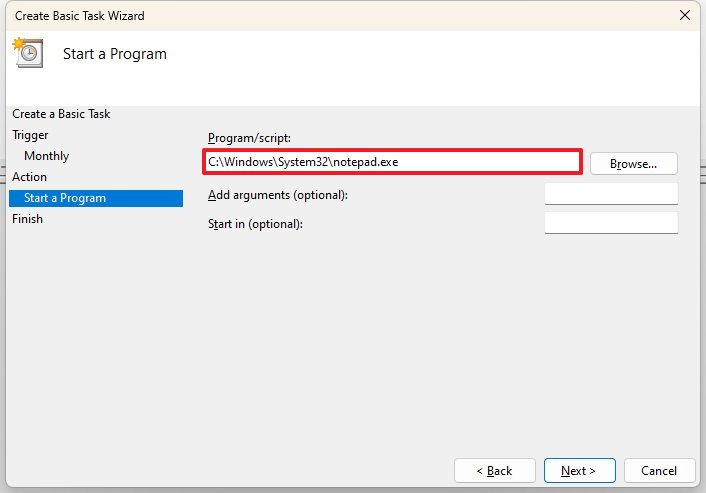
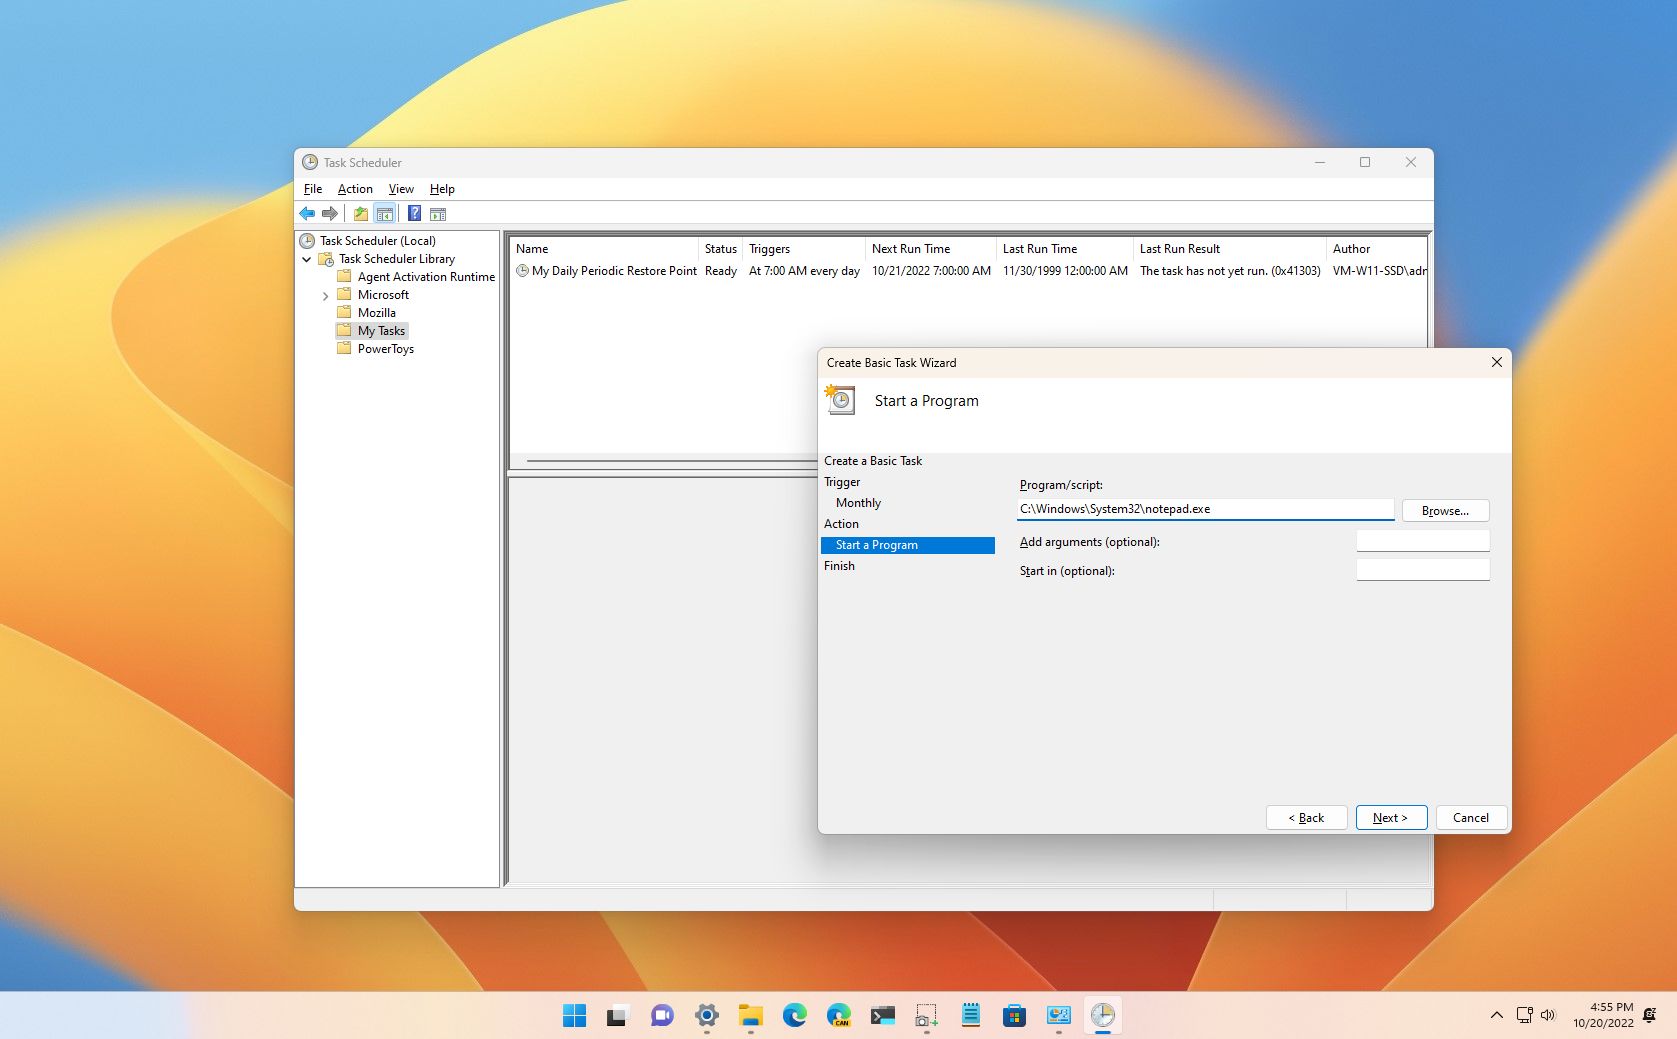
- Specify the path for the app in the "Program/script" field.
- Quick tip: If you don't know the path of the app, click the Browse button to find it.
- (Optional) Specify the arguments to run the task with special instructions in the "Add arguments" field.
- (Optional) Specify the folder in which the program will start in the "Start in" field.
- Click the Finish button.
Once you complete the steps, the system will create and save the task, and it'll run automatically on the schedule.
How to create an advanced task from Task Scheduler
To create an advanced task setting with the Task Scheduler on Windows 11, use these steps:
- Open Start.
- Search for Task Scheduler, and click the top result to open the app.
- Right-click the "Task Scheduler Library" branch, and select the New Folder option.
- Type a name for the folder — for example, MyTasks.
- Click the OK button.
- Expand the "Task Scheduler Library" branch, and select the MyTasks folder.
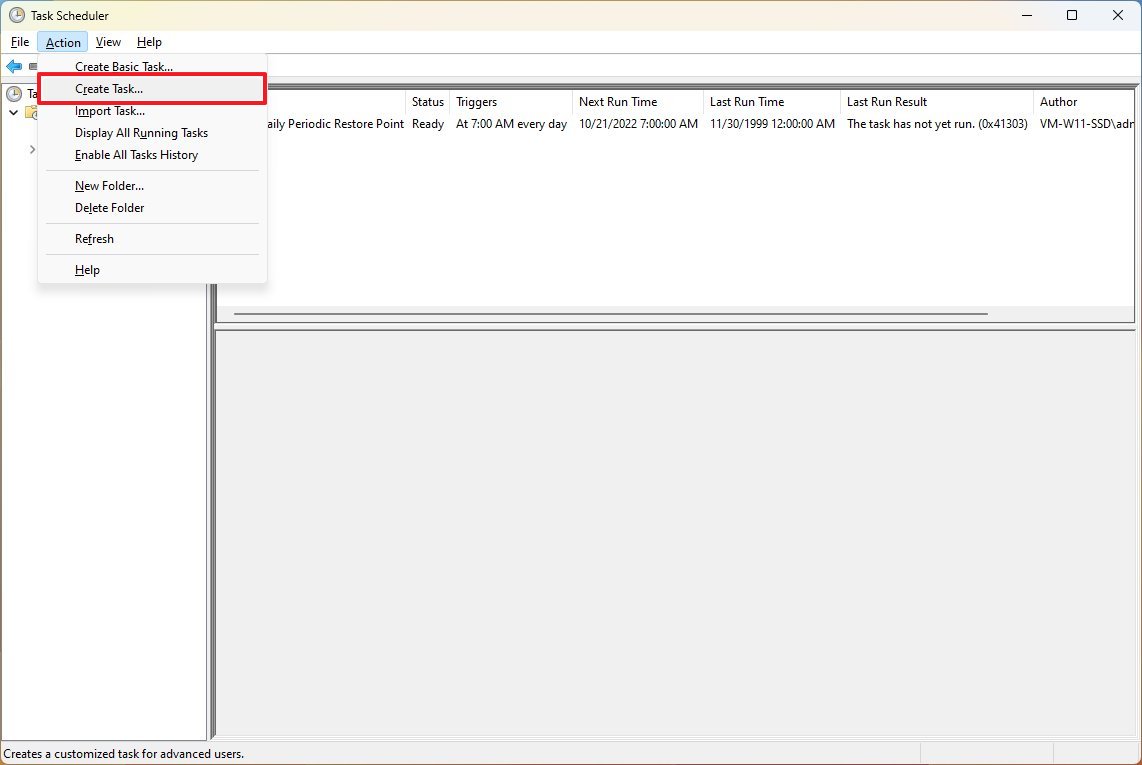
- Click the Action menu and choose the Create Task option.
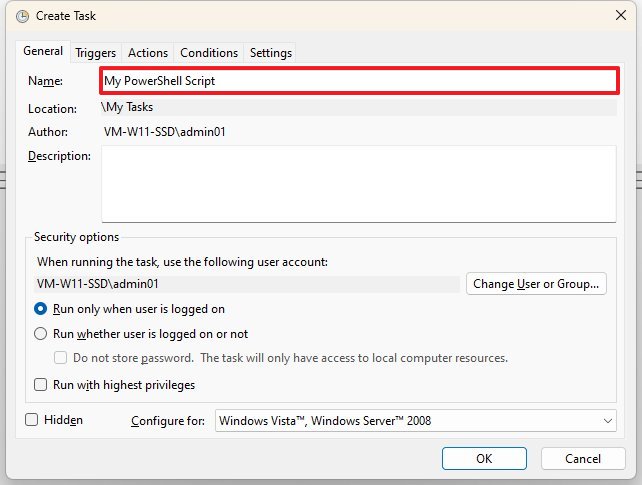
- Type a short descriptive name for the task, for example, My PowerShell Script, in the "Name" field.
- (Optional) Compose a description for the task in the "Description" field.
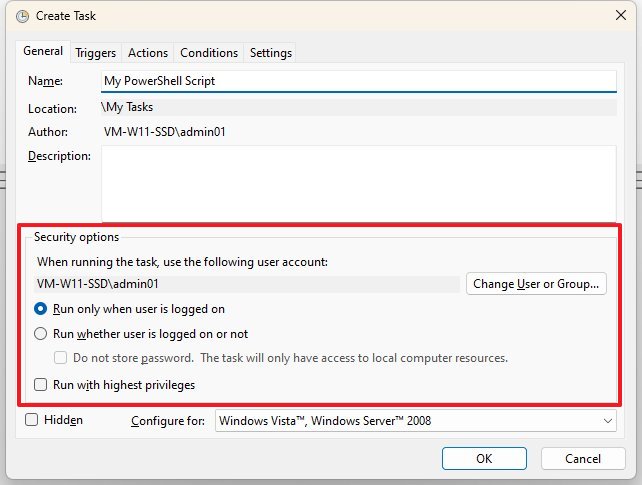
- In the "Security options" section, configure the administrator account to run the task.
- Quick tip: If you use an admin account, the default user should do the job. If you want to run a Command Prompt or PowerShell command, select the "Run whether user is logged on or not" option to prevent the command window from displaying when the task runs automatically.
- (Optional) Check the "Run with highest privileges" option if the task requires elevated privileges.
- The "Configure for" settings should be left alone unless required.
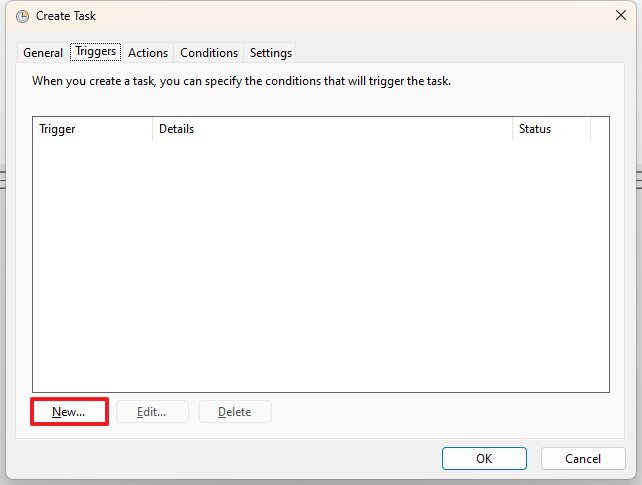
- Click the Triggers tab.
- Click the New button.
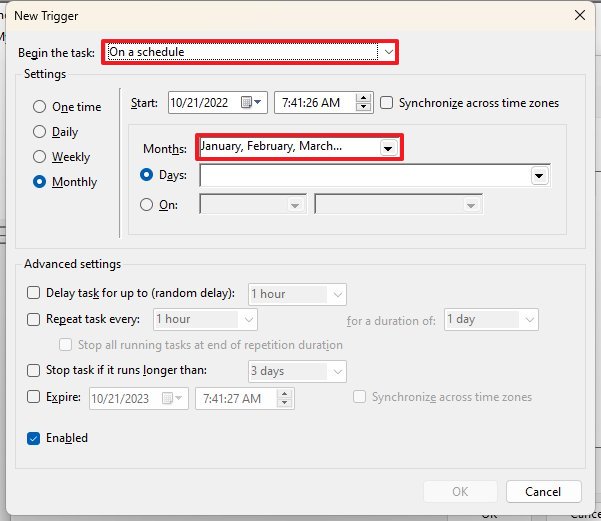
- Use the "Begin the task" drop-down menu to select one of the many triggers — for example, On a schedule.
- Specify when the task should start running and the time using the "Start" setting.
- Select the Monthly option from the left side.
- Select the months to run the task using the "Months" drop-down menu.
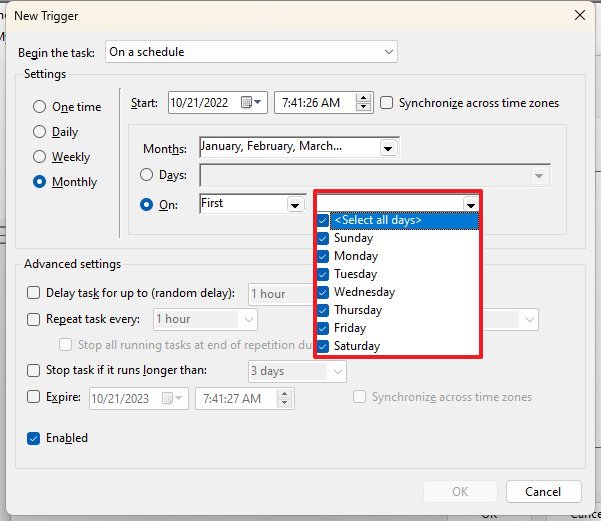
- Specify the days to run the task using the "Days" or "On" drop-down menus.
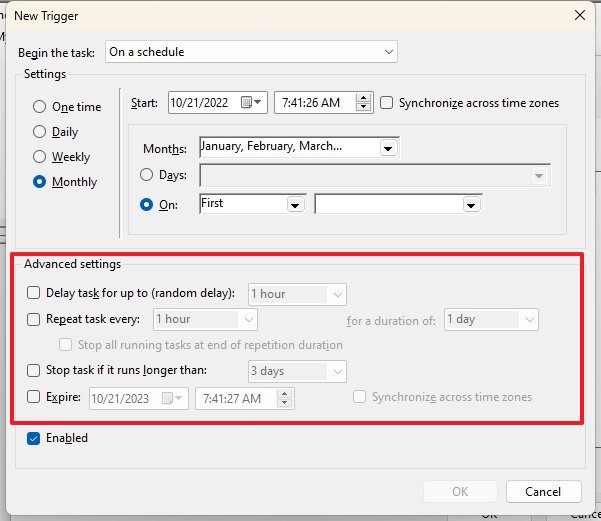
- (Optional) In the "Advanced settings" section, select options to delay, repeat, stop and expire a task.
- Check the Enabled option (if applicable).
- Click the OK button.
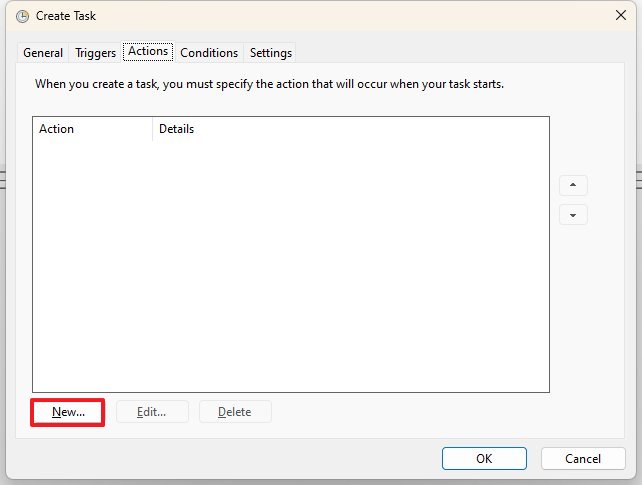
- Click the Action tab.
- Click the New button.
- Select the Start a program option using the "Action" drop-down menu.
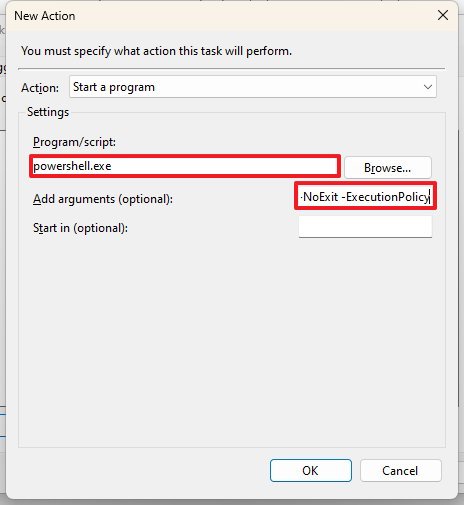
- Under the "Settings" section, in the "Program/script" field, specify the path for the application — for example powershell.exe.
- Quick tip: If you don't know the path of the app, click the Browse button to find it. Also, if it's a known program like PowerShell or Command Prompt, you only need to specify the name of the executable.
- (Optional) Specify arguments to run with the task in the "Add arguments" field — for example: -NoExit -ExecutionPolicy Bypass C:\PATH\TO\SCRIPT\first_script.ps1
- Quick note: The "powershell.exe" command and the above argument will run the script named "first_script.ps1." The argument "-ExecutionPolicy Bypass" ensures that the script runs successfully, and the "-NoExit" argument will prevent the window from closing after running the script.
- (Optional) Specify the folder in which the program will start in the "Start in" field.
- Click the OK button.
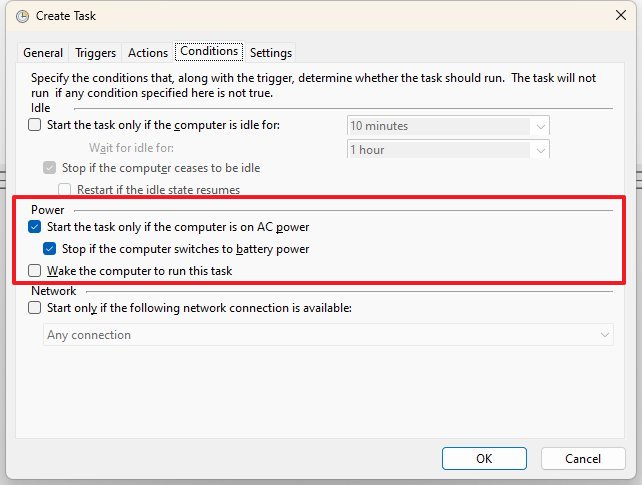
- Click the Conditions tab.
- (Optional) In the "Conditions" tab, you don't have to modify these settings for a basic task. However, you want to ensure the Power settings are configured as needed.
- Click the OK button.
- Click the Settings app.
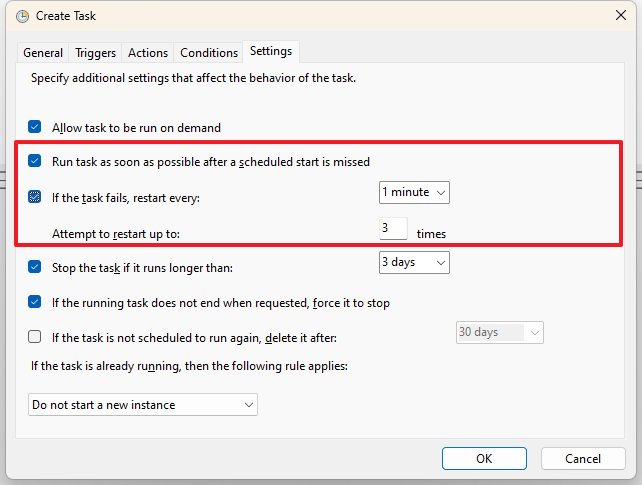
- (Optional) The "Settings" app includes additional options that will impact the task. Usually, it's a good idea to check the following options:
- Run the task as soon as possible after a scheduled start is missed.
- If the task fails, restart every: (Use this option with the default selections.)
- Click the OK button.
After you complete the steps, confirm the account credentials, and the task will run automatically on the specified event or schedule.
All the latest news, reviews, and guides for Windows and Xbox diehards.
How to run and modify a task from Task Scheduler
To view, exit, or run a task on Windows 11, use these steps:
- Open Start.
- Search for Task Scheduler, click the top result to open the app.
- Expand the Task Scheduler Library branch.
- Select the folder that contains the task.
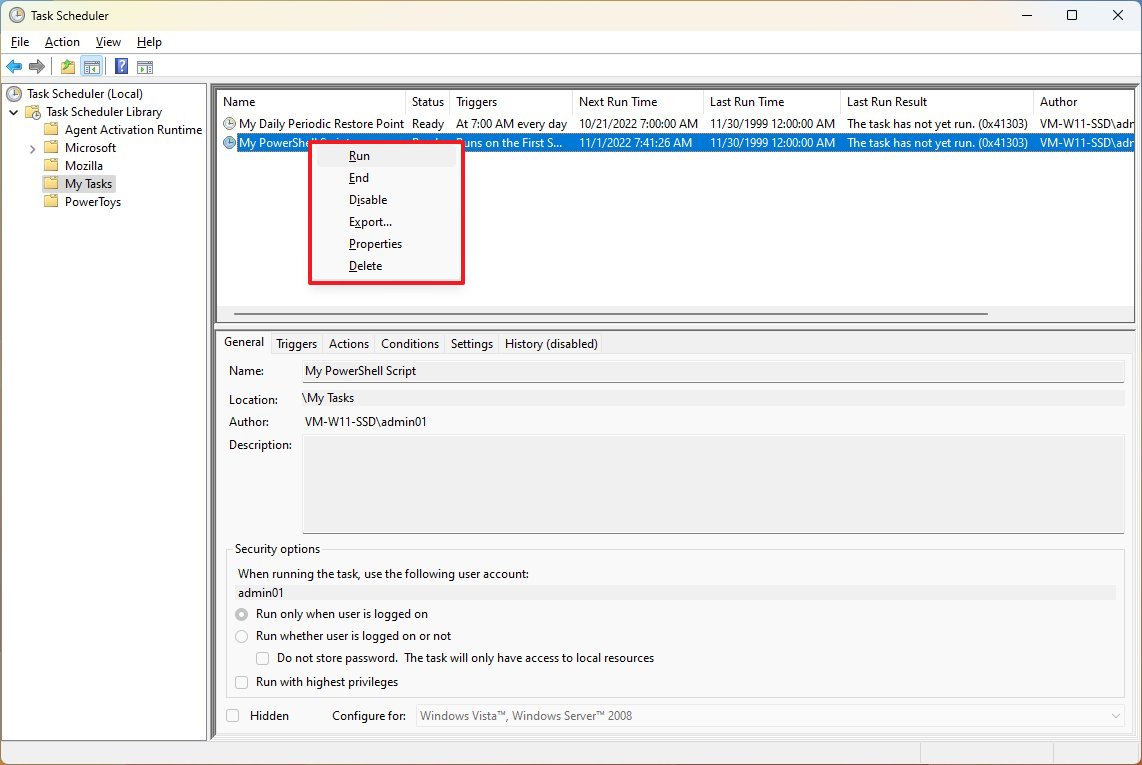
- To run a task on demand, right-click it and select the Run option.
- To edit a task, right-click it and select the Properties options.
- To delete a task, right-click it and select the Delete option.
While the task is selected, you can also see the task information, including triggers, the last time the task was run, and when it'll run again.
Also, you can select the task, and use the right pane to perform different actions, such as run, end, disable, and edit the task.
More resources
For more helpful articles, coverage, and answers to common questions about Windows 10 and Windows 11, visit the following resources:

Mauro Huculak has been a Windows How-To Expert contributor for WindowsCentral.com for nearly a decade and has over 22 years of combined experience in IT and technical writing. He holds various professional certifications from Microsoft, Cisco, VMware, and CompTIA and has been recognized as a Microsoft MVP for many years.
