How to fix a camera not working on Microsoft Teams
Are you having camera problems with Microsoft Teams? In this guide, you will learn several ways to fix this problem.
All the latest news, reviews, and guides for Windows and Xbox diehards.
You are now subscribed
Your newsletter sign-up was successful
On Windows 10, when the camera isn't working with Microsoft Teams, you have many ways to resolve the problem. Although this is one of the best platforms to communicate through video, collaborate, and share files with other people, it is not perfect. And sometimes, you may need to deal with issues that can negatively affect the experience.
If Microsoft Teams cannot detect the camera, or the webcam doesn't appear for the apps' add-ons, making it impossible to join a video conference, Windows 10 includes many ways to troubleshoot and fix this problem with built-in or USB cameras.
In this Windows 10 guide, we will walk you through several sets of instructions to troubleshoot and fix camera problems with Microsoft Teams.
- How to fix Teams camera by configuring settings
- How to fix Teams camera by disabling extra devices
- How to fix Teams camera by enabling privacy settings
- How to fix Teams camera by allowing apps access to media
- How to fix Teams camera by updating app
- How to fix Teams camera by reinstalling app
- How to fix Teams camera by updating driver
- How to fix Teams camera by using web browser
How to fix Teams camera by configuring settings
Microsoft Teams can recognize the camera without additional steps. However, if you cannot start a video conference, you may be experiencing settings problems related to the camera.
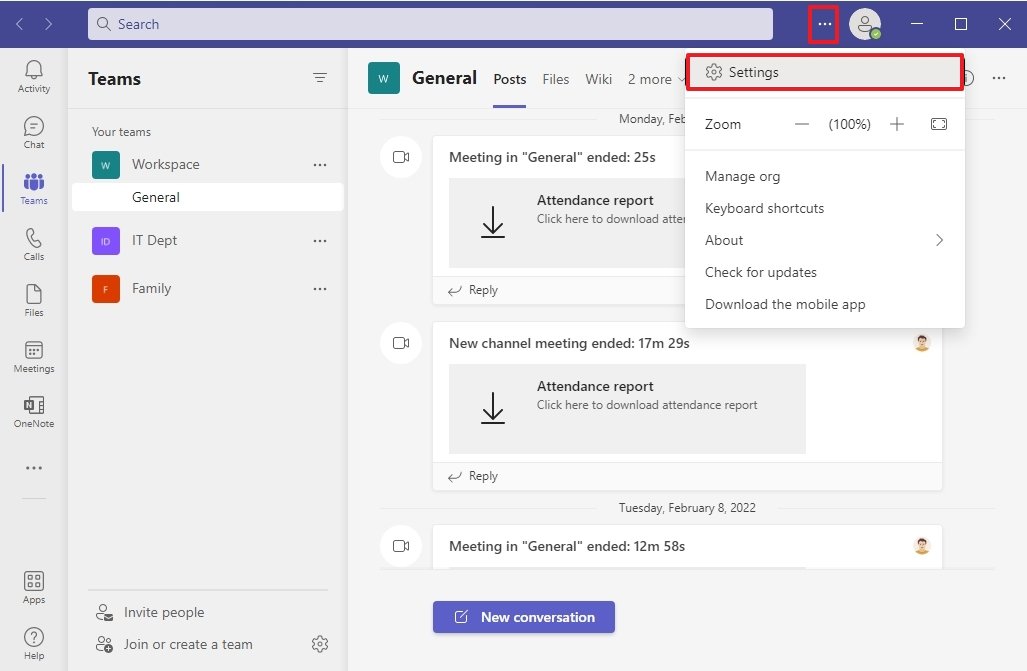
To configure the camera settings on Microsoft Teams, use these steps:
- Open Microsoft Teams.
- Click the main menu (three-dotted) button from the top-right corner.
- Select the Settings option.
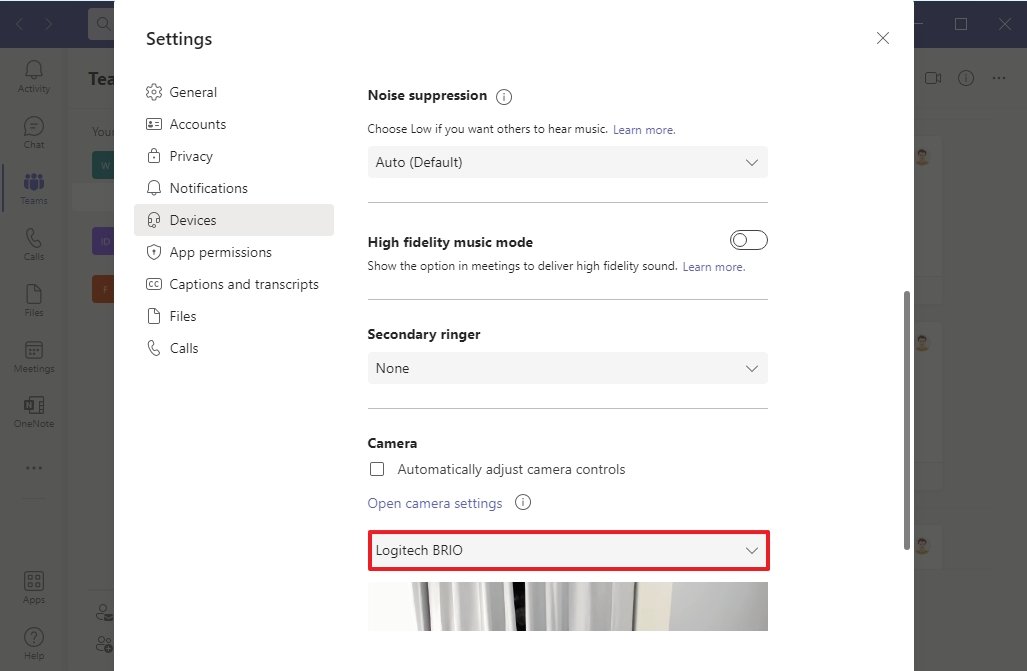
- Click on Devices.
- Under the "Camera" section, use the drop-down menu and select the correct camera.
- Confirm with the preview to make sure the camera is working.
Once you complete the steps, make a test call or call someone to determine whether the camera is working.
How to fix Teams camera by disabling extra devices
If Microsoft Teams cannot detect the camera, disconnecting and reconnecting it may solve the problem. You also want to close all other apps using the peripheral (such as Zoom or Skype) and restart the computer. If you are still having problems, follow these more advanced troubleshooting steps.
All the latest news, reviews, and guides for Windows and Xbox diehards.
On a computer with multiple cameras, you can disconnect the USB camera to confirm whether the app works with the built-in camera. If it works, perhaps using the built-in hardware is the quicker solution to continue using the platform.
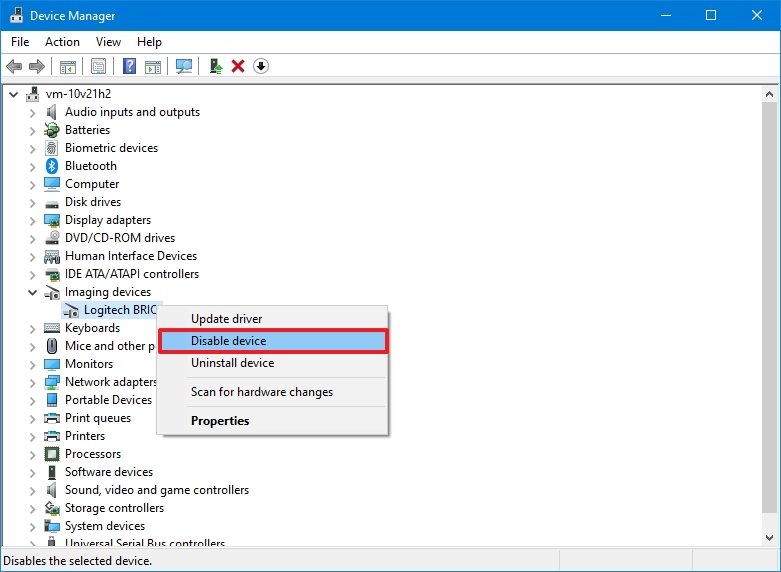
If you must use a USB camera, you could disable the built-in camera in Device Manager. However, consider that while the peripheral is disabled, you won't be able to use it with other apps.
To disable the built-in webcam on Windows 10, use these steps:
- Open Start.
- Search for Device Manager, and click the top result to open the app.
- Expand the Imaging devices, Cameras, or Sound, video, and game controllers branch.
- Right-click the camera and select the Disable device option.
After you complete the steps, open the Teams app to confirm you can continue making video calls.
You can always enable the hardware again by using the same instructions, but on step 4, make sure to select the Enable device option.
If this is a hardware issue and you need a replacement, we recommend the Logitech BRIO webcam because it's capable of 4K video and comes with Windows Hello support.
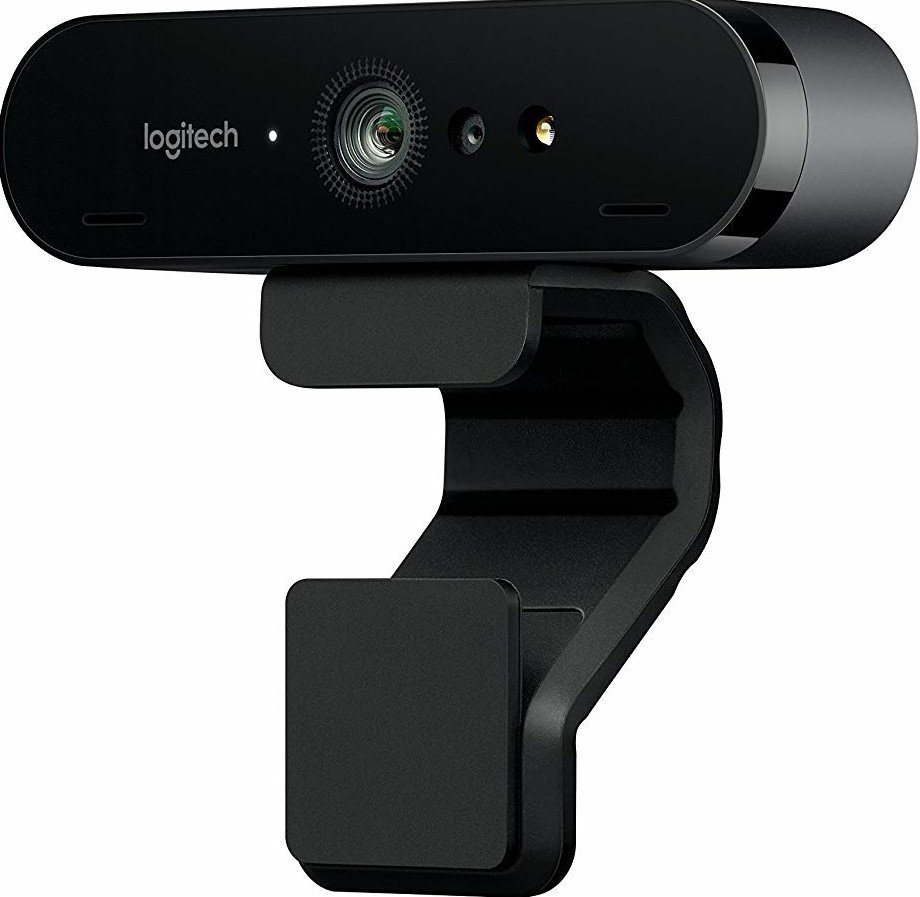
If you're in the market for the best webcam, the Logitech BRIO is the one for you. It features support for 4K video, high dynamic range (HDR), and autofocus. Also, it comes with pretty neat features, such as a background replacement option and support for Windows Hello security for Windows 10 or Windows 11.
How to fix Teams camera by enabling privacy settings
If the app cannot access the camera, you have a problem with the security settings on Windows 10.
Allow camera access
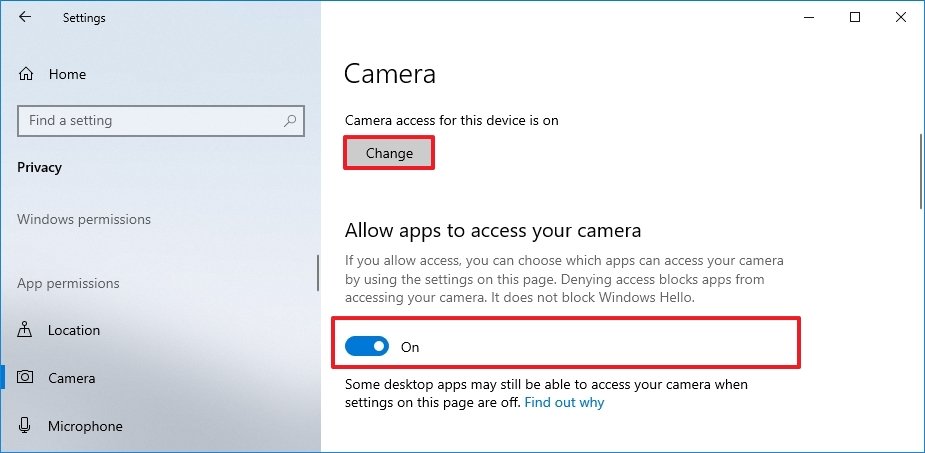
To allow Microsoft Teams access to the camera, use these steps:
- Open Settings.
- Click on Privacy.
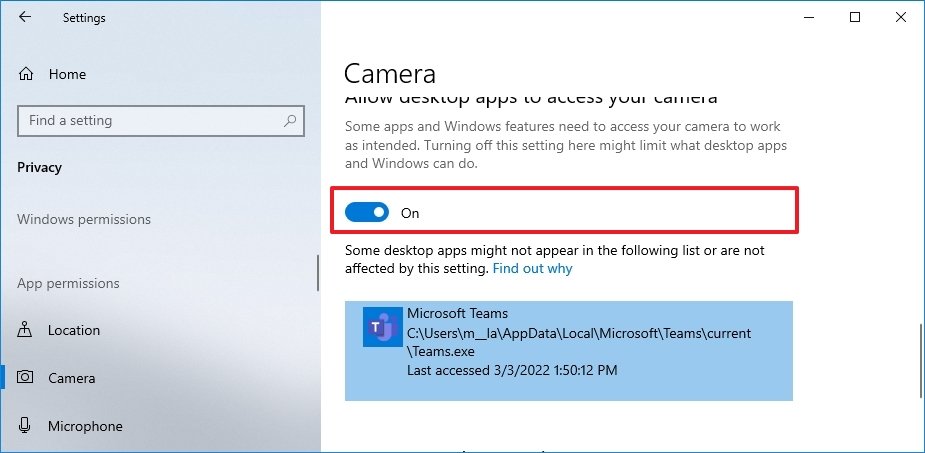
- Click on Camera.
- Under the "Allow access to the camera on this device" section, click the Change button.
- Turn on the Camera access for this device toggle switch.
- Turn on the Allow apps to access your camera toggle switch.
- Turn on the Allow desktop apps to access the camera toggle switch at the bottom of the page.
Once you complete the steps, the camera should now work with the Teams app.
Allow microphone access
If you have a camera with a microphone built in, you may also have to configure the settings to allow Teams to have access.
To allow Microsoft Teams to access the microphone on Windows, use these steps:
- Open Settings.
- Click on Privacy.
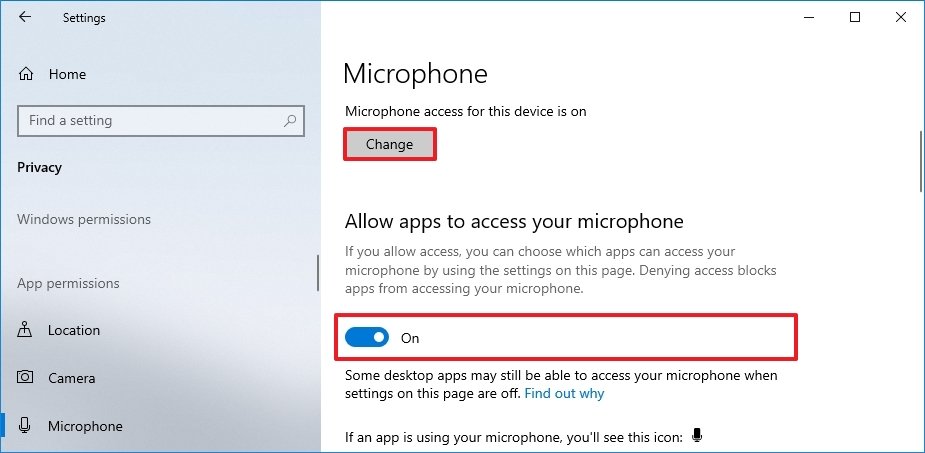
- Click on Microphone.
- Under the "Allow access to the microphone on this device" section, click the Change button.
- Turn on the Microphone access for this device toggle switch.
- Turn on the Allow apps to access your microphone section toggle switch.
- Turn on the Allow desktop apps to access the microphone toggle switch at the bottom of the page.
After you complete the steps, the app should now have access to the microphone and webcam connected to the device.
Configure antivirus access
If you have a third-party antivirus or another security application, they can also prevent the Microsoft Teams app from accessing the camera.
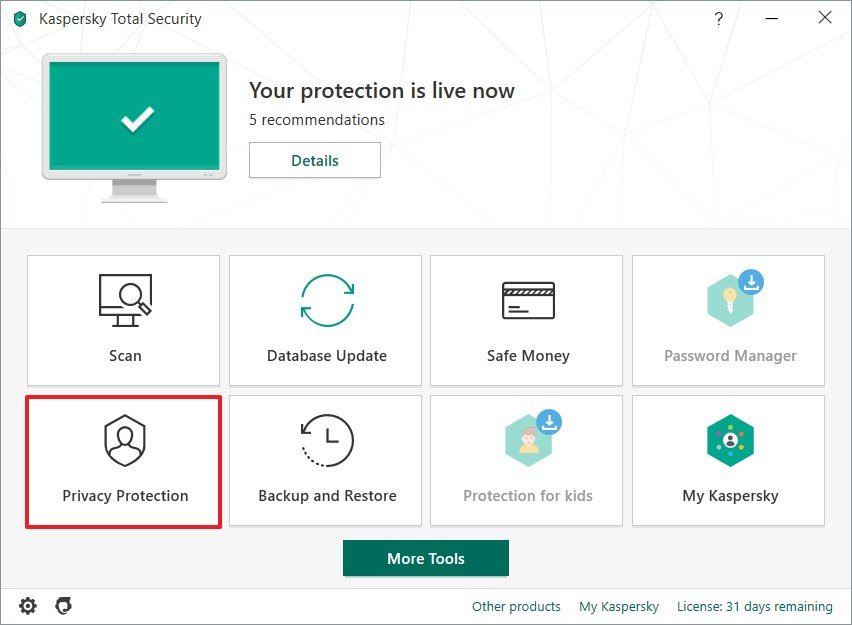
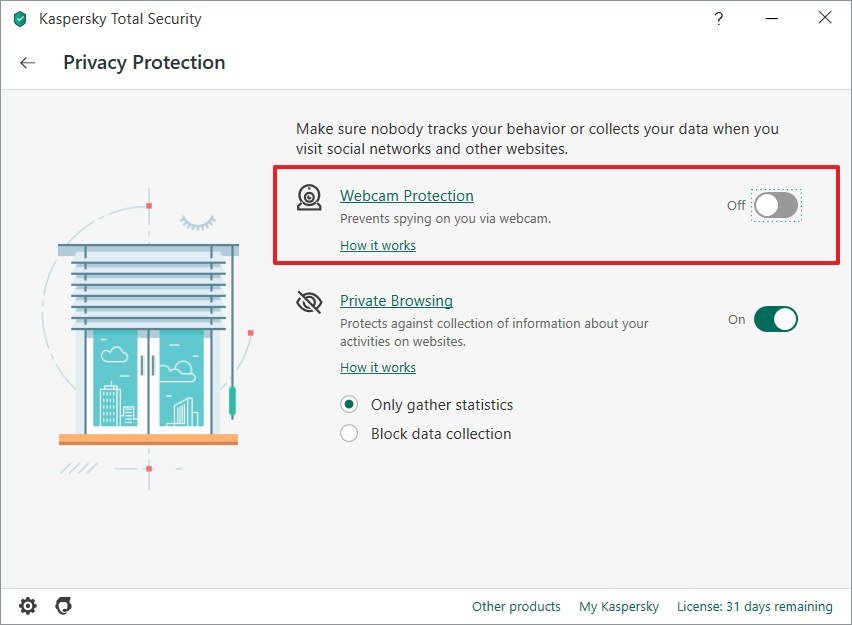
For instance, if you use Kaspersky, you may have to use these steps to fix the camera problem:
- Open Kaspersky.
- Click on Privacy Protection.
- Turn off the Webcam Protection toggle switch.
After you complete the steps, you should now be able to make video calls.
If you have a different security application, check your software vendor support website for specific details to allow access to the camera.
How to fix Teams camera by allowing apps access to media
If the problem is an add-on that cannot access the camera, the problem may lie in the Microsoft Teams permissions.
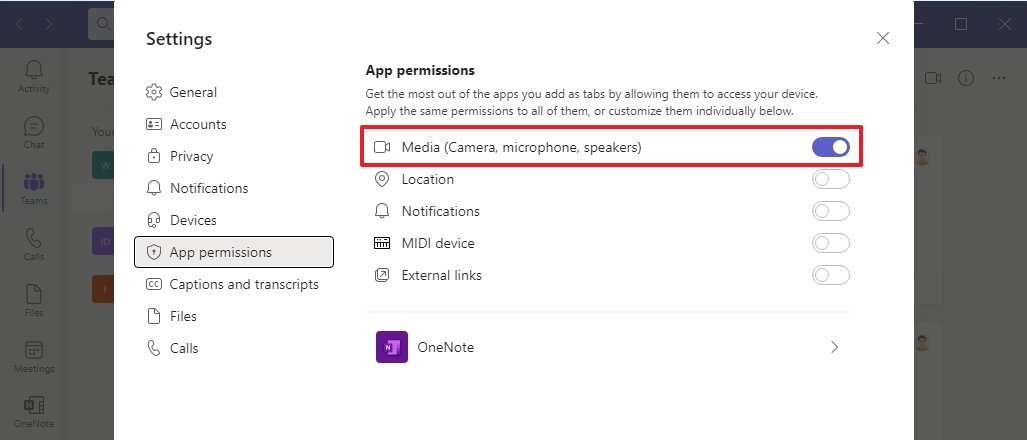
To allow Teams add-ons to access the camera, use these steps:
- Open Microsoft Teams.
- Click the main menu (three-dotted) button from the top-right corner.
- Click the Settings option.
- Click on App permissions.
- Turn on the Media (Camera, microphone, speakers) toggle switch.
Once you complete the steps, the Microsoft Teams add-on will be allowed to access the webcam.
How to fix Teams camera by updating app
Microsoft Teams downloads and installs updates automatically, but sometimes, you may need to update the app manually to fix a bug that may prevent the app from using the camera.
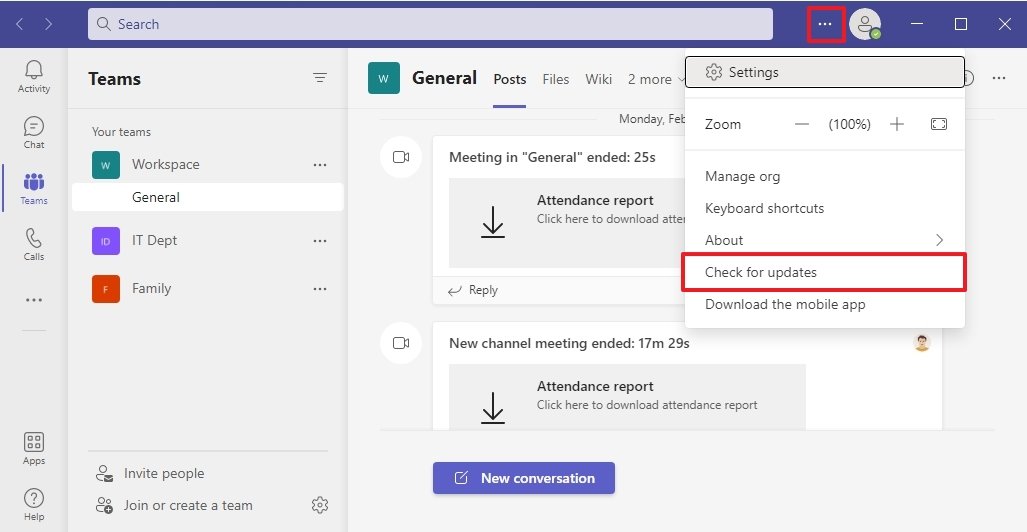
To update Microsoft Teams, use these steps:
- Open Microsoft Teams.
- Click the main menu (three-dotted) button from the top-right corner.
- Click the Check for updates option.Quick note: If an update is available, the app will download and install it automatically.
- Close the Teams app.
- Restart the Teams app.
After you complete the steps, confirm the webcam is working on the "Devices" page from the Teams settings. You can also click the Make a test call button to verify that everything is working correctly.
How to fix Teams camera by reinstalling app
You can also resolve common problems, including issues with the camera, by reinstalling the Microsoft Teams app.
Uninstall Teams
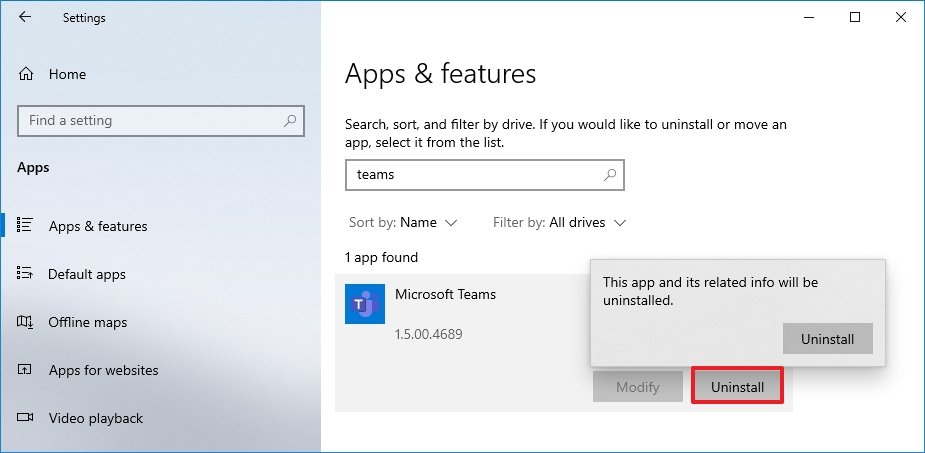
To uninstall Teams on Windows 10, use these steps:
- Open Settings.
- Click on Apps.
- Click on Apps & features.
- Select the Microsoft Teams app.
- Click the Uninstall button.
- Click the Uninstall button again.
Once you complete the steps, you can download and install the Teams app again.
Install Teams
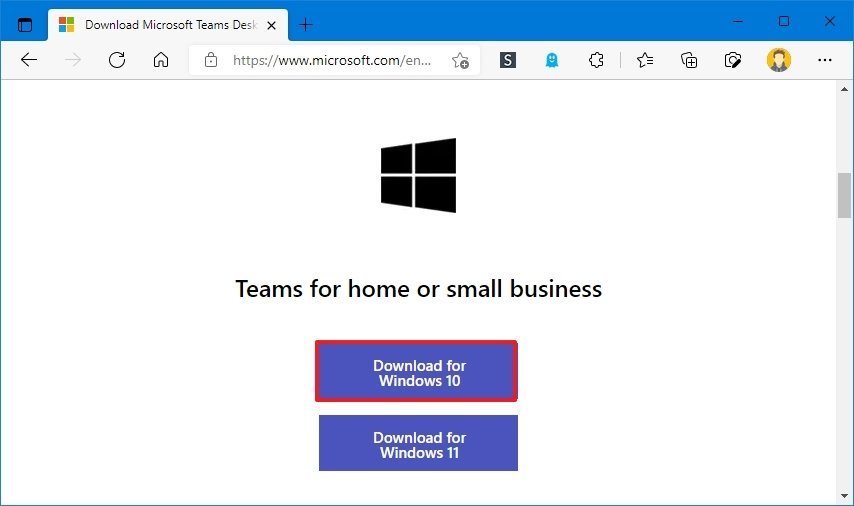
To install the Microsoft Teams app on Windows 10, use these steps:
- Open Microsoft Teams.
- Click the Download button in the middle of the page.
- Double-click the file to launch the installer.
After you complete the steps, the app should now be able to detect the camera.
How to fix Teams camera by updating driver
If the camera still does not work with the app, it could be a driver problem. In this case, updating, reinstalling, or rolling back the driver may help resolve the issue.
Update camera driver
To update the camera driver on Windows 10, use these steps:
- Open Settings.
- Click on Update & Security.
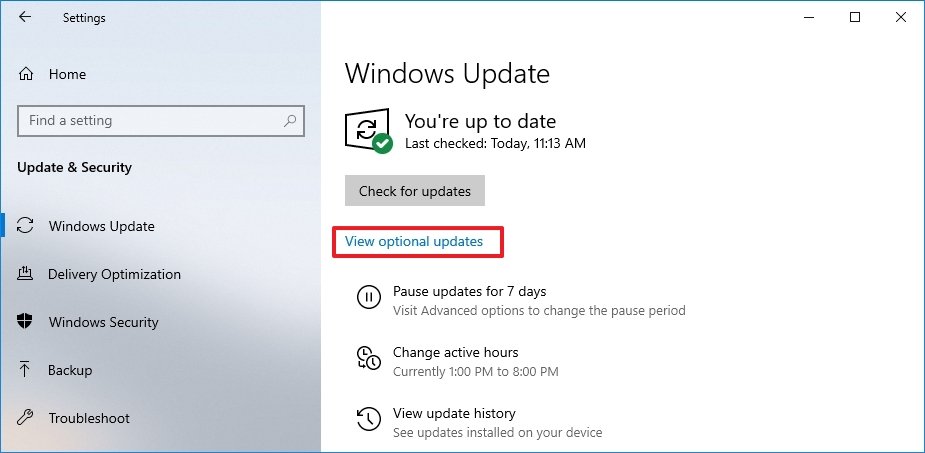
- Click on Windows Update.
- Click the View optional updates option.
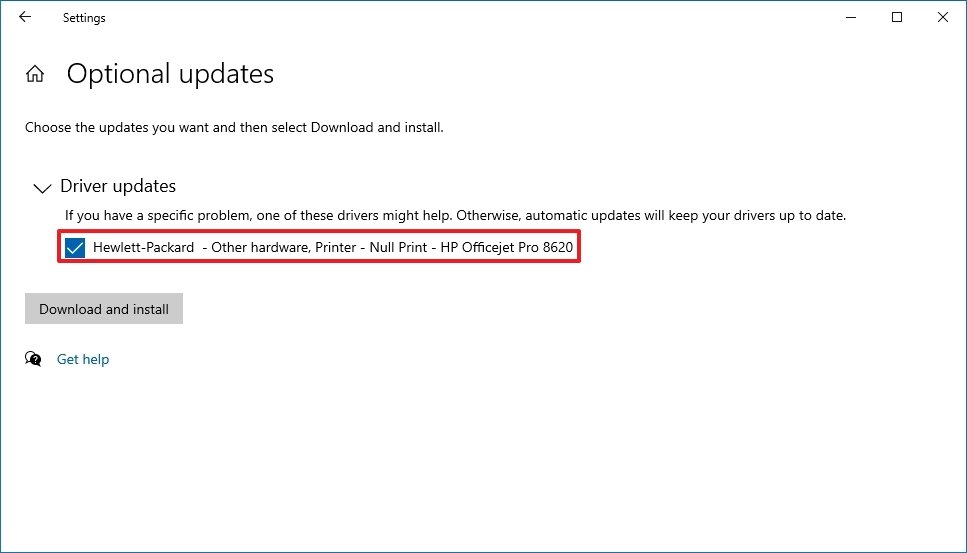
- Under the "Driver updates" section, check the driver update.Quick note: If nothing shows up on the page, Windows Update does not have an update for the hardware.
- Click the Download and install button.
Once you complete the steps, the driver update will download and install automatically, and the camera should start working again with Microsoft Teams.
If there's no newer hardware update, check the manufacturer's support website to download the most up-to-date version using their instructions.
Reinstall camera driver
If the webcam has a driver or configuration problem, reinstalling it through Device Manager may resolve the issue.
To uninstall and reinstall the camera driver, use these steps:
- Open Start.
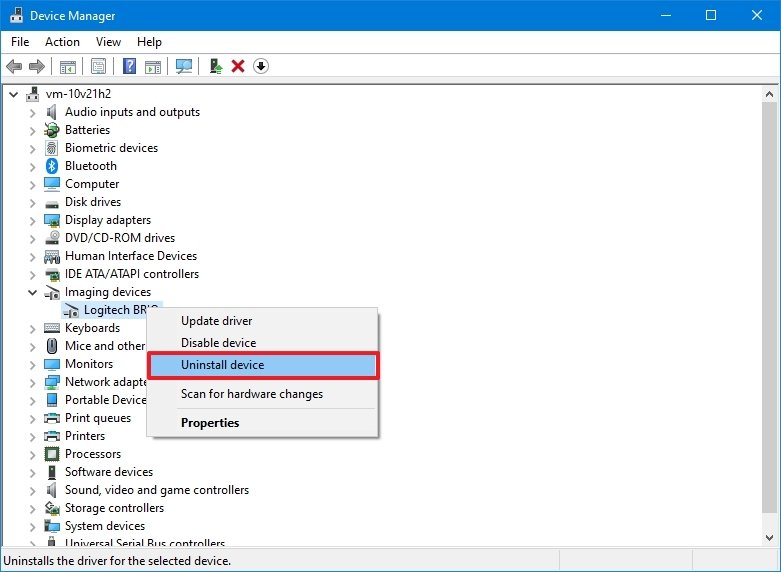
- Search for Device Manager, and click the top result to open the app.
- Expand the Imaging devices, Cameras, or Sound, video, and game controllers branch.
- Right-click the webcam and select the Uninstall driver option.
- Click the Uninstall button.Quick tip: Check the Delete the driver software for this device option to force the system to re-download the driver from Windows Update (if applicable). However, later on, Windows Update can't download the device driver. You will need to download the controllers from the manufacturer's support website.
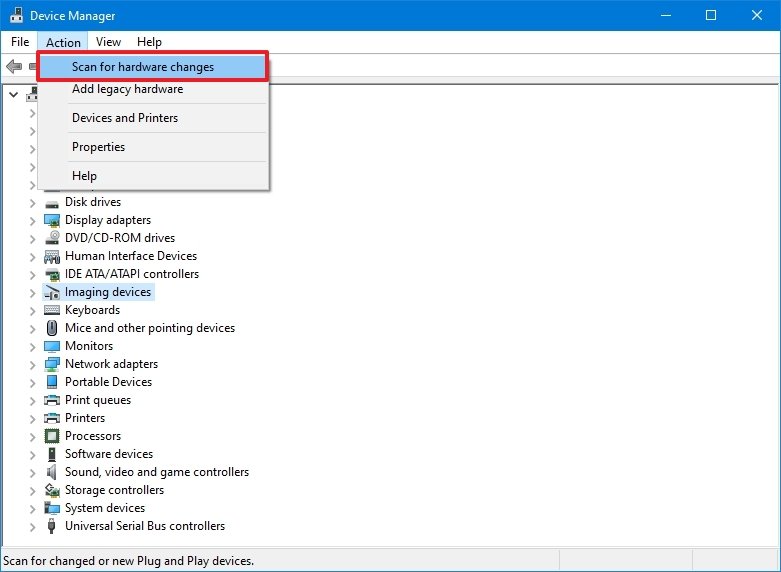
- Click on Actions.
- Click the Scan for hardware changes option.
After you complete the steps, Microsoft Teams should now detect the camera automatically.
Downgrade camera driver
If the camera was working before installing an update, rolling back to the previous version can resolve the problem with Microsoft Teams.
To install the previous version of the camera driver on Windows 10, use these steps:
- Open Start.
- Search for Device Manager, and click the top result to open the app.
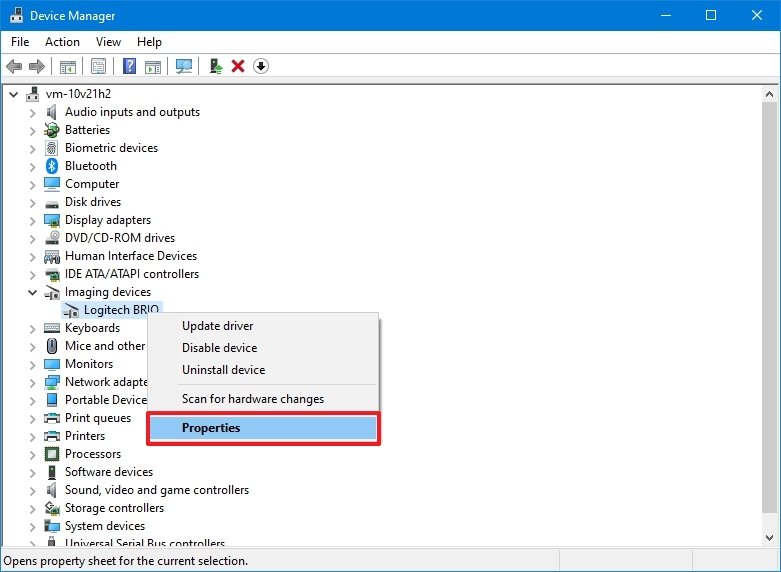
- Expand the Imaging devices, Cameras, or Sound, video, and game controllers branch.
- Right-click the camera and select the Properties option.
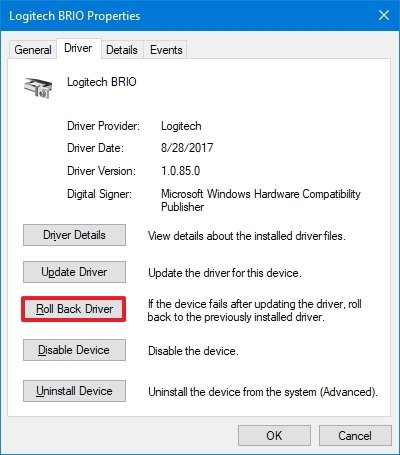
- Click on the Driver tab.
- Click the Roll Back Driver button.Quick tip: If the option is grayed out, the driver's previous version is not available.
- Select a reason for rolling back.
- Click the Yes button.
- Click the Yes button again.
- Restart your computer.
Once you complete the steps, the apps should detect the webcam using the older version of the driver, allowing you to continue to participate in video calls.
How to fix Teams camera by using web browser
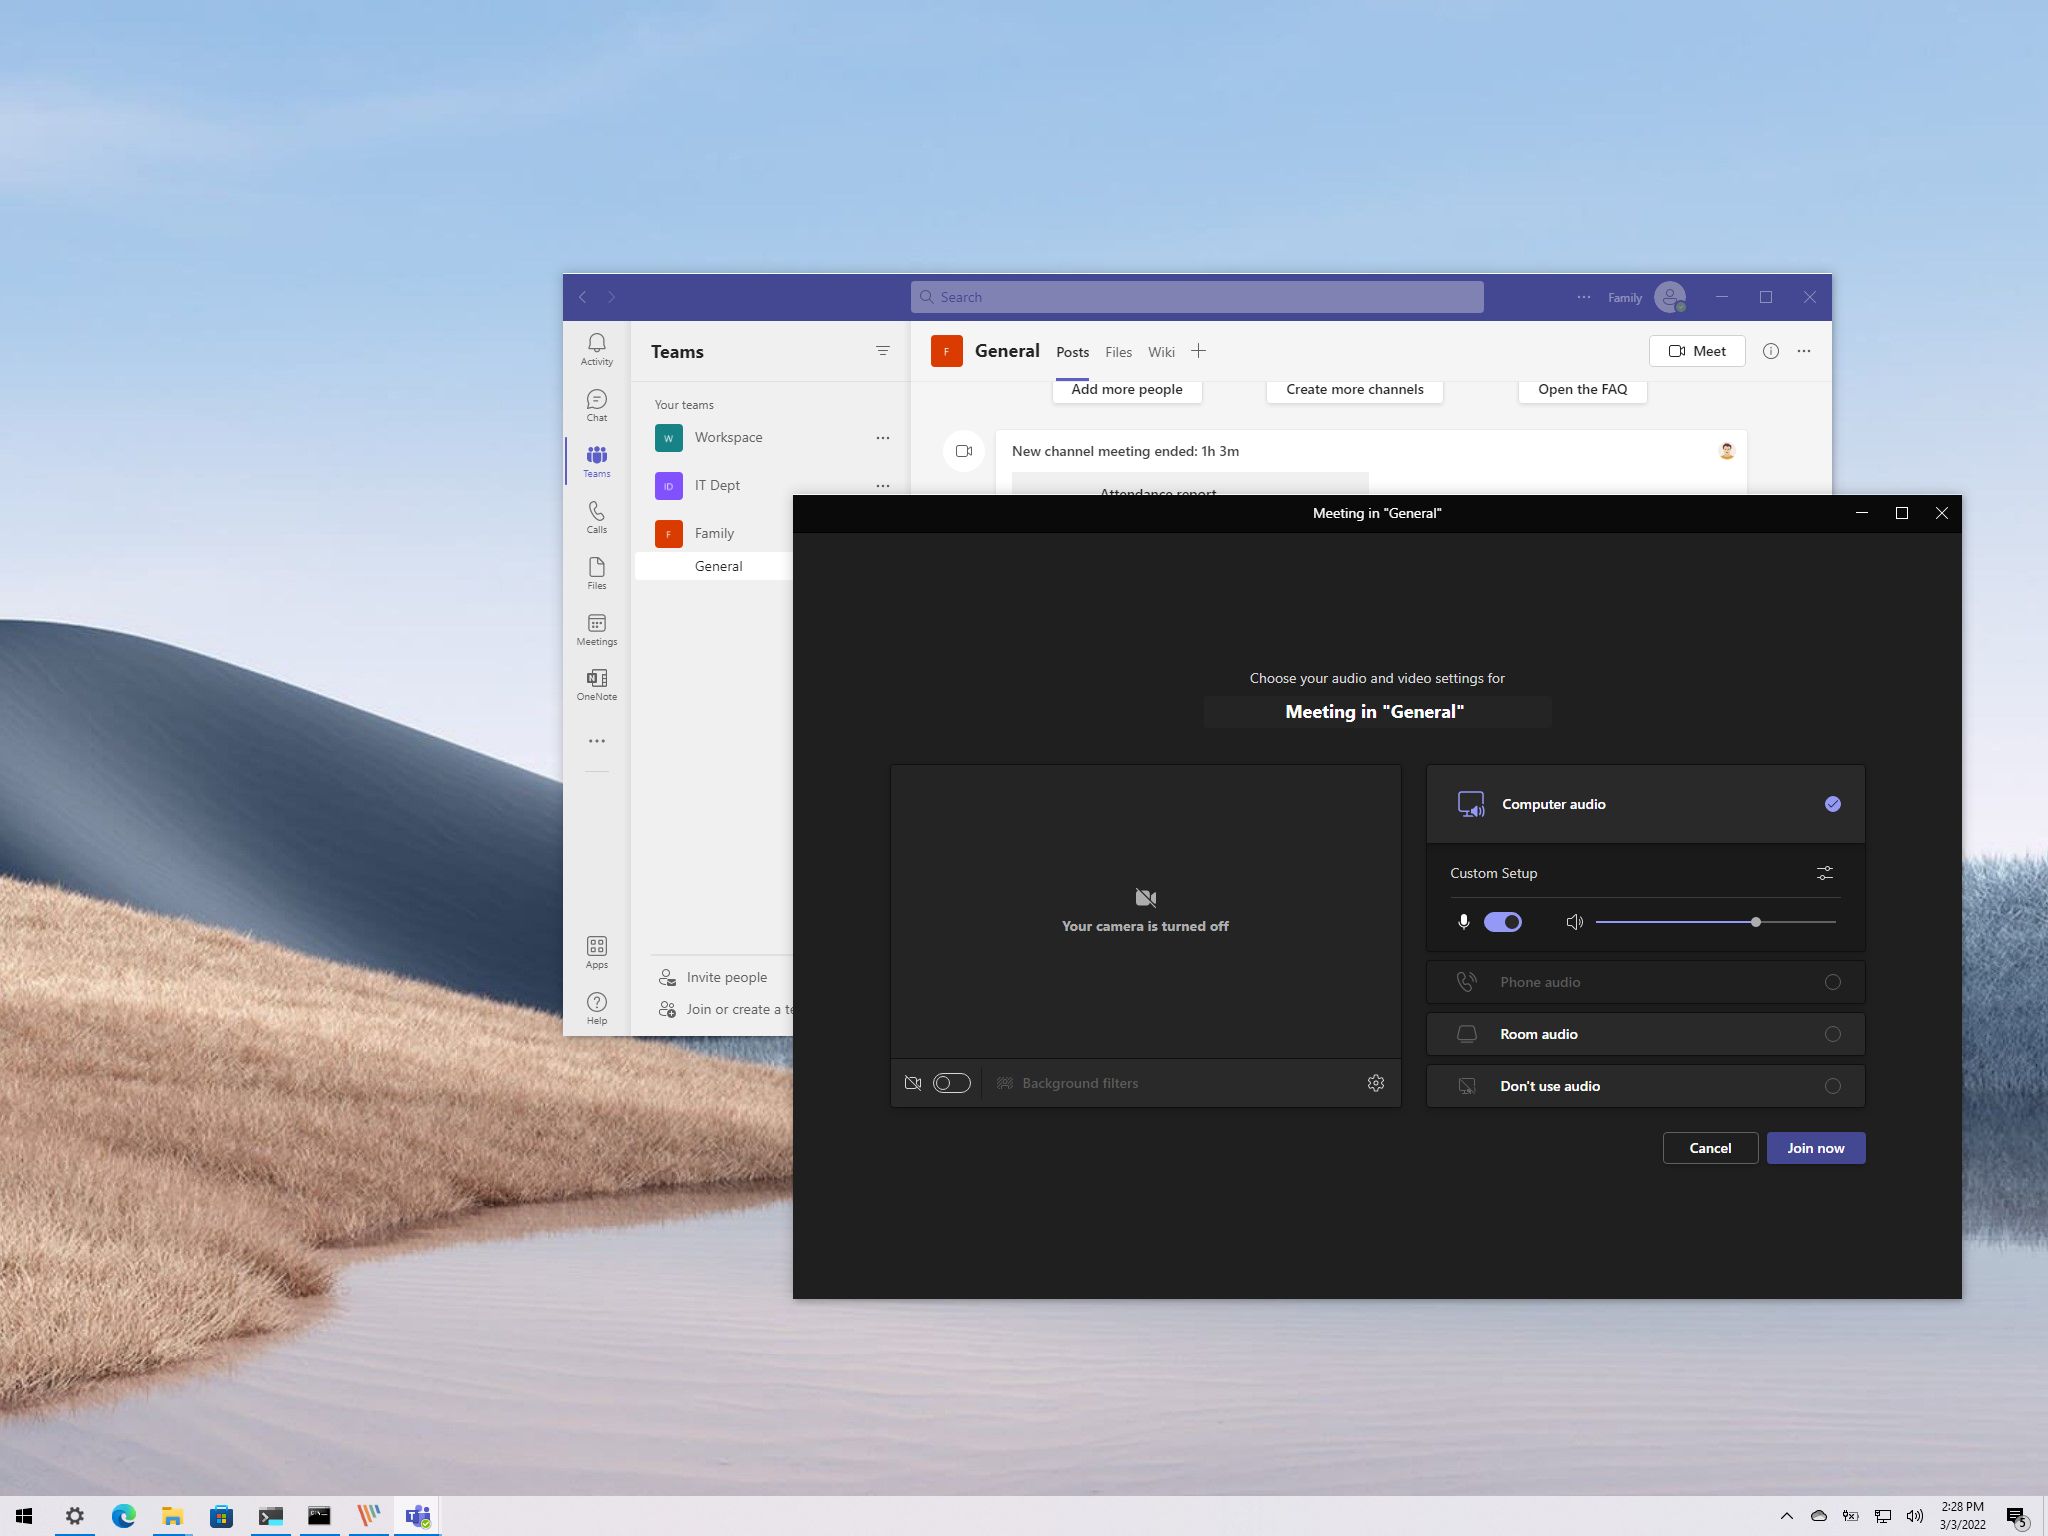
In case nothing seems to resolve the issue, and you have to attend a meeting immediately, you can use the web version of Microsoft Teams.
To join a Teams meeting online, use these steps:
- Open Microsoft Teams on the web.
- Sign in with your credentials.
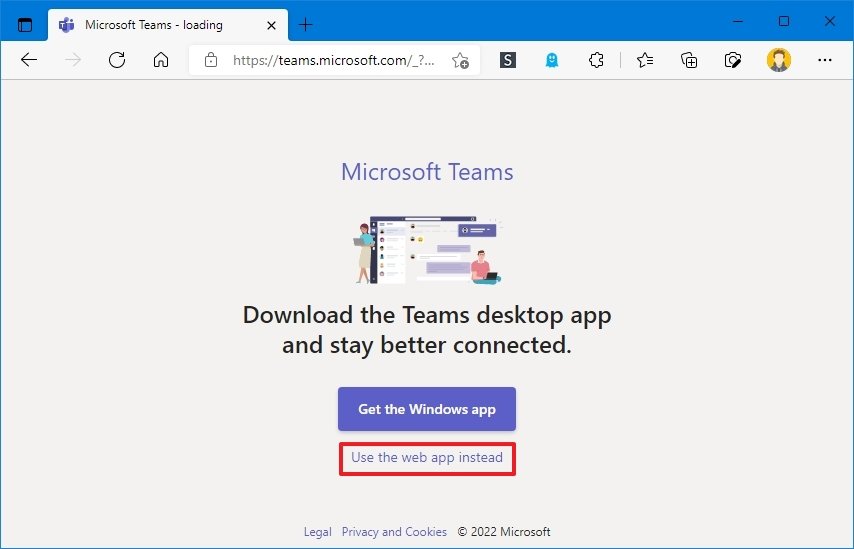
- Click the Use the web app instead option.
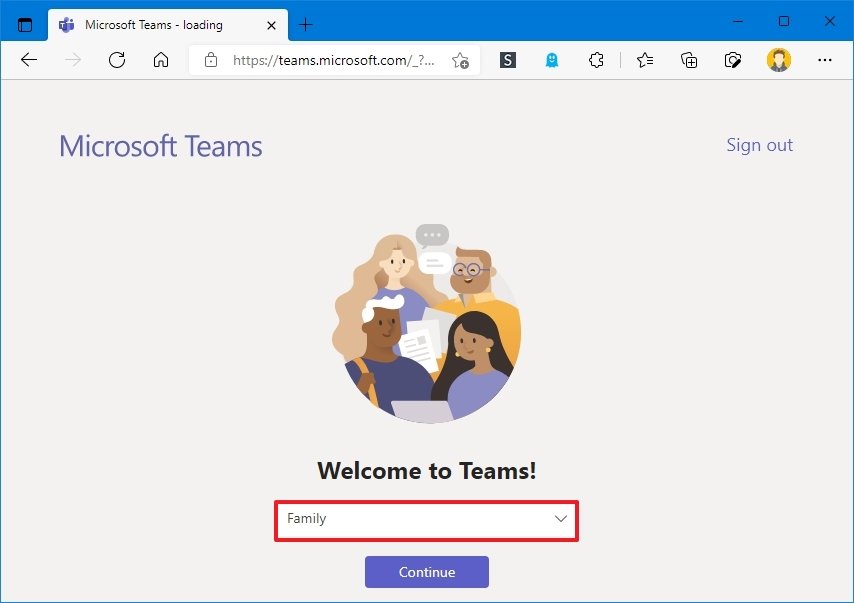
- Select the organization (if applicable).
- Click the Continue button.
- Click on Chat or Teams.
- Select the contact from the right pane.
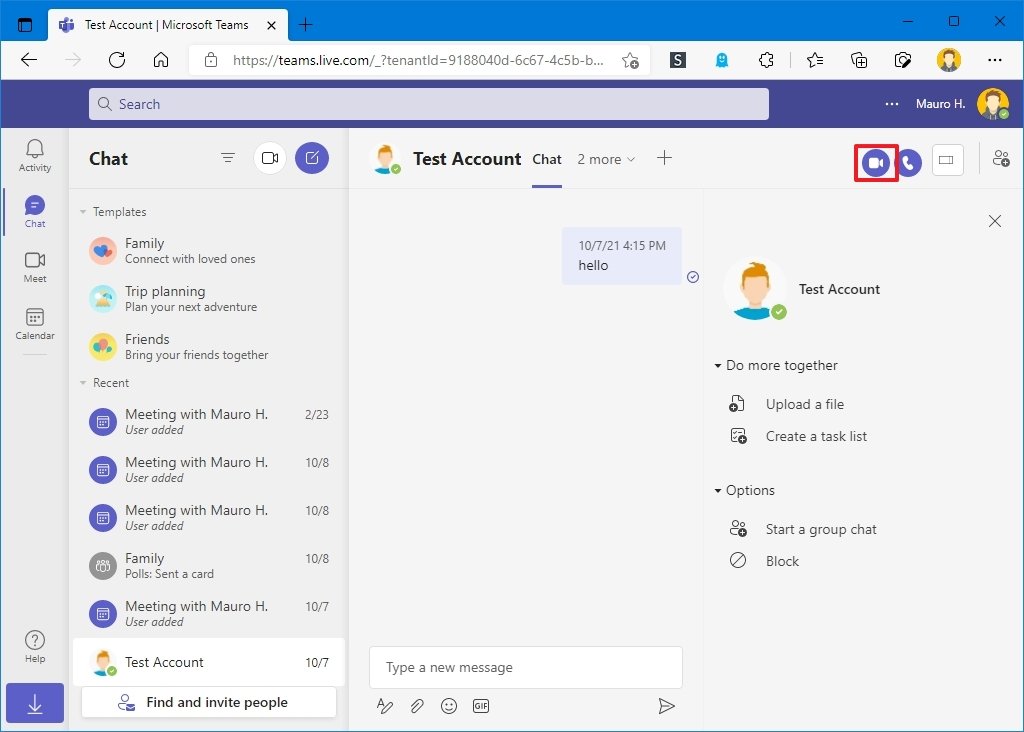
- Click the Video call button from the top-right corner.
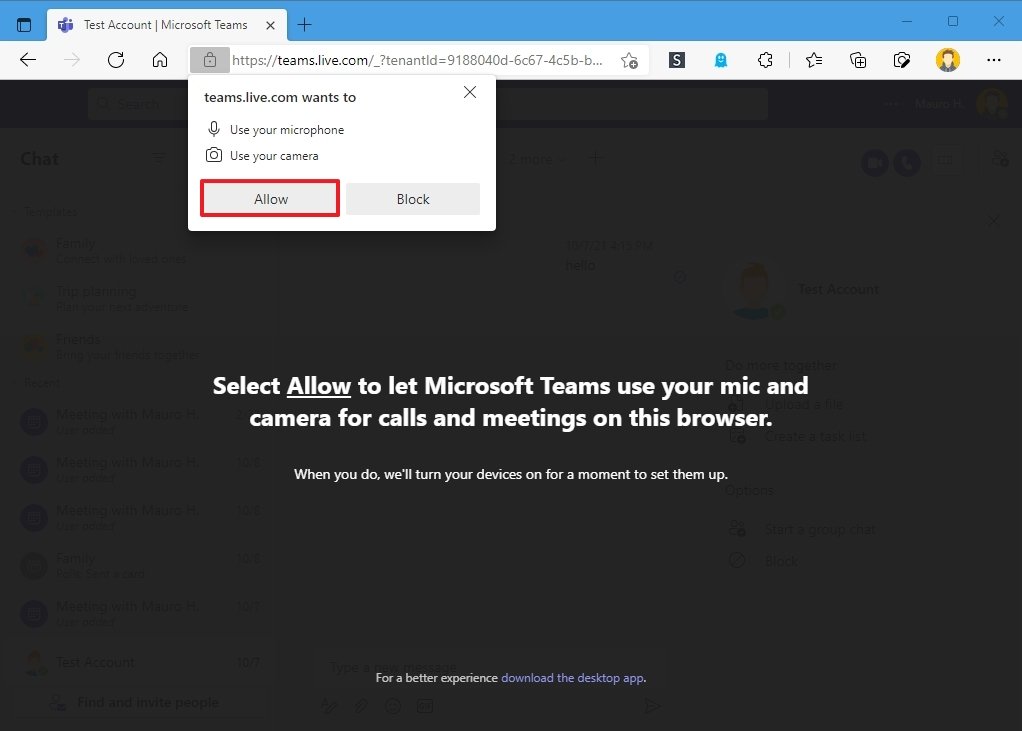
- Click the Allow button in the notification to let the browser access the camera.
After you complete the steps, you should be able to use the camera and microphone on the web version of Teams.
Configure browser permissions
The web version of Teams can help you get back to video calls quickly, but using this option can also cause problems if you don't configure the camera and microphone settings in the browser correctly.
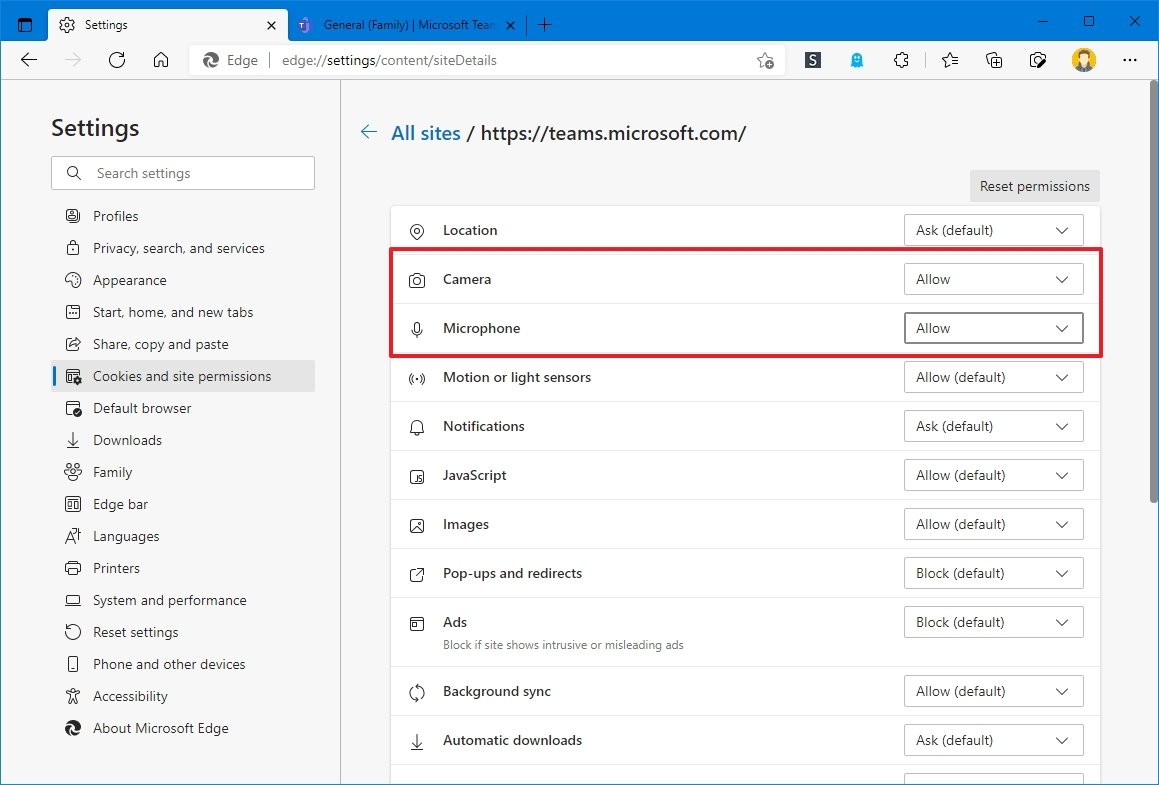
If you are a Microsoft Edge user, follow these steps:
- Open Microsoft Edge.
- Click the Settings and more (three-dotted) menu.
- Click the Settings option.
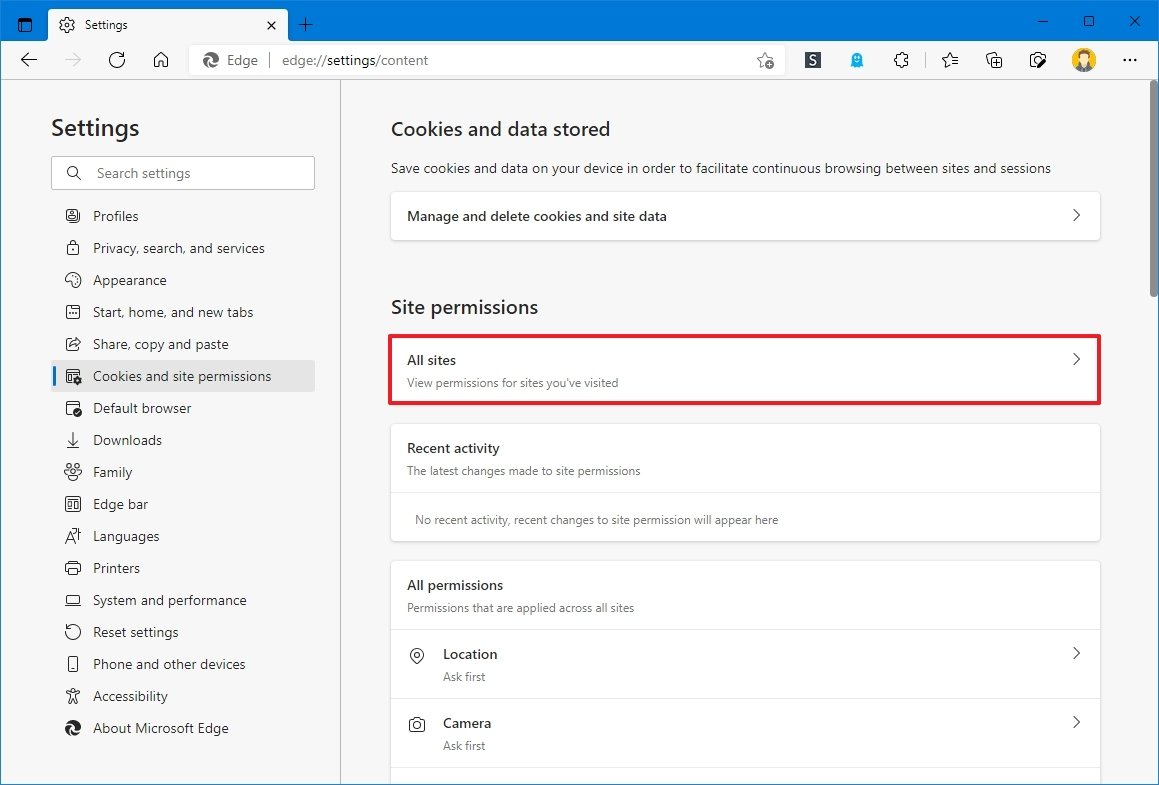
- Click on Cookies and site permissions.
- Click the All sites option.
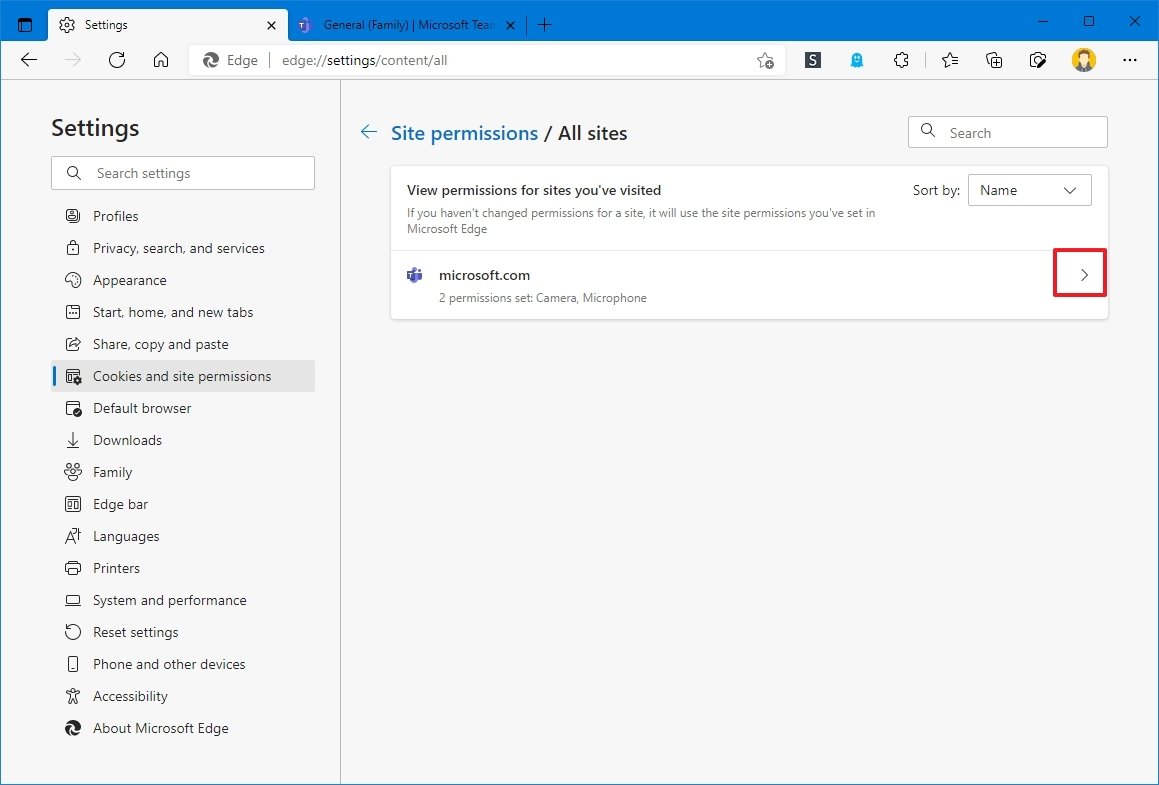
- Click the microsoft.com (for Teams) option.Quick note: If the Microsoft Teams option is missing, you should be able to use the web version of Teams without issues.
- Use the "Camera" settings and select the Allow option.
- Use the "Microphone" settings and select the Allow option.
If you use Google Chrome, the camera settings are available on Settings > Privacy and security > Site settings. Or if you use Mozilla Firefox, the settings are available on Options > Privacy & Security > Permissions.
If the issue with the camera persists, it could be a hardware problem.
More Windows resources
For more helpful articles, coverage, and answers to common questions about Windows 10 and Windows 11, visit the following resources:
- Windows 11 on Windows Central — All you need to know
- Windows 11 help, tips, and tricks
- Windows 10 on Windows Central — All you need to know

Mauro Huculak has been a Windows How-To Expert contributor for WindowsCentral.com for nearly a decade and has over 22 years of combined experience in IT and technical writing. He holds various professional certifications from Microsoft, Cisco, VMware, and CompTIA and has been recognized as a Microsoft MVP for many years.
