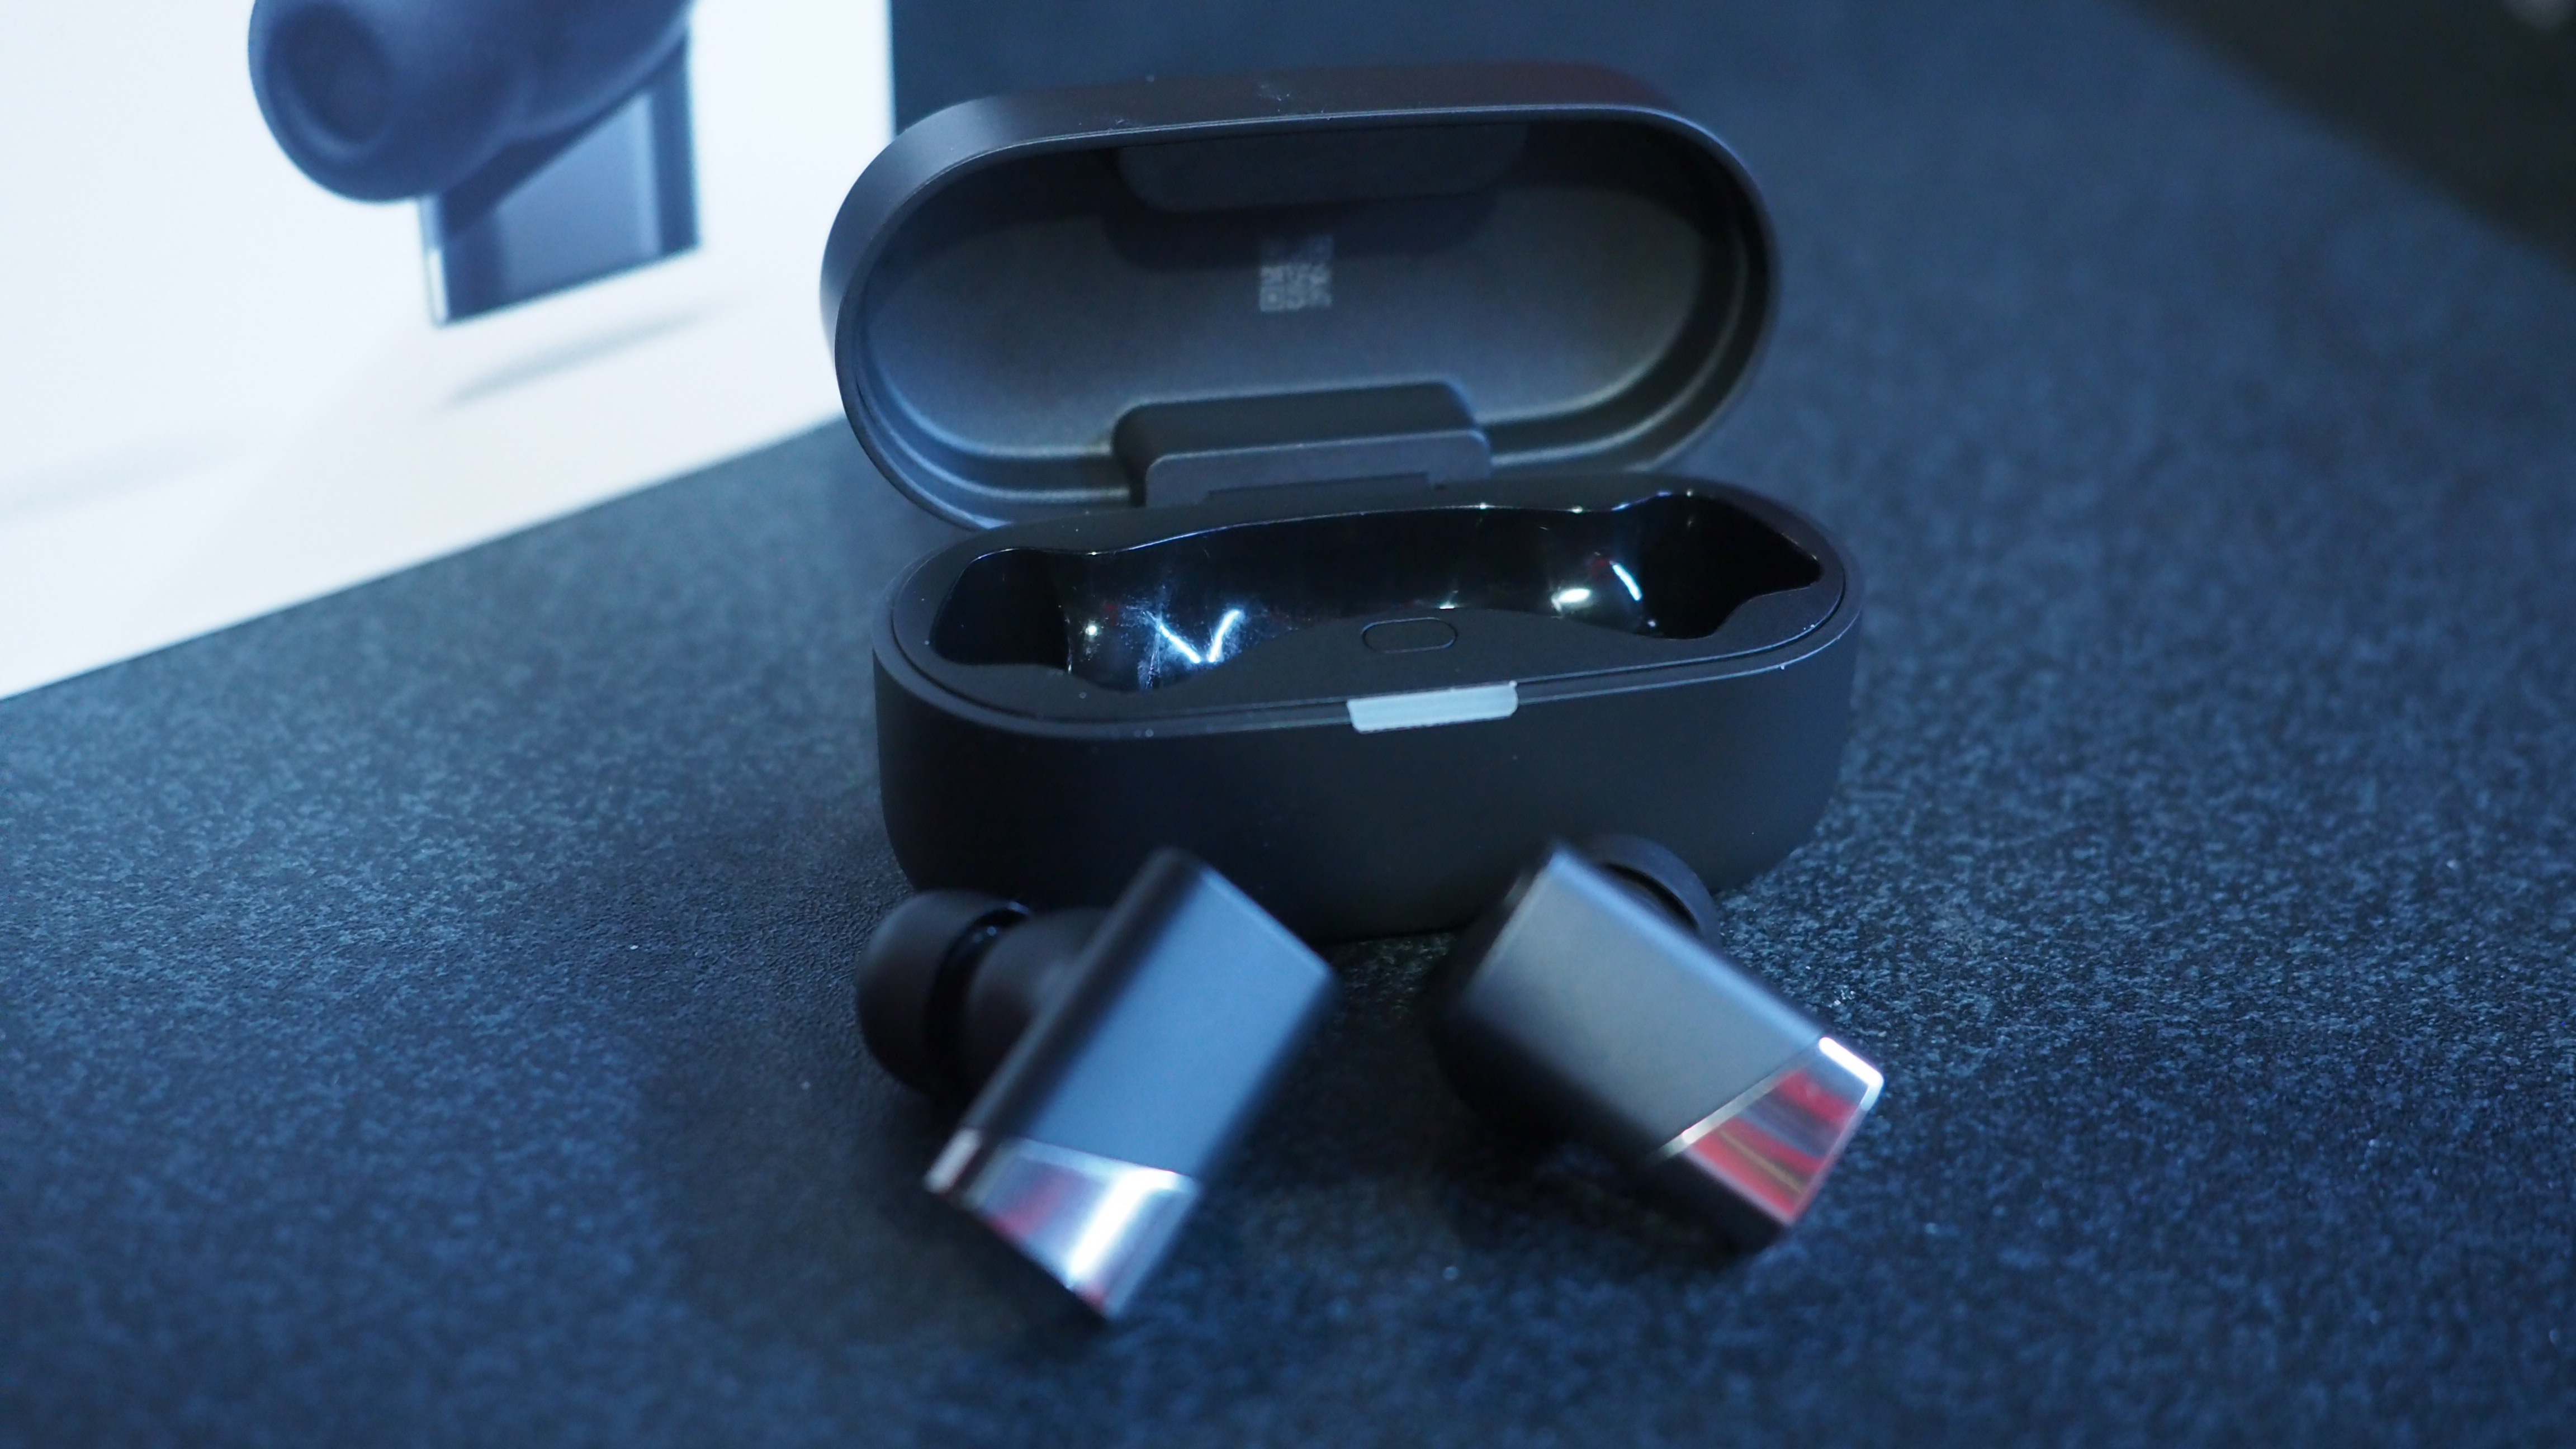
How to protect your PC from buggy Windows 11 updates with restore points, Quick Machine Recovery, and full backups
Here's how to safeguard your Windows 11 PC by utilizing recovery tools and following my safe update tips.
All the latest news, reviews, and guides for Windows and Xbox diehards.
You are now subscribed
Your newsletter sign-up was successful
On Windows 11, Microsoft makes monthly System updates mandatory to patch security vulnerabilities, improve system performance, and deliver new features. However, it's not uncommon for updates to also cause unwanted problems.
For instance, when the company made available the August 2025 Security Update (KB5063878), soon after the release, a significant number of users began reporting storage issues on Windows 11 version 24H2. In this particular case, users explained that writing a large amount of data would cause a Solid State Drive (SSD) or Hard Disk Drive (HDD) to disappear.
Restarting the computer might recover the drive, but it could also cause data corruption and data loss. As part of the same Patch Tuesday update, the company had to quickly release an Out-of-band (OOB) update for versions 23H2 and 22H2 to address a critical bug causing problems with the reset and recovery features.
It’s still unclear whether the August 2025 update for version 24H2 is actually causing SSDs or HDDs to fail. Phison recently released a statement explaining that after more than 4,500 cumulative hours of testing the reported drivers, it was unable to reproduce the issue. Microsoft has also been unable (via Bleeping Computer) to replicate the problem and is currently collecting customer feedback to determine if there’s a real fault in the operating system. That said, update-related issues are not uncommon, so it’s always best to stay prepared just in case.
Still, this is not an isolated case. Almost every year, at least one cumulative update causes serious reliability problems for a subset of users. Since it's unpredictable when a system update will cause problems, and ignoring these patches entirely is not a recommended option, there are some steps you can take for quick recovery and prevent data loss.
It's important to note that while feature updates are not mandatory as long as the release installed on your computer is not nearing the end of support, systems will eventually download and install the next feature update automatically. In this how-to guide, I'll outline the different ways you can protect your computer from any updates that may cause problems on Windows 11.
How to protect your PC from buggy updates on Windows 11
1. Enable System Restore
System Restore is a feature that creates snapshots of your computer's working state and saves them as "restore points." If the device encounters an issue, you can use a restore point to undo the system changes (including removing a recent update) without affecting your files.
This feature used to come turned on by default, but now, it's something you have to configure manually.
If you want to have a way to undo changes after installing a buggy update, you must enable System Restore manually and create a restore point before installing a cumulative update.
Turn on System Restore
To enable System Restore on Windows 11, use these steps:
- Open Start.
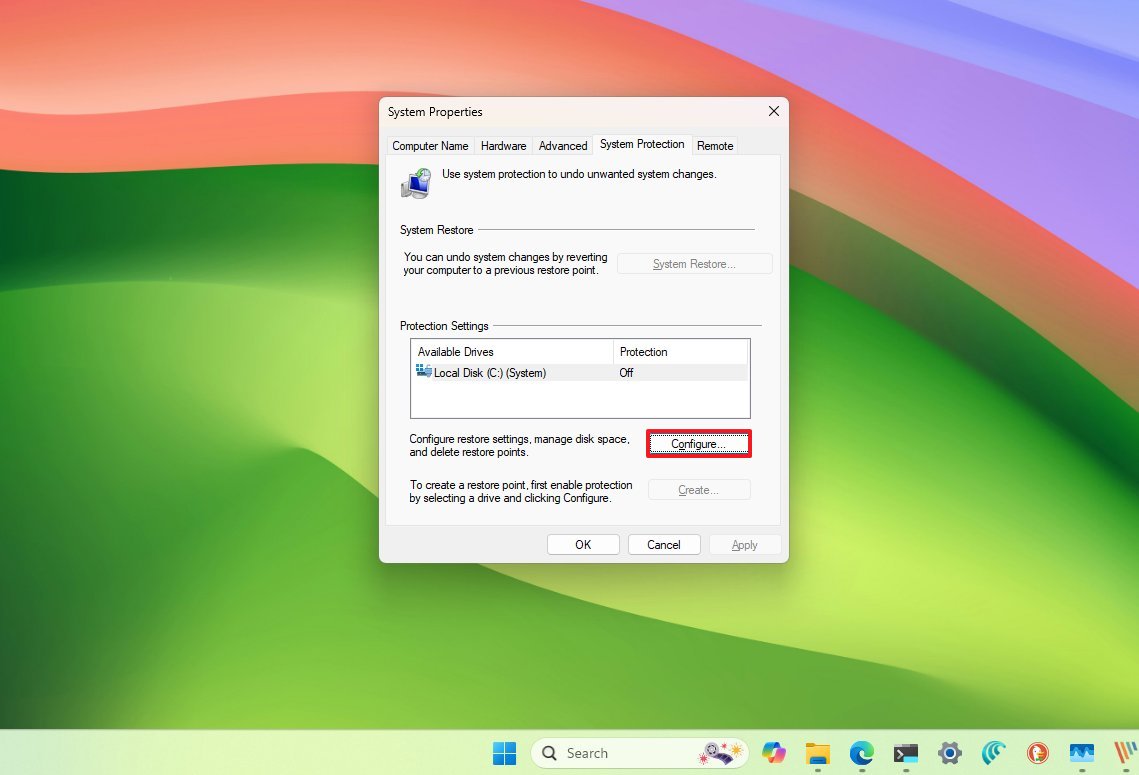
- Search for Create a restore point and click the top result to open the System Properties page.
- Select the main "System" drive under the "Protection Settings" section.
- Click the Configure button.
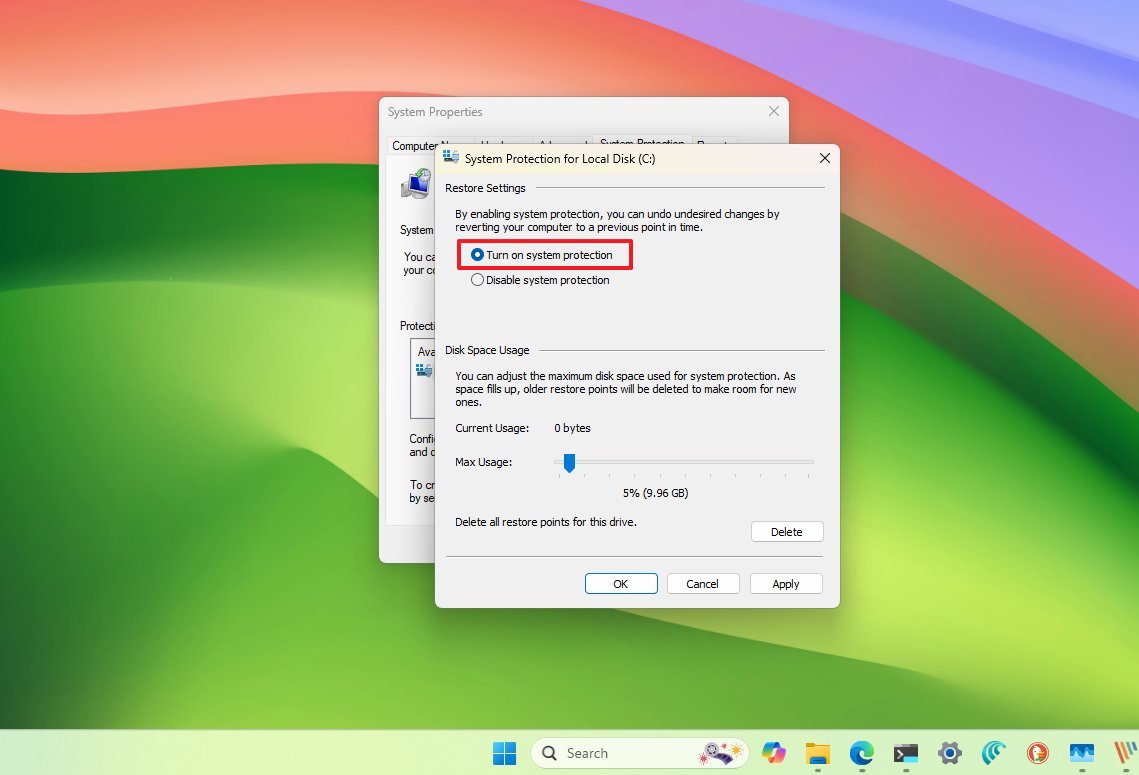
- Select the "Turn on system protection" option.
- Click the Apply button.
- Click the OK button.
Once you complete the steps, the feature will be enabled on your computer.
Although the feature should create restore points automatically upon specific triggers, such as installing a system update or driver, this is not always the case. As a result, it's recommended to create a restore point manually before making system changes.
Create a restore point
To create a restore point before installing a cumulative update, use these steps:
- Open Start.
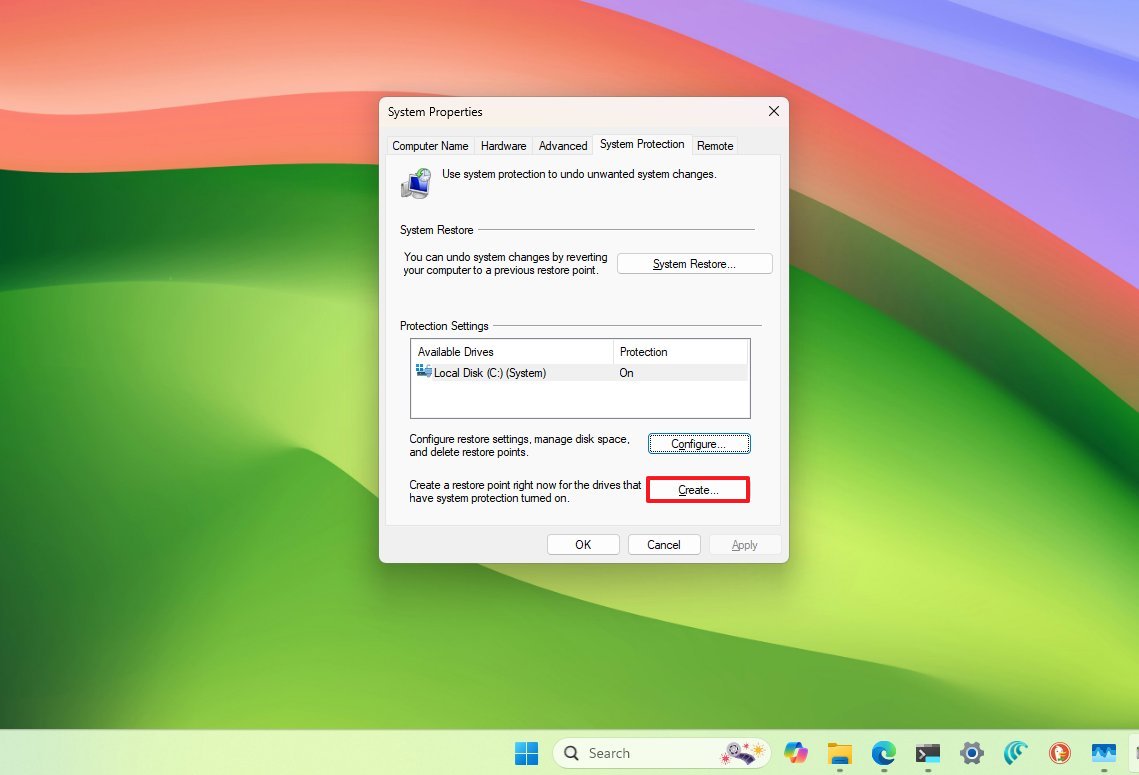
- Search for Create a restore point, and click the top result to open the System Properties page.
- Click the Create button under the "Protection Settings" section.
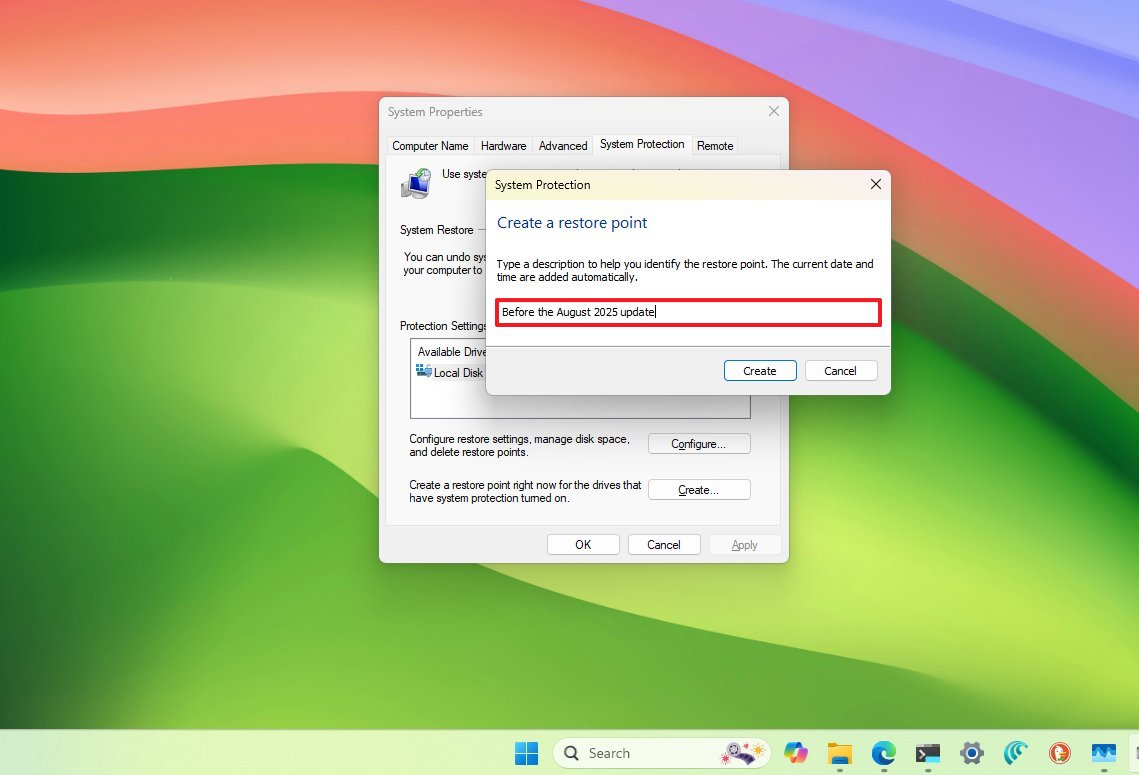
- Confirm a descriptive name for the restore point – for example, Before the August 2025 update.
- Click the Create button.
- Click the Close button.
- Click the OK button.
- Click the Close button.
After you complete the steps, you can proceed with the installation of a new update, knowing you can undo the changes if anything happens.
If you must undo the changes, you can check my previous guide to set up and recover a computer using System Restore.
2. Enable Quick Machine Recovery
Quick Machine Recovery (QMR) is relatively new, and it has been designed to restore your computer from a critical boot failure quickly.
In short, when the feature is enabled, and the device can start correctly because of a buggy update or another boot problem, the system will connect to the internet, upload the logs to the cloud, and then it will download the fix (if available) through Windows Update.
The feature has been available since the August 2025 Security Update on version 24H2 and higher releases, and while it comes enabled by default on Windows 11 Home, you have to enable it manually in the "Pro" edition.
To configure the Quick Machine Recovery feature on Windows 11, use these steps:
- Open Settings.
- Click on System.
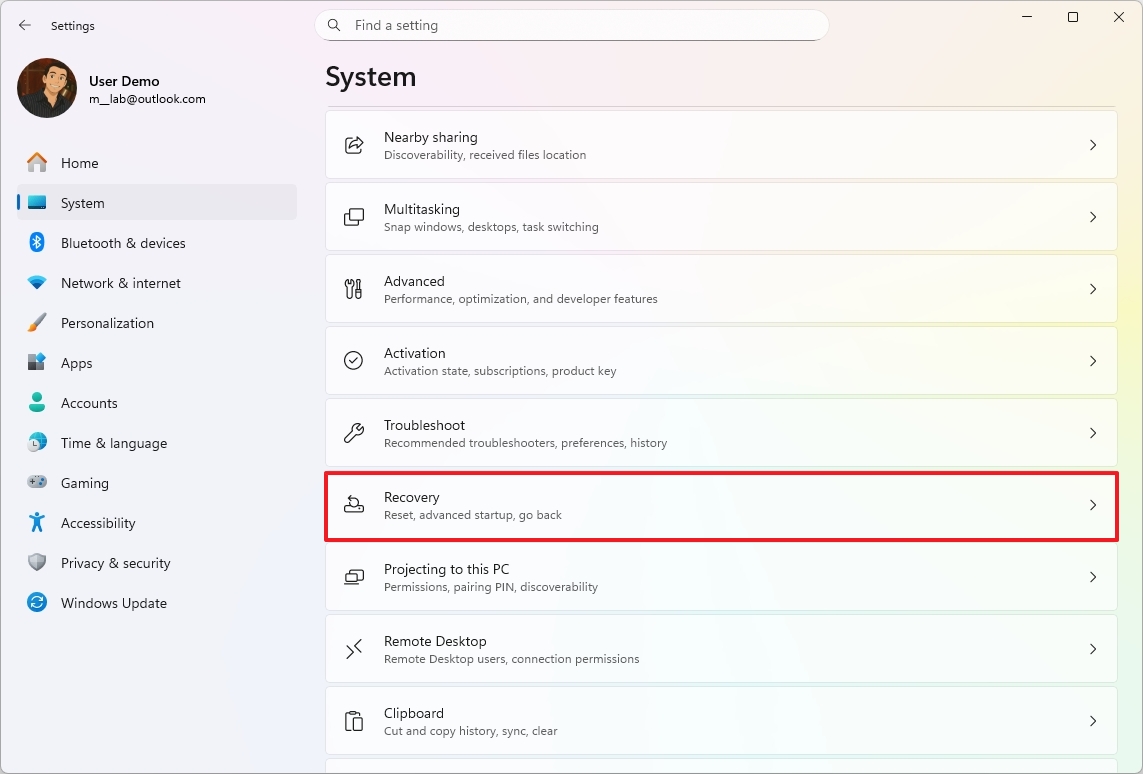
- Click the Recovery page on the right side.
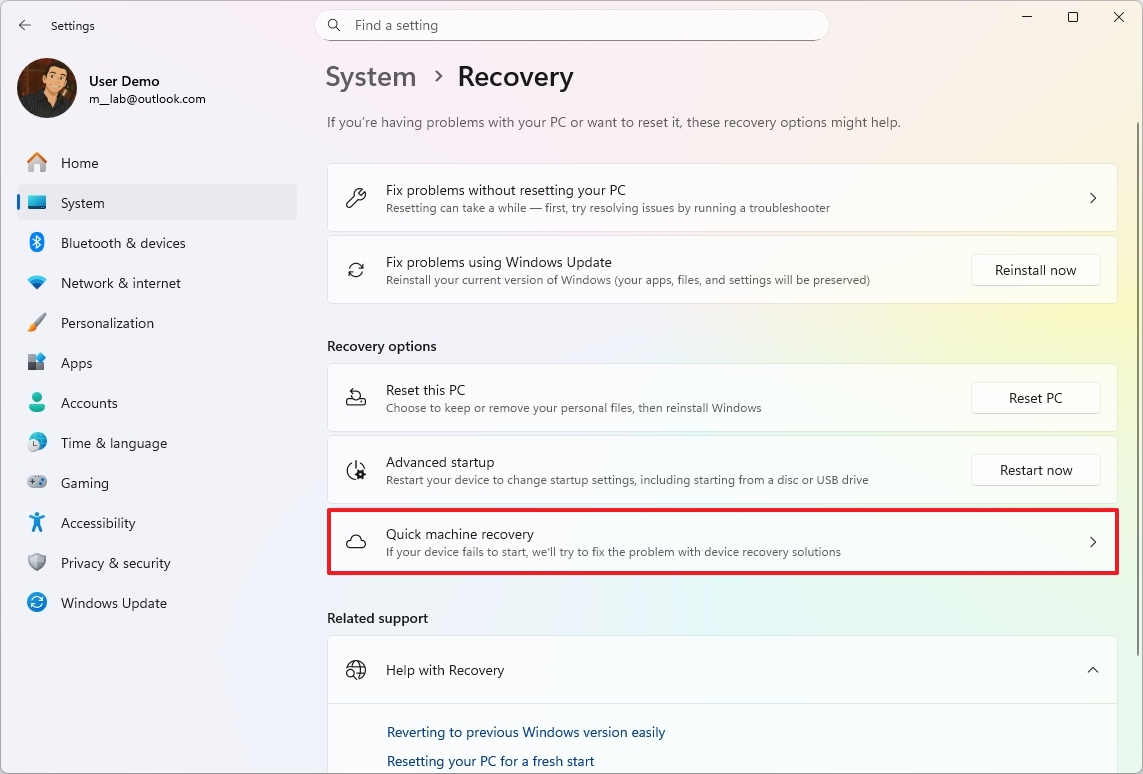
- Click the Quick machine recovery setting.
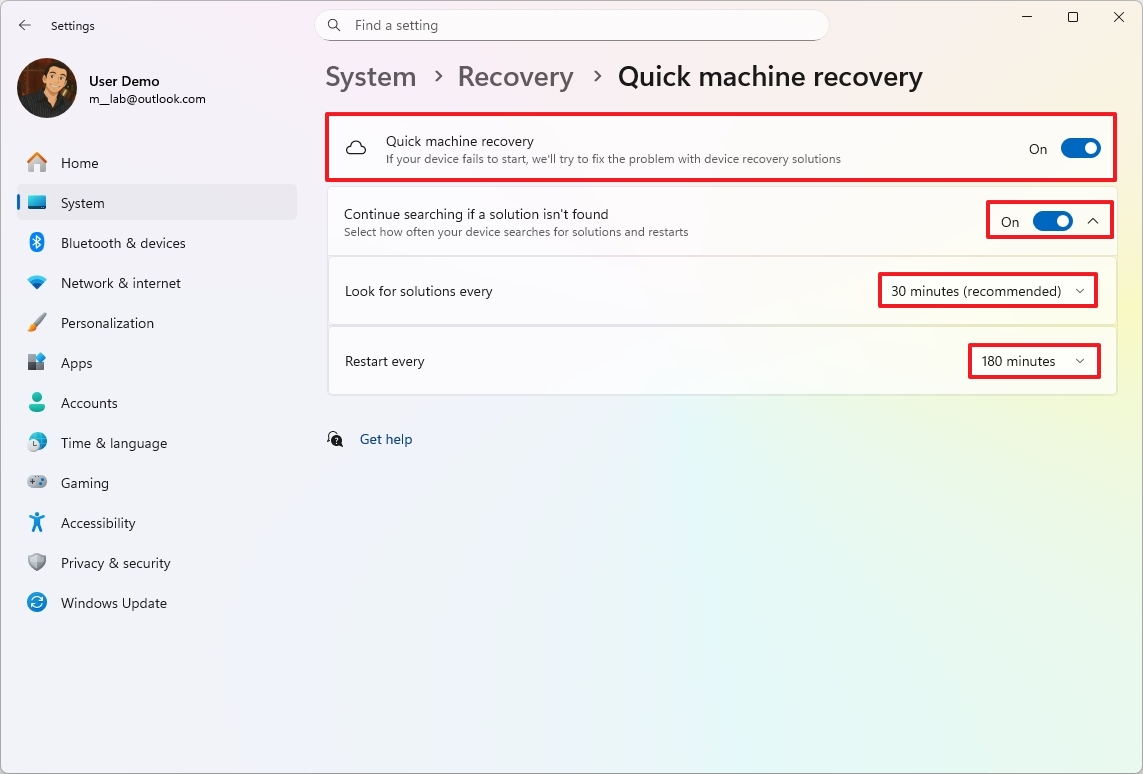
- Turn on the "Quick machine recovery" toggle switch to enable the feature.
- Turn on the "Continue search if a solution isn’t found" toggle switch to control the feature behavior.
- Choose how long the system has to wait before checking for fixes using the "Look for solutions every" setting.
- Select when to restart the device to repeat the process using the "Restart every" setting.
Once you complete the steps, if you receive a buggy update that won't let the computer boot correctly, the Quick Machine Recovery feature will start automatically to download and apply any available fixes (if applicable).
Microsoft says that this is a "best-effort" feature, meaning that it won't work on every boot problem.
You can also check my comprehensive guide to set up and use Quick Machine Recovery on Windows 11.
3. Uninstall problematic update
If a cumulative update is known to cause issues, and you still have access to the desktop, consider uninstalling the update until a permanent solution is released.
On Windows 11, you can uninstall a cumulative update from the desktop or recovery environment.
From Settings
If you still have access to the desktop, use these steps:
- Open Settings.
- Click on Windows Update.
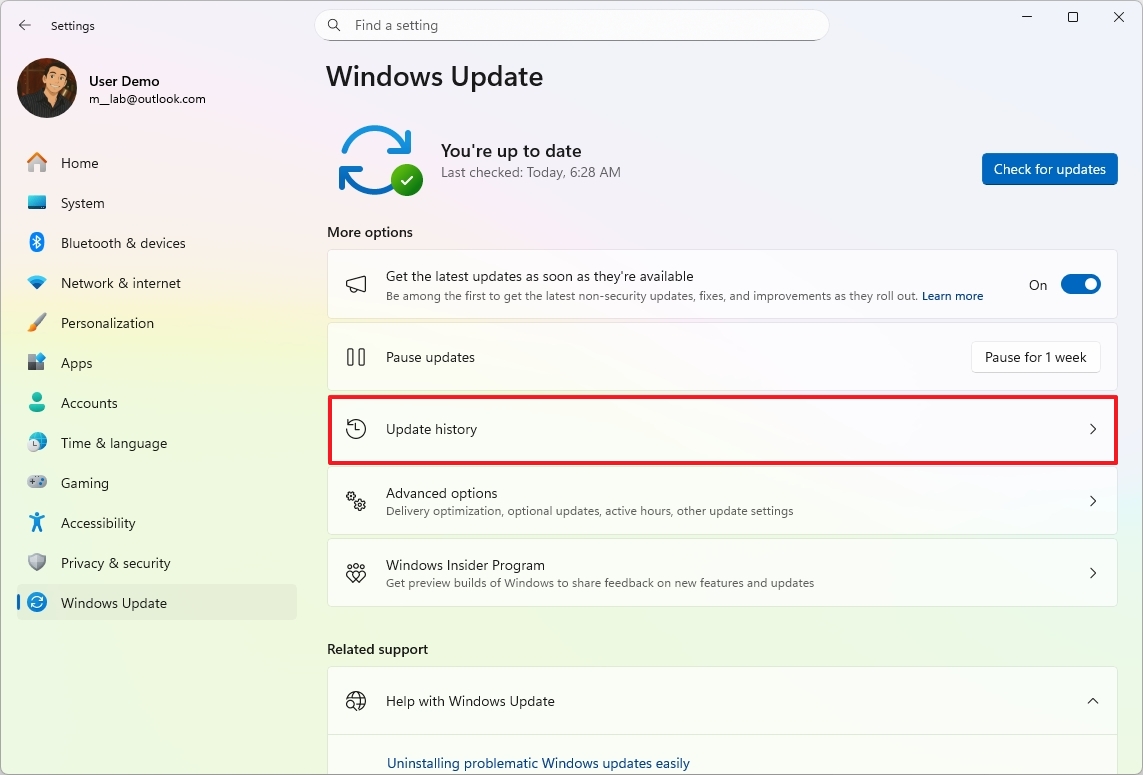
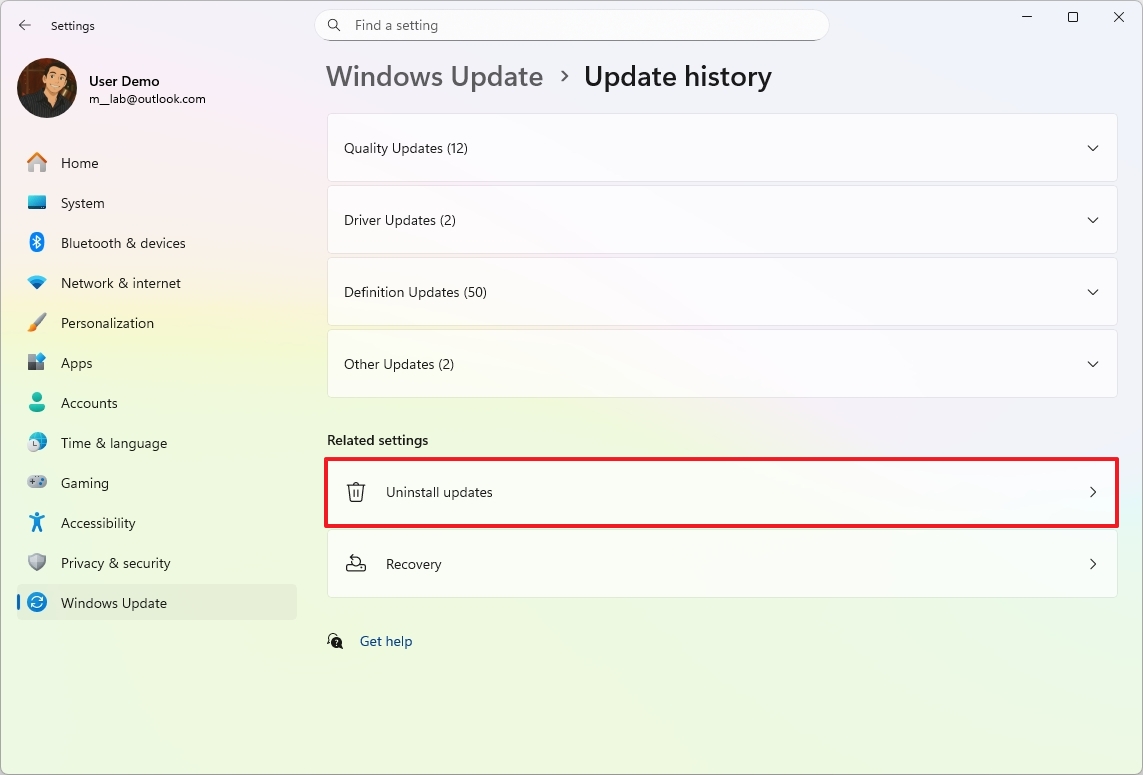
- Click the Update history page.
- Click the Uninstall updates setting under the "Related settings" section.
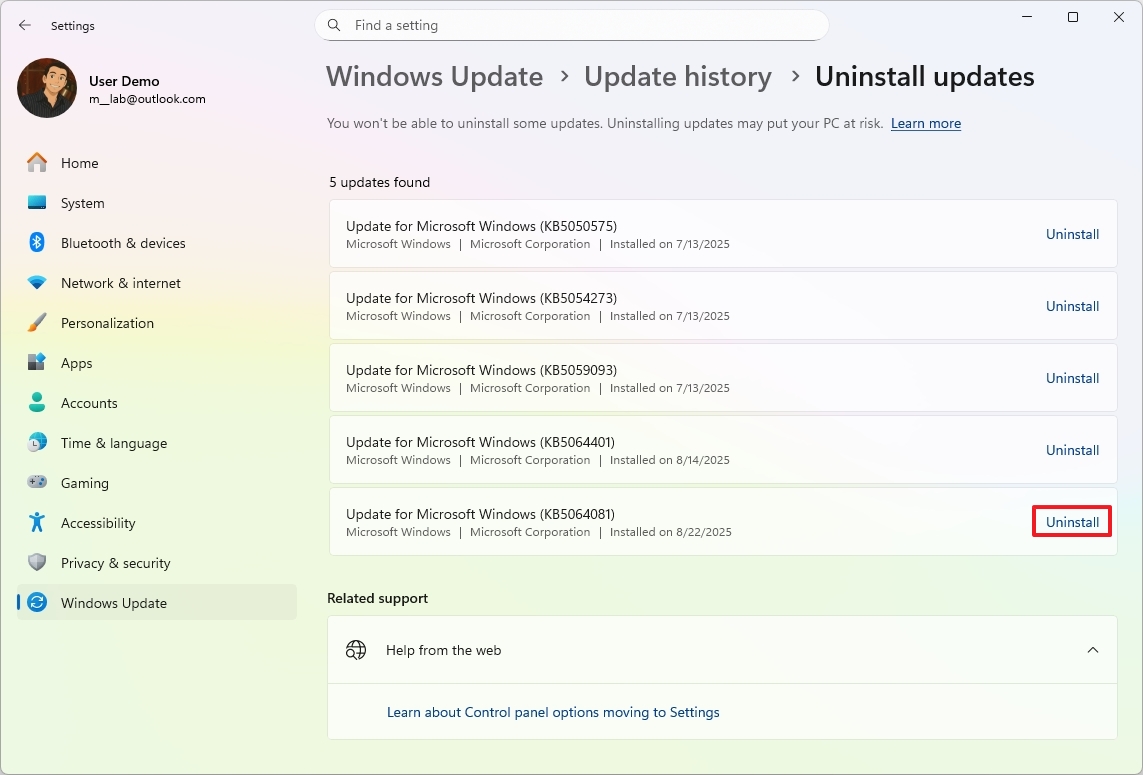
- Click the Uninstall option for the buggy update.
- Click the Restart now button (if applicable).
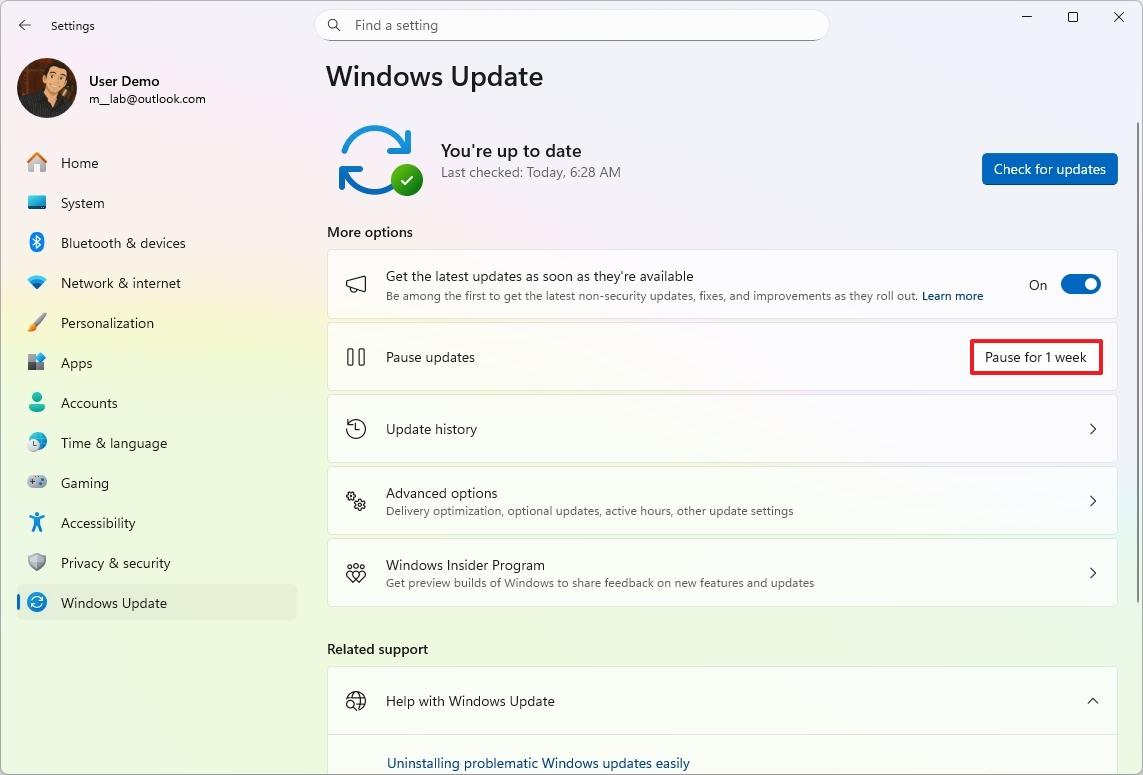
After you complete the steps, open the "Windows Update" page again through the Settings app, and under the "More options" section, click the "Pause for 1 week" button to prevent the system from reinstalling the same update again. If the setting offers more time, choose the longest period, such as four or five weeks.
From Windows Recovery Environment (WinRE)
If you don't have access to a desktop and the Quick Machine Recovery feature didn't work, you can still uninstall the most recent update with these instructions:
- Start PC.
- As soon as the Windows logo appears, press and hold the power button to interrupt the boot sequence.
- Repeat steps 1 and 2 two more times.
- Click the Advanced Startup option.
- Click the Troubleshoot option.
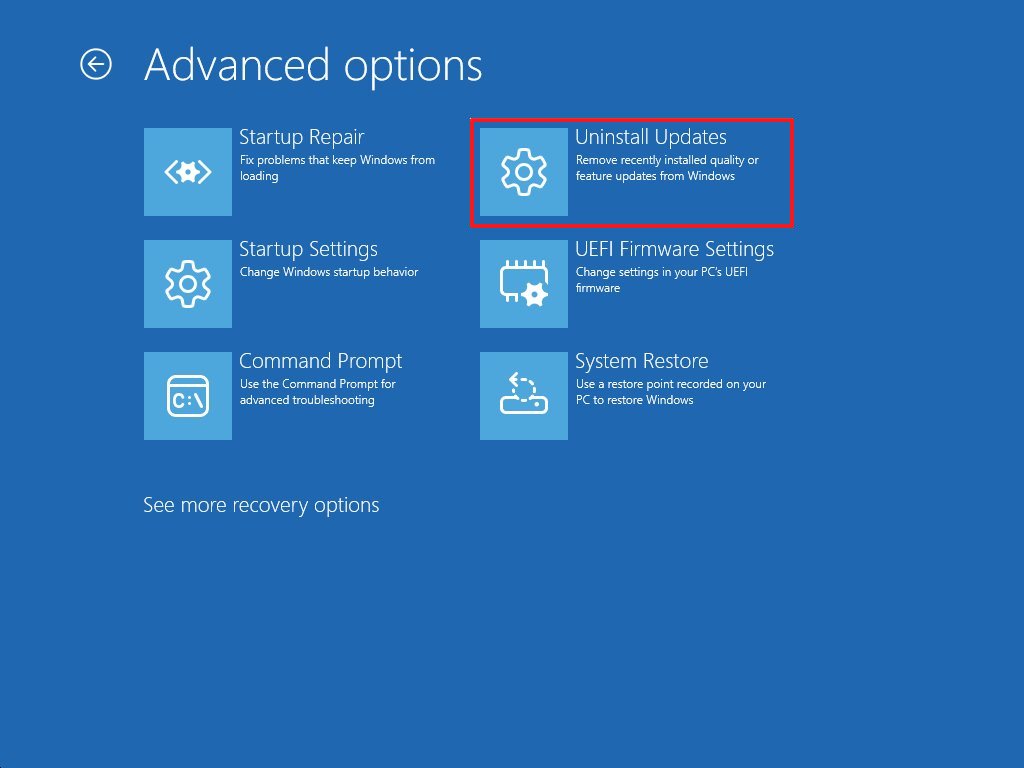
- Click on Advanced options.
- Click the Uninstall Updates option.
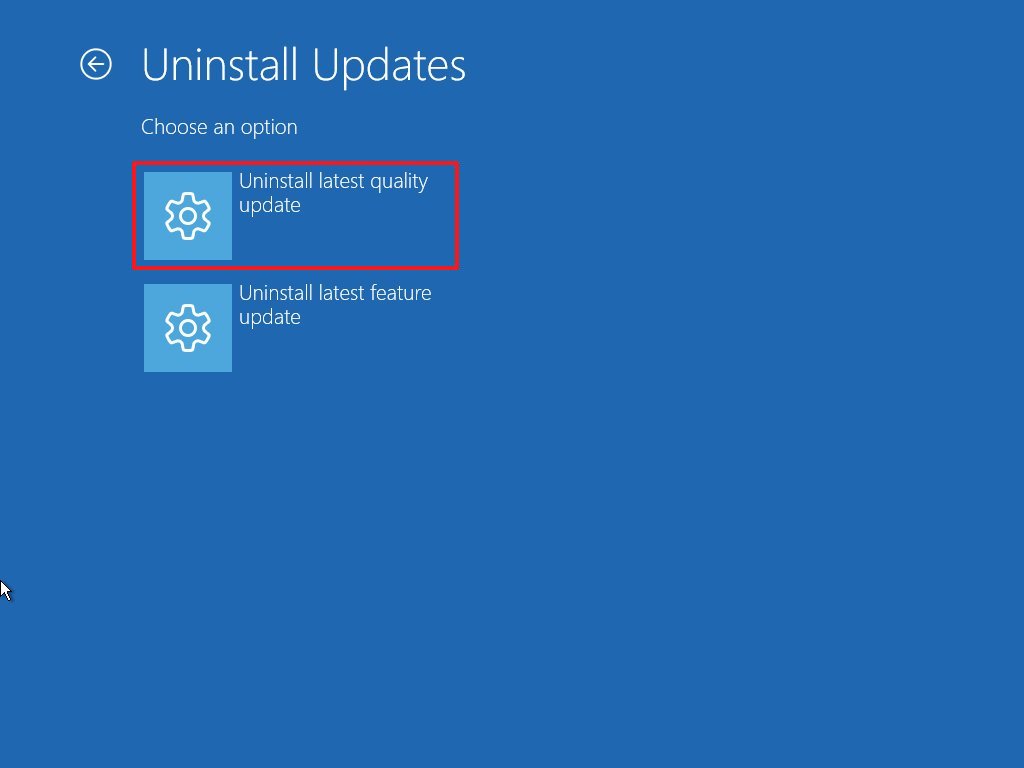
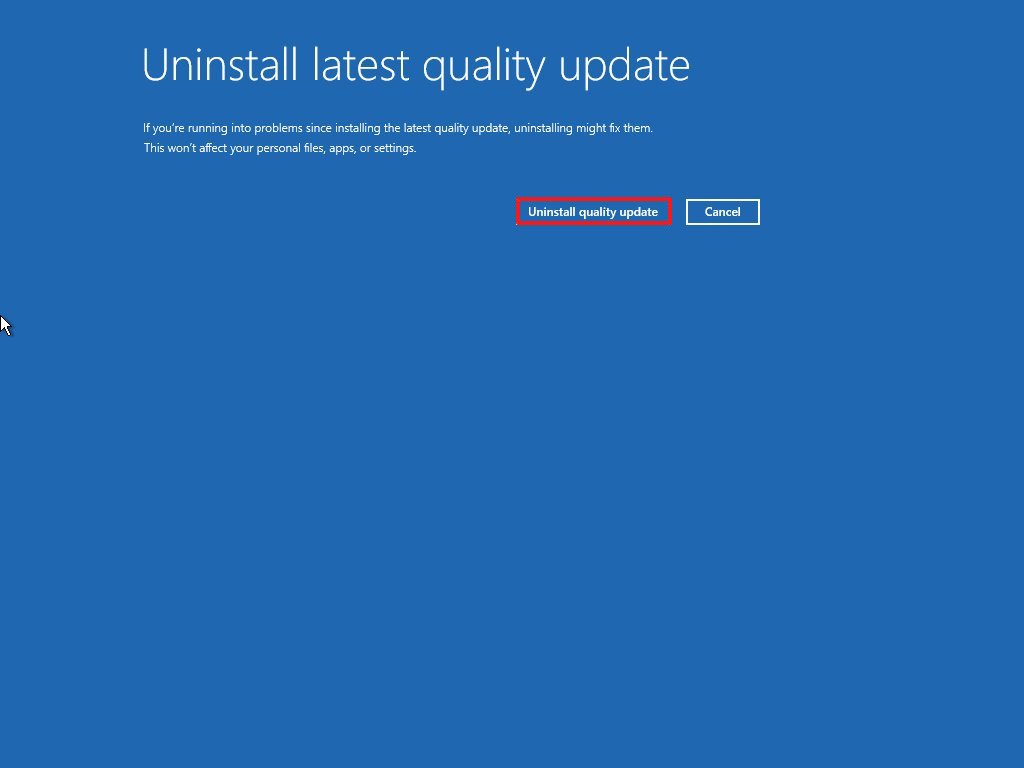
- Click the "Uninstall latest quality update" option.
- Sign in using your administrator credentials (if applicable).
- Click the "Uninstall quality update" button.
Once you complete the steps, the system will uninstall the most recent update, which in this case, should be the one causing the problem.
4. Disable automatic updates
On Windows 11, you can turn off updates in at least three ways. You can use the pause option within the "Windows Update" settings to temporarily prevent the system from downloading updates. Alternatively, you can permanently turn off the automatic mechanism and opt to trigger the update process manually.
From Settings
To temporarily disable automatic updates, use these steps:
- Open Settings.
- Click on Windows Update.
- Click the "Pause for 1 week" button to turn off automatic updates.
After you complete the steps, Windows 11 will stop downloading updates automatically for at least one week, which may be enough time for a newer update to address the current issue.
From Group Policy
To turn off automatic Windows 11 updates permanently from Group Policy, use these steps:
- Open Start.
- Search for gpedit.msc and click the top result to launch the Local Group Policy Editor.
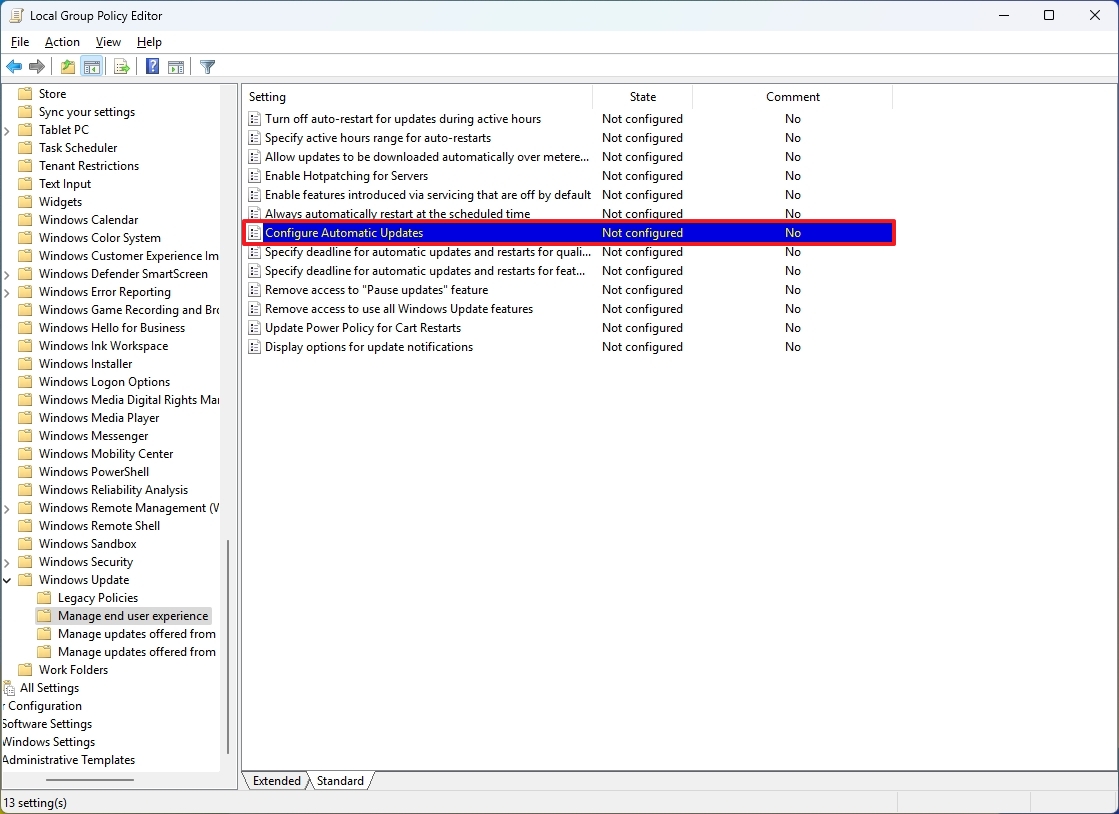
- Navigate to the following path: Computer Configuration > Administrative Templates > Windows Components > Windows Update > Manage end user experience
- Double-click the "Configure Automatic Updates" policy on the right side.
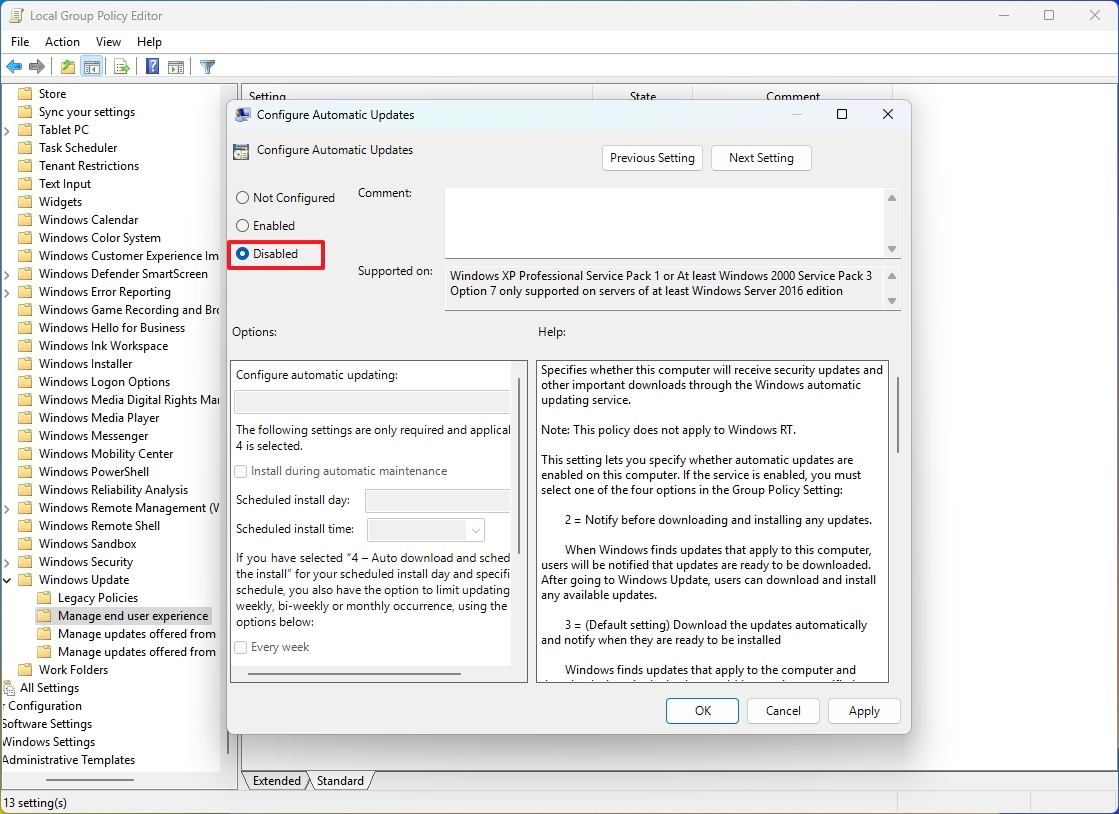
- Check the Disabled option to turn off automatic updates permanently on Windows 11.
- Click the Apply button.
- Click the OK button.
Once you complete the steps, Windows 11 will stop automatically downloading and installing updates.
At any time, you can update the system manually by opening Settings > Windows Update and clicking the "Check for updates" button.
If you want to re-enable automatic updates, follow the same instructions outlined above, but in step 5, select the "Not Configured" option.
If you want to use the Registry or don't have access to the Group Policy Editor because you're using Windows 11 Home, you can refer to my comprehensive guide on how to disable Windows Update on your computer.
5. Create full computer backup
Additionally, another way to protect your setup and data is to create proactive backups of your computer.
Although you should create backups of your device at least once a week, it's recommended to run a full backup before installing the latest update on your computer.
If you have third-party software, you can use that solution. Otherwise, you can still use the legacy System Image backup tool available on Windows 11 to create a full backup to an external storage:
- Open Start.
- Search for Control Panel and click the top result to open the app.
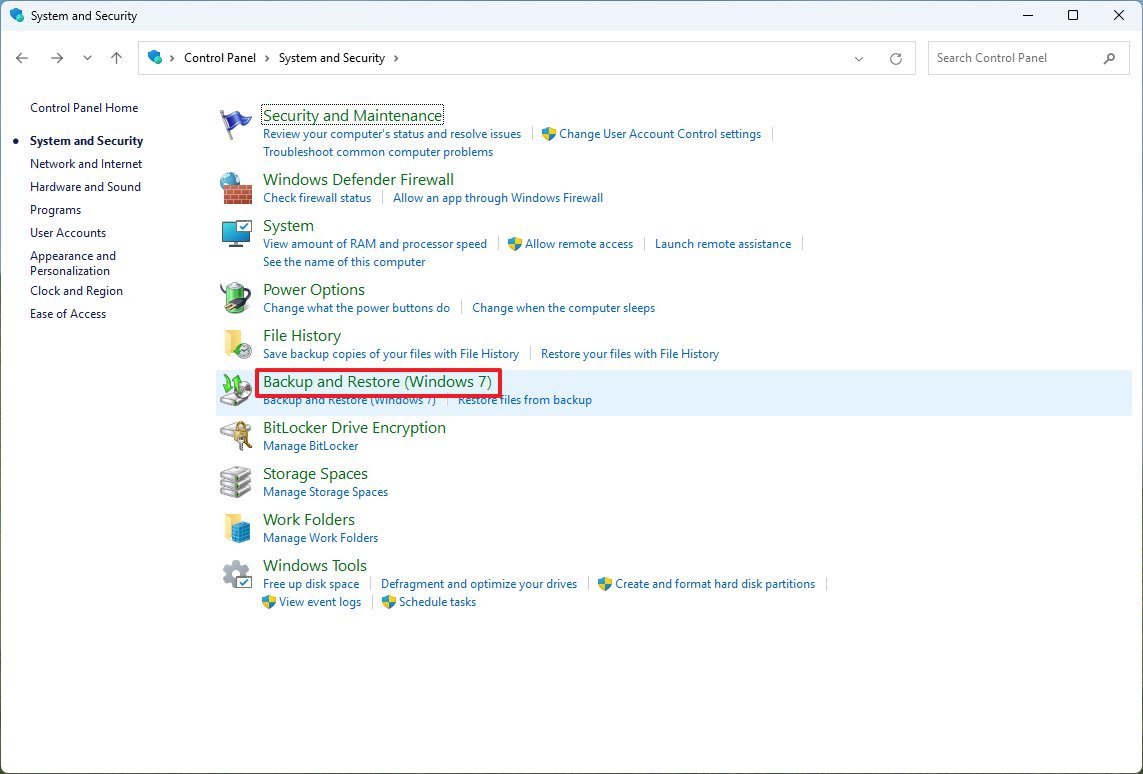
- Click on System and Security.
- Click the "Backup and Restore" setting.
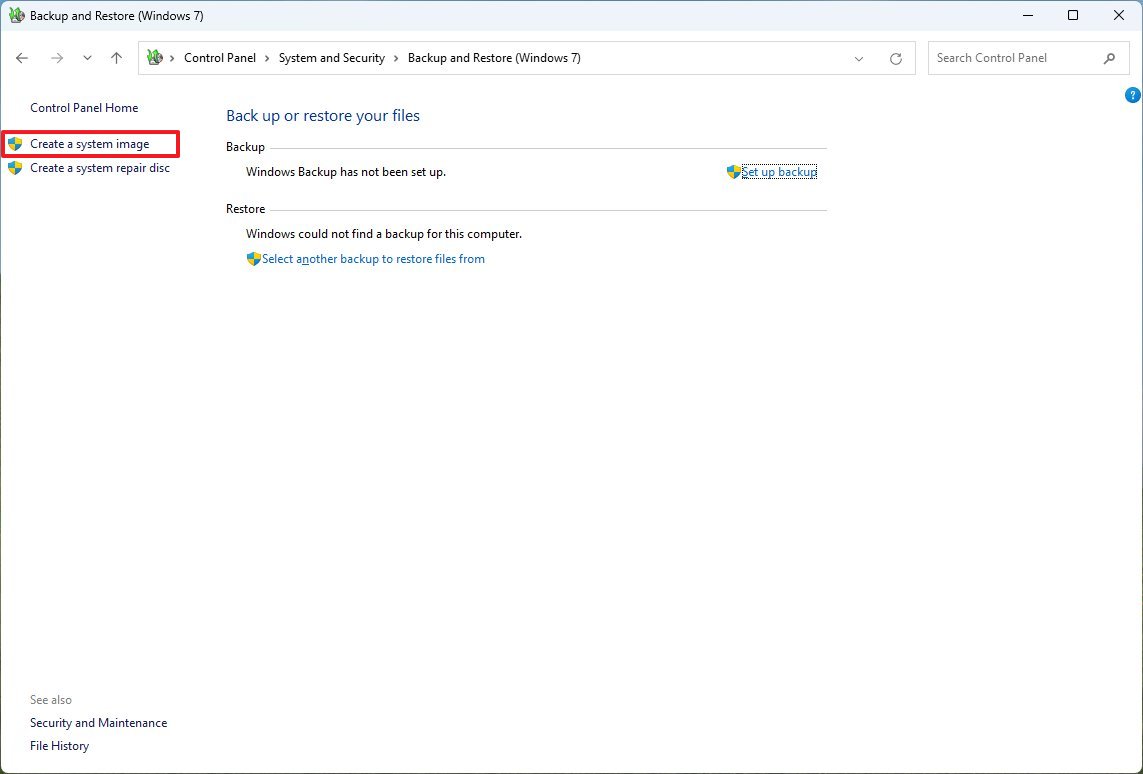
- Click the "System Image Backup" option from the bottom-left corner.
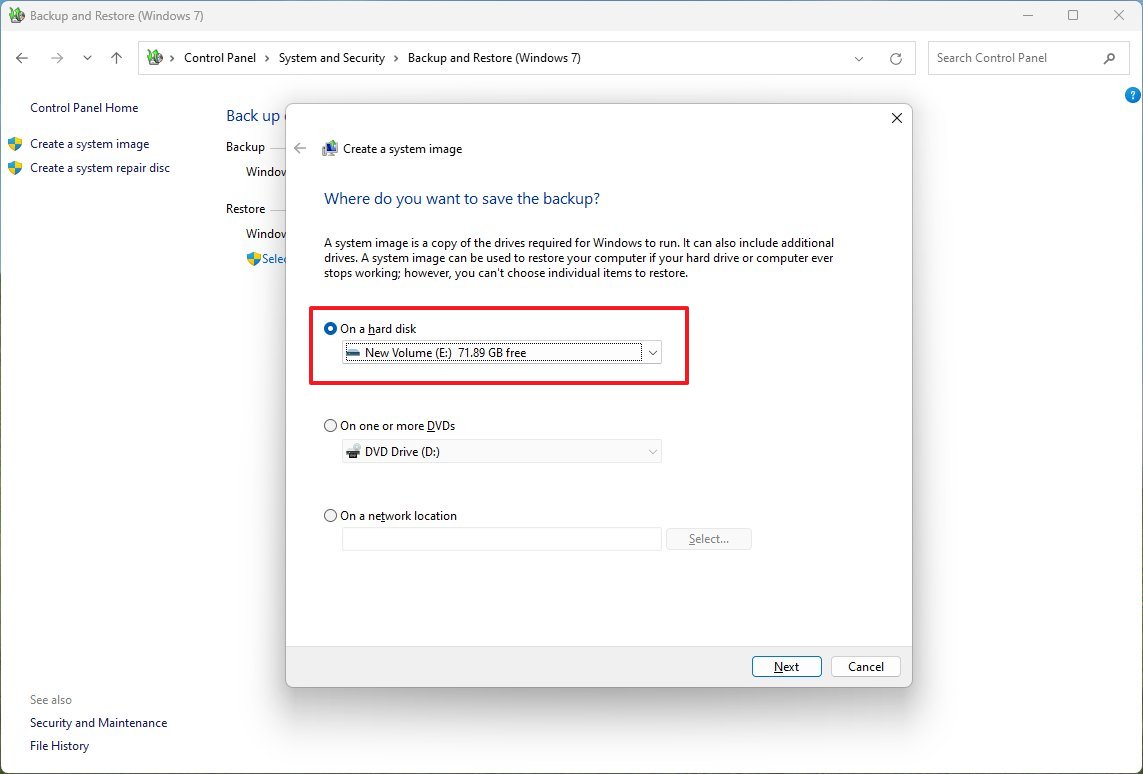
- Select the "On a hard disk" option.
- Use the "On a hard disk" drop-down menu and select the Windows 11 full backup destination.
- Click the Next button.
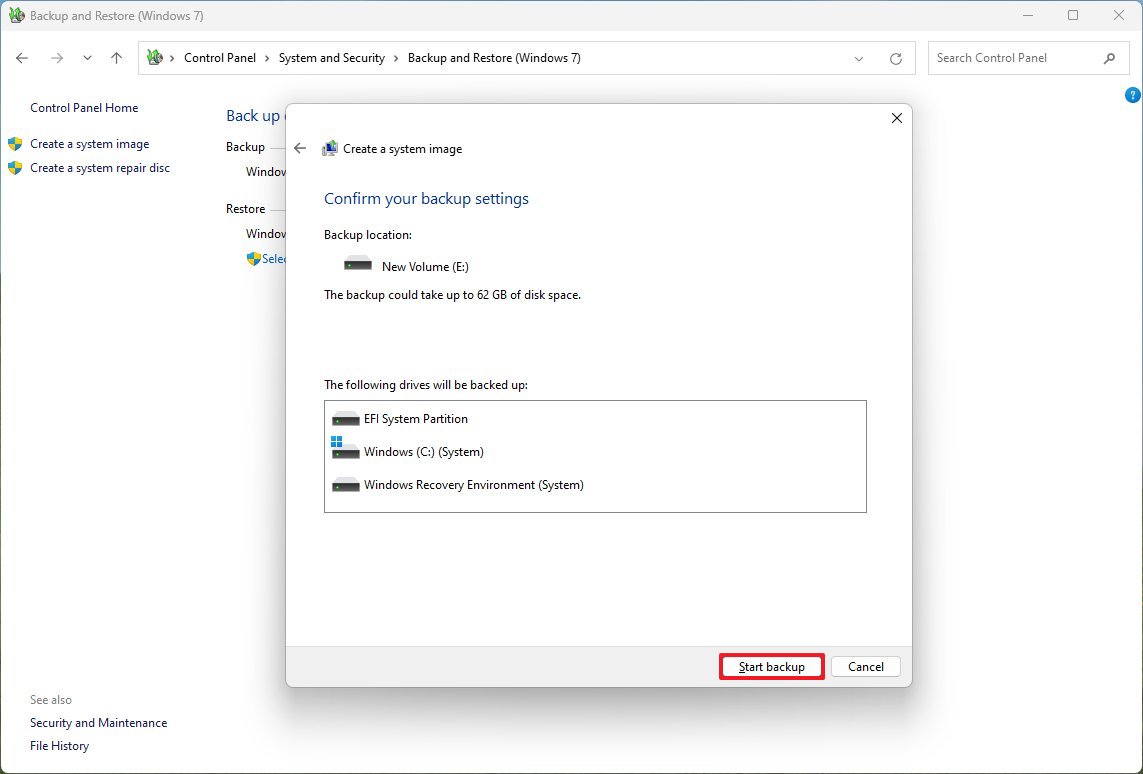
- (Optional) Select any additional drives to include in the backup.
- Click the Next button.
- Click the Start backup button.
- Click the No button.
- Quick note: You'll also receive a prompt to create a system repair disc, but you can skip it. If you need to roll back to a previous installation, you can use a USB installation media to access the recovery settings.
- Click the Close button.
After you complete the steps, you will have a way to recover your computer and files in case an update breaks the installation.
If something happens and you have to recover from a previous backup, you can refer to my previous guide on backing up and restoring Windows 11.
In addition to using the System Image tool, you can alternatively use the "Backup and Restore" feature. On Windows 11, this feature allows you to set up daily automatic backups of the operating system and your files.
Once it's configured, it'll create an initial full backup and then continue creating incremental backups according to the schedule you have selected.
Furthermore, you should also complement your recovery plan with a file backup, which can be easily done using OneDrive or another cloud service.
Of course, you can always copy your files manually to an external storage, or you may use third-party tools.
Additional tips for updating the system
Although updates are crucial to any operating system or application, unless the specific patch fixes a critical vulnerability, you should consider delaying the update for at least two weeks or until you can verify that the release is safe for your computer.
You can do this by proactively pausing the feature through the Windows Update settings page. If you decided to disable the automatic updates, don't click the "Check for updates" button until you can confirm the release doesn't include any known issues.
You can always check the Windows release health dashboard, where it lists known issues and update blocks.
Alternatively, when an update is ready, you can also postpone the restart for several days. If there's a problem with the update, postponing the reboot can give you some time to back up your data and perform other actions before it's too late.
More resources
Explore more in-depth how-to guides, troubleshooting advice, and essential tips to get the most out of Windows 11 and 10. Start browsing here:

Mauro Huculak has been a Windows How-To Expert contributor for WindowsCentral.com for nearly a decade and has over 22 years of combined experience in IT and technical writing. He holds various professional certifications from Microsoft, Cisco, VMware, and CompTIA and has been recognized as a Microsoft MVP for many years.
You must confirm your public display name before commenting
Please logout and then login again, you will then be prompted to enter your display name.
