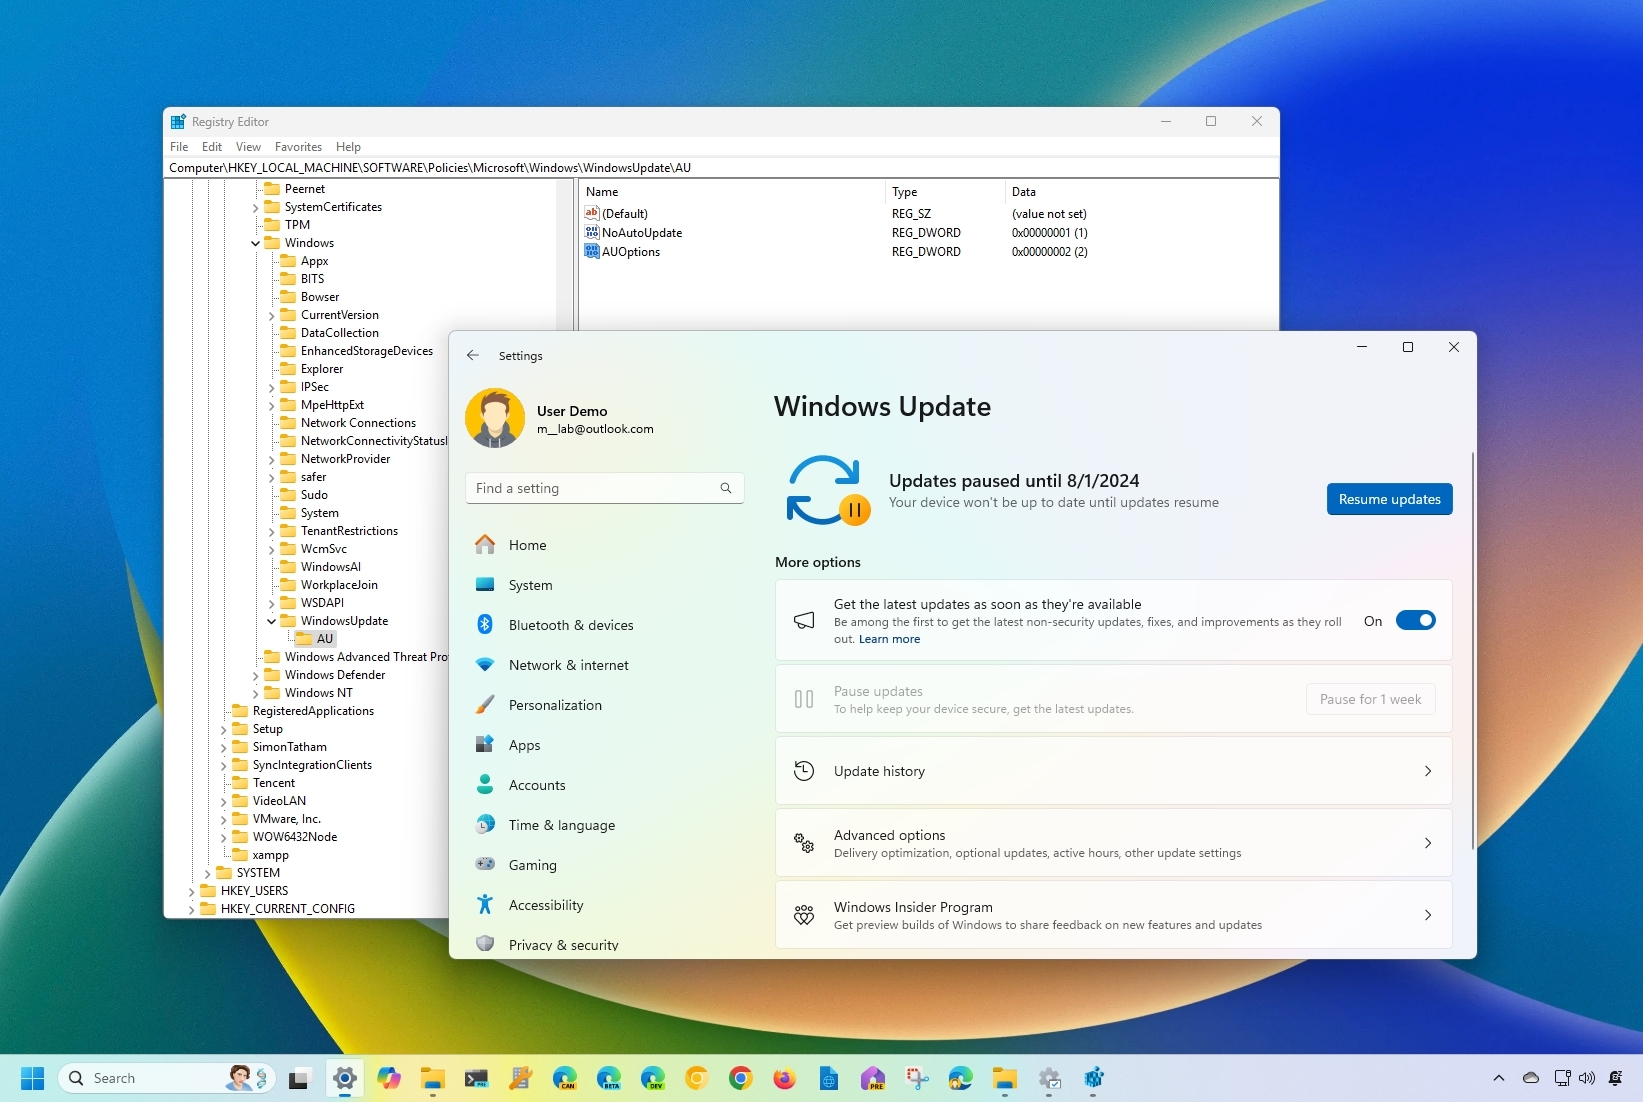
How to stop automatic updates on Windows 11
If you want to disable Windows 11 automatic updates, here are three ways to do this.
All the latest news, reviews, and guides for Windows and Xbox diehards.
You are now subscribed
Your newsletter sign-up was successful
On Windows 11, the system receives maintenance and security updates automatically every month and as required to patch vulnerabilities, fix bugs, improve the overall performance, and (occasionally) add new features. Although this approach keeps devices updated with the latest bits, it's one of the most frustrating features since the quality control of updates has been questionable.
This is not only because they still require a restart to finish applying the changes that can disrupt your workflow but also because the number of updates with bugs negatively affecting the experience has increased significantly in recent years. In the most recent case, I can point out the buggy update that causes devices using encryption to boot into the BitLocker recovery screen, which you can't bypass if you don't provide the recovery key.
While I always recommend keeping up with updates to anyone who asks me, if you find more problems than improvements or have a good reason, Windows 11 includes a few options to disable automatic updates using Settings, Group Policy, and Registry.
In this how-to guide, I will explain how to prevent Windows Update from automatically downloading updates onto your laptop.
How to disable automatic updates from Settings
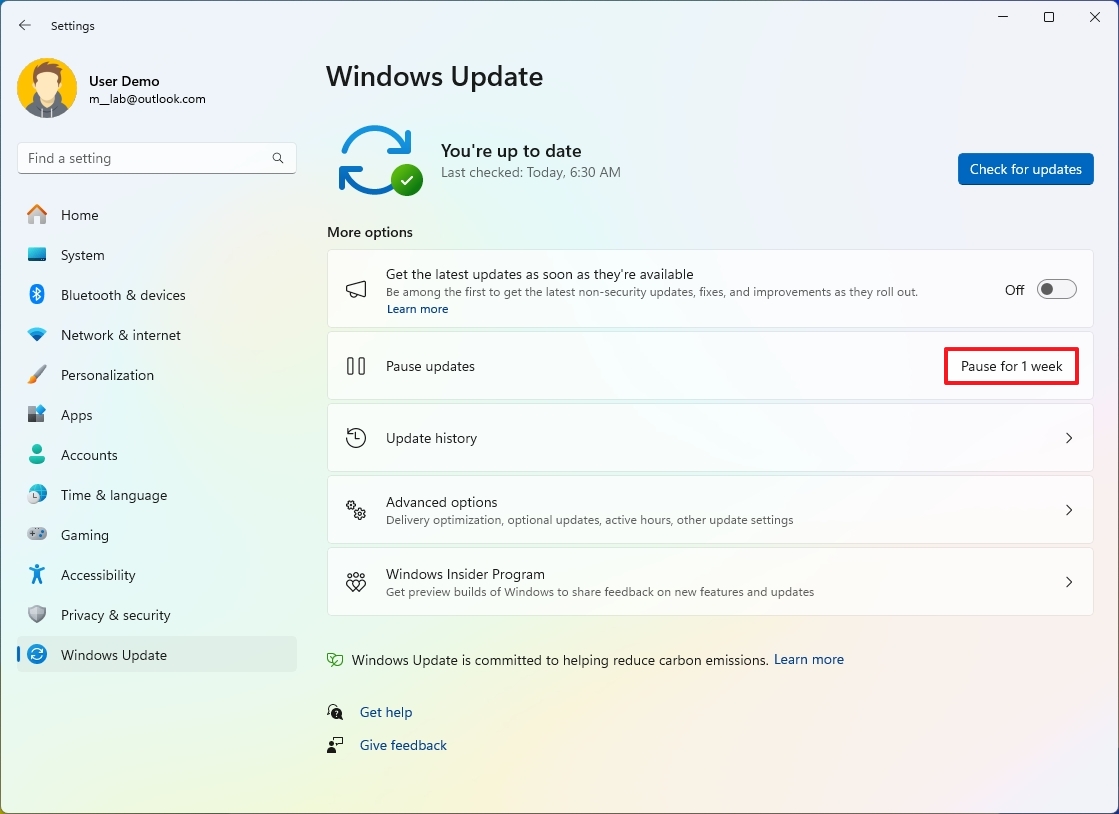
When you try to avoid a specific update, you don't have to disable the "Windows Update" feature permanently. You can simply use the option in the Settings app to pause updates for a week. This option is available for Windows 11 Home and Windows 11 Pro.
To disable updates for Windows 11 temporarily, use these steps:
- Open Settings.
- Click on Windows Update.
- (Optional) Turn off the "Get the latest updates as soon as they're available" toggle switch to prevent preview updates from installing on your computer.
- You can disable automatic updates temporarily by clicking the "Pause for 1 week" button.
Once you complete the steps, the system will no longer download and install updates automatically during the time you specified in the settings.
All the latest news, reviews, and guides for Windows and Xbox diehards.
If you want to resume updates, you can use the same instructions shown above, but on step 4, click the "Resume updates" button.
How to disable automatic updates from Group Policy
On Windows 11 Pro and higher, you can use the Local Group Policy Editor to permanently disable automatic updates or change the "Windows Update" settings to decide when your computer gets serviced.
Disable updates completely
To disable automatic Windows 11 updates permanently from Group Policy, use these steps:
- Open Start.
- Search for gpedit.msc and click the top result to launch the Local Group Policy Editor.
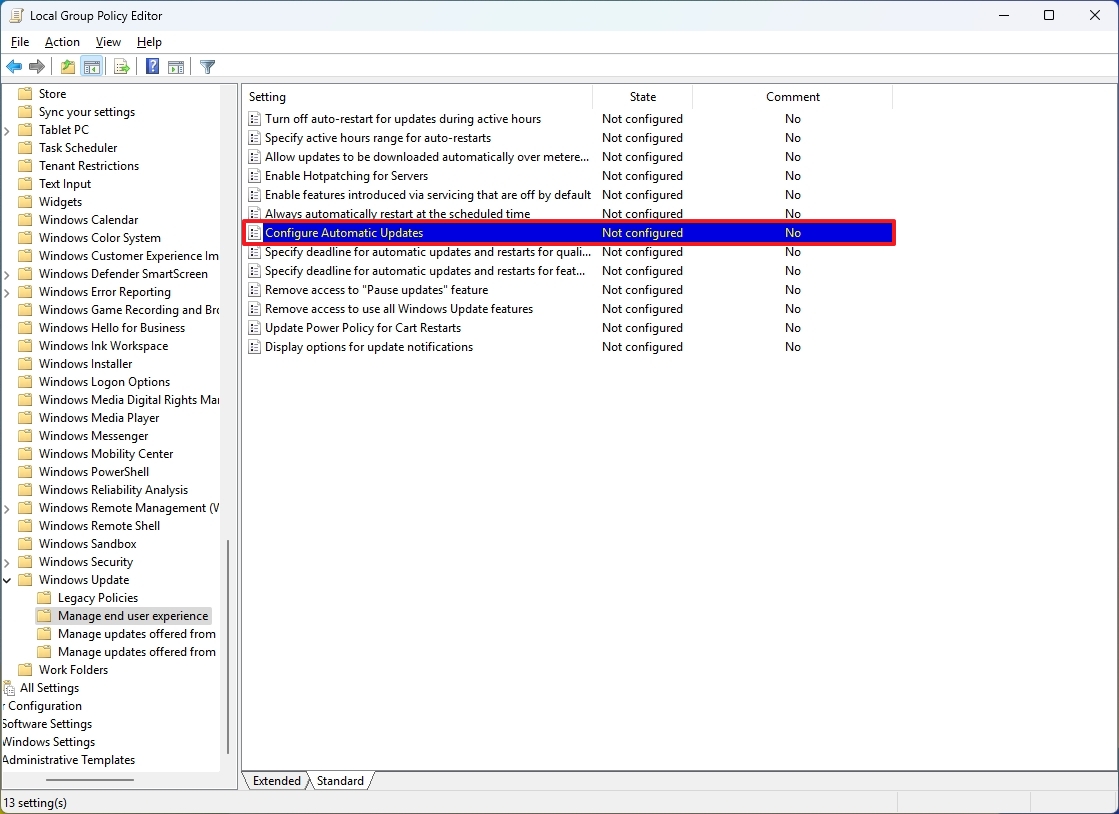
- Navigate to the following path: Computer Configuration > Administrative Templates > Windows Components > Windows Update > Manage end user experience
- Double-click the "Configure Automatic Updates" policy on the right side.
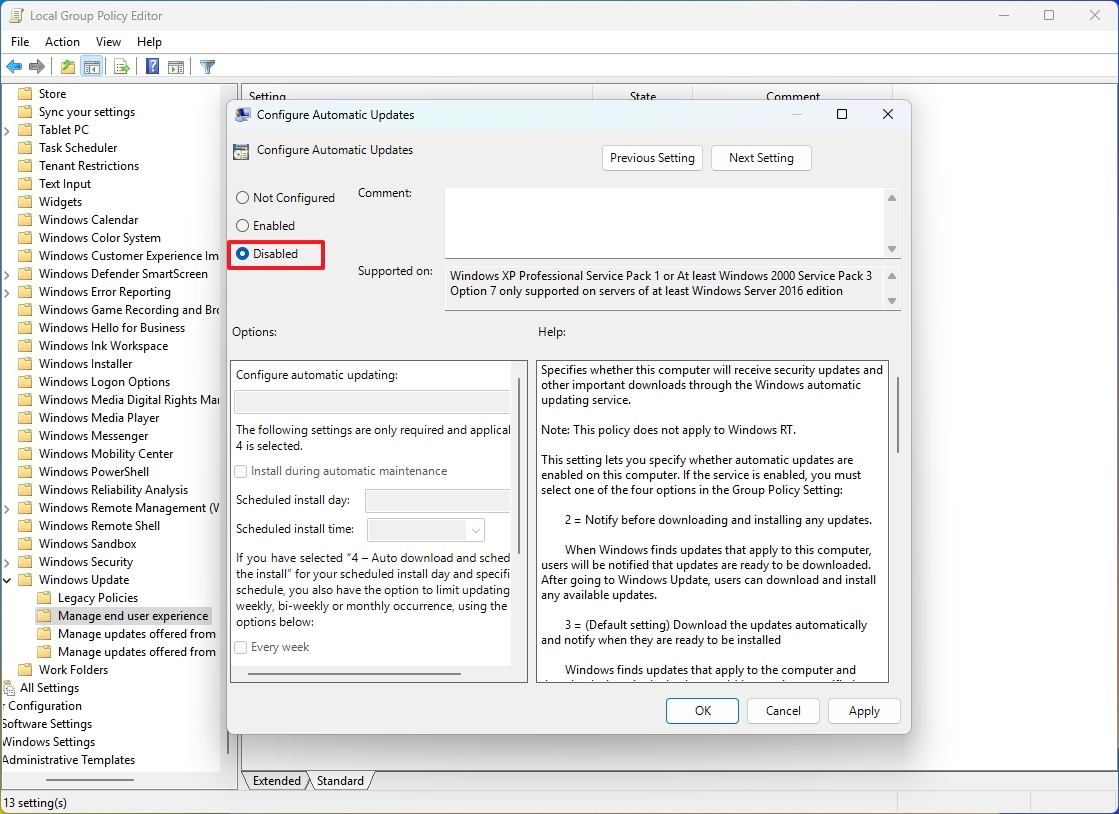
- Check the Disabled option to turn off automatic updates permanently on Windows 11.
- Click the Apply button.
- Click the OK button.
After you complete the steps, Windows 11 will stop downloading and installing updates automatically.
If you need to update the system manually, open Settings > Windows Update and click the "Check for updates" button.
If you want to re-enable automatic updates, follow the same instructions outlined above, but in step 5, select the "Not Configured" option.
Change updates settings
The Windows Update policy also lets you decide how to disable automatic updates on Windows 11.
To manage automatic Windows 11 updates download with Group Policy, use these steps:
- Open Start.
- Search for gpedit.msc and select the top result to launch the experience.
- Navigate to the following path: Computer Configuration > Administrative Templates > Windows Components > Windows Update > Manage end user experience
- Double-click the "Configure Automatic Updates" policy on the right side.
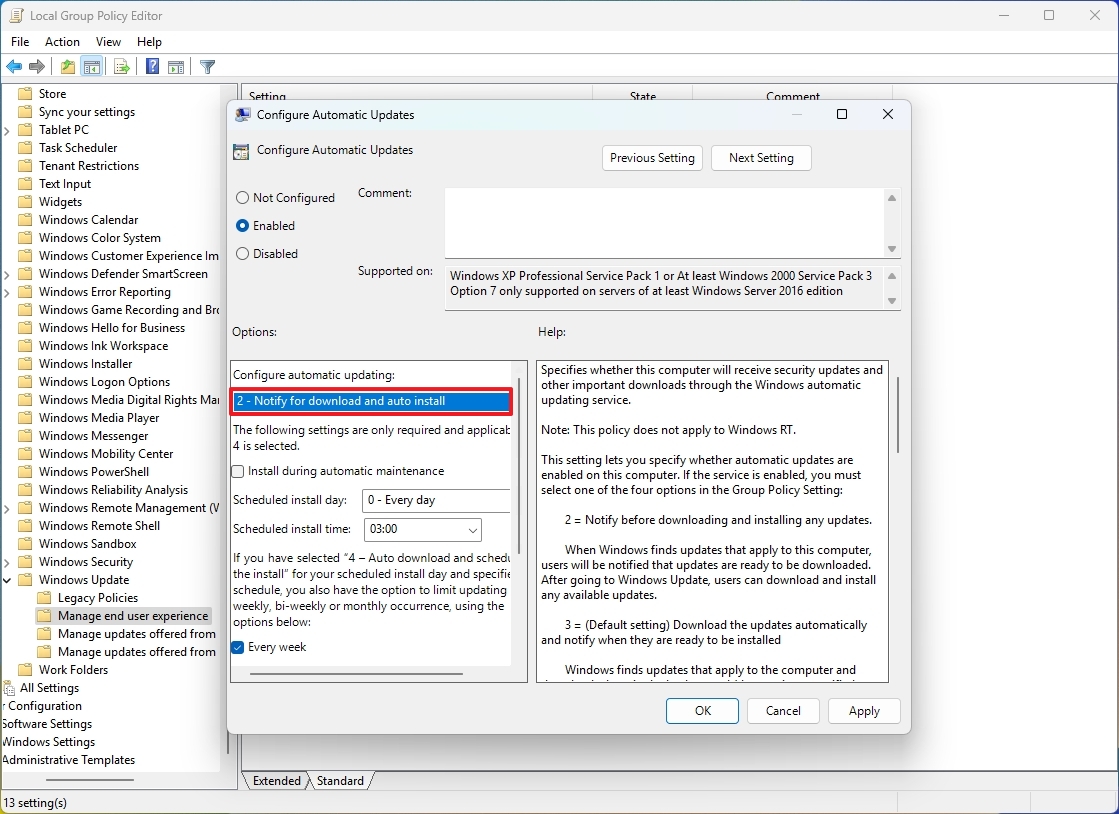
- Check the Enabled option to turn on the policy.
- Under the "Options" section, select the "2 — Notify for download and auto install" option.
- Quick note: Since there's no specific option to disable the feature, the closest alternative to disable system updates is the "2 — Notify for download and auto install" option. If you choose this option, updates won't download automatically. Instead, you will see an "Install now" button to download and install the patches manually on the "Windows Update" settings page.
- Click the Apply button.
- Click the OK button.
Once you complete the steps, automatic updates will no longer occur on Windows 11. However, when new updates become available, you can choose to install them manually from the "Windows Update" settings page.
How to disable automatic updates from Registry
You can also disable automatic updates using the Registry in at least two different ways, like when using the Local Group Policy Editor.
Warning: This is a friendly reminder that editing the Registry is risky and can cause irreversible damage to your installation if you don't do it correctly. Before proceeding, it's recommended that you make a full backup of your PC.
Disable updates completely
To disable Windows Updates permanently through the Registry Editor, use these steps:
- Open Start.
- Search for regedit and click the top result to launch the Registry Editor.
- Navigate to the following path: HKEY_LOCAL_MACHINE\SOFTWARE\Policies\Microsoft\Windows
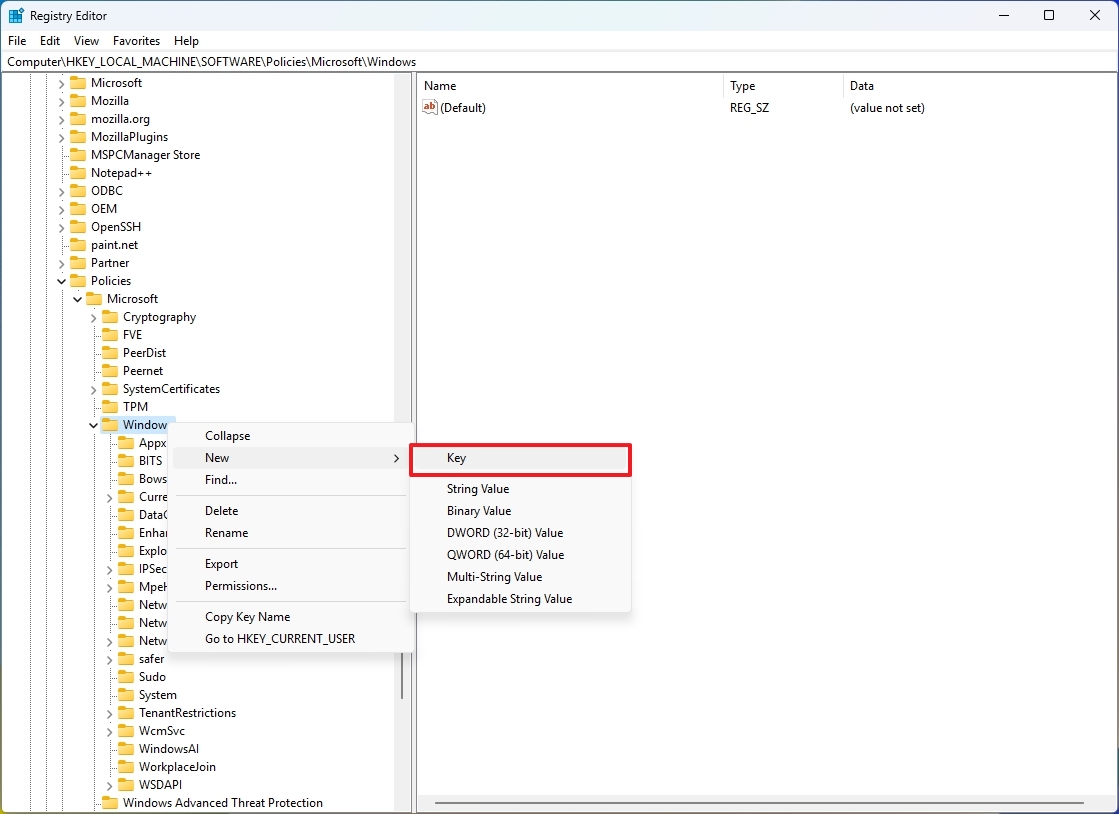
- Right-click the Windows (folder) key, select the New submenu, and choose the Key option.
- Name the new key WindowsUpdate and press Enter.
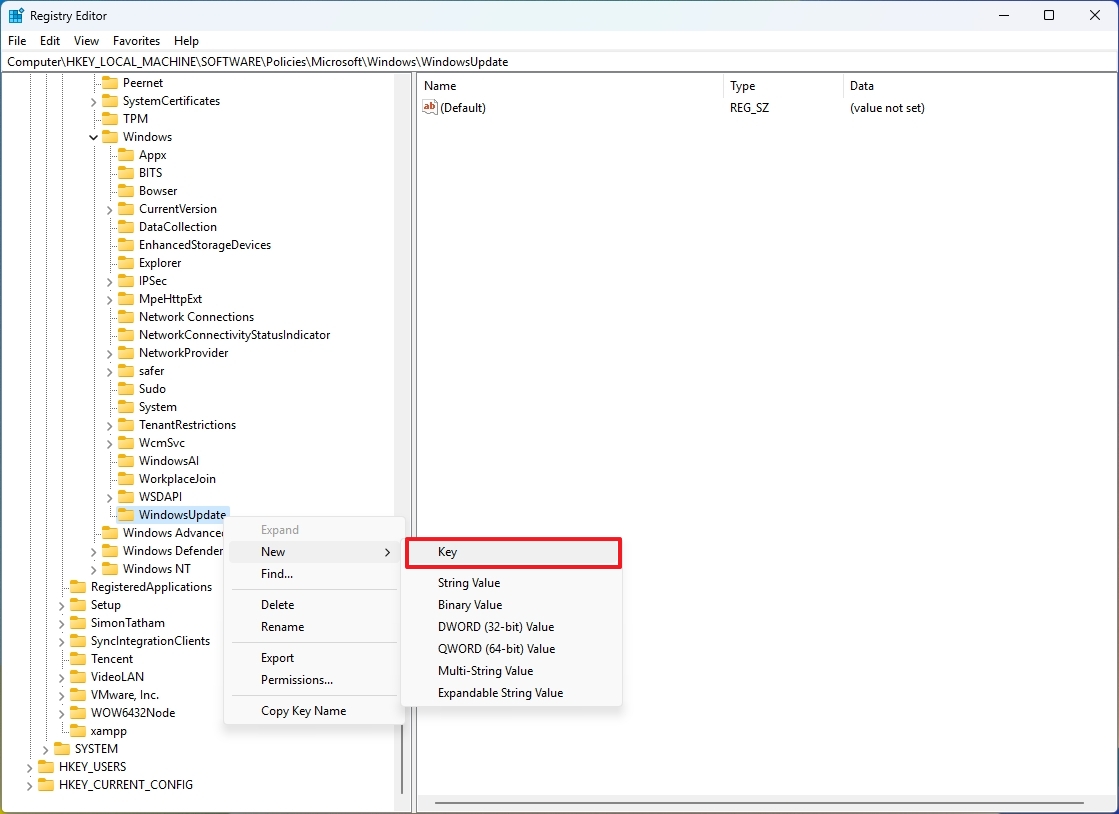
- Right-click the newly created key, select the New submenu, and choose the Key option.
- Name the new key AU and press Enter.
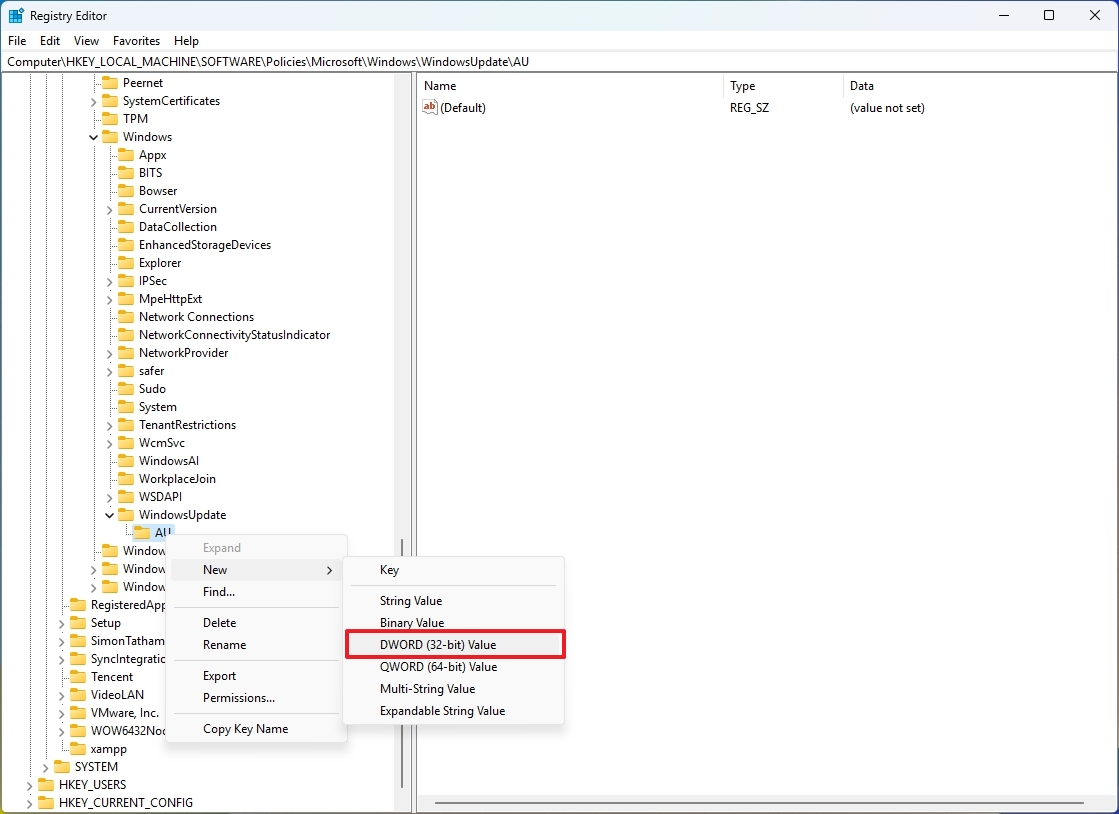
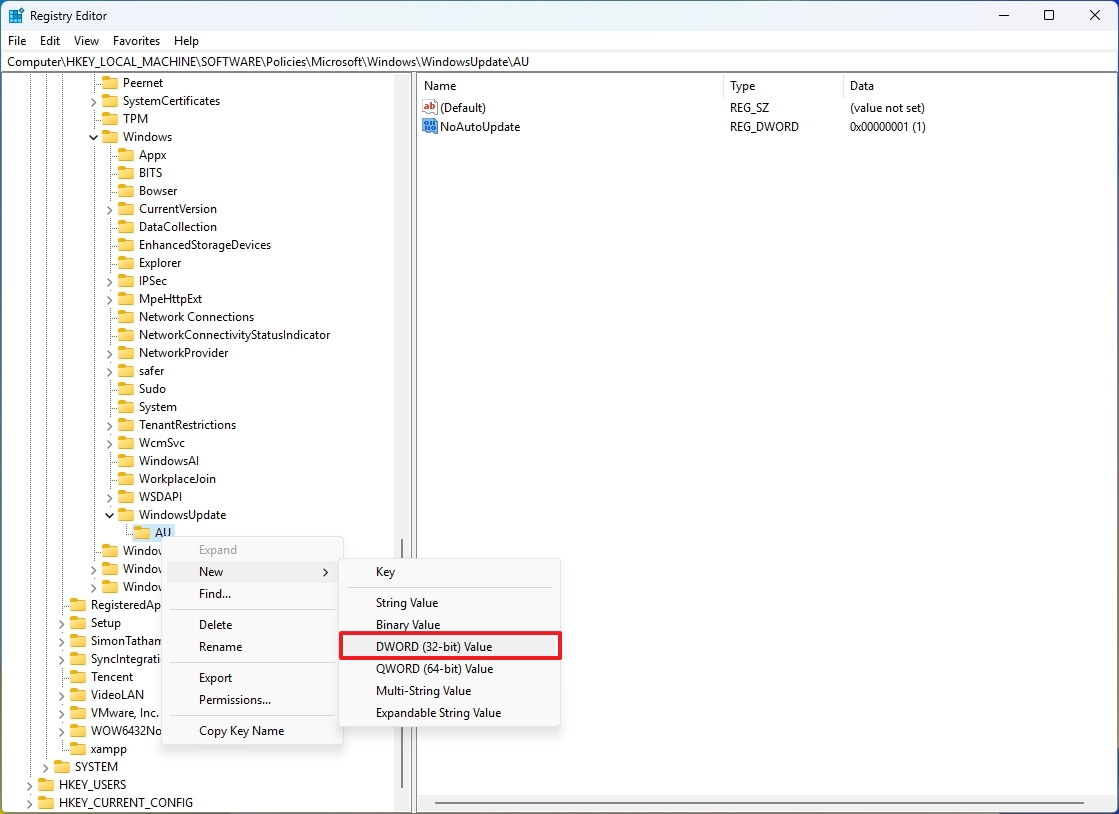
- Right-click the AU key, select the New submenu, and choose the "DWORD (32-bit) Value" option.
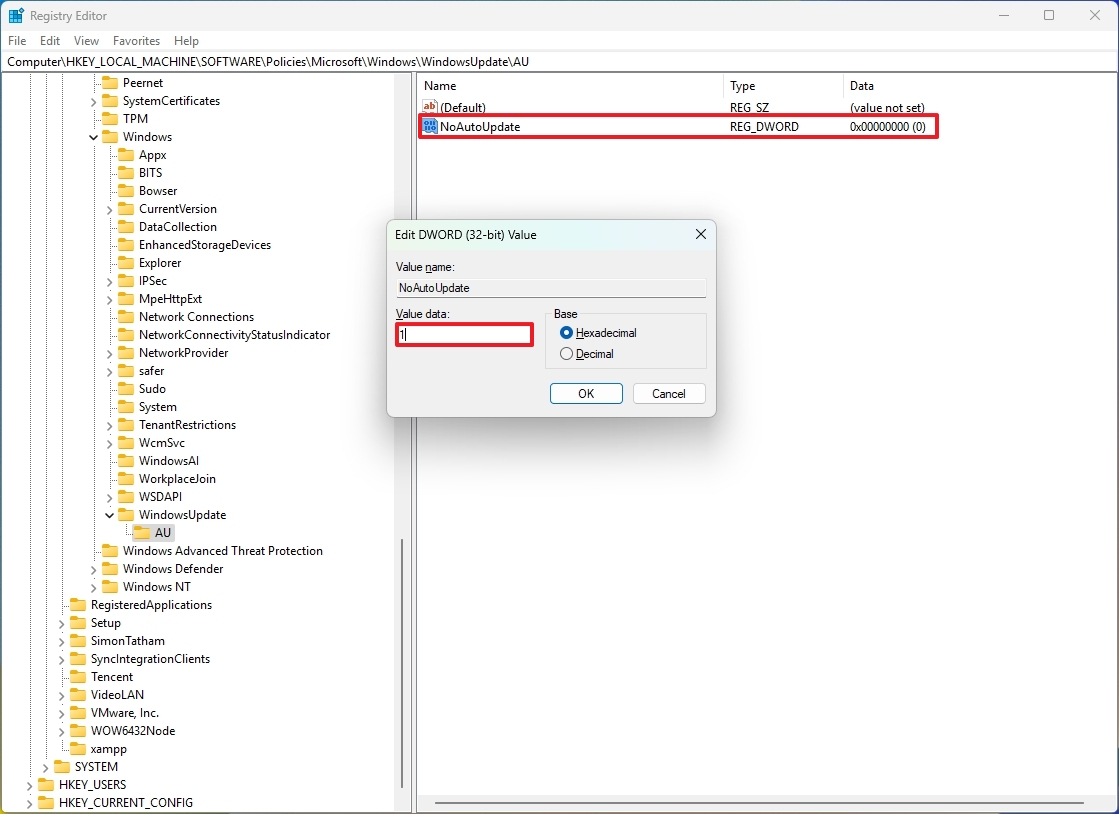
- Name the new key NoAutoUpdate and press Enter.
- Double-click the newly created key and change its value from 0 to 1.
- Click the OK button.
- Restart the device.
After you complete the steps, the automatic update feature on Windows 11 will be disabled permanently. However, you can still install updates from the "Windows Update" settings page.
If you want to undo the changes, you can use the same instructions, but on step 4, right-click the WindowsUpdate key, select the "Delete" option, and restart the device.
Change updates settings
On Windows 11, the Registry also allows you to configure the system settings to choose how updates are installed instead of disabling the feature altogether.
To customize Windows 11 update settings with the Registry, use these steps:
- Open Start.
- Search for regedit and click the top result to open the Registry Editor.
- Navigate to the following path: HKEY_LOCAL_MACHINE\SOFTWARE\Policies\Microsoft\Windows
- Right-click the Windows (folder) key, select the New submenu, and choose the Key option.
- Name the new key WindowsUpdate and press Enter.
- Right-click the newly created key, select the New submenu, and choose the Key option.
- Name the new key AU and press Enter.
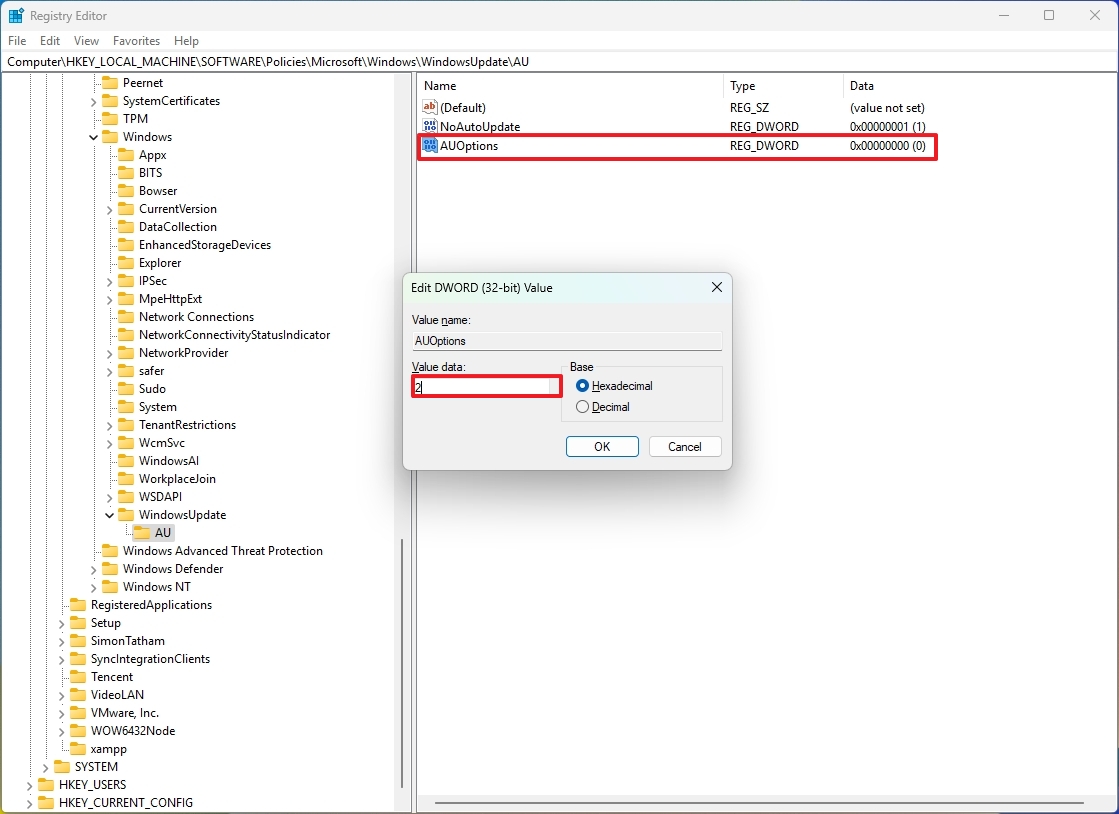
- Right-click the AU key, select the New submenu, and select the "DWORD (32-bit) Value" option.
- Name the new key AUOptions and press Enter.
- Double-click the newly created key and change the value from 0 to 2.
These options work exactly like the Group Policy settings, and option "2" is the closest to permanently enabling the disabling of updates on Windows 11.
- 2 — Notify for download and auto install.
- 3 — Auto download and notify for install.
- 4 — Auto download and schedule the install.
- 5 — Allow local admin to choose settings.
- 7 — Auto Download, Notify to install, Notify to Restart.
- Click the OK button.
- Restart the device.
Once you complete the steps, cumulative updates will no longer download and install automatically. However, when a new update becomes available, you will find the option to install it manually from the Windows Update settings.
You can always use the instructions outlined above to undo the settings, but on step 4, right-click the WindowsUpdate key, select the "Delete" option, and reboot the computer.
Although updates are essential to patch security vulnerabilities, fix problems, and enhance the experience, sometimes, you may want to disable the feature for various reasons. For instance, you may want to prevent problematic updates from causing more harm than good, or you may be using specific equipment or programs that may not benefit from a system update. Or you may want complete control over updates.
More resources
For more helpful articles, coverage, and answers to common questions about Windows 10 and Windows 11, visit the following resources:
- Windows 11 on Windows Central — All you need to know
- Windows 10 on Windows Central — All you need to know

Mauro Huculak has been a Windows How-To Expert contributor for WindowsCentral.com for nearly a decade and has over 22 years of combined experience in IT and technical writing. He holds various professional certifications from Microsoft, Cisco, VMware, and CompTIA and has been recognized as a Microsoft MVP for many years.
