How to manually configure a VPN on Windows 11 and Windows 10
If you need to connect to a VPN service manually, I'll show you how on Windows 11.
All the latest news, reviews, and guides for Windows and Xbox diehards.
You are now subscribed
Your newsletter sign-up was successful
On Windows 11, the best VPN (Virtual Private Network) services usually offer a dedicated app that makes it easy to connect to their secure servers. But if the app isn’t working properly (or you simply prefer not to install additional software), you can still set up the VPN manually.
Regardless of the reason, Windows 11 includes built-in tools that let you configure and manage VPN connections directly through the Settings app. This allows you to connect to almost any VPN service, helping you enhance your online privacy, secure your connection on public networks, and even bypass regional restrictions to access content from other locations.
In this how-to guide, I'll outline the steps to set up, connect, disconnect, and delete a VPN connection on Windows 11.
These instructions have been updated to ensure accuracy and reflect changes to the process in the operating system.
What's a VPN?
VPN stands for "Virtual Private Network" and refers to a technology that creates a secure connection between a device and a specific network, allowing users to access files and resources remotely. Typically, organizations set up a VPN server to enable employees to connect through a VPN client and access resources as if they were physically in the office.
In addition, there are third-party VPN services that function similarly. However, instead of connecting to a corporate network, these services provide an encrypted connection to their own servers, strategically located around the world. This setup allows users to access the internet while hiding their public IP address, offering a more private and secure browsing experience. Beyond the extra layer of privacy and security, VPN services are also useful for bypassing geographic restrictions, enabling access to censored content and region-locked services (such as the U.S. version of Netflix) from anywhere in the world.
How to set up a VPN connection on Windows 11
To set up a Windows 11 VPN connection, use these steps:
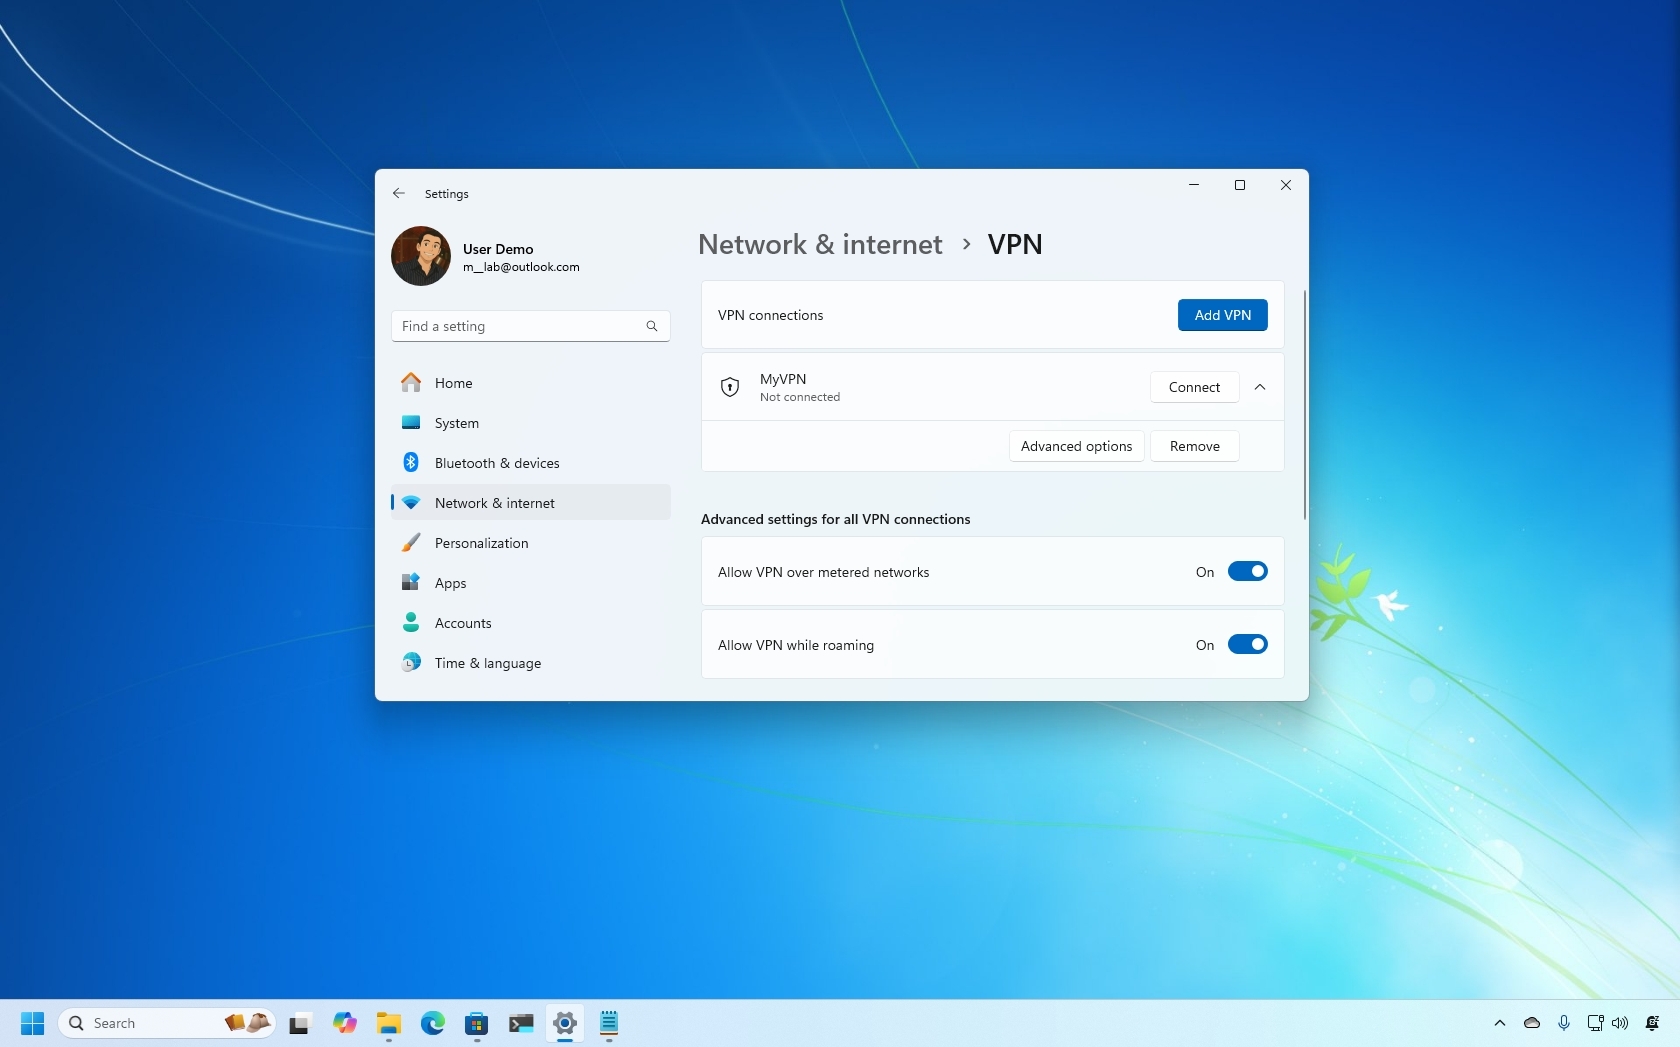
- Open Settings.
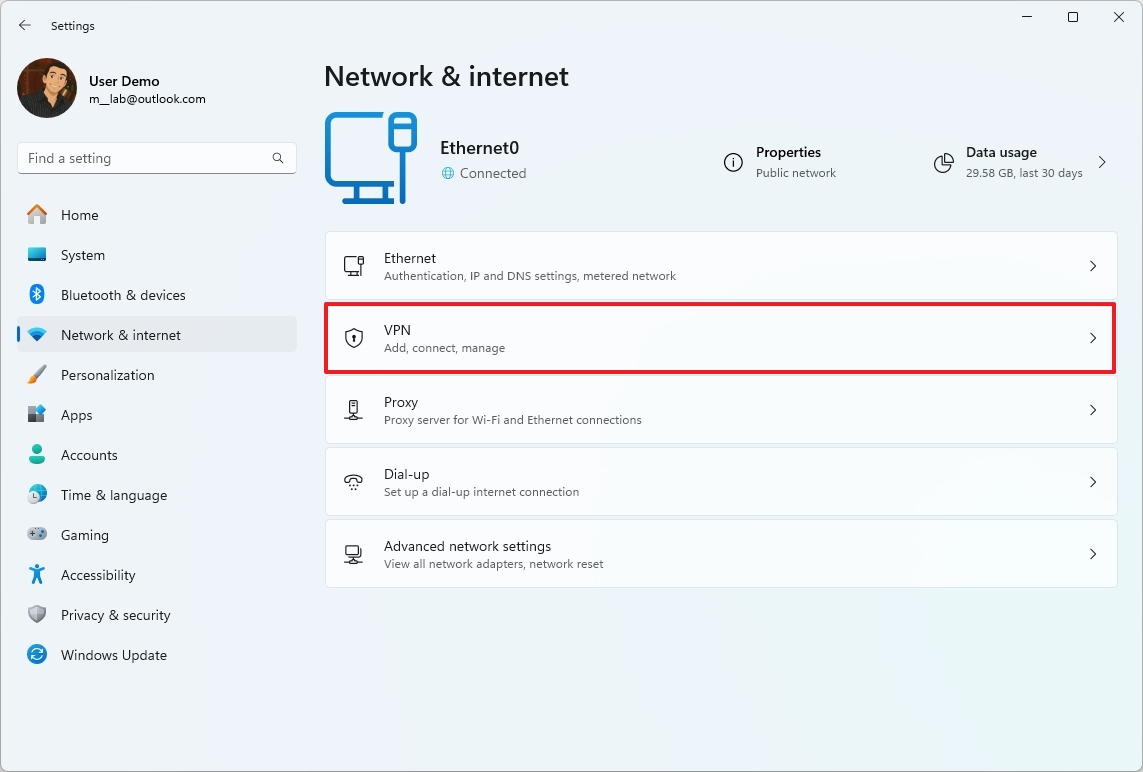
- Click on Network & internet.
- Click the VPN page from the right side.
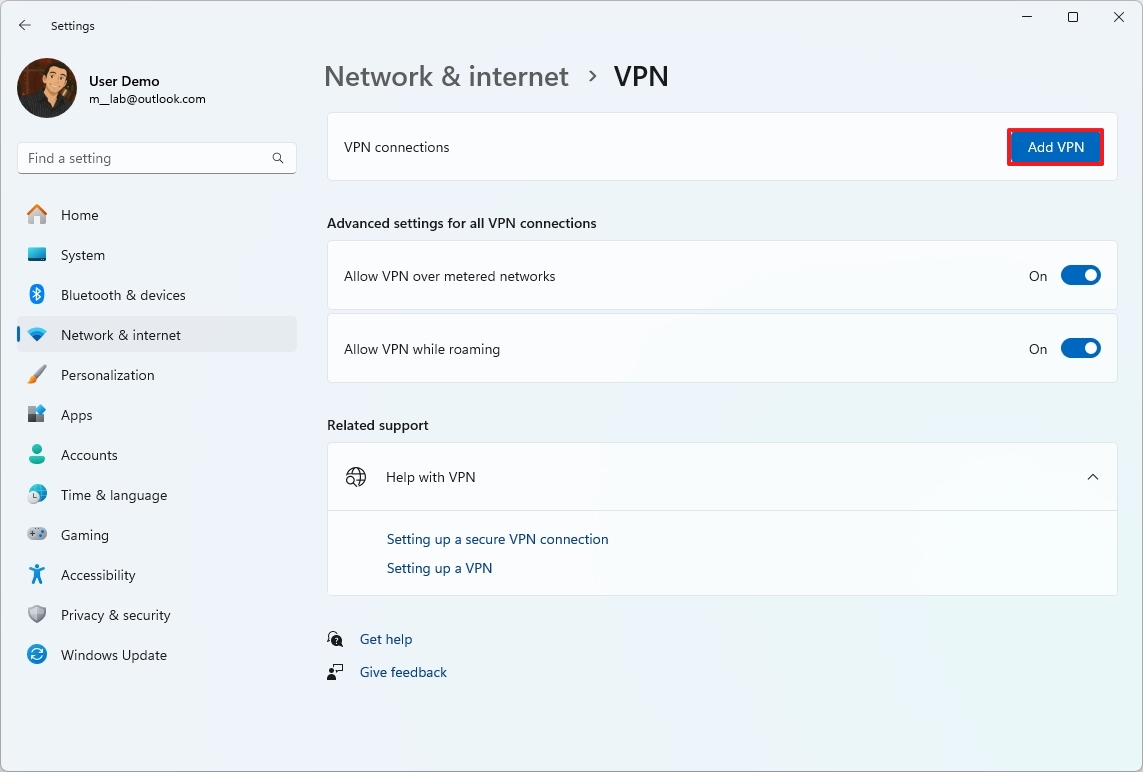
- Click the Add VPN button in the "VPN connections" setting
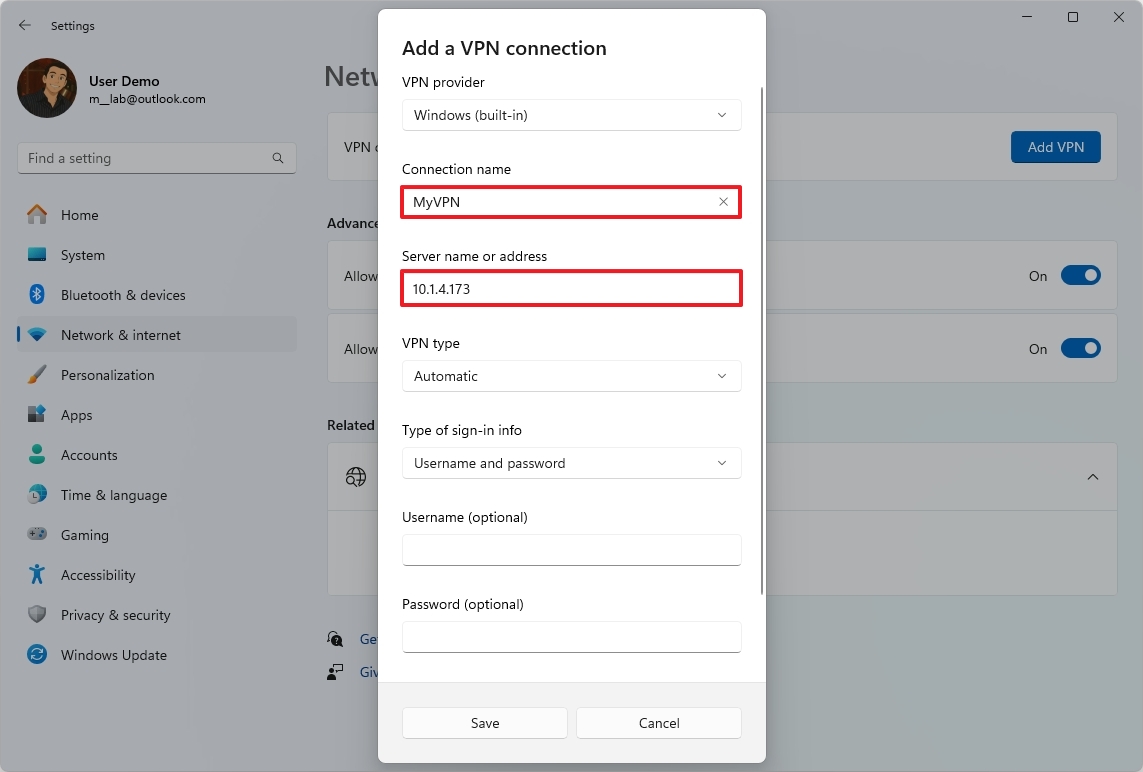
- Select the Windows (built-in) option in the "VPN provider" setting.
- Enter a name to identify the connection (for example, you can use a service name like IPVanish, Private Internet Access, etc) in the "Connection name" setting.
- Enter the address of the VPN server (such as vpnserver.com or 122.122.122.122) in the "Server name or address" setting.
- Select the Automatic option or the protocol required to connect to the particular VPN server in the "VPN type" setting.
- Select the authentication method using the "Type of sign-in info" drop-down menu.
- Quick note: This option will depend on the VPN provider settings.
- Confirm the username and password if you select the "User name and password" option.
- Click the Save button.
Once you complete the steps, connect to the VPN service from the Settings app or Taskbar.
How to connect a VPN connection on Windows 11
To connect to a VPN server, use these steps:
- Open Settings.
- Click on Network & internet.
- Click the VPN page from the right side.
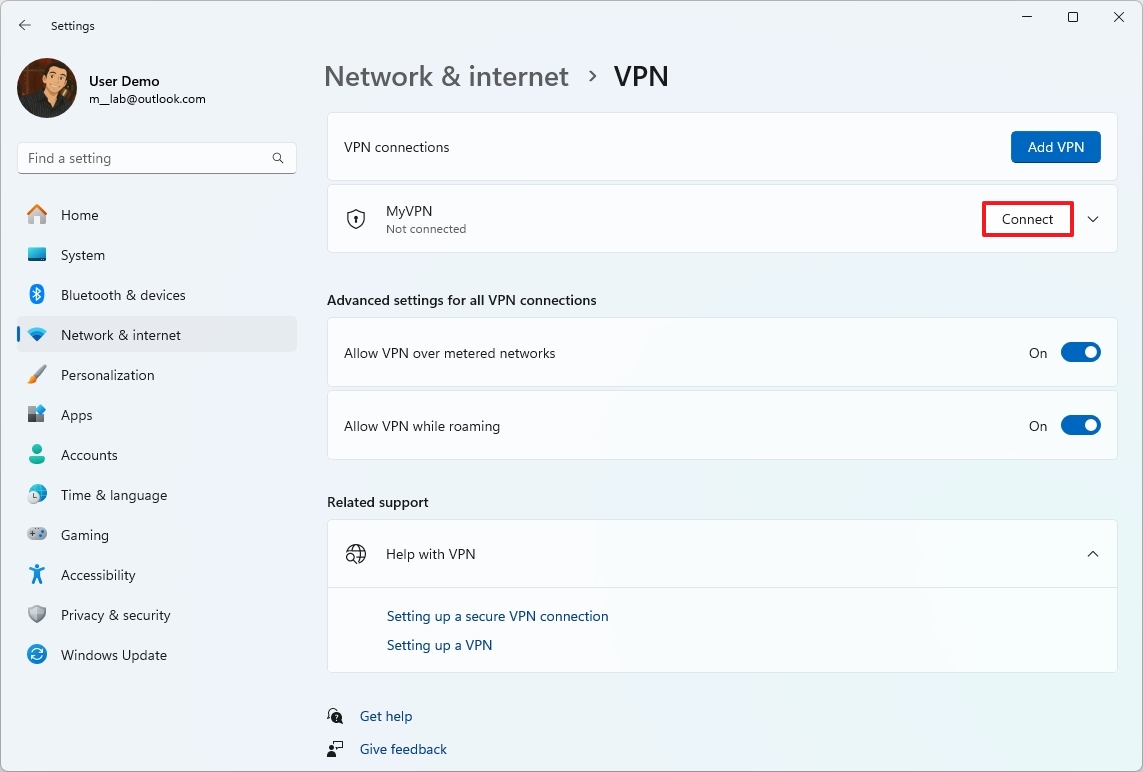
- Click the Connect button for the connection
After you complete the steps, the computer will connect to the VPN server.
Connect from Taskbar
To make a VPN connection from the Taskbar, use these steps:
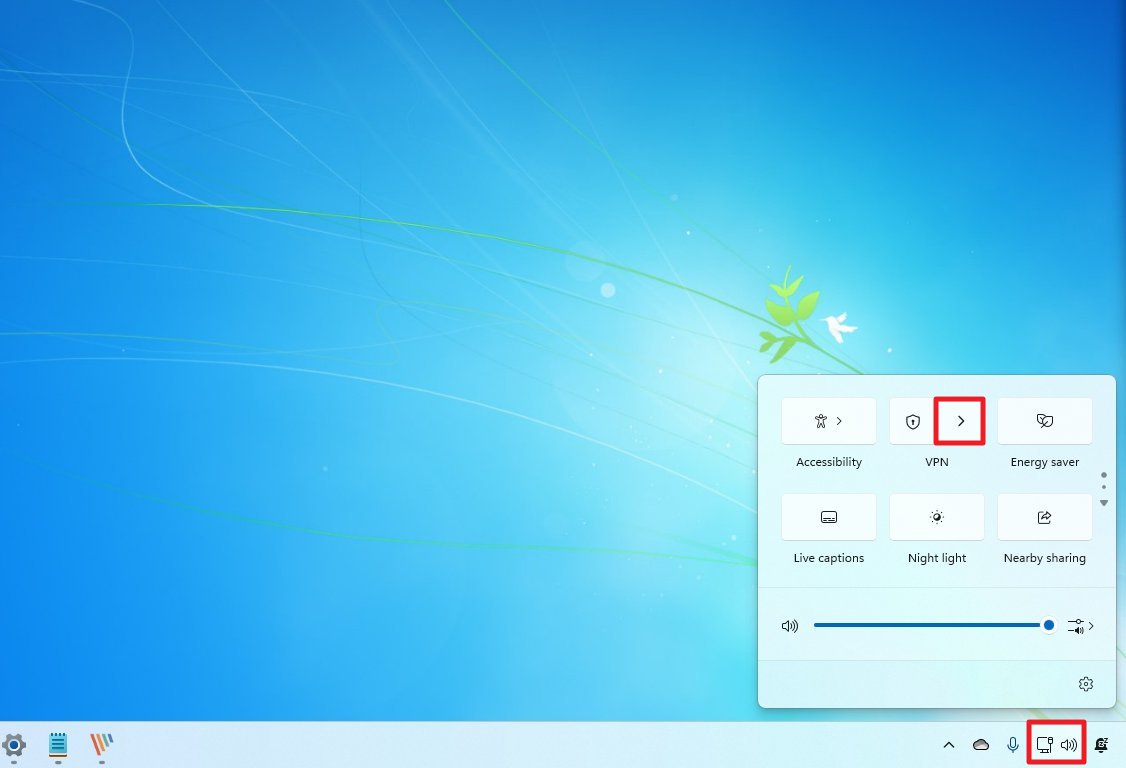
- Click the network icon in the Taskbar
- Click the VPN button.
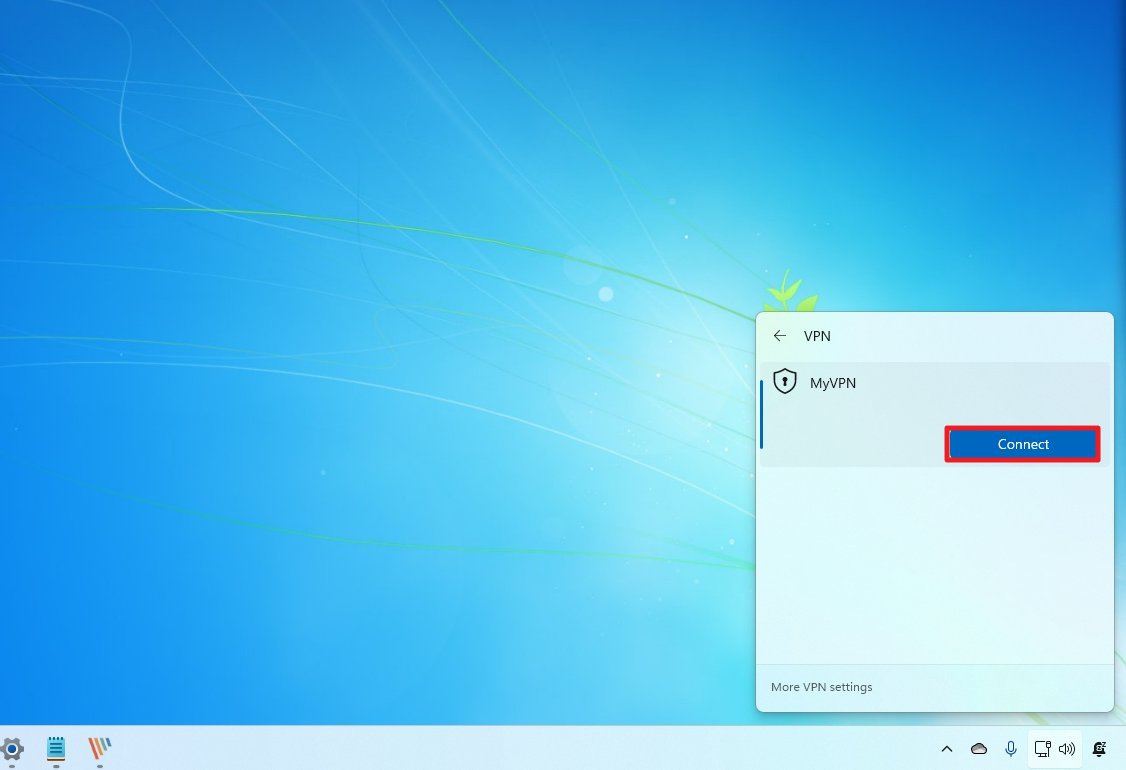
- Select the VPN connection.
- Click the Connect button.
Once you complete the steps, like using the Settings app, the device will authenticate and connect to the remote network.
How to disconnect a VPN connection on Windows 11
To disconnect a VPN connection, use these steps:
- Open Settings.
- Click on Network & internet.
- Click the VPN page from the right side.
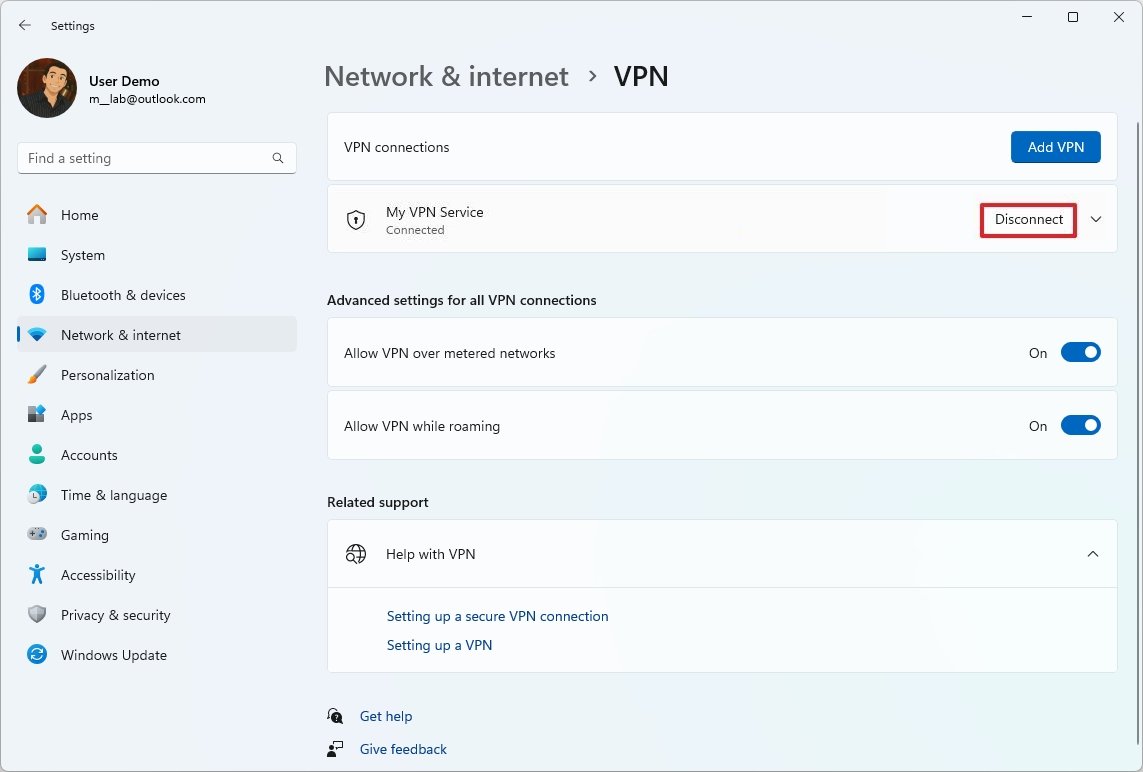
- Click the Disconnect button.
- Click the Confirm button.
After you complete the steps, the computer will disconnect from the VPN server.
Disconnect from Taskbar
To disconnect a VPN connection from the Taskbar, use these steps:
- Click the network icon in the Taskbar
- Click the VPN button.
- Select the VPN connection.
- Click the Disconnect button.
Once you complete the steps, the laptop or desktop will terminate its connection to the remote virtual private network.
How to remove a VPN connection on Windows 11
To remove and delete a VPN connection, use these steps:
- Open Settings.
- Click on Network & internet.
- Click the VPN page from the right side.
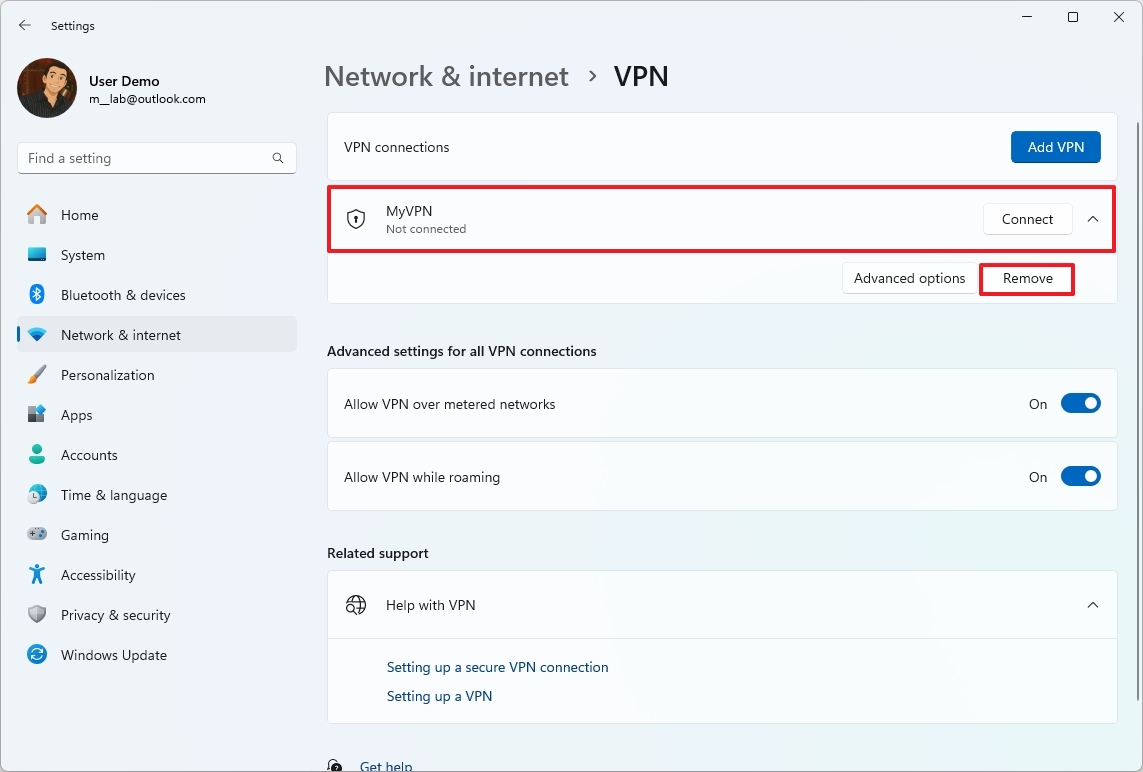
- Click the connection to access its settings.
- Click the Disconnect button (if applicable).
- Click the Remove button.
After you complete the steps, the VPN connection will be removed from the computer.
Our top VPN and software picks
If you want to complete the configuration steps, you will need a reliable VPN service and Windows 11 or 10. We lean toward ExpressVPN thanks to a great price, tons of features, and proven security, but there are more options listed below.
Premier VPN service
With robust encryption and plenty of connection protocols, including OpenVPN, this is one of the best services operating today.
More resources
For more helpful articles, coverage, and answers to common questions about Windows 10 and Windows 11, visit the following resources:
- Windows 10 on Windows Central — All you need to know
- Windows 11 on Windows Central — All you need to know
How to manually add and connect to a VPN on Windows 10
Note: If you've upgraded to Windows 11, our guide on how to manually configure a VPN on Windows 11 will help you through the process.
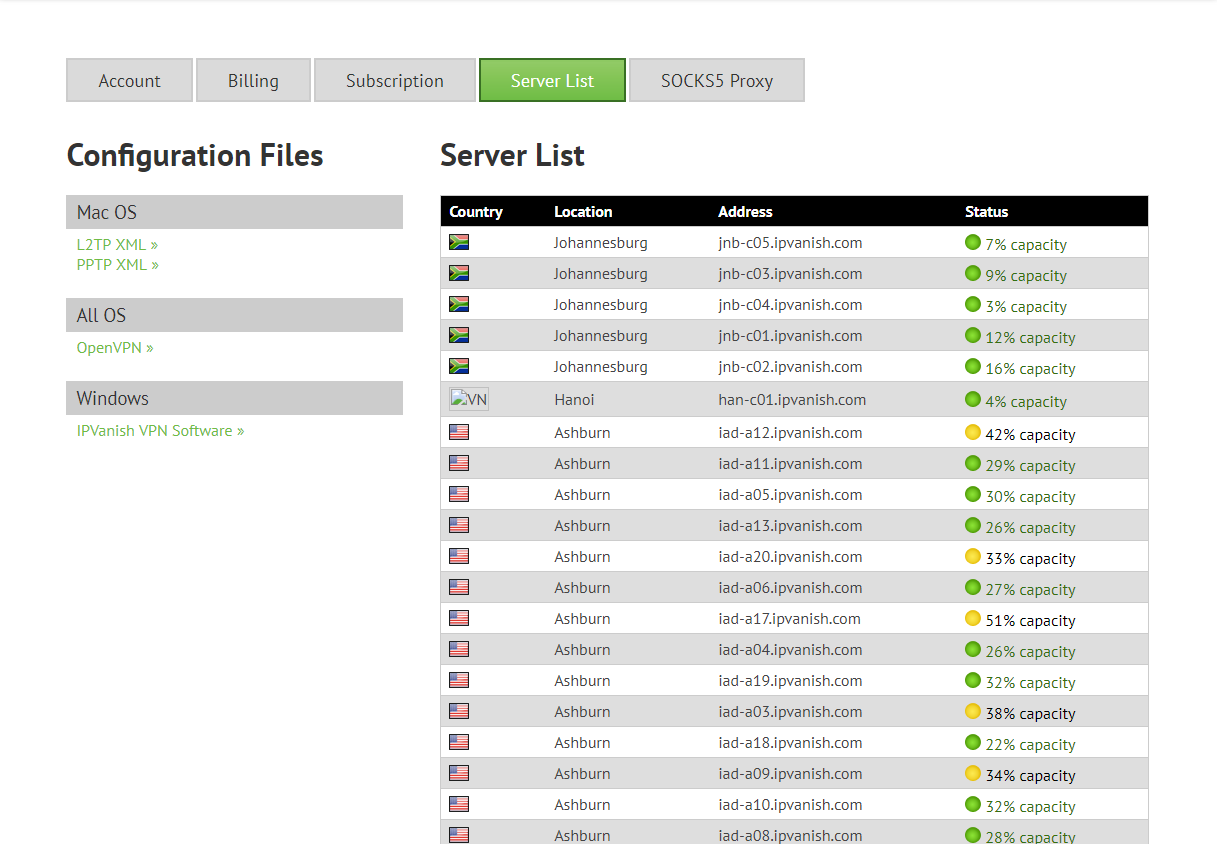
Once you subscribe to a VPN service — keep in mind there are plenty of great VPN options out there — you should have access to a list of servers that you can connect to. It will differ depending on the VPN service you're using, but you should have access to a webpage or desktop app section that lists the server's location, the address needed to create a manual connection, and the current load of the server.
Your VPN provider should also provide manual sign-in information that can be used as credentials. This might be some sort of username and password or certificate depending on the service, and it will vary from provider to provider.
Once you have the required information to make a connection, you can jump into settings and get everything running.
- Right-click the Start button.
- Click Settings.
- Click Network & Internet.
- Click VPN.
- Click Add a VPN connection.
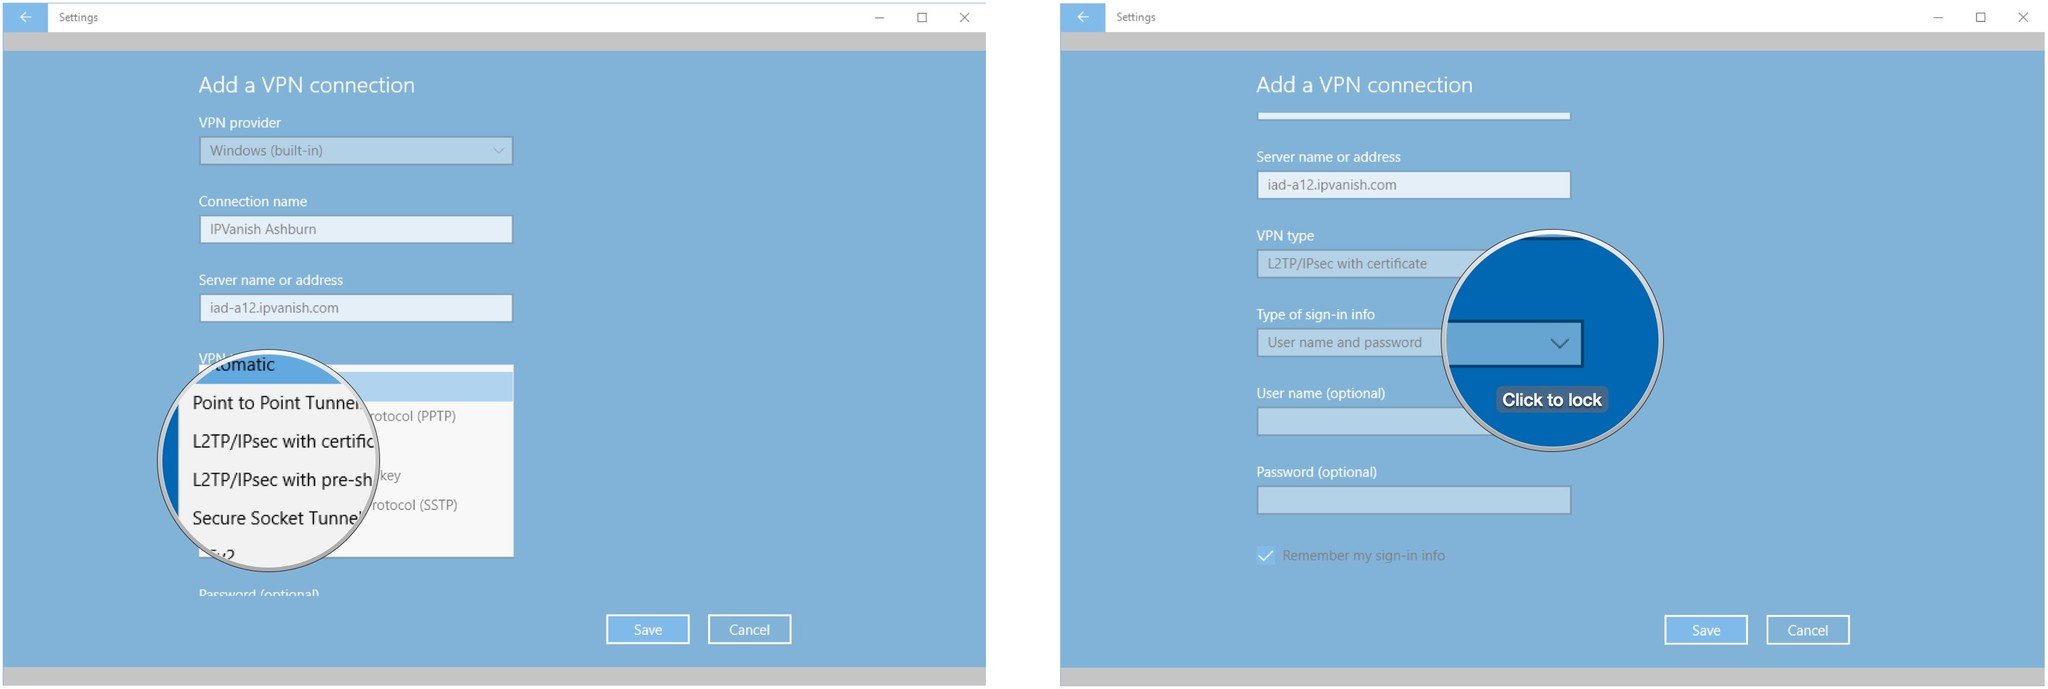
- Click the dropdown menu below VPN provider.
- Click Windows (built-in).
- Click the Connection name field.
- Type a name for the VPN connection. (In this case, I'll use the name of my provider and the server location.)
- Click the Server name or address field.
- Type the server's address. (You can likely find this in your VPN account.)
- Click the dropdown menu below VPN type.
- Choose a connection protocol.
- Click the dropdown menu below Type of sign-in info.
- Click a sign-in method. (This will no doubt change depending on your VPN provider.)
- Click Save.
- Click the VPN you just set up. (It will now appear in the VPN list.)
- Click Connect. (Depending on the sign-in method used by your provider, you might have to enter your username and password.)
How to disconnect and remove a VPN on Windows 10
If you don't want to use a VPN anymore, or if you just want to remove a server from the list, you can disconnect or altogether remove it. There is a VPN button for quick on and off located in the Windows 10 action center (the small speech bubble in the bottom-right corner of your display), but we'll go through the entire process, which includes completely removing a VPN from your system.
- Right-click the Start button.
- Click Settings.
- Click Network & Internet.
- Click VPN.
- Click a VPN connection you want to disconnect or remove.
- Click Disconnect.
- Click Remove.
- Click Remove again to confirm.
That's it! The VPN you configured should now be removed. You can always add a server again using the first set of instructions.
Note that even if you manually configure a VPN on Windows 10 you will still be able to use a separate client without issue. You can always remove the manual connection, but it's not entirely necessary.
FAQs about using a VPN connection
These are common questions regarding VPN on Windows 11.
What information do I need from my VPN provider before I start?
You need the VPN server name or address, VPN type (IKEv2, L2TP/IPsec, SSTP, or PPTP), authentication details (username, password, or certificate), and any pre-shared key if required.
Where can I manually configure a VPN connection on Windows 11 or 10?
On Windows 11, open Settings > Network & internet > VPN > Add VPN. On the other hand, on Windows 10, open Settings > Network & Internet > VPN, and click "Add a VPN connection."
What VPN types does the operating system support?
Windows 11 (and 10) includes support for Automatic, PPTP, L2TP/IPsec with a certificate or a preshared key, SSTP, and IKEv2.
How do I manually connect to and disconnect from a VPN?
Once configured, open Settings > Network & internet > VPN, select your VPN, and click Connect. To disconnect, open the same page or use the "Network" icon on the Taskbar.
How can I delete or remove a VPN connection?
On Settings > Network & internet > VPN, choose the connection and click "Remove."
Why should I manually configure a VPN instead of using the provider's app?
When using manual setup, you can avoid third-party software, use the operating system's built-in security, and connect to enterprise or custom VPN servers that apps might not support.
What are common VPN connection errors, and how can I fix them?
Errors such as authentication failed or can't connect to VPN server often result from incorrect credentials, an incorrect protocol selection, or blocked ports. Double-check details with your VPN provider and ensure your firewall allows the connection.
How do I check if my VPN connection is working correctly?
After connecting, check sites like "whatismyip.com" to confirm your public IP address has changed.
What are the security considerations when manually configuring a VPN?
You should avoid older protocols like PPTP. You should be using protocols like IKEv2 or L2TP/IPsec. Also, use strong passwords, and verify that the VPN provider uses secure encryption standards (AES-256 or better).
How can I troubleshoot persistent VPN issues?
Reset the VPN profile, check the event logs, temporarily disable third-party antivirus or firewalls, and test on another network to isolate the cause.
Our top VPN and software picks
To complete the steps laid out above, you'll need to invest in a quality VPN and you'll need Windows 10. We are partial to ExpressVPN thanks to a great price, tons of features, and proven security, but there are plenty more options in our collection of the best VPN services.
ExpressVPN
With rock-solid encryption and plenty of connection protocols for you to use, including OpenVPN, this is one of the best services operating today.
Buy from: ExpressVPN
All the latest news, reviews, and guides for Windows and Xbox diehards.

Mauro Huculak has been a Windows How-To Expert contributor for WindowsCentral.com for nearly a decade and has over 22 years of combined experience in IT and technical writing. He holds various professional certifications from Microsoft, Cisco, VMware, and CompTIA and has been recognized as a Microsoft MVP for many years.
- Cale HuntContributor
You must confirm your public display name before commenting
Please logout and then login again, you will then be prompted to enter your display name.
