


One of my favorite places on the internet is a site called Thingiverse. You can spend hours there looking for amazing things to print and sometimes you find one that catches the imagination, like this little ditty from user pixel2. It is a very simple yet elegantly designed rack and pin steering wheel to fit on your Xbox One controller.
I'm going to take you through a little step by step on how to print it and put it together so you can see how simple it is but before we go further let me offer a word of warning. This steering wheel is a fun idea that is incredibly well thought out and engineered but it is not going to win you many competitions or make you better at driving games. It's a fun thing to show off to your friends but it blocks too many of the buttons to be truly useful it can scuff your controller if you are not careful. Anyway, let's have some fun.
The 3D Print

Once you have downloaded the STLs from Thingiverse here, you can load them into your favorite slicer, I used Simplify 3D, and you should print them in the orientation that they arrive. It does mean using a fair amount of supports on the main clip but trust me, it's worth it to get the right strength for the parts.

Pixel2 does recommend using sixteen walls, no top or bottom layers and zero percent infill, an unusual approach but it seems to work well to add strength and durability. If you are using a 0.4mm nozzle, like most people do, then print this at 0.2mm layer height for best results. I used these exact settings and apart from losing a little bit of support the print looks great. I used the AmazonBasics translucent red to print it because red makes you go faster, just ask Ferrari.
More: Is AmazonBasics Filament any good?
The build
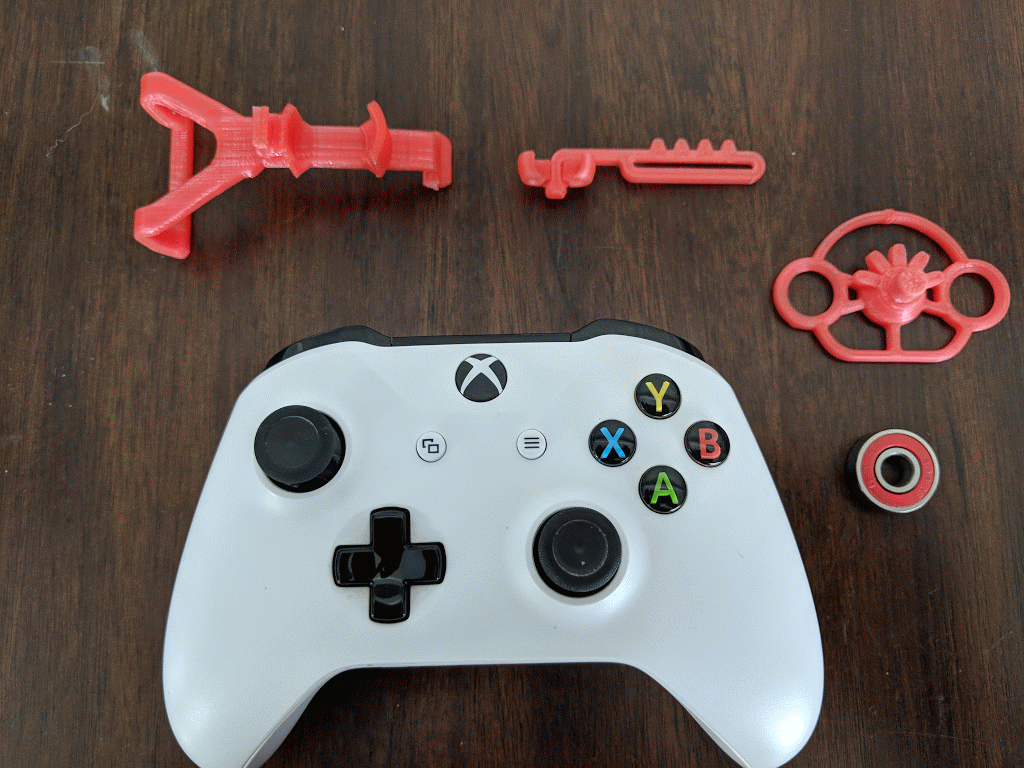
The build itself ended up being very easy once I figured out the right order to place the pieces. You will need to find a 22mm skateboard bearing to go with the 3D printed parts you have made, they are the same ones you find in those fidget spinners that were a fad for about an hour, so you can break one of those open to get it. After you have that make sure you put the bearing in the clamp first not the wheel. I did that the first time and couldn't get the wheel to fit afterward.
As shown in the Gif you need to put the clamp on first, if you are thinking of keeping it on for a while maybe purchase some super thin felt to go on the back as padding to stop it scratching your controller. Once that is settled you can make quick work of putting the bearing in then attaching the pin to the controller cap. Once you have that all set attach the cap to the controller thumbstick, settle the wheel into place and you are ready to race!
Final thoughts

This is very cool, it really is. Someone solved a problem we never knew we had and it looks really cool doing it, but do you actually want to use this? probably not. With the wheel attached you can't reach the Select and Menu buttons, and you are completely blocked from the right stick which, granted, you rarely use in racing games but it still frustrating to have your buttons blocked in that way. The bottom of the clamp also sits in the headset connector and while it doesn't interfere with the 3.5mm jack there are plenty of people who use the old style.
What do you think? Is this something you would like to print? have you already? what do you think of the control it gives you? let me know answers to any of these questions in the comments.

