13 easy ways to tune your Windows 11 laptop for the new school year
Get your laptop ready for the next school year with these tips.
All the latest news, reviews, and guides for Windows and Xbox diehards.
You are now subscribed
Your newsletter sign-up was successful
The next school year is looming, and in addition to getting school supplies, it's also important to prepare your computer for class. Whether you recently purchased a new laptop or have had one for a while, proper preparation will ensure it's ready for any schoolwork.
Luckily, Windows 11 has virtually every tool you need to prepare the device for schoolwork. For instance, you'll find tools to delete unnecessary files to free up space, which not only helps to reclaim storage but it also helps with performance. The system offers different settings to optimize battery life and enhance security, features to protect your files and various options to customize the desktop appearance.
Furthermore, as part of the preparation is also important to install essential apps like the Office suite of apps (including OneNote) to have the tools to tackle any task.
This guide will walk you through over a dozen ways to tune up your laptop for the new school year.
1. How to free up space with Storage Sense on Windows 11
If you are gearing up to attend school, you want to ensure your computer has enough space for your files and maintain system performance.
On Windows 11, you can use Storage Sense to clear out junk files to free up space for more important files.
Clear junk files manually
All the latest news, reviews, and guides for Windows and Xbox diehards.
To delete temporary files to free up space on Windows 11, use these steps:
- Open Settings.
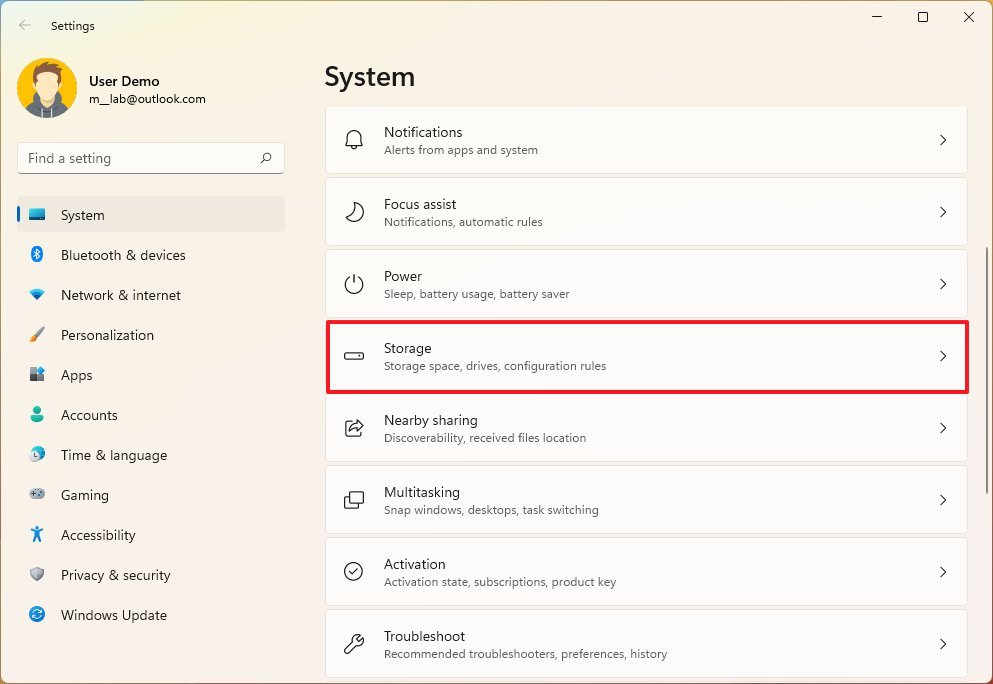
- Click on System.
- Click the Storage page on the right side.
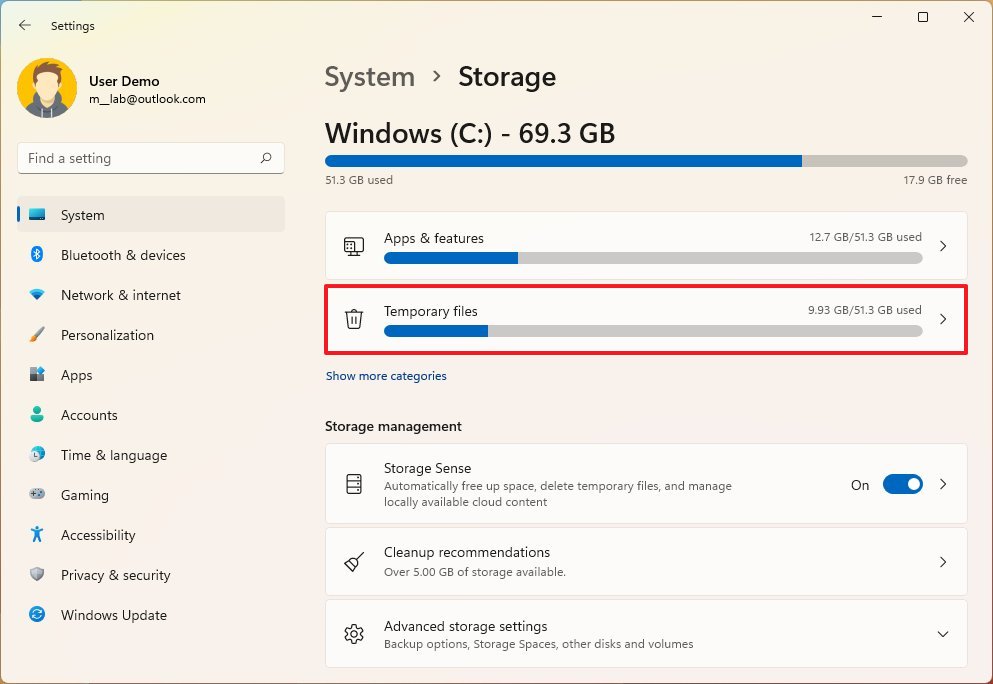
- Click the Temporary files setting.
- Clear all the selected items.
- Check only the files to delete to free up space, including:
- Delivery Optimization Files.
- Temporary files.
- Thumbnails.
- Microsoft Defender Antivirus.
- Recycle Bin.
- Temporary Windows installation files.
- DirectX Shader Cache.
- System created Windows Error Reporting Files.
- Temporary Internet Files.
- Previous Windows installation(s).
- Quick tip: The items available in the list will vary depending on the current setup configuration. Also, if you select the "Downloads" folder, the contents on that location will be deleted. As a result, back up any important file you may want to keep before proceeding.
- Click the Remove files button.
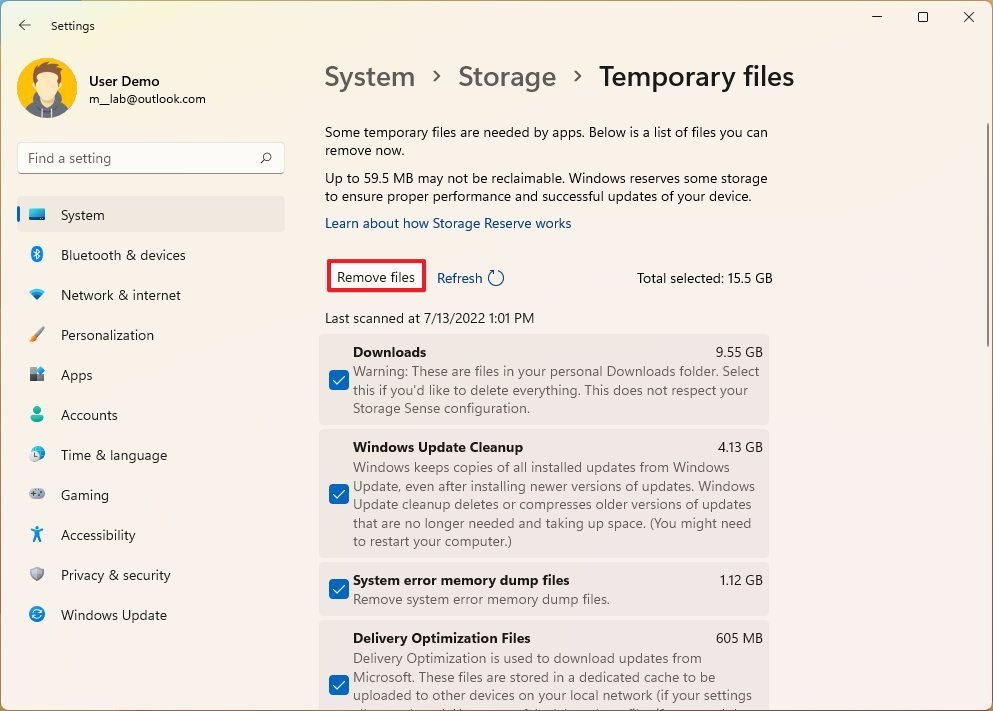
Once you complete the steps, the temporary files will be erased from your computer, making space for more important files.
Clear junk files automatically
To clear storage space automatically on Windows 11, use these steps:
- Open Settings.
- Click on System.
- Click the Storage page on the right side.
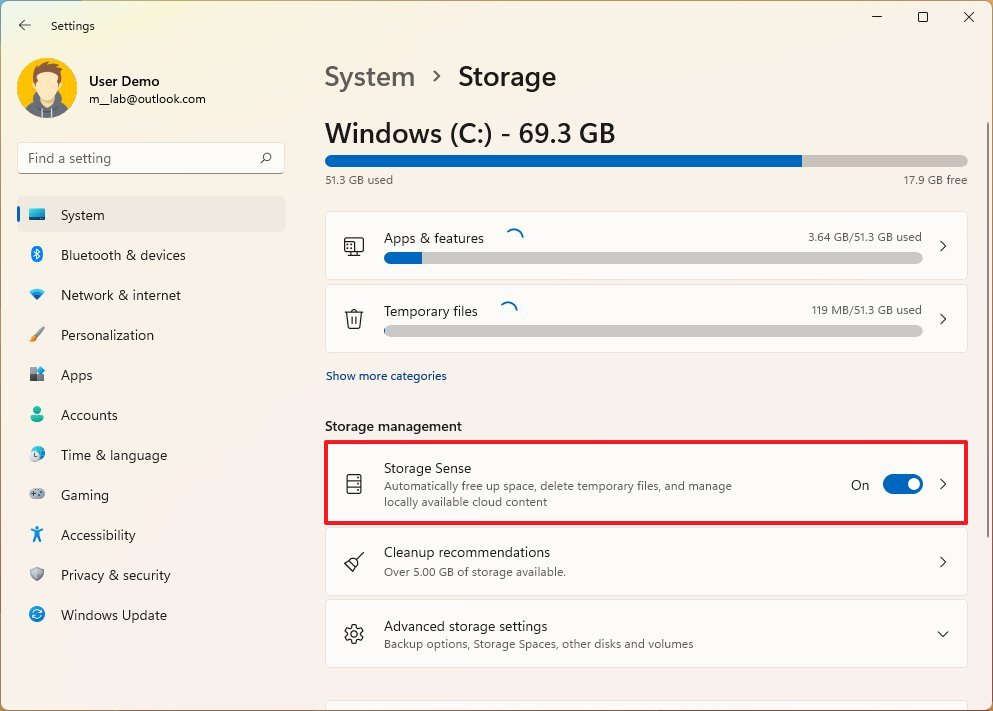
- Under the "Storage management" section, click the Storage Sense setting.
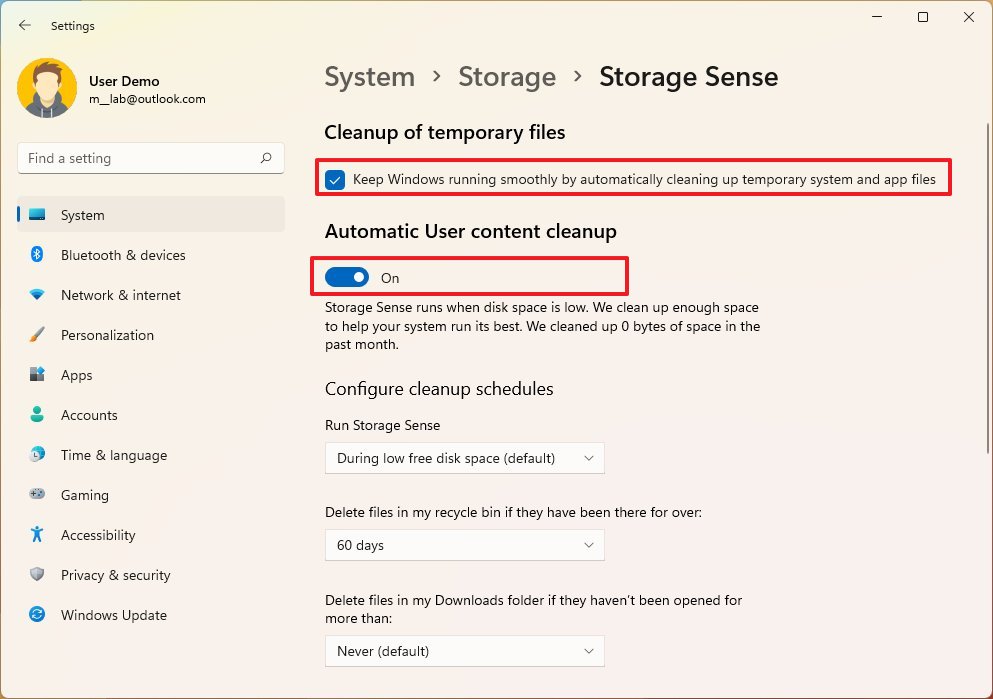
- Under the "Cleanup of temporary files" section, check the "Keep Windows running smoothly by automatically cleaning up temporary system and app files" option to allow the system to delete junk files as needed.
- Turn on the "Automatic User content cleanup" toggle switch.
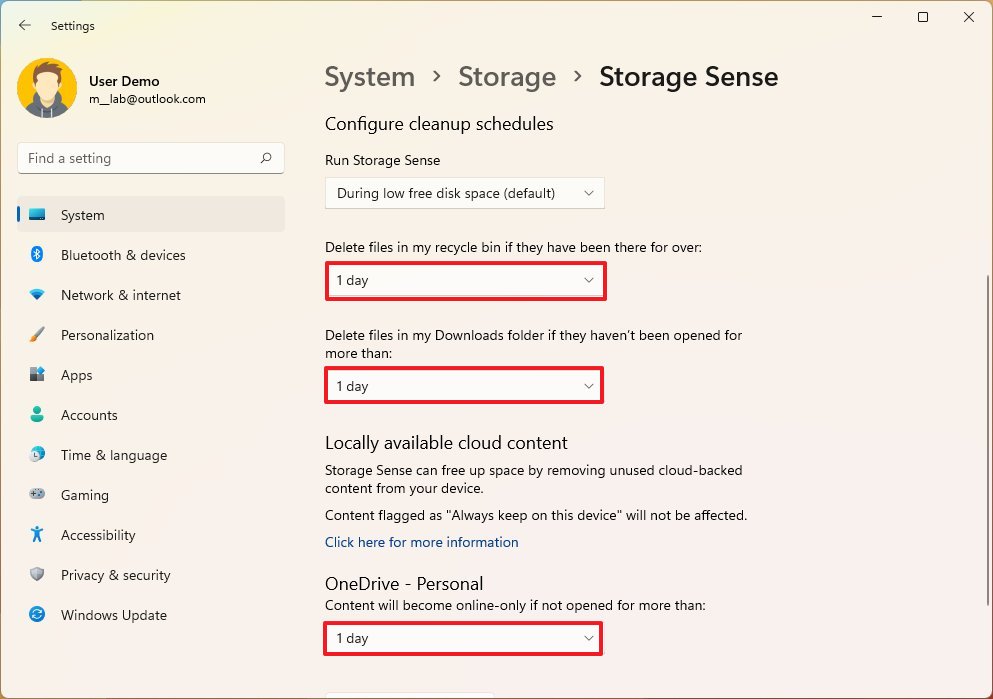
- Under the "Configure cleanup schedules" section, use the Run Storage Sense drop-down menu and select the best cleanup option for you:
- Every day.
- Every week.
- Every month.
- During low free disk space (recommended).
- Use the Recycle Bin drop-down menu to specify how to clear already deleted files.
- Use the Downloads drop-down menu to specify how to clean up files from the "Downloads" folder. Quick tip: To delete most files, use the 1-day option for the settings. The Downloads folder may contain important files, so it is recommended to backup them manually before running Storage Sense.
- Under the "Locally available cloud content" section, use the drop-down menu to specify how long OneDrive content synced to the device becomes online-only.
- (Optional) Click the Run Storage Sense now button.
After you complete the steps, whenever the laptop runs out of space, the Storage Sense feature will run automatically to clear unnecessary files automatically.
You can learn more tips to make room on the hard drive in this guide.
2. How to uninstall unnecessary apps on Windows 11
Another way to optimize the device storage is to remove apps and games you no longer need or rarely use to reclaim space to minimize points of problems and distractions and prevent services from running in the background to reduce resource utilization.
To uninstall apps and games on Windows 11, use these steps:
- Open Settings.
- Click on Apps.
- Click the Apps & features page on the right side.
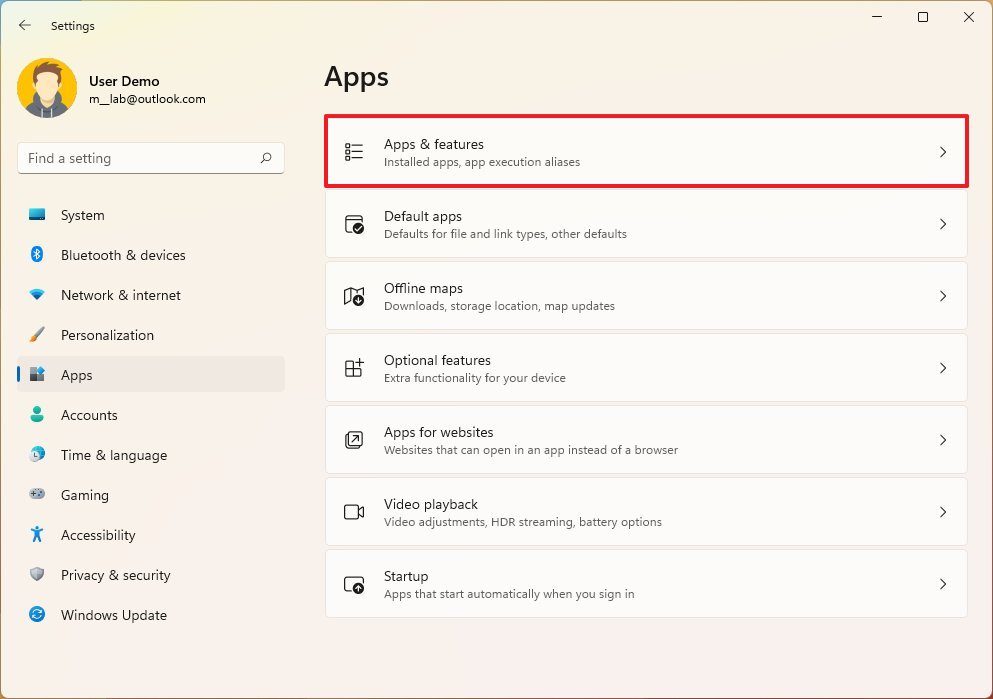
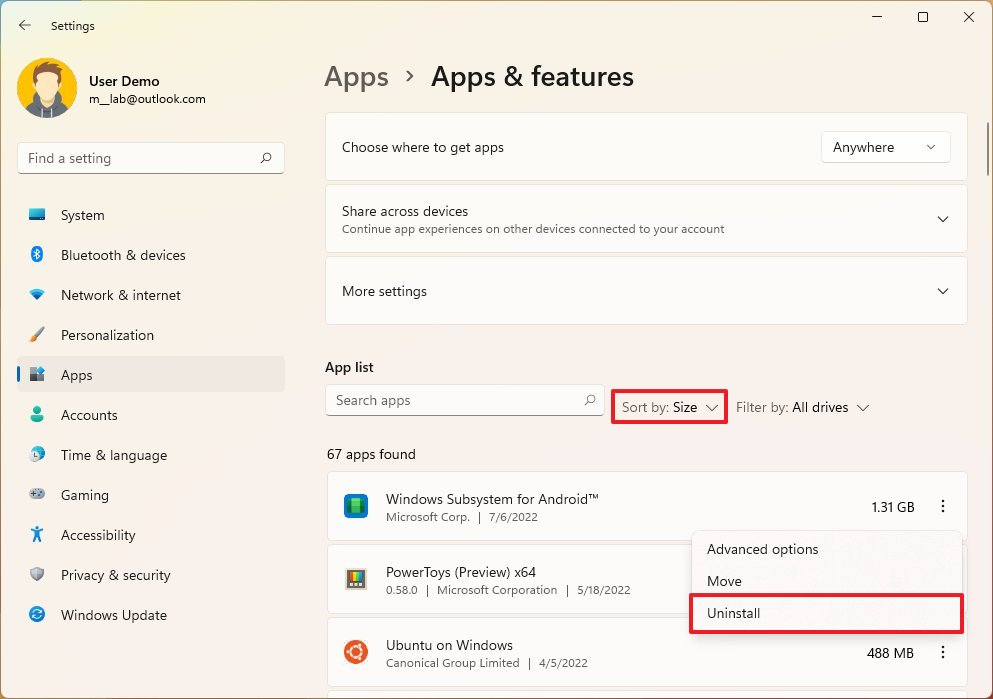
- Under the "App list" section, use the Sort by setting and sort the app by size.
- Click the app menu (three-dotted) button and select the Uninstall button.
- Click the Uninstall button again.
- Continue with the on-screen directions (if applicable).
Once you complete the steps, the app will be removed from the system. You may need to repeat the steps to remove other apps and games.
3. How to disable apps at startup on Windows 11
Some applications can register with the system to launch automatically, and others can configure services to run in the background during startup, and doing so can impact boot times, battery life, and performance.
If you want to optimize the system startup performance, you want to disable as many apps as possible.
To disable apps from startup on Windows 11, use these steps:
- Open Settings.
- Click on Apps.
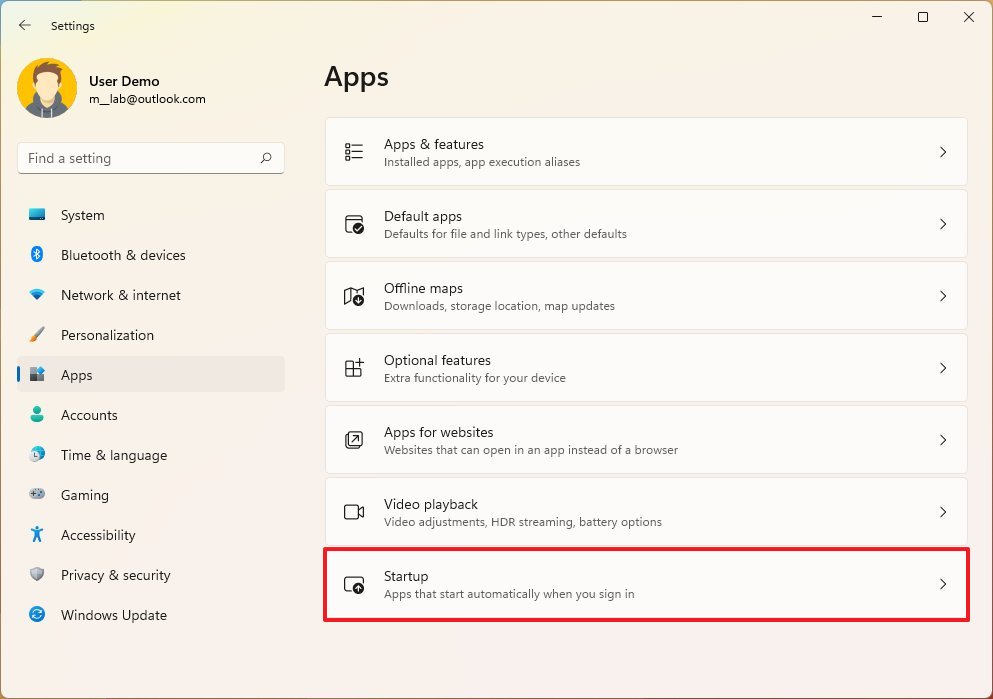
- Click the Startup page on the right side.
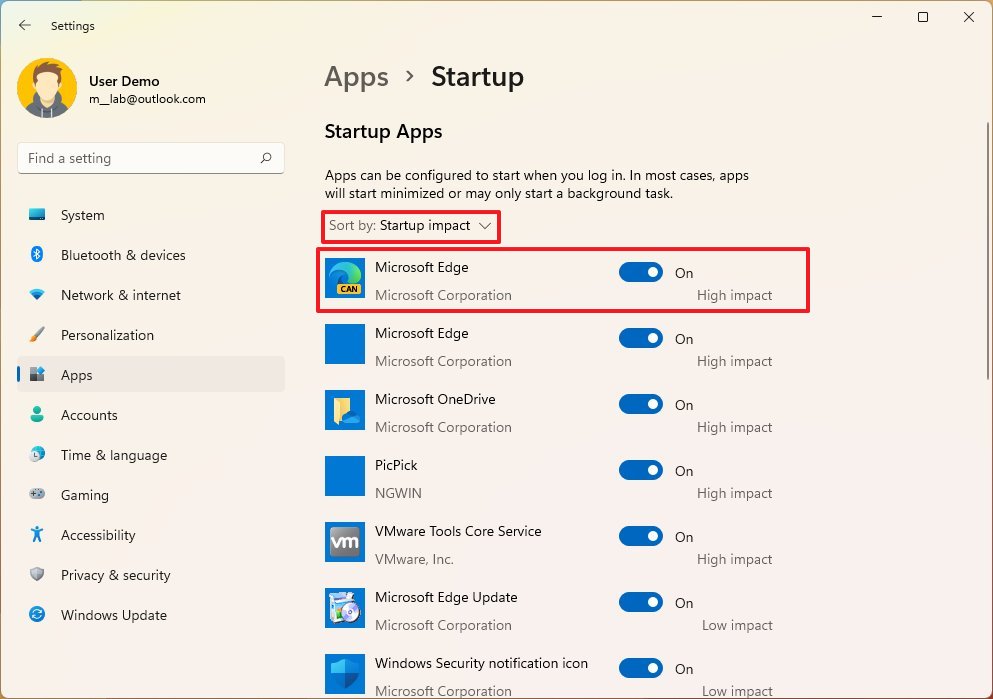
- Use the "Sort by" setting and select the Startup impact option.
- Turn off the toggle switch for the apps causing the most impact and other unnecessary apps during the startup.
After you complete the steps, the app will continue to be available on your laptop, but it'll no longer start automatically during startup to improve performance.
4. How to protect your laptop from malware on Windows 11
Windows Security is the app that allows managing many of the security-related features of Windows 11, including the Microsoft Defender Antivirus and Microsoft Defender Firewall.
If you are preparing your laptop for the new school year, you want to make sure that there are no viruses or open ports in the firewall for hackers to exploit.
Run a full virus scan
Although the default Windows 11 antivirus runs automatically to monitor and remove viruses, spyware, ransomware, and many other types of malware, you may still need to run a full malware scan to ensure the device doesn't have any malware.
To perform a full malware scan on Windows 11, use these steps:
- Open Start.
- Search for Windows Security and click the top result to open the app.
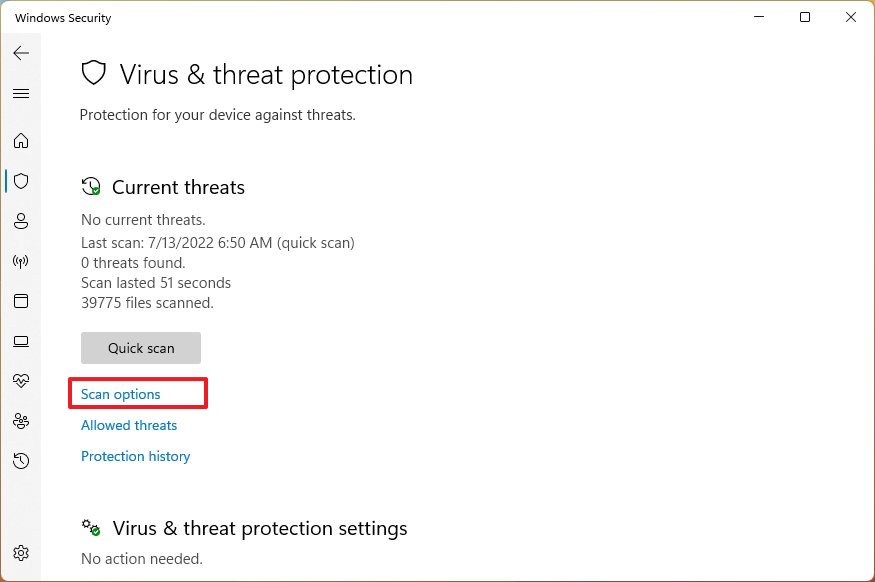
- Click on Virus & threat protection.
- Under the "Current threats" section, click the Scan options setting.
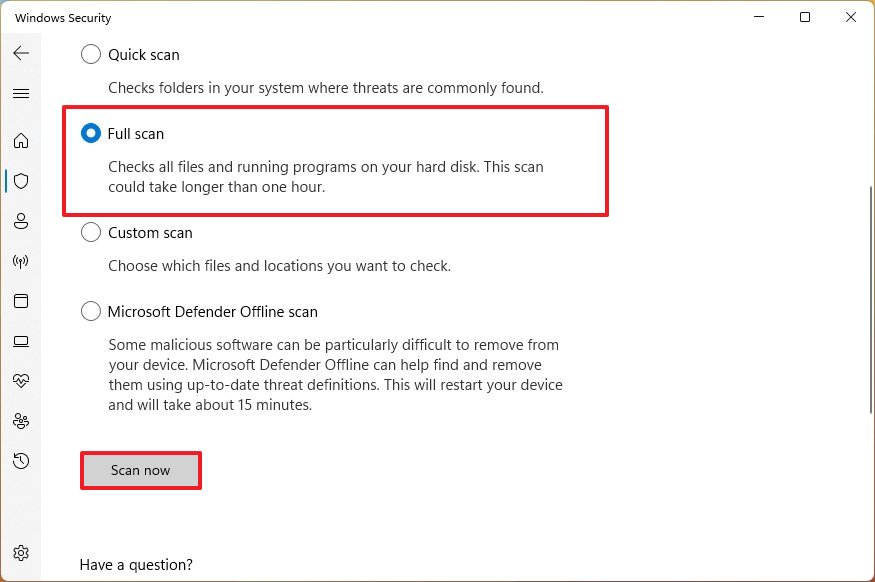
- Select the Full scan option.
- Click the Scan now button.
Once you complete the steps, the Defender Antivirus will run a full scan to remove any malicious code.
Turn on the firewall
The Microsoft Defender Firewall is the default firewall that protects your device from unauthorized access. The feature is enabled by default, but you may still need to check to confirm.
To confirm or enable the Windows 11 firewall, use these steps:
- Open Start.
- Search for Windows Security and click the top result to open the app.
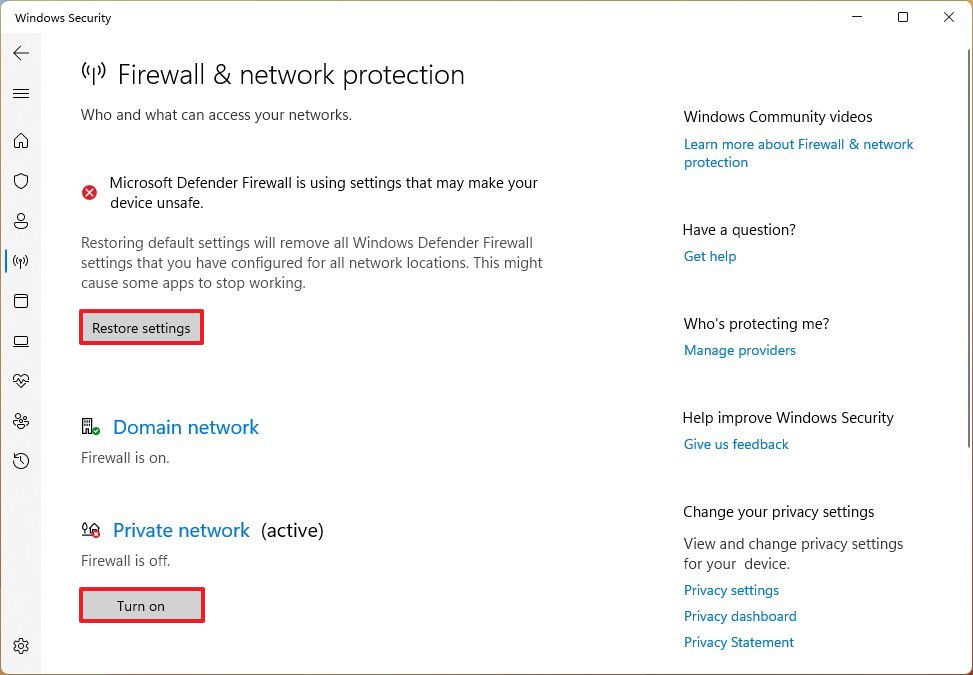
- Click on Firewall & network protection.
- Click the "Restore settings" or the "Turn on" button for the active network.
After you complete the steps, the firewall will protect your laptop from hackers and other malicious individuals trying to gain unauthorized access.
5. How to optimize your laptop for battery life on Windows 11
Running out of battery during a school project can be frustrating. However, Windows 11 comes with several features to help conserve energy as much as possible.
Change power modes
To change power settings to extend the battery life of your laptop on Windows 11, use these steps:
- Open Settings.
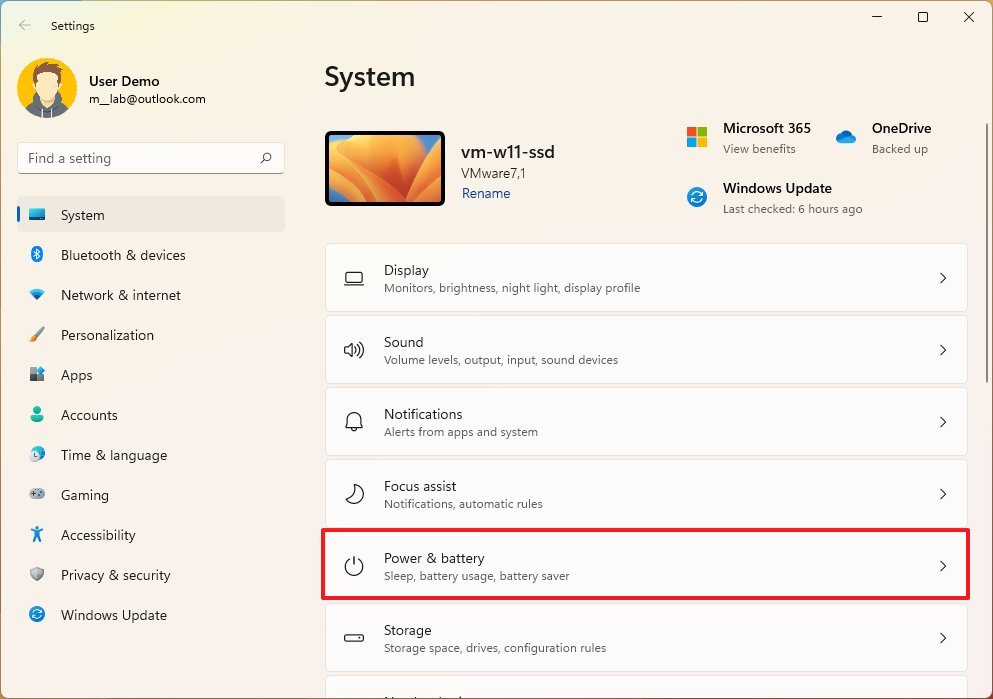
- Click on System.
- Click the Power & battery page on the right side.
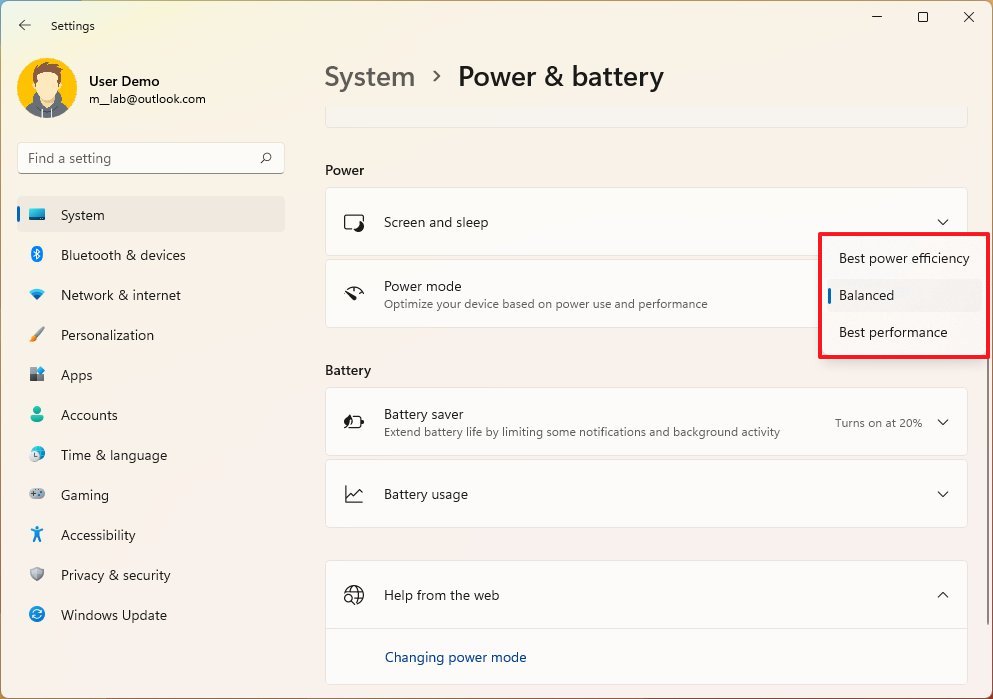
- Use the "Power mode" setting to select a different mode:
- Best power efficiency — saves the most energy, but it impacts performance.
- Balanced — balances performance with energy on the laptop.
- Best performance — provides the most system performance but drains the battery faster.
Once you complete the steps, the system will optimize the energy consumption based on your mode selection.
Customize battery saver settings
To configure the battery saver feature on Windows 11, use these steps:
- Open Settings.
- Click on System.
- Click on Power & battery page on the right side.
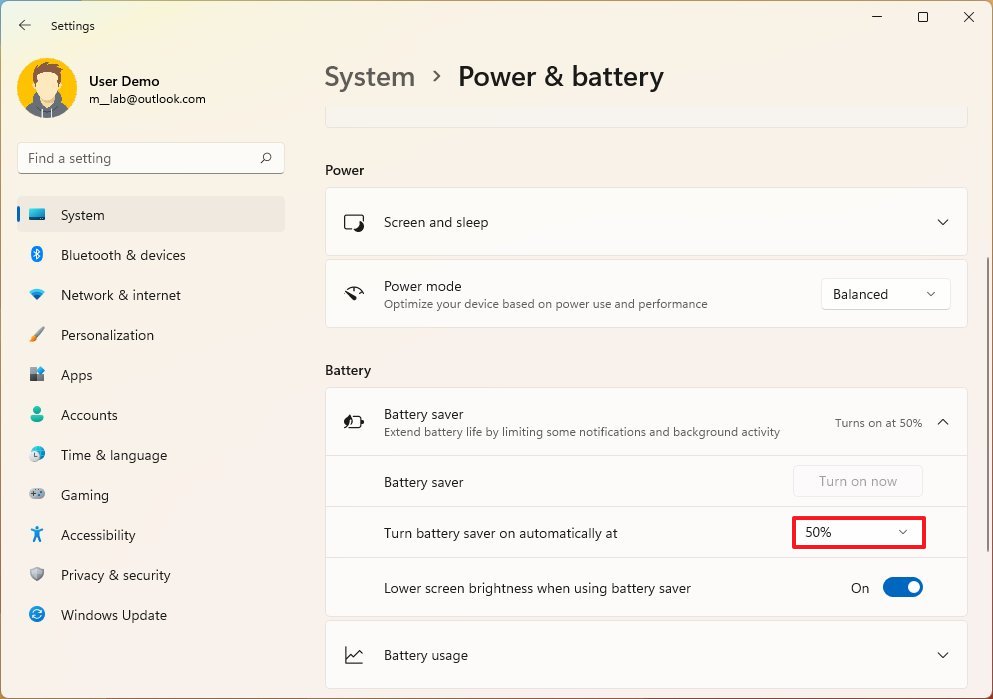
- Under the "Battery" section, use the "Turn battery saver on automatically at" setting and select when to turn on the feature.
- Quick tip: The sooner the system turns on the feature, the longer the battery will run.
- Check the "Lower screen brightness when using battery saver" toggle switch.
After you complete the steps, the new adjustments should help to expand the laptop's battery life by reducing brightness, disabling features, and throttling resources.
Change video playback settings
If you must watch a video for homework, you can adjust the video playback settings to help expand that battery life.
To change the video playback settings, use these steps:
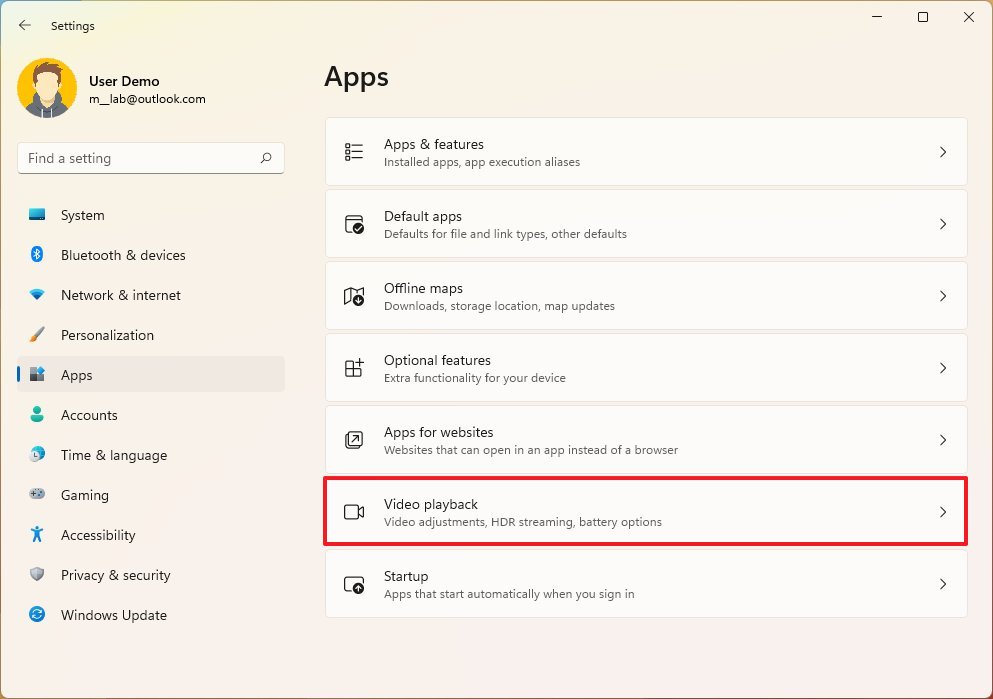
- Open Settings.
- Click on Apps.
- Click the Video playback page on the right side.
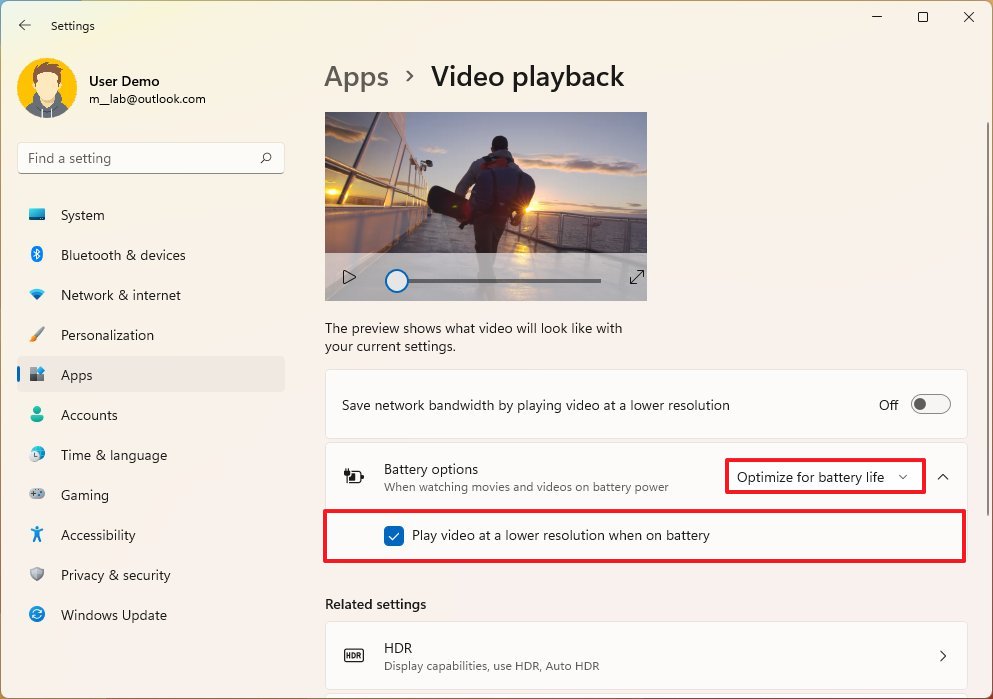
- Use the "Battery options" setting and select the "Optimize for battery life" option.
- Quick note: If the video performance is more important, select the "Optimize for video quality" option.
- Check the "Play video at a lower resolution when on battery" option.
Once you complete the steps, the device's battery life will adjust according to your configuration.
Change display settings
Something so simple as lowering the brightness, lowering the screen and sleep timers, and changing other settings can significantly impact battery life.
Adjusting brightness
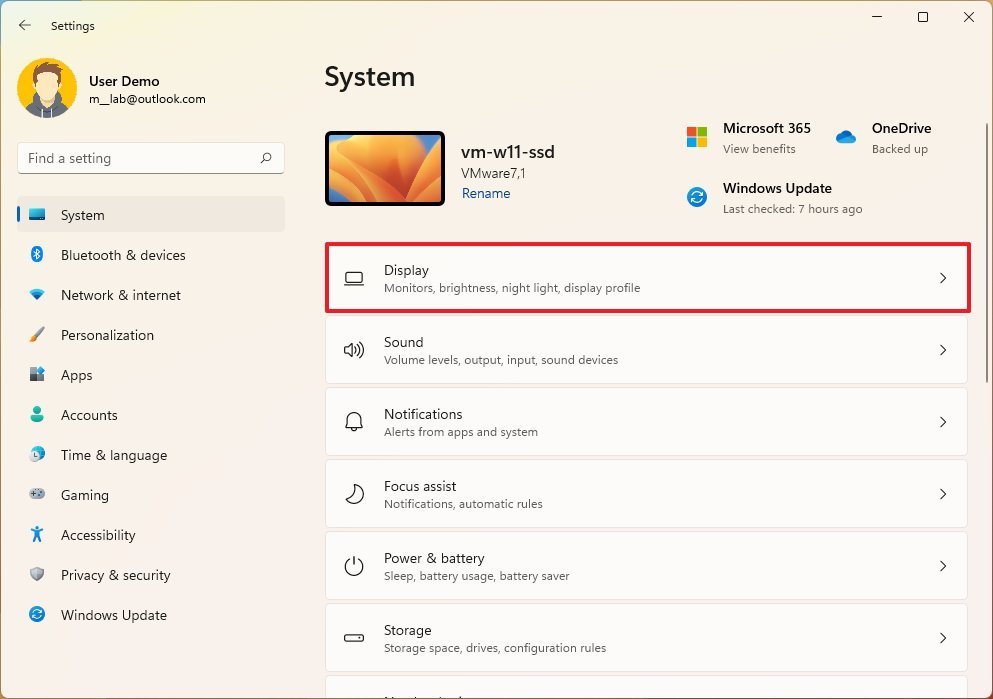
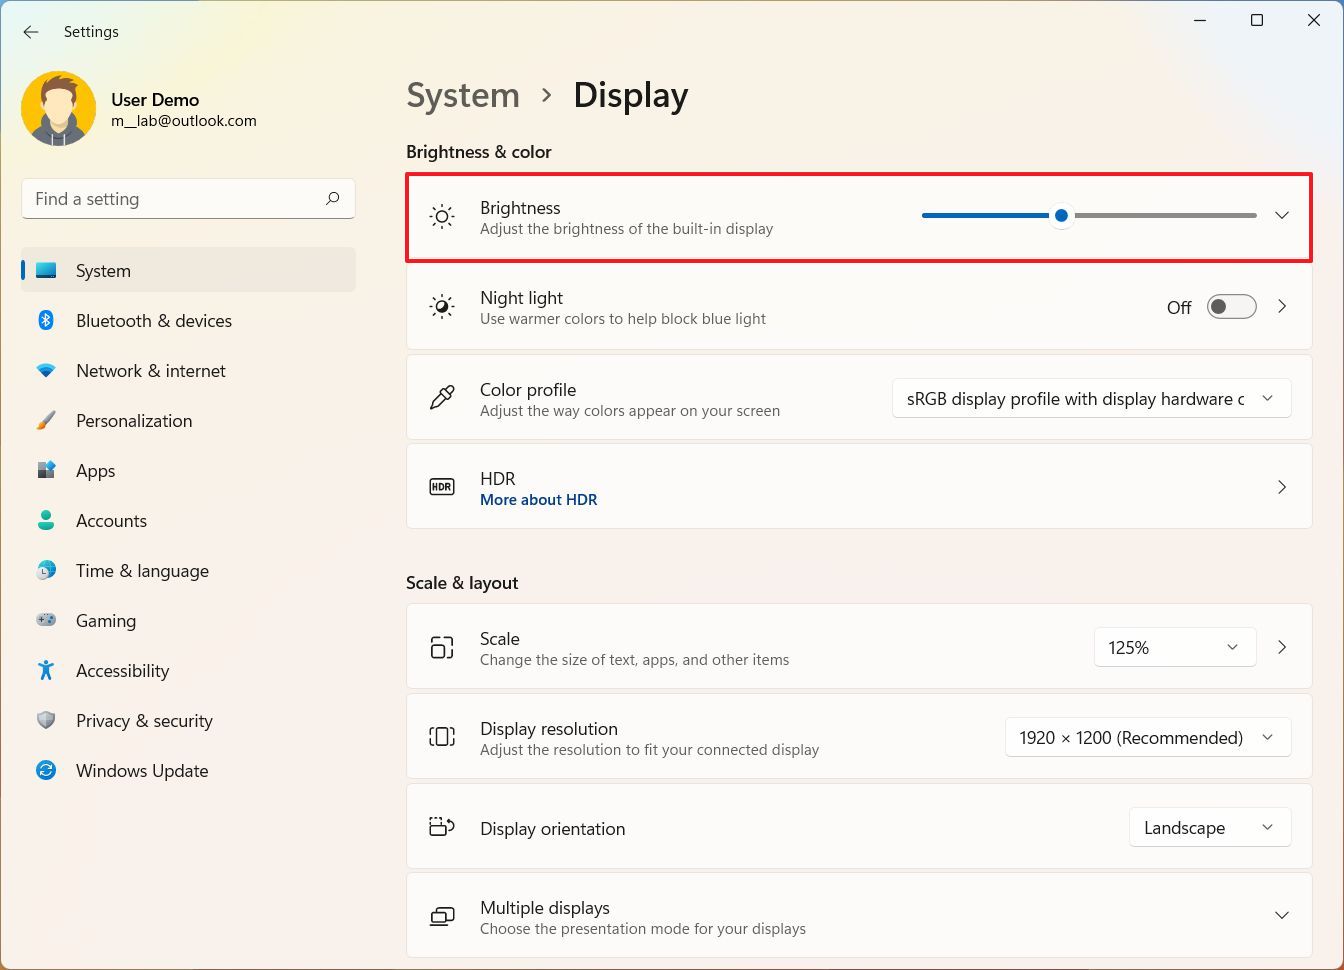
To lower the display brightness to save battery on Windows 11, use these steps:
- Open Settings.
- Click on System.
- Click the Display page on the right side.
- Under the "Brightness & color" section, use the Brightness setting to lower the intensity to conserve battery life.
After you complete the steps, the new brightness setting should apply to the device.
Change screen and sleep timers
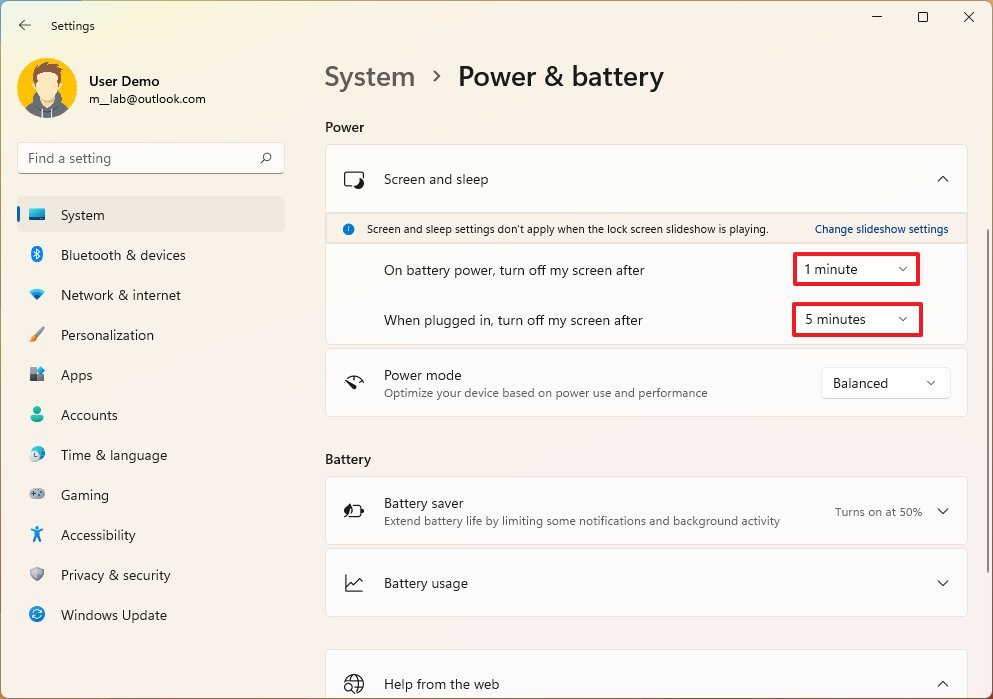
To change the display and sleep timers to conserve energy, use these steps:
- Open Settings.
- Click on System.
- Click the Power & battery page on the right side.
- Under the "Power" section, select the "Screen and sleep" setting.
- Use the "On battery power, turn off my screen after" setting and select the "1 minute" option to conserve the most battery.
- Use the "On battery power, put the device to sleep after" setting, and select "5 minutes" option to sleep the device after five minutes of inactivity to save battery.
Once you complete the steps, the computer will turn off the display after the selected time of inactivity, and then the system will sleep to save energy.
Switch to dark mode
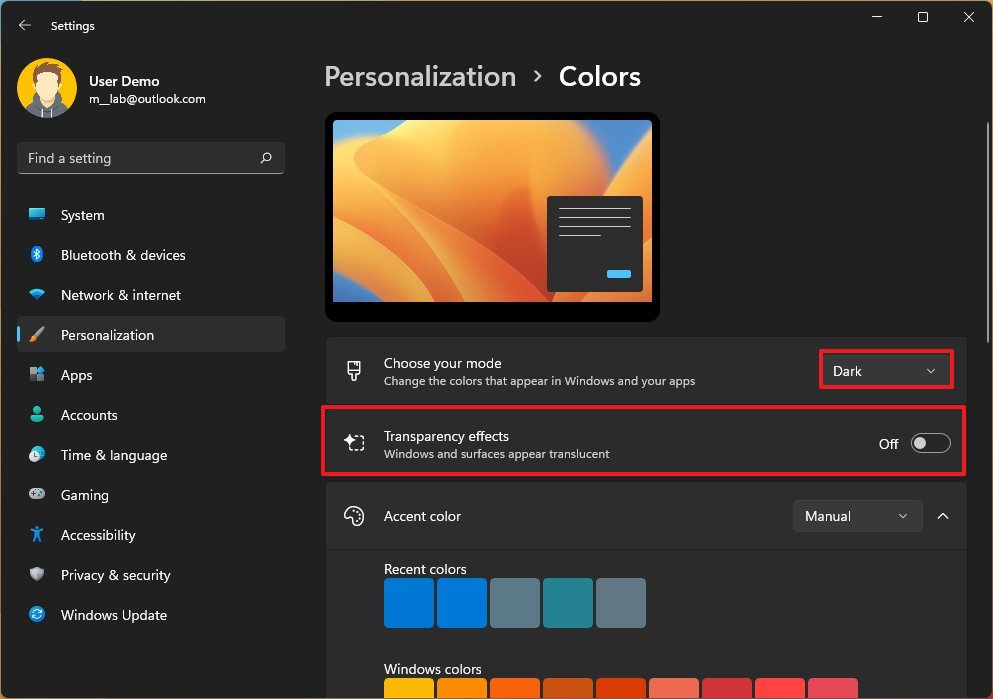
Changing the color mode to dark can also save energy to expand your laptop's battery life when working on a school project.
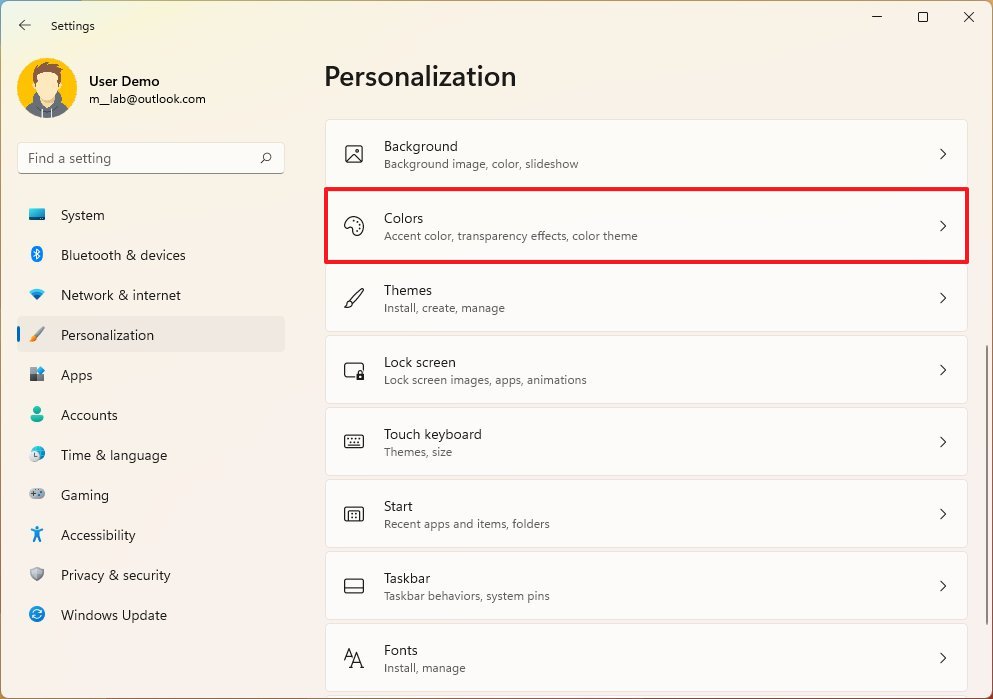
To change color mode on Windows 11, use these steps:
- Open Settings.
- Click on Personalization.
- Click the Colors page on the right side.
- Use the "Choose your mode" setting and select the Dark option.
- (Optional) Turn off the Transparency effects toggle switch to disable the desktop element visuals effects that can also affect the battery.
After you complete the steps, the desktop components and apps like File Explorer will switch to dark mode to optimize energy usage.
If you want to go one step further, you can also use a dark solid color in the "Background" settings page instead of an image to save a little bit more battery.
Enable airplane mode
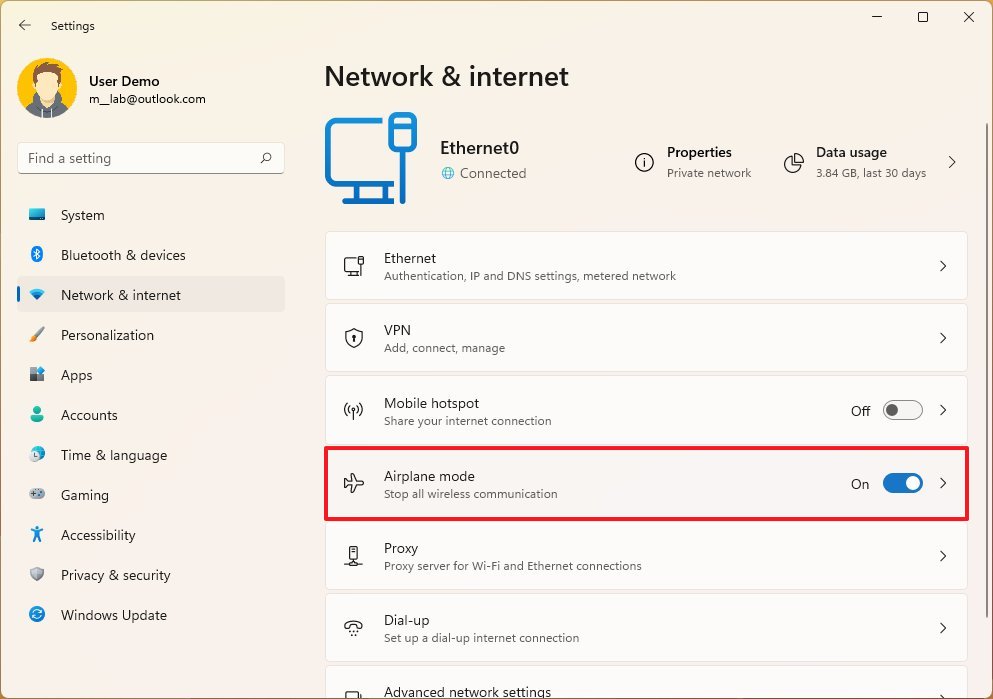
If an internet connection is not required to complete the school work, you can turn on Airplane mode to disable all wireless communications (including Bluetooth) to preserve battery life.
To enable Airplane mode on Windows 11, use these steps:
- Open Settings.
- Click on Network & internet.
- Turn on the Airplane mode toggle switch.
Alternatively, you can also enable Airplane mode from the Quick Settings flyout using the Windows key + A keyboard shortcut.
Disconnect non-essential peripherals
If the laptop has connected peripherals like external storage, cameras, and Bluetooth devices, they can also impact battery life. Disconnecting these devices can help to improve battery performance.
Enable hibernation
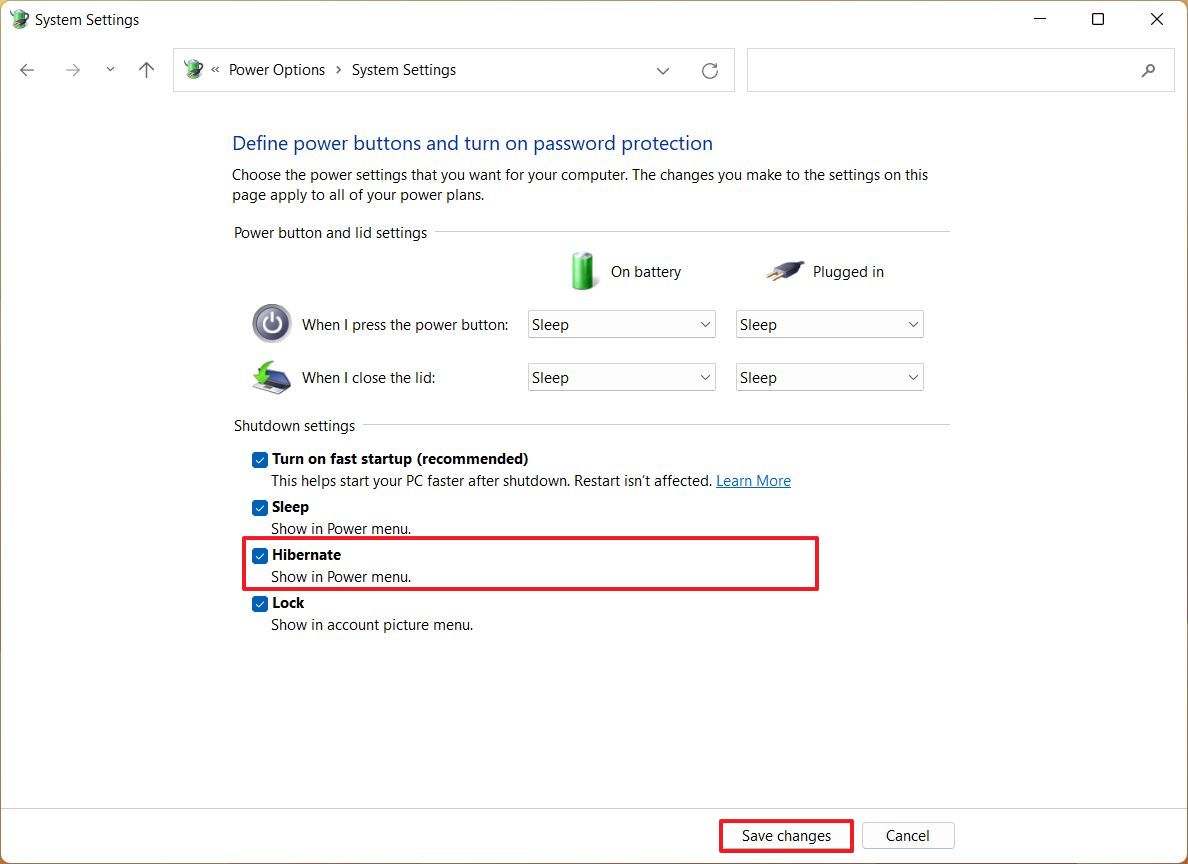
You can also enable hibernation to conserve battery on the laptop. On Windows 11, hibernation works by saving the current session to the hard drive, allowing the computer to turn off completely. You can continue working where you left off when you turn on the device.
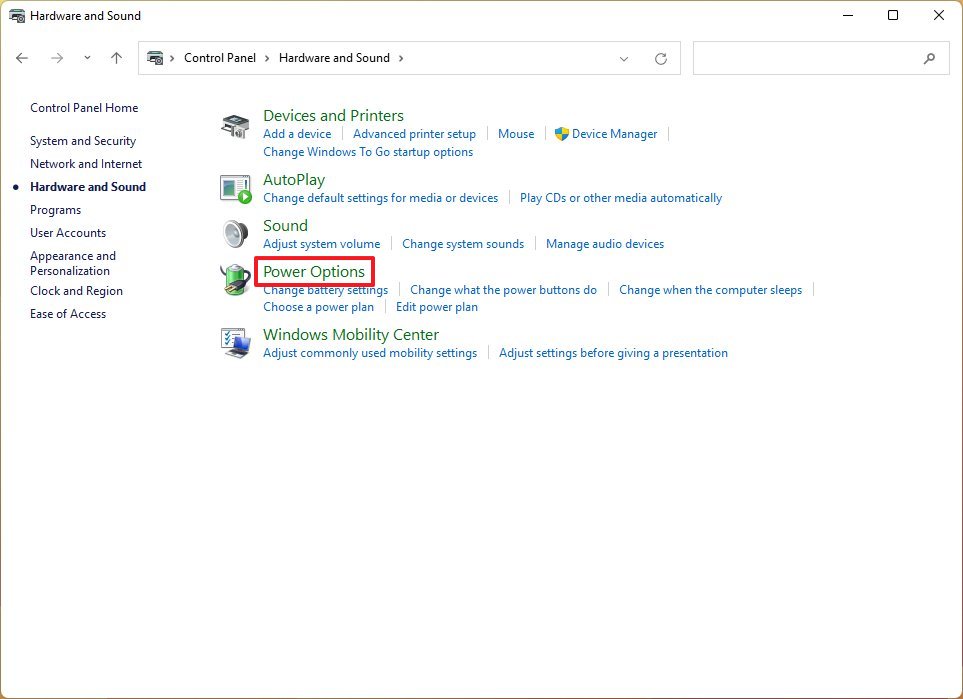
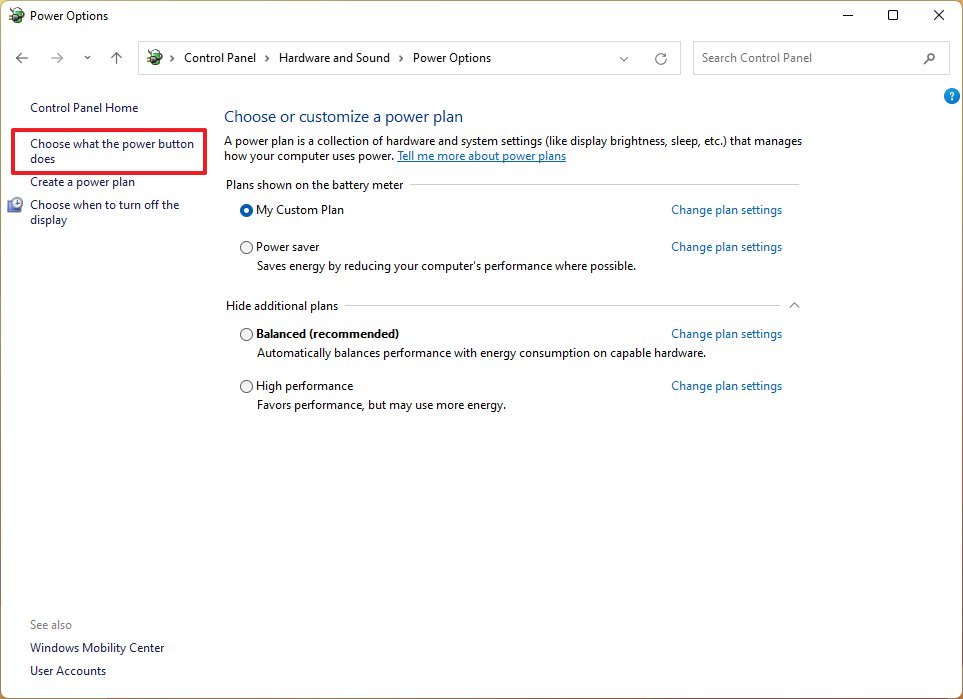
To enable hibernation on Windows 11, use these steps:
- Open Control Panel.
- Click on Hardware and Sound.
- Click on Power Options.
- Click the "Choose what the power button does" option from the left.
- Click the "Change settings that are currently unavailable" option to modify the "Shutdown" settings.
- Check the Hibernate option.
- Click the Save changes button.
Once you complete the steps, you will find the "Hibernation" option in the Power options menu in Start.
You can also use these instructions to learn more about hibernation on Windows 11.
6. How to customize the desktop appearance on Windows 11
On Windows 11, you can customize the appearance of the desktop and apps in many ways. However, these are the must-use settings if you are getting your computer ready for school.
Change the desktop theme
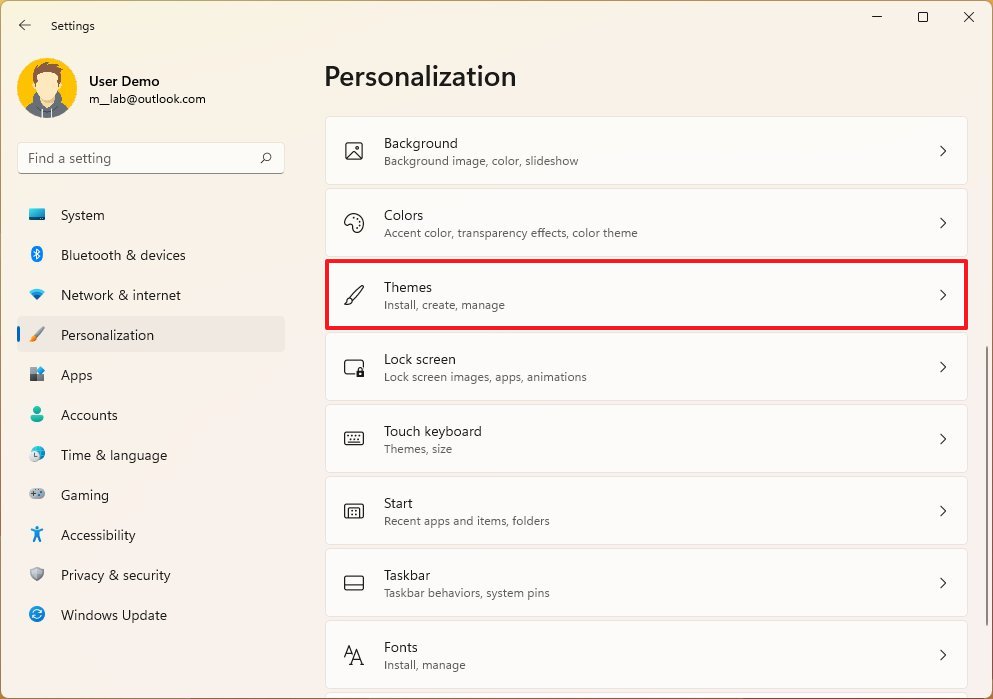
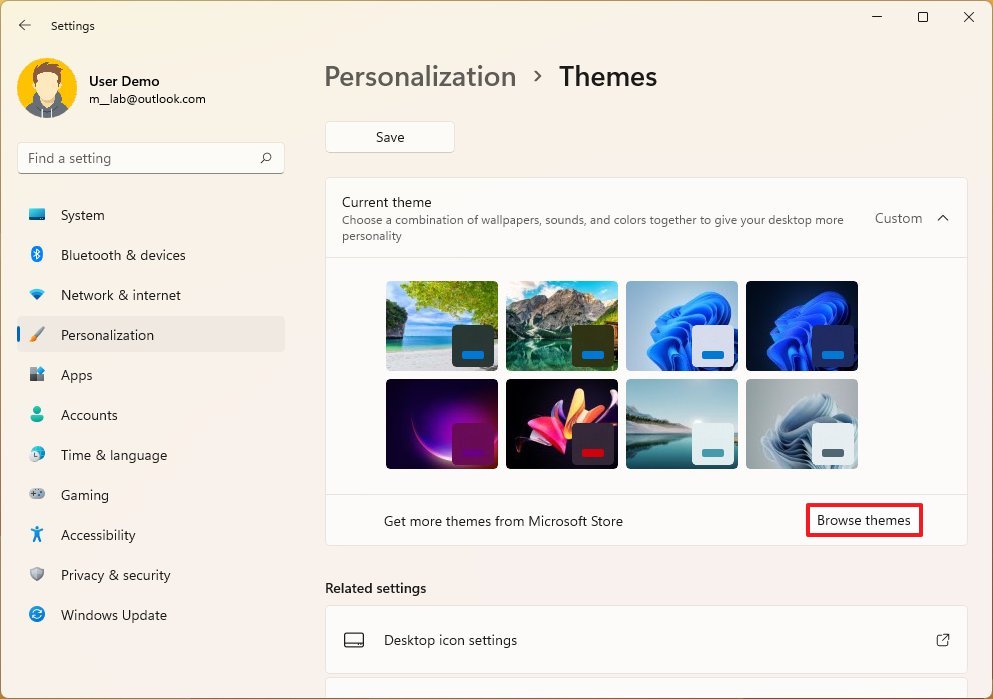
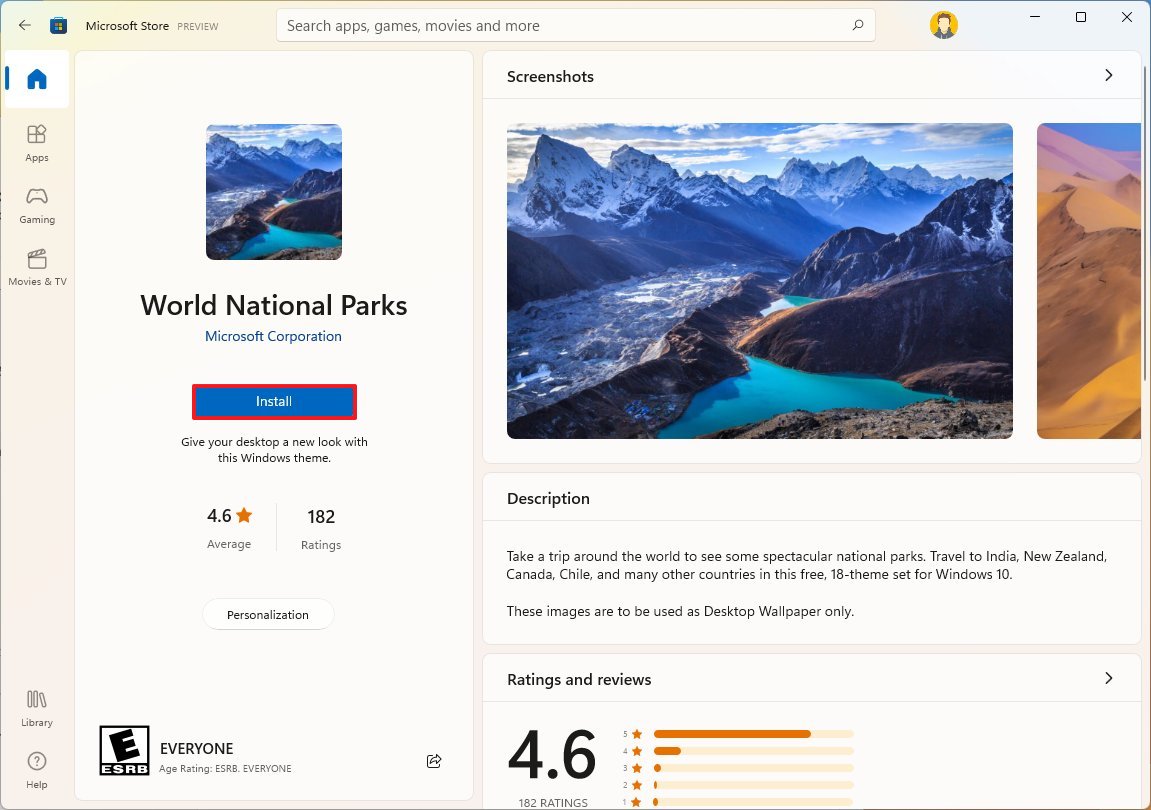
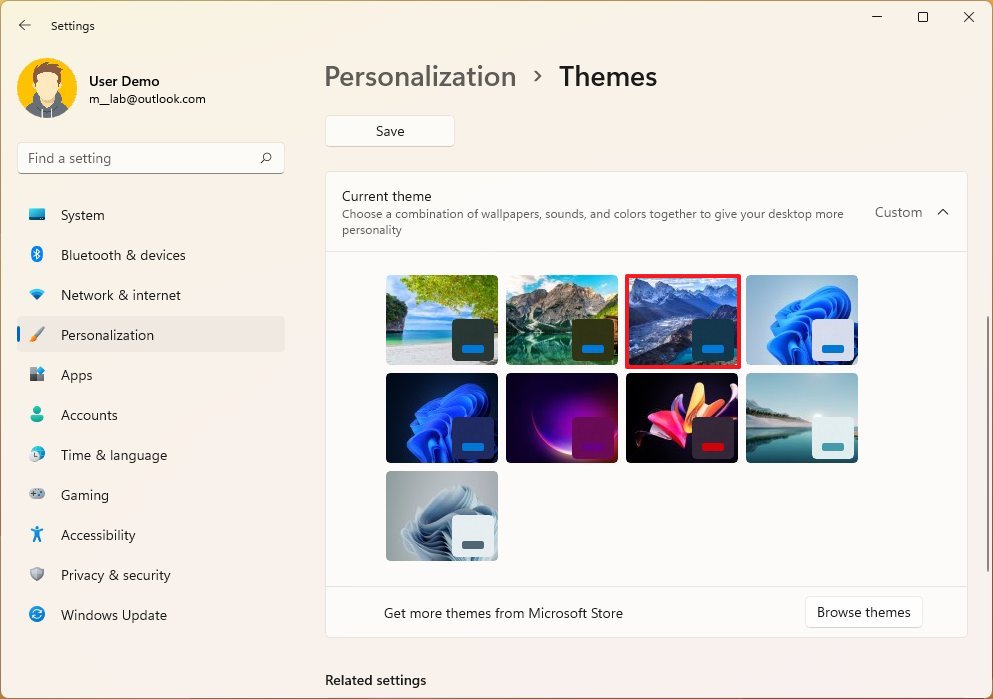
To set a new theme on Windows 11, use these steps:
- Open Settings.
- Click on Personalization.
- Click on Themes
- Click the Browse themes button.
- Select one of the free available themes.
- Click the Install button.
- Click the Open button.
- Under the "Current theme" section, select the newly downloaded theme to apply it.
After you complete the steps, the theme will apply, changing the desktop wallpaper and applying a new color accent for the Start menu, Taskbar, and other elements.
You can customize the desktop appearance even further with these tips on Windows 11.
Pin apps to Start and Taskbar
If you want quicker access to your apps, you should pin them to the Start menu or Taskbar.
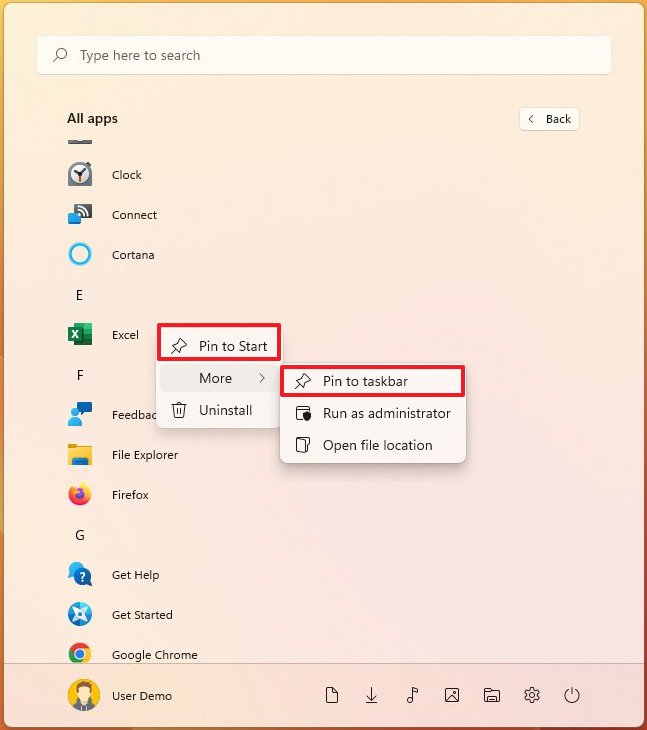
To pin apps to the Start's Pinned section or Taskbar, use these steps:
- Open Start.
- Click the All apps button on the top-right corner.
- Right-click the app and select the "Pin to Start" or "Pin to taskbar" (from the More submenu).
Once you complete the steps, you may want to repeat the instructions to pin other apps.
Declutter the desktop
The best way to avoid cluttering the desktop is to save your files into the categorized profile folders (Documents, Pictures, Videos, etc.). However, if you keep everything on the desktop, Windows 11 includes an option to declutter the desktop quickly.
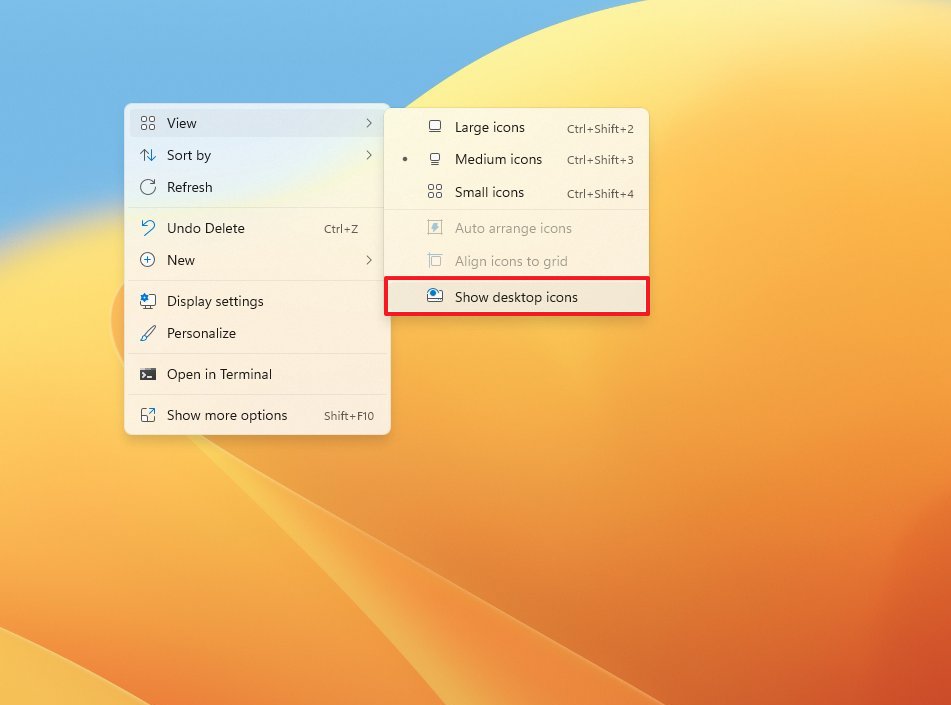
To hide files and icons from the desktop, use these steps:
- Right-click on the desktop.
- Select the View menu option.
- Clear the Show desktop icons option.
Using File Explorer, you can always access your files and shortcuts from the Desktop folder.
If you want to show the contents again, you can use the instructions outlined above, but on step 3, recheck the Show desktop icons option.
Organize your work with virtual desktops
On Windows 11, "Desktops" is a feature that helps you organize your work on different virtual desktops. For example, you can create a virtual desktop with different applications for each class or keep the school work separate from your personal stuff.
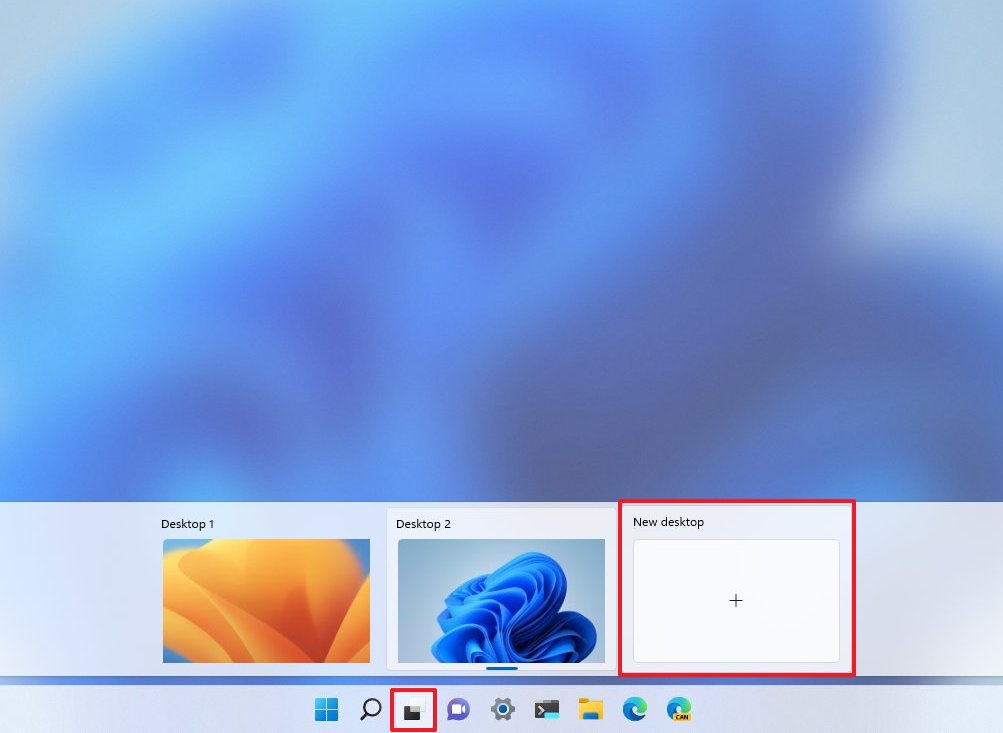
To create a new desktop on Windows 11, use these steps:
- Click the Task View button.
- Quick note: You can also hover over the Task View button to access the interface or use the Windows key + Tab keyboard shortcut.
- Click the New desktop (+) button on the right side.
- Repeat steps 1 and 2 to create as many desktops as you need.
Once you complete the steps, you can start creating spaces to separate your work. On Windows 11, you can create as many desktops as you need. They will remain active (even after restarting the computer) until you close them.
While in Task View, you can also right-click the virtual desktop to find the option to rename, close, or change the background.
The apps will only run on the desktop you open, but you can always move them by opening Task View, right-clicking the app, selecting the "Move to" menu, and choosing the virtual desktop.
You can learn more about virtual desktops on Windows 11 in this guide.
7. How to install a printer on Windows 11
If you must print out content on paper, you may also need to install the printer on your computer. The steps will be slightly different depending on whether you have a printer with a wireless or wired connection.
The instructions below outline the general steps to set up a printer. However, manufacturers usually provide custom tools to install a printing device that unlocks some additional features. As a result, if you need to use one or more specific features, it's recommended to download and install the required software from the manufacturer support website.
Install Wi-Fi printer
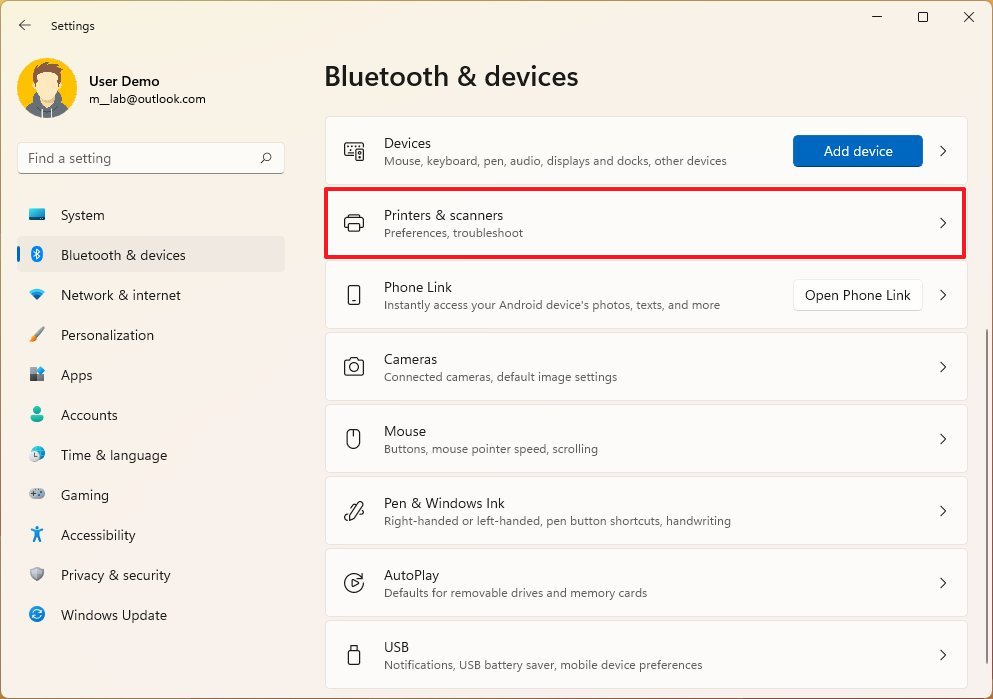
To install a wireless printer on Windows 11, use these steps:
- Open Settings.
- Click on Bluetooth & devices.
- Click the Printers & scanners page on the right side.
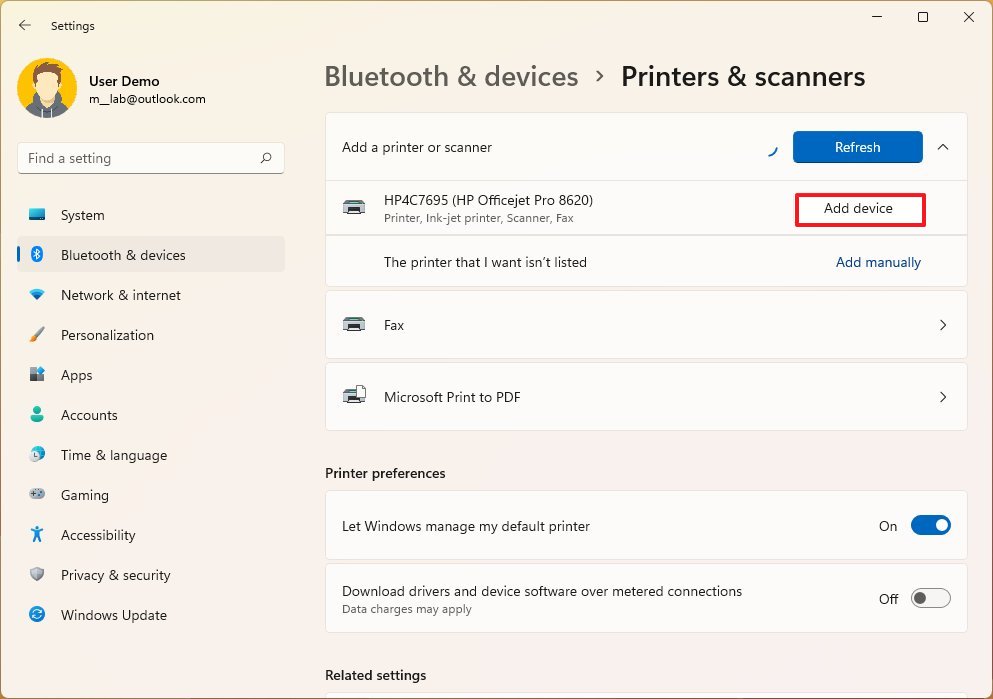
- Click the Add device button.
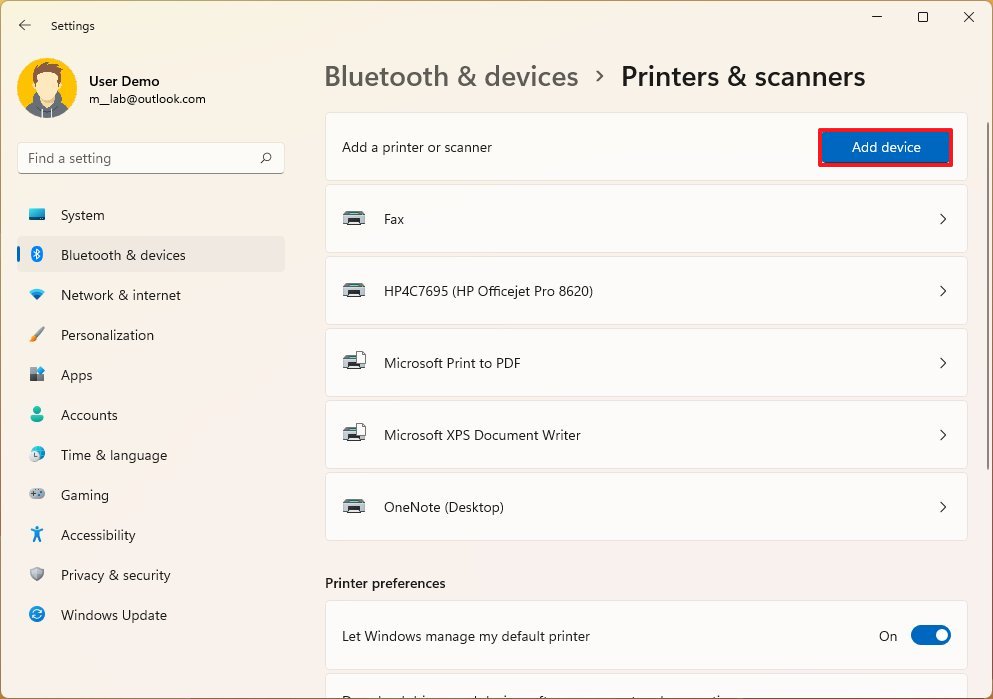
- Select the printer to install.
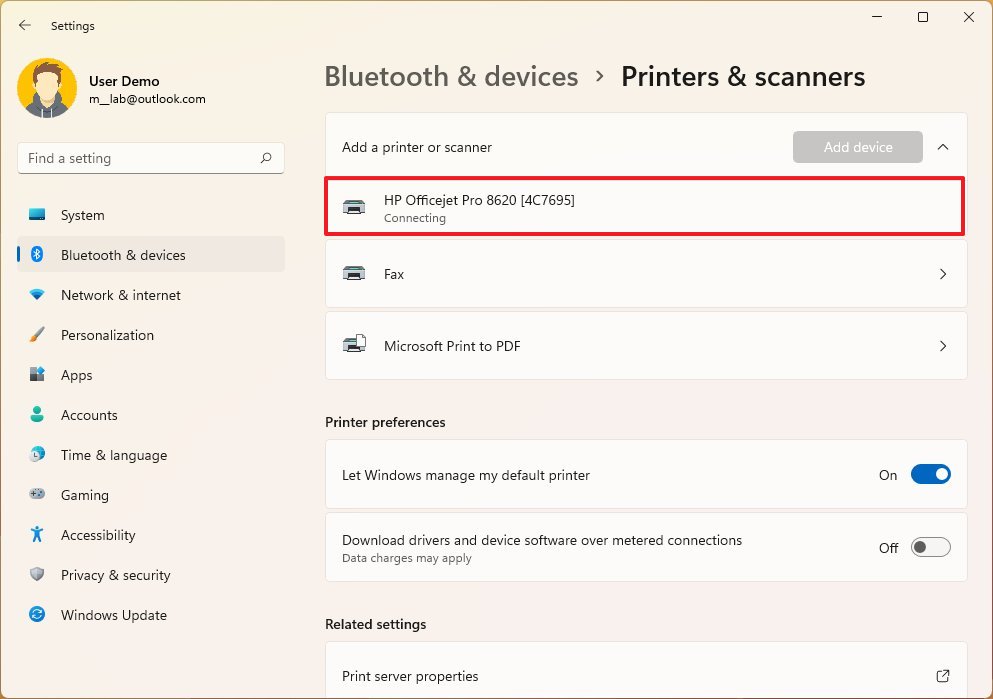
- Click the Add device button.
Once you complete the steps, the system will automatically detect and install the printer driver.
Install USB printer
To install a USB printer to a laptop running Windows 11, use these steps:
- Open Settings.
- Click on Bluetooth & devices.
- Click the Printers & scanners page on the right side.
- Connect the USB cable of the printer to the laptop.
After you complete the steps, Windows 11 will try to install the device automatically.
8. How to install the Microsoft Office apps on Windows 11
When preparing your laptop for school, you cannot ignore Microsoft Office since it includes all the essential apps (such as Word, Excel, PowerPoint, and Outlook) you need to get the work done.
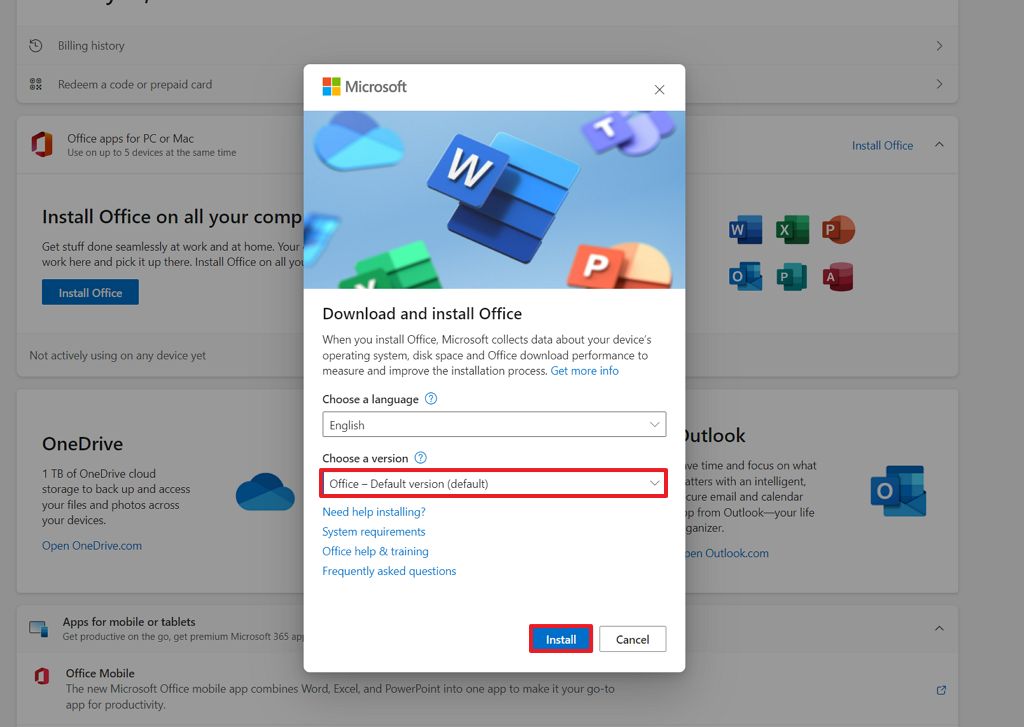
If you already have a Microsoft 365 subscription or you plan to subscribe to one of the plans, these are the steps to install the suite of apps on your laptop:
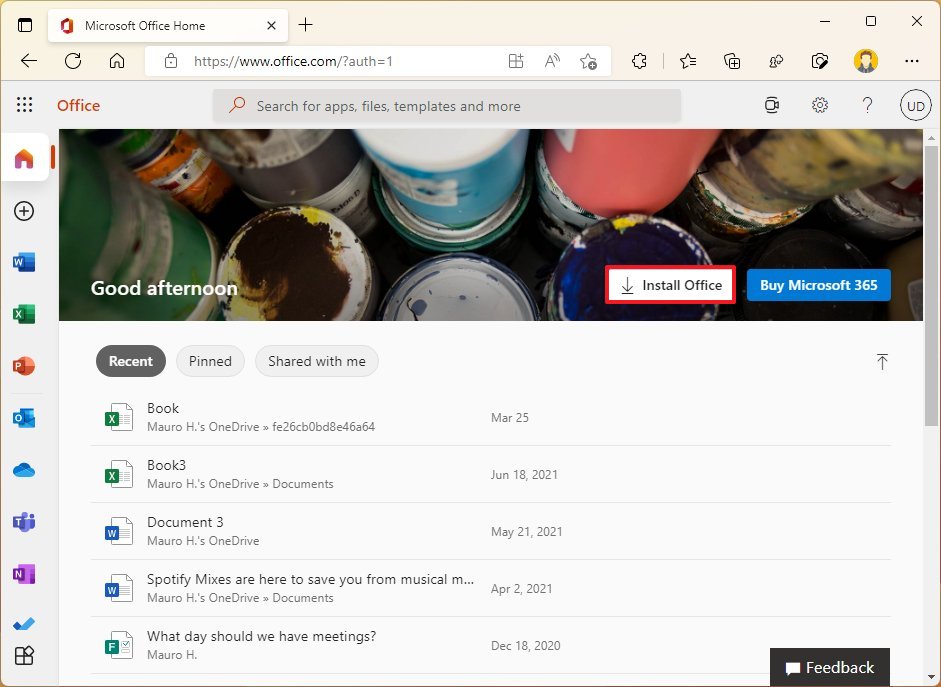
- Open Office account page.
- Click the Sign-in button.
- Click the Install Office button.
- Select your language and version (the default options should be fine.)
- Click the Install button to download the installer.
- Double-click the file to launch the automatic Office setup.
Once you complete the steps, the setup will install the Office apps, including Word, Excel, PowerPoint, Outlook, and others, on your Windows 11 computer.
In addition to installing the Office apps, you should also install OneNote, which makes it easy to take and organize your notes from classes and test preparation.
9. How to switch to Microsoft Edge on Windows 11
Yes, you can continue using Google Chrome, Mozilla Firefox, Opera, or any other browser. However, Microsoft Edge is still among the best browsers, especially for laptops running Windows 11.
The reasoning for this choice is that the browser has been custom designed to run on Windows, plus it comes with support for Chrome extensions. As a result, it provides better performance and power management than its competitors.
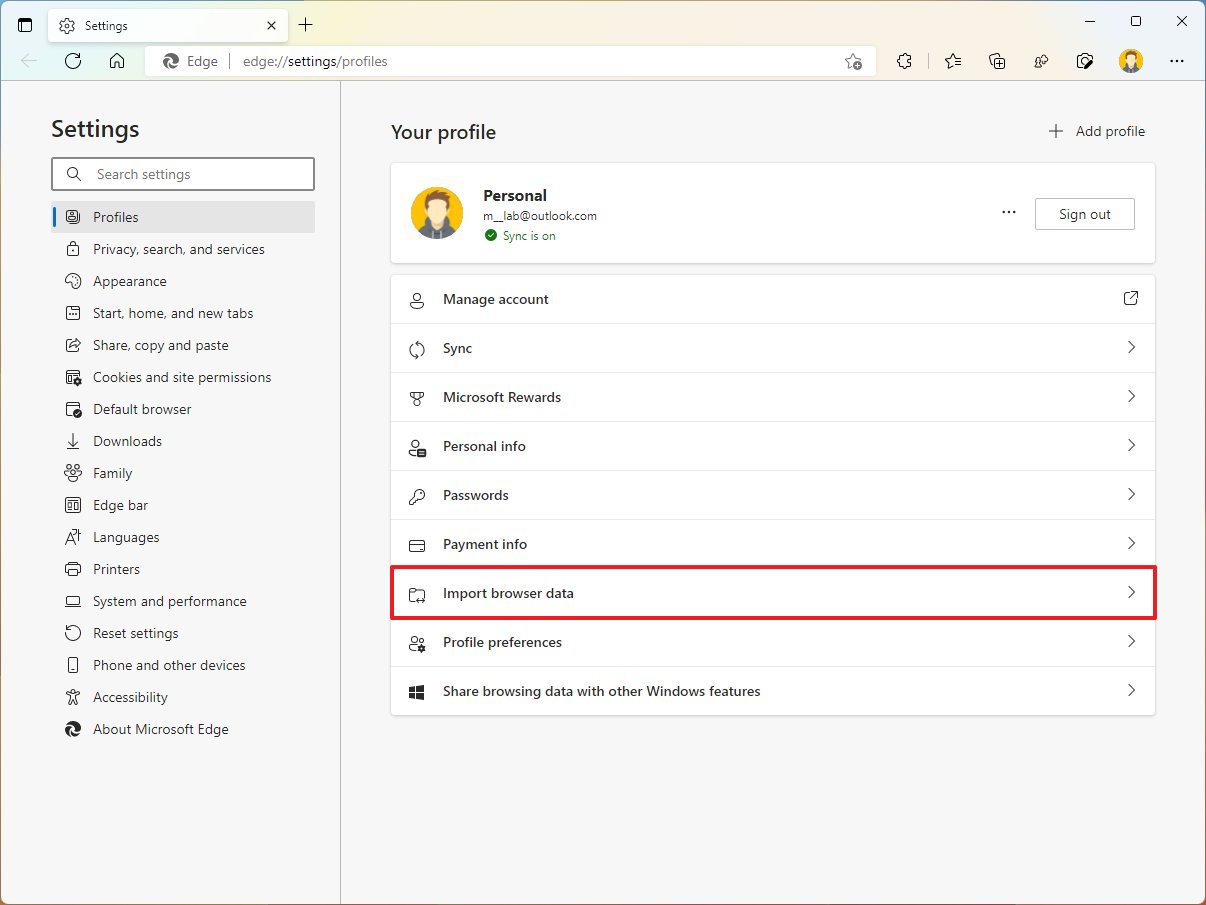
To switch your browsing experience to Microsoft Edge on Windows 11, use these steps:
- Open Microsoft Edge.
- Click the Settings and more (three-dotted) button.
- Select the Settings option.
- Click on Profiles.
- Click the Import browser data option.
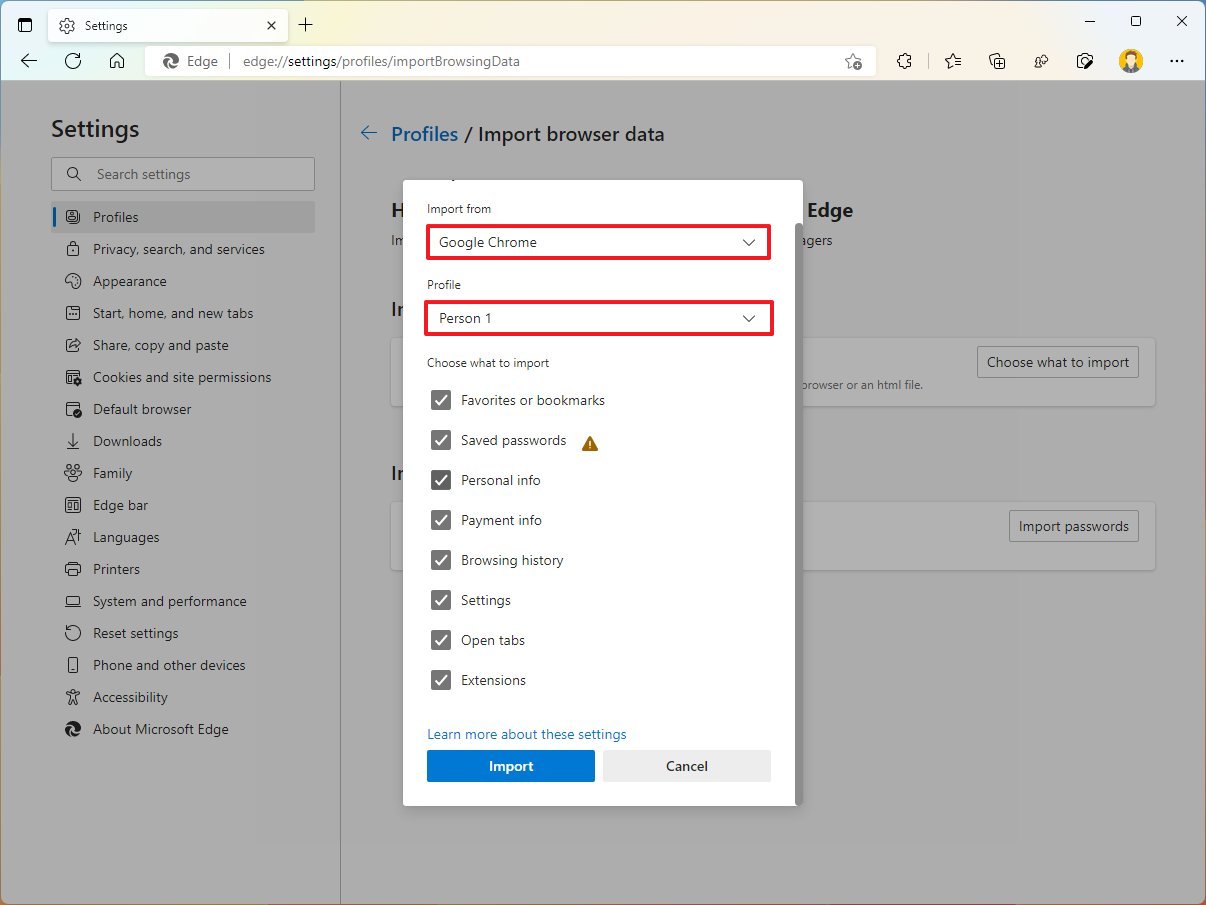
- Click the Choose what to import button.
- Select the Google Chrome (or the other browser you are switching from) option.
- Select the profile where you want to import the data — Profile 1.
- Check the data you want to import.
- Click the Import button.
After you complete the steps, you can start browsing the web with Microsoft Edge on Windows 11.
10. How to protect files with OneDrive on Windows 11
As you gear up to return to school, you must also consider protecting your files with a cloud storage service like OneDrive. These services can protect your school work and other important files and synchronize those files across the device, and they can protect your files in the event that your device gets damaged, lost, or stolen.
If you use OneDrive, you can proactively save your files into the main folder, allowing the application to sync them to the cloud automatically. However, it's also possible to configure backup for local folders, and here's how:
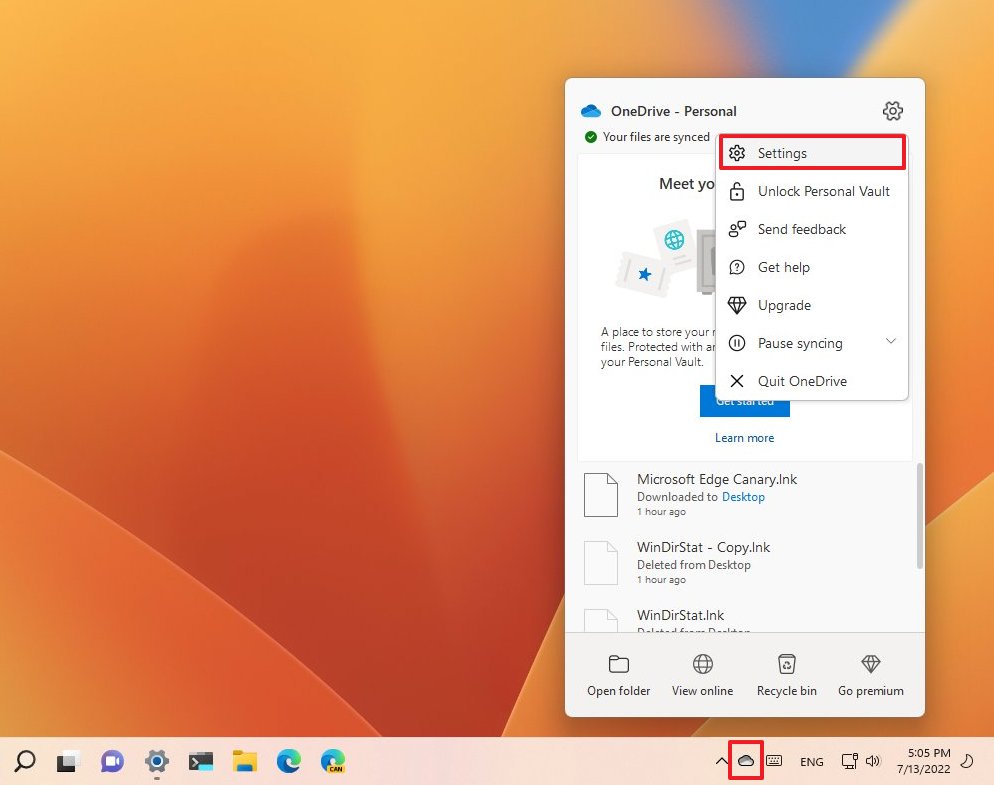
To enable OneDrive backup for the Desktop, Documents, and Pictures folders, use these steps:
- Click on the OneDrive (cloud) button in the Taskbar.
- Click the Help & Settings menu (gear) button.
- Select the Settings option.
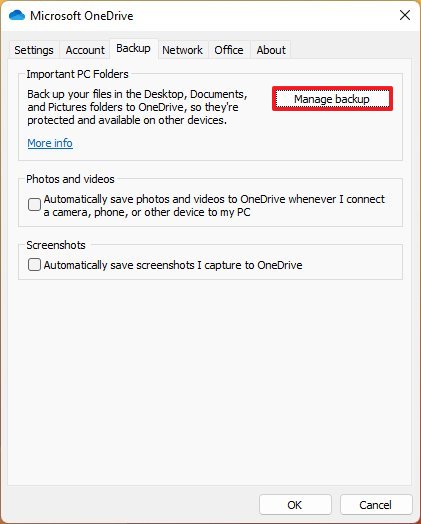
- Click the Backup tab.
- Under the "Important PC Folders" section, click the Manage backup button.
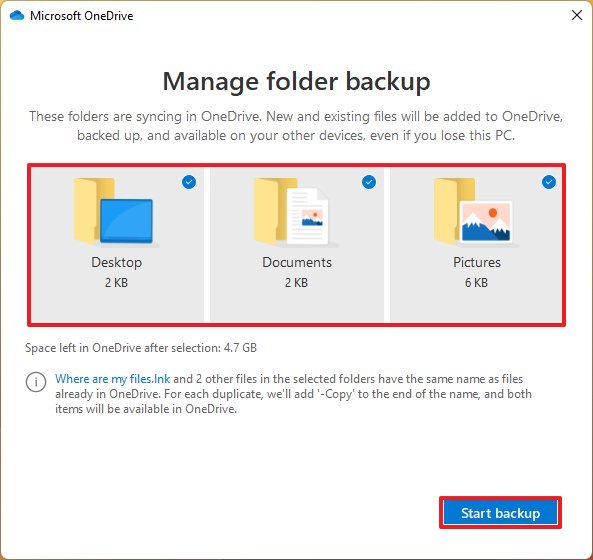
- Select the folders to sync and backup to OneDrive, including Desktop, Documents, and Pictures.
- Click the Start backup button.
Once you complete the steps, the files in the profile folders will sync to the cloud and across devices.
The free version of OneDrive includes 5GB of storage. If you have a lot of files, you should get a Microsoft 365 subscription. For a monthly fee, you get 1TB of OneDrive storage and access to the suite of Office apps and many other benefits.
11. How to repair storage errors on Windows 11
- Open File Explorer.
- Click on This PC from the left navigation side.
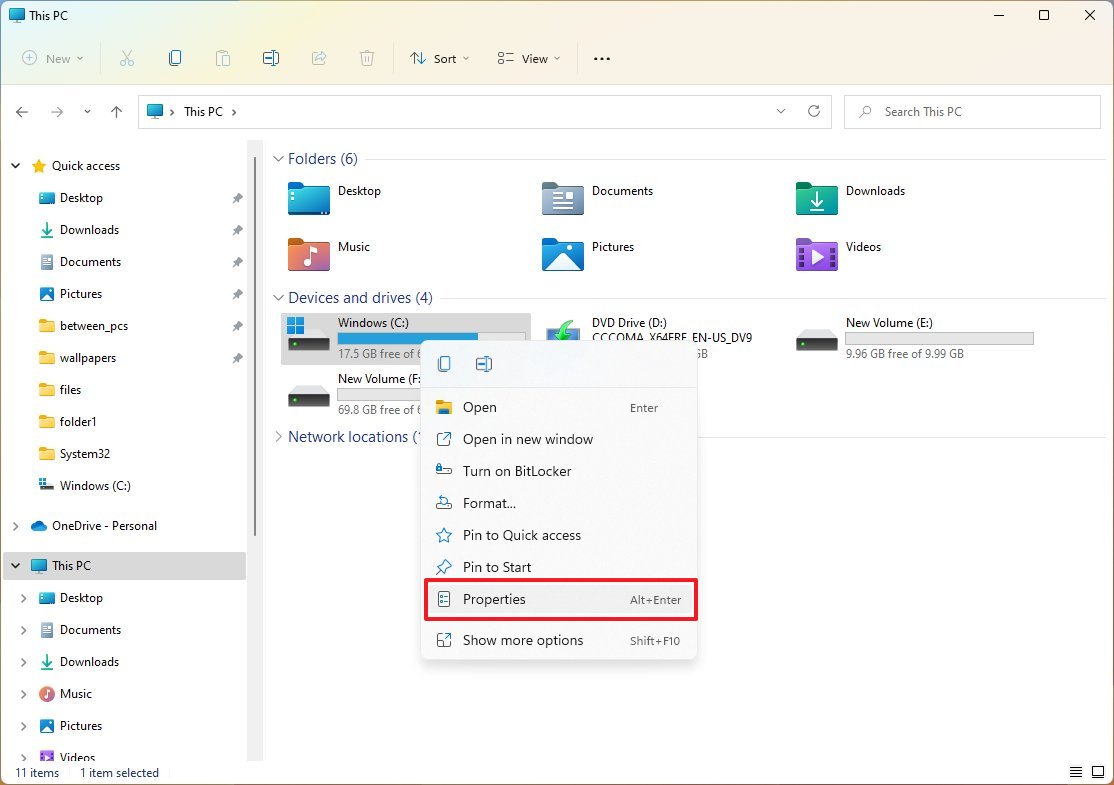
- Under the "Devices and drives" section, right-click the Windows 11 installation drive and select the Properties option.
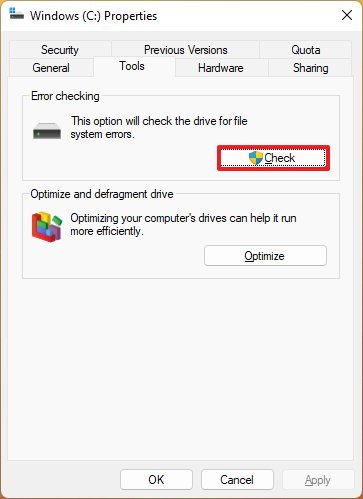
- Click the Tools tab.
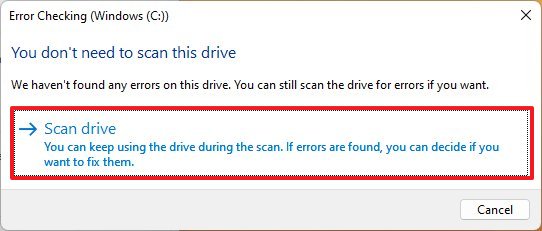
- Under the "Error checking" section, click the Check button.
- Click the Scan drive option.
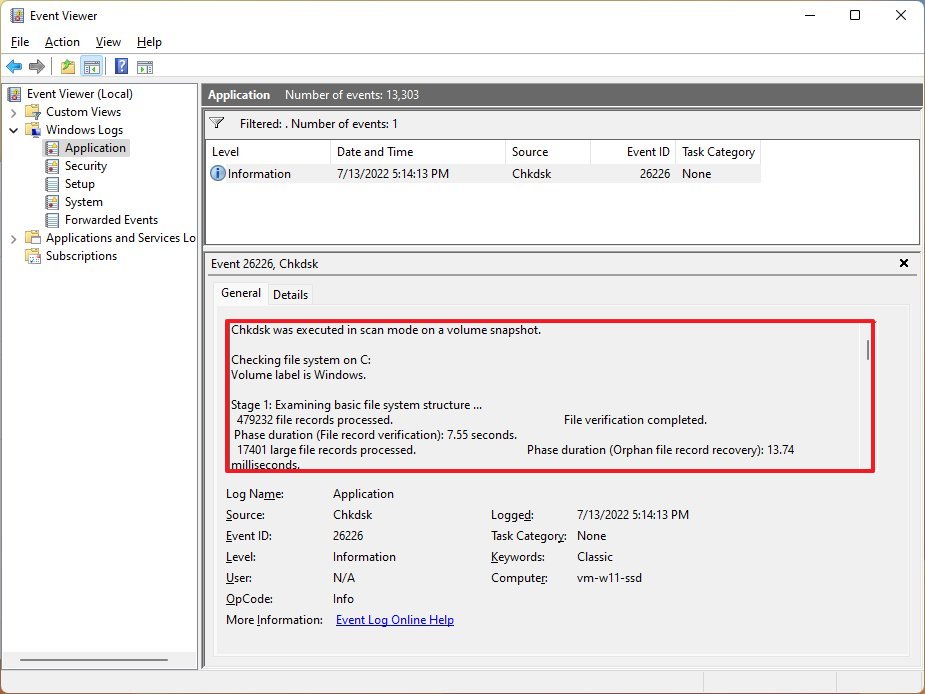
- Click the Show Details option to open the Event Viewer to see more information about the scanning.
- Close the Event Viewer.
- Click the Close button.
After you complete the steps, the tool will try to repair the problem automatically.
If the computer has a more complex problem, you can refer to these instructions to use DISM and SFC to scan and fix the issues.
12. How to reset your laptop to improve performance on Windows 11
If the laptop has had the same installation for some time, it's probably already running slow, showing errors, or draining the battery faster than usual. In this situation, you can use the reset option to wipe out and install Windows 11 while keeping your files.
Important: This process will delete the current installation, including apps and third-party software. However, you can always reinstall them at any time. Also, even though this feature shouldn't delete your files, it's a good idea to back up your files in case something goes wrong.
To reset the current installation of Windows 11, use these steps:
- Open Settings.
- Click on System.
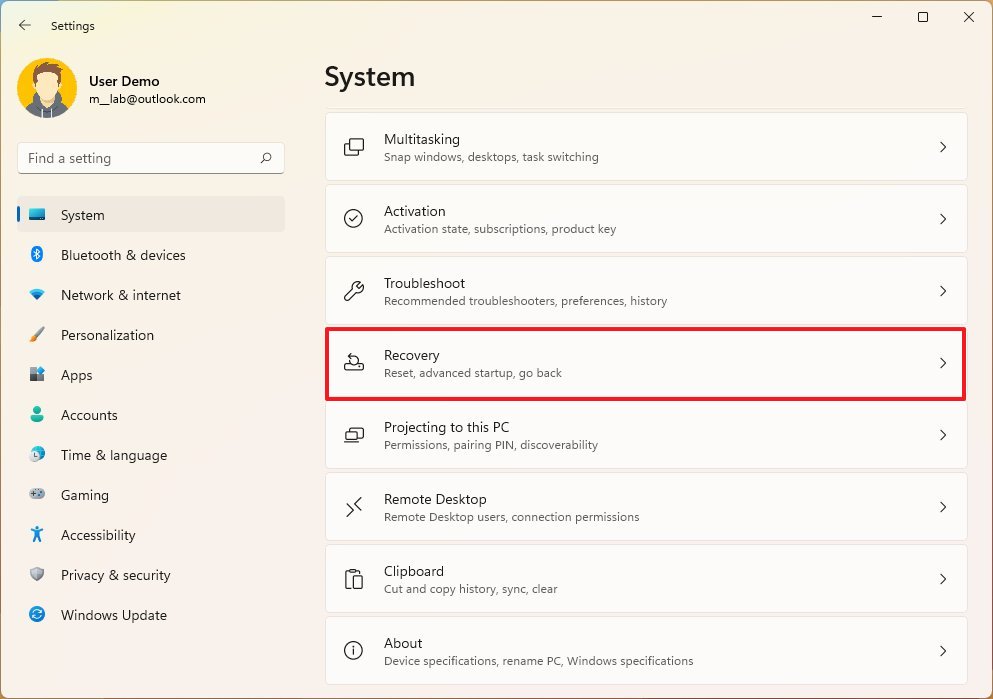
- Click the Recovery page on the right side.
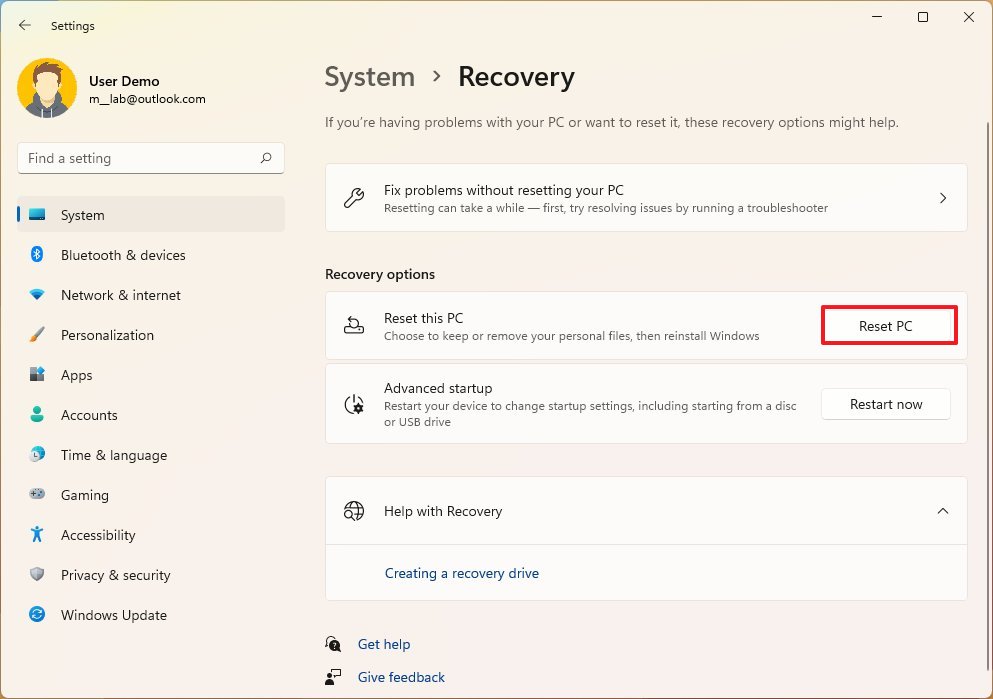
- Under the "Recovery options" section, click the Reset PC button for the "Reset this PC" feature.
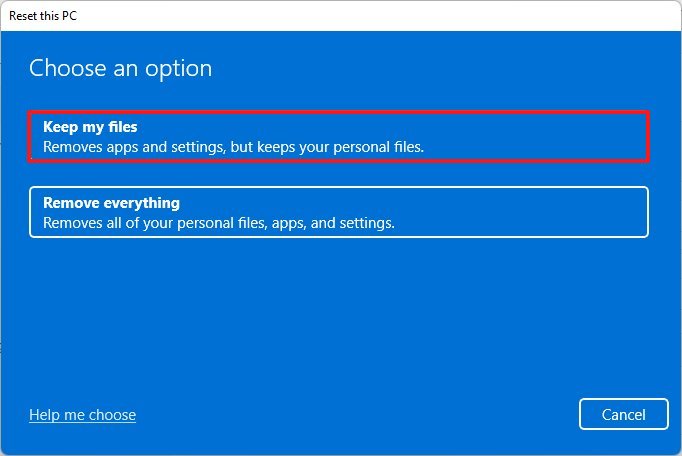
- Click the Keep my files option.
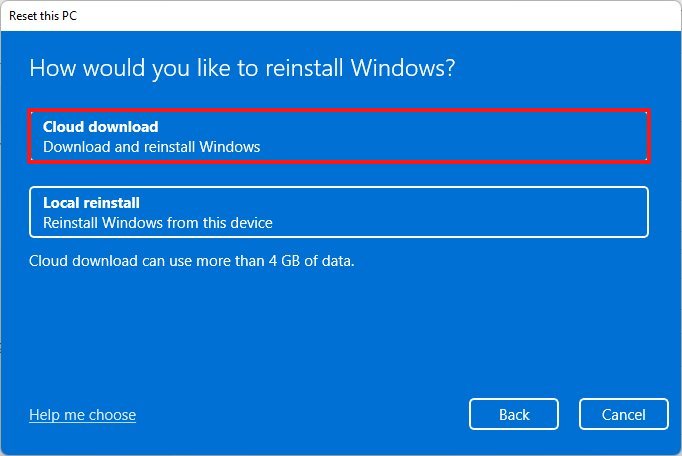
- Select the Cloud download option to download a fresh copy of Windows 11 from the cloud.
- Quick note: This option will not restore the tools, apps, and configuration that came with the original image provided by the manufacturer. If you want to restore the device to the original settings, then select the "Local reinstall" option.
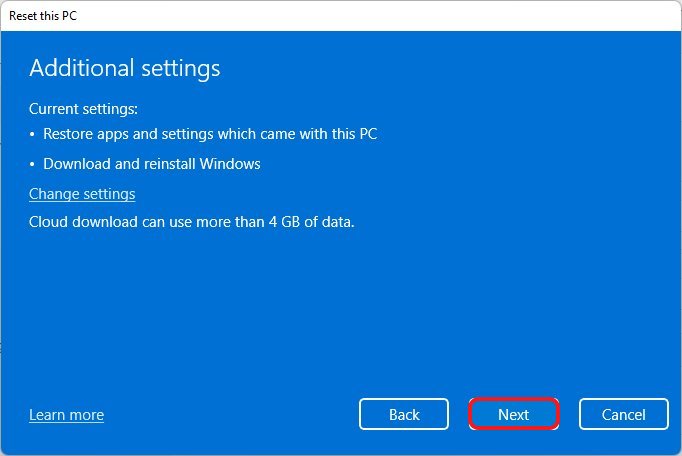
- Review the apps you may need to reinstall.
- Click the Next button.
- Click the Reset button.
Once you complete the steps, the laptop will reset to the factory settings preserving your files and hopefully fixing performance and other issues.
13. How to back up your laptop on Windows 11
After spending the time to prepare your laptop for the new school year, it's crucial to create a backup to protect the setup, settings, apps, and files from hardware failure, malware, and other problems.
Although you can pick from many third-party tools, it's still possible to use the legacy system image backup to create a full backup of the computer, which Microsoft no longer maintains, but it still works.
To create a backup of your computer on Windows 11, use these steps:
- Open Start.
- Search for Control Panel and click the top result to open the app.
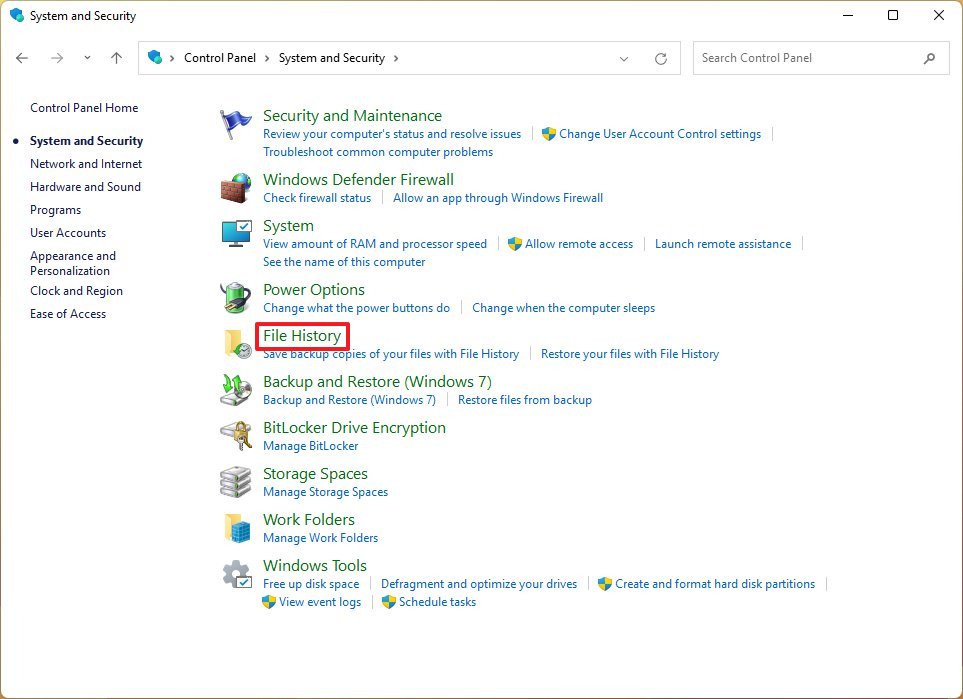
- Click on System and Security.
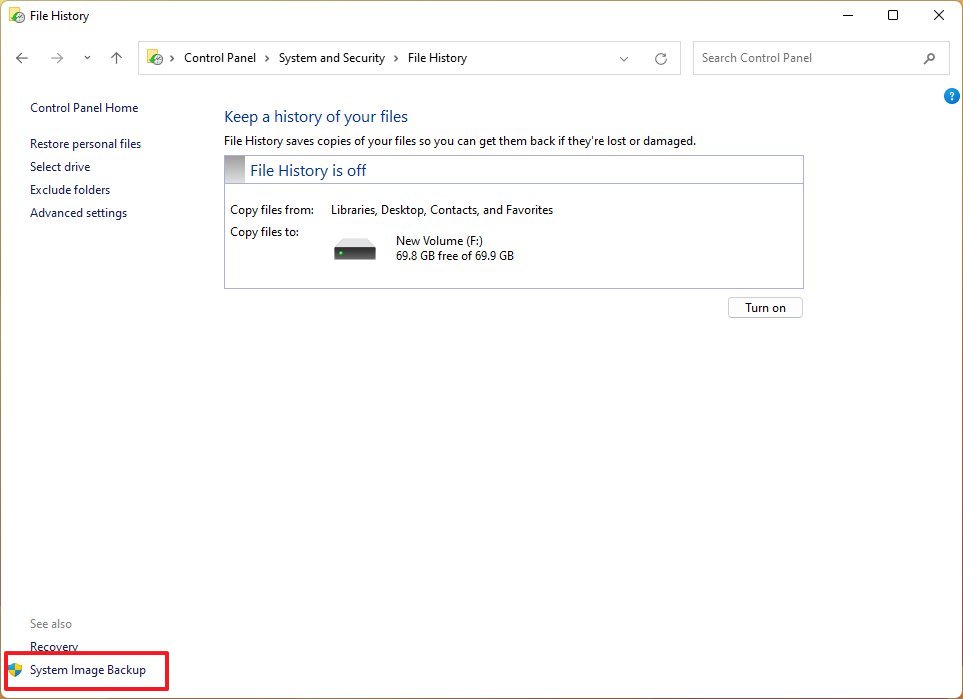
- Click the File History setting.
- Click the System Image Backup option from the bottom-left corner.
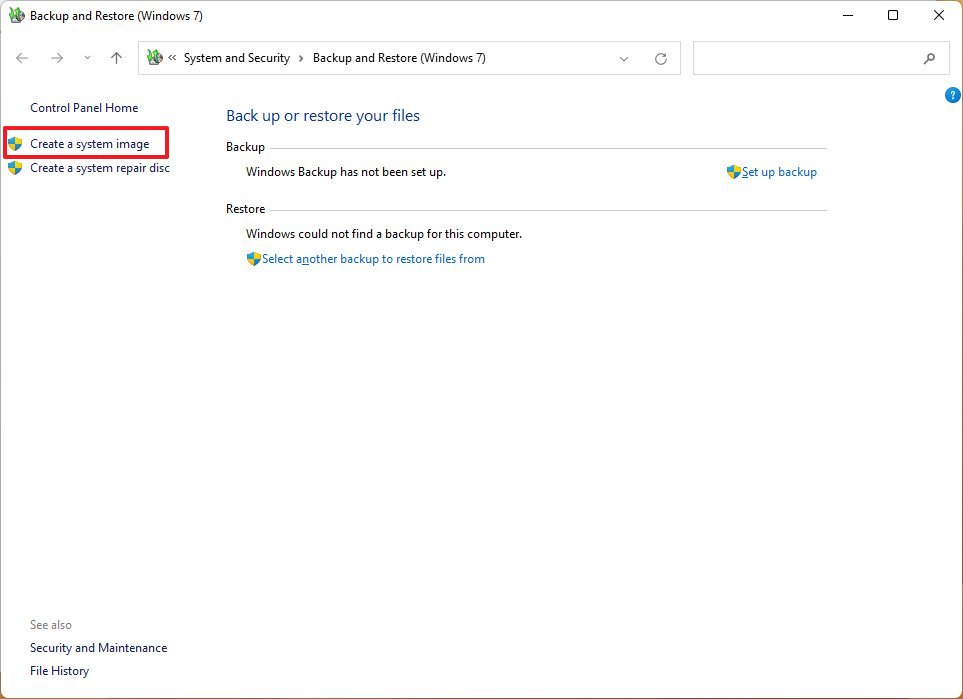
- Click the Create a system image option from the left navigation pane.
- Select the On a hard disk option.
- Use the "On a hard disk" drop-down menu and select the Windows 11 full backup destination.
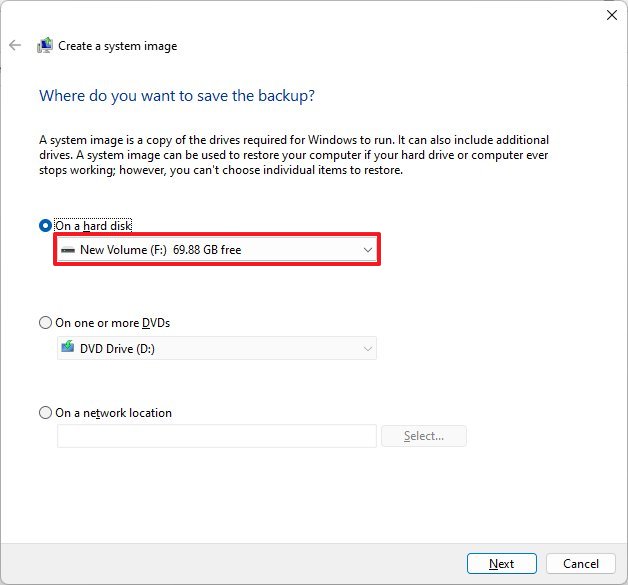
- Click the Next button.
- (Optional) Select any additional drive to include in the backup.
- Click the Next button.
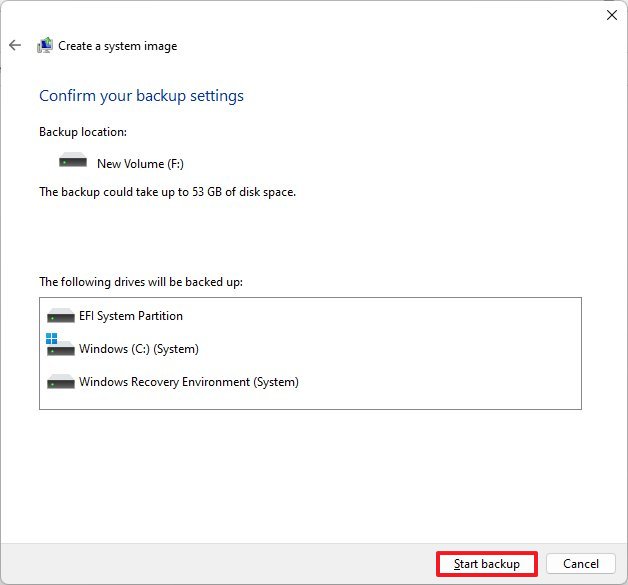
- Click the Start backup button.
- Click the No button.
- Quick note: You'll also receive a prompt to create a system repair disc, but you can skip it. If you need to roll back to a previous installation, you can use a USB installation media to access the recovery settings.
- Click the Close button.
Once you complete the steps, Windows 11 will create a backup of the primary drive and any other storage you may have selected.
More resources
For more helpful articles, coverage, and answers to common questions about Windows 10 and Windows 11, visit the following resources:

Mauro Huculak has been a Windows How-To Expert contributor for WindowsCentral.com for nearly a decade and has over 22 years of combined experience in IT and technical writing. He holds various professional certifications from Microsoft, Cisco, VMware, and CompTIA and has been recognized as a Microsoft MVP for many years.
