


As we move through our daily routine, it's natural to wonder how you can become more efficient. How do you automate simple tasks? Where can you save time within a process without sacrificing quality or reliability of the results? Microsoft Flow answers the call for the automation of workflows. Take a look at how you can get started with Microsoft Flow.
- What are connectors and triggers?
- How to Create a Flow in Microsoft Flow
- How to add steps in Microsoft Flow
- How to share your flow in Microsoft Flow
If used correctly, you can perform a wide array of functions such as email attachment storage, data collection or automatically posting to social media. Microsoft Flow goes well beyond these simple yet important functions. Before you jump into the deep end, here's how you can get your feet wet.
What are connectors and triggers?
A connector is a service that you log into and use. Examples of these include OneDrive for Business, Twitter or Salesforce. A trigger is an event that occurs within the service that will then result in the desired action. These triggers include, when a lead is created or when an email from Jane Smith arrives in the Inbox folder. This then initiates the flow you are about to create.

Each flow has a detailed section that helps you manage it to optimize the services found within. Options are housed within tiles. They are as follows:
- Description — This section contains the title and the description of the flow. You can change the details by clicking on Edit description.
- Connections and Owners — These tiles both contain all service connection types used in the flow and the details of the individuals who are using that particular flow. Owners can update, edit and even delete flows. All owners can also add and remove members from the flow ownership.
- Run History — As flows are running, you can see details such as the date they were created as well as trigger details. A Status section will also indicate if a trigger had failed.
How to Create a Flow in Microsoft Flow
Microsoft Flow offers a few ways to create flows for your benefit. Templates are readily available throughout the website, but you can also decide to bake one from scratch.
How to create a Flow from a template

- Log into your Office 365 account.
- Click the Apps icon in the top right corner of the window.
- Select Flow from the app grid.
- Select Templates from the top ribbon.
- Click on a flow tile from the list of templates. You can also filter the tiles using the presented categories.
- Read the flow description in the presented page.
- Click View permissions for all connectors involved.
- Click Create Flow. The flow is then saved to your My Flows list.
How to create a flow from a blank slate
For this example, let's look at using Microsoft Flow to create an automated process for Outlook.
- Select My flows from the top.
- Choose Create from blank.
- Click Search hundreds of connectors and triggers.
- Select Office 365 Outlook from the Connectors group. You can also use the search field to quickly find a connector or trigger.
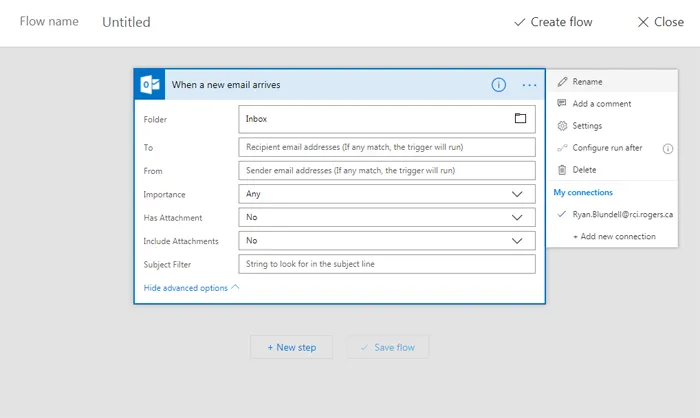
- Select a specific trigger based on the connector. Chose Office 365 Outlook – When a new email arrives.
- Click on the ellipses (...) to add connections, rename the flow, add a comment and view specific settings.
- Choose a folder to work with.
- Click Advanced options to specify details such as Sender email addresses, Importance and Attachment status.
- Select New Step.
- Add an action such as OneDrive for Business – Create file.
- Choose folder Path, name and content.
- Click Save Flow.
How to create a team flow

- Select My flows from the top ribbon.
- Select the People icon on the flow you want to work with.
- Enter the contact details (name, email address or group name) for those that you want to make an owner.
- Select the person from the presented search results.
- Add additional people as required.
As you select individuals, they then become owners of the flow. They have permissions to fully manage the connectors, triggers, and actions of the flow.
How to delete an owner
- Click My flows in the top ribbon.
- Choose a flow to work with.
- Select the People icon on that flow.
- Navigate to the owner that is to be removed.
- Click the Delete icon (trash can).
- Select Remove this owner in the confirmation dialog box.
How to add steps in Microsoft Flow
How to add a step
You aren't limited to the steps found in existing templates. In fact, it's possible to add multiple actions to a flow in order to further your automation reach.
- Access your flow from My flows in the top ribbon.
- Select the flow to be edited from your list.
- Select New Step.
- Select Add an action.
- Selection an action in the Chose an action dialog box.
- Enter any necessary credentials, based on the services its found under.
- Choose Update flow once you have finished the setup for the particular action.
Based on output dependencies, you can move steps around by clicking and dragging their title bars into a new position. Actions can also be easily deleted by click on the ellipsis found in the title bar and select Delete.
How to share your flow in Microsoft Flow
How to submit your own Flow to the Microsoft Flow Template gallery

- Navigate to the My flows section.
- Choose a flow from the list to submit.
- Select the ellipsis (...) for the chosen flow.
- Select Submit as template from the drop-down menu. A dialog box will appear.
- Select an appropriate title for the flow.
- Define the function and solution that your flow performs in the Description field.
- Click the checkboxes for all categories that apply to your flow template.
- Select Submit.
With any luck, your flow will be verified and approved for inclusion in the gallery of templates. Keep in mind that your flow may be modified during the verification process.
Wrapping up
The steps above only cover the bare basics of Microsoft Flow. We have just scratch the surface of the automation benefits; imagine notifying your team of a new lead in Dynamics CRM with a post in their Yammer group or sending a customized email to a candidate when they sign their offer. Are you using Microsoft Flow to automate repetitive tasks? Which flow do you use the most? Let us know in the comments.
Microsoft Office 101: Help, how-tos and tutorials

