How to change DNS settings on your PC running Windows 10
Yes, you can change the Windows 10 DNS settings for more private and reliable services, and in this guide, I'll show you how.
All the latest news, reviews, and guides for Windows and Xbox diehards.
You are now subscribed
Your newsletter sign-up was successful
As part of your internet service, the Internet Service Provider (ISP) also provides the local network with the necessary settings, including the Domain Name System (DNS) addresses, which allow you to access your favorite websites and online services and download files.
The only caveat is that the ISP's DNS servers are usually not very private, slower than other services, and can be unreliable. However, you can always use different resolvers from third-party companies to improve your internet experience on Windows 10.
What's DNS?
A Domain Name System is an internet service (usually at no cost to you) that allows you to type a friendly domain name in the web browser's address bar to load a website. And without it, it'd be a nightmare to surf the web.
The issue is that every device requires an IP address (for example, 104.18.189.55) to communicate with other devices. However, these addresses are not easy for humans to remember, and DNS servers provide the mechanism to translate friendly domain names (for example, WindowsCentral.com) into IP addresses that computers can understand.
Although you can type "https://windowscentral.com" to access this website, in the background, the browser first sends a request to the DNS servers to resolve the IP address from the website's name. Only when the address is found does the browser connect to the site and download the page's contents.
Usually, you won't notice this process because it's automatic, and everything happens quickly, in milliseconds. However, if your resolvers are unreliable, they slow down your internet, or you want to use faster and more private servers, Windows 10 allows you to change these settings using Control Panel, Command Prompt, PowerShell, and Settings app.
In this how-to guide, I'll outline the steps to change the DNS settings on Windows 10.
All the latest news, reviews, and guides for Windows and Xbox diehards.
These instructions has been updated to ensure accuracy and reflect changes to the process in the operating system.
How to change DNS settings using Control Panel on Windows 11
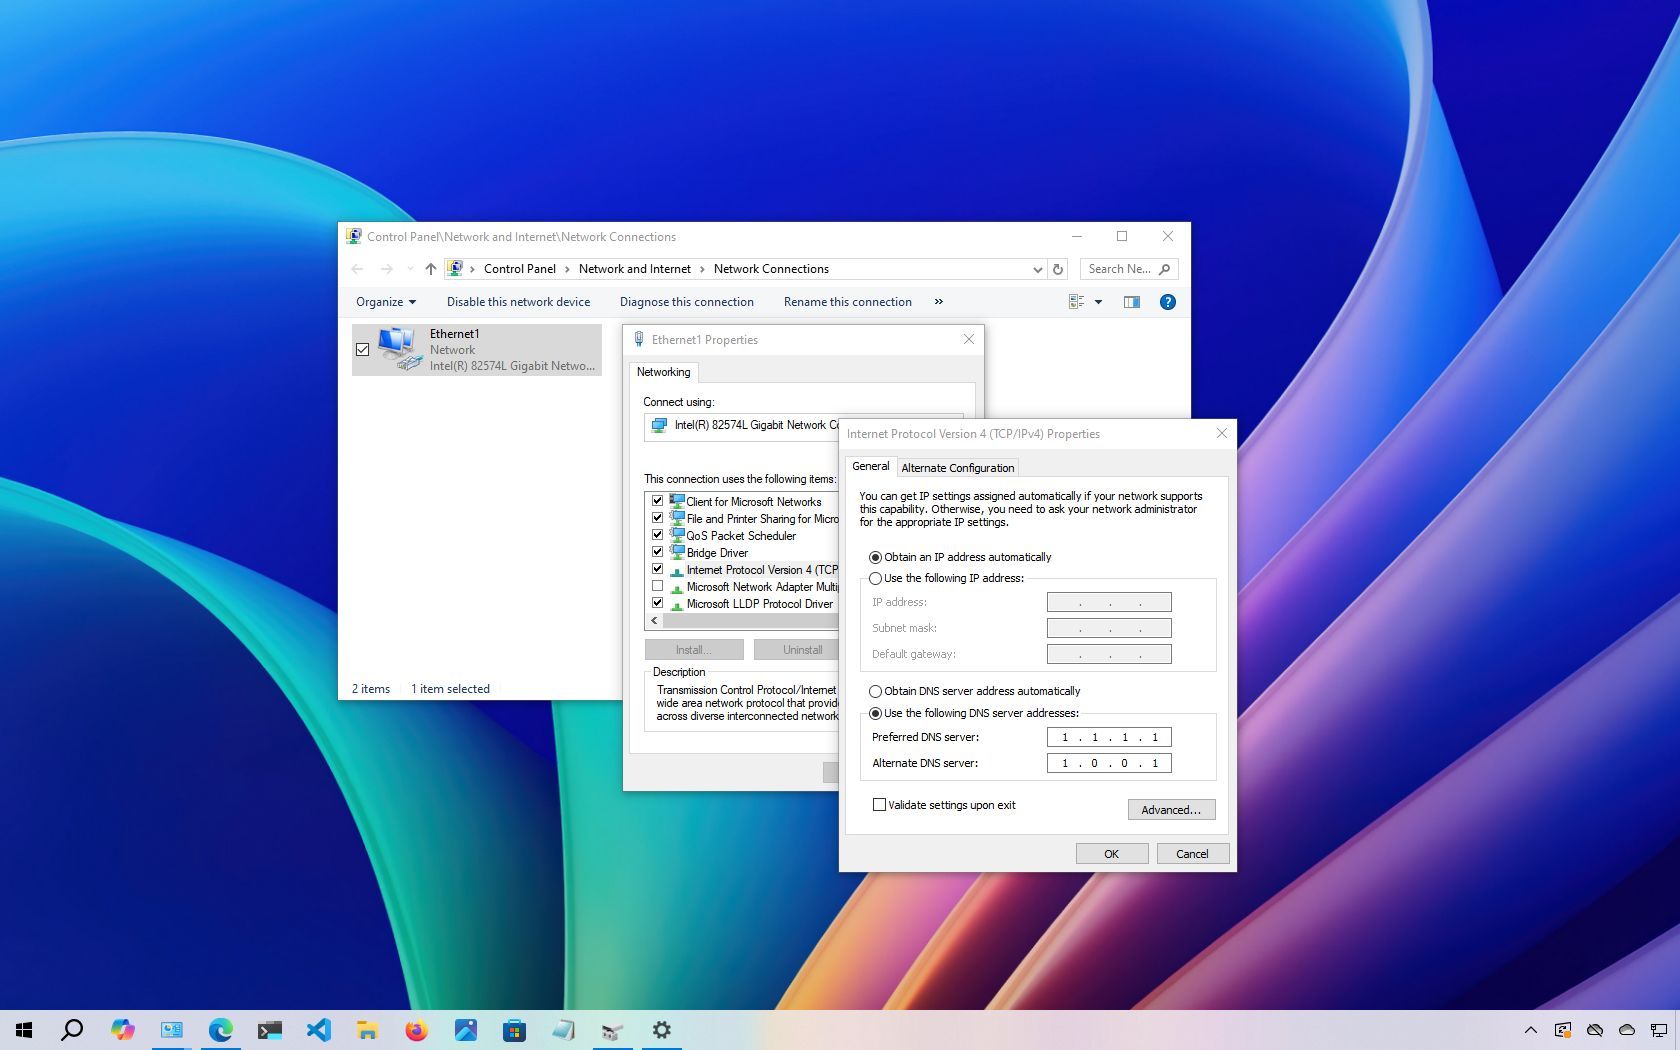
To change the DNS settings with Control Panel, use these steps:
- Open Control Panel.
- Click on Network and Internet.
- Click on Network and Sharing Center.
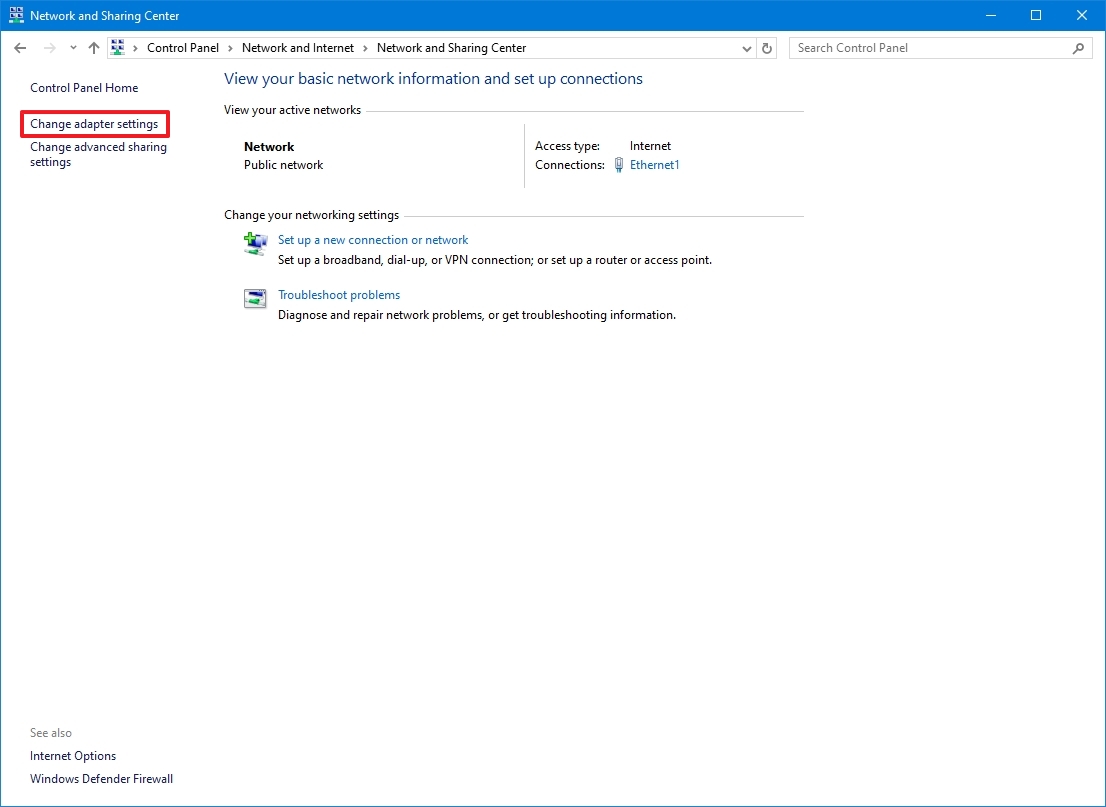
- Click the "Change adapter settings" option in the left pane.
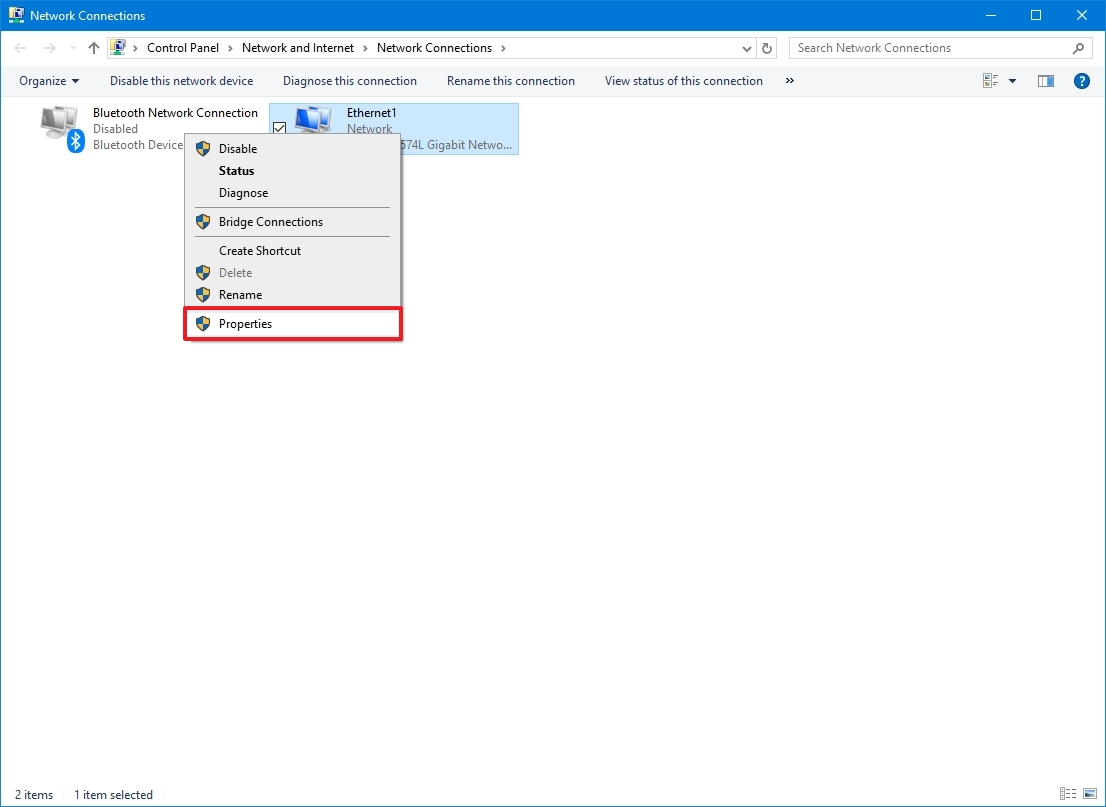
- Right-click the active network interface and select the Properties option.
- Quick tip: You'll know which adapter is connected to the network because it won't have a "Disabled" or "Network cable unplugged" label.
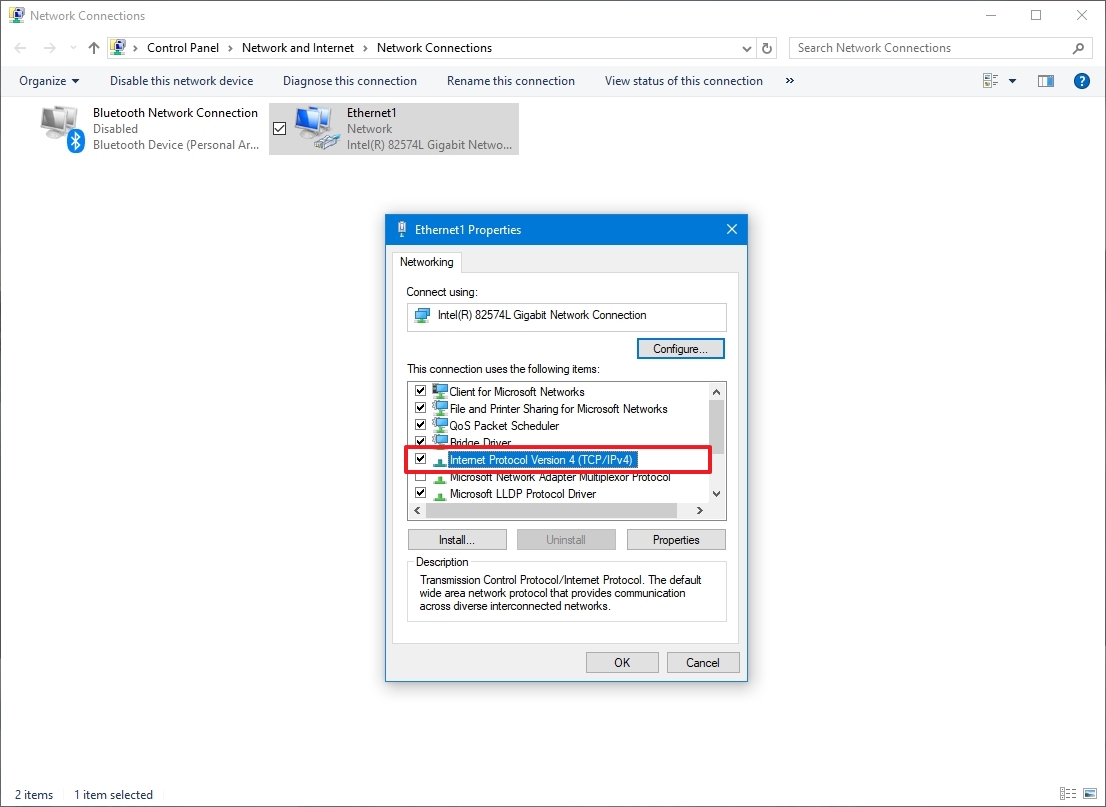
- Select and check the "Internet Protocol Version 4 (TCP/IPv4)" option.
- Click the Properties button.
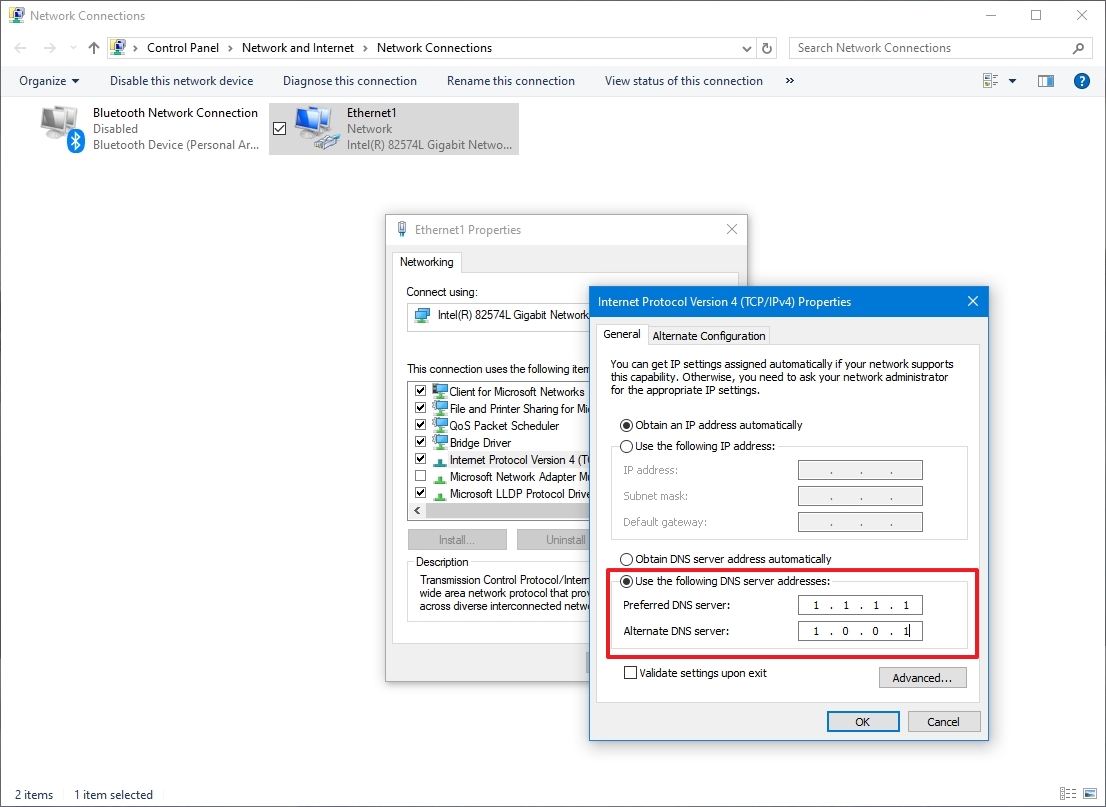
- Select the "Use the following DNS server addresses" option.
- Quick note: When you select the option to specify the DNS settings manually, the computer will continue to receive the TCP/IP address from the DHCP server (router).
- Confirm the primary DNS address under the "Preferred DNS server" section. For example:
- Cloudflare: 1.1.1.1
- Google Public DNS: 8.8.8.8
- OpenDNS: 208.67.222.222
- Confirm the secondary DNS address the computer will use if the primary is not reachable under the "Alternate DNS server" section. For example:
- Cloudflare: 1.0.0.1
- Google Public DNS: 8.8.4.4
- OpenDNS: 208.67.220.220
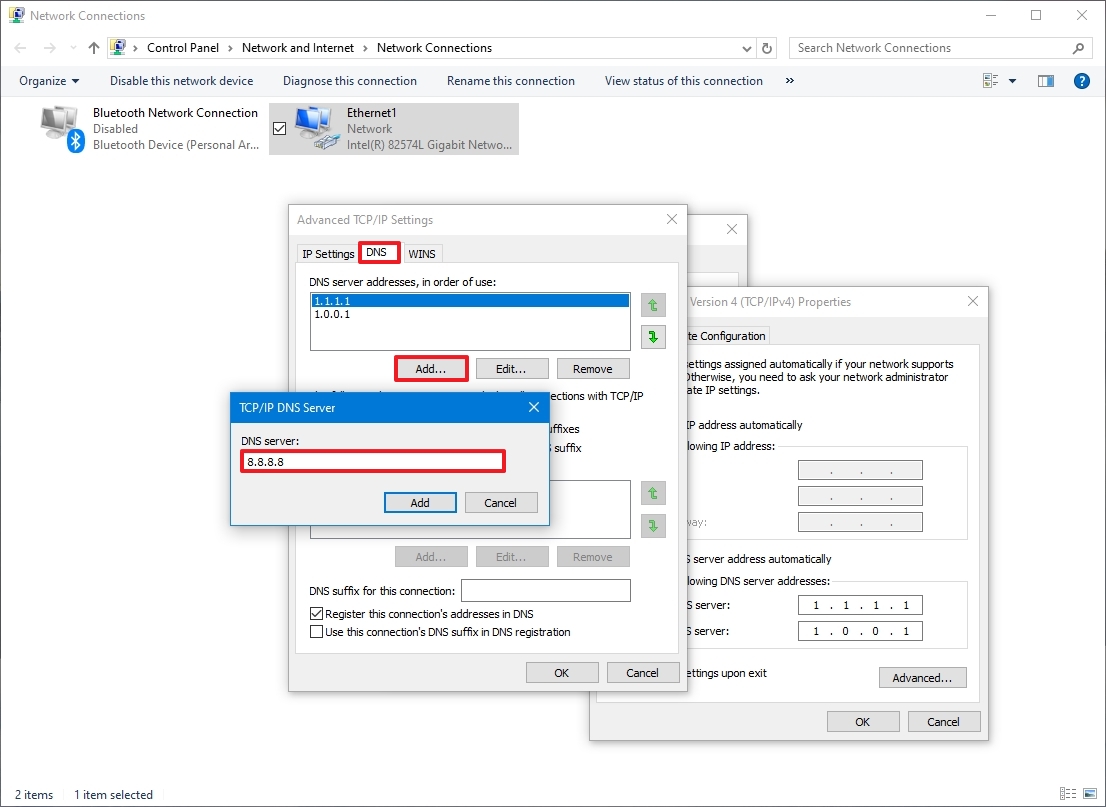
- (Optional) Click the Advanced button.
- Click the DNS tab.
- Click the Add button.
- Confirm additional alternate DNS server addresses (as necessary).
- Click the Add button.
- Quick tip: In addition to adding more addresses, you can edit and remove resolvers, and adjust their priority.
- Click the OK button.
- Click the Close button.
Once you complete the steps, the device will start using the specified DNS settings immediately.
How to change DNS settings using Settings on Windows 10
To change the DNS addresses through the Settings app, use these steps:
- Open Settings.
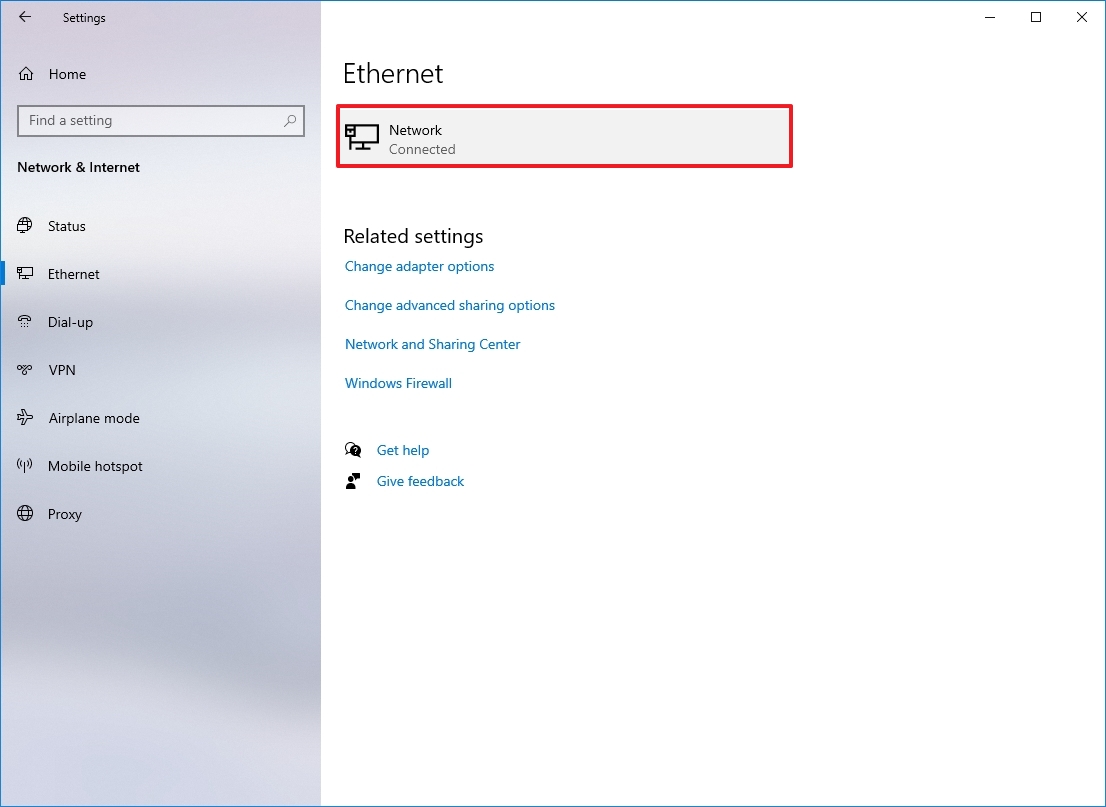
- Click on Network & Internet.
- Click on Ethernet or Wi-Fi.
- Select the active network connection.
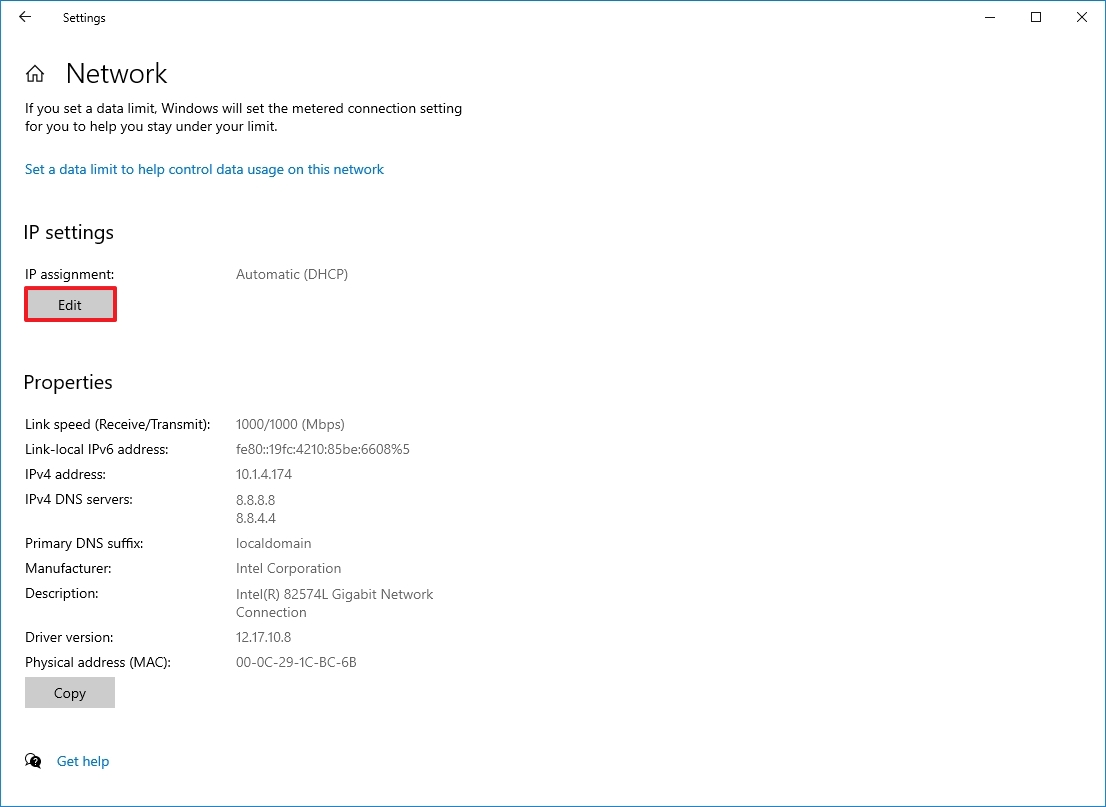
- Click the Edit button under the "IP settings" section
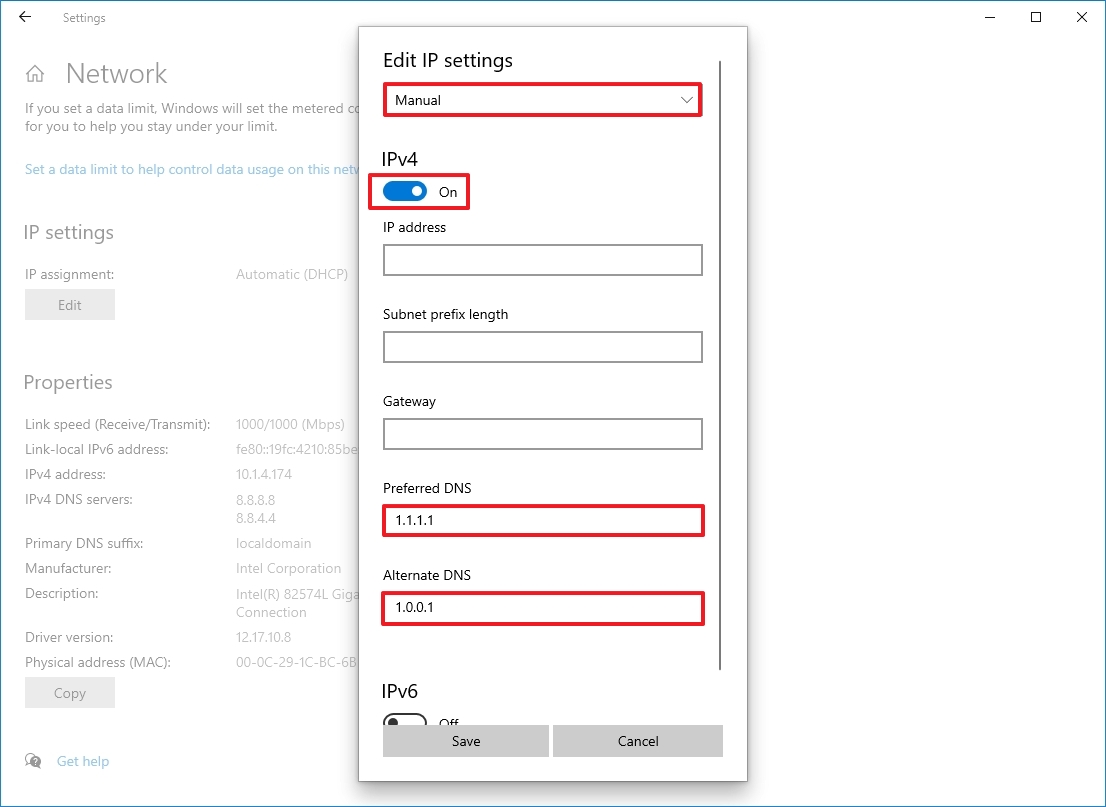
- Select the Manual option in the "Edit IP settings" section.
- Turn on the IPv4 toggle switch.
- Confirm the primary DNS address under the "Preferred DNS server" section. For example:
- Cloudflare: 1.1.1.1
- Google Public DNS: 8.8.8.8
- OpenDNS: 208.67.222.222
- Confirm the secondary DNS address under the "Alternate DNS server" section. You can use one of these secondary addresses:
- Cloudflare: 1.0.0.1
- Google Public DNS: 8.8.4.4
- OpenDNS: 208.67.220.220
- Click the Save button.
- Restart the device.
After you complete the steps, the computer should connect to the internet using the new resolvers. Although it's not a requirement, changing the DNS configuration from the Settings app may cause the system to lose connectivity. As a result, I commend restarting the computer after making these changes.
Although the Settings app is the recommended option to change DNS settings on your computer, I'm not listing it first because this method can be confusing for some people.
How to change DNS settings using Command Prompt on Windows 10
To change the computer's DNS settings through the Command Prompt, use these steps:
- Open Start.
- Search for Command Prompt, right-click the top result, and select the Run as administrator option.
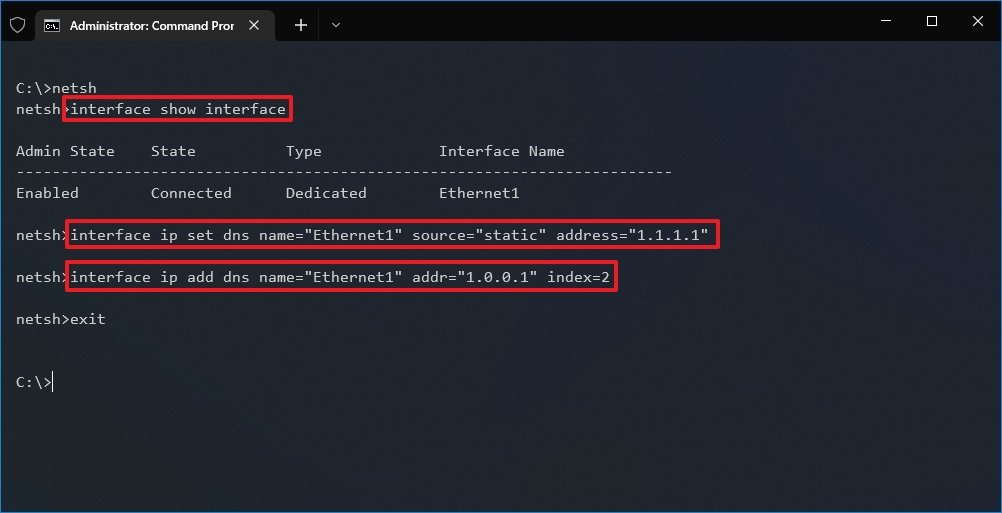
- Type the following command to launch the tool to change the networking settings and press Enter: netsh
- Type the following command to identify the names of the network adapters and press Enter: interface show interface
- Type the following command to set the primary DNS IP address and press Enter: interface ip set dns name="ADAPTER-NAME" source="static" address="X.X.X.X"
In the command, change "ADAPTER-NAME" with the name of the network adapter you identified in step 4, and change "X.X.X.X" with the IP address you want to use. For example:
- Cloudflare: 1.1.1.1 and 1.0.0.1
- Google Public DNS: 8.8.8.8 and 8.8.4.4
- OpenDNS: 208.67.222.222 and 208.67.220.220
This example sets the primary DNS address to 1.1.1.1: interface ip set dns name="Ethernet1" source="static" address="1.1.1.1"
- Type the following command to add an alternative DNS IP address and press Enter: interface ip add dns name="ADAPTER-NAME" addr="X.X.X.X" index=2
In the command, change "ADAPTER-NAME" with the name of the network adapter you identified in step 4, and change "X.X.X.X" with the secondary address. This example sets the secondary DNS address to 1.0.0.1: interface ip add dns name="Ethernet1" addr="1.0.0.1" index=2
- Quick tip: You can repeat the above steps to add more addresses if necessary. However, in the command, you must increase the number of the index option by "1." For instance, interface ip add dns name="Ethernet1" addr="8.8.8.8" index=3
Once you complete the steps, Windows 10 will start using the new DNS server addresses to resolve domain names to numeric addresses that your device can understand.
How to change DNS settings using PowerShell on Windows 10
To change the computer's DNS settings through PowerShell, use these steps:
- Open Start.
- Search for PowerShell, right-click the top result, and select the Run as administrator option.
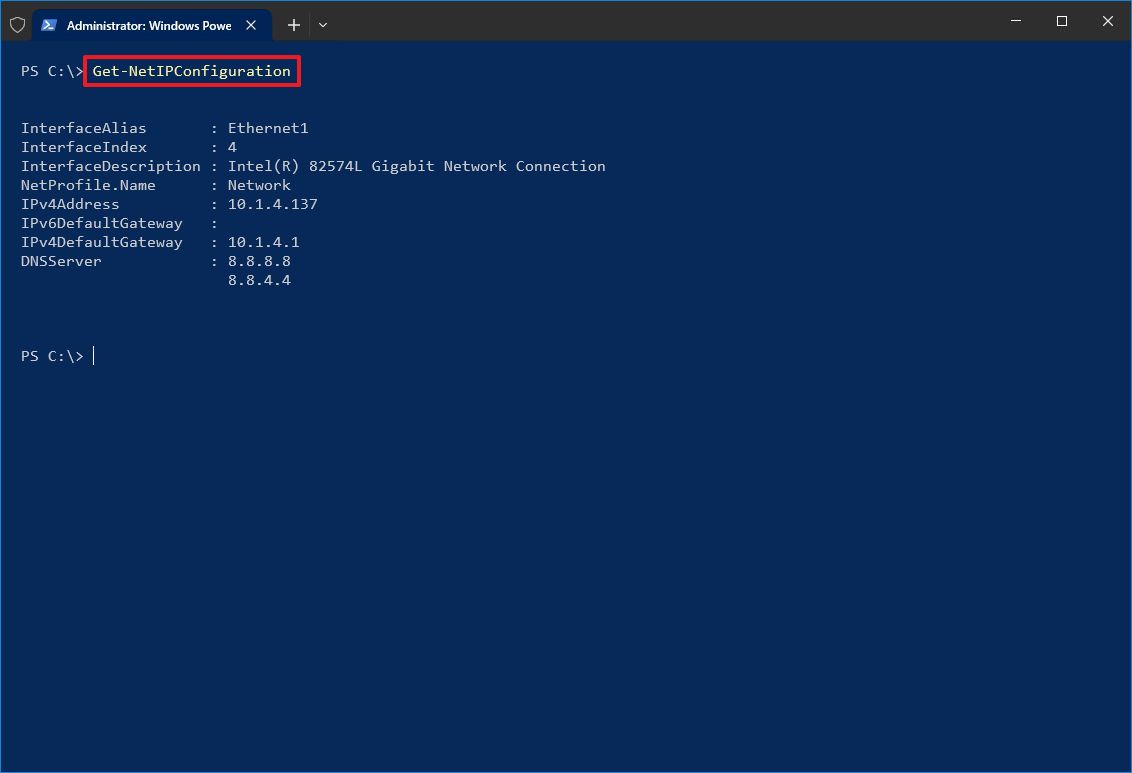
- Type the following command and note the "InterfaceIndex" and "DNSServer" settings from the current configuration, and press Enter: Get-NetIPConfiguration
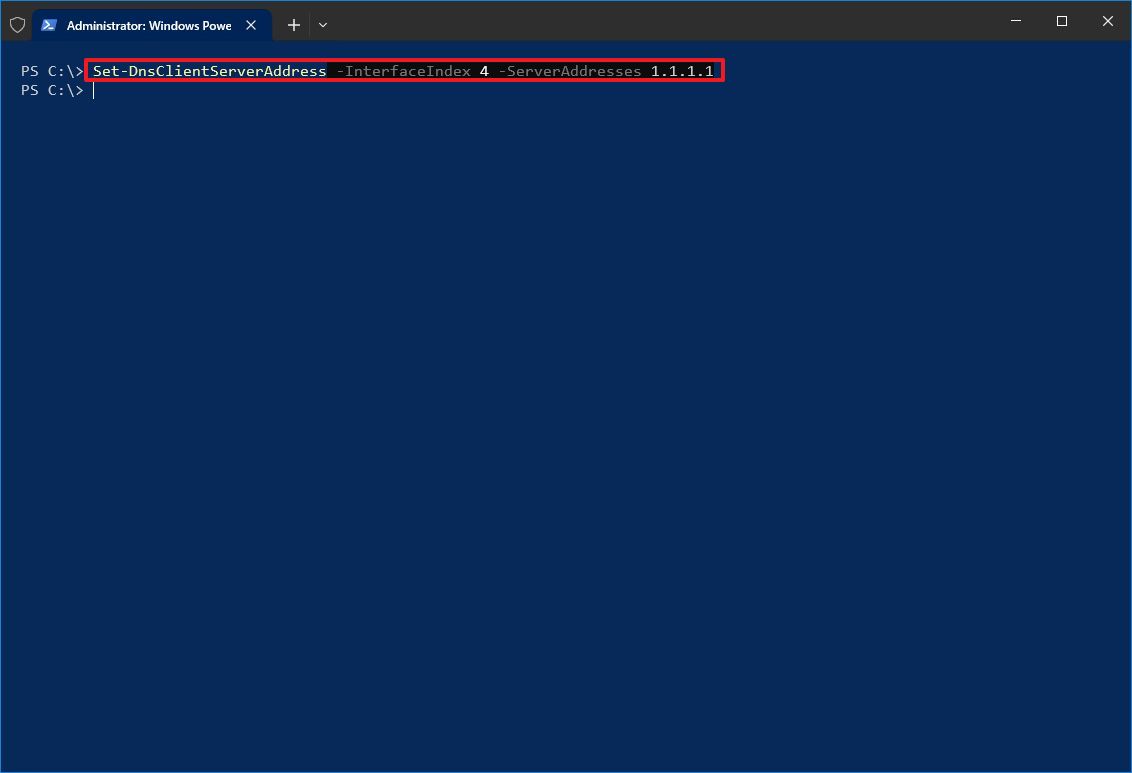
- Type the following command to configure a primary DNS address and press Enter: Set-DnsClientServerAddress -InterfaceIndex ADAPTER-INDEX -ServerAddresses X.X.X.X
In the command, change "ADAPTER-INDEX" with the number of the network adapter you identified in step 4, and change "X.X.X.X" with the IP address you want to use. For example:
- Cloudflare: 1.1.1.1 and 1.0.0.1
- Google Public DNS: 8.8.8.8 and 8.8.4.4
- OpenDNS: 208.67.222.222 and 208.67.220.220
This example sets the primary DNS address to 1.1.1.1: Set-DnsClientServerAddress -InterfaceIndex 4 -ServerAddresses 1.1.1.1
- Type the following command to configure primary and secondary DNS addresses and press Enter: Set-DnsClientServerAddress -InterfaceIndex ADAPTER-INDEX -ServerAddresses X.X.X.X, X.X.X.X
In the command, change "ADAPTER-INDEX" with the number of the network adapter you identified in step 4, and change "X.X.X.X" with the IP addresses you want to use. For example:
This example sets the primary DNS address to 1.1.1.1: Set-DnsClientServerAddress -InterfaceIndex 4 -ServerAddresses 1.1.1.1, 1.0.0.1
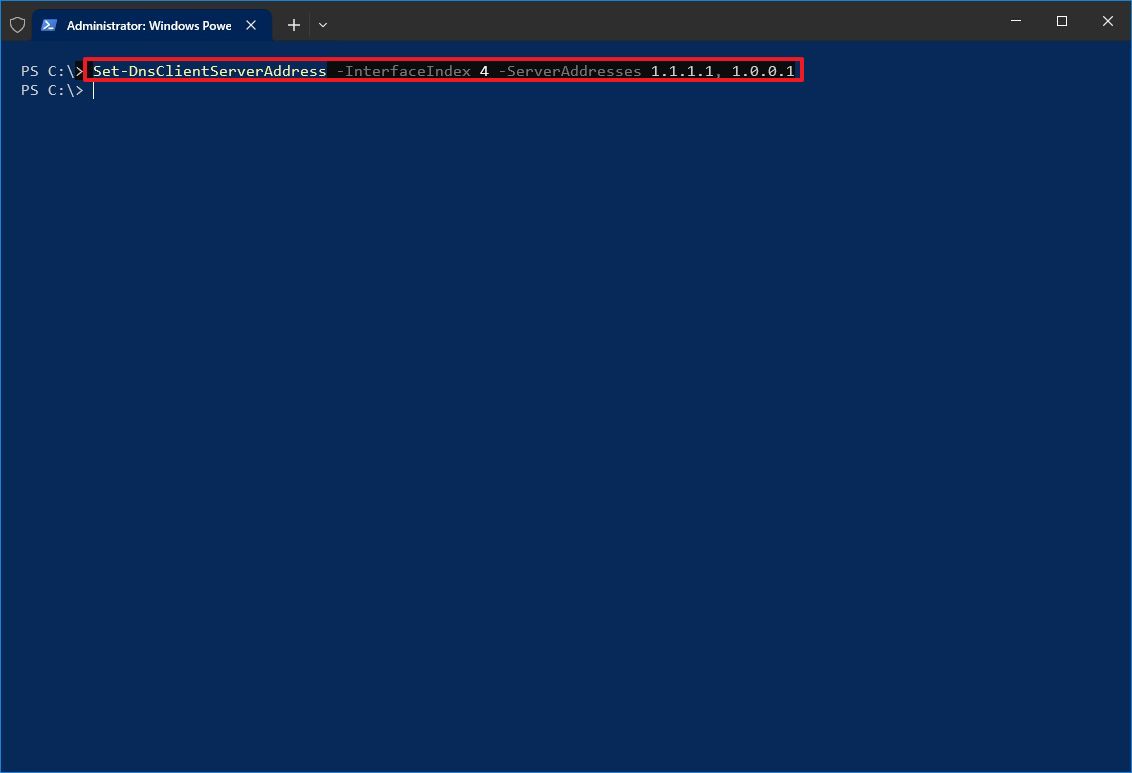
After you complete the steps, the device will start using the new DNS server addresses.
Finally, it's worth noting that support for Windows 10 will end on October 14, 2025. After this date, Microsoft will no longer release security or maintenance updates and will also cease to provide any support.
You can use these instructions to prepare your device and upgrade from Windows 10 to 11.
More resources
For more helpful articles, coverage, and answers to common questions about Windows 10 and Windows 11, visit the following resources:

Mauro Huculak has been a Windows How-To Expert contributor for WindowsCentral.com for nearly a decade and has over 22 years of combined experience in IT and technical writing. He holds various professional certifications from Microsoft, Cisco, VMware, and CompTIA and has been recognized as a Microsoft MVP for many years.
You must confirm your public display name before commenting
Please logout and then login again, you will then be prompted to enter your display name.
