How to prepare your Windows 10 PC for the Windows 11 upgrade
This is all you need to do before upgrading to Windows 11 from 10.
All the latest news, reviews, and guides for Windows and Xbox diehards.
You are now subscribed
Your newsletter sign-up was successful
Windows 10 is approaching its end of support on October 14, 2025. After this date, Microsoft will stop providing security updates and technical assistance for the operating system.
To maintain a secure and supported environment, it's recommended to upgrade to Windows 11 before the end-of-support date. This upgrade ensures continued access to security updates and new features. However, it's crucial to verify that your computer meets the system requirements for Windows 11, including enabling the Trusted Platform Module (TPM) and Secure Boot.
Before continuing with the upgrade, you also need to ensure that the device has enough space and that there are no problems. Furthermore, you want to create a backup in case you need to roll back, check the activation status, and create installation media.
In this how-to guide, I'll outline the steps to prepare your laptop or desktop computer for the big upgrade.
These instructions has been updated to ensure accuracy and reflect changes to the process in the operating system.
How to check compatibility of Windows 11
- Confirm your PC meets Windows 11’s minimum requirements: 1GHz dual-core CPU, 4GB RAM, 64GB storage, UEFI with Secure Boot, TPM 2.0, DirectX 12 GPU.
- Use Microsoft’s PC Health Check app to verify eligibility quickly.
- If requirements fail, follow the app’s links for fixes (e.g., enabling TPM or Secure Boot).
Although Microsoft offers Windows 11 as a free upgrade for computers already running Windows 10, this does not mean that you can upgrade any device. Windows 11 significantly increases the minimum system requirements compared to previous releases, so you should confirm whether the device can handle the new version even before planning to upgrade.
Windows 11 requirements
These are the minimum requirements to upgrade from Windows 10 to 11:
- CPU: 1GHz or faster or System on a Chip (SoC) with two cores minimum.
- RAM: 4GB.
- Storage: 64GB or larger.
- Firmware: UEFI with Secure Boot capable.
- TPM: Trusted Platform Module (TPM) version 2.0.
- Graphics: Compatible with DirectX 12 or later with WDDM 2.0 driver.
- Display resolution: High definition (720p) display greater than 9-inch diagonally, 8 bits per color channel.
If you plan to upgrade to Windows 11 Home, an internet connection will be required to complete the initial setup.
PC Health Check app
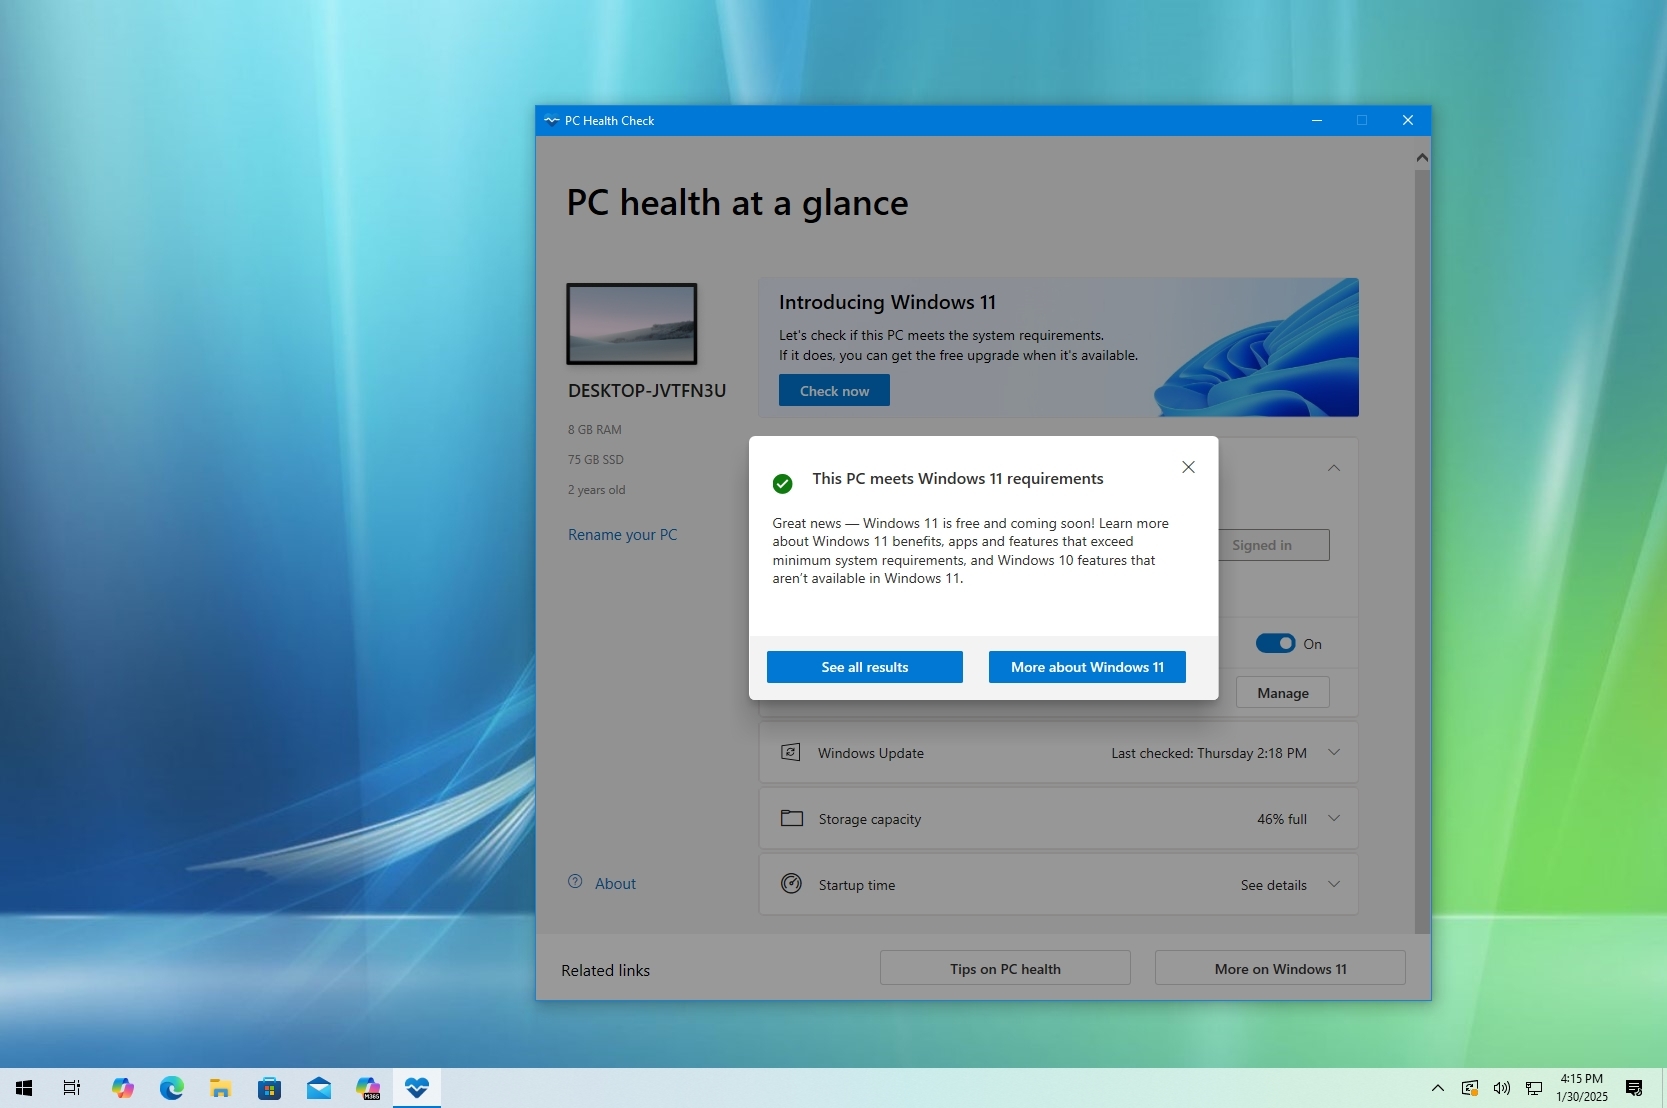
Microsoft has released an app to make it easier to confirm whether your computer meets the minimum requirements.
To check if a device will run Windows 11, use these steps:
- Open Start.
- Search for PC Health Check and click the top result to open the app.
- Click the Check now button under the "Introducing Windows 11" section.
- Click the "See all results" button to display the final report.
Once you complete the steps, you will know if your computer meets the requirements to run Windows 11. If there's a requirement the device didn't pass, use the available links in the report to determine the steps to fix them
How to enable required features to run Windows 11
- Ensure TPM 2.0 and Secure Boot are enabled in UEFI/BIOS.
- Convert drives from MBR to GPT if switching from legacy BIOS to UEFI.
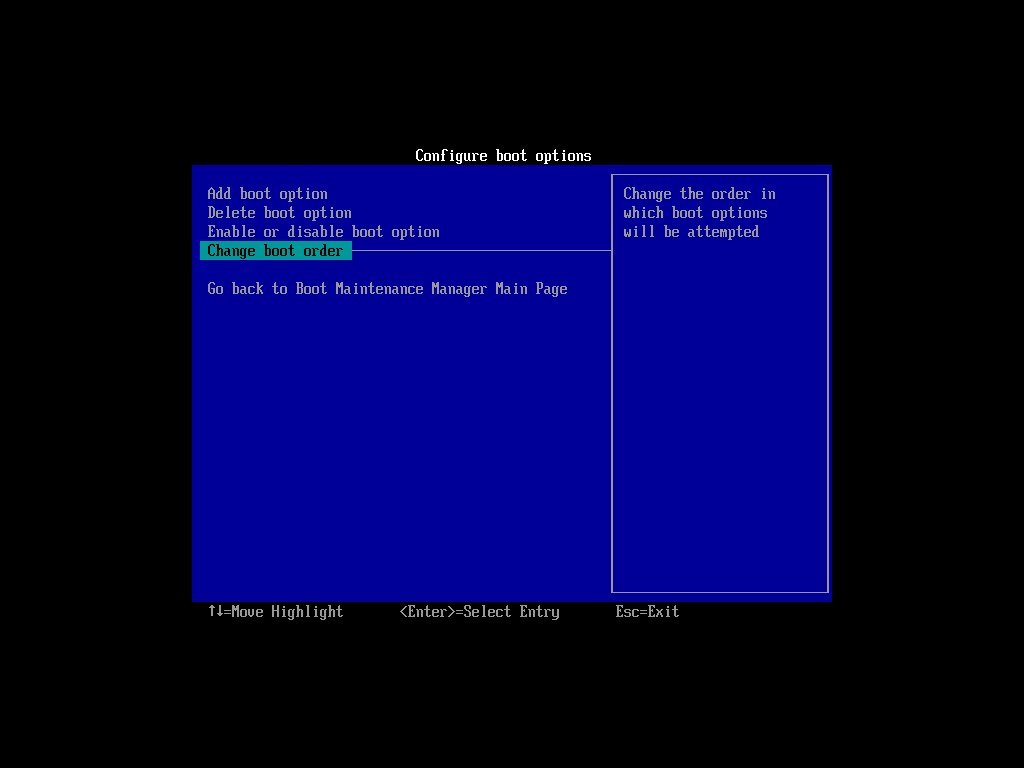
- Adjust the boot order to allow USB installation media if planning a clean install.
Beyond processor, memory, and storage specifications, it's essential to enable two critical security features in the Unified Extensible Firmware Interface (UEFI), including the Trusted Platform Module (TPM) and Secure Boot. If you plan to perform a clean installation, ensure your computer can boot from a USB flash drive.
For systems still using the legacy Basic Input/Output System (BIOS), it's necessary to convert the primary drive from the Master Boot Record (MBR) partition style to the GUID Partition Table (GPT) before switching to UEFI mode. This conversion can be accomplished using the MBR2GPT command-line tool, which allows for the transition without data loss. Failing to perform this conversion before enabling UEFI mode and Secure Boot will result in the computer failing to boot.
The partition conversion isn't necessary if you plan to perform a clean installation of the operating system.
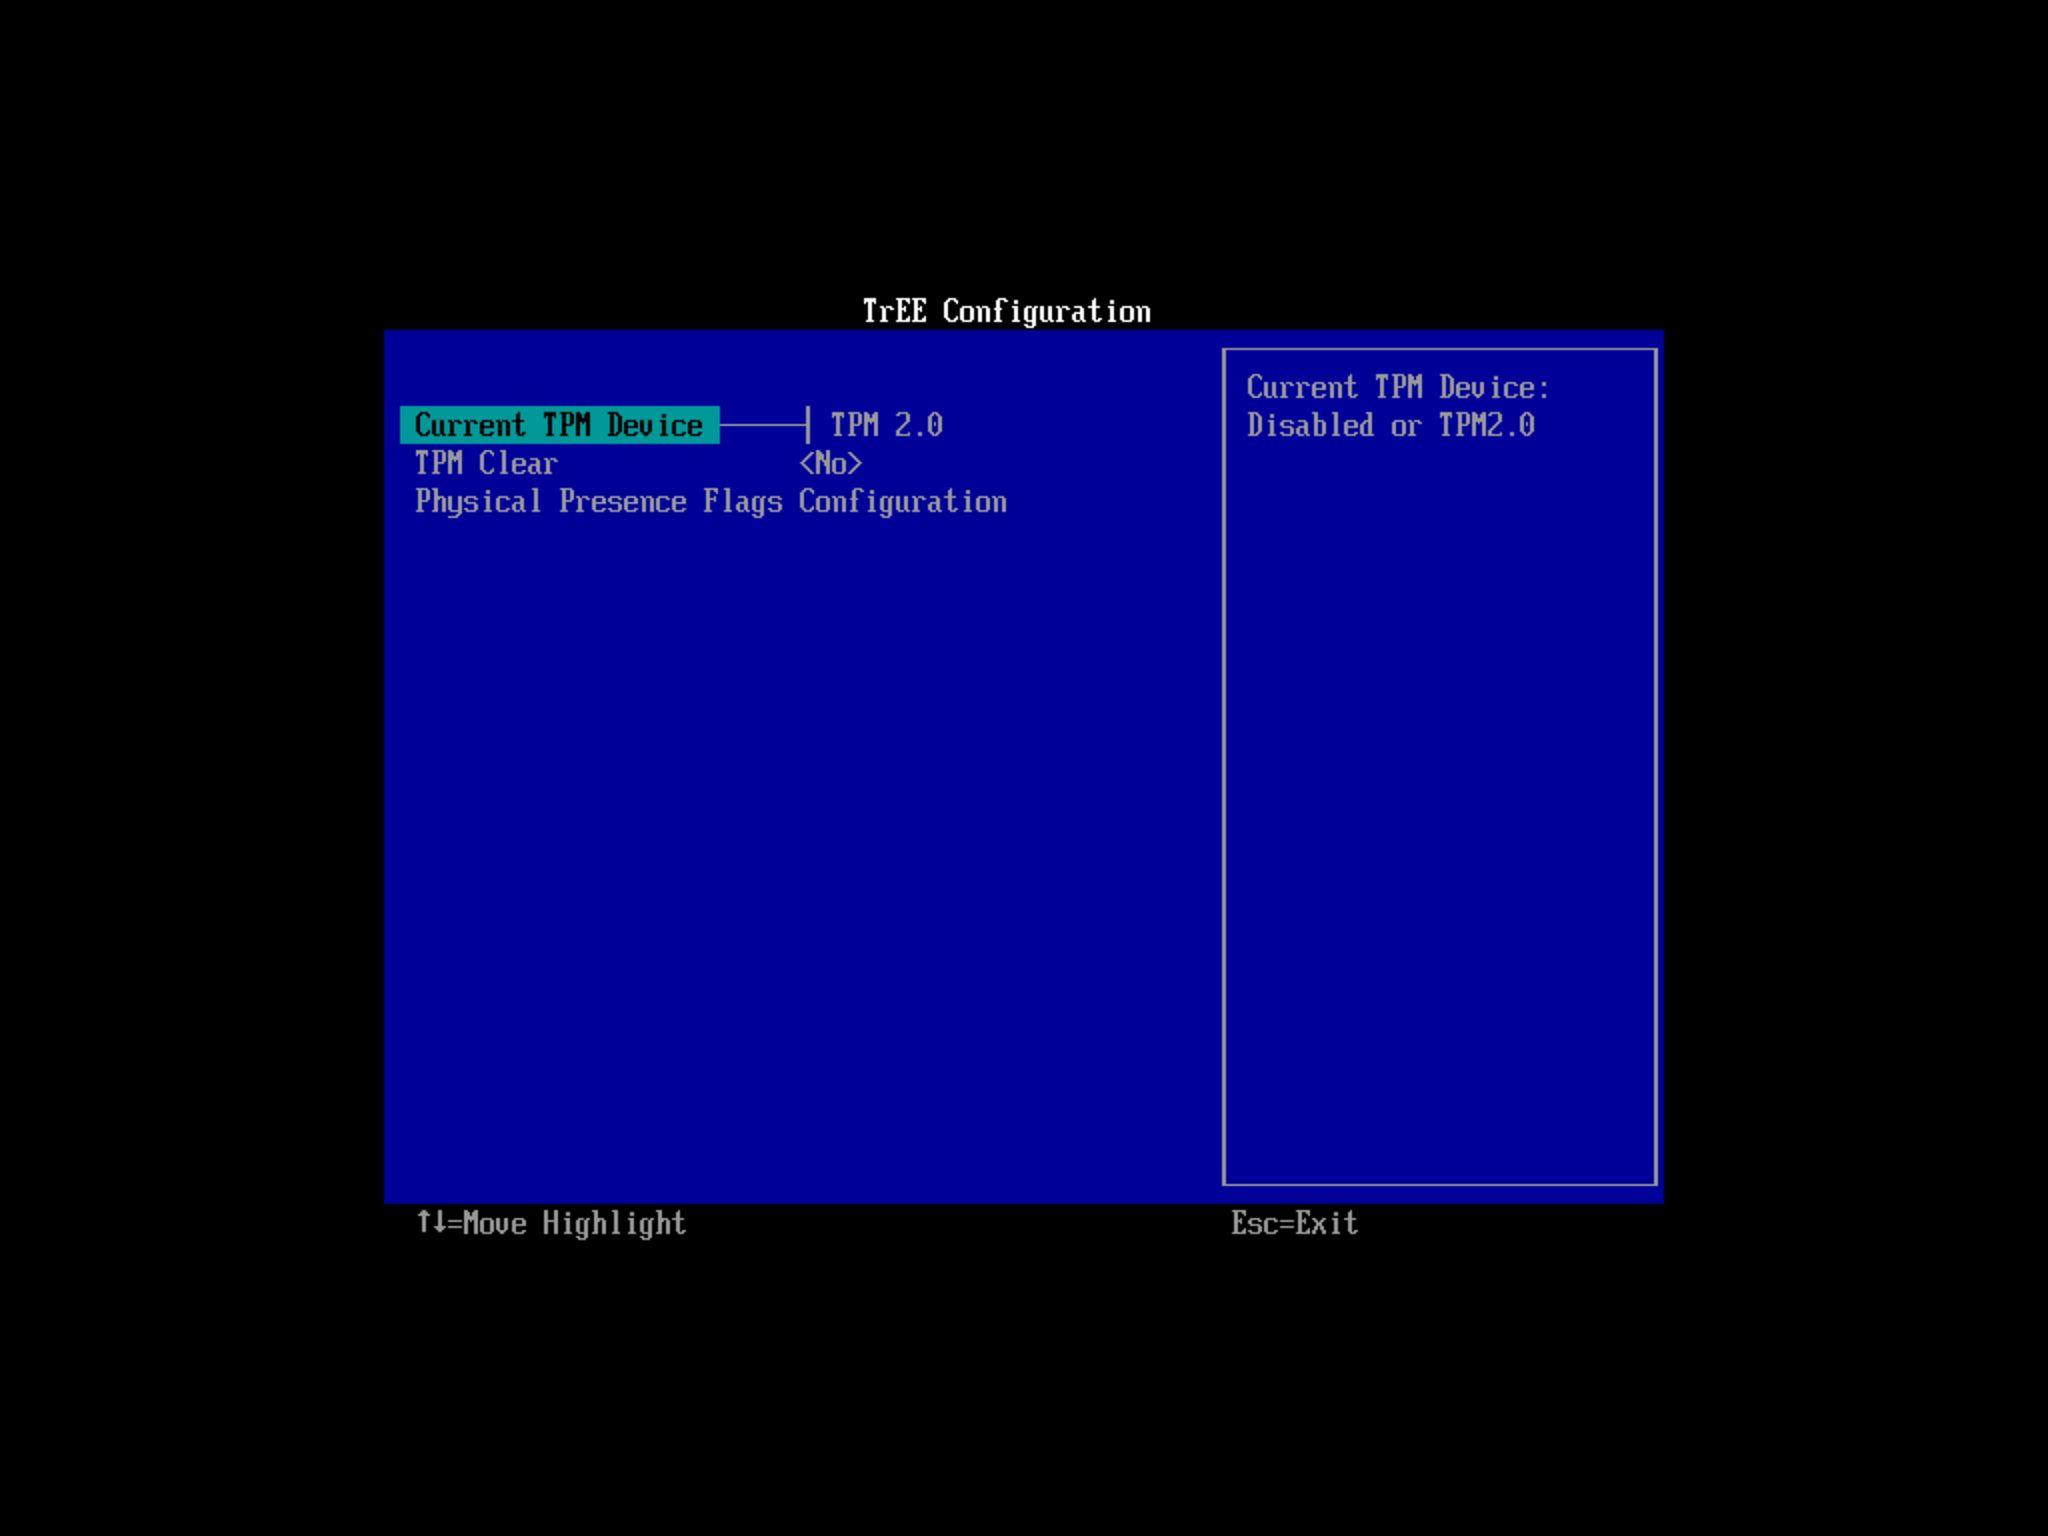
It's important to note that if your computer doesn't show the presence of a TPM 2.0 chip, this feature may be embedded inside the processor. For AMD processors, this feature is often labeled as "fTPM" (Firmware Trusted Platform Module) in the UEFI settings, while Intel processors refer to it as "Platform Trust Technology (PTT)." You can verify the availability and status of these features by checking your computer or motherboard manufacturer's support resources.
Configure TPM, Secure Boot, and boot order within Windows
On Windows, you can access the settings to change the boot order from within the desktop environment.
To change the UEFI boot settings on Windows 10, use these steps:
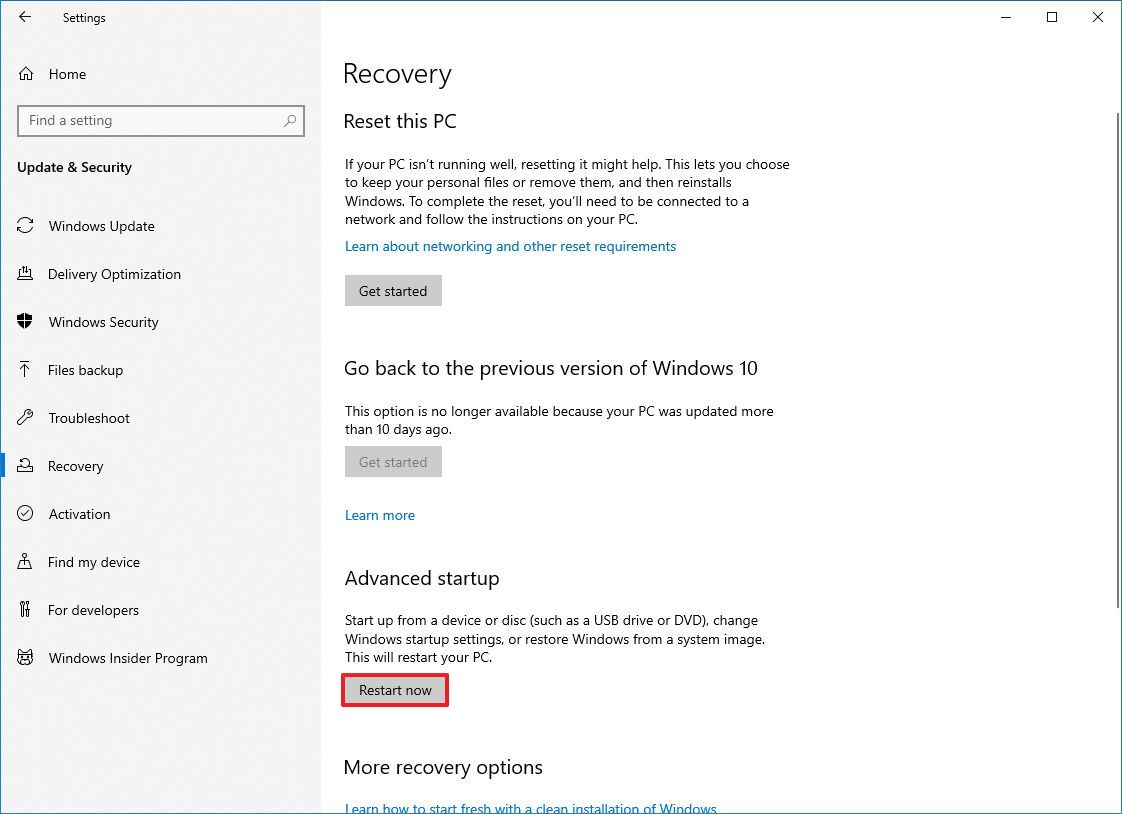
- Open Settings.
- Click on Update & Security.
- Click on Recovery.
- Click the Restart now button under the "Advanced Startup" section.
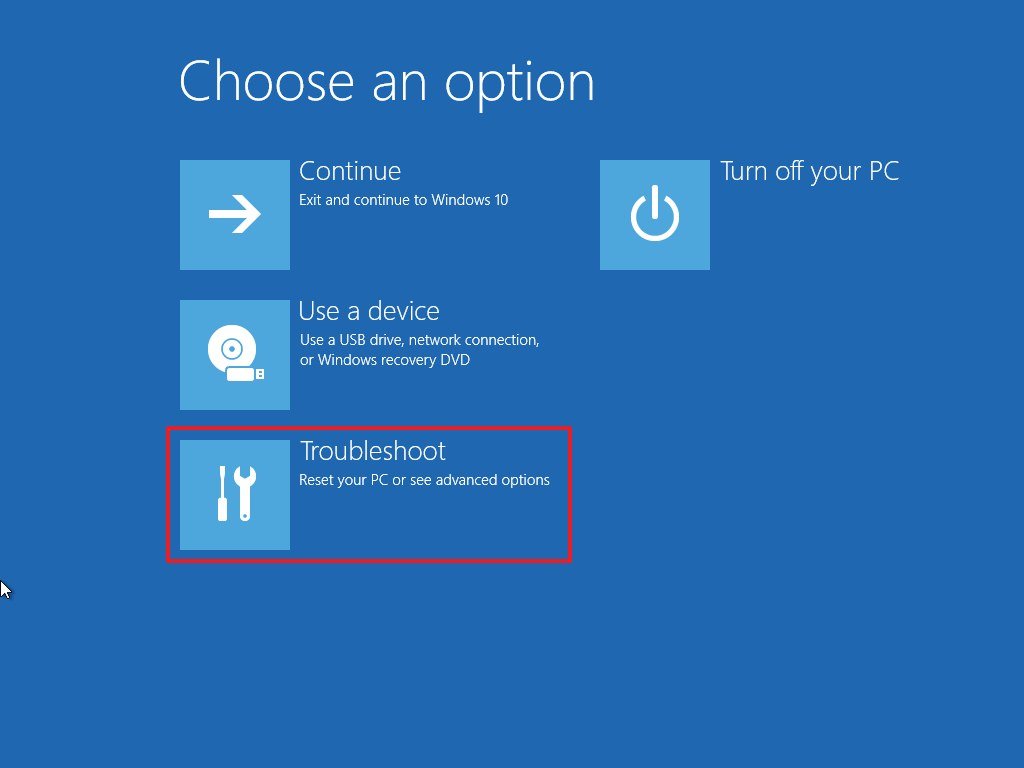
- Click the Troubleshoot button.
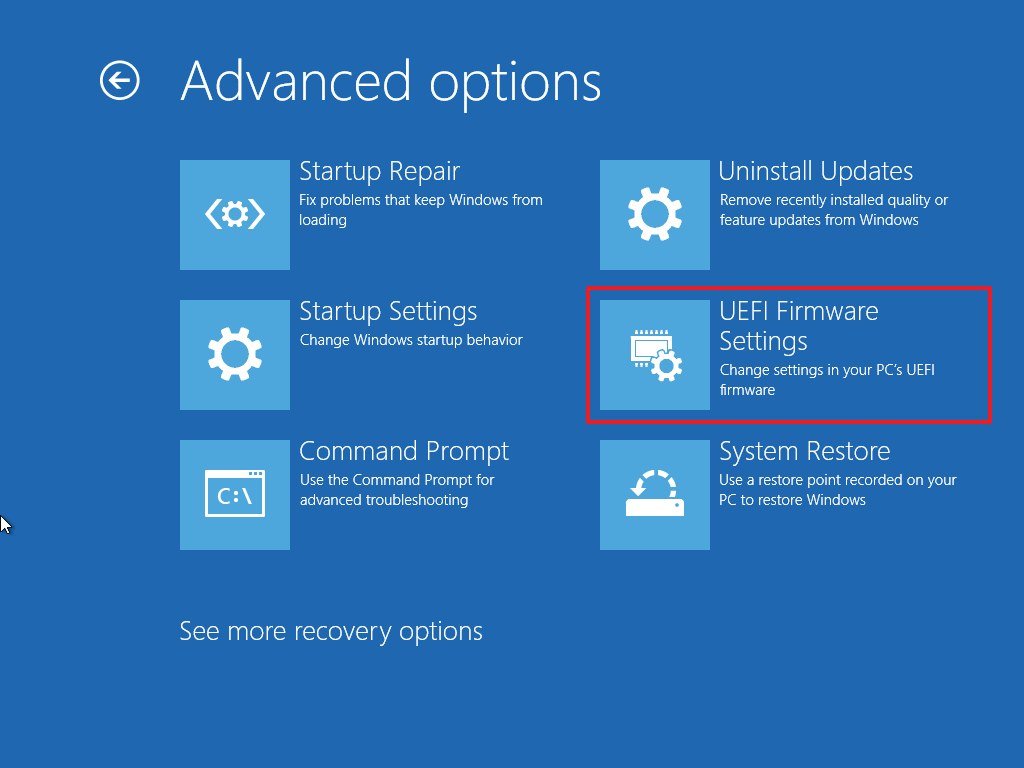
- Click on Advanced options.
- Click the "UEFI Firmware Settings" option.
- Click the Restart button.
- Open the Security page.
- Enable the "Trusted Platform Module (TPM)" option (if applicable).
- Enable the Secure Boot option (if applicable).
- (Optional) Open the Boot page.
- Set the boot order to start from the USB flash drive with the Windows 11 installation files (if necessary).
- Save the changes.
After you complete the steps, the device should be able to boot from a USB installation media and pass the minimum system requirements check.
Configure TPM, Secure Boot, and boot order from boot
If you do not have access to the Windows desktop, you can configure the UEFI settings with these steps:
- Start the computer.
- As soon as the computer starts booting up, press the power button to shut down the computer.
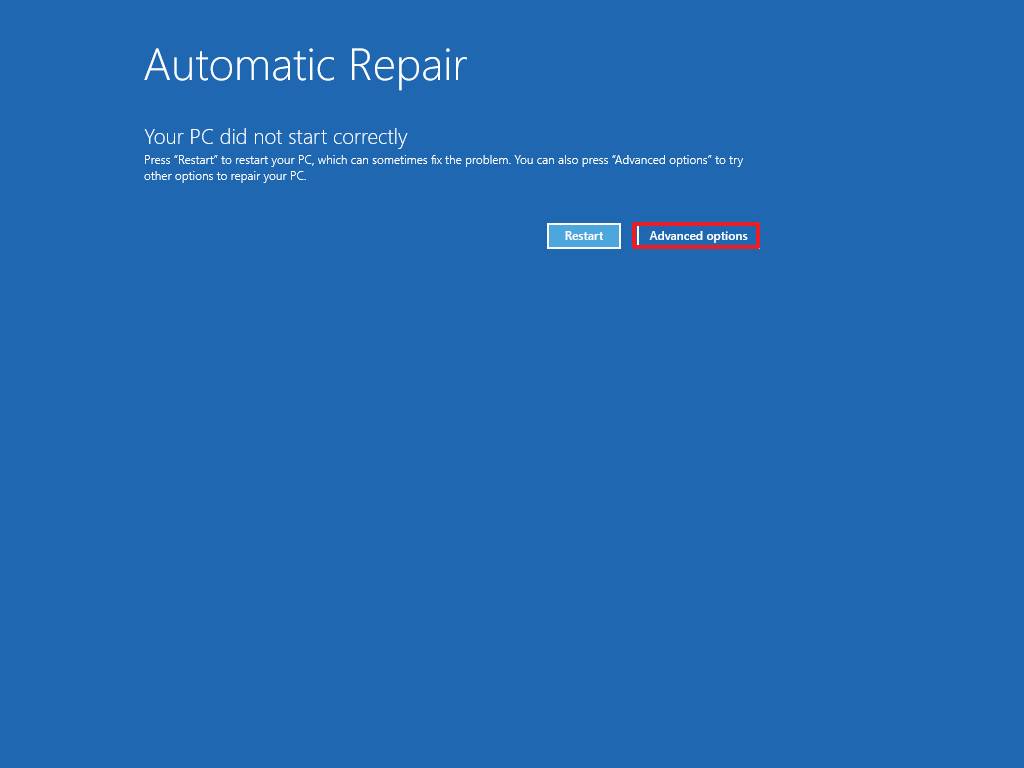
- Repeat steps 1 and 2 two more times or until the device starts in the recovery mode.
- Click the Advanced options button.
- Click on Troubleshoot.
- Click on Advanced options.
- Click the "UEFI Firmware Settings" option.
- Click the Restart button.
- Open the Security page.
- Enable the "Trusted Platform Module (TPM)" option (if applicable).
- Enable the Secure Boot option (if applicable).
- (Optional) Open the Boot page.
- Set the boot order to start from the USB flash drive with the Windows 11 installation files (if necessary).
- Save the changes.
After you complete the steps, the computer should be able to boot from the Windows 11 USB flash drive.
It might be time to upgrade if the computer doesn't meet the minimum requirements. You can check our guide for the best laptops you can buy now with support for Windows 11 and beyond.
How to free up space on your computer before install of Windows 11
- Clear temporary files (Windows Update cleanup, cache, old installs).
- Use Storage Sense to automate cleanup and reclaim up to 20GB.
- Uninstall unused apps or large games to free additional space.
Your computer needs at least 64GB of storage space, but the upgrade will still take several gigabytes. Usually, you want to make sure the device has at least 20GB of free space to prevent running into installation issues.
Clearing up space with Temporary files
To free up space on Windows 10 before upgrading to Windows 11, use these steps:
- Open Settings.
- Click on System.
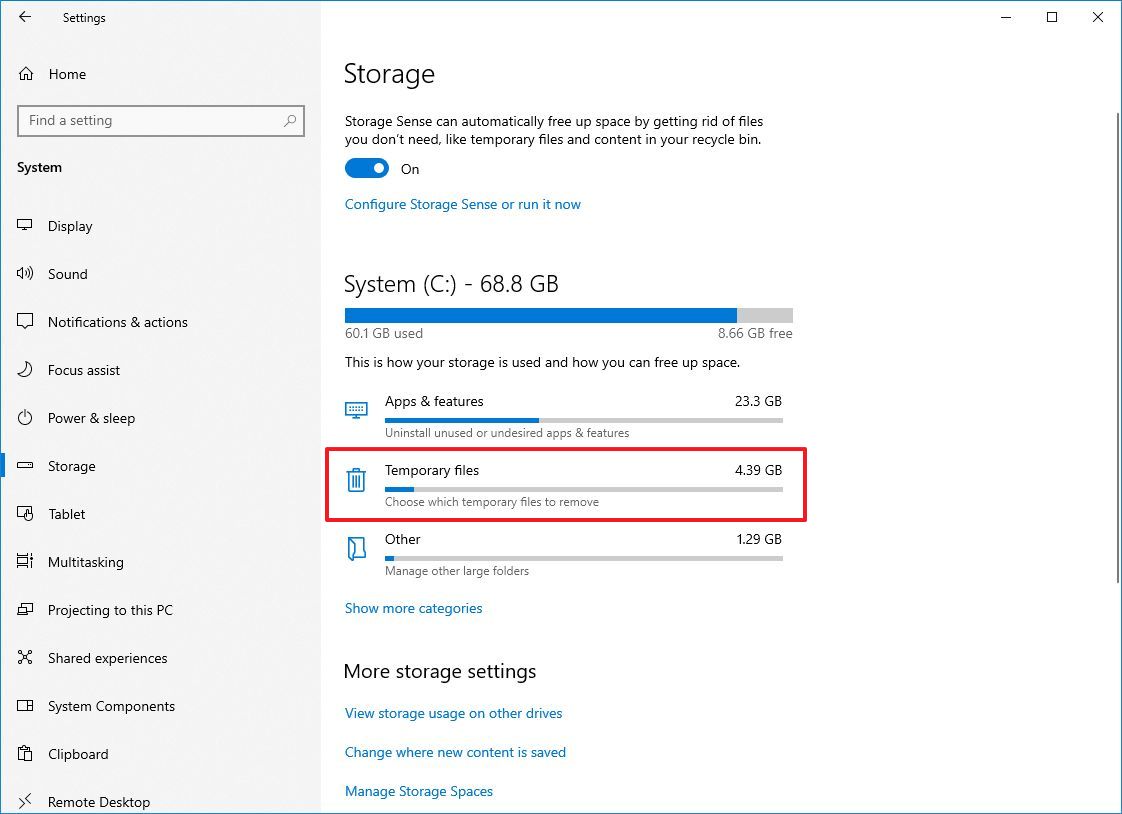
- Click on Storage.
- Click the Temporary files item under the "Local Disk (C:)" section. (If the item is not available, click the "Show more categories" option.)
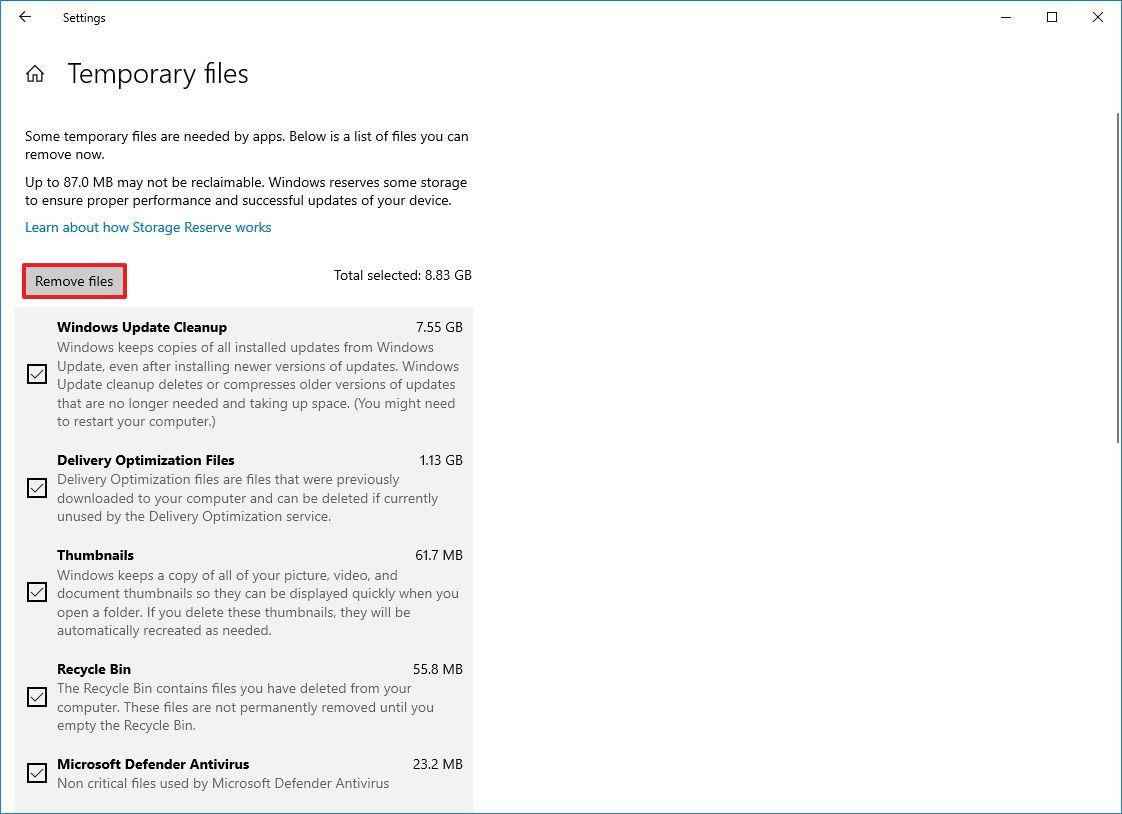
- Check all the items you want to remove to optimize the space — for example:
- Downloads.
- Windows Update Cleanup.
- Recycle Bin.
- Delivery Optimization Files.
- Thumbnails.
- Microsoft Defender Antivirus.
- Temporary Internet Files.
- Temporary files.
- Windows error reports and feedback diagnostics.
- DirectX Shader Cache.
- Previous Windows installation(s).
- Temporary Windows installation files.
- Quick tip: The available items may be different in your setup. If you want to select the Downloads item, before clearing these files, make sure to understand that this option will erase everything in the "Downloads" folder.
- Click the Remove files button.
After you complete the steps, the selected files will be deleted permanently, freeing up space to process the upgrade.
Clear space with Storage Sense
To use Storage Sense to free up space, use these steps:
- Open Settings.
- Click on System.
- Click on Storage.
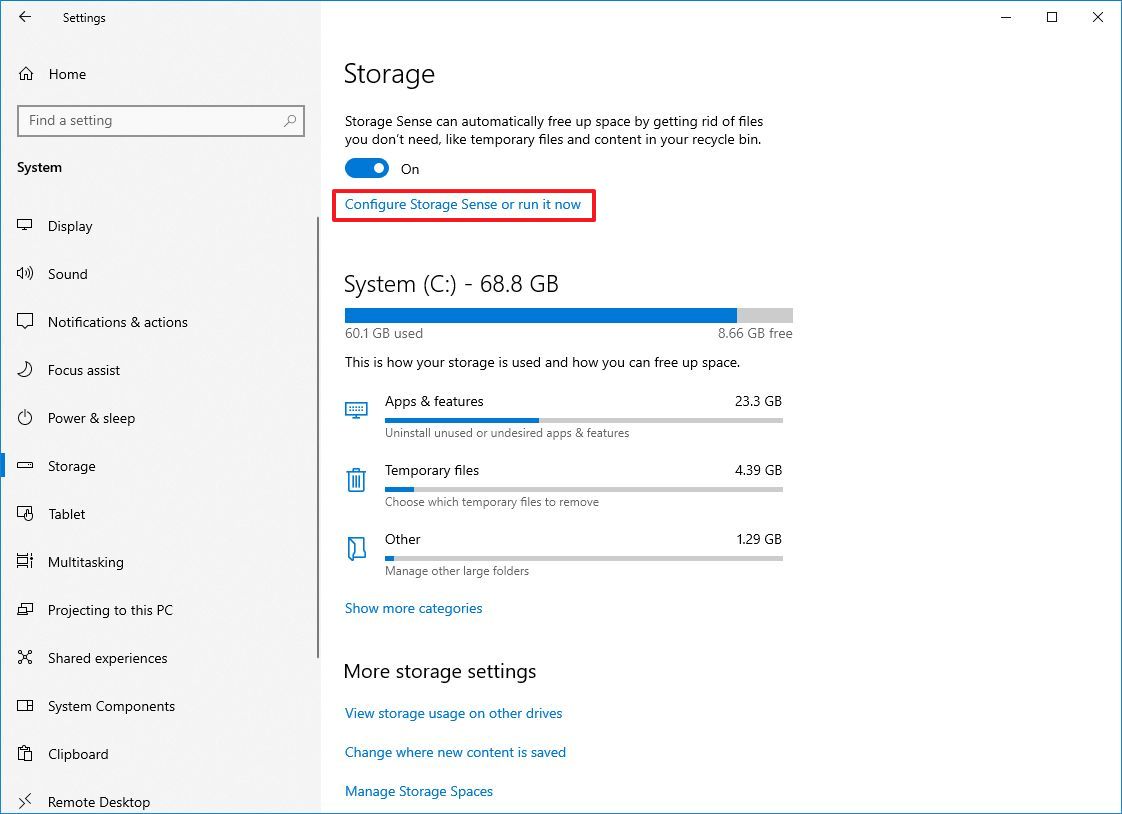
- Click the "Configure Storage Sense or run it now" option under the "Storage" section.
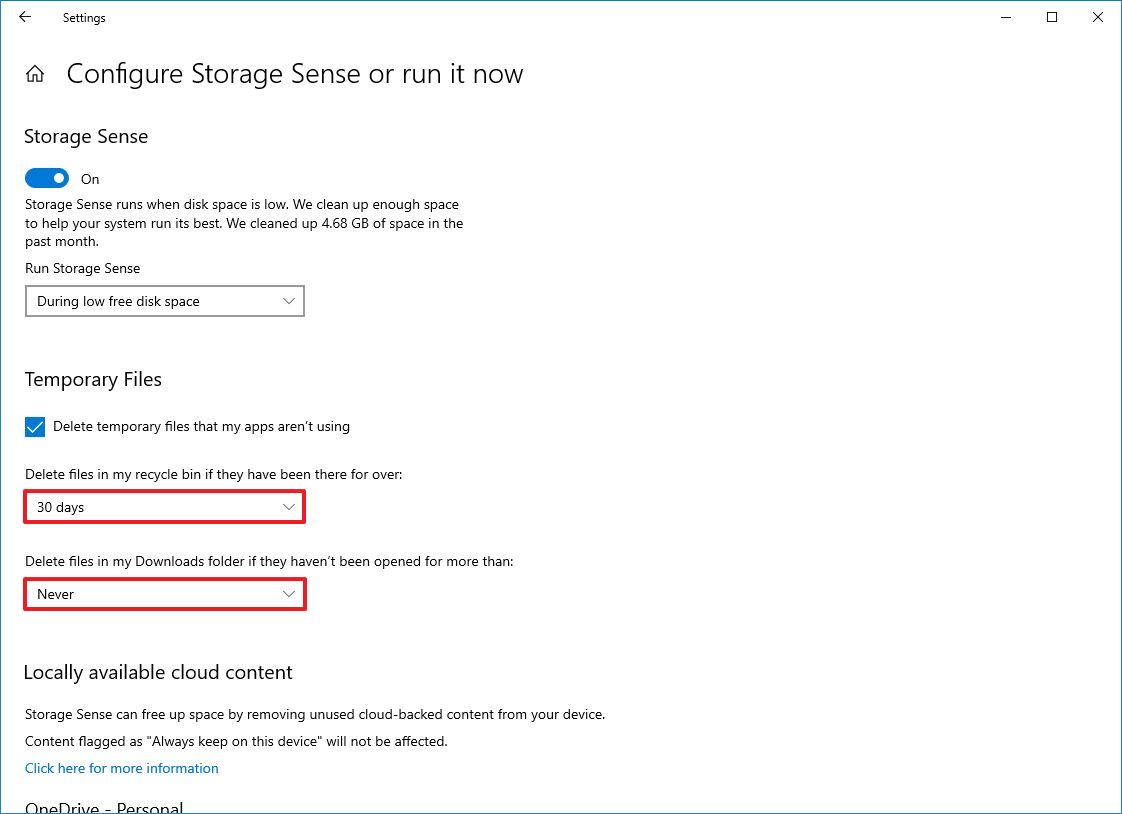
- Under the "Temporary Files" section, check the "Delete temporary files that my apps aren't using" option.
- Use the Recycle Bin drop-down menu to specify how to clear items in the trash.
- Use the Downloads drop-down menu to specify how to clean up internet files.
- Under the "Locally available cloud content" section, use the drop-down menu to specify how long OneDrive content synced to the device becomes online-only.
- Under the "Free up space now" section, check the "Delete previous versions of Windows" option (if applicable).
- Quick note: If this option is available, you may be able to free up close to 20GB of space.
- Click the Clean now button.
Once you complete the steps, Storage Sense will delete unnecessary files from the device to reclaim space to run the Windows 11 update without storage problems.
Clear space with Apps & features
You can also uninstall apps you rarely use to free up space. If you have many games installed on the computer, deleting some of them can free up space so that you can proceed with the upgrade process.
To uninstall apps and games on Windows 10, use these steps:
- Open Settings.
- Click on Apps.
- Click on Apps & features.
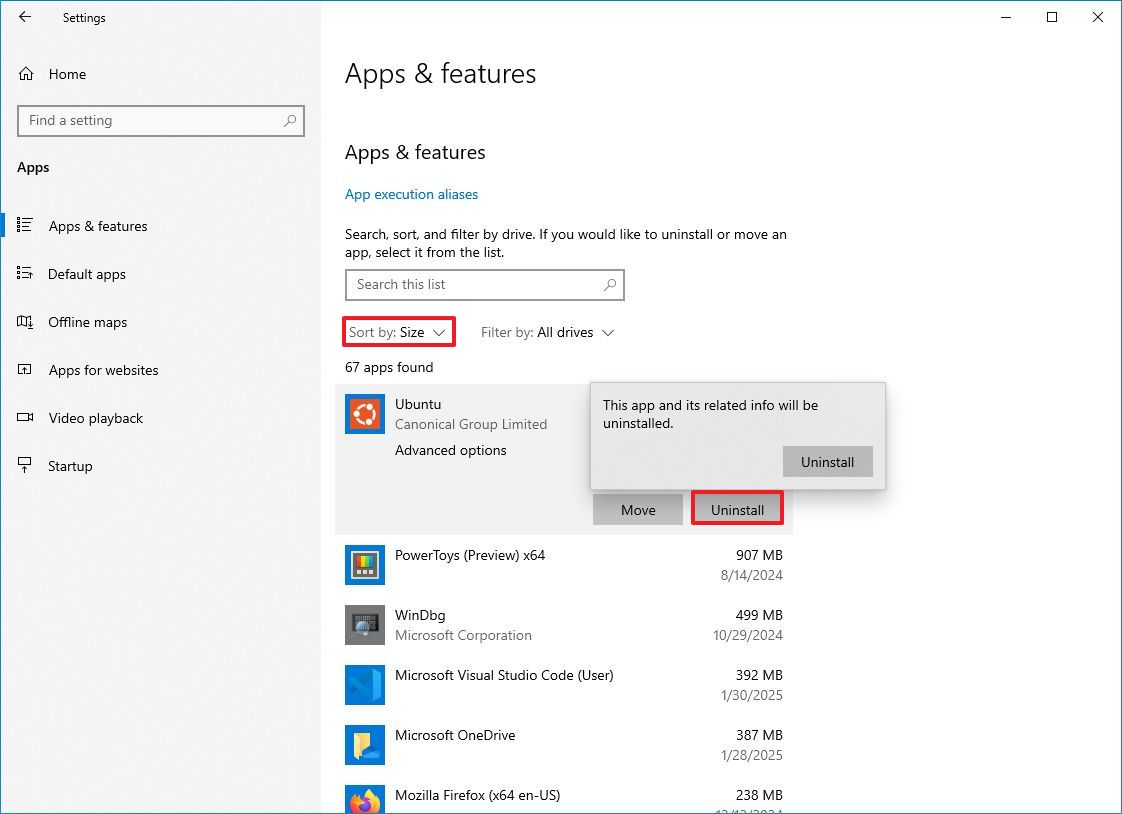
- Use the "Sort by" filter and select the Size view to quickly identify the apps and games using the most space.
- Select the item you want to remove.
- Click the Uninstall button.
- Click the Uninstall button again.
- Continue with the on-screen directions (if applicable).
After you complete the steps, repeat the same instructions to remove additional apps and games from the computer.
You can check this guide with virtually all the methods you can use to clean up space on your Windows 10 computer.
How to repair current installation to avoid problems with Windows 11
- Run DISM (DISM.exe /Online /Cleanup-Image /RestoreHealth) to repair the Windows image.
- Use SFC (sfc /scannow) to fix corrupted system files.
- This reduces the risk of upgrade errors if you keep your current install.
If you have had the same installation for a long time, you might want to analyze and repair the current setup to fix missing or damaged files. If you skip this step, it may increase the likelihood of encountering issues during the upgrade process. However, if you intend to perform a clean installation using a bootable USB flash drive, this step can be skipped, as the previous installation will be erased during the process.
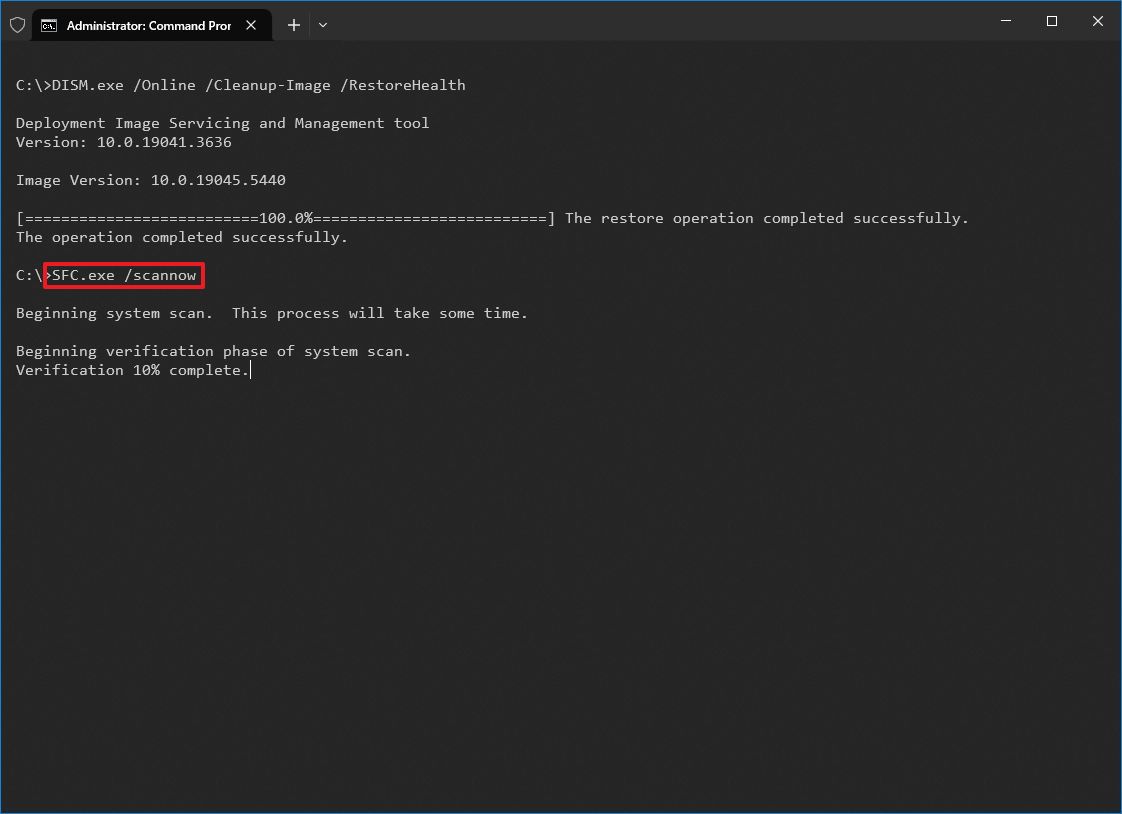
To repair your system before upgrading to Windows 11, you can utilize two command-line tools, including the Deployment Image Servicing and Management (DISM) and System File Checker (SFC).
To repair the current setup before upgrading to Windows 11, use these steps:
- Open Start.
- Search for Command Prompt, right-click the top result, and select the Run as administrator option.
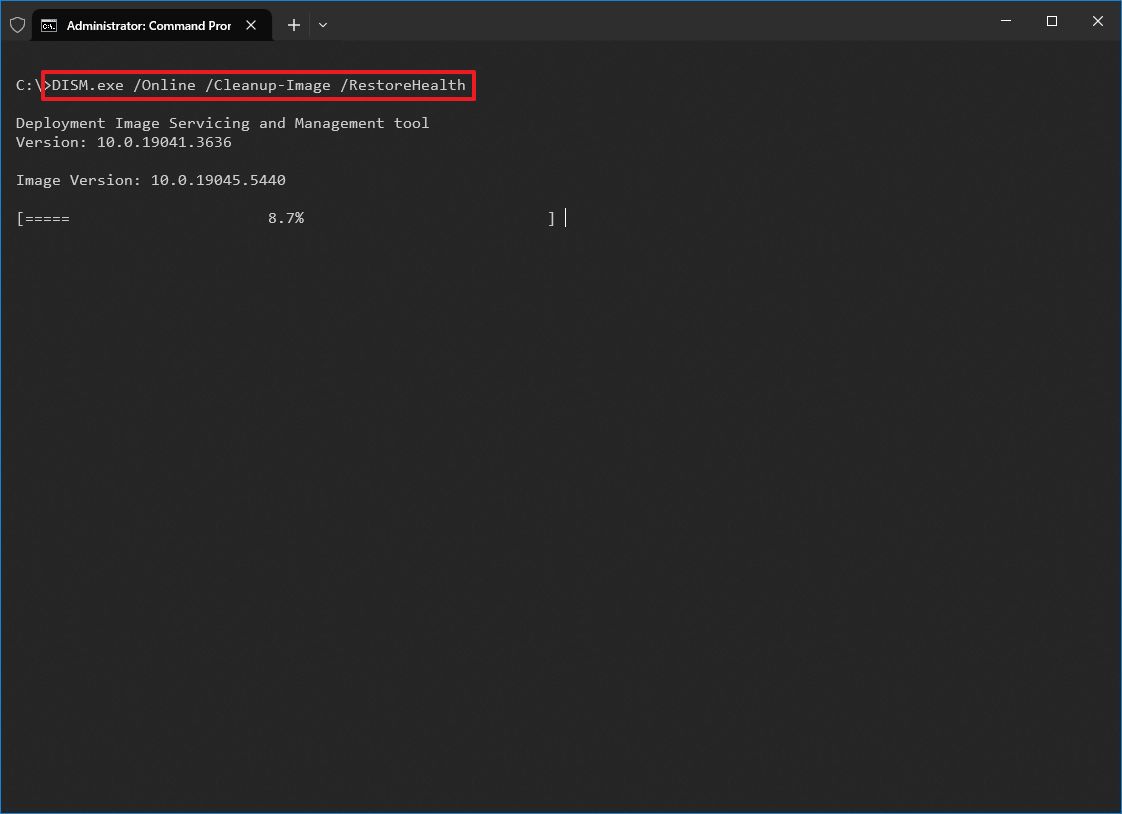
- Type the following command to repair the locally available image of Windows 10 and press Enter: DISM.exe /Online /Cleanup-Image /RestoreHealth
- Type the following command to fix problems with the current installation and press Enter: SFC.exe /scannow
Once you complete the steps, the Deployment Image Servicing and Management tool will repair any problems with the local image. Then, the System File Checker tool will use the already repaired image to fix issues with the current installation.
How to create backup of device before upgrade of Windows 11
- Create a full system image backup using Backup and Restore to an external drive.
- Optionally, back up personal files separately to a USB or cloud storage.
- Export browser bookmarks, saved passwords, and note down license keys.
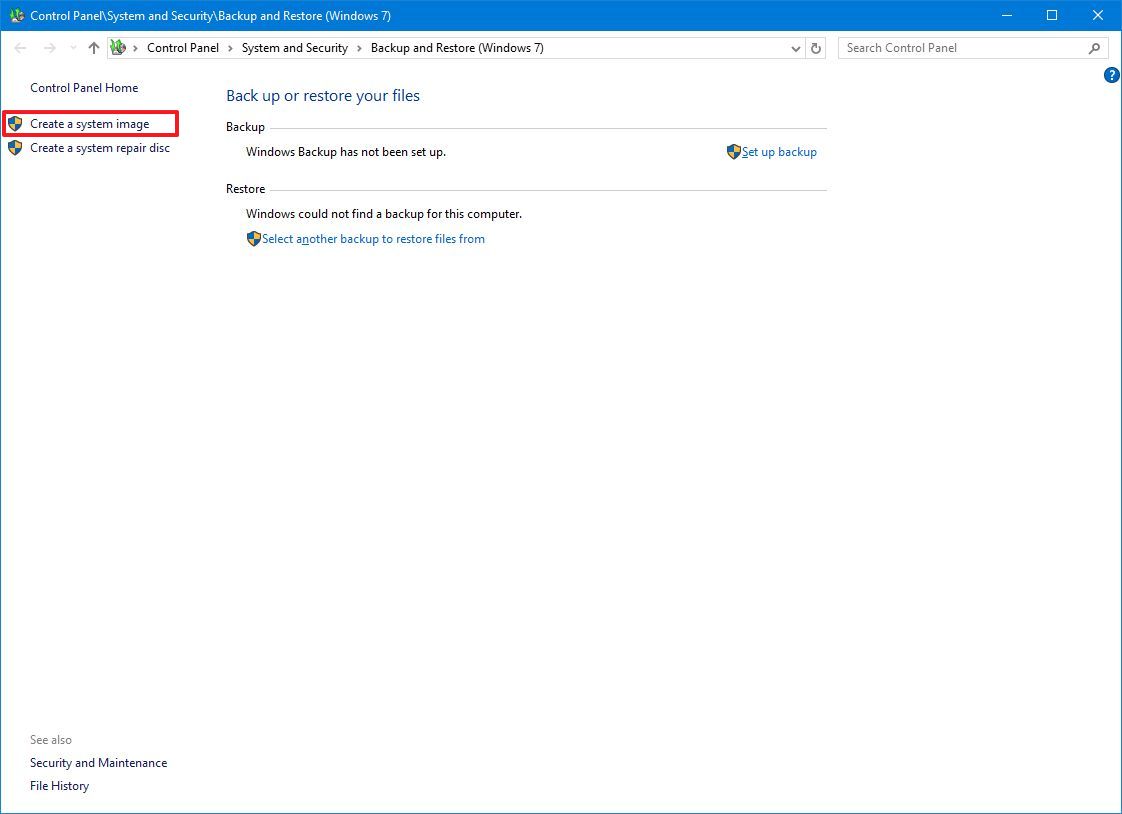
The Backup and Restore feature lets you easily create a full system backup to an external hard drive. You only need to connect a USB hard drive with enough storage to save the backup.
Important: Microsoft no longer maintains the backup feature, but you can still use it to create a temporary full backup while it's still available.
To create a full backup on Windows 11, use these steps:
- Open Start.
- Search for Control Panel and click the top result to open the app.
- Click on System and Security.
- Click the File History setting.
- Click the "System Image Backup" option from the bottom-left corner.
- Click the "Create a system image" option from the left navigation pane.
- Select the On a hard disk option.
- Use the "On a hard disk" drop-down menu and select the Windows 11 full backup destination.
- Click the Next button.
- (Optional) Select any additional drive to include in the backup.
- Click the Next button.
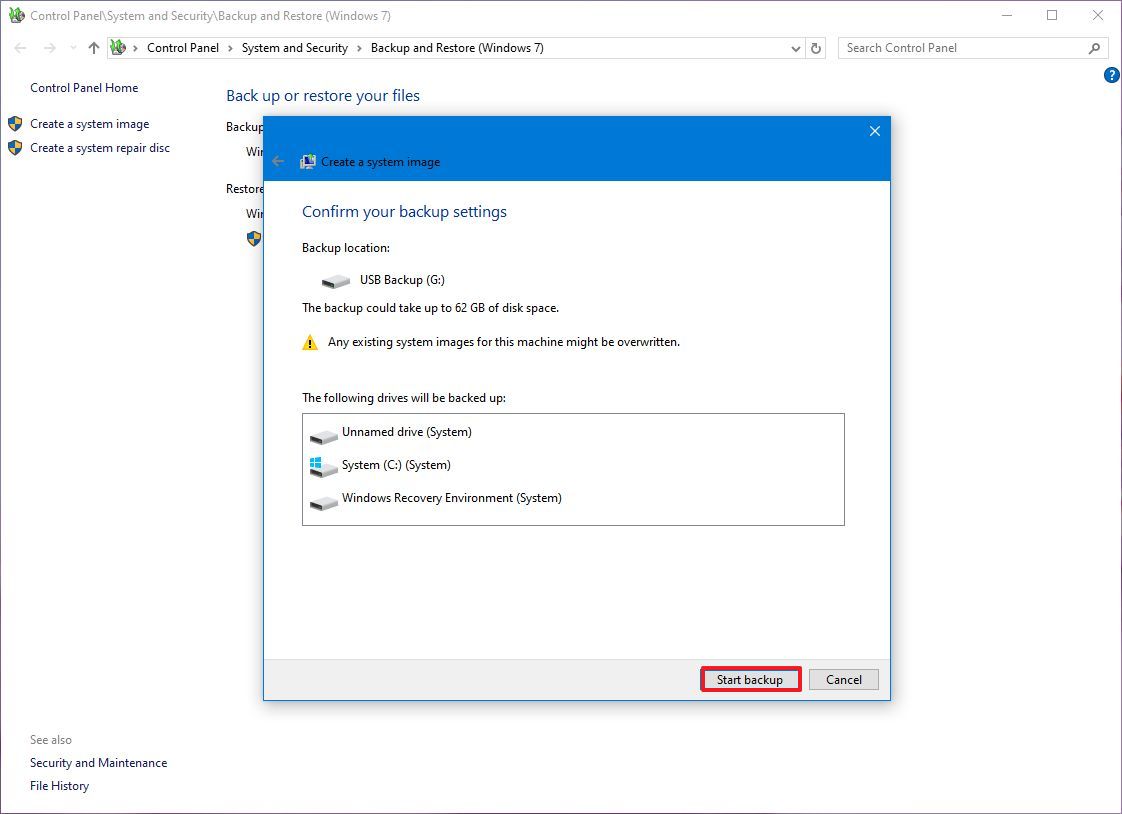
- Click the Start backup button.
- Click the No button.
- Quick note: You'll also receive a prompt to create a system repair disc, but you can skip it. If you need to roll back to a previous installation, you can use USB installation media to access the recovery settings.
- Click the Close button.
Once you complete the steps, a backup of the entire system will be created with everything on the primary hard drive and other drives you may have selected.
Create file backup (optional)
Although a full backup should be more than enough, creating a backup of your files separately to an external drive or cloud service is also recommended.
To create a file backup manually, connect a drive with enough storage and use these steps:
- Open File Explorer.
- Type the following path in the address bar and press Enter: %HOMEPATH%
- Quick tip: You can access other profile folders from C:\Users.
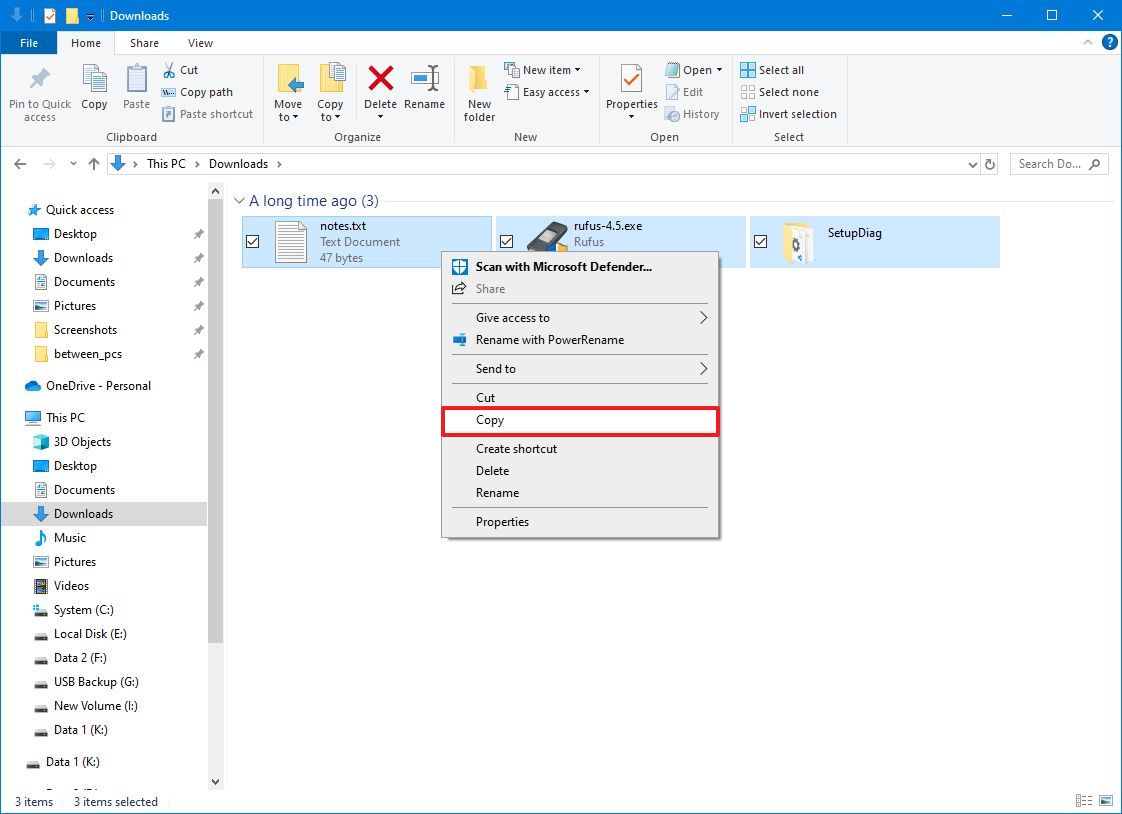
- Use the "Ctrl + A" keyboard shortcut or the mouse to select all the folders.
- Right-click the selection and choose the "Copy" option.
- Navigate to the external USB storage.
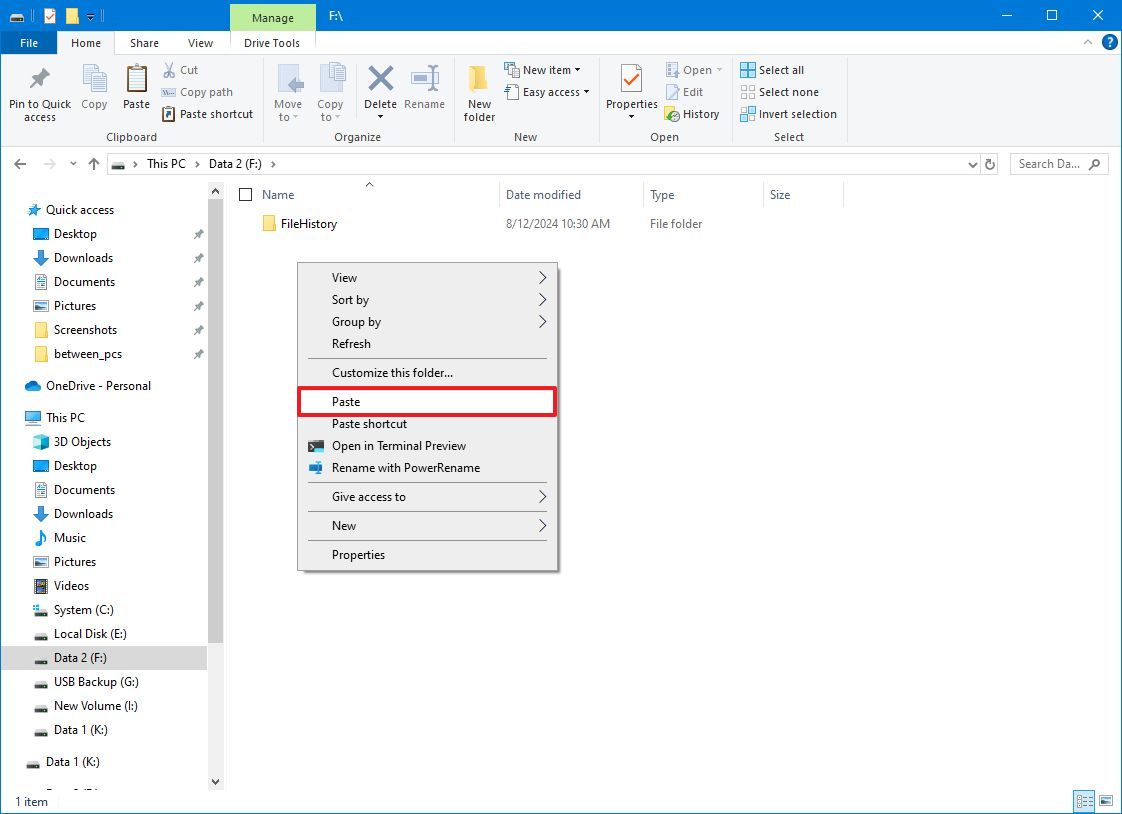
- Right-click on an empty space and select the Paste option.
After completing the backup process for your account, repeat these steps for any additional user accounts on your system. In addition to duplicating your files, it's advisable to compile a list of installed programs along with their product keys, if applicable, to make reinstallation easier on the new setup. If you don't typically synchronize passwords and bookmarks with an online service, now is the time to export your browser credentials and bookmarks.
How to check current activation to reactivate Windows 11
- Verify Windows 10 is activated under Settings → Update & Security → Activation.
- If activated with a digital license, Windows 11 will auto-activate after upgrade.
- PCs without a license will require a valid Windows 10/11 product key.
If you had a previous installation correctly activated on the same computer, you don't need to provide a product key to activate Windows 11. After the installation, the device will reactivate automatically.
Check Windows 10 activation
To check if Windows 10 is activated, use these steps:
- Open Settings.
- Click on Update & Security.
- Click on Activation.
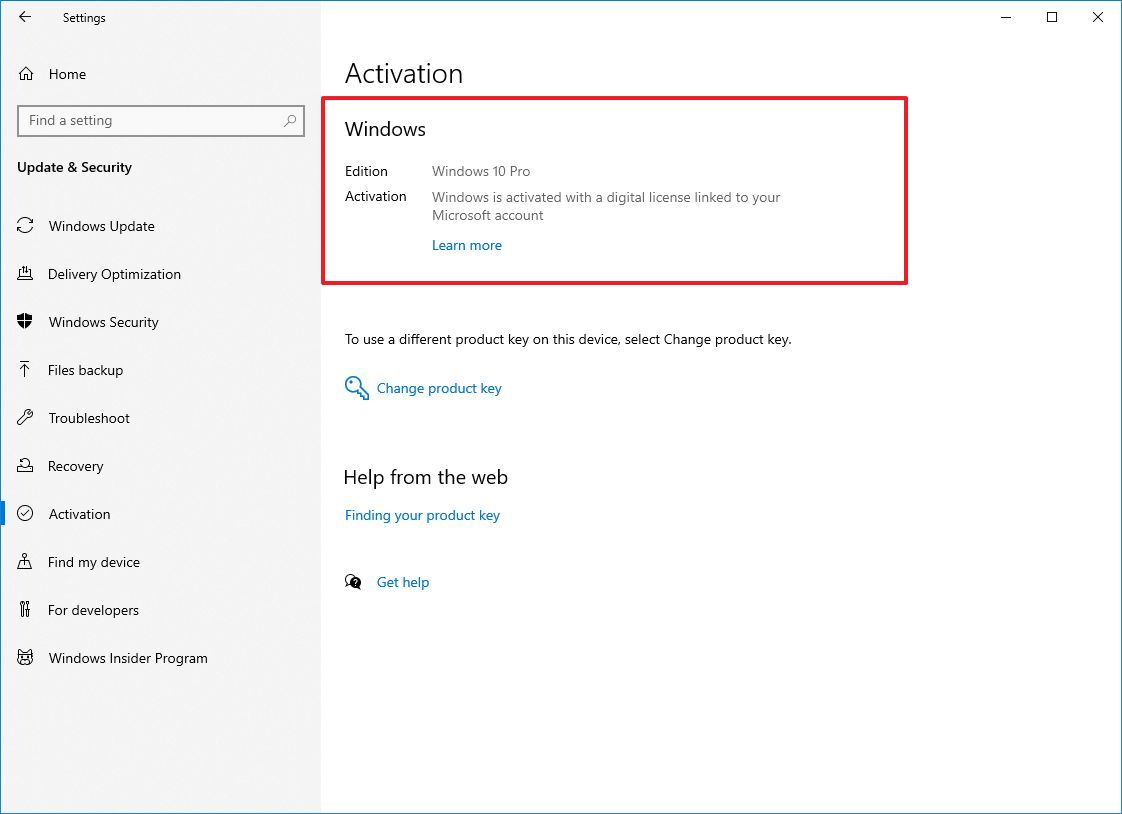
- Under the "Windows" section, confirm the activation. If the device has been properly activated, you'll see one of these messages:
- Windows is activated with a digital license: The installation has been activated, but it isn't linked to your Microsoft account.
- Windows is activated with a digital license linked to your Microsoft account: The installation has been activated, and the license is linked to your Microsoft account.
After you complete the steps, Windows 11 should automatically reactivate after the upgrade.
Get Windows 11 product key
A computer that has never had an installation of Windows will need a valid license, which you can purchase from the Microsoft Store, Amazon, or another retailer. A Windows 11 installation should activate using a Windows 11 or 10 product key.
How to uninstall non-essential apps to avoid conflicts with Windows 11
- Remove incompatible or outdated apps that may cause conflicts.
- Temporarily uninstall third-party antivirus/firewall software.
- Reinstall apps after the upgrade is complete.
Apps that were not specifically designed for Windows 10 or higher releases and security software may cause compatibility issues during the installation. It's always recommended to uninstall these apps before proceeding with the Windows 11 upgrade.
To uninstall apps on Windows 10, use these steps:
- Open Settings.
- Click on Apps.
- Click on Apps & features.
- Select the app you want to remove and click the Uninstall button.
- Click the Uninstall button again.
- Continue with the on-screen directions (if applicable).
After you complete the steps, repeat the instructions to uninstall any other app that may cause conflicts.
If you have a third-party antivirus or firewall, confirm with your software support website for specific details on how to disable or uninstall the program. After the installation, you can reinstall the apps one more time.
How to create installation media of Windows 11
- Use Microsoft’s Media Creation Tool to make a bootable USB (8GB+).
- Alternatively, download Windows 11 ISO for manual installation.
- The Installation Assistant can help if Windows Update doesn’t offer the upgrade
If you do not plan to use the Windows Update settings or it's not working, as part of the preparation process, you will need a bootable USB flash drive, Windows 11 ISO file, or the Installation Assistant to proceed with the upgrade.
USB flash drive creation
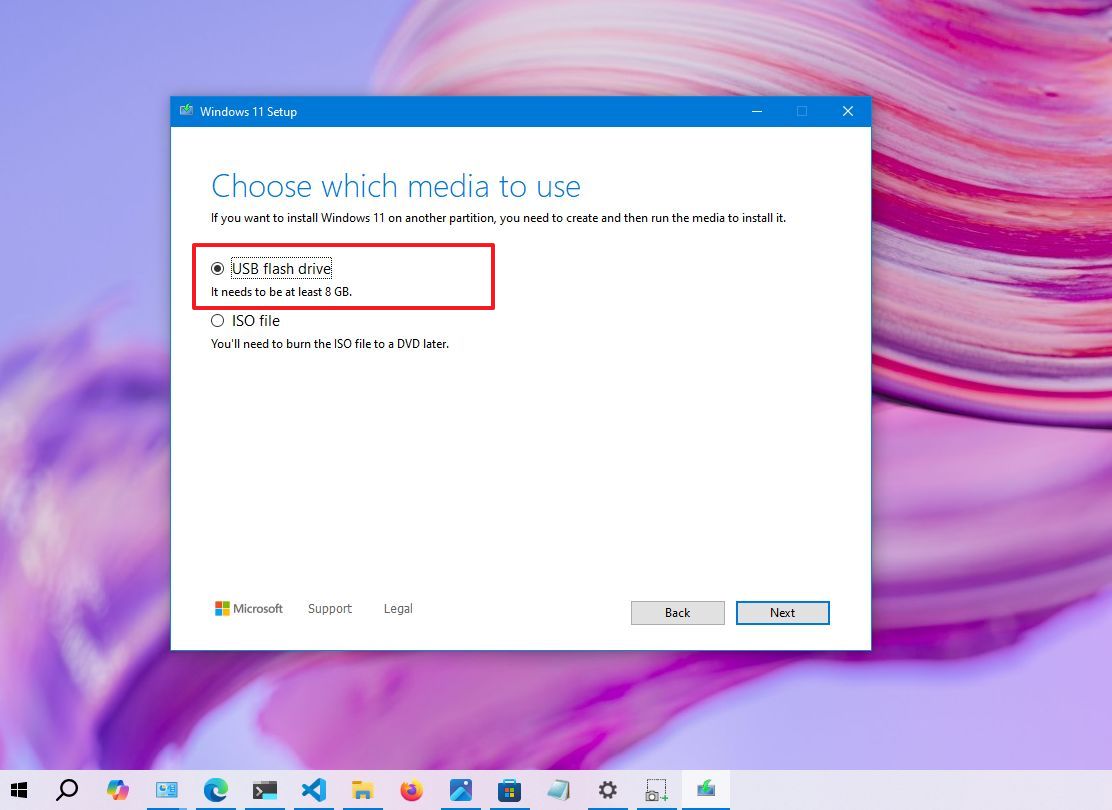
To create install media with the Media Creation Tool, connect a USB flash drive with at least 8GB of space, and use these steps:
- Open the Windows 11 download page.
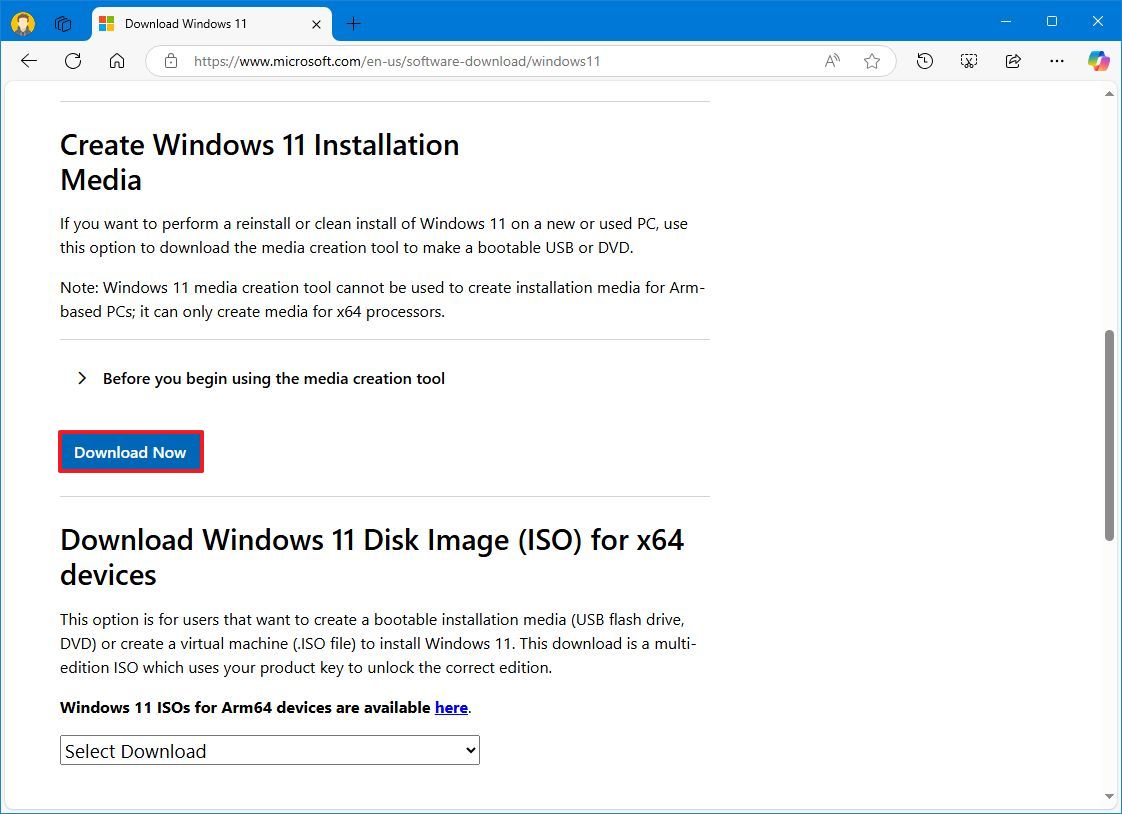
- Click the Download now button under the "Create Windows 11 Installation Media" section to save the file on the device.
- Double-click the MediaCreationTool.exe file to launch the tool.
- Click the Accept button to agree to the terms.
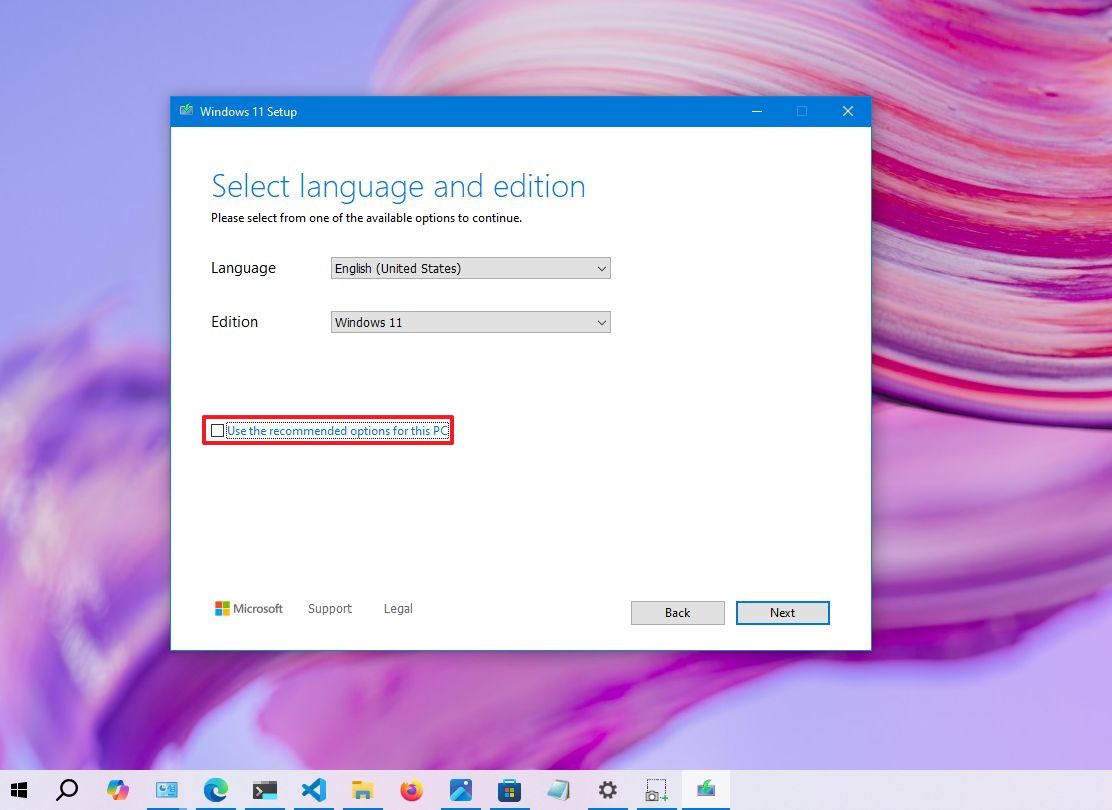
- (Optional) Clear the "Use the recommended options for this PC" option.
- Select the correct language and edition of Windows 11.
- Click the Next button.
- Select the "USB flash drive" option.
- Click the Next button
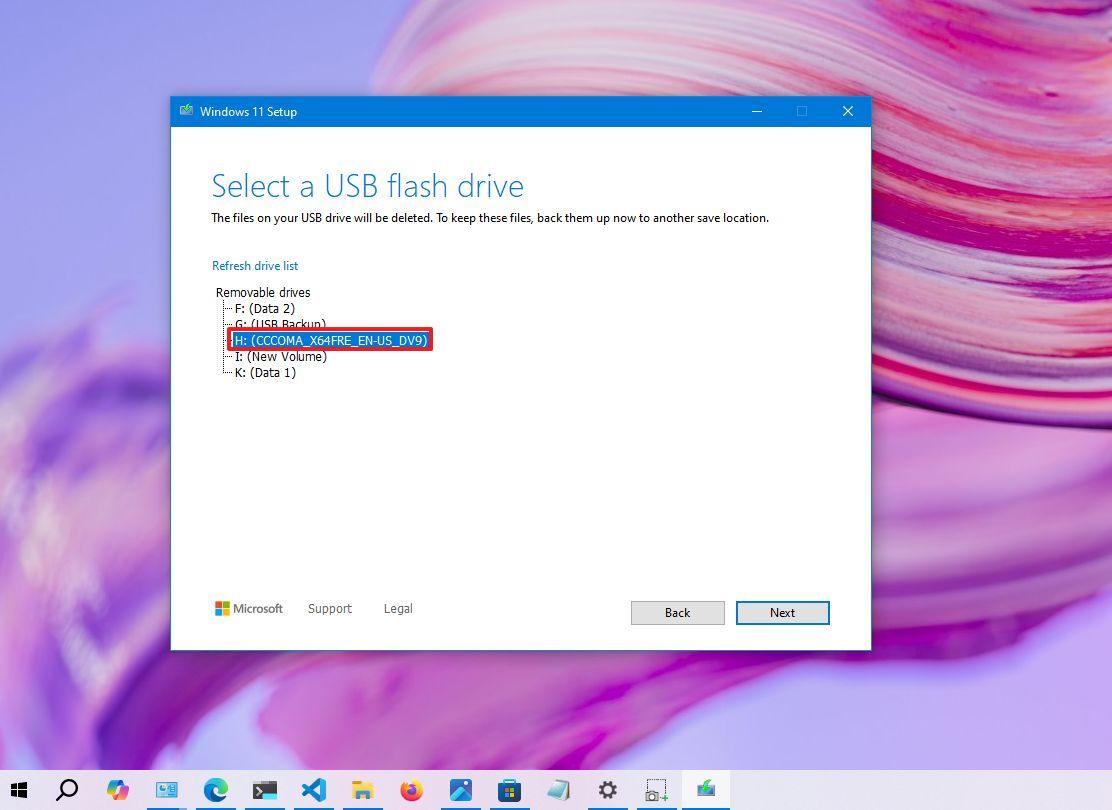
- Select the USB flash drive.
- Quick tip: If the device is not on the list, click the "Refresh drive list" option to make it available.
- Click the Next button.
- Click the Finish button.
Once you complete the steps, the tool will download the files and create an installation media, which you can then use to upgrade a compatible computer to Windows 11.
Windows 11 ISO download
To download the Windows 11 ISO file, use these steps:
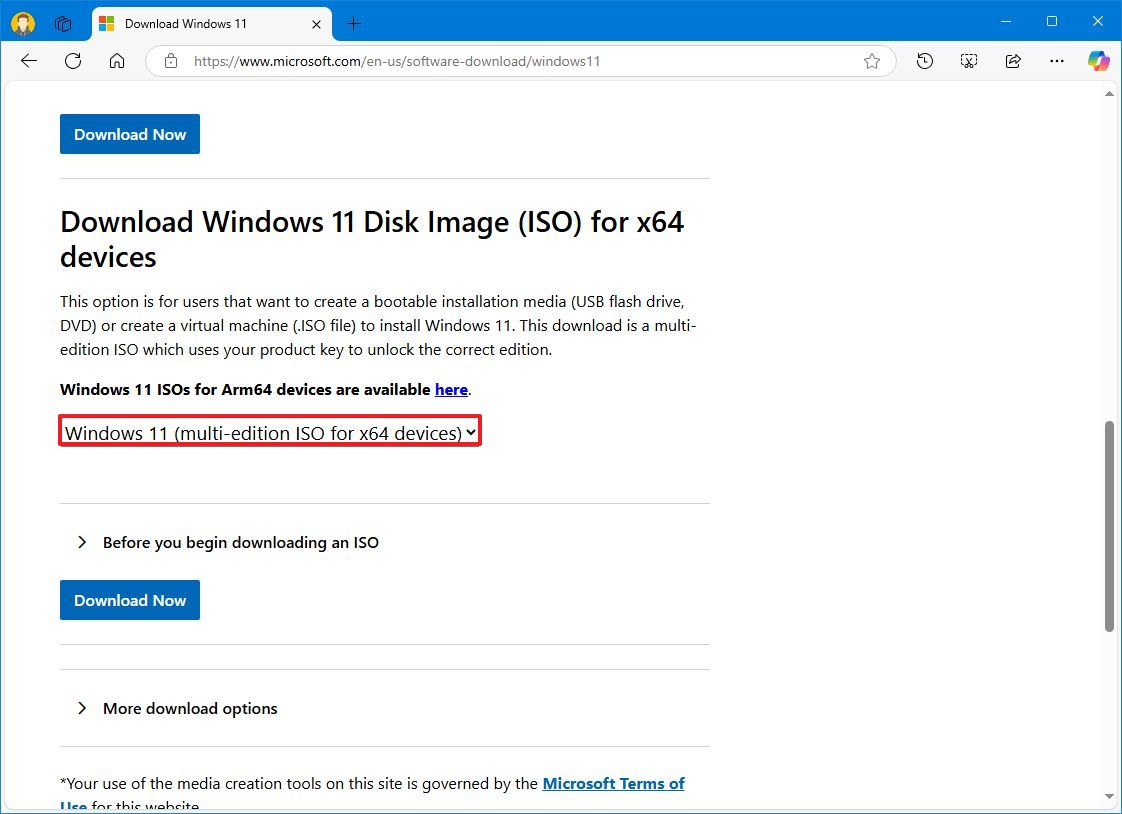
- Open the Windows 11 download page.
- Select the Windows 11 option under the "Download Windows 11 Disk Image (ISO)" section.
- Click the Download button.
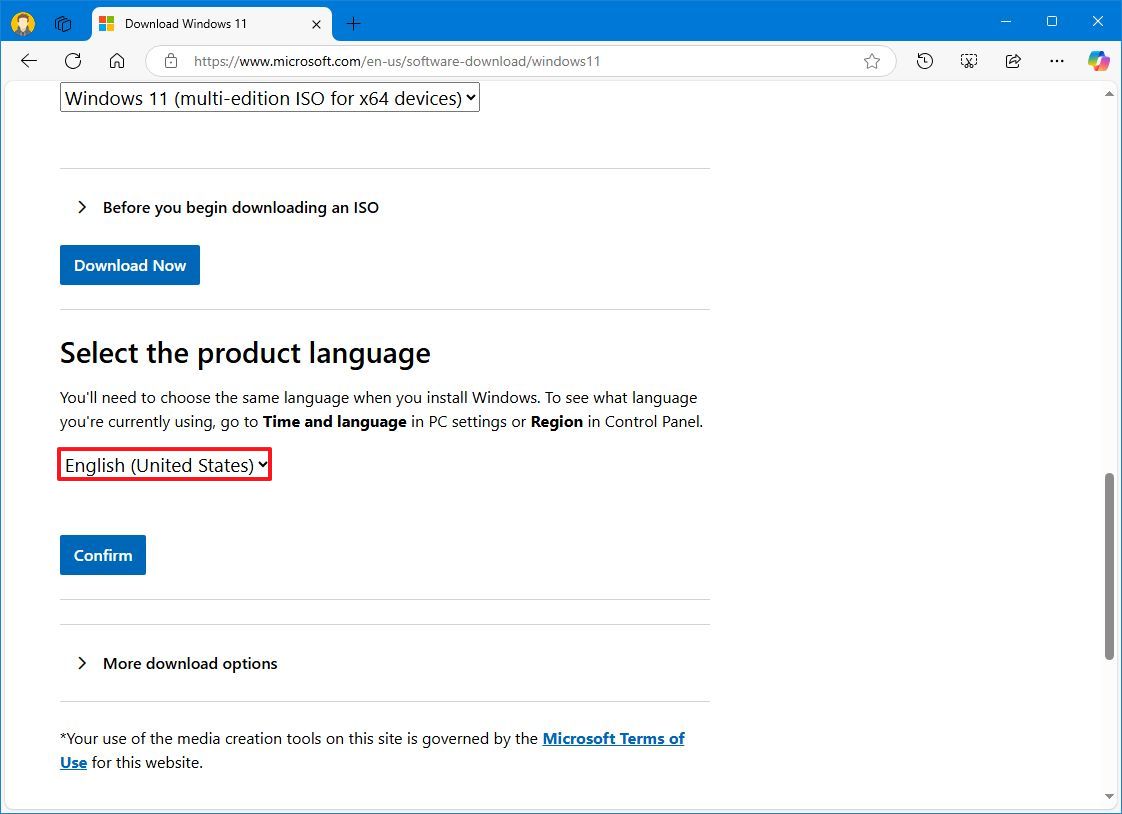
- Select the ISO language.
- Click the Confirm button.
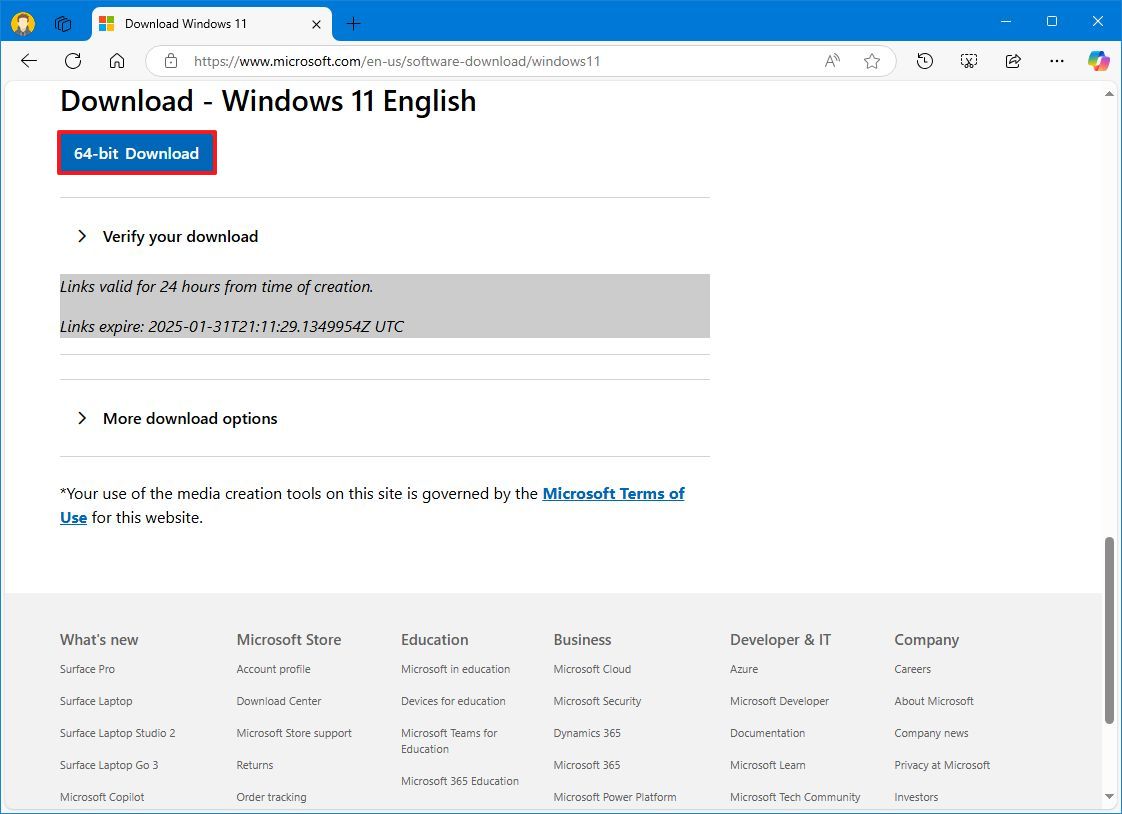
- Click the 64-bit Download button.
After you complete the steps, the Windows ISO will download on your computer, and you can double-click it to mount it and start the in-place upgrade.
Installation Assistant download
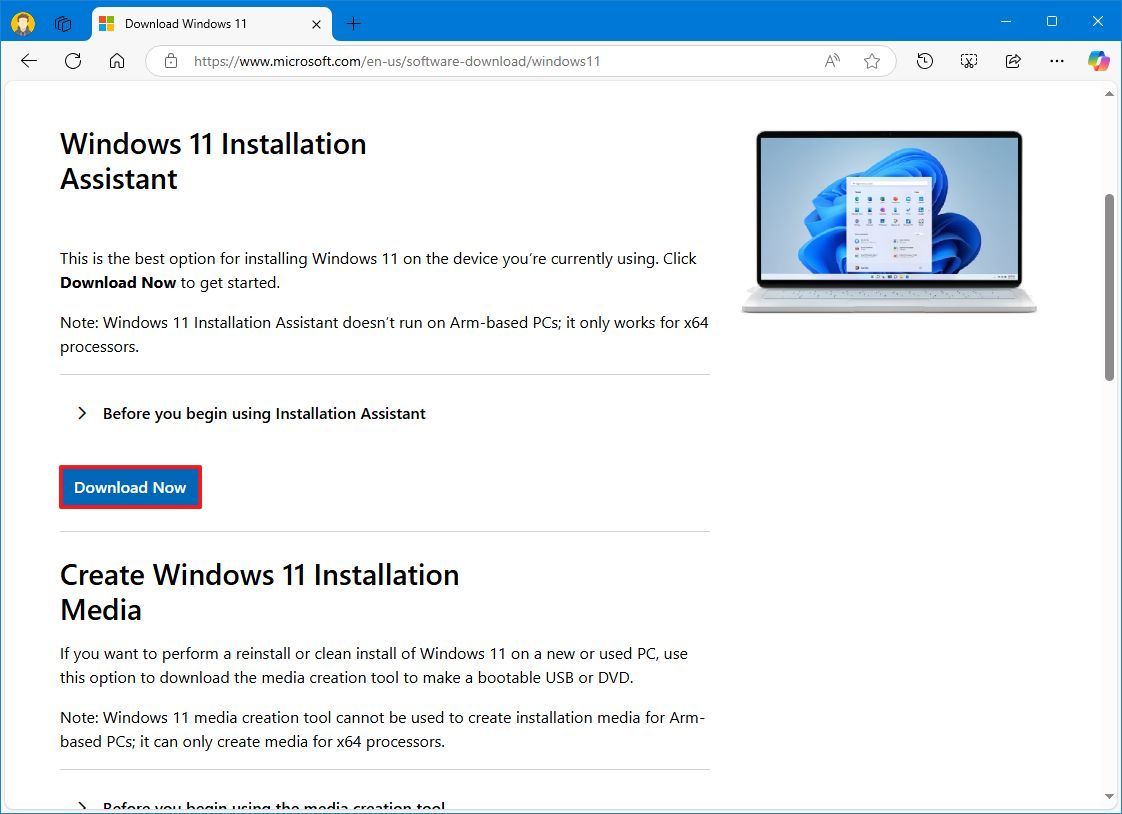
The Installation Assistant is a tool provided by Microsoft to make it easier to upgrade to Windows 11, especially in scenarios where the update isn't available through the standard "Windows Update" settings despite your computer meeting the compatibility requirements.
To download the Installation Assistant, use these steps:
- Open the Windows 11 download page.
- Select the Download Now button under the "Windows 11 Installation Assistant" section.
- Save the tool on your computer.
Once you complete the steps, the package will download. You can then use it to upgrade any computer that meets the minimum requirements. However, you will need an internet connection to proceed with the upgrade.
How to upgrade to Windows 11 using Windows Update
- Go to Settings → Update & Security → Windows Update.
- Select Check for updates, then choose Download and install for Windows 11.
- Restart to begin the in-place upgrade; files and apps remain intact
After you have prepared, you can proceed with the upgrade process. In this guide, I'm including the upgrade method using the "Windows Update" settings.
- If you want to use the Installation Assistant or ISO file to upgrade to Windows 11, follow these instructions.
- If you prefer a clean installation, follow these instructions.
To upgrade a PC running Windows 10 to Windows 11 through Windows Update, use these steps:
- Open Settings.
- Click on Update & Security.
- Click on Windows Update.
- Click the Check for updates button.
- Click the "Download and install" button.
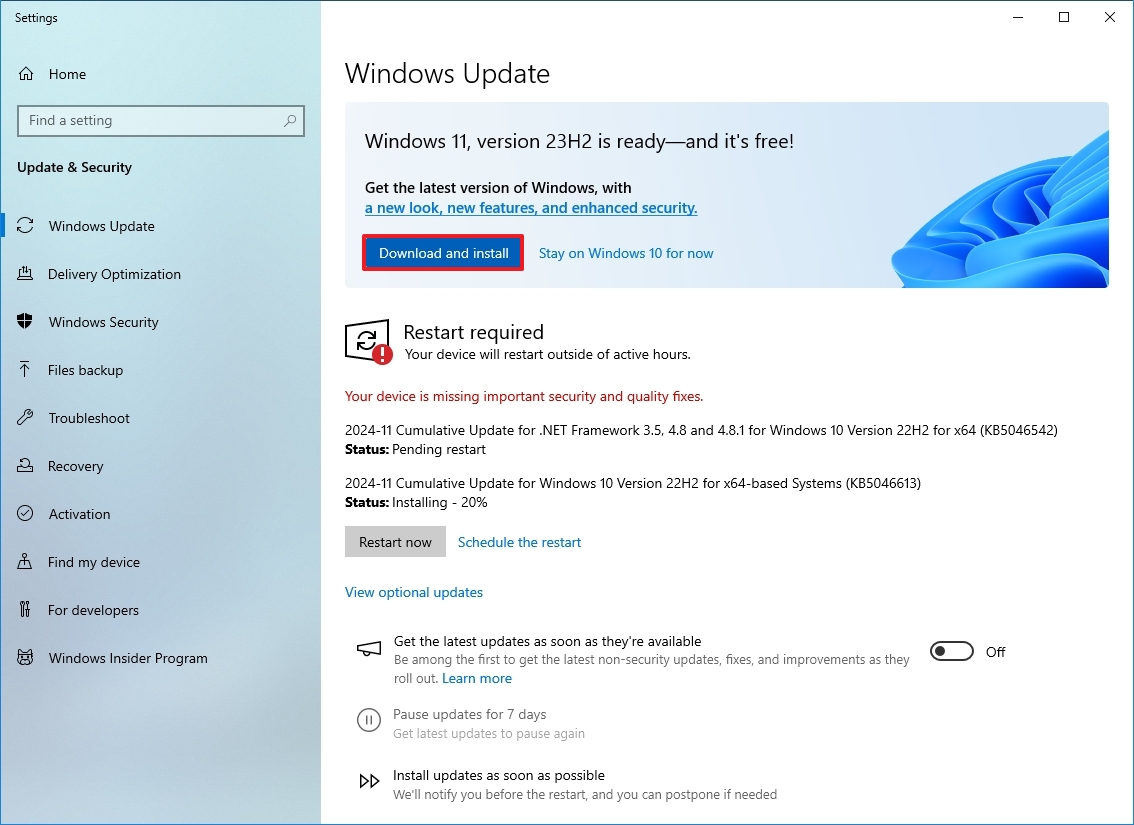
- Click the Restart now button.
Once you complete the steps, the computer will restart, and the upgrade to Windows 11 will begin. Since this is an in-place upgrade, you won't need to go through the entire out-of-box experience (OOBE).
More resources
For more helpful articles, coverage, and answers to common questions about Windows 10 and Windows 11, visit the following resources:

Mauro Huculak has been a Windows How-To Expert contributor for WindowsCentral.com for nearly a decade and has over 22 years of combined experience in IT and technical writing. He holds various professional certifications from Microsoft, Cisco, VMware, and CompTIA and has been recognized as a Microsoft MVP for many years.

