How to manage Outlook 2016 folders
Do you yearn for a less cluttered Outlook inbox, but can't seem to let go of your messages? Knowing how to manage folders in Outlook is a crucial step towards a less cumbersome inbox.

All the latest news, reviews, and guides for Windows and Xbox diehards.
You are now subscribed
Your newsletter sign-up was successful

Would you rather spend less time searching and scrolling in Outlook and more time composing and replying? Then you need to learn about the benefits of folders and subfolders. Read on to get started with folders.
Folder management
By default an Outlook account will present the following folders:
- Inbox — The inbox is the primary location for incoming messages.
- Drafts — Drafts are messages that have been either completely or partially composed but have not been sent yet. Drafted messages are still able to be opened and edited before sending.
- Sent Items — A copy of each message you send will be saved in the Sent Items folder. They are not visible in the inbox folder.
- Deleted Items — As a message is chosen to be deleted, it's moved to the Deleted Items folder. These messages will be automatically purged after 30 days unless the Retention Policy is changed. Users can also choose to empty the folder of its contents at any time.
- Clutter — Messages that are considered low priority will be redirected to the Clutter folder. Outlook recognizes which messages are read and determines the unread messages to be of little importance.
- Junk Email — Messages that seem to exude the appearance of junk mail will be redirected to this folder.
- Archive — Archiving older messages moves them from the main .pst file into a separate archive.pst file.
Depending on your organization, you may see additional folders created by an administrator or by other services, such as Skype or Yammer. Now understanding the folders that are first presented to you, you should know that you cannot delete these folders. You can, however, create folders of your own and delete them, as well.
How to create a folder:
- Locate where the new folder should live on the left pane.
- Right-click on the location.
- Select New Folder.
- Input a name in the resulting Name box.
- Press Enter to create.
How to delete a folder:
- Right-click on the folder to be deleted.
- Select Delete from the command menu.
- Select Yes to confirm.
Folder creation and deletion are parts of the overall folder management options found when you right-click on the left pane of the Outlook interface. Keep in mind that many of the actions are grayed out for default folders. Here are the options that are presented:
- Open in New Window — This opens another Outlook 2016 window with the selected folder opened.
- New Folder — Creates a folder or sub-folder.
- Rename Folder — This allows you to rename any folder or subfolder that you created.
- Copy Folder — This copies the selected folder as a subfolder. You can then choose the destination folder in the resulting Copy Folder pop up box.
- Move Folder — You can move the folder into any existing folder from inside the popup box.
- Delete Folder — This option moves the folder and its contents to the Deleted Items folder.
- Mark all as Read — All messages and other items in the folder will be marked as read.
- Clean up Folder — Duplicate or redundant messages will be automatically moved to the Deleted Items folder.
- Delete All — All items in the folder will be deleted. If you choose this action with a folder that contains subfolders, the sub-folders will be removed as well.
- Show in Favorites — Choose to add this folder to the Favorites section, which is located near the top of the left panel.
- Remove from Favorites — This option appears when right-clicking in the Favorites section. It removes the folder from Favorites but does not delete it.
- Sort Subfolders A to Z — All sub folders within a folder will be listed alphabetically.
- Move Up/Down — Folders and subfolders can be moved up or down the list, one entry at a time.
- Properties — This action takes you the properties menu of the folder. A series of settings are presented such as selecting the folder policy, permissions and viewing the folder size.
Search folders

Those who need Outlook to retain a large volume of messages could potentially have difficulty retrieving information. A Search Folder aims to eliminate the needle-in-a-haystack scenario. It presents messages that match search criteria determined by the user. It doesn't matter if the messages are stored in various folders. As long as they are contained within the same .pst file, they will be found.
How to create a customized search folder:
- Select the Folder tab from the ribbon.
- Select New Search Folder.
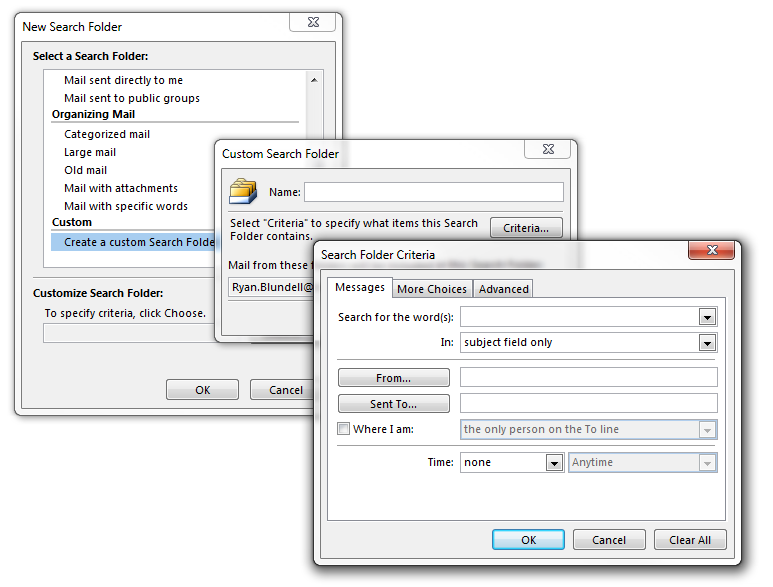
- Select Create a custom Search Folder from the Select a Search Folder list.
- Click Choose.
- Enter the name of the folder in the name box.
- Click Criteria to pick your options from the following sections:
- Messages – Choose to search for specific words from the subject or body, specific contacts or recipients.
- More Choices – This offers more criteria such as specifying read or unread items, attachments and level of importance.
- Advanced – This gives the user the option to create finely tuned criteria to narrow down result. This provides a list of criterion and allows you to choose conditions and values.
- Click Browse to select a specific folder to include in the search.
- Click Ok on each dialog box to confirm your selections.
How to create a pre-defined search folder:
- Select Folder from the ribbon.
- Choose New Search folder.
- Select a folder type from the Select a Search Folder list.
- Select Criteria under the Customize Search Folder section.
- Select Ok to save the search folder.
Folder sharing and delegation

Your Outlook folders can also be a place for collaboration. Depending on the necessary tasks, you can either choose to share a folder or delegate one. To delegate is to allow someone to act on your behalf, such as responding to emails or managing items in your folders. Sharing folders is commonly used to promote collaboration.
How to delegate a folder:
- Click on File.
- Click on Account Settings under Account Information.
- Click on Delegate Access.
- Click on Add.
- Search and select the individual.
- Click Add
- Select the permission level for the individual under the Permissions box.
- Right-click on the account.
- Select Folder Permissions.
- Reviewer – Users can read items but cannot delete them.
- Author – Users can read and create items.
- Editor – Users can read, create and modify items.
- Click on the name of the person.
- Select the Permission Level.
- Click Ok.
How to remove a delegate:
- Click on File.
- Click on Account Information.
- Click on Delegate Access.
- Select the name of the current delegate.
- Click Remove.
- Click Ok.
How to share a folder
- Click on the Folder Tab in the ribbon.
- Click on Folder Permission in the Properties section
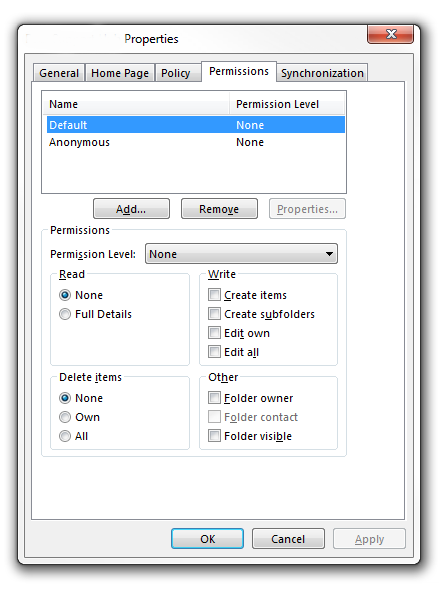
- Click on the Permissions tab in the Inbox Properties box.
- Click Add to add a user.
- Locate the person in the address list.
- Click Add
- Click Ok.
- Select an option from the Permission Level list.
- Owner – Change permission levels for others who have access. Create, read, modify and delete contents of a folder.
- Publishing Editor – All contents that the owner has created can be read and deleted. Content and subfolders can be created as well.
- Editor – All items can be created read and modified.
- Publishing Author – Items can be modified, deleted, created and read. Sub-folders can be created as well.
- Author – Allows users to read and create items that the owner has created.
- Nonediting Author – Owner created items can be deleted. Can create and read items.
- Reviewer – Can read items but cannot delete them.
- Contributor – Users can only create items.
- Select specific permission in the provided fields.
- Click Apply.
- Click Ok.
How to stop sharing a folder:
- Access the Folder tab from the ribbon.
- Select Folder permissions.
- Click on the name of the individual.
- Select None to suspend sharing.
- Select Remove to stop sharing.
Wrapping up
Being able to effectively manage folders enables you to be more productive in your communication. It also allows you to make Outlook both personal and comfortable. Do you frequently share folders with colleagues? How do you manage your folders? Let us know!
All the latest news, reviews, and guides for Windows and Xbox diehards.
- Microsoft Office 101: Help, how-tos and tutorials

Ryan is a Former Contributor for Windows Central.
