How to use Event Viewer on Windows 10
If Windows 10 or an app isn't behaving as expected, you can use the Event Viewer to understand and troubleshoot the issue, and in this guide, we'll show you how.
All the latest news, reviews, and guides for Windows and Xbox diehards.
You are now subscribed
Your newsletter sign-up was successful
On Windows 10, Event Viewer remains one of the most underrated yet effective diagnostic tools. While it's a legacy utility, it still plays an essential role since it collects detailed logs from apps, drivers, services, and core components. Whether you're dealing with hardware failures, app crashes, driver issues, system errors, or even successful operations, Event Viewer has likely already logged the details.
If you've ever had your computer reboot without warning, freeze unexpectedly, or display a Blue Screen of Death (BSoD), the answer may already be in the logs. In my experience, Event Viewer should be one of the first places to check when something goes wrong on your computer. Even if you don't immediately understand the logs, they often contain clues (timestamps, error codes, warnings) that can help you fix, research, or explain the issue to tech support.
Typically, most users overlook this tool simply because they don't know it exists or find it intimidating. However, once you understand how to read its logs, it becomes a valuable part of your troubleshooting toolkit.
In this how-to guide, I'll outline the steps to navigate and use the Event Viewer on Windows 10.
These instructions has been updated to ensure accuracy and reflect changes to the process in the operating system.
How to use Event Viewer on Windows 10
On Windows 10, Event Viewer exists to help you monitor apps and system components as well as troubleshoot problems.
Interface navigation
To open the Event Viewer on Windows 10, simply open start and perform a search for Event Viewer, and click the top result to launch the console.
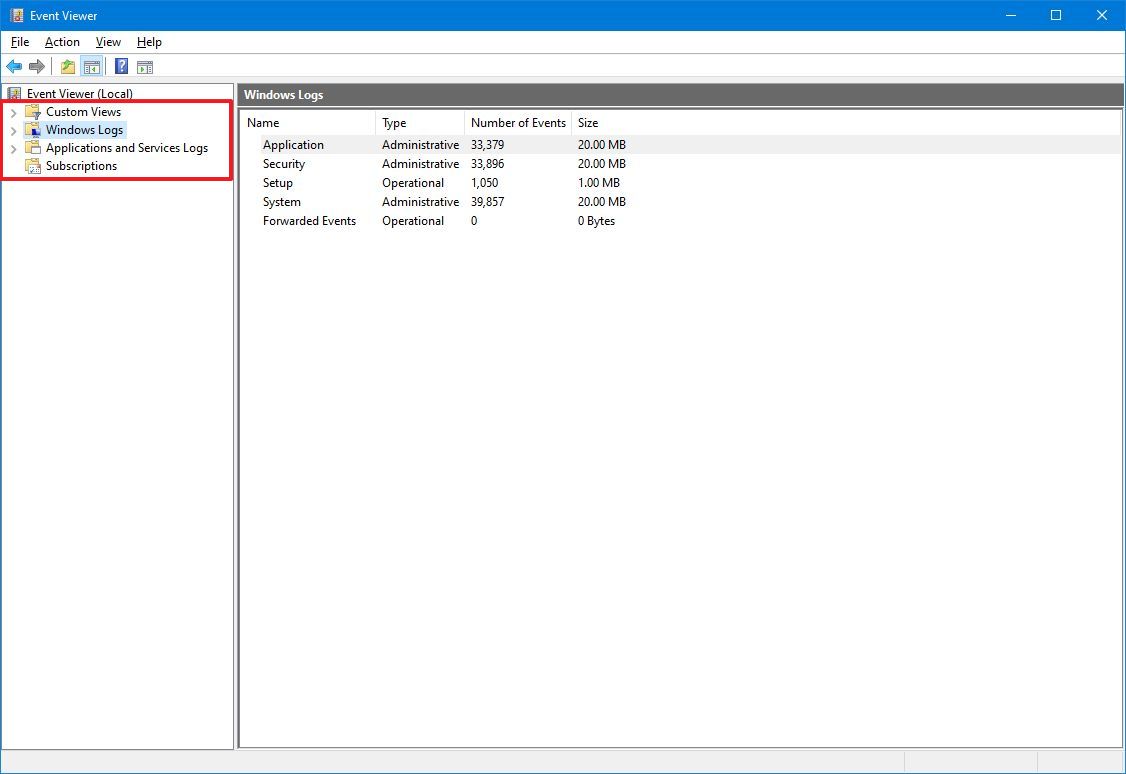
The experience is divided into four main groups, including "Custom Views," "Windows Logs," "Applications and Services Logs," and "Subscriptions. " Each group stores related logs.
All the latest news, reviews, and guides for Windows and Xbox diehards.
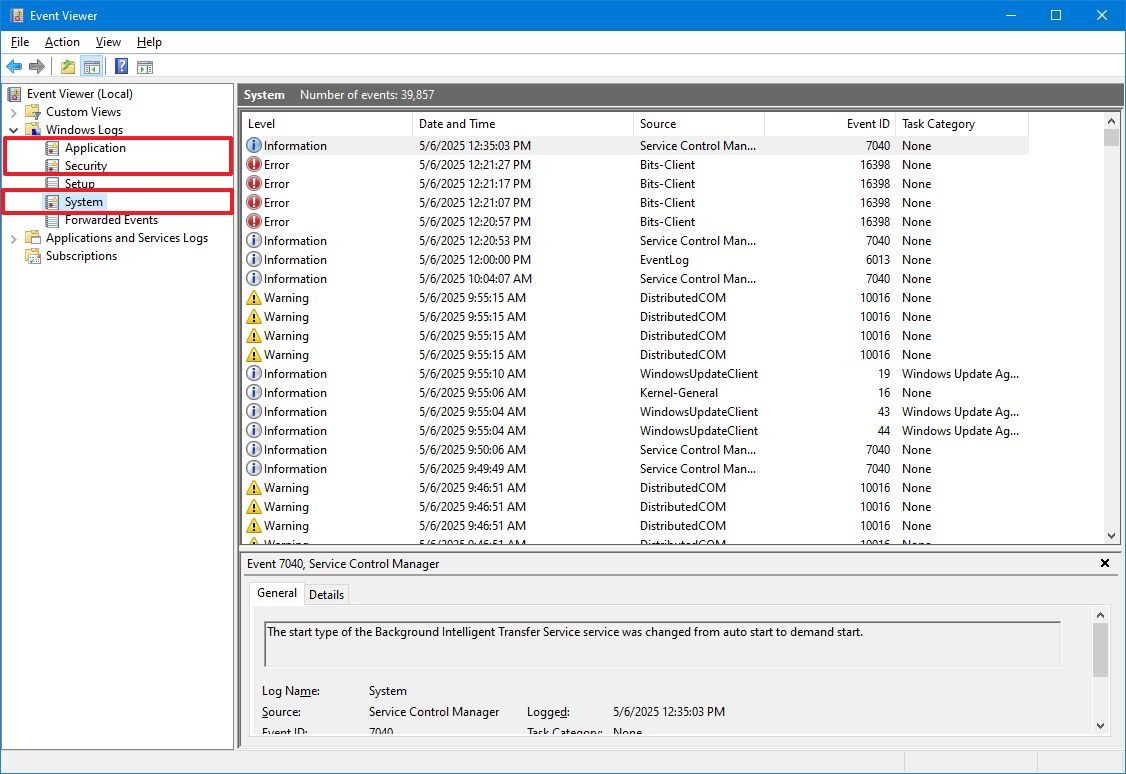
Although each group can hold different app and system logs, you'll usually only check the Application, Security, and System logs inside the "Windows Logs" group to investigate an issue.
Inside the "Application" log, you'll find events related to the user interface and other critical components required for running apps. The "Security" log contains events tied to login attempts and security-related features. Finally, the "System" log records events related to core system processes, including services and apps installed on Windows 10.
The Event Viewer classifies logs into three primary event levels:
- Error: Indicates serious issues that typically require immediate attention.
- Warning: Suggests potential problems that aren't critical but may impact system performance or behavior.
- Information: Captures standard operations and successful execution of processes and services.
Although most applications (especially those from Microsoft) log events in Event Viewer, this isn't always the case for third-party programs. Many external apps do not use this logging system consistently.
It's also normal to see a few errors or warnings even when your system is functioning correctly. For instance:
- A service might fail to load during startup but successfully restart later.
- Windows Time Service could experience sync issues if it can't connect to the internet temporarily.
- A file on a network share might be inaccessible due to a brief connectivity drop.
- An app may crash unexpectedly but then reopen and continue to work as expected.
These events are usually normal and expected and not a cause for concern unless they occur frequently or negatively affect your workflow.
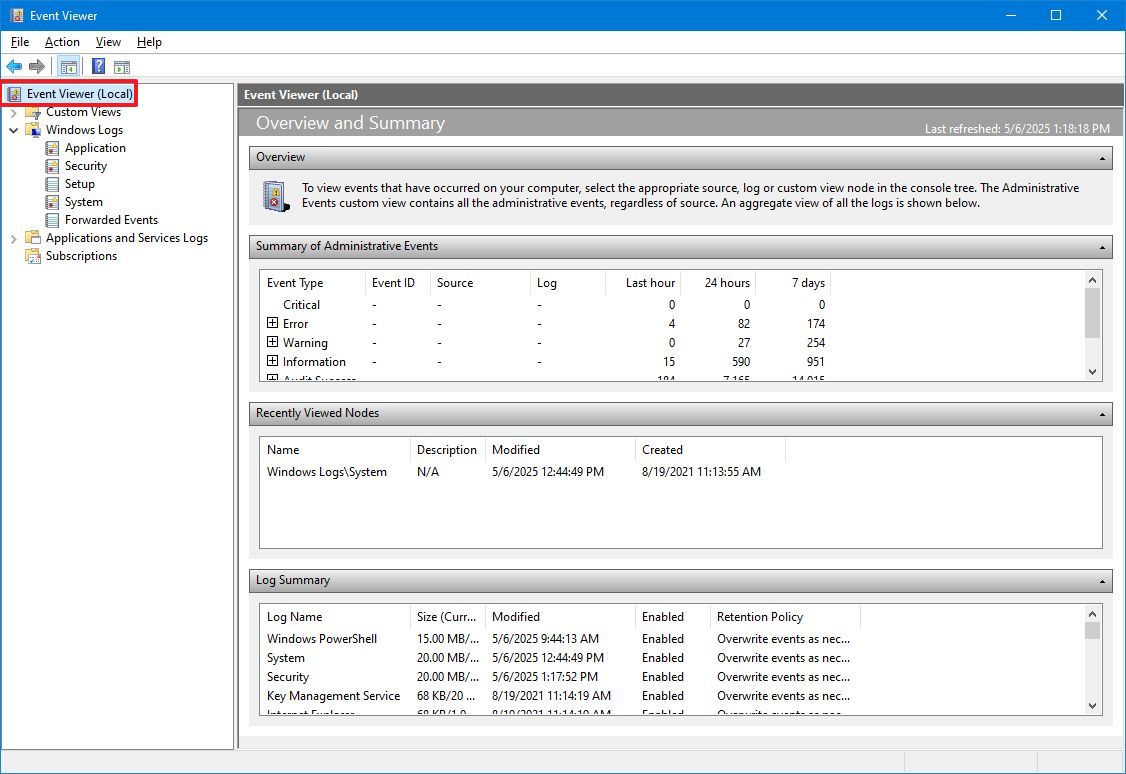
In the Event Viewer console, you can select any of the main categories (Application, Security, or System) to access detailed information, including the number of logged events and their disk size. Alternatively, selecting "Event Viewer (Local)" from the top-left panel provides a centralized overview. This summary includes recently viewed logs, an event summary by category, and overall health insights of your system.
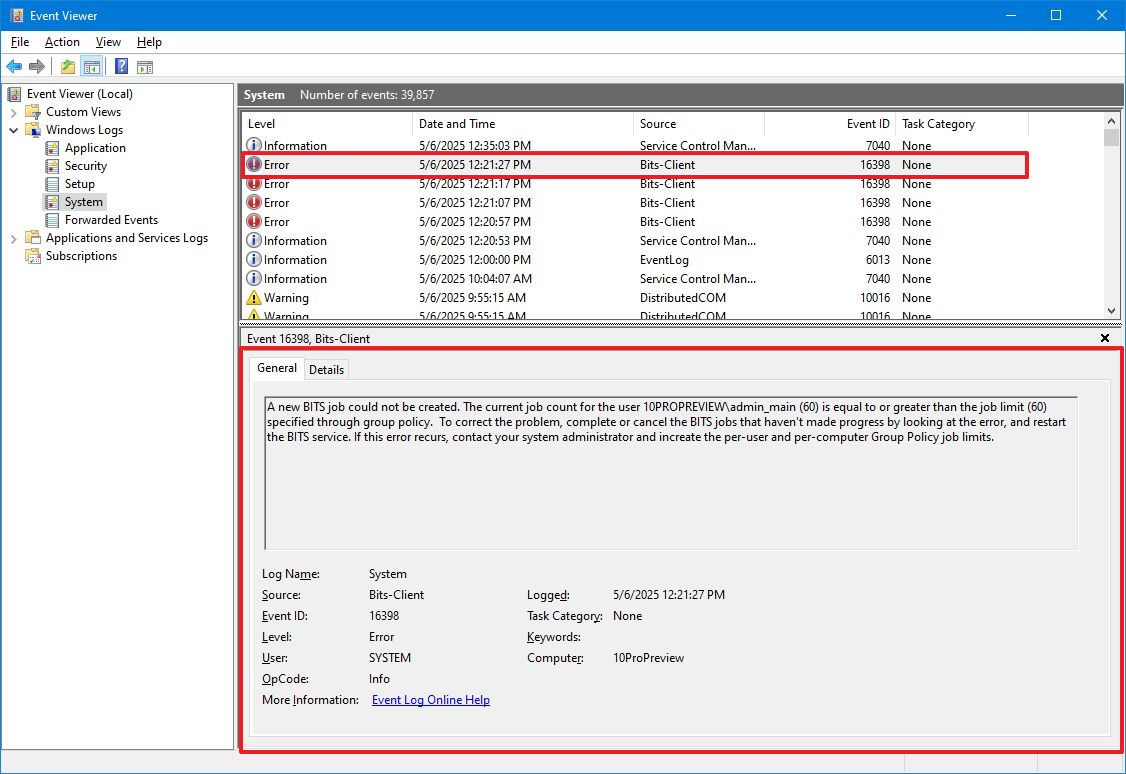
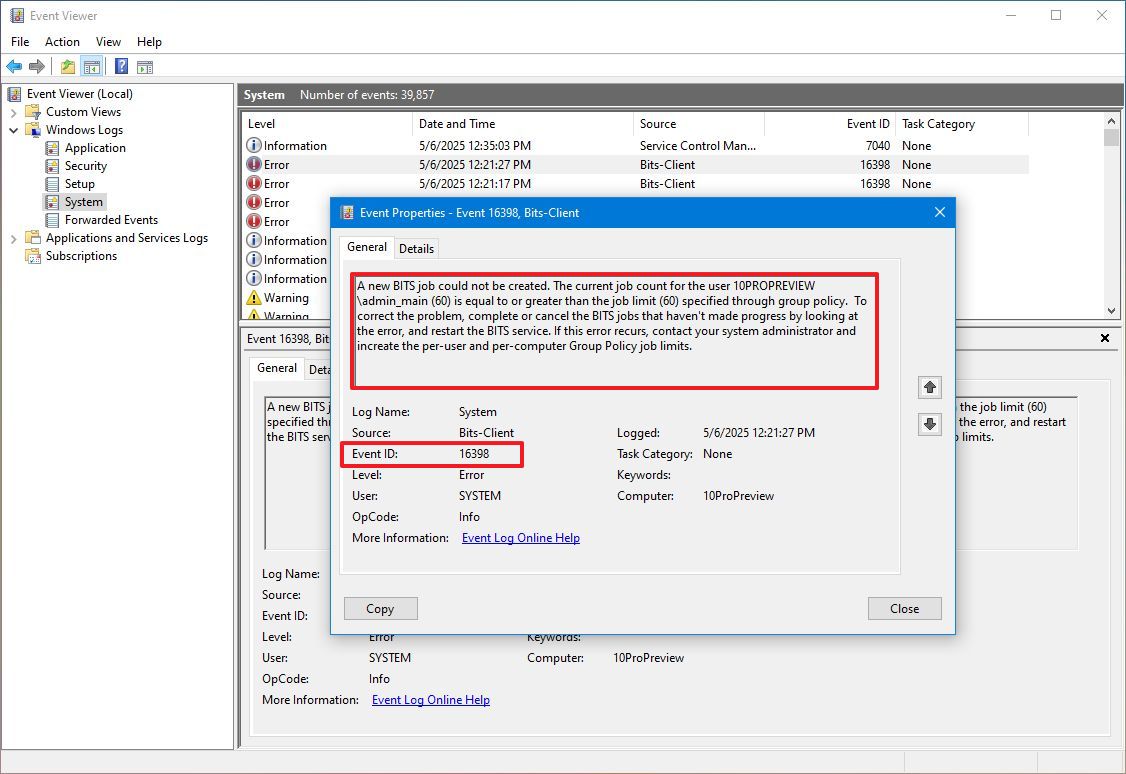
If you select one of the groups, on the right side, you'll see all the events with their "Level" information, "Date and Time" of creation, "Source," "Event ID," and "Task Category." If you want to see more details, you can select the event, and the information will be displayed at the bottom of the console, or you can double-click the event to access more details.
In the event properties window, the "General" tab includes an easy-to-understand description of the error, warning, or information.
Usually, the description should give you enough information to understand and resolve the issue. However, the "Event ID" is also an important piece of information, as you can use it to search online for more information and possible instructions to fix the problem.
Search for specific logs
If you're looking for a specific event, the console provides at least two ways to find events using the filters or keyword search.
Advanced search
To use the filters to find a specific type of log, use these steps:
- Open Start.
- Search for Event Viewer and select the top result to open the console.
- Expand the event group.
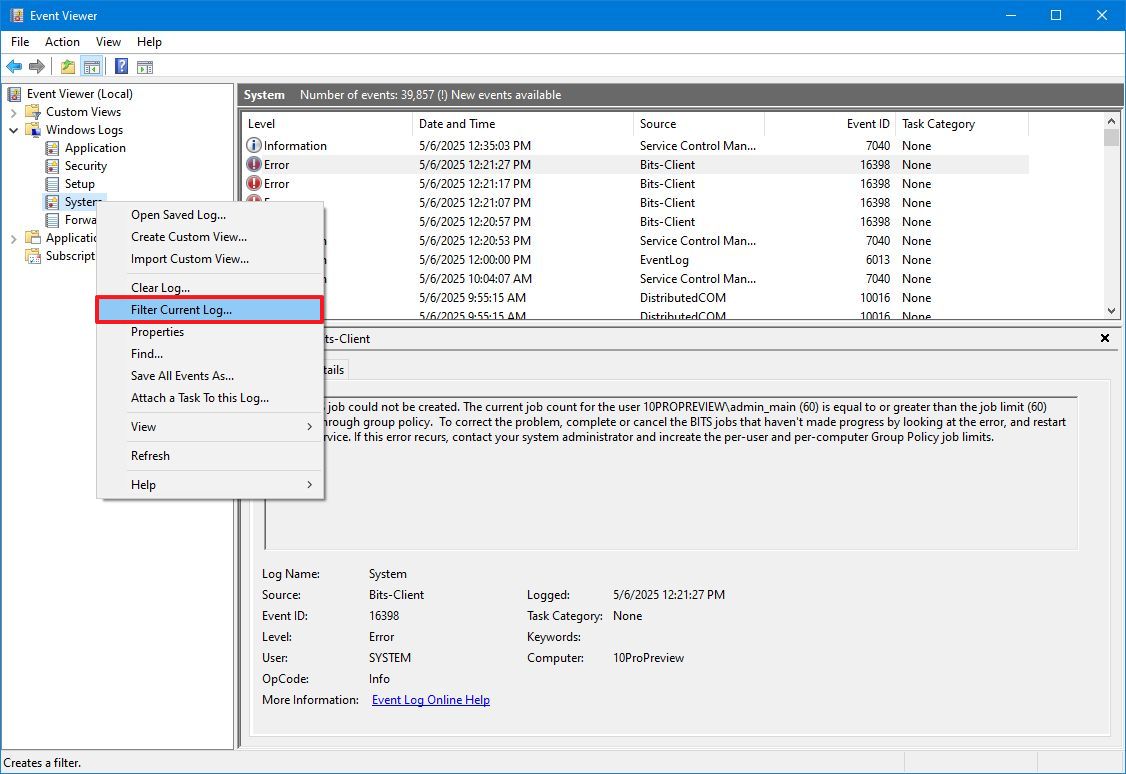
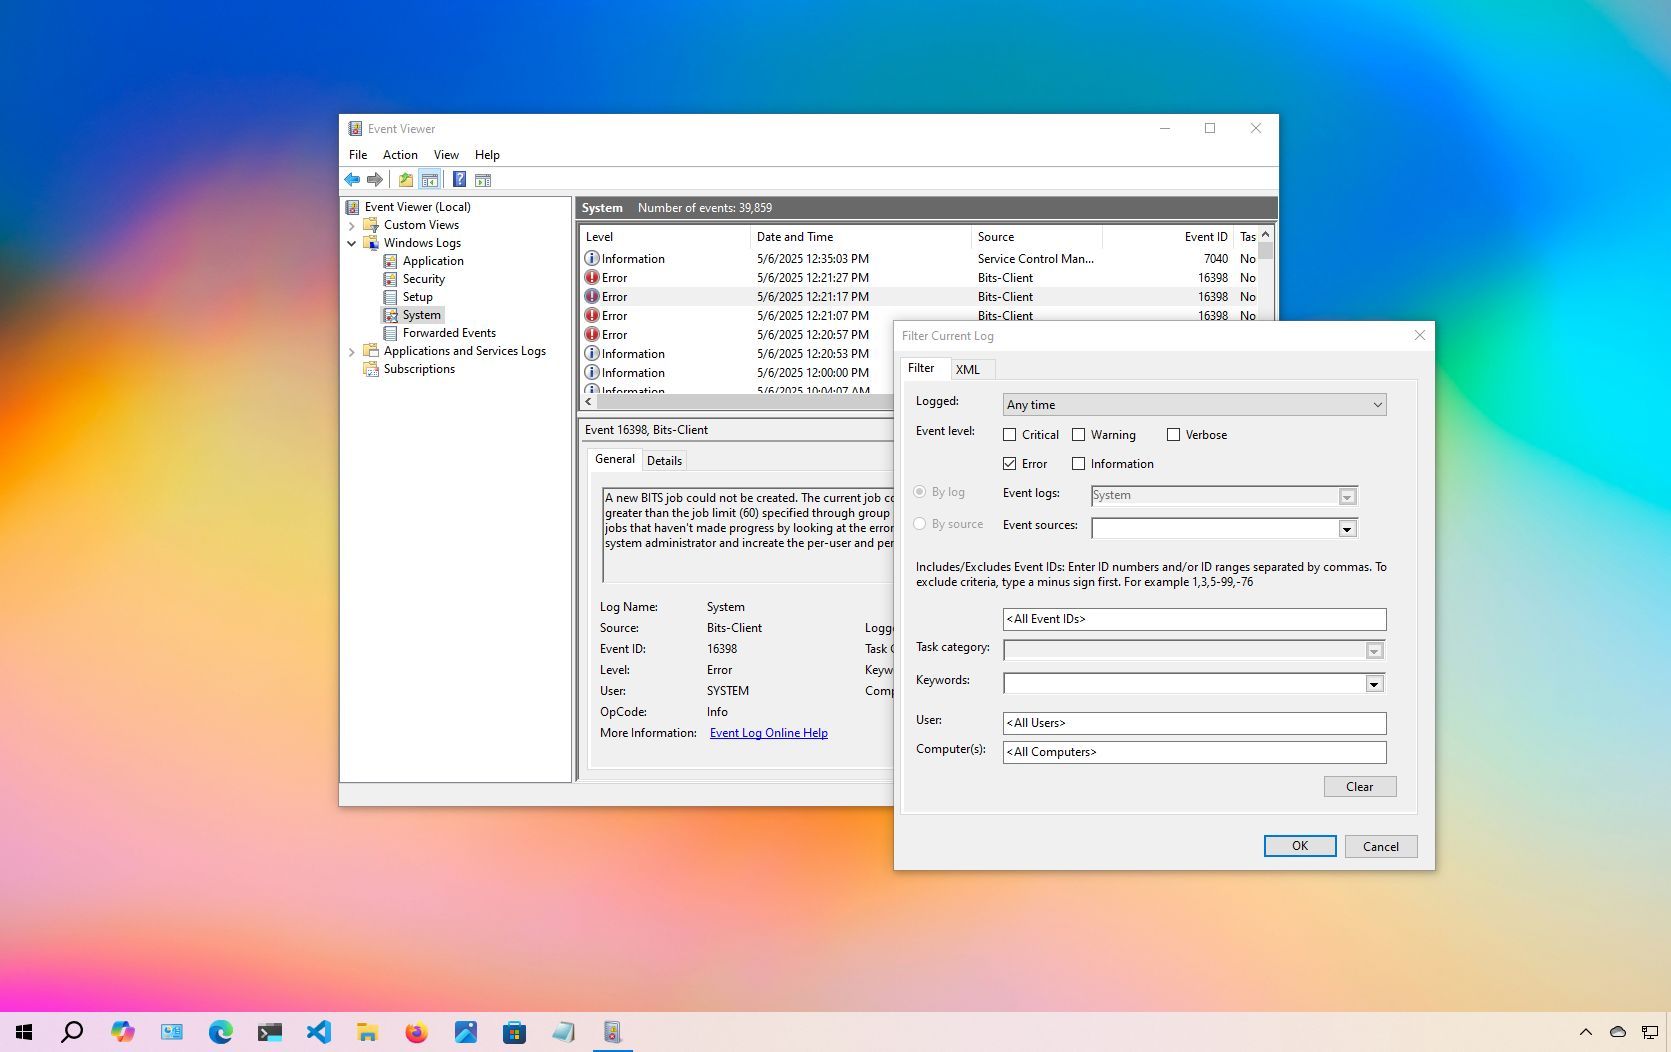
- Right-click a category and choose the "Filter Current Log" option
- .Quick note: You can also access the filter and other common options in the "Action" pane available in the right side of the console.
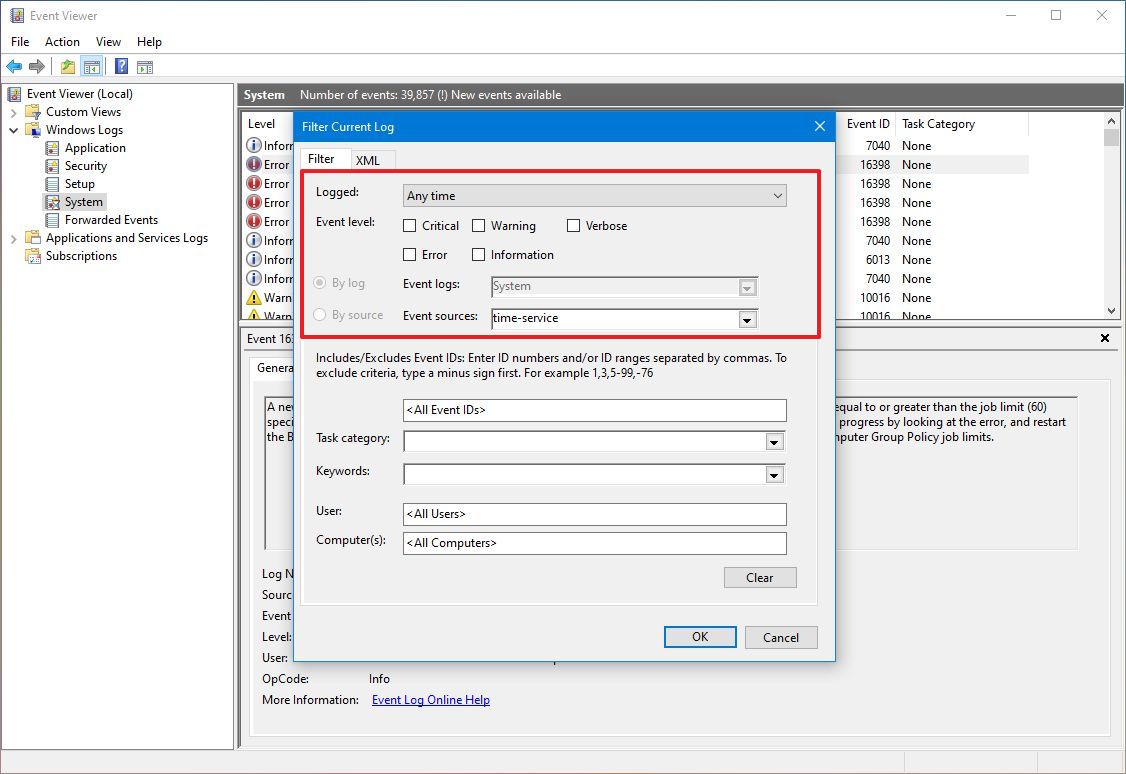
- Click the Filter tab.
- Use the "Logged" drop-down menu and select a time range when the event might have occurred, including:
- Any time.
- Last hour.
- Last 12 hours.
- Last 24 hours.
- Last 7 days.
- Last 30 days.
- Custom range.
- Select the event level of interest, including:
- Critical.
- Warning.
- Verbose.
- Error.
- Information.
- (Optional) Select the event sources. This can be from one or more apps and services.
- (Optional) Select the Task category.
- (Optional) Select or confirm a keyword to help narrow down the log.
- Use the default selections for User and Computers.
- Click the OK button.
Once you complete the steps, related logs will appear filtered in the console. If you want to clear the current filter, right-click the group, and select the Clear Filter option.
Basic search
To use a keyword to find an error, warning, or information event with Event Viewer, use these steps:
- Open Start.
- Search for Event Viewer and select the top result to open the console.
- Expand the event groups.
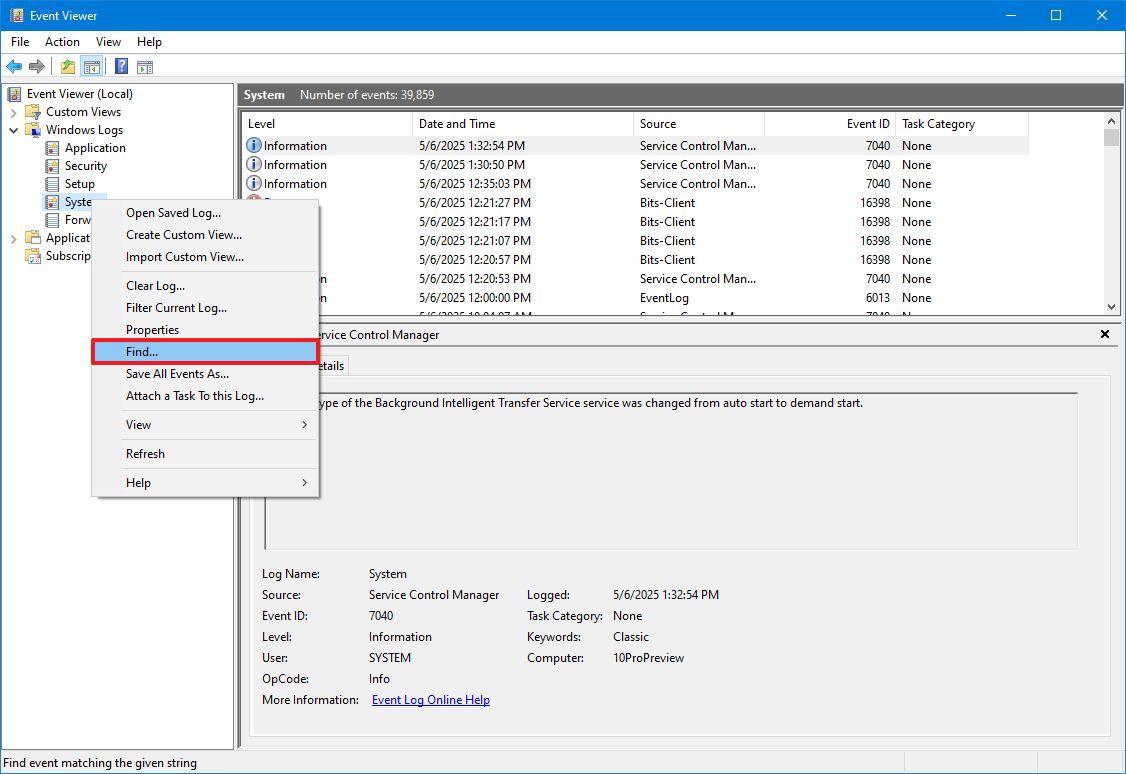
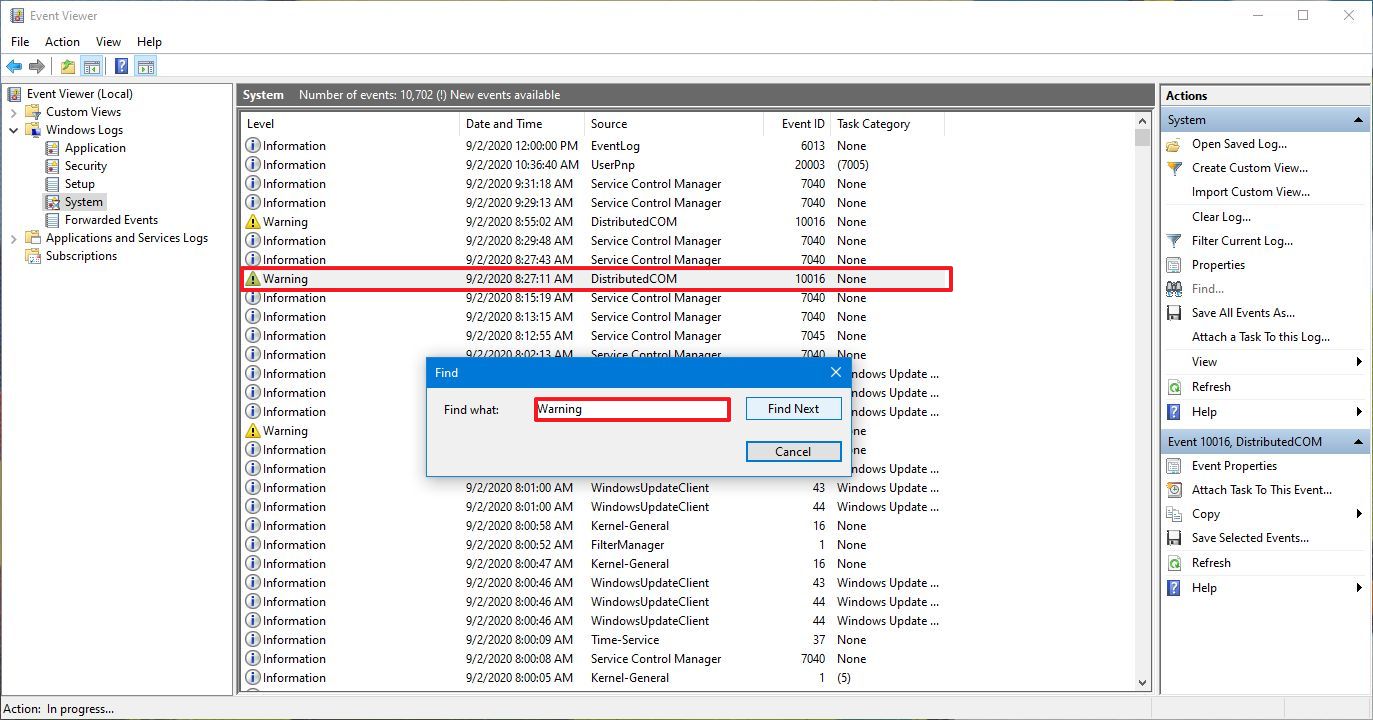
- Right-click a category and choose the Find option.
- Type a keyword and press the Find Next button.
After you complete the steps, the event will be highlighted in the list if a match is found.
Create custom views
If you frequently search for the same type of events, the Event Viewer also comes with an option to create custom views, which allows you to quickly filter the logs to view only those that are relevant to you.
To create a custom view in the Event Viewer, use these steps:
- Open Start.
- Search for Event Viewer and select the top result to open the console.
- Expand the event group.
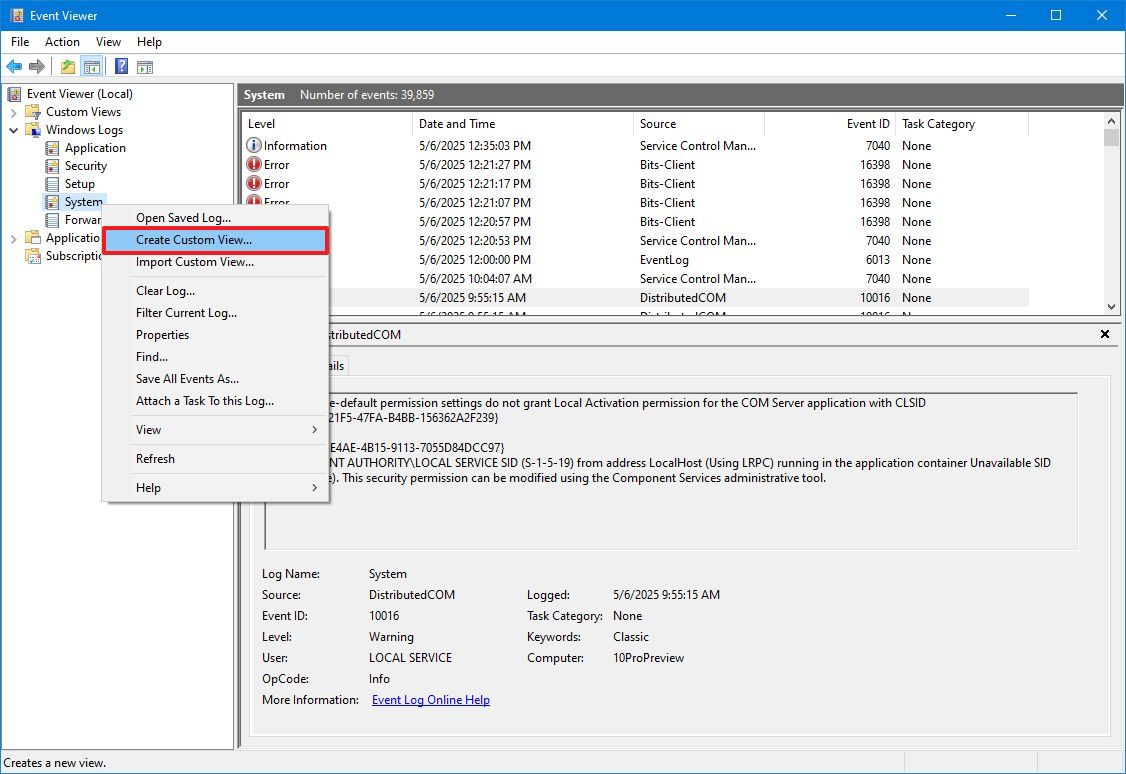
- Right-click a category and choose the "Create Custom View" option.
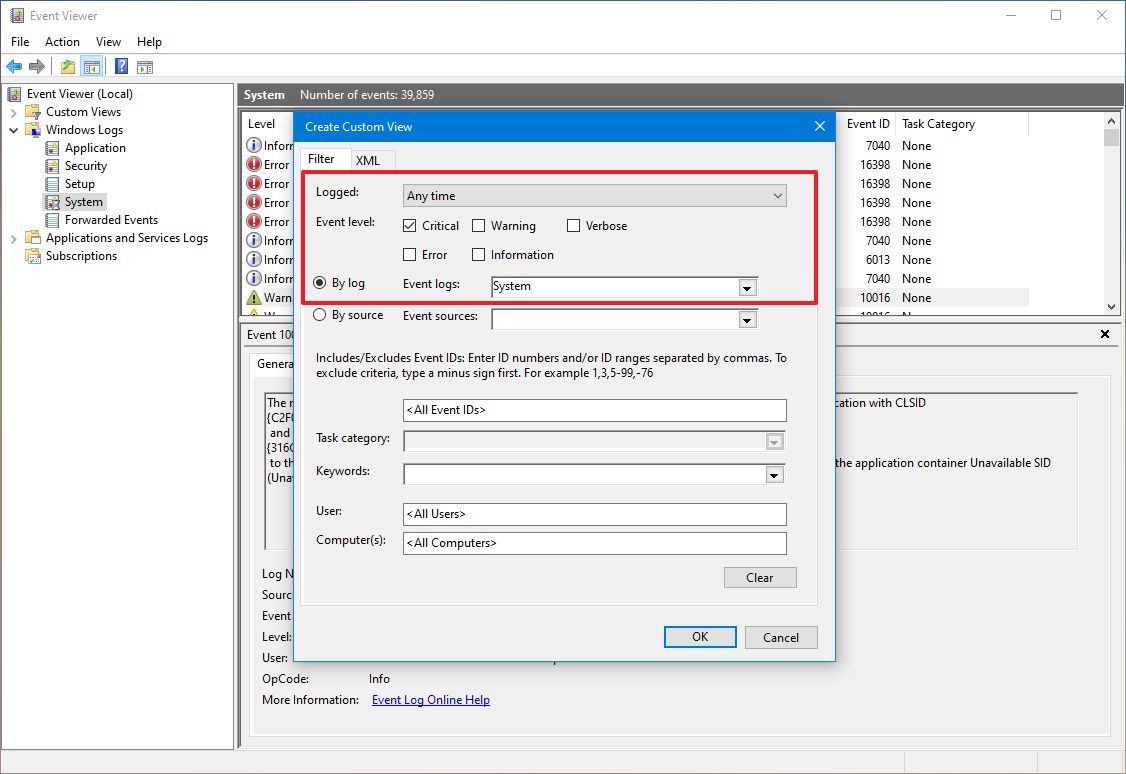
- Click the Filter tab.
- Use the "Logged" drop-down menu and select a time range.
- Select the By log option.
- Choose the event category you want to filter (for example, System) using the "Event logs" setting.
- Select or confirm a keyword to help narrow down the log.
- Use the default selections for User and Computers.
- Click the OK button.
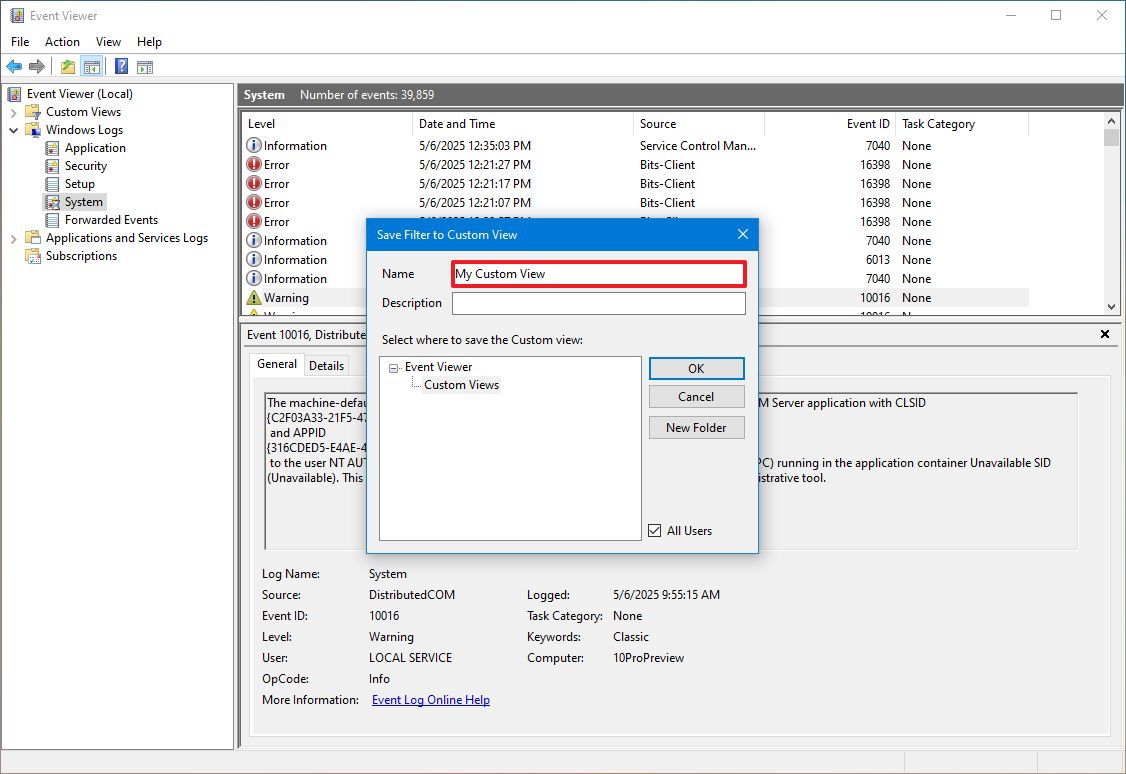
- Confirm a name for the custom view.
- (Optional) Compose a description for the custom view.
- Select where to save the view.
- Quick note: The default location is always recommended, but you can always create a new folder to store them.
- Click the OK button.
Once you complete the steps, the next time you need to view specific logs, you can expand the "Custom Views" folder and select the view you created.
Clear log history
On Windows 10, logs help you track your device's health and troubleshoot problems, and you should keep them as long as possible. However, you can clear the log history to free up space or make it easier to track an existing problem.
To clear the log history of a particular category, use these steps:
- Open Start.
- Search for Event Viewer and select the top result to open the console.
- Expand the event group.
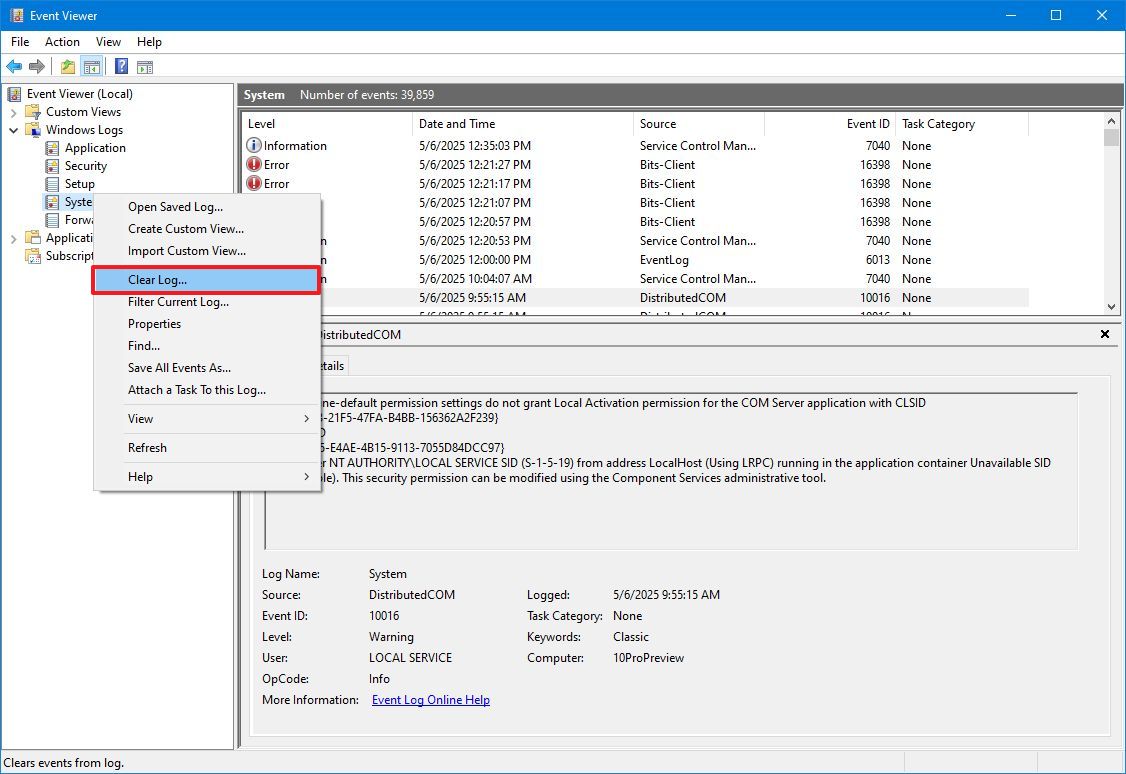
- Right-click a category, and select the Clear Log option.
- Click the Clear button.
- Quick note: If you want to archive the log history on a file outside the Event Viewer, you can also click the "Save and Clear" button.
After you complete the steps, the events will be deleted, and the console will start recording new events.
More resources
Find in-depth guides, troubleshooting tips, and the latest updates on Windows 11 and 10 here:

Mauro Huculak has been a Windows How-To Expert contributor for WindowsCentral.com for nearly a decade and has over 22 years of combined experience in IT and technical writing. He holds various professional certifications from Microsoft, Cisco, VMware, and CompTIA and has been recognized as a Microsoft MVP for many years.
You must confirm your public display name before commenting
Please logout and then login again, you will then be prompted to enter your display name.
