How to use Storage Spaces in Windows 10
All the latest news, reviews, and guides for Windows and Xbox diehards.
You are now subscribed
Your newsletter sign-up was successful
Windows 10 is an operating system that delivers a lot of new features and improvements, including a new breed of apps that run across devices, a new web browser built for the modern web, a unified Store, improvements on security, and an updated, but yet familiar user interface.
The operating system also includes many familiar features found in Windows 7 and Windows 8.1. One of these features is Storage Spaces. This feature was originally introduced in Windows 8.x and let you group different types of drives, such as traditional rotating platters hard drives and Solid State Drives into a single storage pool, which then you can use to create "storage spaces".
What are Storage Spaces?
Storage Spaces are technically virtual drives that appear in File Explorer as normal local storage, and each storage space you create can be less, equal, or greater to the amount of the physical capacity available in the storage pool.
Storage Spaces support some drive technologies, including ATA, SATA, SAS and USB drives. Getting started with the feature only requires one or more drives, in addition to the drive where you have Windows installed.
You don't even have to use all the available drives to create storage spaces. For example, if you have three drives of 100GB each, you could only use two to create a "storage pool". Once you have a new pool, you can create a 200GB virtual drive that represents the total amount of space available, or you can provision and create a 1000GB virtual drive (storage space).
Of course, if you have a storage space of 1000GB that was created in a pool with 200GB of available physical storage, you can only store 200GB worth of data. However, as the drives begin to fill up, you will be notified to add more drives to accommodate more available space.
Also, you're not limited to one storage space per storage pool; you can create as many spaces as allowed by the available space. Let me explain. While you can create storage spaces of virtually any size, each time you create a new virtual drive, you will be using a small portion of the physically available storage, and eventually, you will run out of space as you keep creating more storage spaces.
All the latest news, reviews, and guides for Windows and Xbox diehards.
Why Storage Spaces?
Although, there are not many scenarios where everyday users will be using this feature, "Storage Spaces" has numerous benefits. For example, you can use storage spaces to create a large network drive instead of sharing multiple drives in your network, which is cleaner and more efficient.
If you have different USB drives that you can connect to your computer to save your data, you can combine the drives into a single logical drive, which enables you to organize all your data in a single place -- and no more asking yourself: "In which drive did I save those photos?"
Perhaps the most important aspect of Storage Spaces isn't the ability to group different drive technologies with different sizes, but the ability to configure different types of data protection.
Resiliency
Storage Spaces supports four types of resiliency:
- Simple: A simple storage space writes one copy of your data and does not protect you from driver failures. This option requires, at least, one drive, and each new additional drive adds another point of failure.
- Two-way mirror: This option writes two copies of your data on the drives, which can protect your data from a single driver failure. Two-way mirror requires a least two drives.
- Three-way mirror: This option works similar to the two-way mirror, but it writes three copies of your data on the drives, which will help you to protect your data from two simultaneous drive failures. Three-way mirror requires, at least, three drives.
- Parity: Similar to the standard RAID 5 technology, Parity for a storage space writes your data with parity information on the available driver to help you protect your data from a single driver failure. This option requires a least three drivers.
The resiliency type you need will mainly depend on what you're trying to accomplish. If you're only interested in available space and drive speed, you could use the "Simple (no resiliency)" option. If you want to protect your data from drive failure, you can go with one of the two mirror types, but remember that the more copies of your data get written to disk, it will consume more storage. If you like a balance of available space and speed, then you should use the "Parity" option.
Here's something else to keep in mind. You can always make a storage space larger, but you cannot make the available space smaller. Every time you make a change it will cost you a quarter of a gigabyte of the available physical space, as such, you should plan in advance how large you want to make the storage space. Currently, the operating system allows a maximum of 63TB per storage space.
How to setup Storage Spaces
Now that you have a little background on Storage Spaces for Windows, below we'll go through how to use and manage the feature.
How to create a storage pool and storage space
1- Connect all the drives you want to participate on Storage Spaces.
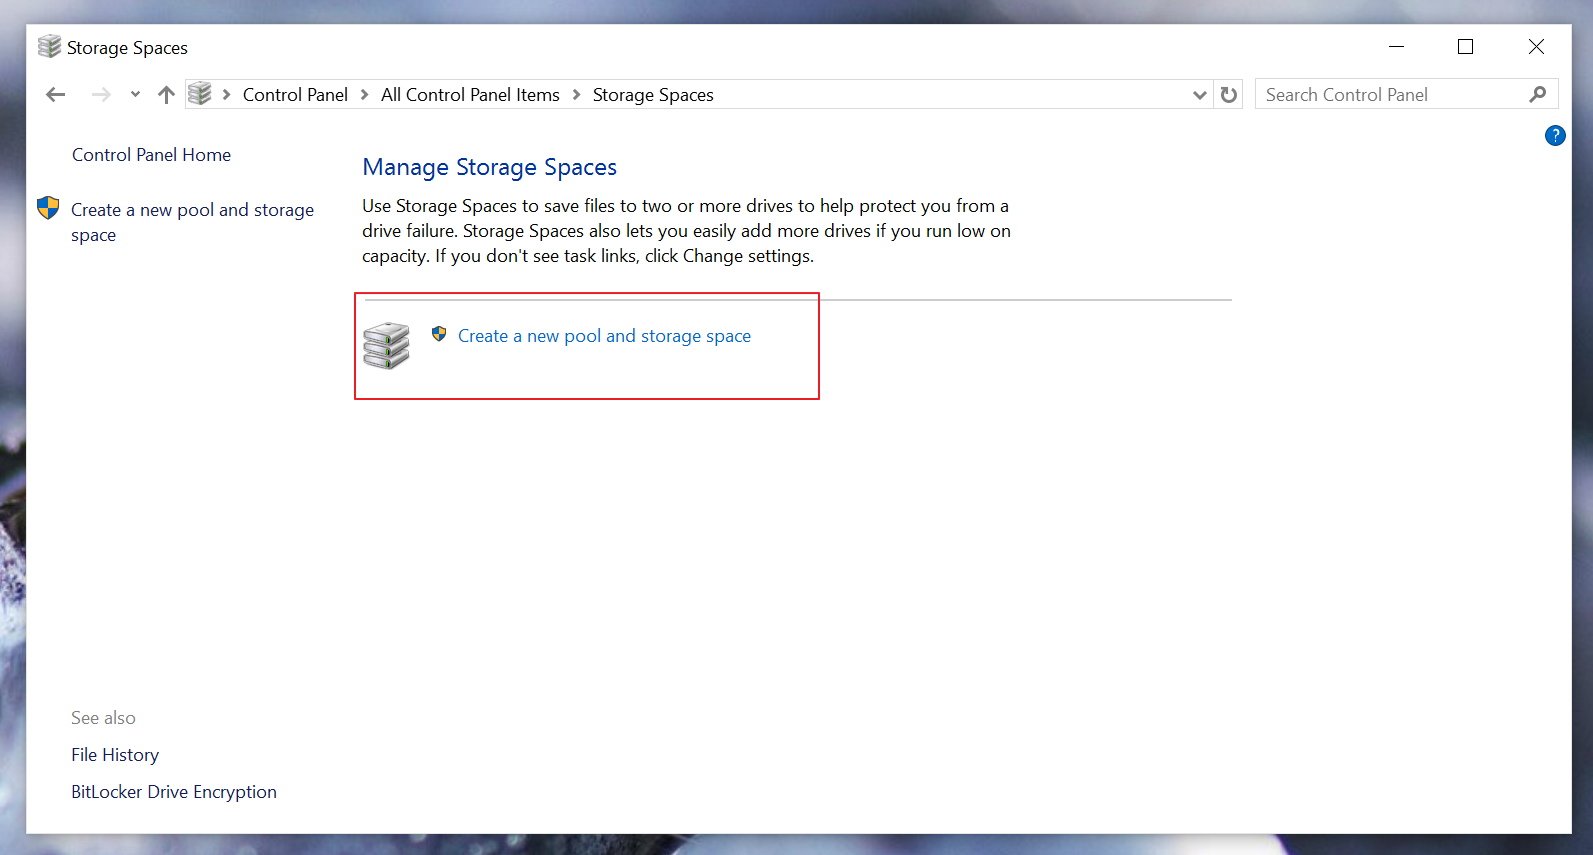
2- Open Start, do a search and open Storage Spaces.
3- Click the link Create a new pool and storage space.
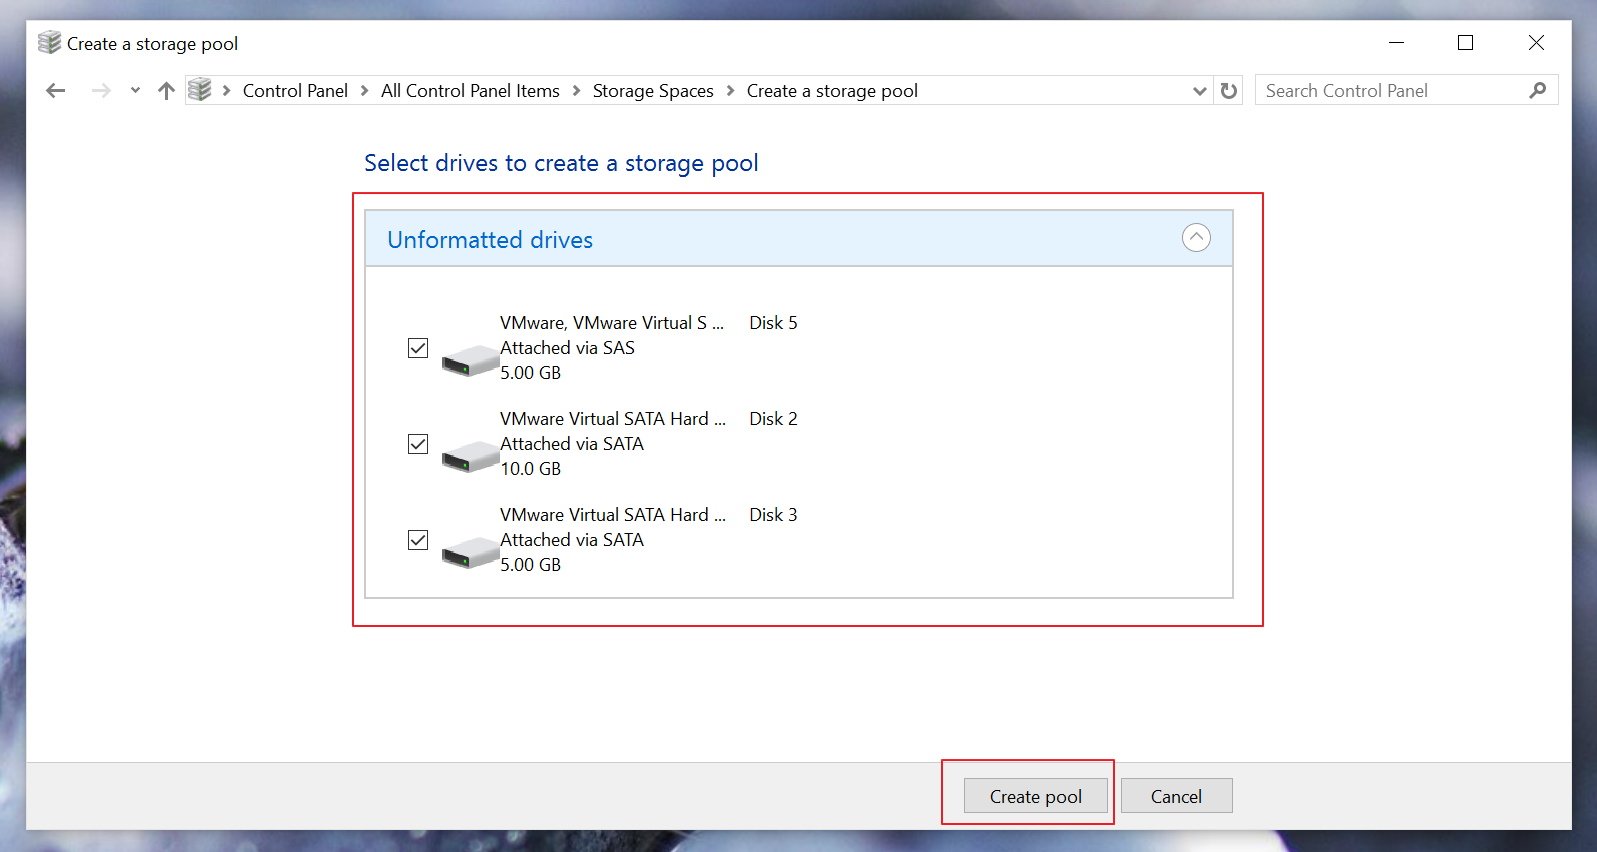
4- Select the drives you want to be part of the pool and click Create Pool. It's important to note that all the data currently on the drives will be erased during the process.
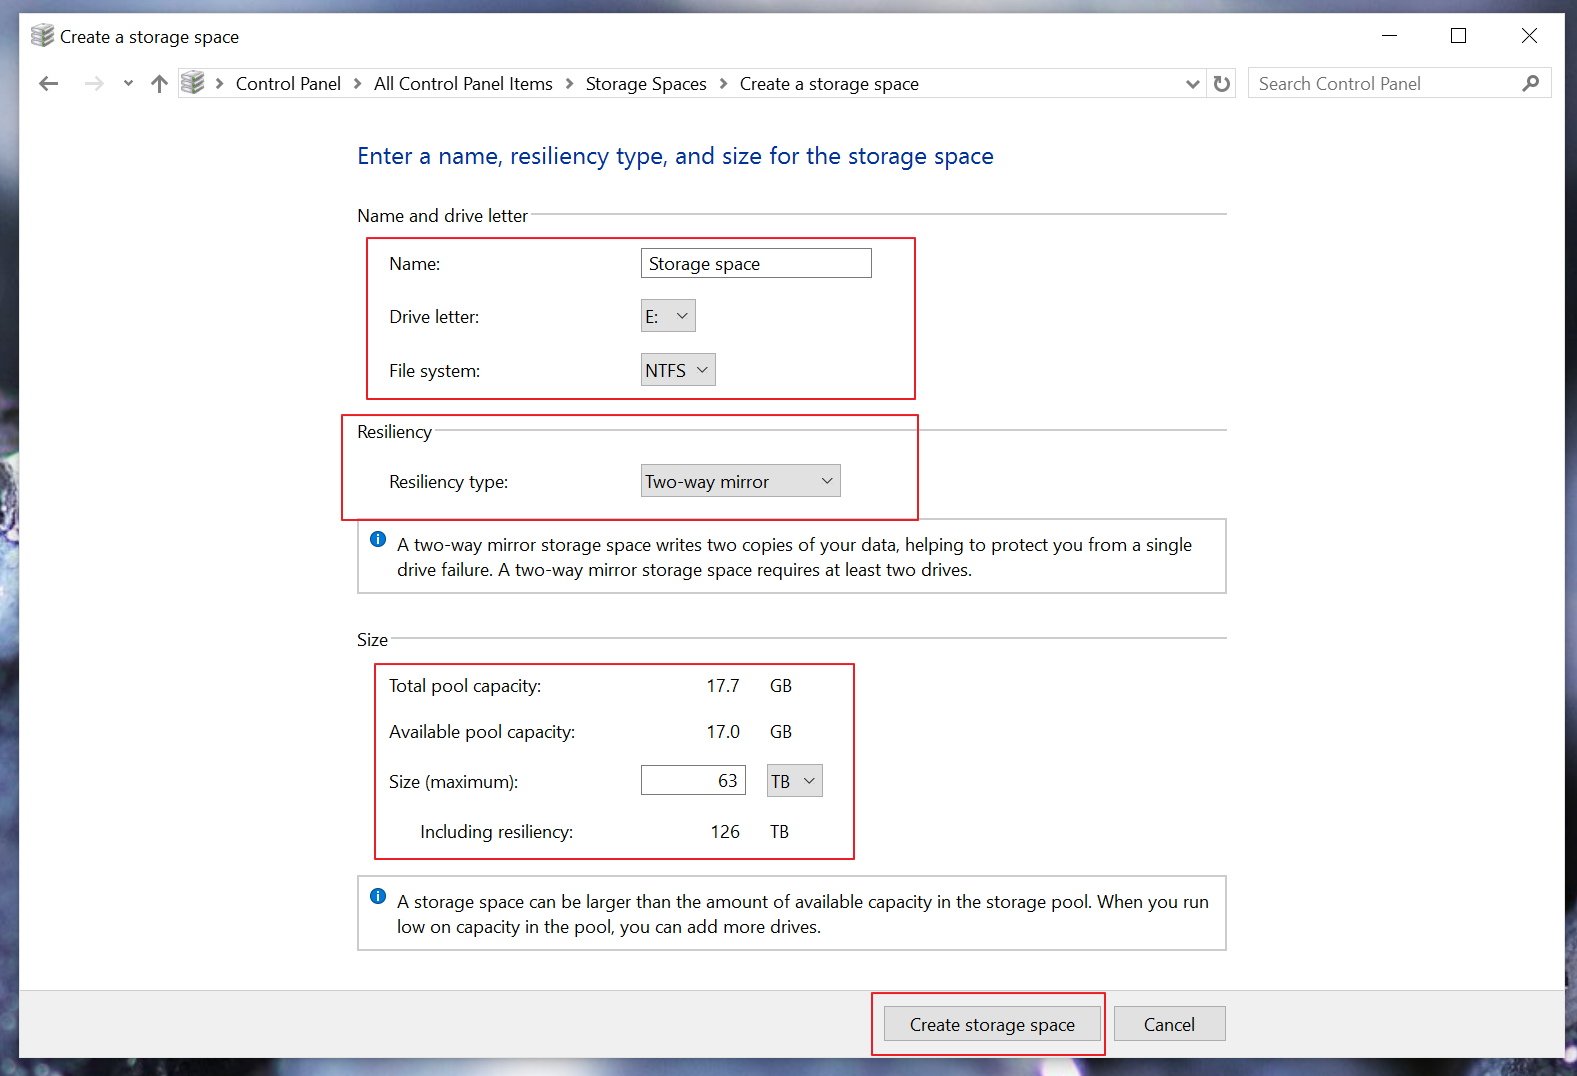
5- Now, it's the time to create the storage space (virtual drive), choose a descriptive name, as it will get confusing if you don't. Then choose the drive letter and file system -- for most people NTFS will be fine, but you always REFS (Resilient File System).aspx){.nofollow}, which is a new "local file system. It maximizes data availability, despite errors that would historically cause data loss or downtime. Data integrity ensures that business-critical data is protected from errors and available when needed."
6- Pick the resiliency type you want to use for this particular storage space.
7- Select the size you want to allocate. Remember that you can pick any size you want. It doesn't matter if you don't have the available physical space as you will get an alert when it's time to add more storage.
8- Click the Create storage space button to complete the process.
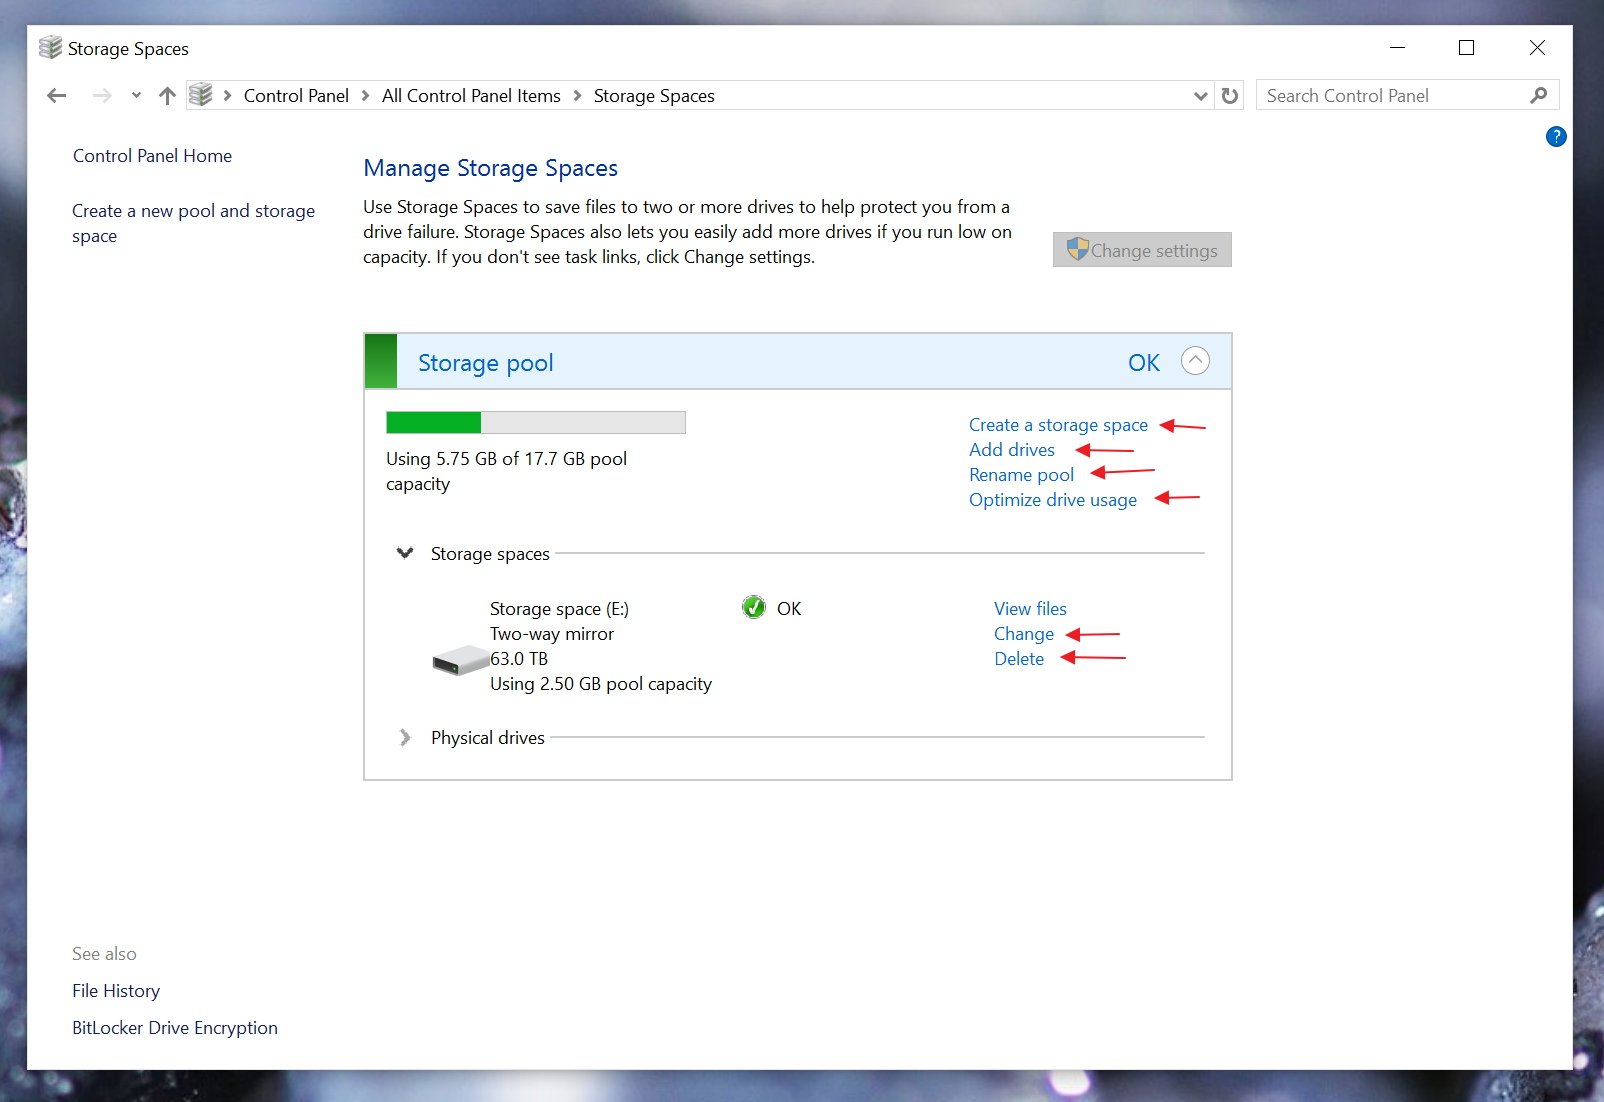
Now that you have created the storage space, in "Manage Storage Spaces" you can now view some useful information, such as physical storage usage, information about the storage space and from the participating physical drives.
How to create multiple storage spaces
1- If you want to create a second storage space, open Start, do a search and open Storage Spaces.
2- Click the Create a storage space link under the storage pool.
3- Choose your preferences (remember to pick a descriptive name).
4- Click the Create storage space button to complete the process (refer to the previous image).
How to add new drives to a storage pool
At any time, you can always add more drives to the pool to expand a storage space -- just follow the steps below:
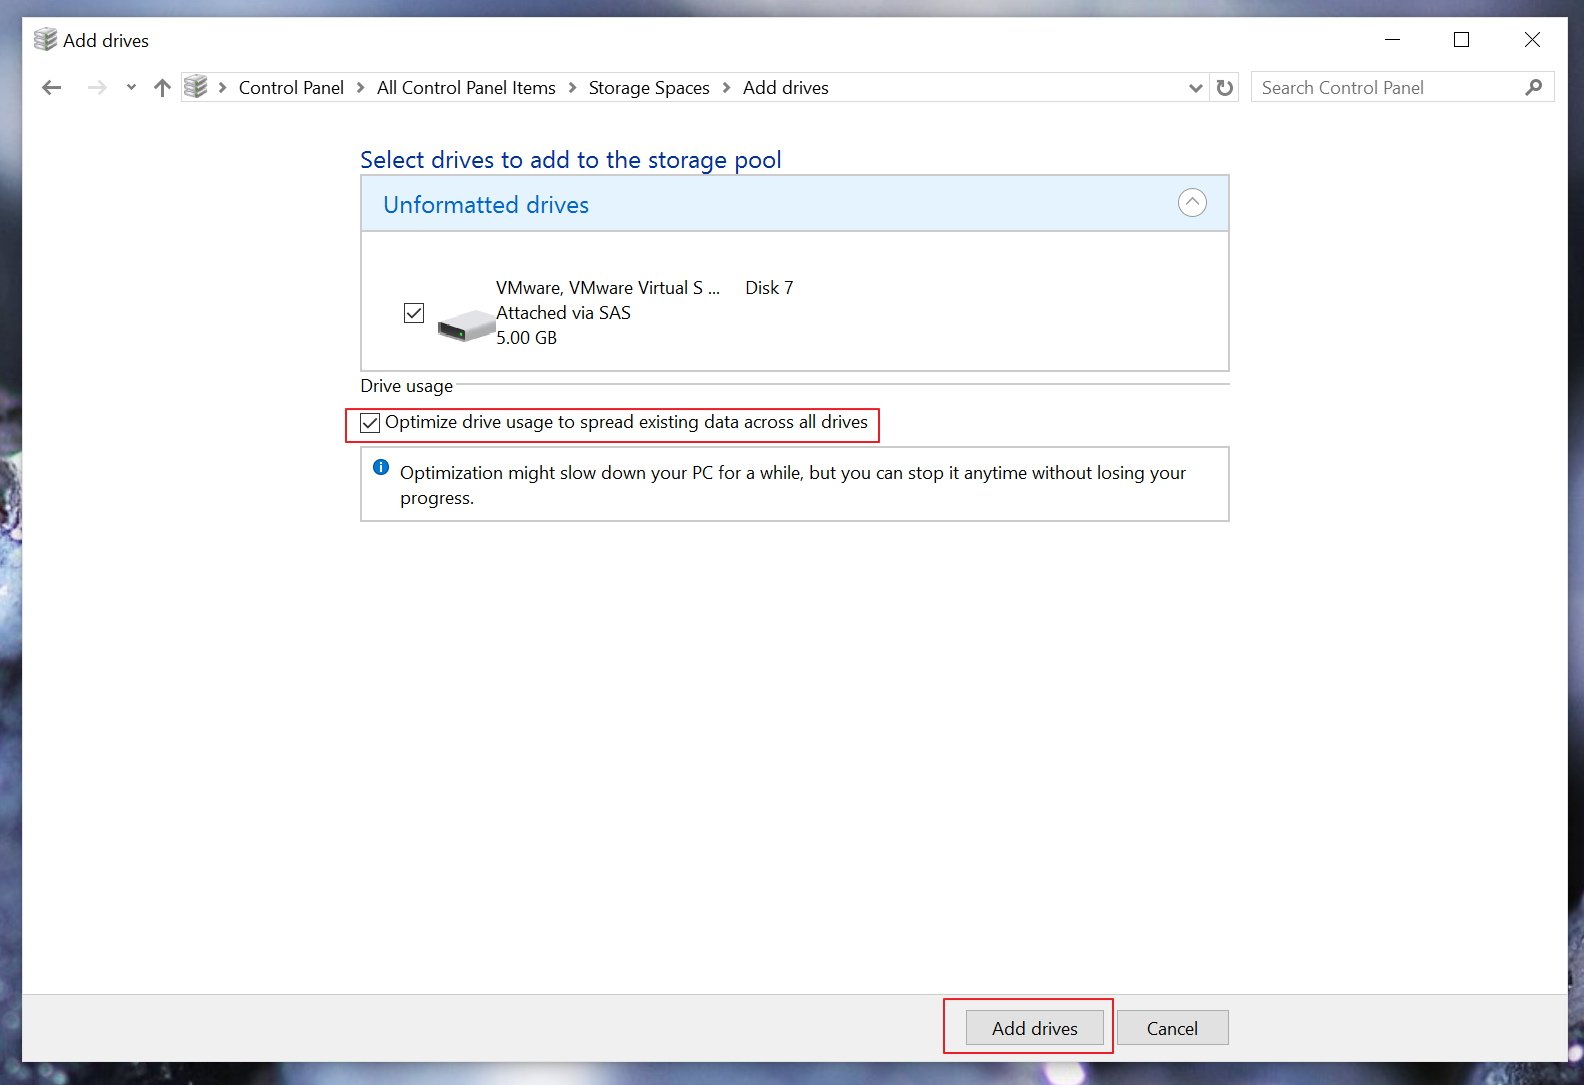
1- While in "Manage Storage Spaces" click the Add drives from the storage pool.
2- The available drives you can add will appear, select the one you want, and click the Add drives button. You will also notice the Optimize drive usage to spread existing data across all drives, make sure this option is enabled as well.
How to change the size of a storage space
1- Open Start, do a search and open Storage Spaces.
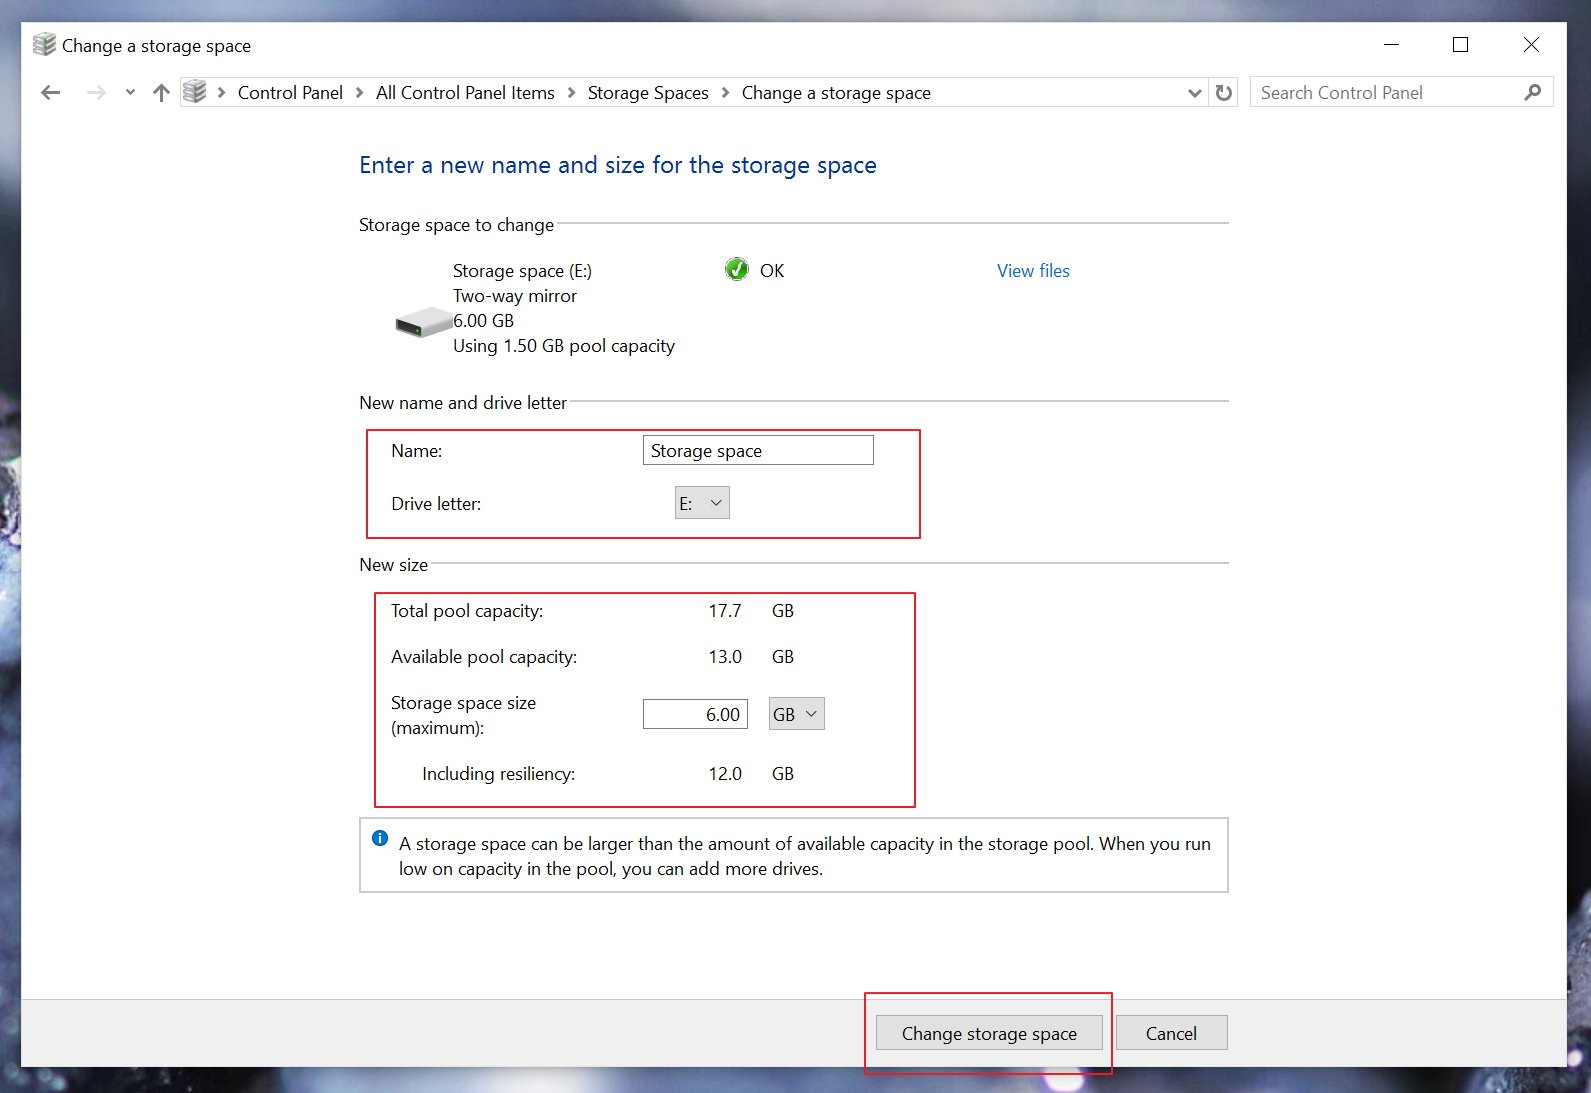
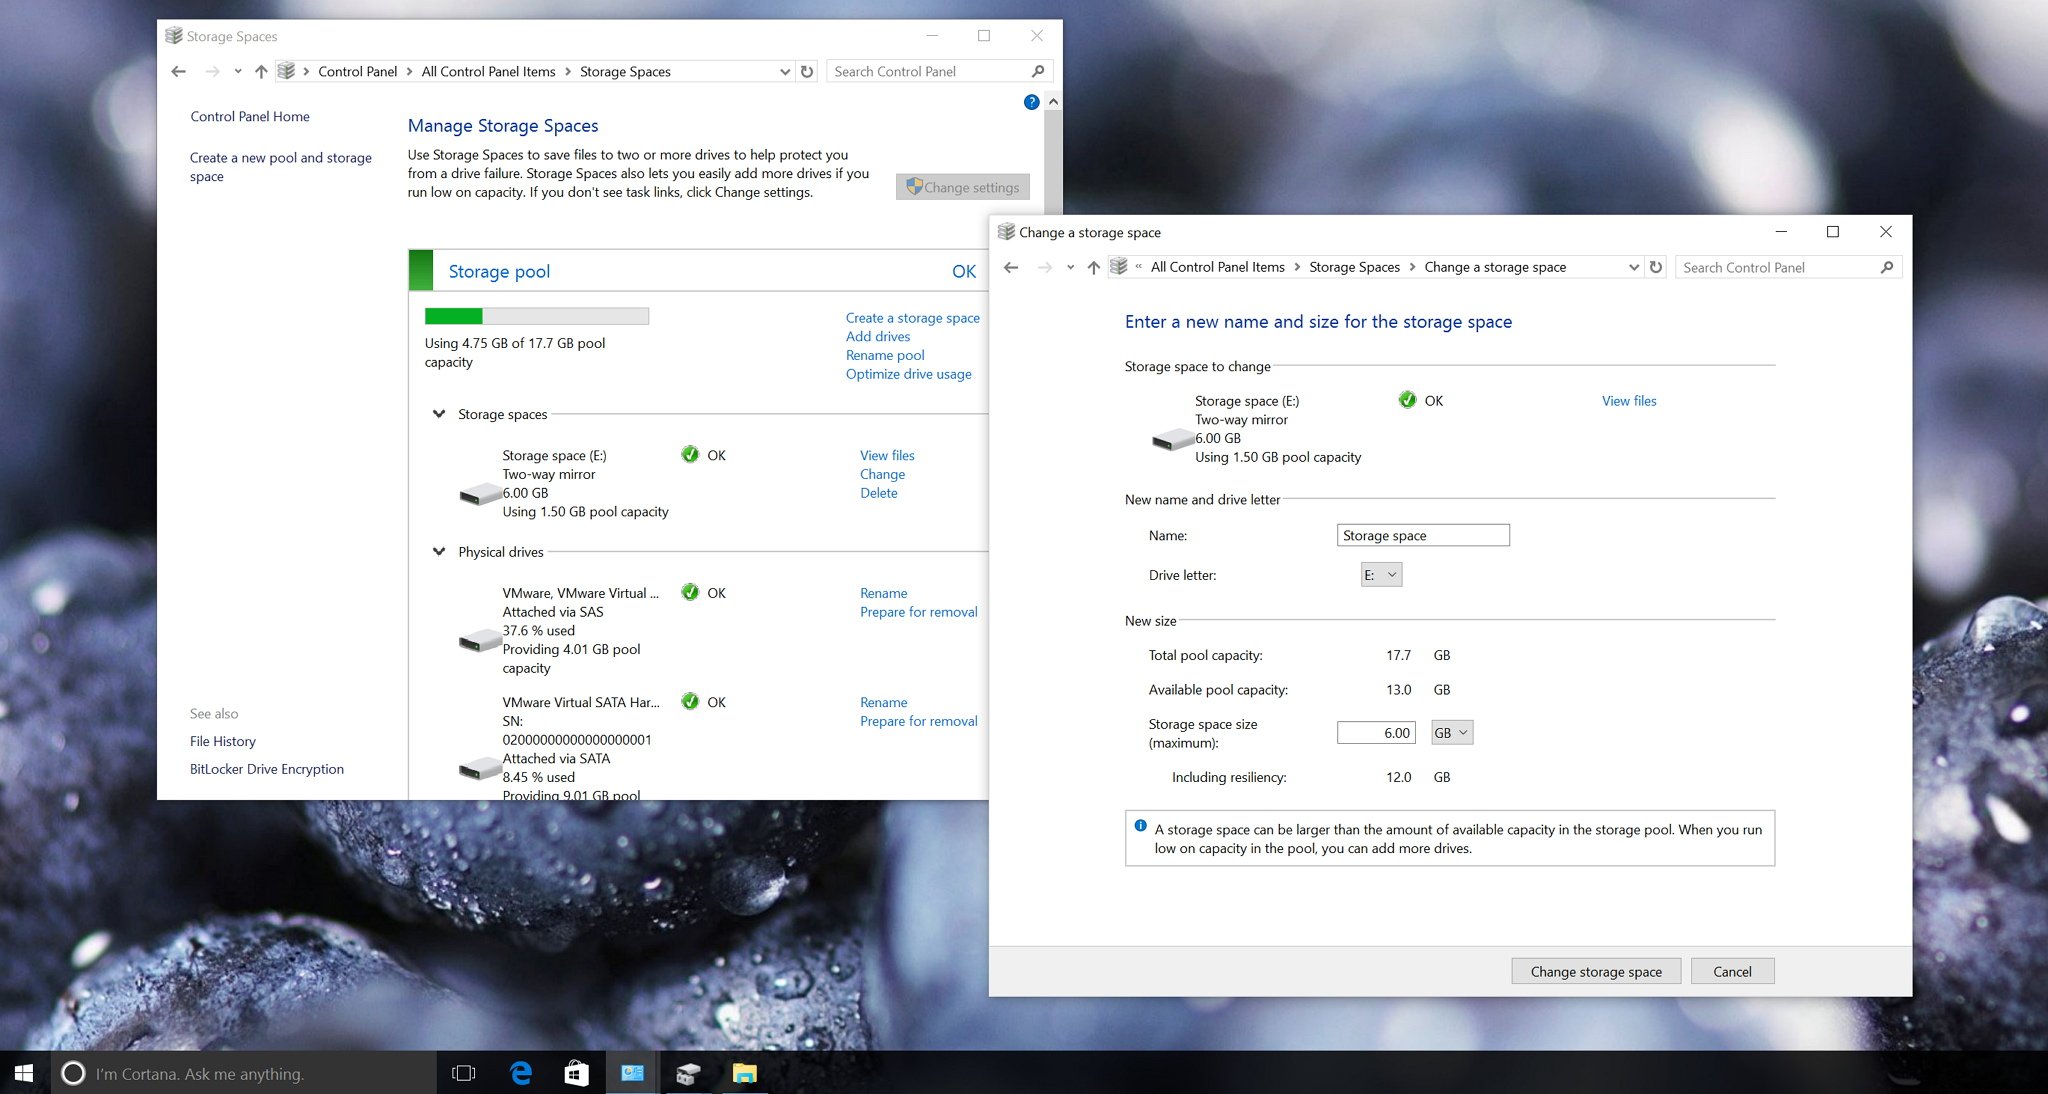
2- Under the storage space you want to modify, click the Change option.
3- From this page, you can change the name of the "space", drive letter, and size. Make your changes, and click the Change storage space button to complete the process.
How to optimize drive usage
While "Storage Spaces" remains pretty much unchanged since Windows 8.1, Microsoft is adding a new feature to optimize drive usage in Windows 10. This feature is useful when you add new drives to an existing pool, as it will move some data to the newly added drive to better utilize the drives in the pool and capacity.
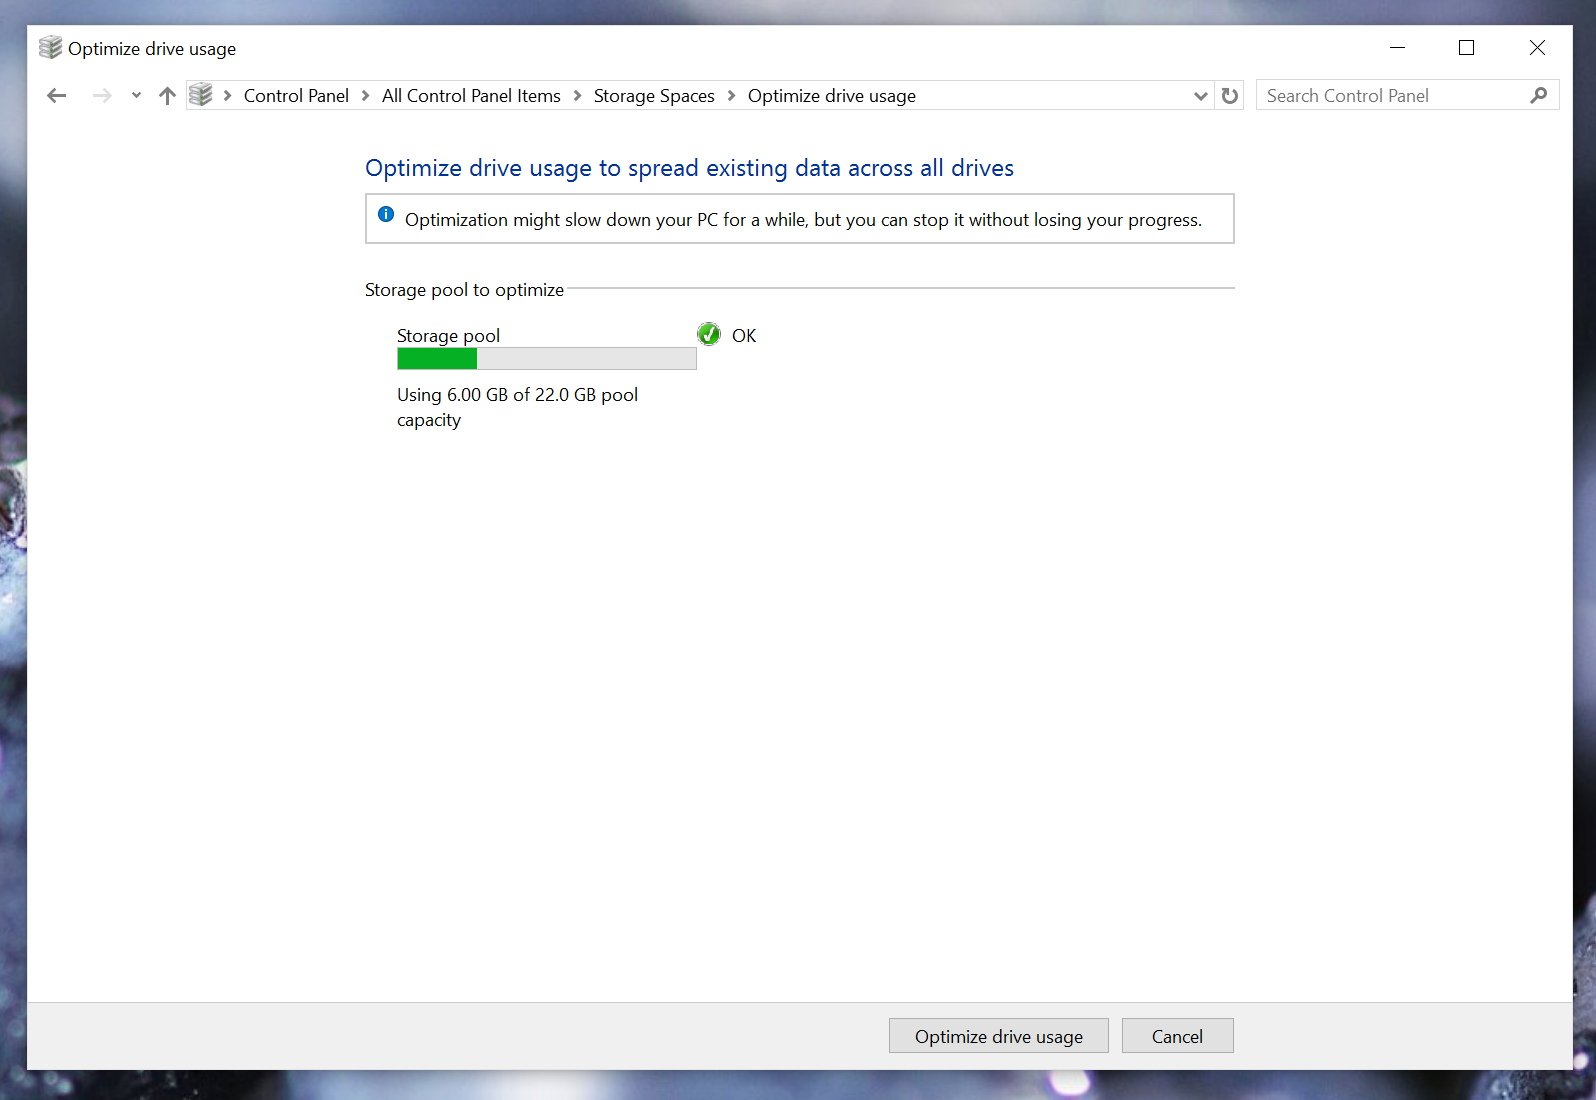
The optimization happens by default when you add a new drive to an existing pool, when you select the Optimize drive usage to spread existing data across all drives option. However, if you didn't check the option or drives were added before upgrading the pool, you need to perform an optimization manually.
1- While in Storage Spaces click the Optimize drive usage from the storage pool.
2- Click the Optimize drive usage button. Keep in mind that this process in intensive, as such you may notice your PC being slow for a while.
How to properly remove a drive in use
When you have a Storage Space configured, you cannot just disconnect a drive out of the blue, as it may cause data loss and other problems.
Fortunately, Windows 10 includes a mechanism to remove a drive properly from a pool, by moving the data on that drive other drives in the pool, and then you can disconnect the drive from your computer, or you can use to store something else.
Follow the step below to remove a drive from a pool:
1- Open Start, do a search and open Storage Spaces.
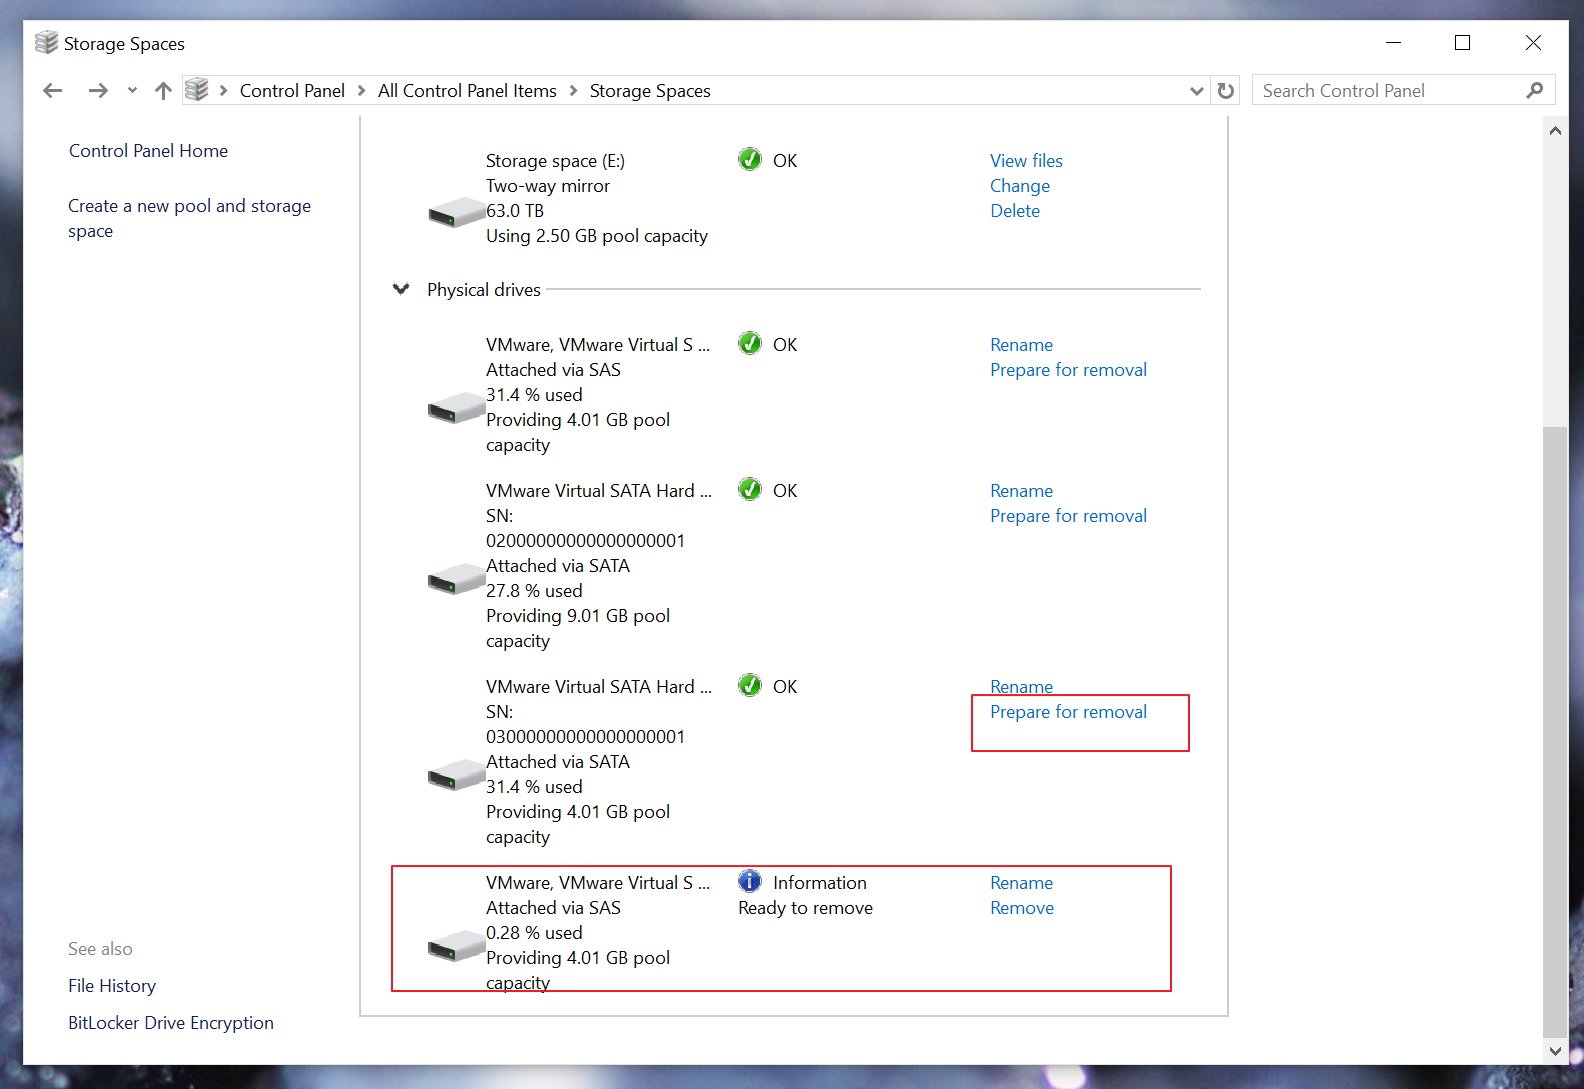
2- On the storage pool expand Physical drives.
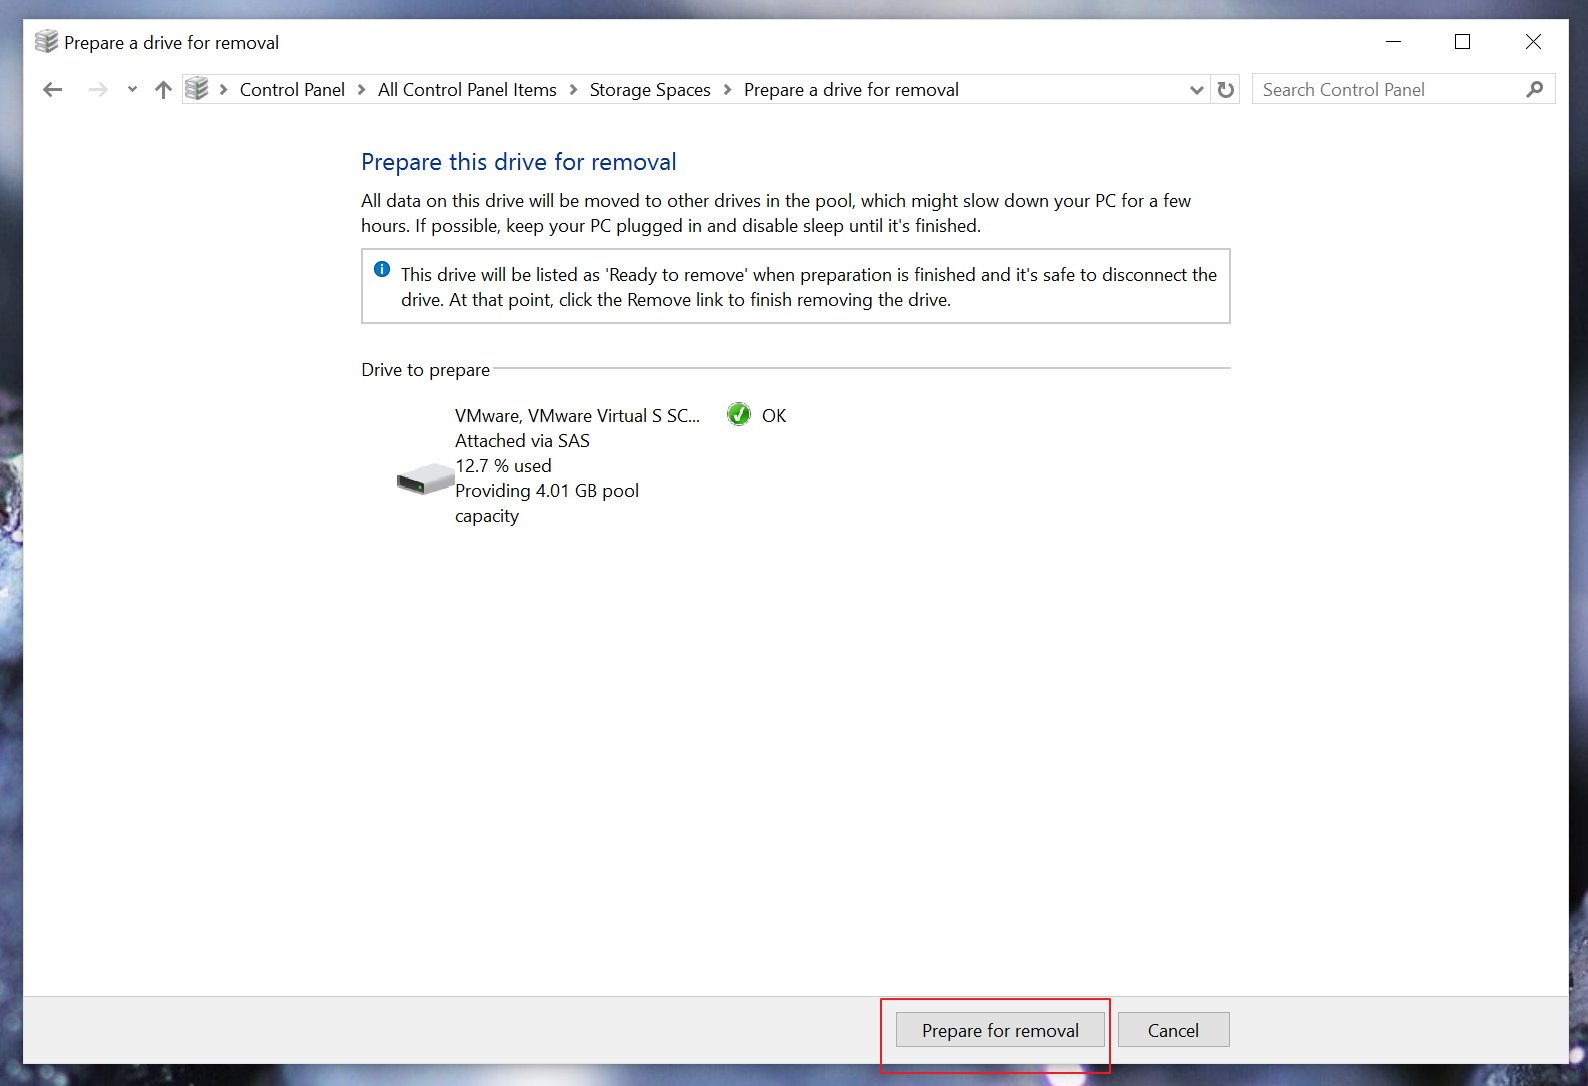
3- Click the Prepare for removal option.
4- Make you're removing the correct drive and then click the Prepare for removal button.
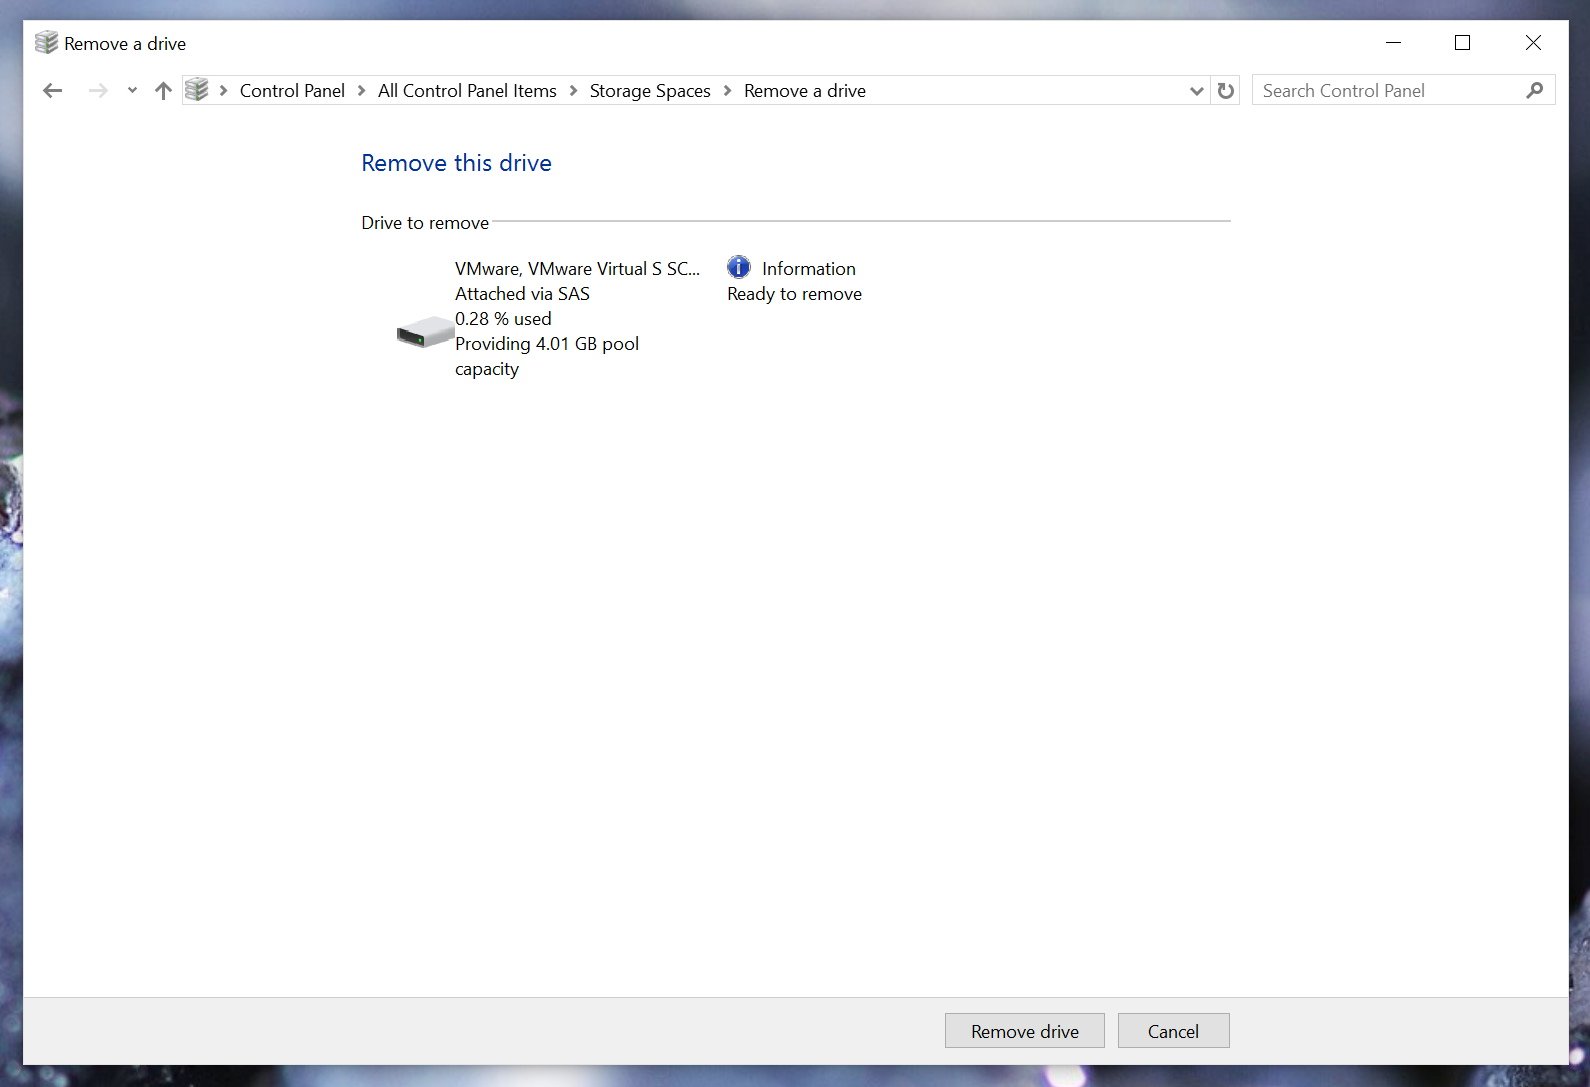
5- Once again locate the drive you want to remove and click the Remove button (refer to the image in step number three).
6- Finally, click the Remove drive button to complete the process.
It's important to note that after you remove the drive, it won't be accessible through File Explorer. You'll need to open Disk Management and reformat the drive in question.
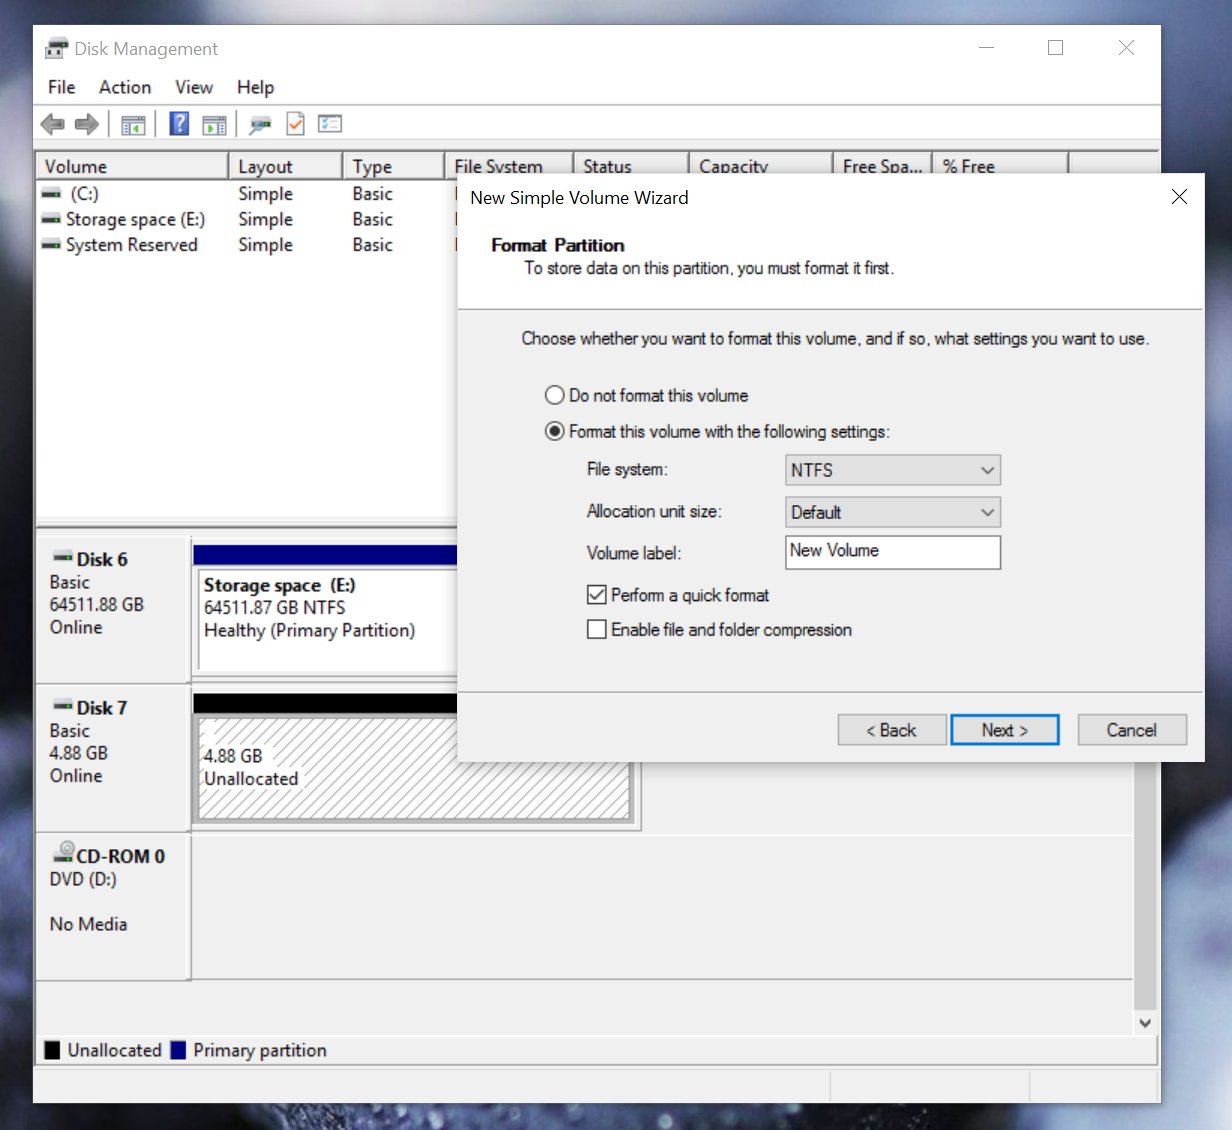
1- Simply, right-click the Start button, and click Disk Management, locate the drive with the "Unallocated" label.
2- Right-click the drive, select New Simple Volume and follow the on-screen instructions to format the drive using NTFS file system and performing a quick format.
Now the removed drive should be usable again.
How to delete a Storage Space
If you no longer need a storage space, you can easily delete it. Simply follow the steps below:
1- Open Start, do a search and open Storage Spaces.
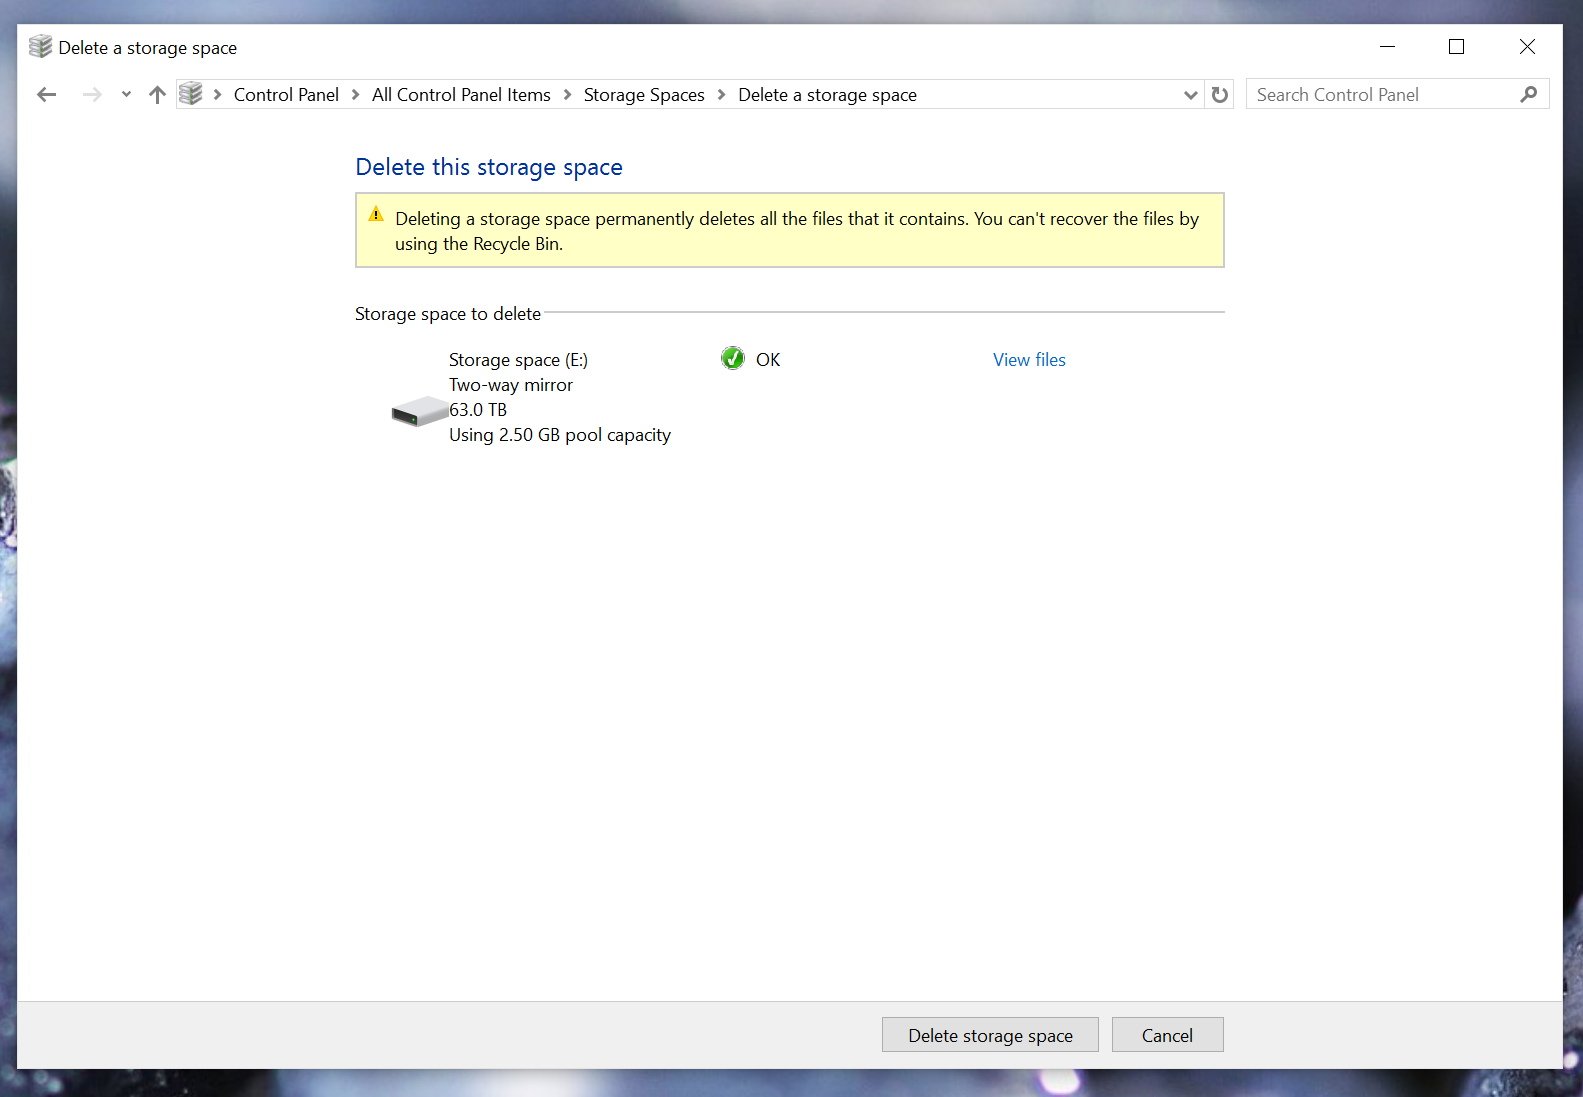
2- Under "Storage Spaces" click the Delete option next to the "space" you no longer need. It's important to note that that deleting a storage space permanently deletes the data it contains. The only way to recover is by using a previously made backup.
3- Once you're ready, click the Delete storage space.
How to delete a Storage Pool
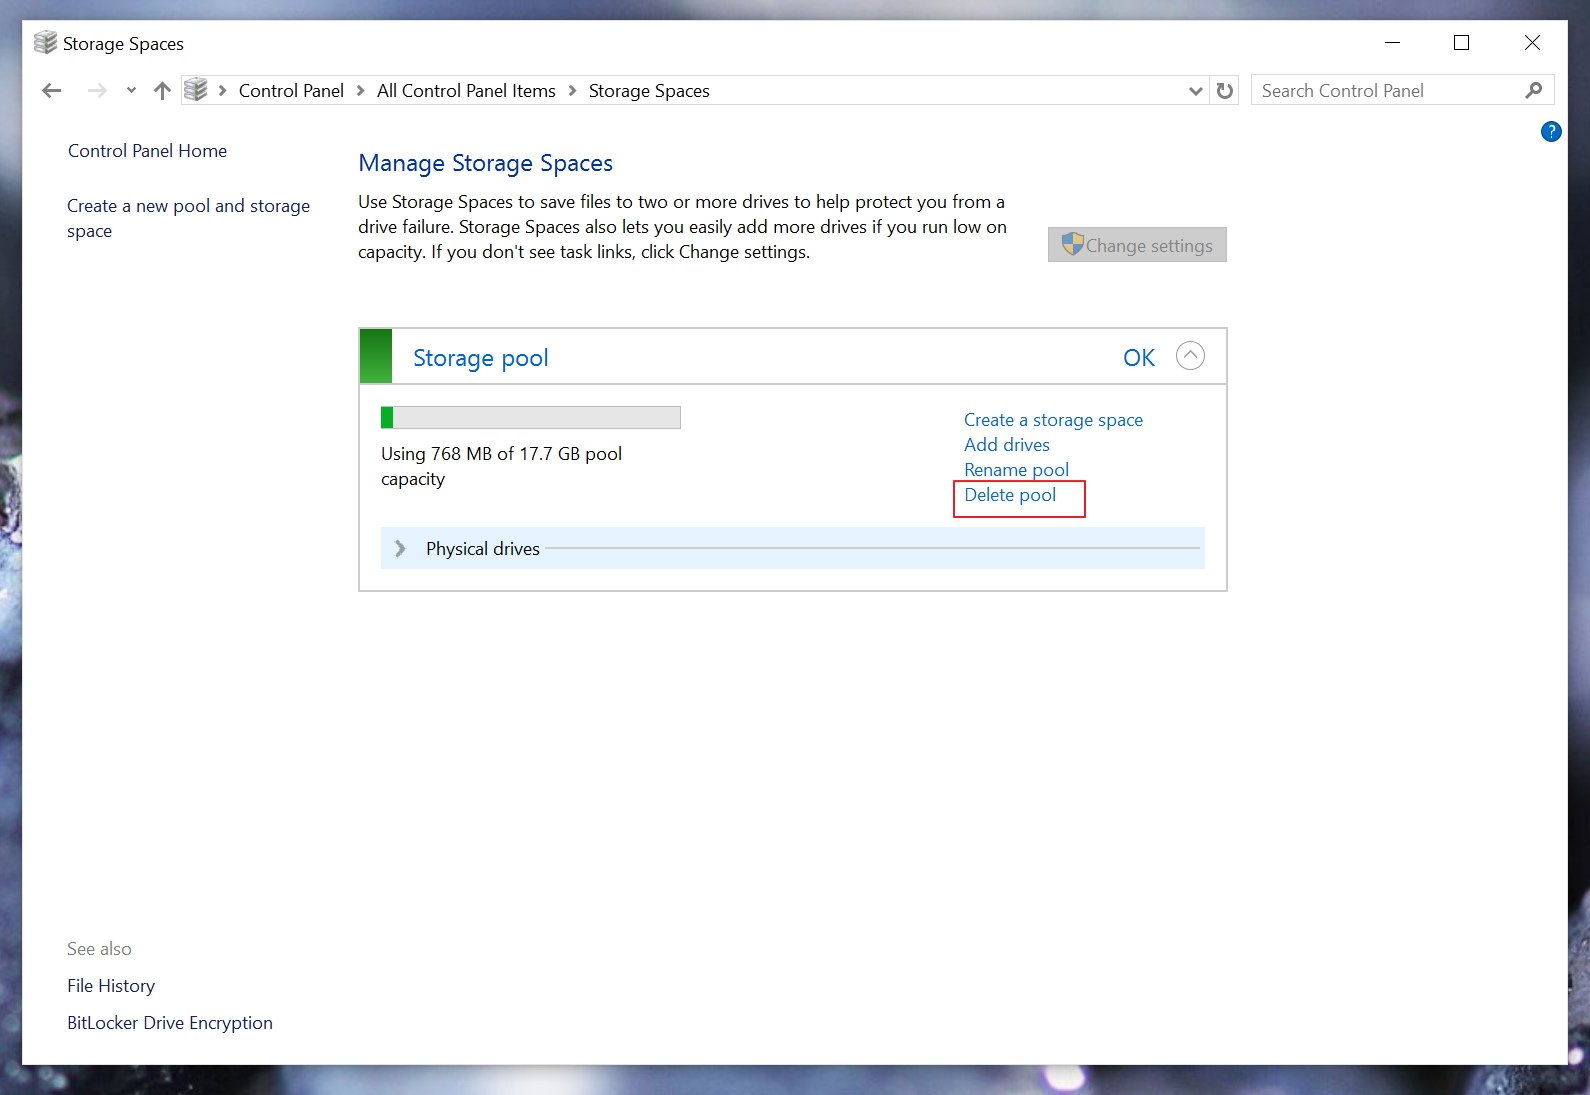
You cannot delete a storage pool that contains a storage space. You first need to remove all the storage spaces created in a pool properly. Only then the option to delete the pool will be available.
1- Open Start, do a search and open Storage Spaces.
2- Click the Delete pool on the storage pool you want to remove.
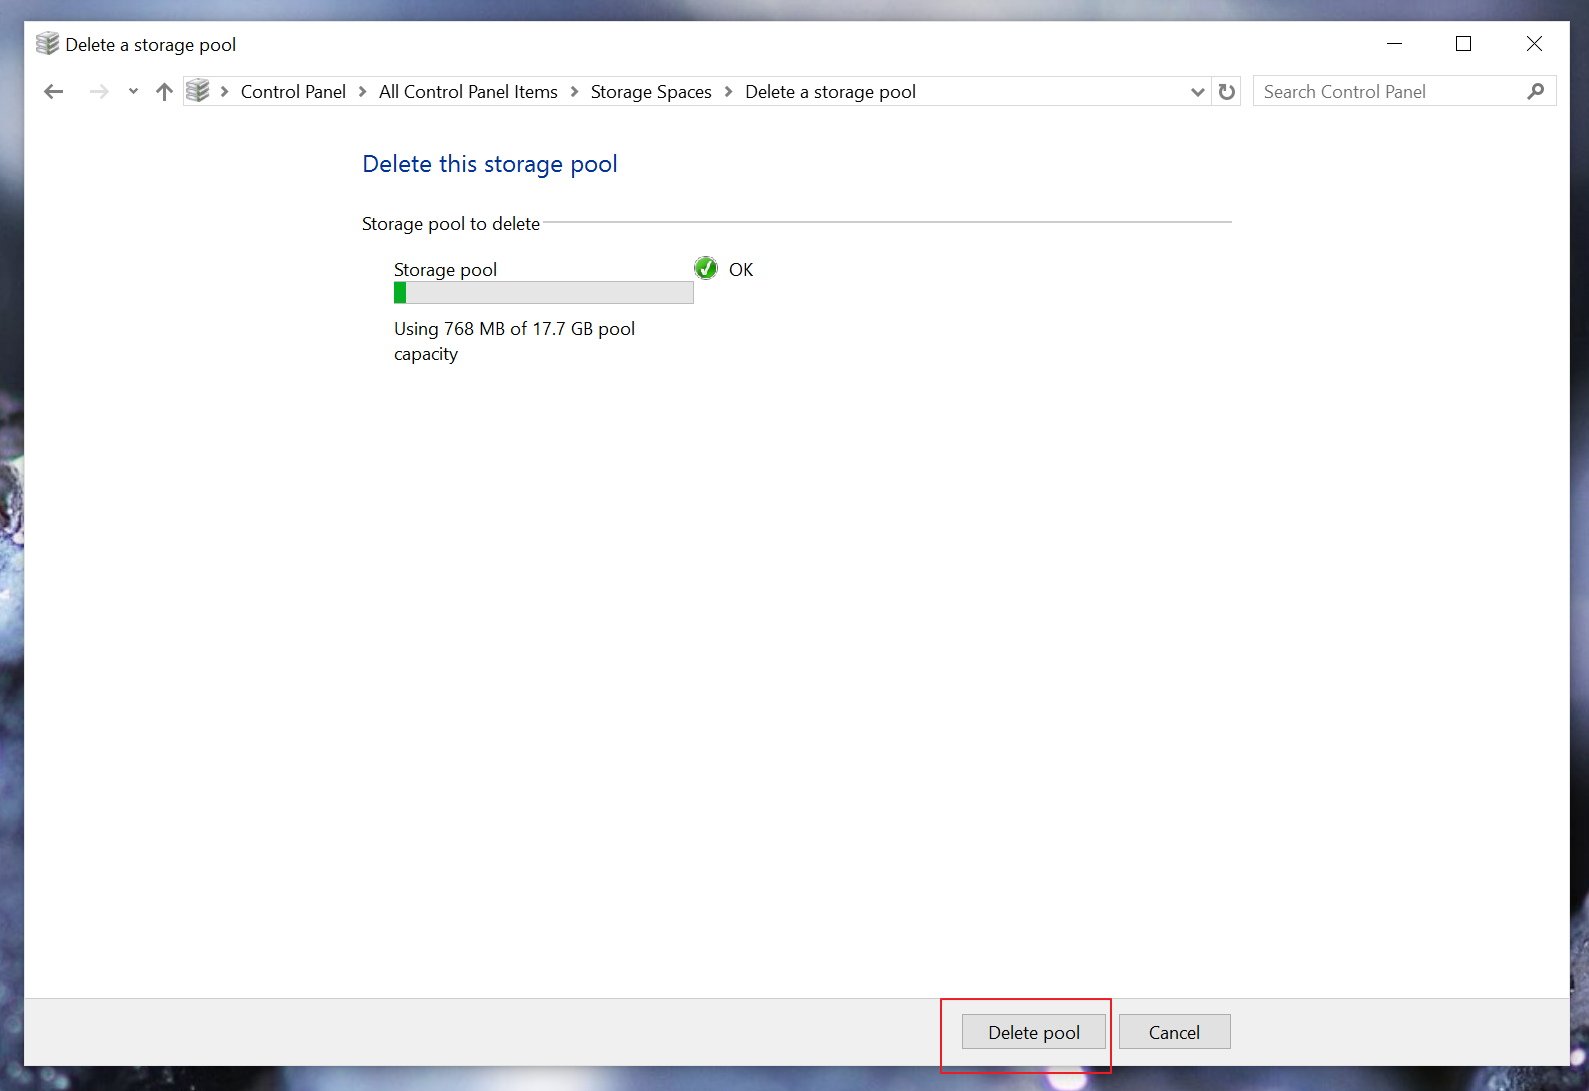
3- Then click the Delete pool to complete the process.
Once you delete the pool, the participating drive will be reinstated to your system, but again, as I have mentioned in the steps, the drives won't be visible in File Explorer until you manually reformat each drive through Disk Management.
Additional information
- Once set, you cannot change the storage space resiliency or file system.
- Yes, you can add more drives and upgrade a storage space on-demand without disrupting access and affecting data already in the "space".
- At any time, you can rename a pool or space.
- Storage Spaces is available in Windows 10 Pro and Windows 10 Home.
- The drive has to be around 5GB of size to be available in Storage Spaces.
Wrapping things up
By now, you should be able to use and manage Storage Spaces in Windows 10. If it was a bit confusing, just remember that with Storage Spaces for Windows, you can create one or more pools with the available drives on your system. In each pool, you can create one or more storage spaces (a virtual drive) of any size as available storage. You can always add more drives and upgrade the space as necessary.
Note: If all the options appear grayed out after creating a Storage Space, this is because you need Administrator Rights. To enable this feature simply click the Change settings button in the top-right corner of the settings page.
More resources
If you want to read more about Windows 10, make sure you check these resources:
- Windows 10 on Windows Central – All you need to know
- Windows 10 help, tips, and tricks
Do you use Storage Spaces in Windows 10? What's the primary reason you use the feature? Tell us your story in the comments below.

Mauro Huculak has been a Windows How-To Expert contributor for WindowsCentral.com for nearly a decade and has over 22 years of combined experience in IT and technical writing. He holds various professional certifications from Microsoft, Cisco, VMware, and CompTIA and has been recognized as a Microsoft MVP for many years.
