7 accessibility features in Windows 11 that make life easier for everyone
Discover seven accessibility features anyone can use to improve customization and productivity.
All the latest news, reviews, and guides for Windows and Xbox diehards.
You are now subscribed
Your newsletter sign-up was successful
Windows 11 offers a comprehensive list of accessibility features designed to improve usability for all users, regardless of their abilities. However, these tools not only support individuals with specific needs, but they can also help improve anyone's overall experience.
For example, you can use the mouse settings to change the pointer's style, and you can even enable the indicator to make it easier to find the pointer on the screen. Also, it's possible to customize the appearance of the text cursor to improve usability.
You will also find features such as Live Captions to show captions on the screen from any voice or video content. Voice Access allows you to control your computer with only your voice. Similarly, the Voice Typing feature can help you type a document using your voice and more.
In this how-to guide, I'll share seven accessibility features that everyone should be using on Windows 11.
Best accessibility for anyone using Windows 11
These are some accessibility features that can help anyone boost the overall navigation experience on Windows 11.
1. Customise mouse appearance
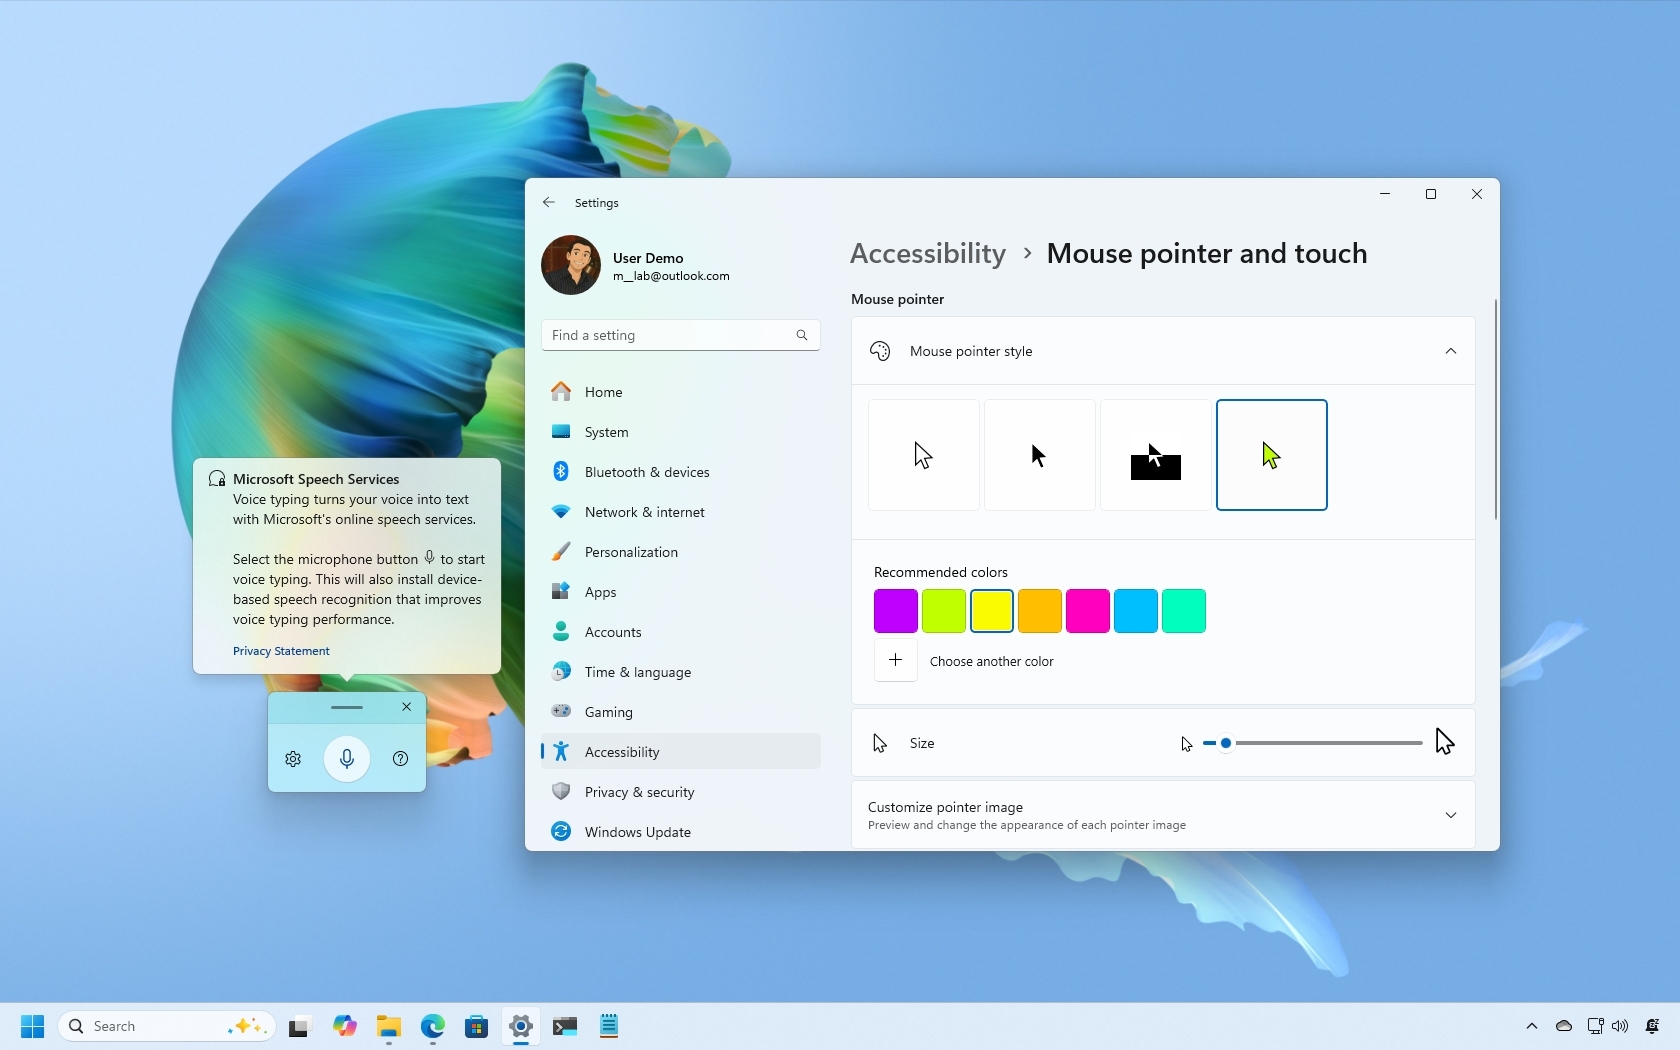
Microsoft categorizes the mouse settings as accessibility features, but anyone can use them to make the pointer a little more personal and fun.
To change the mouse pointer appearance, use these steps:
All the latest news, reviews, and guides for Windows and Xbox diehards.
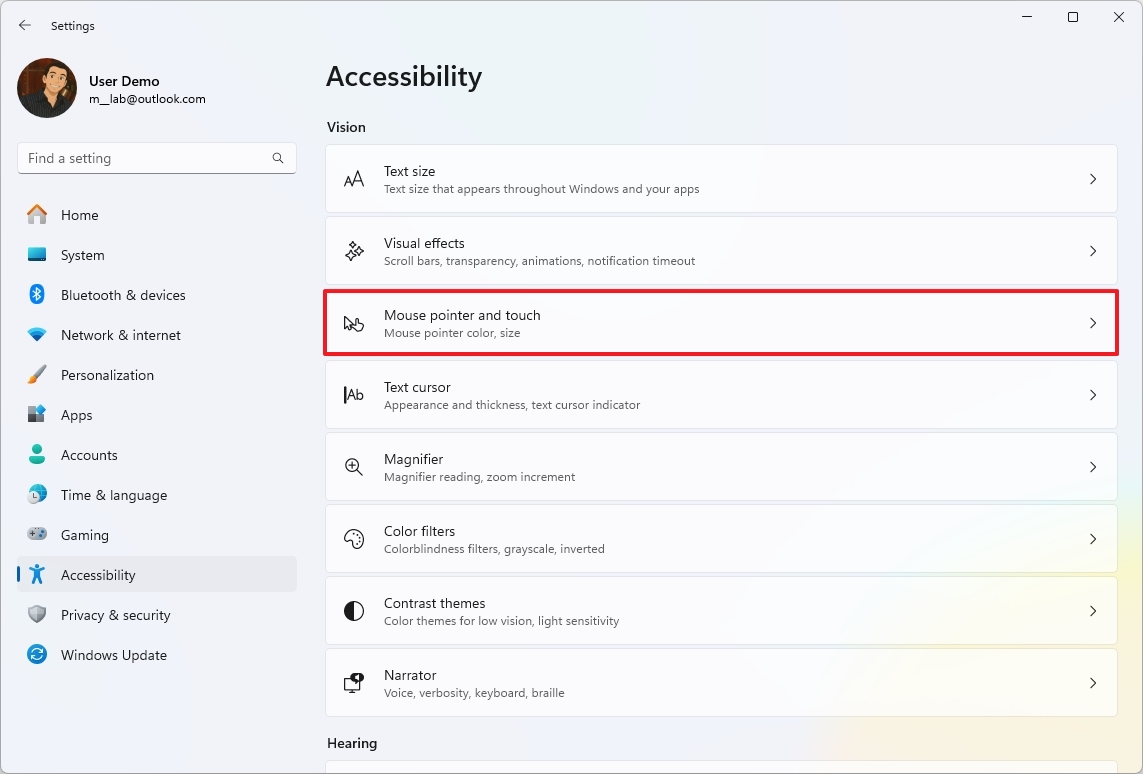
- Open Settings.
- Click on Accessibility.
- Click the "Mouse pointer and touch" setting.
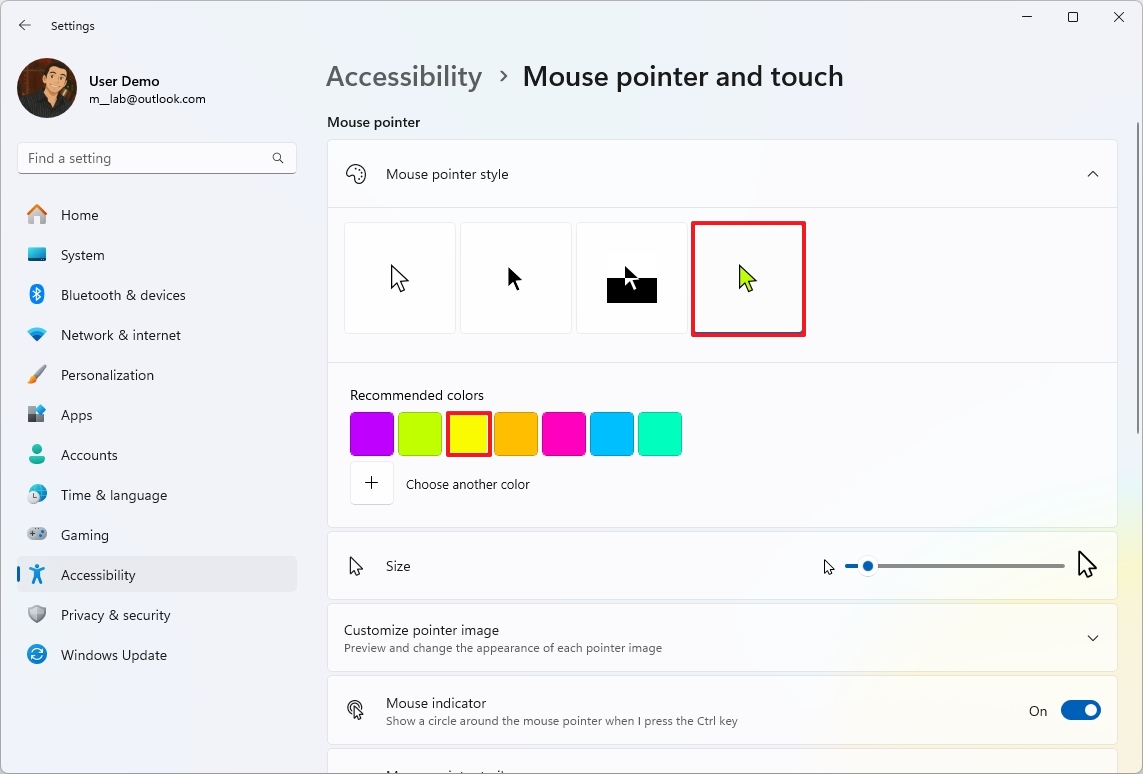
- Select the Custom option under the "Mouse pointer style" section.
- Choose the new color scheme for the pointer.
- Quick tip: You can also create a custom color with the "Choose another color" option.
If you want to personalize even further, you can use the "Customize printer image" setting to set a custom icon for each state of the mouse pointer. (This is a new option that may or may not be available for everyone at the time you're reading this guide.)
In addition, you can make the mouse pointer bigger or smaller using the "Size" slider.
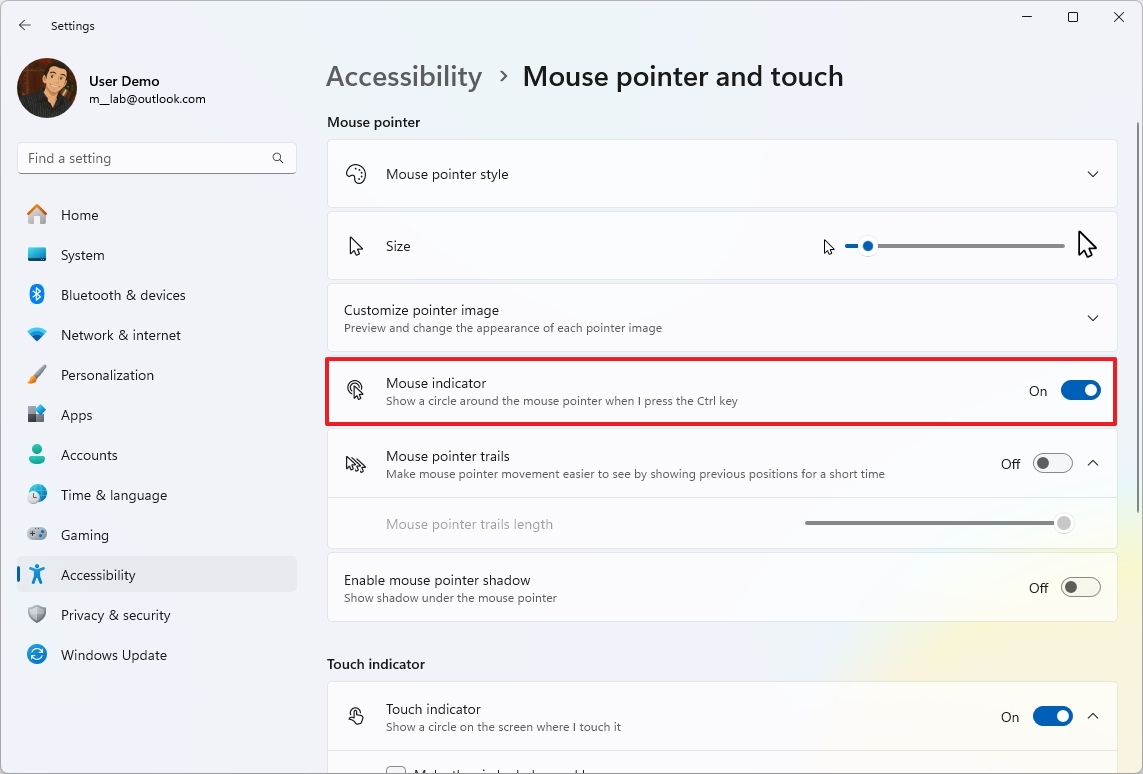
One particular option I also usually turn on is the "Mouse indicator" feature, which allows you to press the "Ctrl" key to show a circle around the mouse pointer to make it easier to find on the screen.
Microsoft is also porting other legacy mouse features to this page, including mouse pointer trails and shadow.
2. Change text cursor appearance
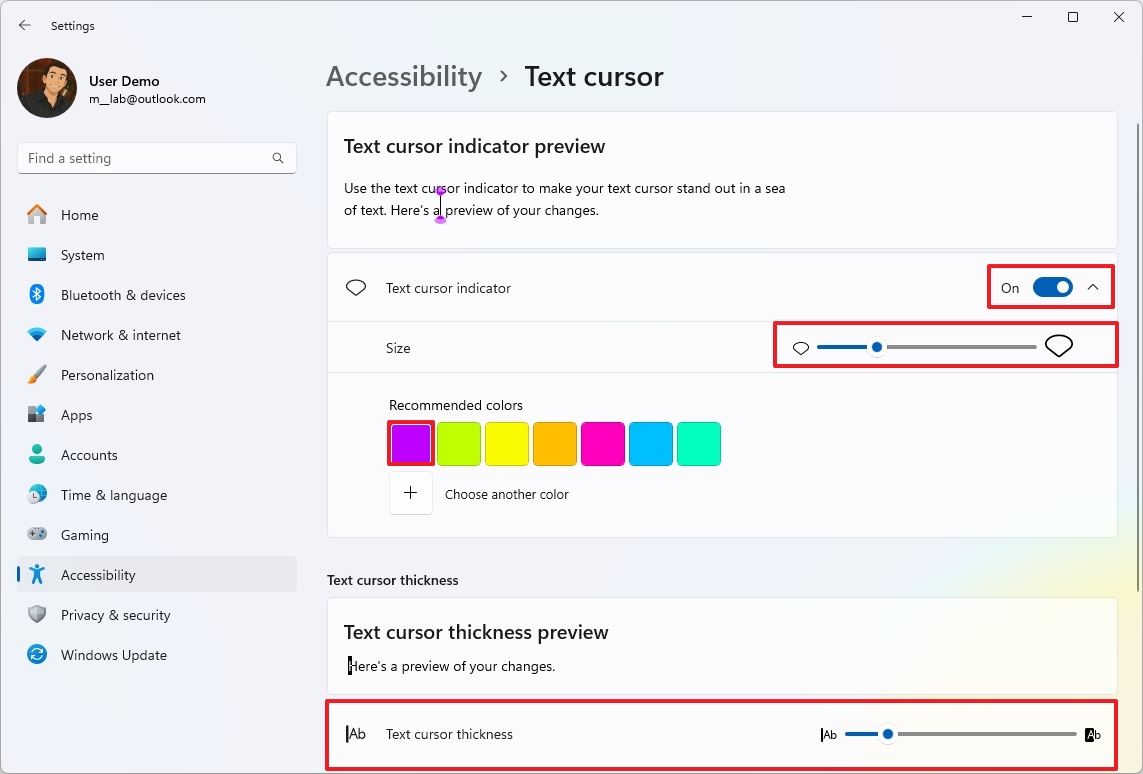
Although you wouldn't typically think about the text cursor since it's just a flashing visual indicator that shows where text will be entered or edited on the screen, you can also customize its color and thickness.
To change the text cursor appearance, use these steps:
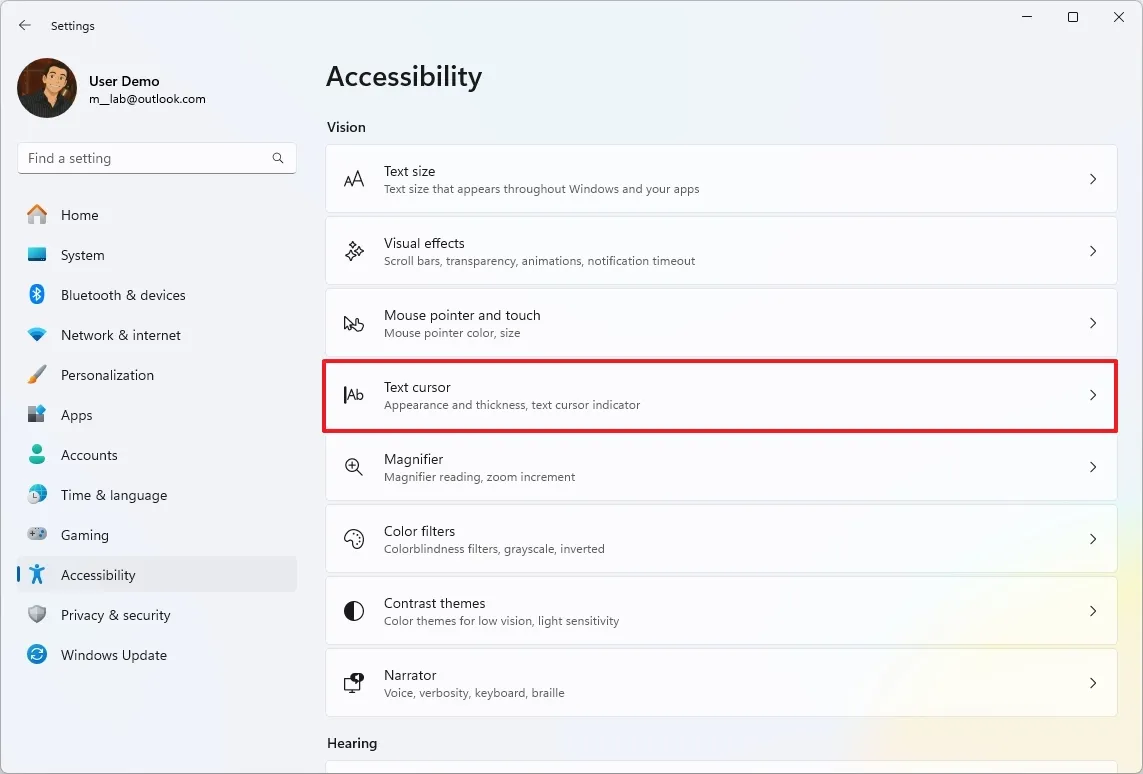
- Open Settings.
- Click on Accessibility.
- Click the "Text cursor" setting.
- Turn on the "Text cursor indicator" toggle switch.
- Select the size of the indicator.
- Choose the new color scheme for the text indicator.
- Quick tip: You can also create a custom color with the "Choose another color" option.
- Choose how thin or thick the text cursor is using the "Text cursor thickness" slider.
Once you complete the steps, the changes will apply to the text cursor.
3. Show live captions from any media
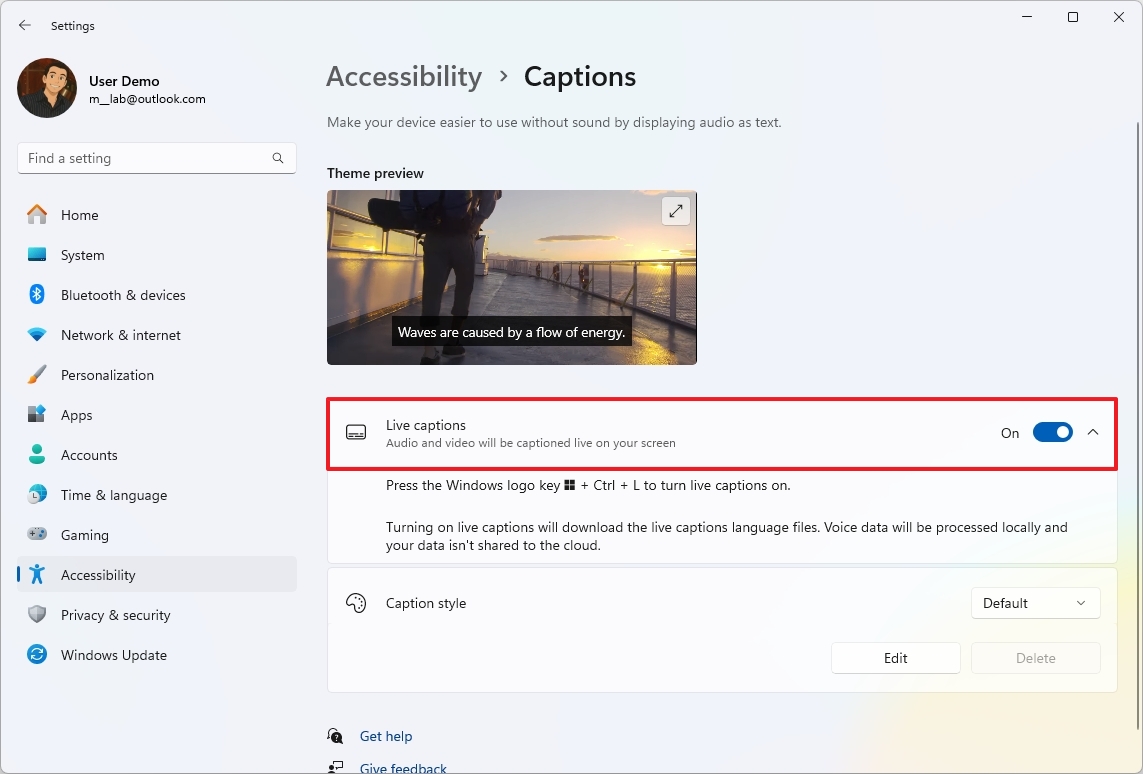
Live Captions is a feature that provides real-time transcription of audio into text on your screen. In other words, this means that whether you're watching videos, attending virtual meetings, listening to podcasts, or even playing games, you can see what's being said in text format.
To enable Live Captions on Windows 11, use these steps:
- Open Settings.
- Click on Accessibility.
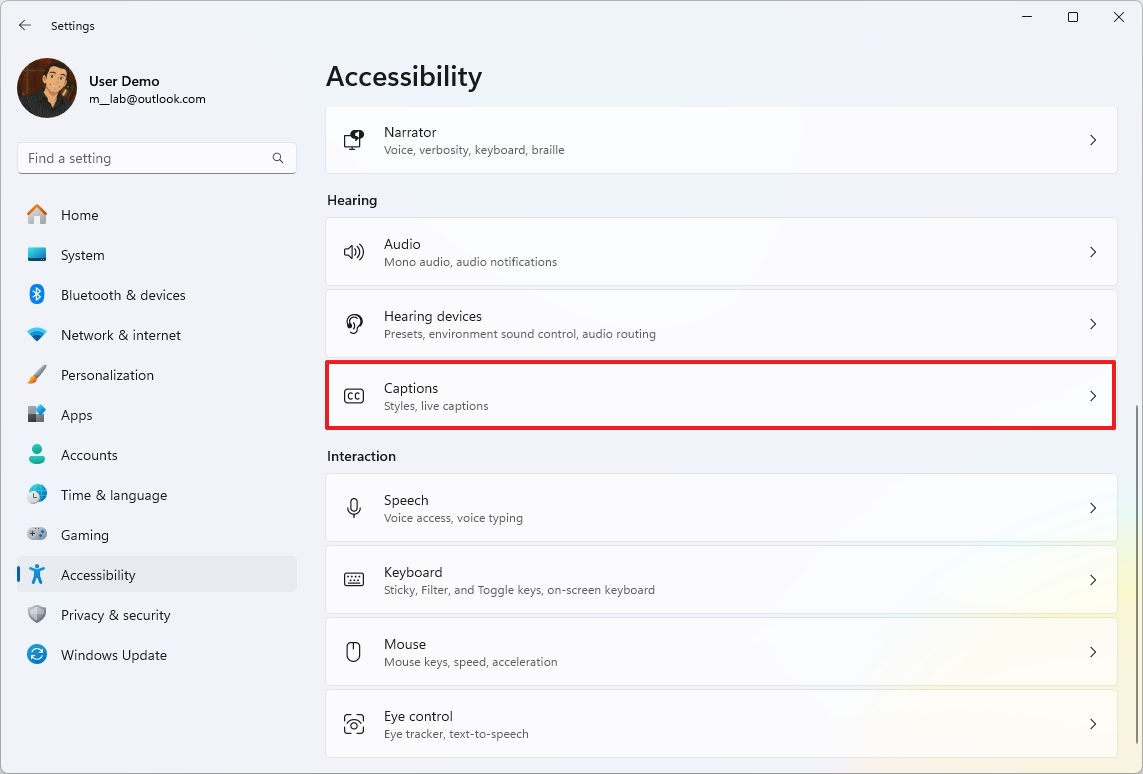
- Click the "Captions" setting.
- Turn on the "Live Captions" toggle switch.
- Click the "Yes, continue" button (if applicable).
- Click the Continue button (if applicable).
After you complete the steps, you can use the "Windows key + Ctrl + L" keyboard shortcut to control the feature. For example, if you turn the feature on, the system will use the on-device components to generate captions from any content with audio.

This feature works virtually with any source of audio, including online streaming (such as YouTube), local files, virtual meetings, music, podcasts, and even games.
4. Control your PC with voice commands
On Windows 11, you can also control your computer entirely with your voice without a keyboard or mouse. It's built directly into the operating system and can function offline after an initial language file download.
As an accessibility feature, it's particularly helpful for individuals with limited mobility or temporary injuries, but anyone can use it for a hands-free experience.
- Open Settings.
- Click on Accessibility.
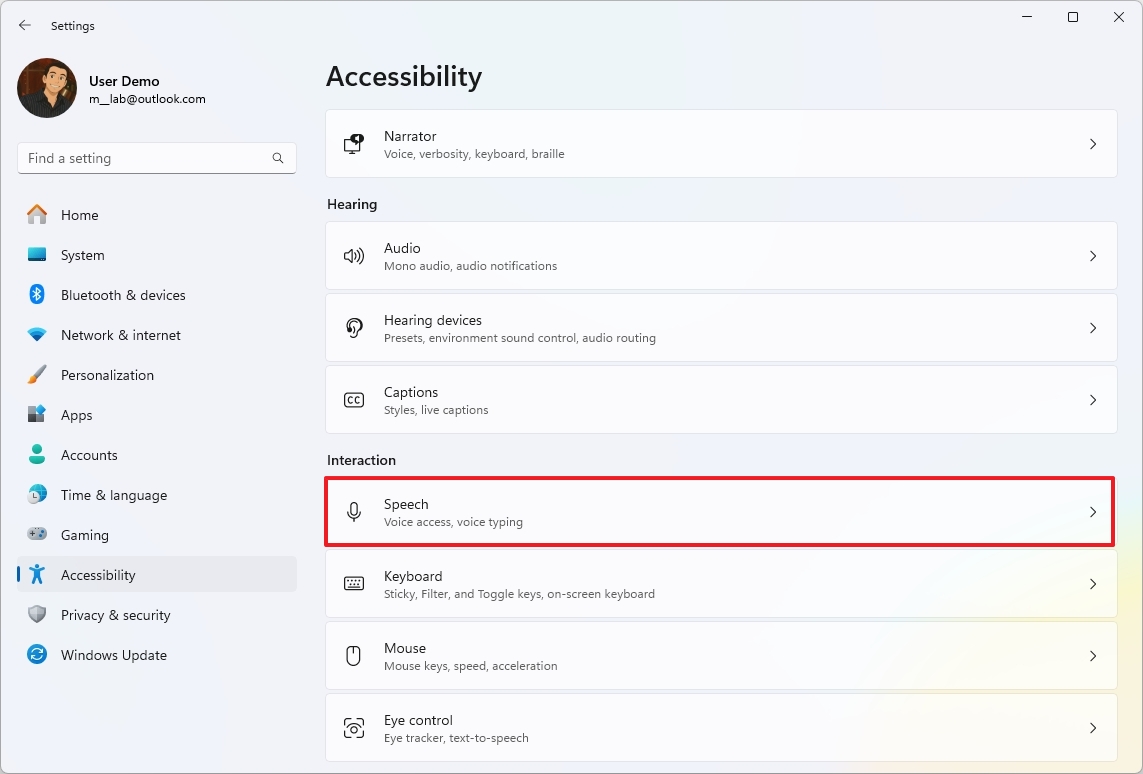
- Click the "Speech" setting.
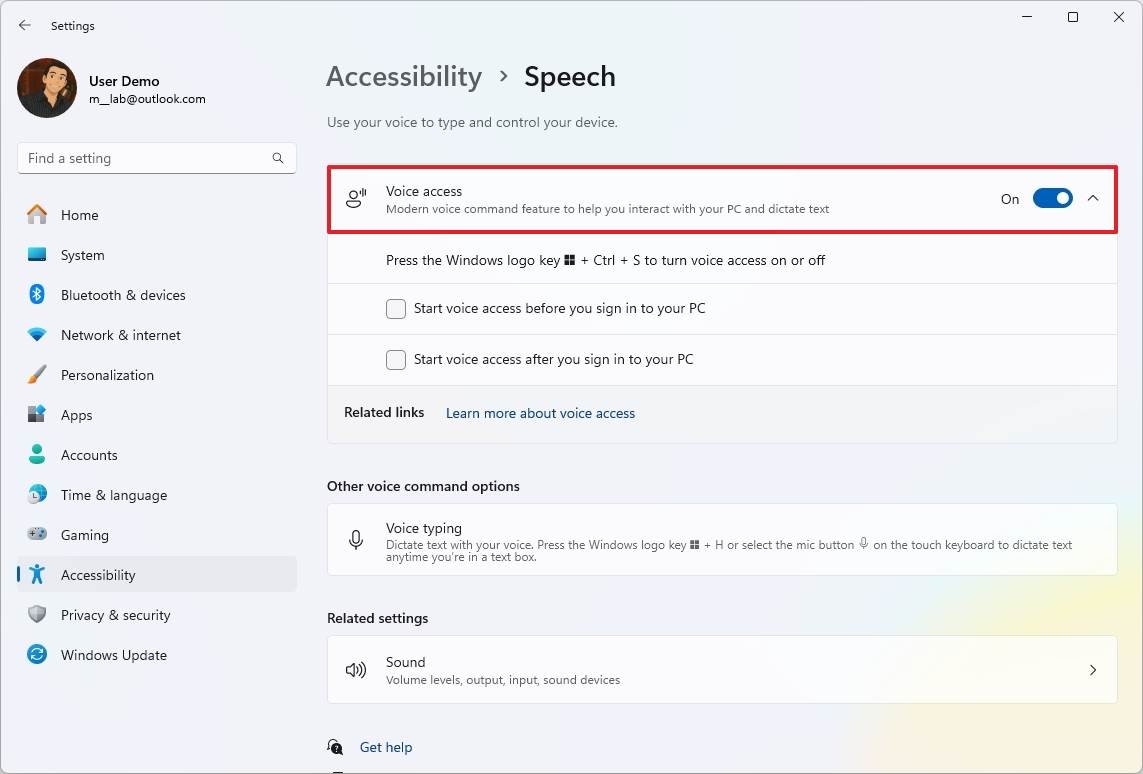
- Turn on the "Voice Access" toggle switch.
- Click the "I agree" button (if applicable).
- Set up your device's microphone using the Voice Access Guide app.
You can click the "Done" button to start using the feature or the "Start guide" button to learn the basics about Voice Access.
For example, you can say: "Voice Access wake up" to turn the microphone on to interact with the feature.
You can launch and switch between apps, open and close windows, manage your desktop, and perform system tasks like shutting down or restarting your computer.
Command examples: "Open File Explorer," "Switch to Microsoft Edge," "Close window," "Go to desktop," "Shut down PC."
You can also navigate through various elements on your screen, including menus, buttons, links, and folders.
Command examples: "Click Start," "Scroll down," "Show numbers" (to display numbers on clickable items), "Click 5" (to select a numbered item), and "Show grid" (to refine mouse pointer placement).
Furthermore, you can control the mouse pointer with your voice, allowing for precise clicks, double-clicks, right-clicks, and even drag-and-drop actions.
Command examples: "Click," "Right click," "Double-click," "Mouse grid" (to move the mouse to a specific point on a monitor).
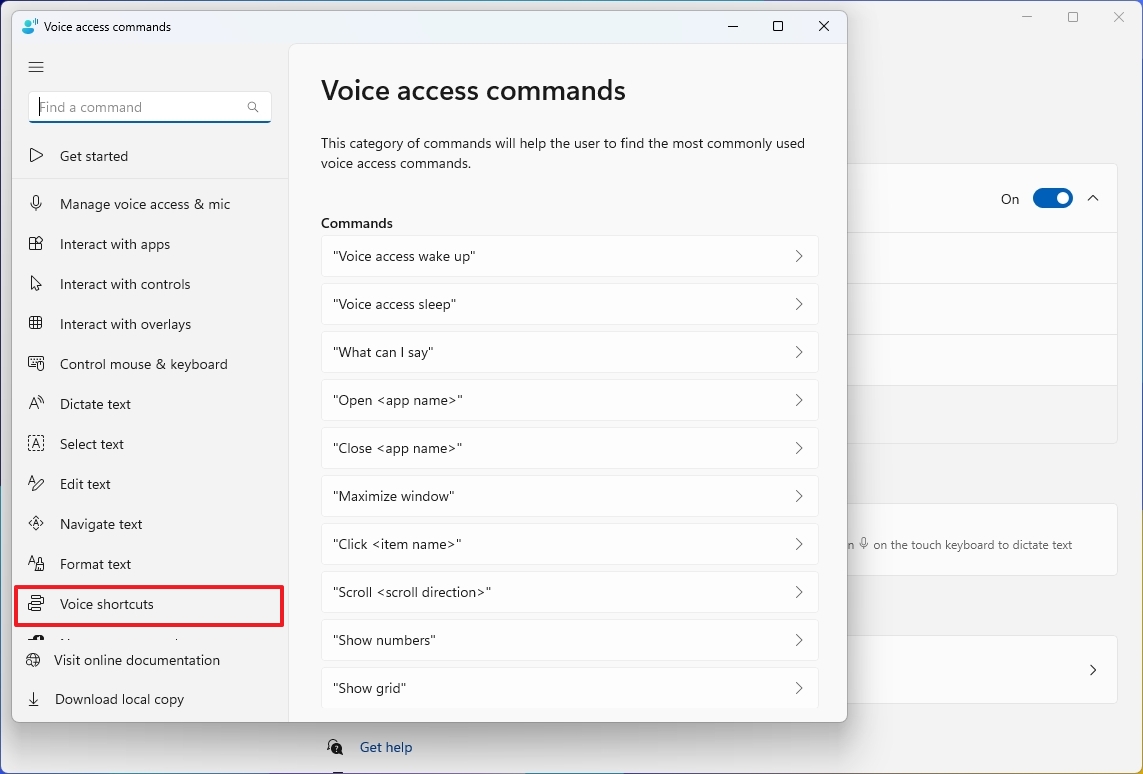
You can always use the "Help" (?) menu in the Voice Access interface to access the app and view all the commands. You can even create shortcuts for one or multiple actions using the "Voice shortcuts" feature.
5. Convert voice into text with dictation
Voice Typing is a feature that allows you to convert your spoken words into text in virtually any text field on your computer.
In other words, you can use this feature to dictate emails, documents, messages, search queries, and more, speeding up your writing process and providing an alternative to traditional keyboard typing.
To get started with Voice Typing, use these steps:
- Invoke the "Windows key + H" keyboard shortcut.
- Click the Microphone button to start dictation.
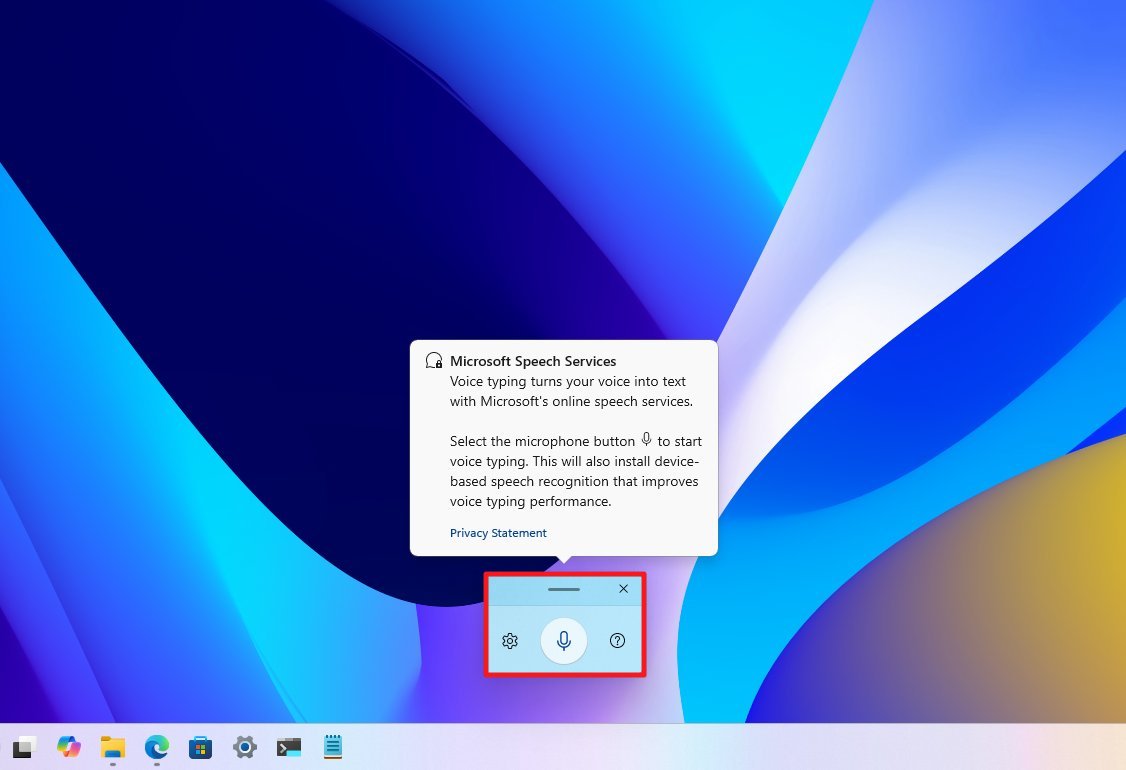
After you complete the steps, you can create text from voice on any application with a text field.
Optionally, you can open the Voice Typing settings to turn on the option to launch the feature when it detects you're in a text box.
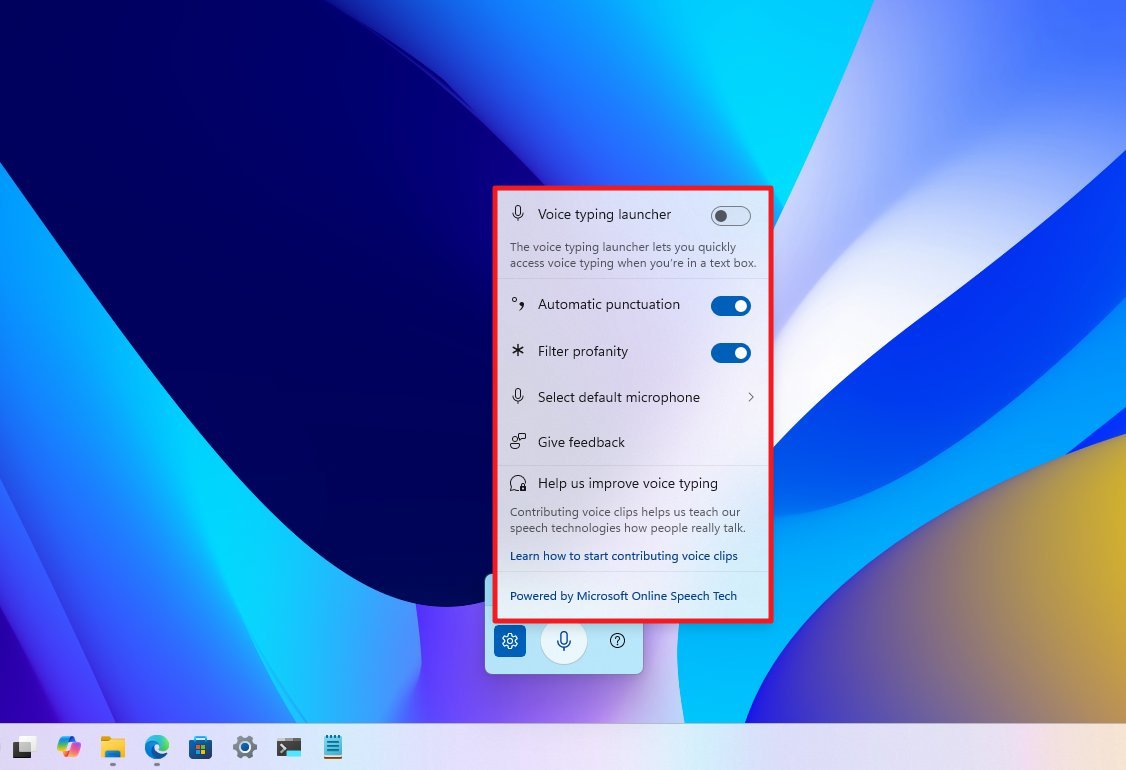
You can also turn on automatic punctuation and change the microphone source as needed.
6. Show scrollbar on all apps
Windows 11 introduced a more minimalist design, including making scrollbars thinner and often hiding them by default until you hover your mouse pointer over the area where they appear or begin scrolling. The idea was to provide a cleaner, less cluttered visual interface, especially on touch-enabled devices.
However, this "auto-hide" behavior can be annoying or even slow productivity for many users, which is why Windows 11 provides an option always to show scrollbars.
To always show the scrollbar, use these steps:
- Open Settings.
- Click on Accessibility.
- Click the "Visual effects" setting.
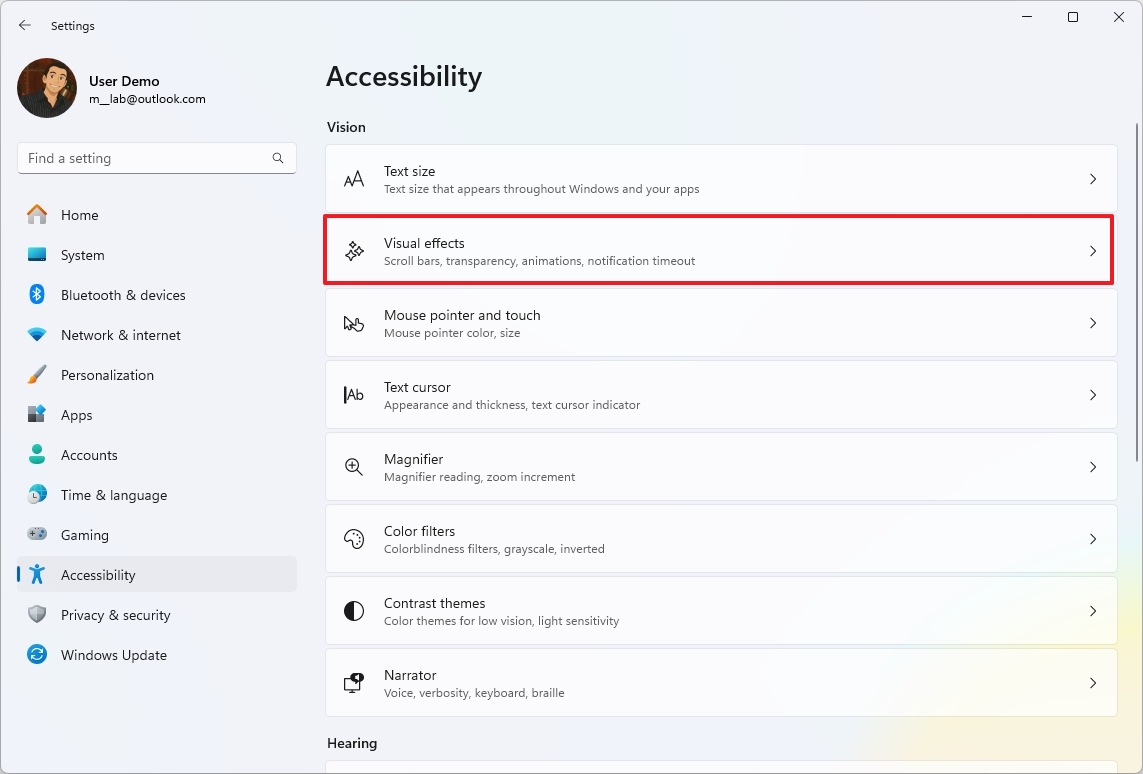
- Turn on the "Always show scrollbars" toggle switch.
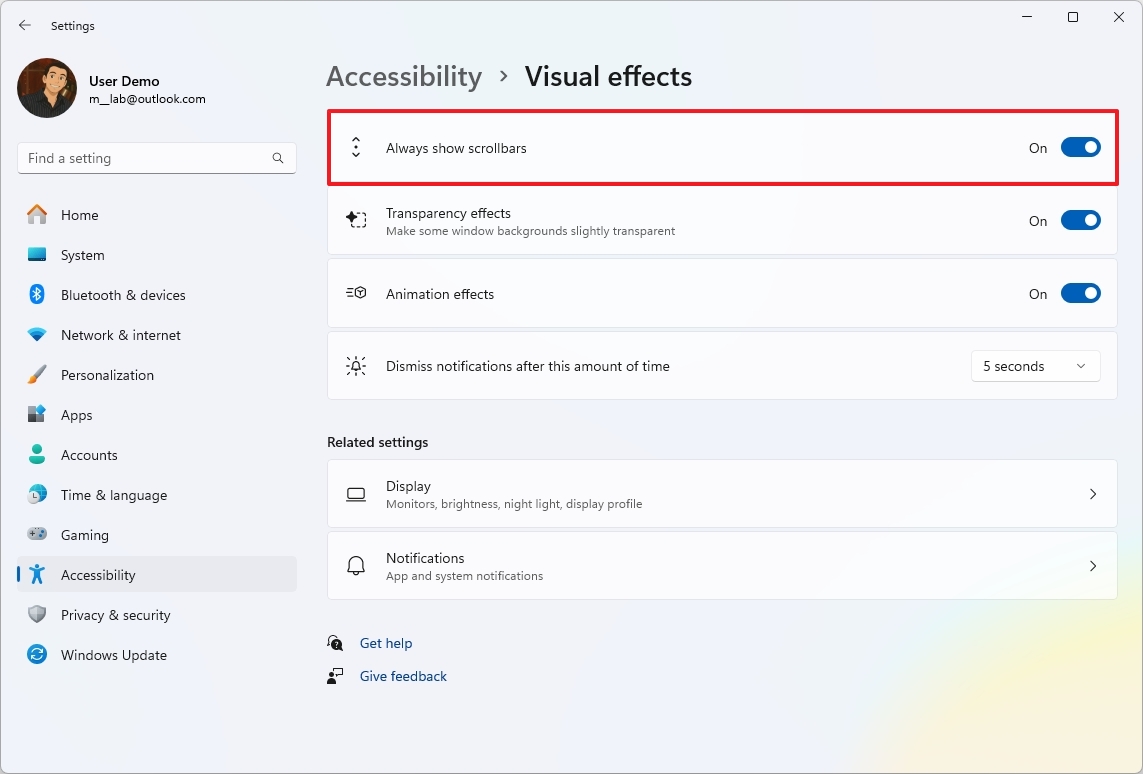
Once you complete the steps, apps like File Explorer and Settings app will always show the scrollbar to improve navigation across the operating system.
7. Control keyboard sensitivity when typing
Filter Keys is a feature that allows you to control the sensitivity of the keyboard by setting options to ignore or slow down repeated keystrokes.
It's designed to assist individuals with mobility challenges, but you can always use it to improve your typing experience if you find yourself accidentally pressing keys multiple times or have difficulty holding down keys for the correct duration.
To change the filter keys settings on Windows 11, use these steps:
- Open Settings.
- Click on Accessibility.
- Click the "Keyboard" setting.
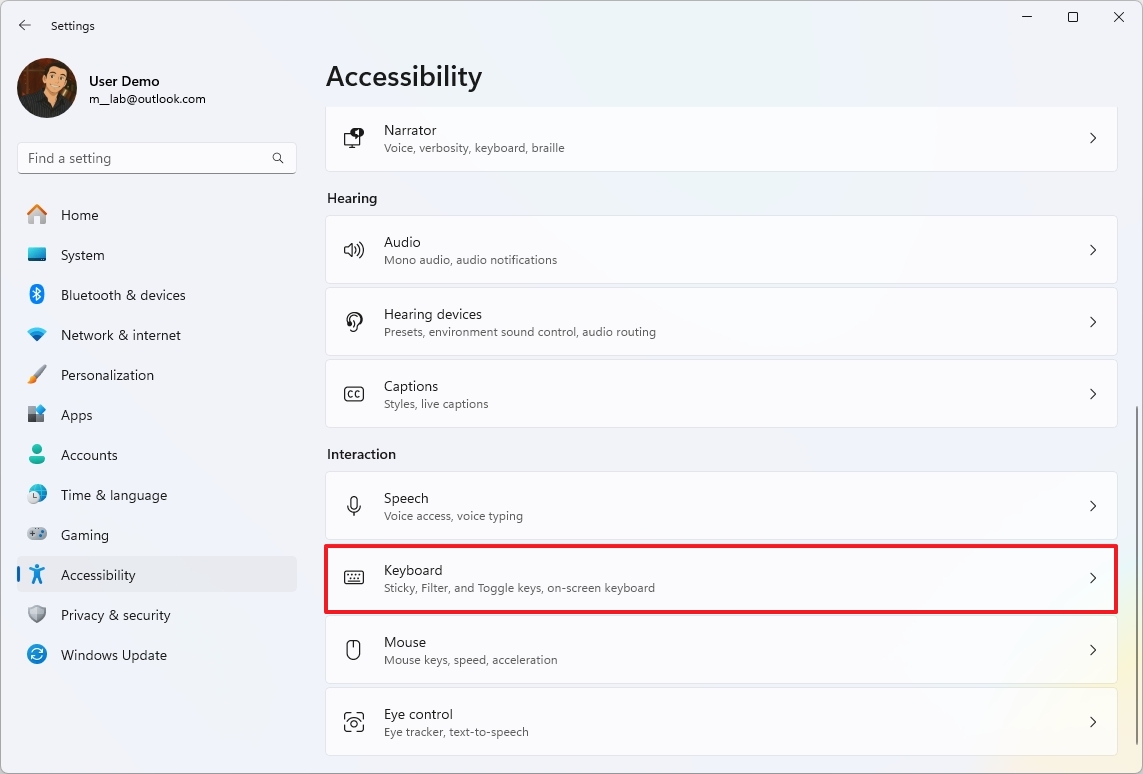
- Click on the "Filter keys" setting.
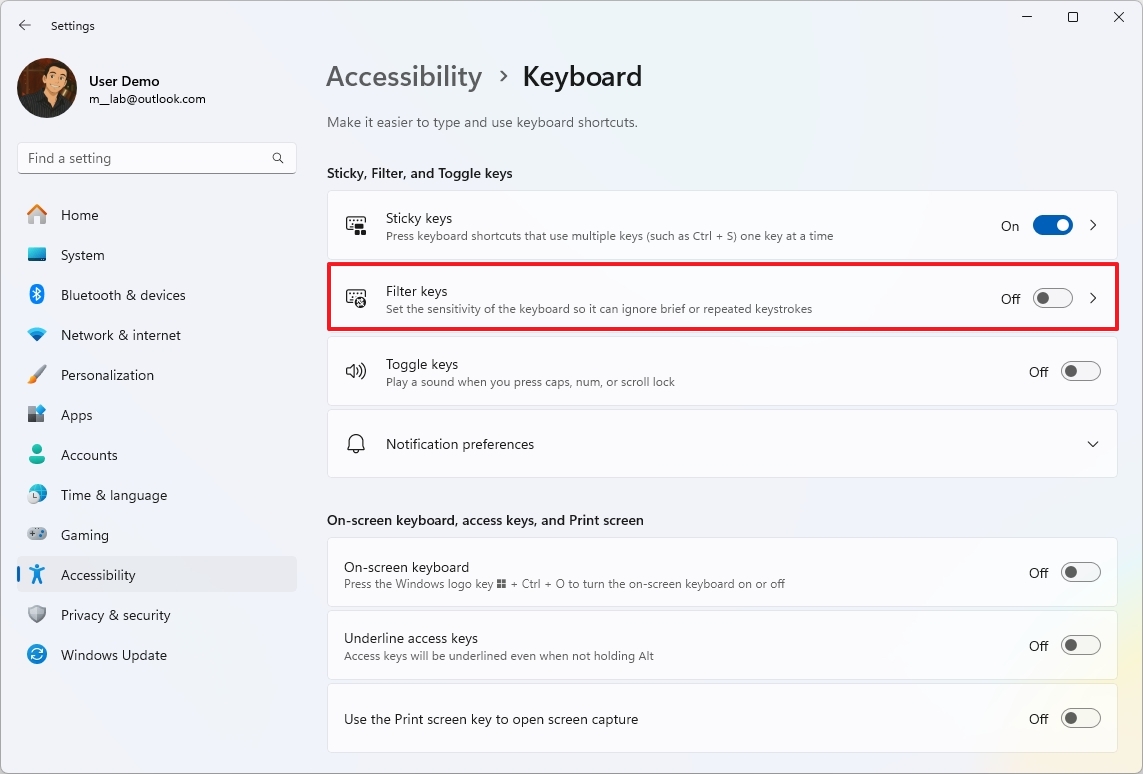
- Turn on the "Filter keys" toggle switch.
- Turn on the "Ignore quick keystrokes (slow keys)" toggle switch.
- Choose the time in seconds in the "Wait before accepting a keystroke" setting.
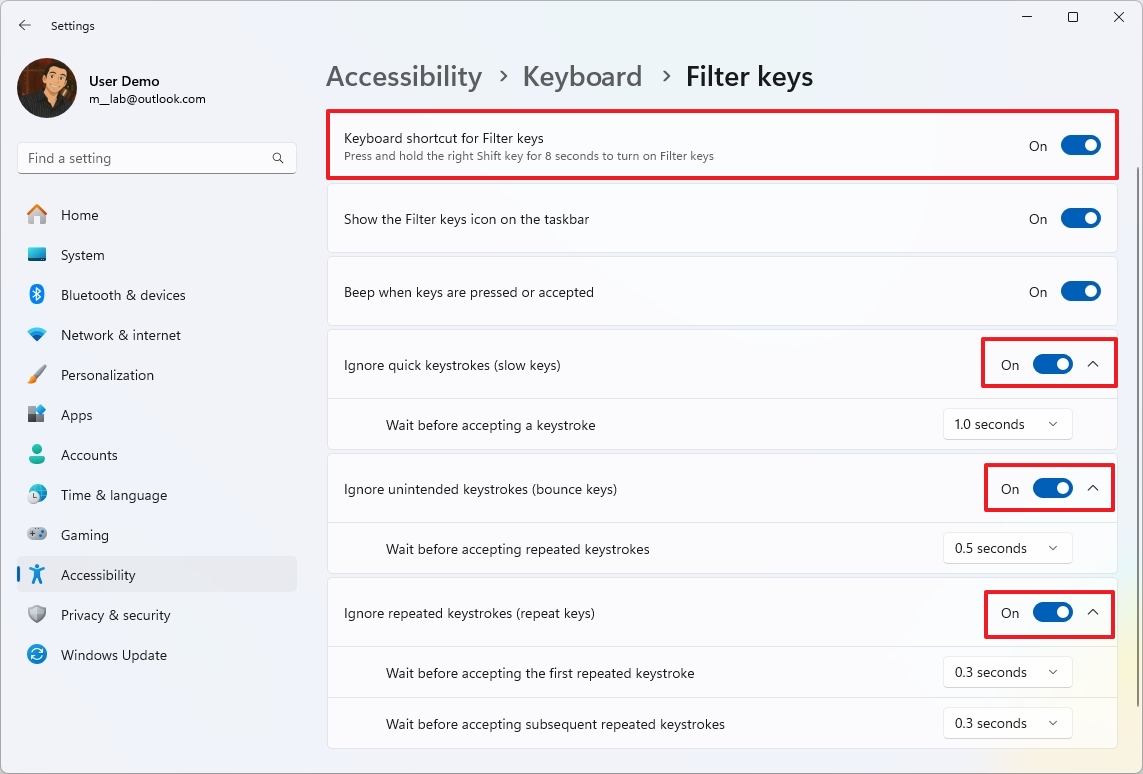
- Turn on the "Ignore unintended keystrokes (bounce keys)" toggle switch.
- Choose the time in seconds in the "Wait before accepting repeated keystrokes" setting.
- Turn on the "Ignore repeated keystrokes (repeated keys)" toggle switch.
- Choose the time in seconds in the "Wait before accepting the first repeated keystroke" setting.
- Choose the time in seconds in the "Wait before accepting subsequent repeated keystroke" setting.
It's important to adjust and test the settings until you arrive at the best configuration for your needs.
Do you regularly use any of the Windows 11 accessibility features to enhance your experience? Let me know in the comments.
More resources
Find in-depth guides, troubleshooting tips, and the latest updates on Windows 11 and 10 here:

Mauro Huculak has been a Windows How-To Expert contributor for WindowsCentral.com for nearly a decade and has over 22 years of combined experience in IT and technical writing. He holds various professional certifications from Microsoft, Cisco, VMware, and CompTIA and has been recognized as a Microsoft MVP for many years.
You must confirm your public display name before commenting
Please logout and then login again, you will then be prompted to enter your display name.
