How to get started using Windows Terminal app on Windows 11
If you're new to the Windows Terminal, read this guide.
All the latest news, reviews, and guides for Windows and Xbox diehards.
You are now subscribed
Your newsletter sign-up was successful
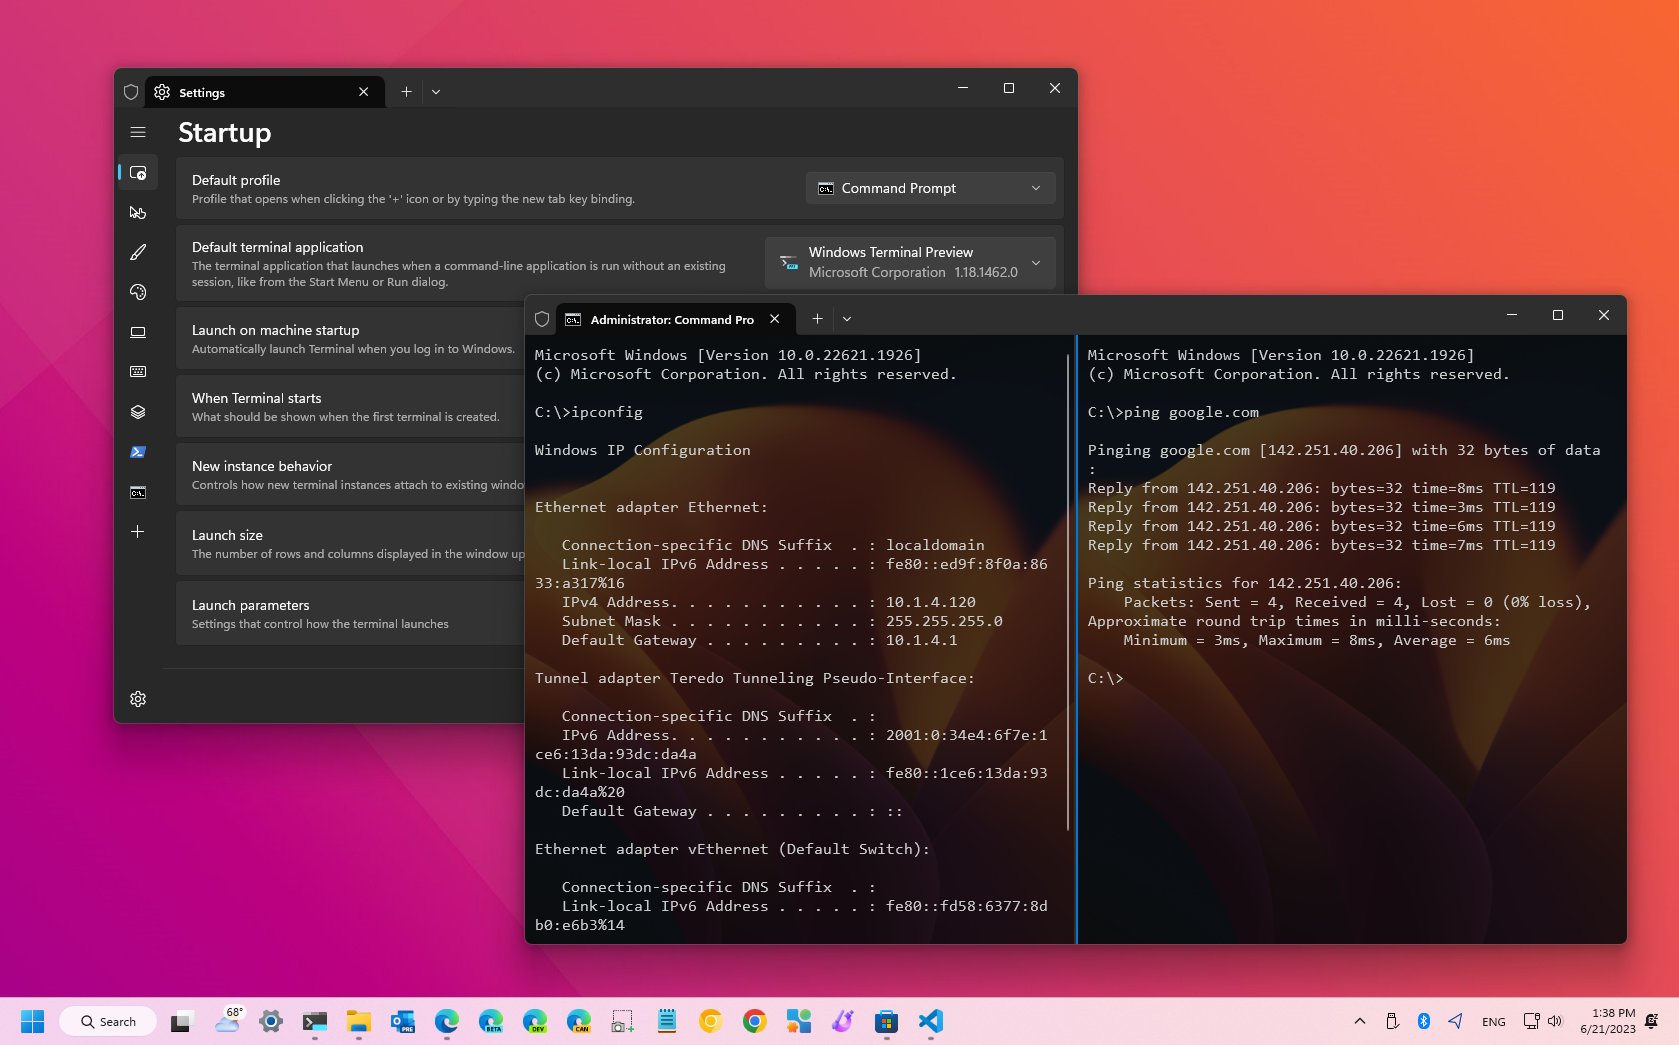
On Windows 11, the Windows Terminal is a modern shell that replaces the legacy Windows Console Host to run Command Prompt, PowerShell, and Linux commands (through the Windows Subsystem for Linux (WSL)) from a unified experience, and in this guide, you will learn the steps to get started.
When Microsoft first released the Terminal, it was available as an optional download, but since the rollout of version 22H2, it's now the default command line experience for Windows 11. Unlike the legacy experience, the Windows Terminal includes many improvements, from a modern code base to new features like tabs and panes, profile support, and the ability to customize virtually every aspect of the experience without modifying the configuration file manually.
This how-to guide will walk you through what you need to know to get started using and configuring the Windows Terminal on Windows 11.
Windows Terminal getting started guide
These instructions will teach you the basics of navigating the Windows Terminal, including essential commands. In addition, this guide will walk you through the settings and the options to customize the experience, including the steps to create and delete profiles and back up the settings.
Getting around
The Windows Terminal navigation is not much different than navigating a web browser. The app includes controls to manage tabs, and a menu to access the Settings, Command Palette, and the different profiles.
Tabs
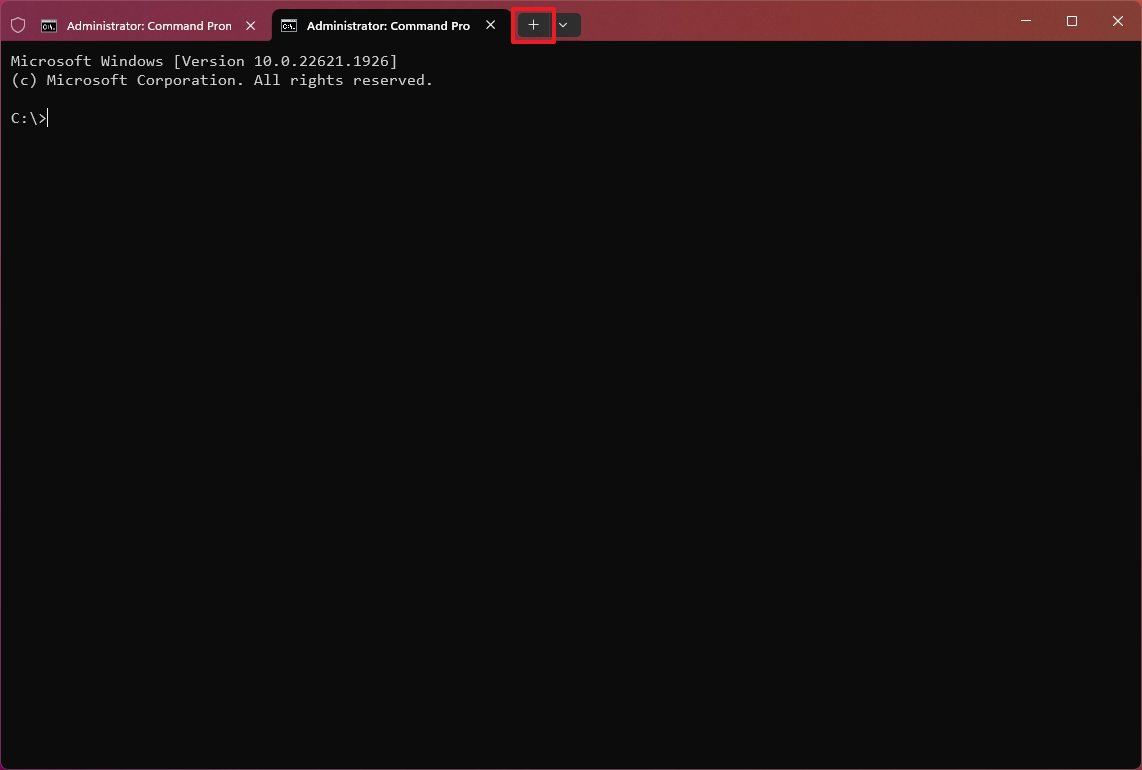
To create a new tab with the default console, click the "+" button from the top right. To duplicate the tab, you can also use the "Ctrl + Shift + N" keyboard shortcut or the "Ctrl + Shift + D" shortcut. However, to open a new tab with another console, you can open the main menu and choose the profile from the list.
All the latest news, reviews, and guides for Windows and Xbox diehards.
In the same way, you can use the "Ctrl + Shift + W" keyboard shortcut to close a tab.
Finally, you can also use the "Ctrl + Shift + 1 through 9" keyboard shortcut to open a profile in a new tab, depending on the position of the profile in the main menu. For example, since Windows PowerShell is the first profile by default, you can open this profile using the "Ctrl + Shift + 1" shortcut.
Panes
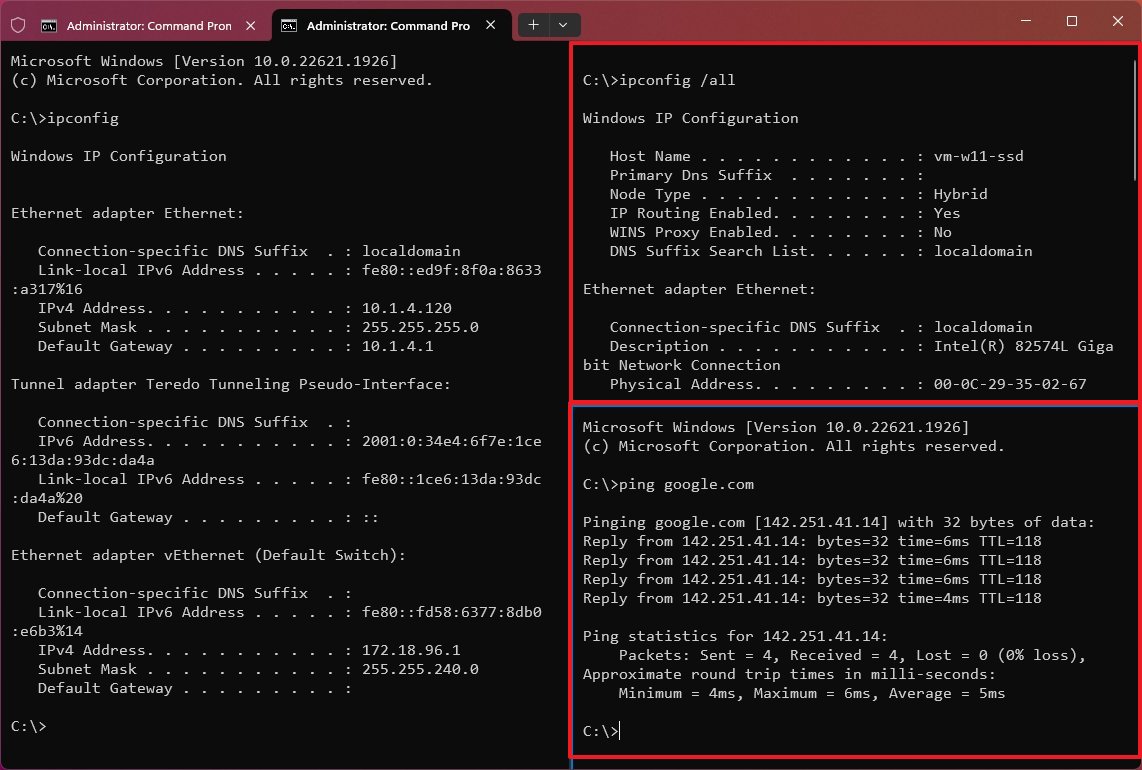
On Windows Terminal, a pane is a way to have multiple windows inside a single tab, allowing you to work with different applications simultaneously.
To create a new pane, hold the "Alt" key and click the "+" button to open another instance of the default console. If you have to have Command Prompt and PowerShell in the same tab, hold the "Alt" key, open the main menu, and choose the profile.
You can also use the "Alt + Shift + Plus key" keyboard shortcut to create a vertical pane or the "Alt + Shift + Minus key" shortcut to create a horizontal pane. Also, the "Alt + Shift + D" shortcut allows you to create a duplicate pane of the current tab. It's even possible to use the "Split Tab" option from the tab right-click context menu to create a new vertical pane.
Similar to closing a tab, you can use the "Ctrl + Shift + W" keyboard shortcut to close a pane.
Command Palette
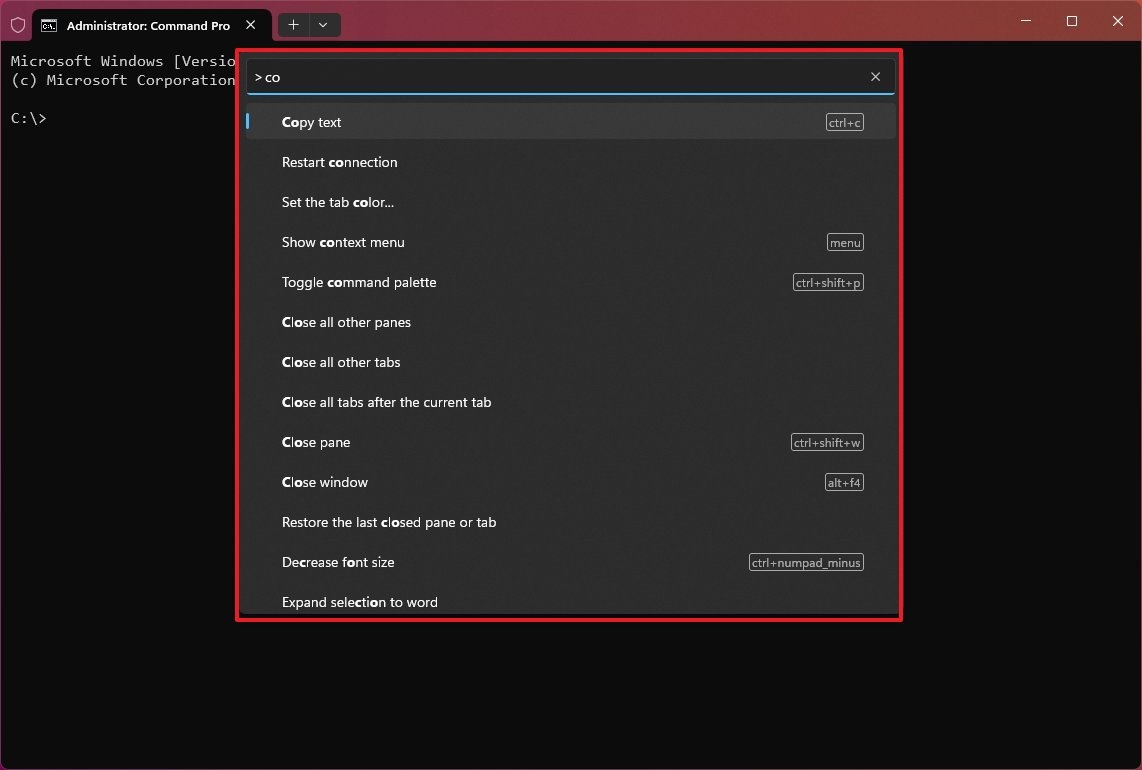
The Command Palette is available from the main menu or using the "Ctrl + Shift + P" keyboard shortcut, and it's a feature that allows you to run commands, open settings, and perform other tasks without remembering the specific commands or keybindings.
For instance, to run a palette command, use the "Ctrl + Shift + P" keyboard shortcut, scroll or use the search box, and choose the action to run it.
Settings
The Settings is the place that allows you to customize virtually anything about the Windows Terminal, including behaviors, features, and appearance.
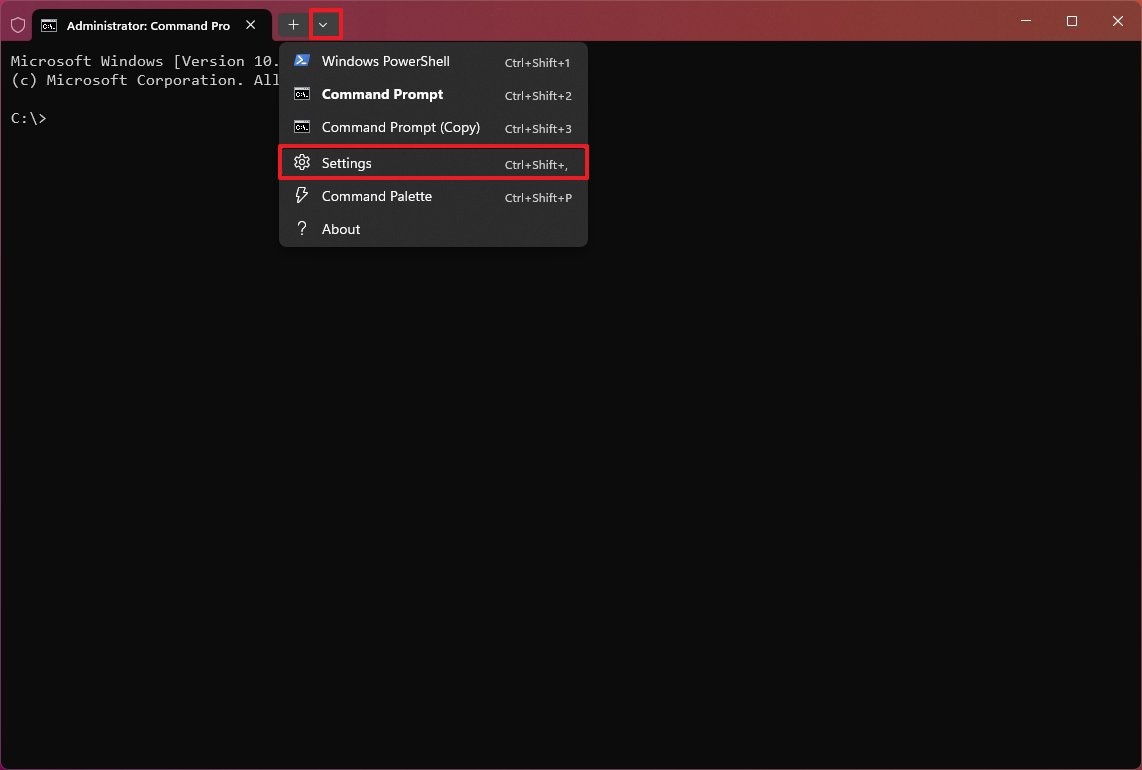
To access the Settings, open the main menu next to the tabs and choose the Settings option. You can also use the "Ctrl + Shift + ," keyboard shortcut.
You can always use the "Ctrl + Shift + Space" shortcut to open the Terminal menu or the "Ctrl + ," keyboard shortcut to open the Settings page directly.
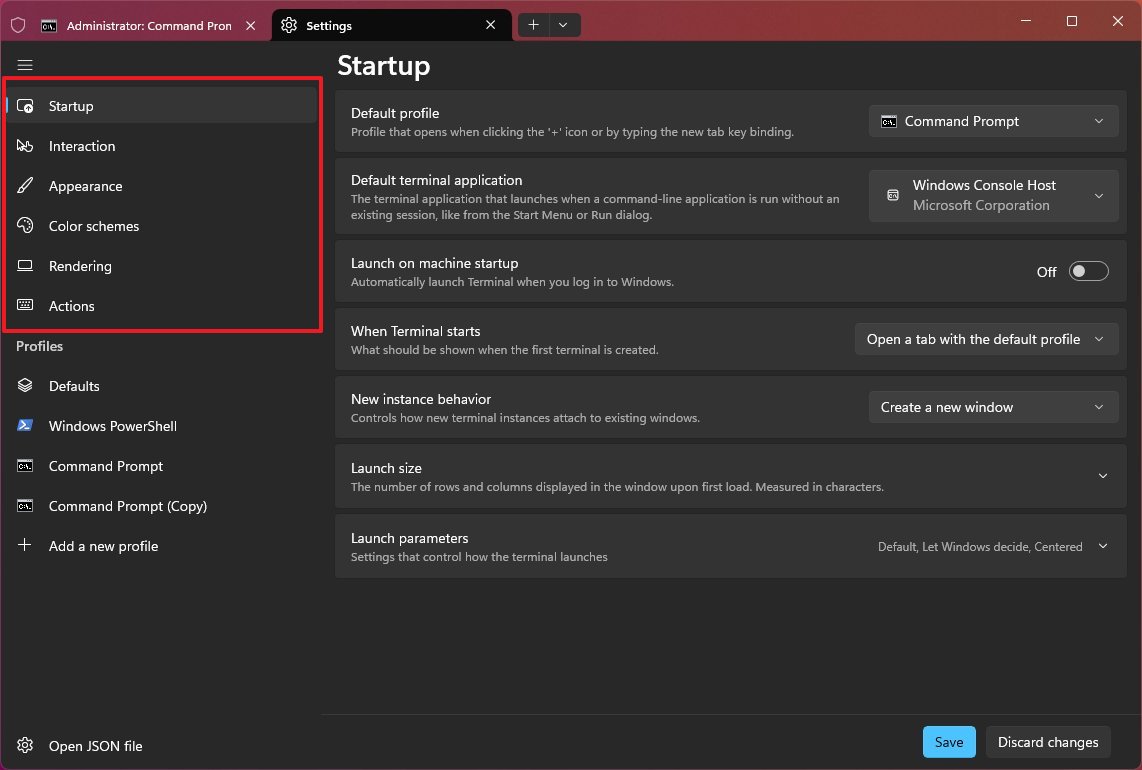
Inside Settings, you will find six sections, including Startup, Interaction, Appearance, Color Schemes, Rendering, and Actions.
Then there's the "Profiles" section that includes the "Defaults" page, which houses the global settings that will apply to every profile.
Also, the "Profiles" section lists the available profiles with their respective settings alongside the option to create and customize additional profiles.
Startup behavior settings
The Startup page includes the default startup settings.
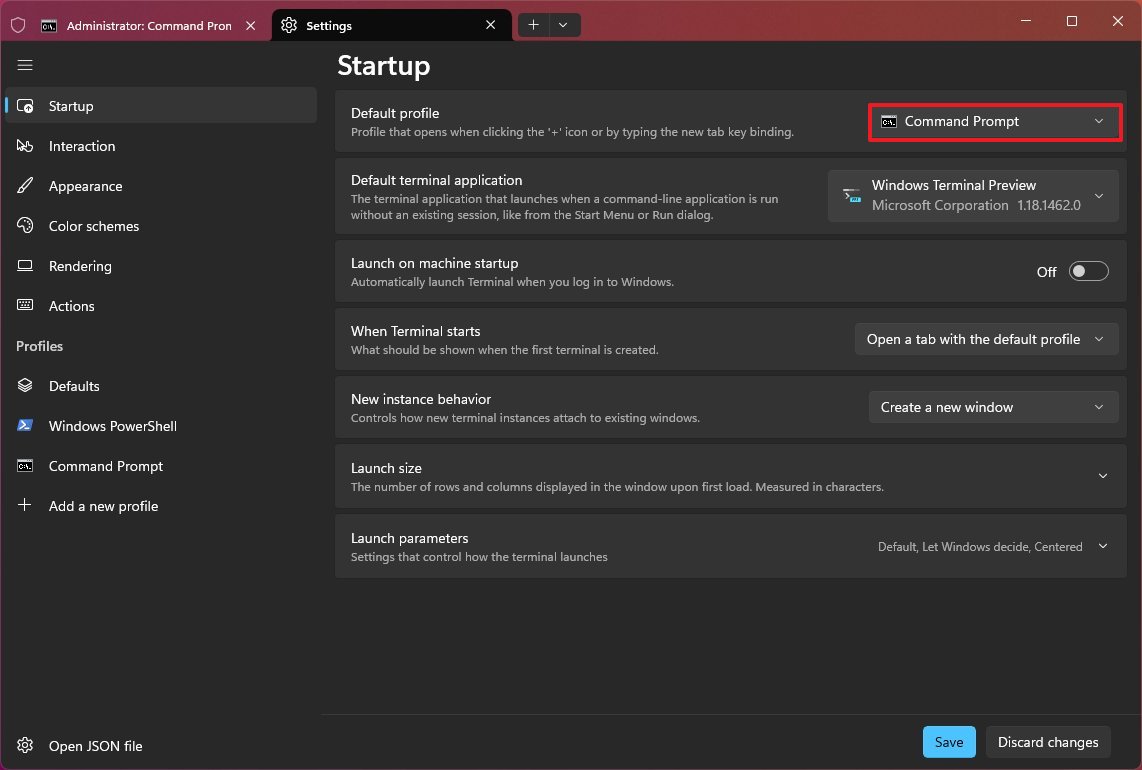
To change the default command application that should open when launching the Windows Terminal, open Settings > Startup, choose one of the available profiles (Such as Command Prompt or Windows PowerShell) from the "Default profile" setting, and click the Save button.
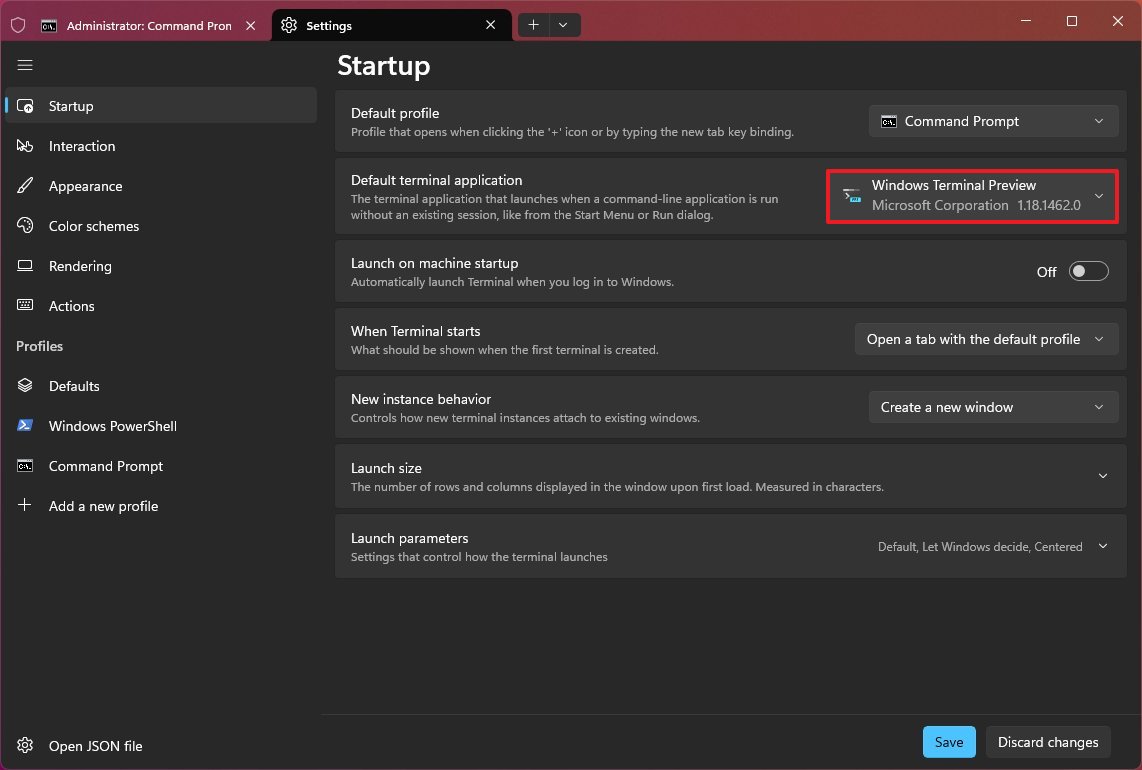
To change the default terminal application, open Settings > Startup, choose the application from the "Default terminal application" setting and click the Save button.
For example, if you selected the "Windows Console Host" option, then when opening Command Prompt, it will open in the legacy console. However, if you choose the "Windows Terminal" option, the terminal application will open Command Prompt.
In addition, the "Startup" page includes the settings that allow you to decide whether the terminal should launch automatically when the operating system starts, the default size, and other launch parameters.
Customize appearance
The Windows Terminal includes two ways to customize the look and feel of the experience, including the "Appearance" and "Color schemes" settings.
Change theme
The application theme defines the color the main color, which can be dark, light, or custom.
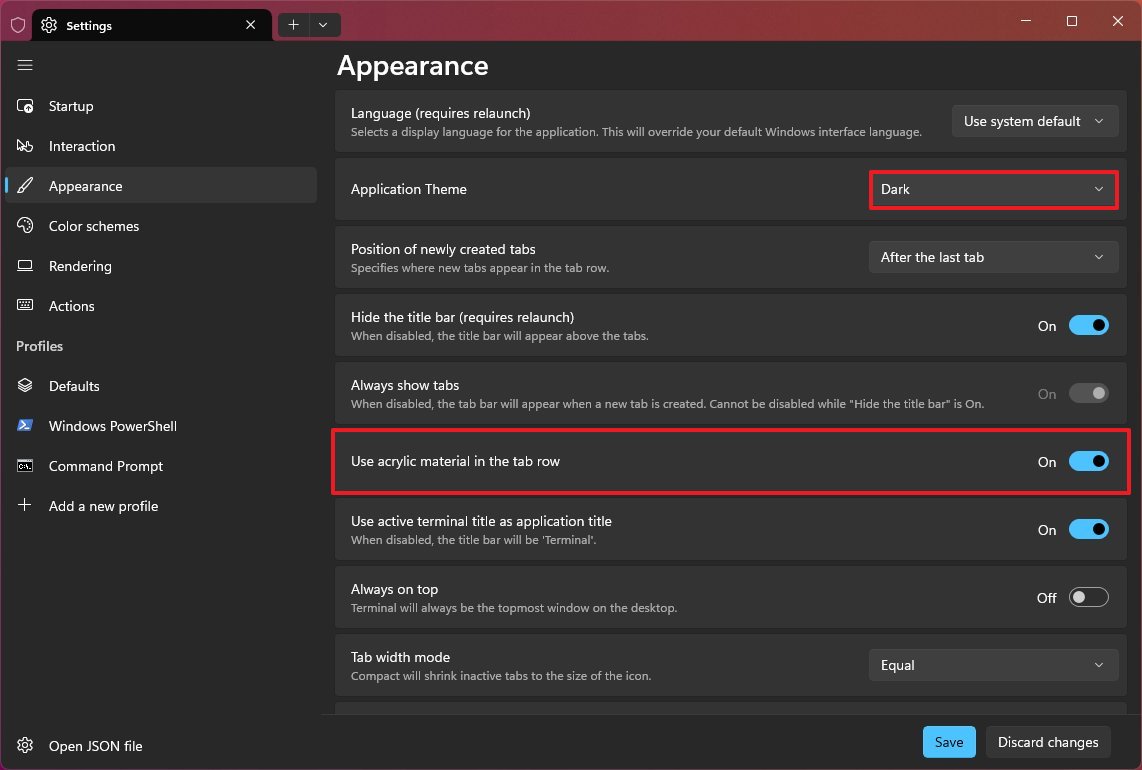
To change the Windows Terminal theme, open Settings > Appearance, and choose the color mode (light, dark, system mode) from the "Application theme" setting. On this page, you can also turn on the "Use acrylic material in the tab row" toggle switch to enable the mica material for the frame of the application. Once you complete selecting your settings, click the Save button.
Change color scheme
The color scheme defines the colors that apply to the elements, including test, cursor, background, foreground, selection, etc.
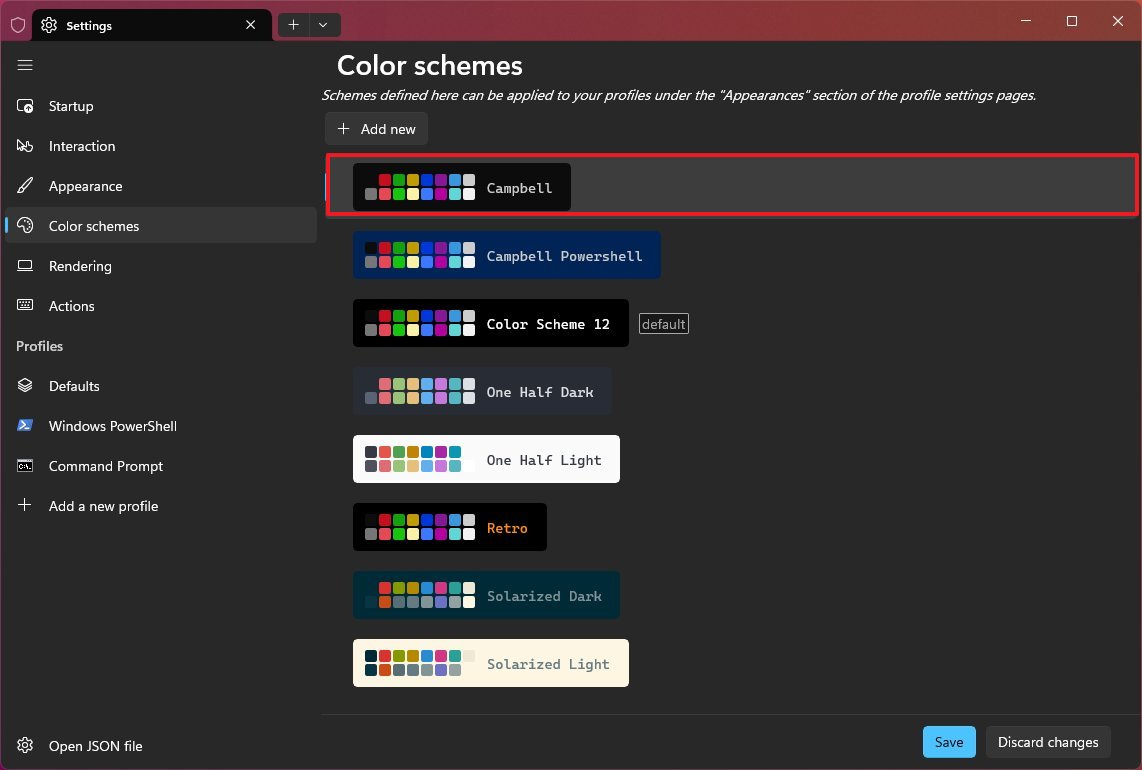
To change the Windows Terminal color scheme, open Settings > Color schemes, choose the available schemes, and click the Save button.
The page includes several color schemes, including Campell, Campell PowerShell, One Half Dark, One Half Light, Retro, Solarized Dark, Solarized Light, Tango Dark, Tango Light, and Vintage.
Create custom scheme
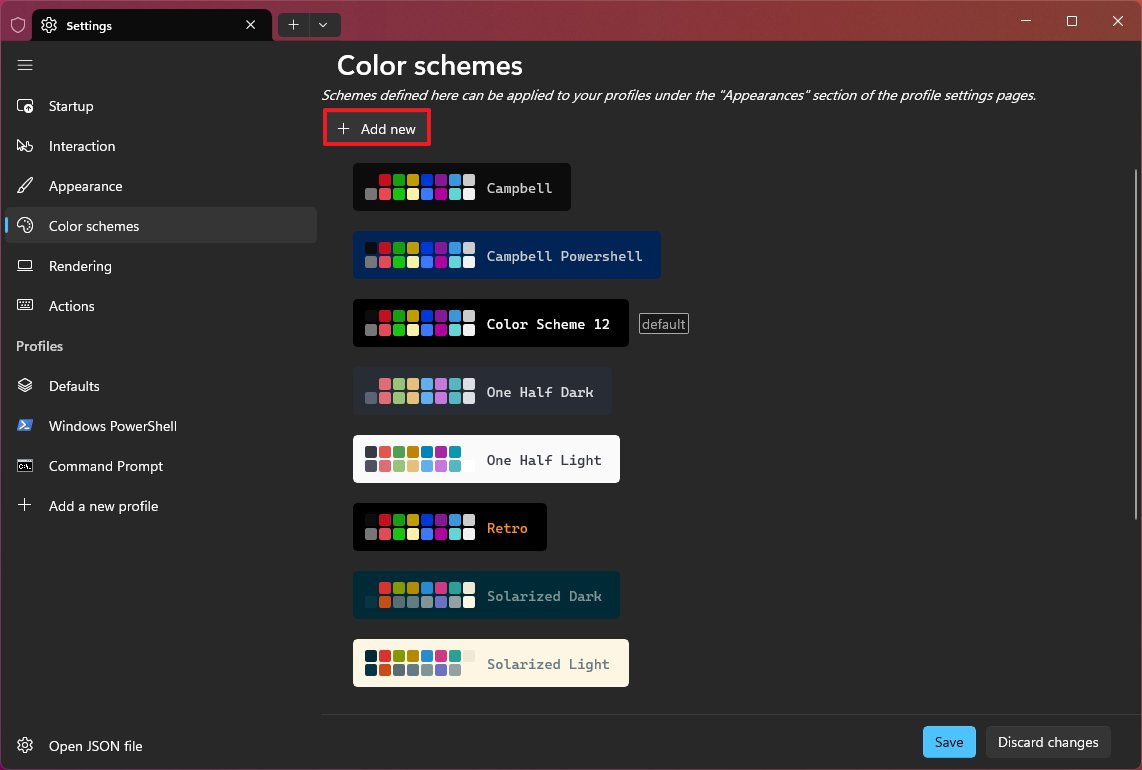
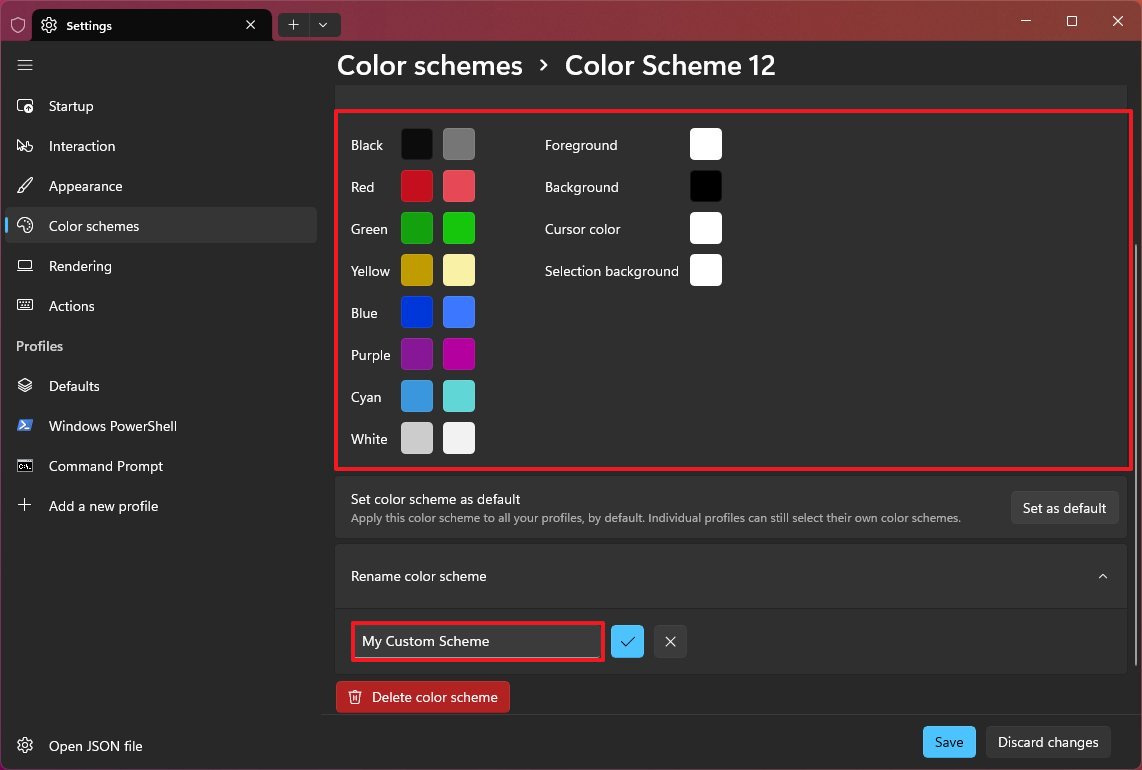
Alternatively, you can click the "Add new" button to create a custom scheme. While on the page, under the "Colors" section, click on each color and choose the replacement color.
Once you're done, click the "Rename color scheme" settings, confirm a descriptive name, and click the Accept rename button.
If you want to apply the new scheme, click the "Set as default" button and then the Save button.
In the case you don't need a color scheme anymore, click on the scheme, then the "Delete color scheme" button, and confirm the deletion.
Change and create actions
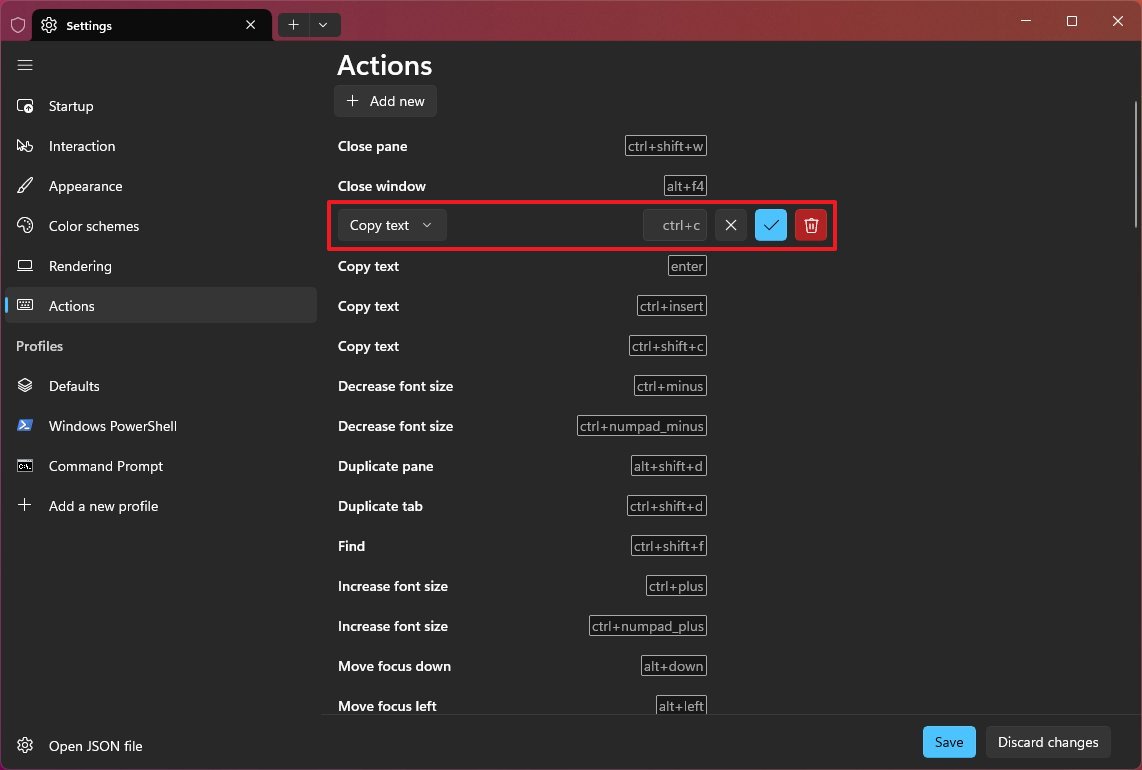
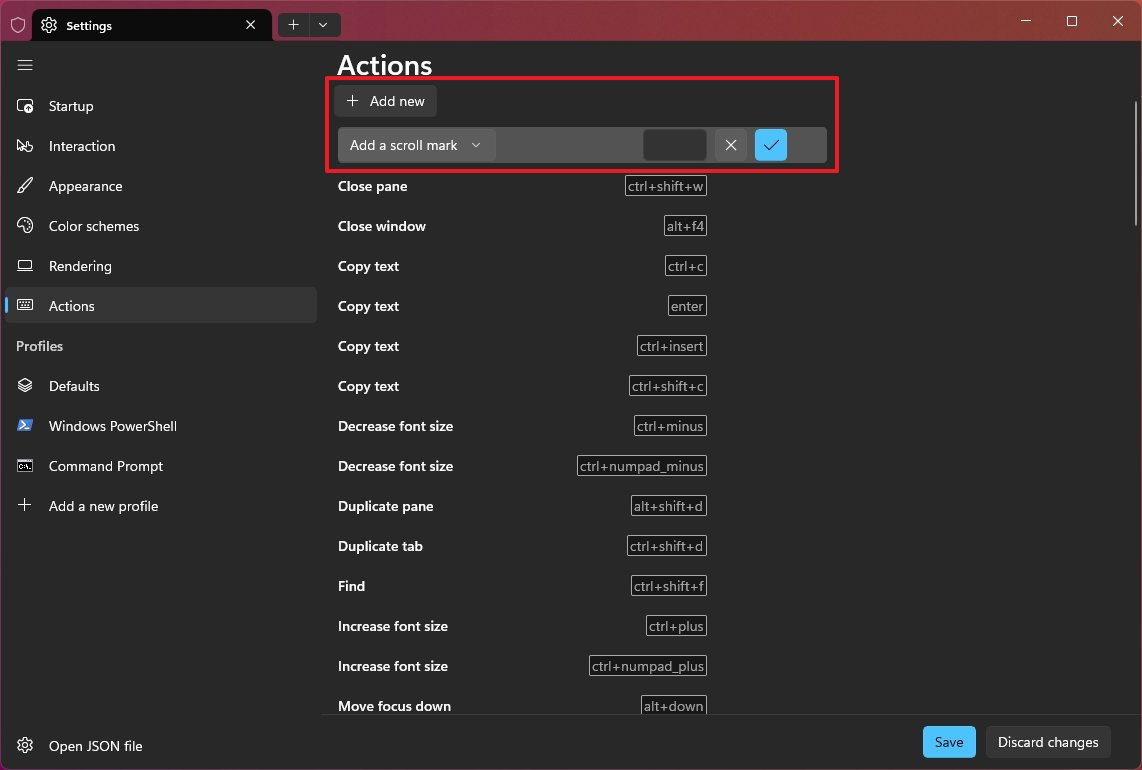
The "Actions" page includes the commands, actions, and tasks you can run from the Command Palette. By default, the Windows Terminal includes a long list of actions you can modify or create new ones.
To modify a terminal action, open Settings > Actions, hover over the action, and click the Edit button. Using the left menu, choose the action, and using the setting on the right, select the shortcut to run the action. Finally, click the Accept button to apply the changes.
To create a new action, click the "Add new" button from the "Actions" page. Using the left menu, choose the action, and using the setting on the right, select the shortcut to run the action, and click the Accept button to apply the changes.
To run the action, refer to the steps to use the Command Palette instructions outlined earlier in this guide.
Profiles
The "Profiles" section includes all the profiles with their respective settings alongside the option to create and customize additional profiles.
You can manage these settings in two ways. You can change the settings on the "Defaults" page that will apply to every profile defined in the application. Or you can change the settings on each profile individually.
Change default settings
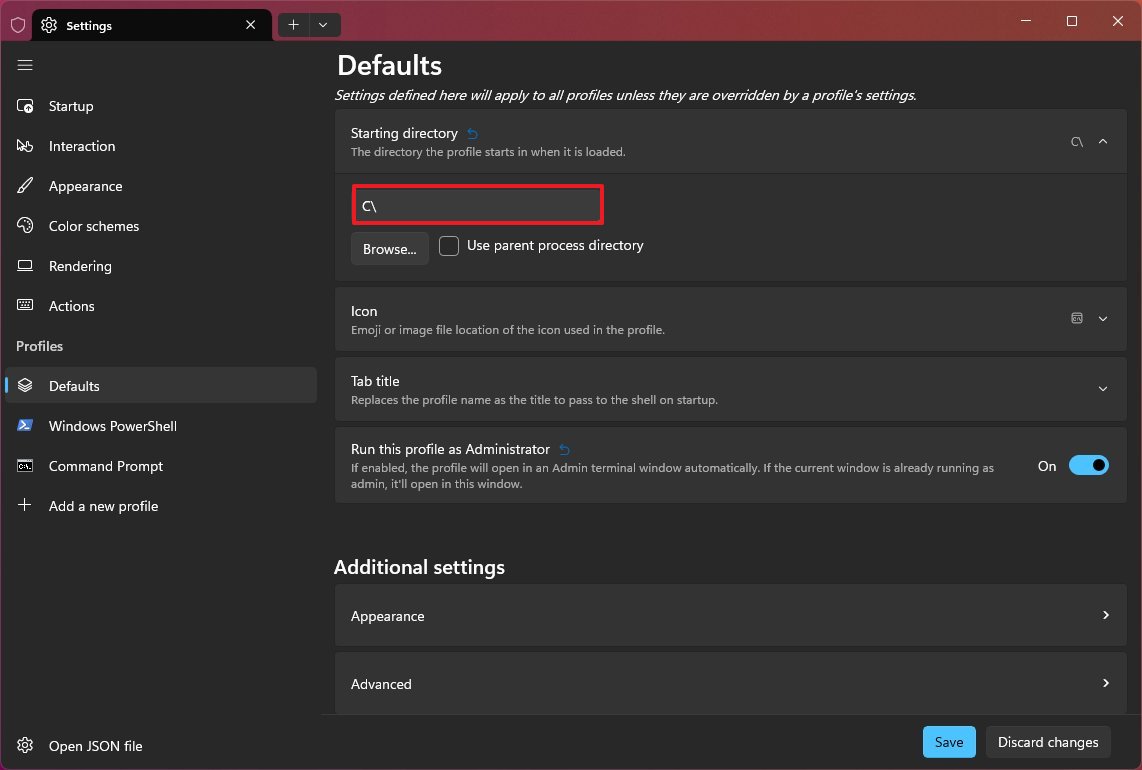
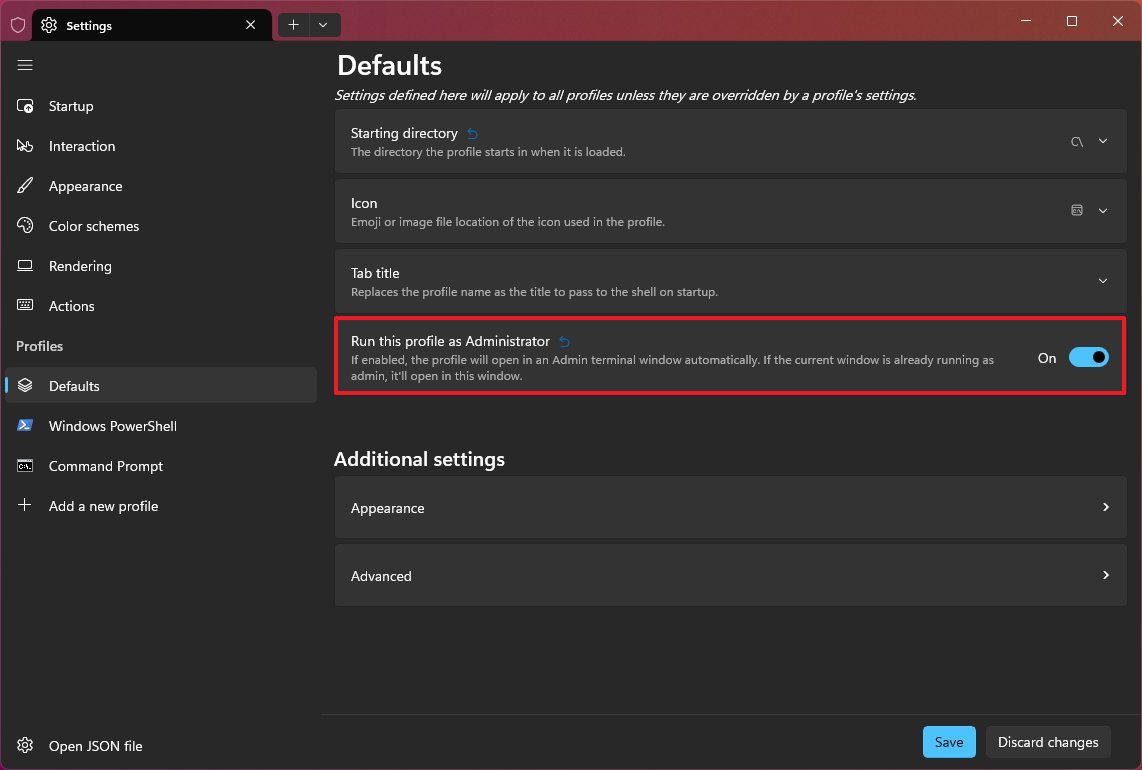
To change the profile settings globally, open Settings > Defaults. On the page, the most important settings are the "Starting directory" and "Run this profile as Administrator."
The "Starting directory" is the path the application will start by default. For instance, if you always move directories as soon as you open the app, consider adjusting this setting. Click the "Starting directory" setting, clear the "Use parent process directory" option, confirm the path, and click the Save button.
You can also configure the Windows Terminal to always run elevated, and to do this, you need to turn on the "Run this profile as Administrator" toggle switch and click the Save button.
Under the "Additional settings" section, you will find two settings, including "Appearance" and "Advanced."
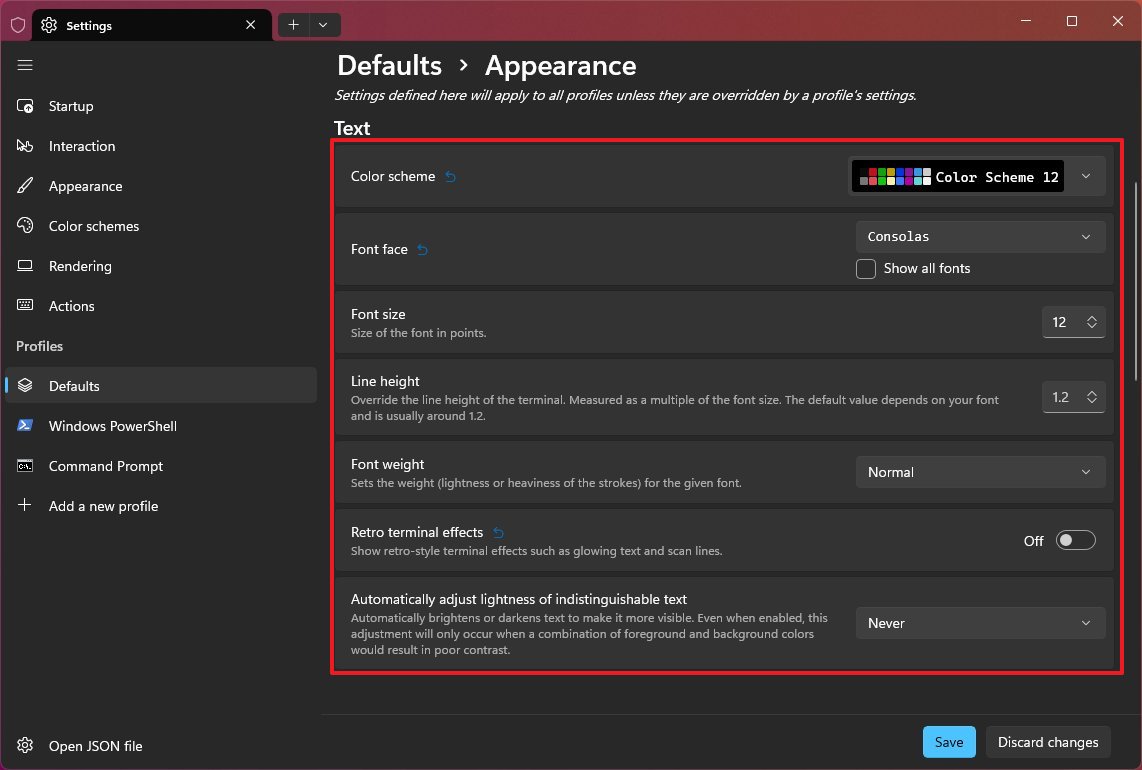
On the "Appearance" page, you can customize various visual elements. For instance, you can choose the default color scheme, font properties, cursor shape, background image, control transparency, and more.
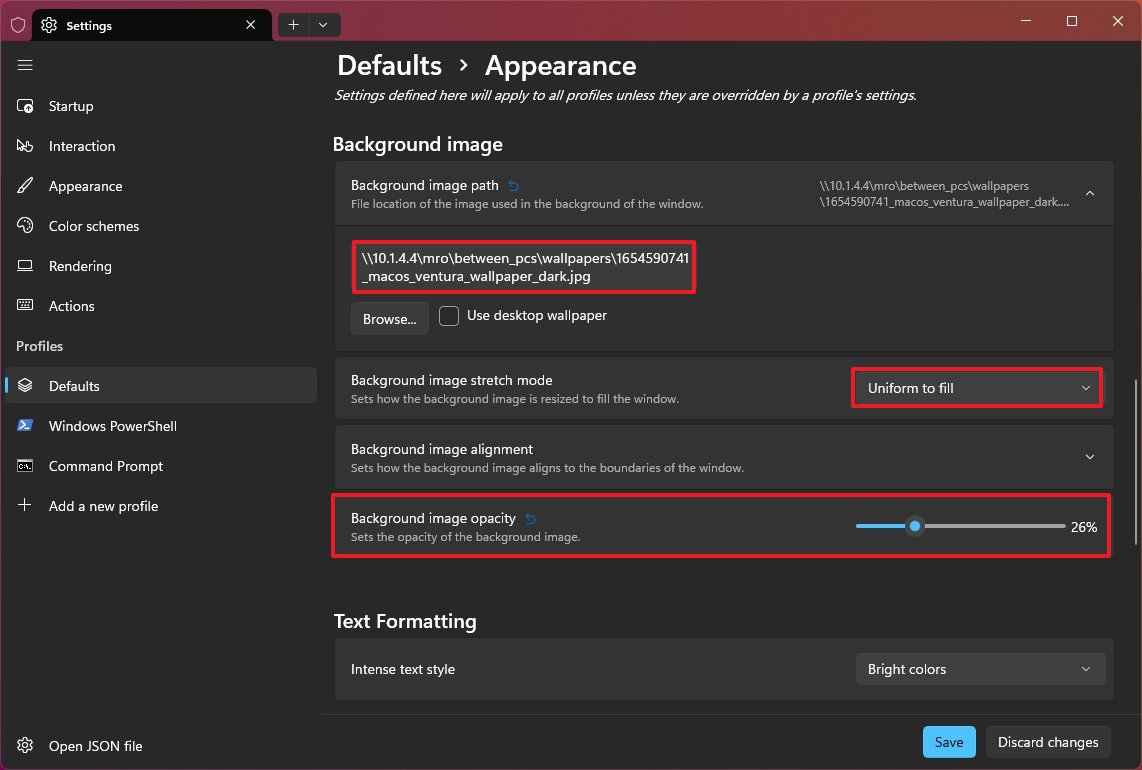
If you want to specify a default background image, click the "Background image" setting, click the Browse button, choose the image, click the Open button, select the background properties (stretch mode, alignment, and opacity) as necessary, and click the Save button. (You can also check the "Use desktop wallpaper" option for the current background as the wallpaper for the Windows Terminal.)
If you are not using a background image, you can add opacity and acrylic material to the background using the "Transparency" settings. The "Background opacity" setting makes the desktop background visible through the Windows Terminal, while the "Enable acrylic material" applies a semitransparent blur to the window.
In the case you want to undo a specific setting, you can click the "Reset inherited value" button next to the setting to apply the default values again and click the Save button.
On the "Advanced" page, if you're getting with the Windows Terminal, you don't need to change any of these settings.
Change profile settings
You can have each profile with its own settings alongside the default settings.
To change a profile setting, choose the profile from the left navigation pane. On the page, you will find similar settings to the ones available on the "Defaults" page, including the "Starting directory" and "Run this profile as Administrator."
However, you'll also find some settings specific to the profile. For example, you can use the "Name" setting to change the display of the profile. You can use the "Command line" setting to specify the location of the executable that launches the application. And you can hide the profile from the main menu, among other options.
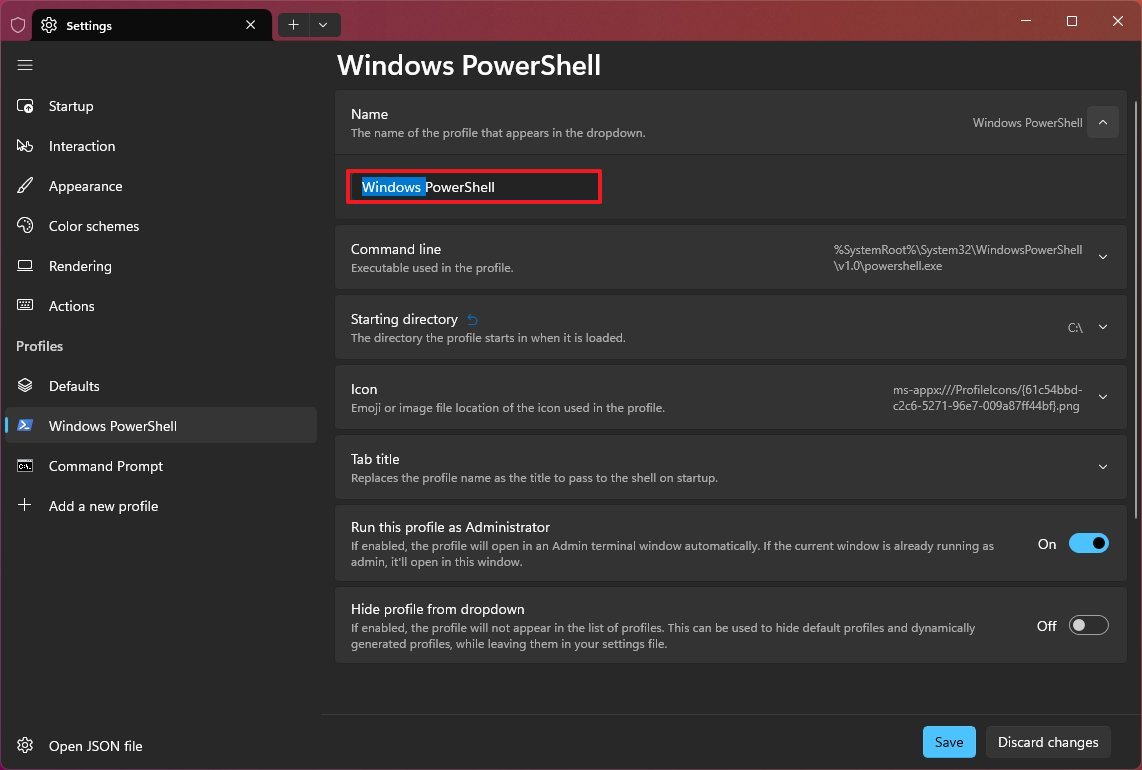
To change the profile name, open Settings, click on the profile name from the left pane, click the "Name" setting, confirm the new name for the profile, and click the Save button.
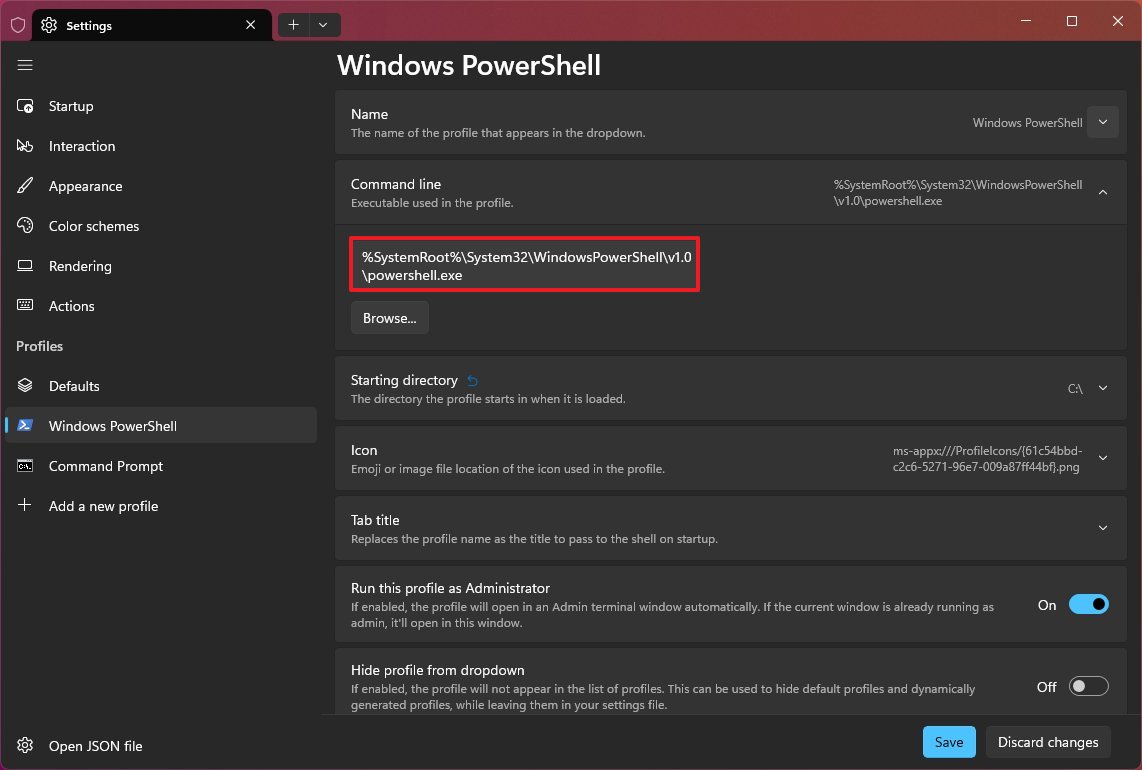
To specify the path for the command tool executable, open Settings, click on the profile name from the left pane, click the "Command line" setting, click the Browse button, then select the executable (such as diskpart.exe), click the Open button, and click the Save button.
Create new profile
On Windows Terminal, you can create profiles for the different applications with custom settings and personalization.
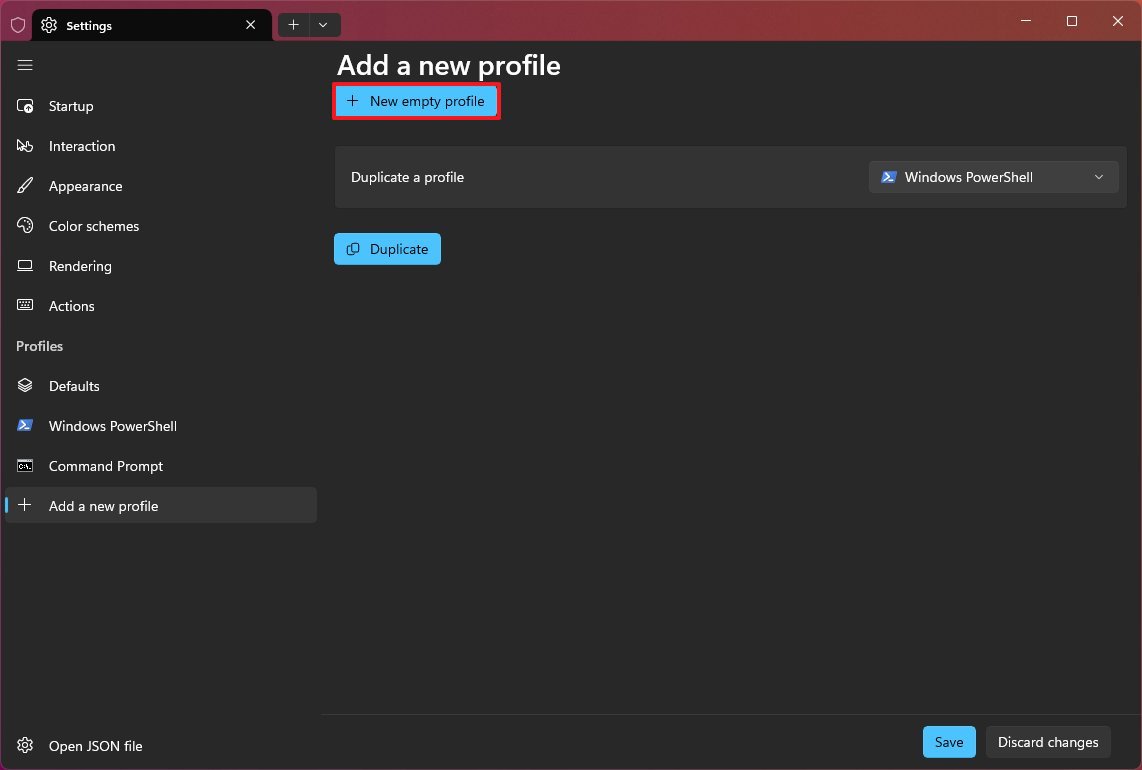
To create a new Windows Terminal profile, open Settings and click the "Add a new profile" option from the left navigation pane. On the page, you will find two ways to create a profile, including creating a new empty profile or duplicating an existing one and updating its settings.
If you want to create a profile from scratch, click the "New empty profile" button, click the "Name" setting, confirm the new name for the profile, and click the Save button.
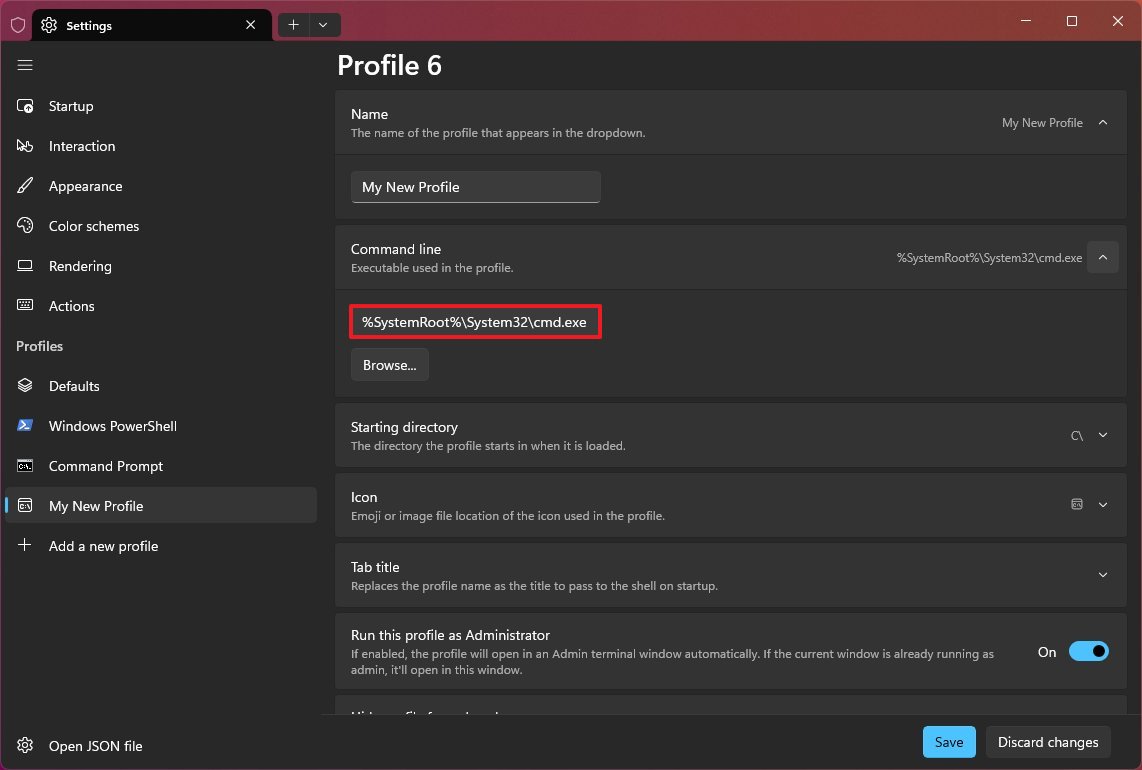
To specify the application to run in the profile, click the "Command line" setting, click the Browse button, select the executable (such as cmd.exe), click the Open button, and click the Save button.
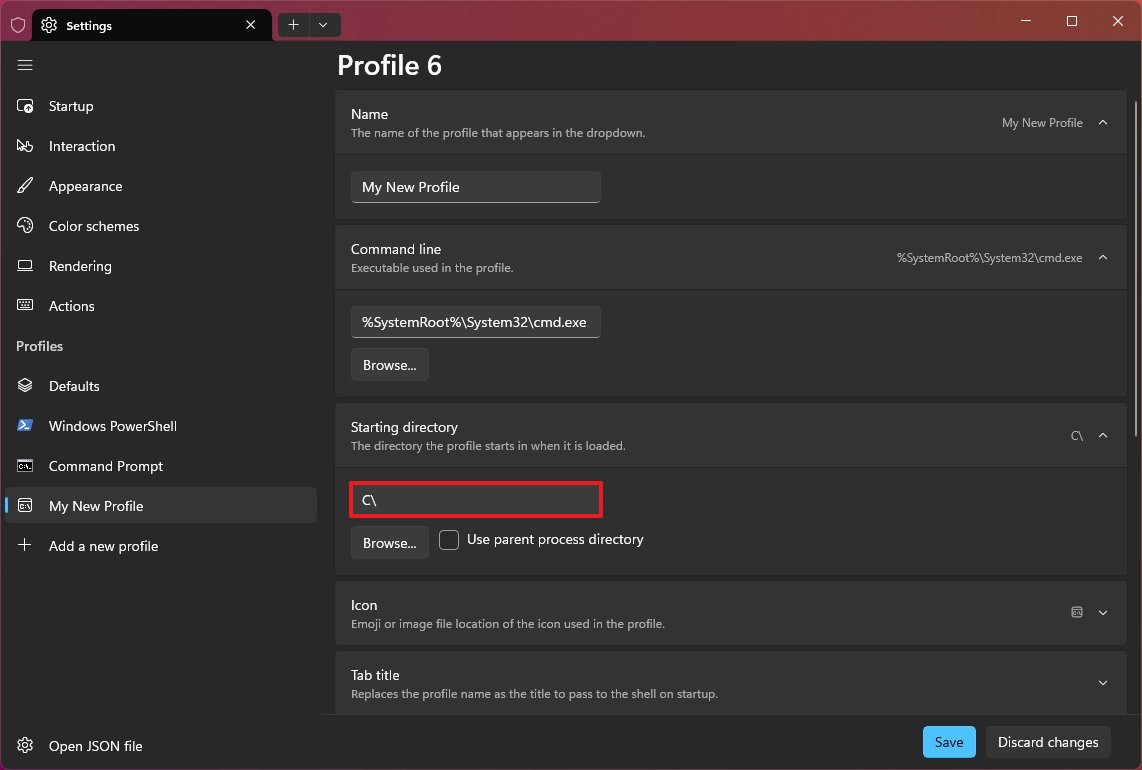
To specify the root directory to run the app, click the "Starting directory" setting, clear the "Use parent process directory" option, confirm the path, and click the Save button.
Optionally, you can also customize the appearance of the profile with a custom color scheme, font, cursor shape, background image, and more. (You can refer to the previous instructions outlined above to customize the experience.)
Delete profile
You can always delete those Windows Terminal profiles that are no longer needed on the system.
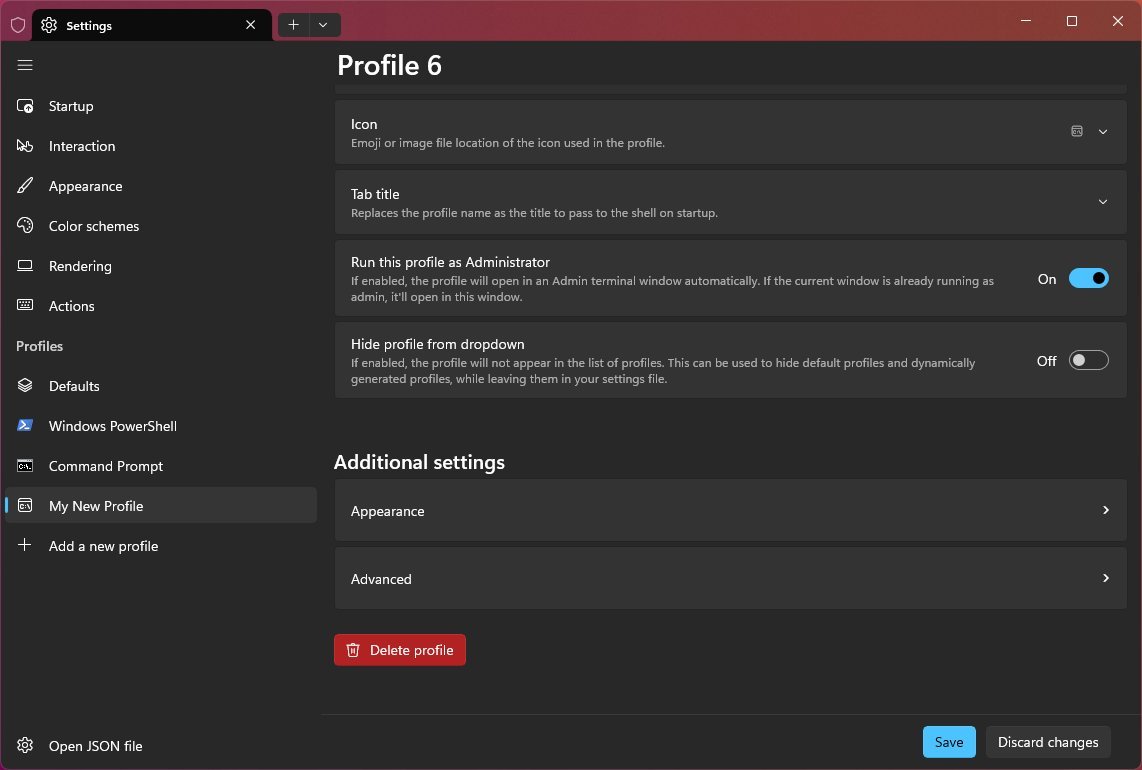
To delete a profile, open Settings, choose the profile from the left navigation pane, and click the Delete profile button (and the Yes, delete profile button to confirm).
Backup settings
Although the Windows Terminal doesn't include a backup feature, every configuration (settings, profiles, appearance, etc.) is stored in the "settings.json" file, which means that backing up this file allows you to protect your settings and quickly transfer your settings to another computer.
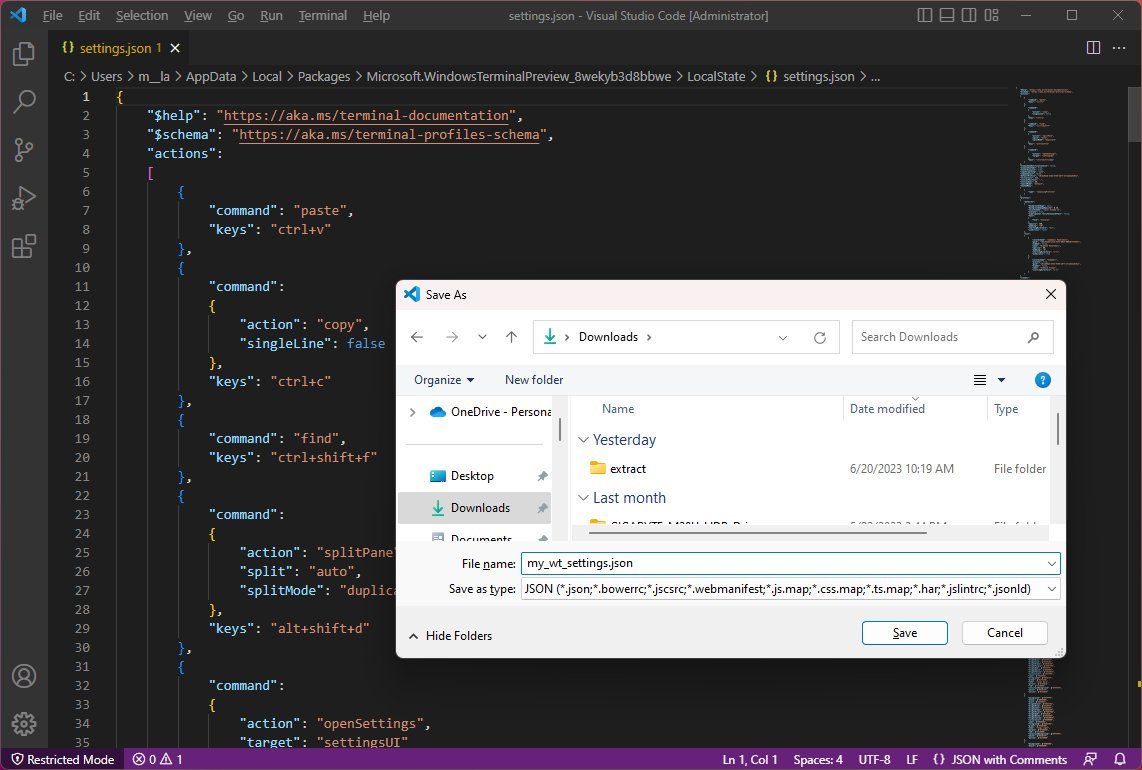
To back up the settings.json file, open Settings and click the "Open JSON file" button in the bottom-left corner of the navigation pane. Alternatively, you can use the "Shift + Control + ," keyboard shortcut to open the settings.json directly with the default text editor. Once the settings file opens in the text editor, you can click on File, choose the Save As option, confirm a descriptive name for the file (for example, my_wt_settings.json), and click the Save button.
Alternatively, you can copy the "settings.json" file from the %USERPROFILE%\AppData\Local\Packages\Microsoft.WindowsTerminalPreview_8wekyb3d8bbwe\LocalState path.
To restore the configuration settings, open Windows Terminal > Settings and click the "Open JSAON file" button in the bottom-left corner of the navigation pane. Open the settings.json file with Notepad or any other text editor, use the "Ctrl + A" keyboard shortcut to select everything from the file, and use the "Ctrl + C" shortcut to copy the content to the clipboard.
In the settings.json file, use the "Ctrl + A" keyboard shortcut to select everything, hit the Delete key to clear the file, and use the "Ctrl + V" shortcut to paste the settings from the backup and use the "Ctrl + S" shortcut to save and restore the settings. Finally, restart the Windows Terminal to complete the restoration.
More resources
For more helpful articles, coverage, and answers to common questions about Windows 10 and Windows 11, visit the following resources:
- Windows 10 on Windows Central — All you need to know
- Windows 11 on Windows Central — All you need to know

Mauro Huculak has been a Windows How-To Expert contributor for WindowsCentral.com for nearly a decade and has over 22 years of combined experience in IT and technical writing. He holds various professional certifications from Microsoft, Cisco, VMware, and CompTIA and has been recognized as a Microsoft MVP for many years.
