


There a lot of great things about Windows Mixed Reality, but the batteries in the controllers aren't one of them. Thanks to the wonder of 3D printing, and the ingenuity of one Thingiverse user named Nagorak, we now have a solution in the form of a Micro-USB rechargeable battery and a 3D printed backplate. This guide will take you through the steps you need to get there.
Products used in this guide
- Just a filler: Fake AA battery ($9 at Amazon)
- The power: Micro-USB Rechargeable AA size battery 14500UR75 ($11 at Ebay)
- Charging with length: 10ft Micro-USB cables - 2 Pack ($8 at Amazon)
A word of caution
Before we go any further, we have to note that this involves using your controllers in a way that they weren't originally intended, so there is a chance of damage. From what I've seen, there are no reports of anything going wrong, but you're still messing with electrics, so be warned! Of course, we take no responsibility if you damage your controller — it's all on you.
Step by Step
- Go to the Thingiverse web page.
- Click on the Thing files tab.
- Click on the WMR_Rechargeable_Flat_Bottom_-_Left and WMR_Rechargeable_Flat_Bottom_-_Right to download them
- Print both files standing up on their bottoms. They are flattened to allow this and shouldn't need supports.

- Place the Micro-USB Rechargeable AA size battery into the correct side of the controller. On the right-hand controller, it should go on the right side; on the left controller, it should go on the left. Both charging ports should be at the bottom of the controllers.
- Place the fake AA battery into the empty slot to complete the connection.
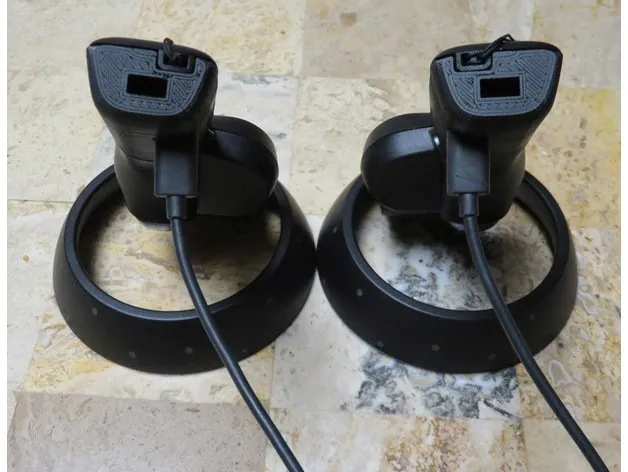
- Install the printed backs by angling them into the clips at the top and clicking them down into place. You should see the Micro-USB port through the 3D printed back.

- Plug the Micro-USB cables into your USB adapter or PC.
- Plug the other end of the Micro-USB cables into the controllers and check to see if the LED's light up. If they do, then it all worked!!

- If you need to re-sync your Controllers at any time, use the curved end of a paperclip and push it through the opening at the bottom of the 3D printed controller case. This will push the button buried deep inside the handle.
And there we have it. Nagarok tells us the battery lasts around 8.5 hours, which is less than you would get from the AA batteries you would typically use, but as long as you keep them charged, this won't be an issue. I wouldn't recommend trying to play with the controllers plugged in, however. That sounds like it would be a disaster.
Our top equipment picks
These are the mandatory or core equipment selections. Optional or ancillary equipment will follow.

A simple AA sized Micro-USB chargeable battery
This battery is recommended by the creator of this mod, Nagorak. It doesn't come with a Micro-USB lead, so you need to own one or purchase it separately
This rechargeable battery matches the power output and is shaped to fit in the Windows Mixed Controller correctly. Make sure you get the model numbered 14500UR75, as an incorrect purchase could wreck your controller.
Needed only to complete the connection
This battery is just to fill in a blank space. The creator of the mod said that you could use one of these, a screw, or some tinfoil, but I think we can all agree that these are the safest route.
Additional Equipment
These are not required as you may have them already, but if you don't, these extras will help you with the mod.

10ft Micro-USC cable - 2 pack ($8 at Amazon)
The battery you use in this modification doesn't come with the need cables, so this is a strong set for you to use.

Anker Elite adapter ($9 at Amazon)
The Anker Elite is my go-to wall adapter. It's perfect for charging your two modified controllers and just about anything else you want to charge.

