How to fix output audio problems on Windows 11
Are you dealing with audio problems on Windows 11? Use these troubleshooting tips to fix it.
All the latest news, reviews, and guides for Windows and Xbox diehards.
You are now subscribed
Your newsletter sign-up was successful
On Windows 11, the day may come when your computer suddenly stops playing audio. If this happens, many things could be the problem. It could be an issue with the physical and wireless connection, misconfiguration settings, hardware conflict, outdated or damaged audio adapter driver, issues with audio features, etc.
Whatever the problem might be, on Windows 11, you can perform various troubleshooting steps to resolve the issue quickly.
This guide will walk you through the different ways to troubleshoot and fix output audio problems on Windows 11.
How to troubleshoot and resolve audio issues on Windows 11
On Windows 11, you have many troubleshooting steps to fix audio problems, whether you use speakers, headphones, headsets, or any other output device.
Check physical connections
It might be obvious, but if you are dealing with audio problems, you first want to restart the computer as the issue could be something (such as a background service) not working as expected in the current session.
In addition, you also want to check the physical connection between the speakers or headphones with the computer, as the problem could be a loose or damaged cable or the plugs are not fully connected. If the connection seems fine, try unplugging and replugging the cables.
All the latest news, reviews, and guides for Windows and Xbox diehards.
Also, make sure that you're using the audio port. If you cannot make out the port, it's best to check your device manufacturer documentation for more specific details. Usually, speakers use a 5mm jack connection and should be plugged into the green port.
Furthermore, make sure that the output device receives power and is powered on (if applicable).
If you have multiple output devices connected, disconnect all the devices and only connect the one you want to use. Try a different port and avoid using a USB hub if this is a USB device.
Check Bluetooth connection
If the headphones, headsets, or speakers use a Bluetooth connection, you must confirm that Bluetooth is enabled on your device. In the case that the problem is the wireless connection, you may want to unpair and pair the device one more time to fix the issue.
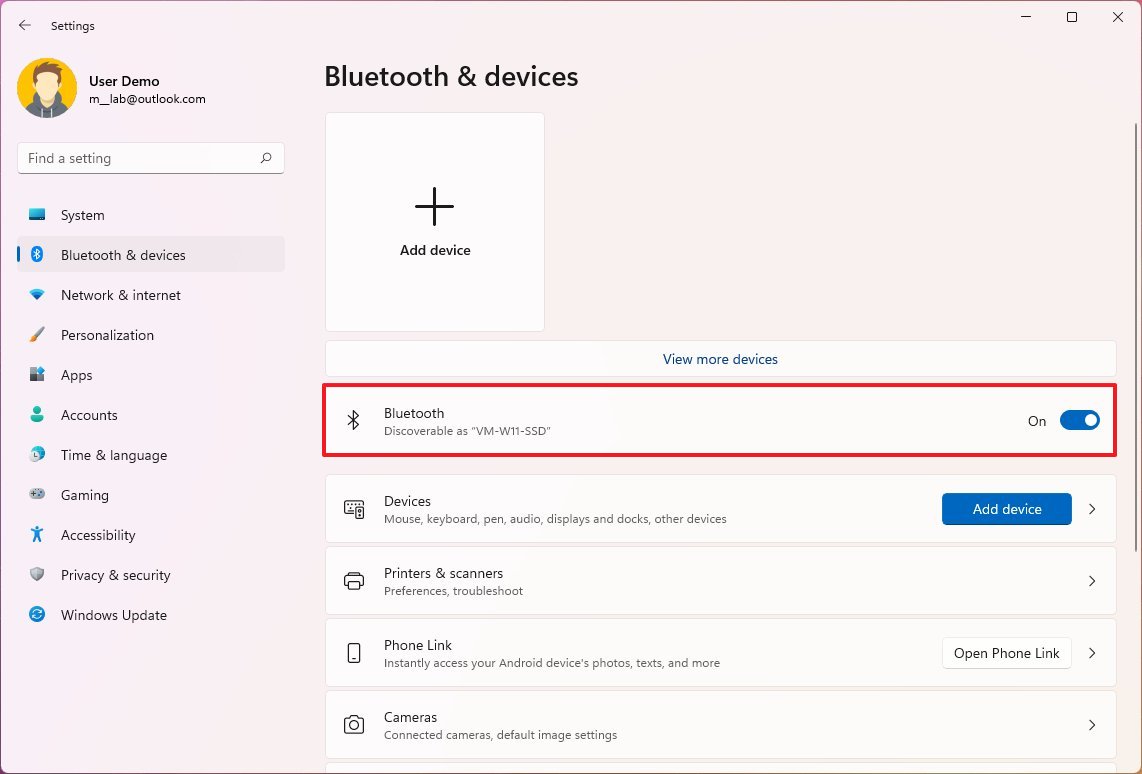
Turn on Bluetooth on your computer
To turn on Bluetooth on your computer, use these steps:
- Open Settings.
- Click on Bluetooth & devices.
- Turn on the Bluetooth toggle switch.
Once you complete the steps, the audio device should be able to connect to the computer.
Reconnect Bluetooth audio device
To disconnect and reconnect a Bluetooth audio device on Windows 11, use these steps:
- Open Settings.
- Click on Bluetooth & devices.
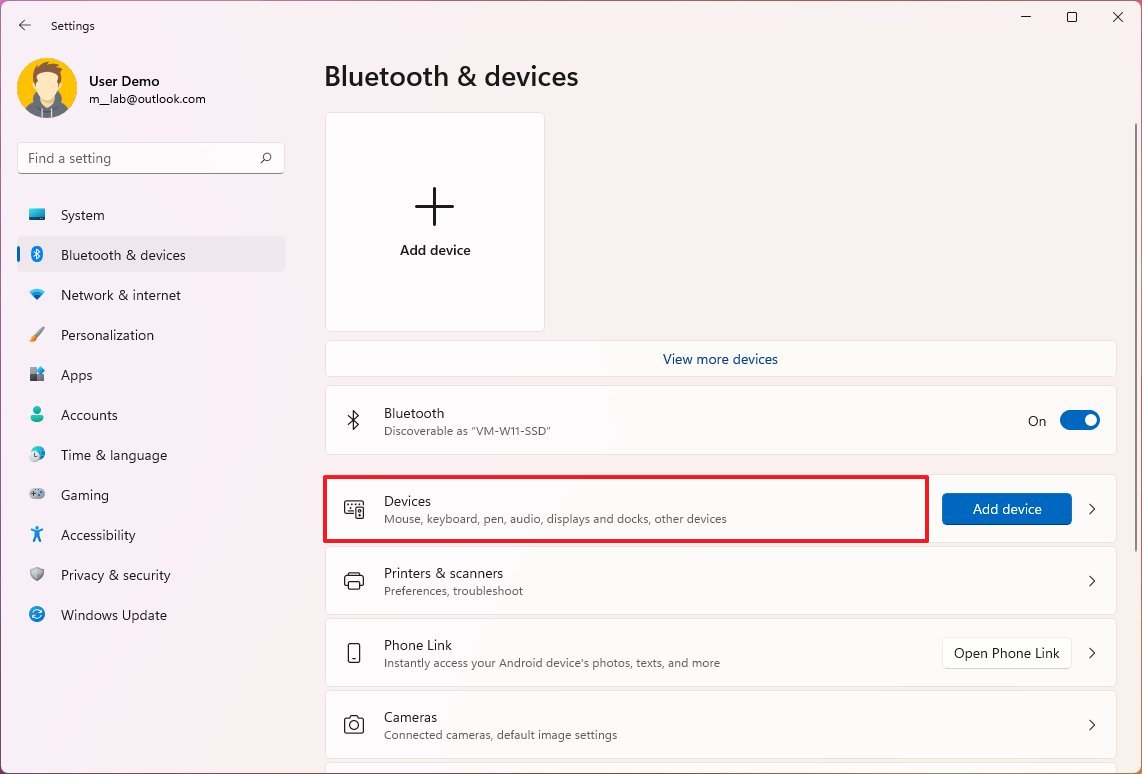
- Click the Devices page on the right side.
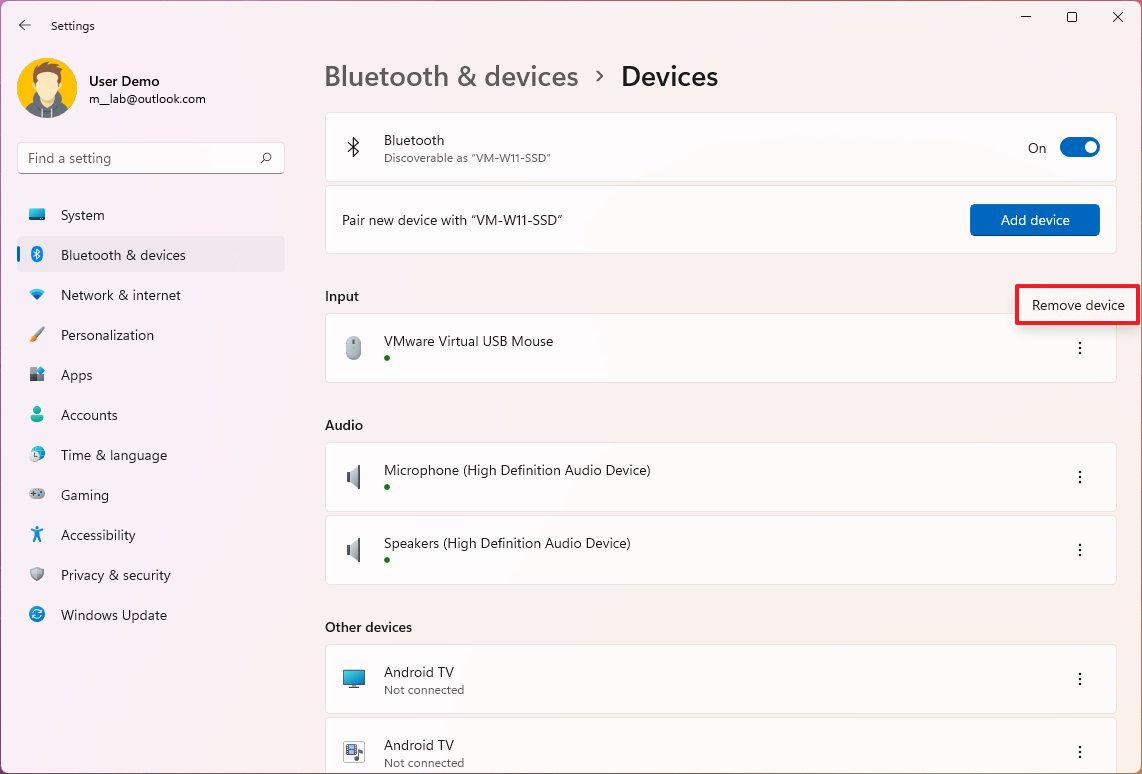
- Click the menu (three-dotted) button on the right of the device and select the Remove device option.
- Click on Bluetooth & devices again.
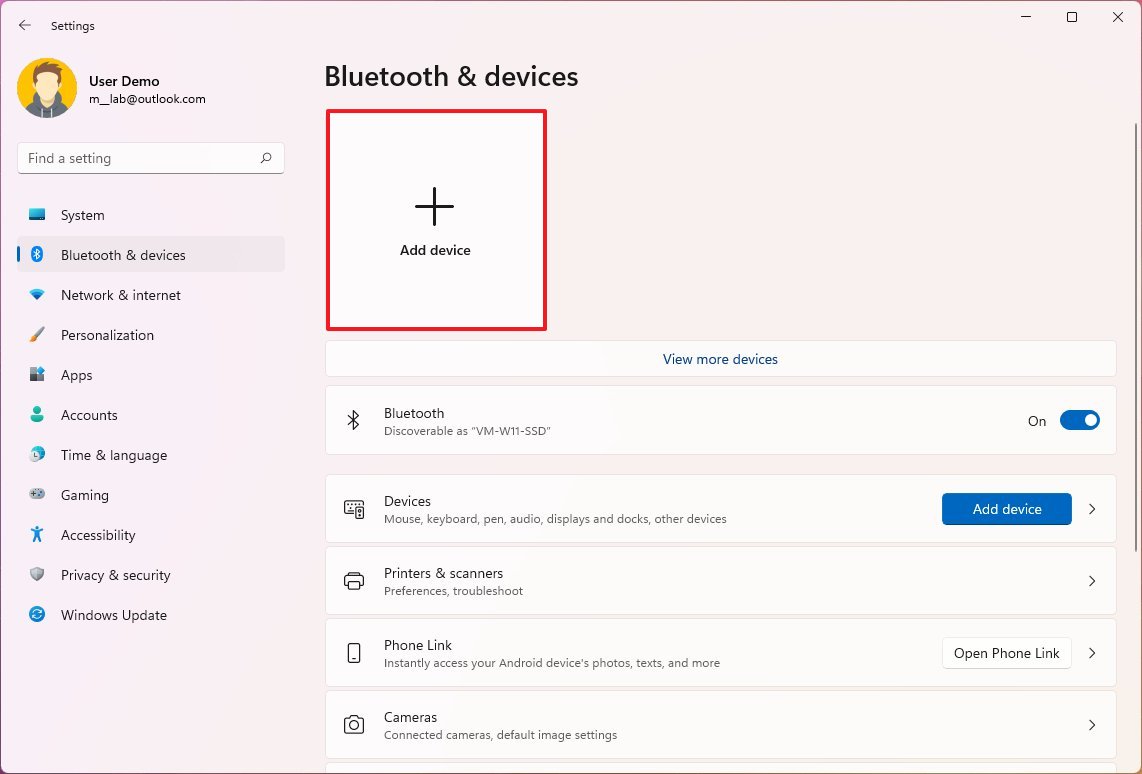
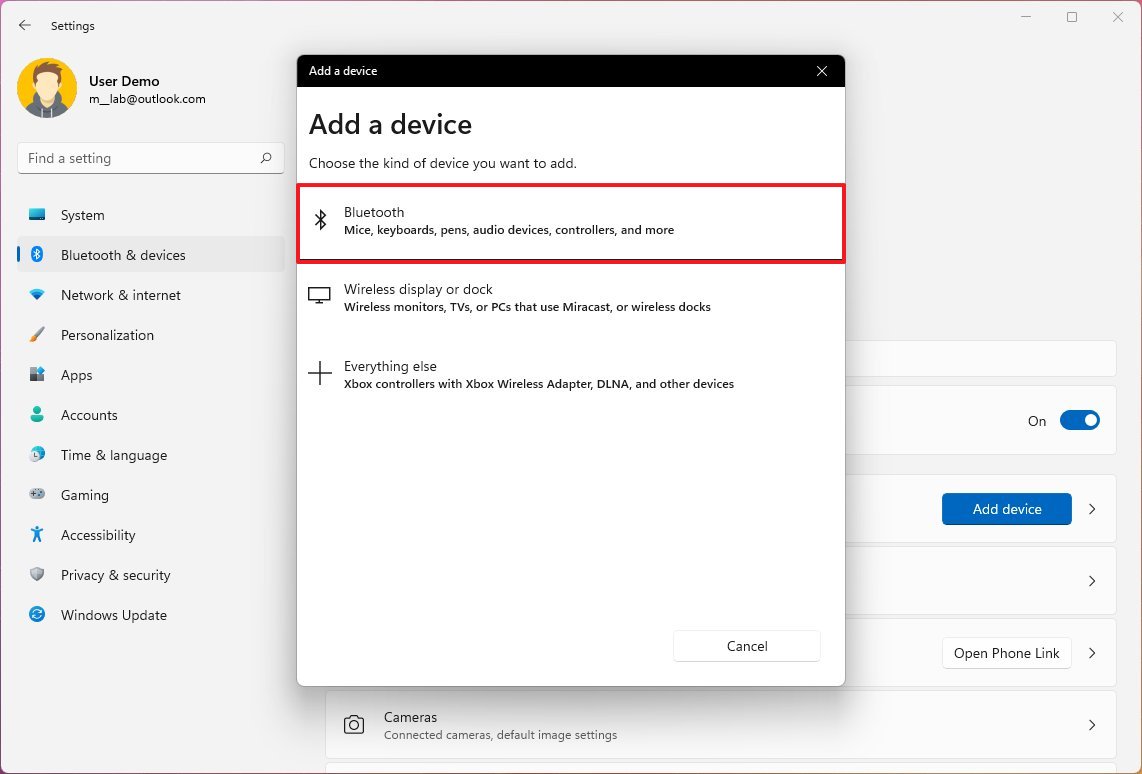
- Click the Add device option.
- Select the Bluetooth option.
- Turn on the audio device and put it in pair mode, according to the device documentation.
- Select the audio device from the list.
- Continue with the on-screen directions (if applicable).
After you complete the steps, the sound device should start working again on Windows 11.
Change speaker output
You must confirm that the correct device is selected if you have multiple output devices.
To change the default speakers on Windows 11, use these steps:
- Open Settings.
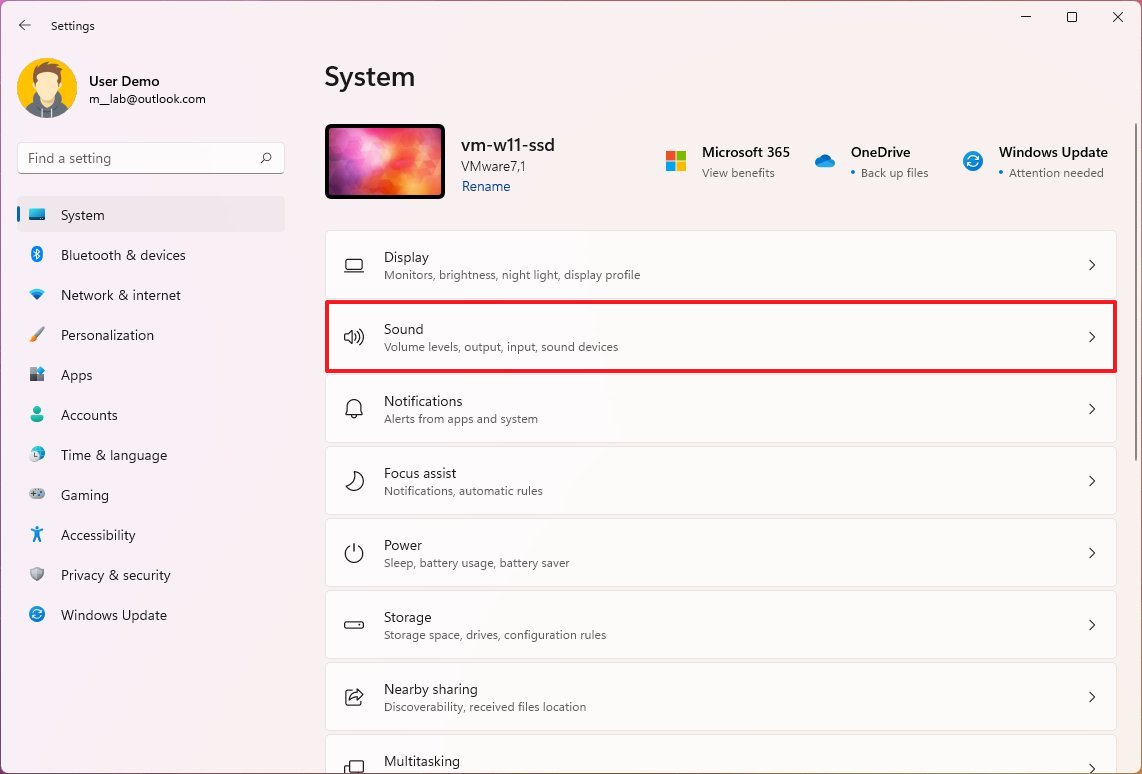
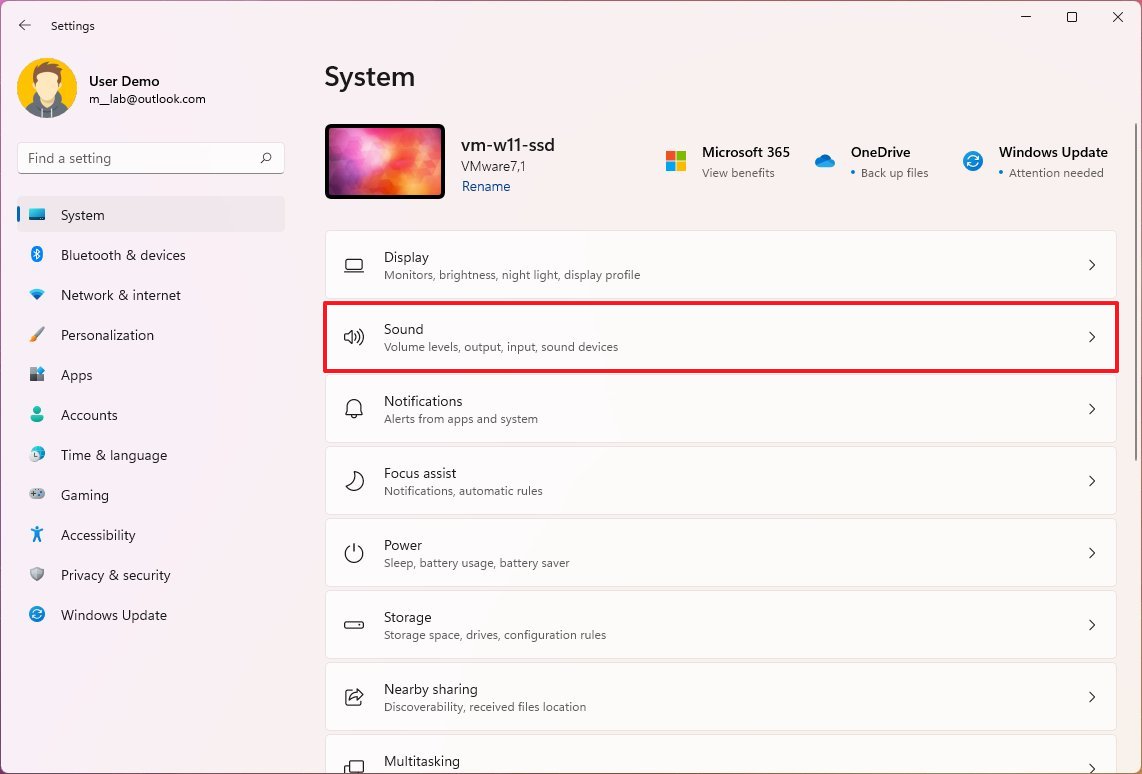
- Click on System.
- Click the Sound page on the right side.
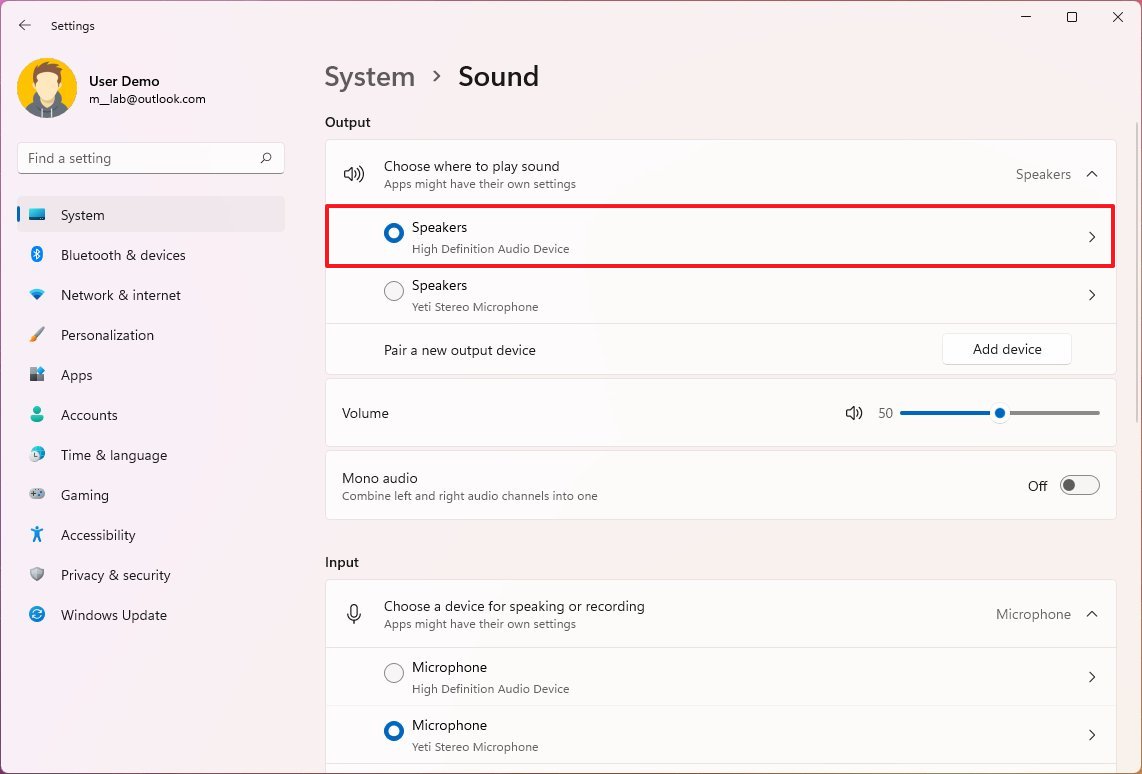
- Under the "Output" section, click the "Choose where to play sound" setting.
- Select the speakers, headphones, or headsets you want to use.
Alternatively, you can change the default output device by opening the Quick Settings flyout (Windows key + A keyboard shortcut), clicking the Manage audio devices button next to the volume slider, and selecting the device.
Run audio troubleshooter
On Windows 11, troubleshooters are applications that can automatically diagnose and fix common problems, and you can use the "Playing Audio" troubleshooter to resolve audio issues.
To fix common audio problems on Windows 11, use these steps:
- Open Settings.
- Click on System.
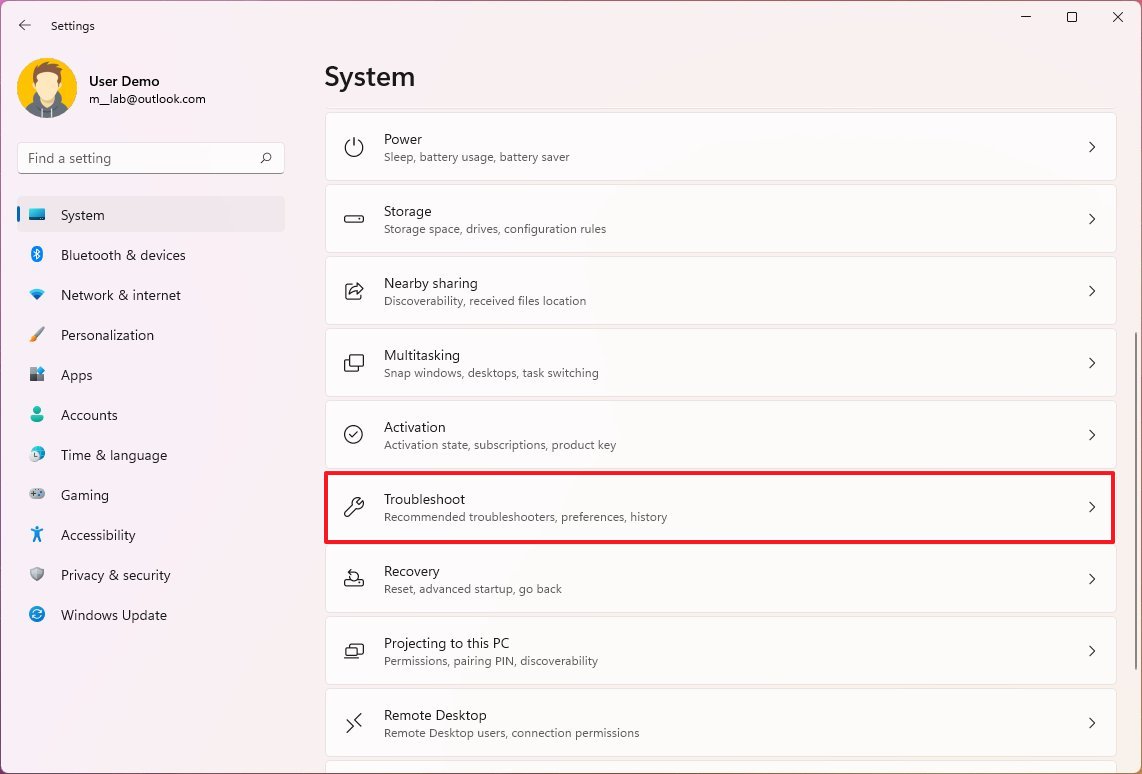
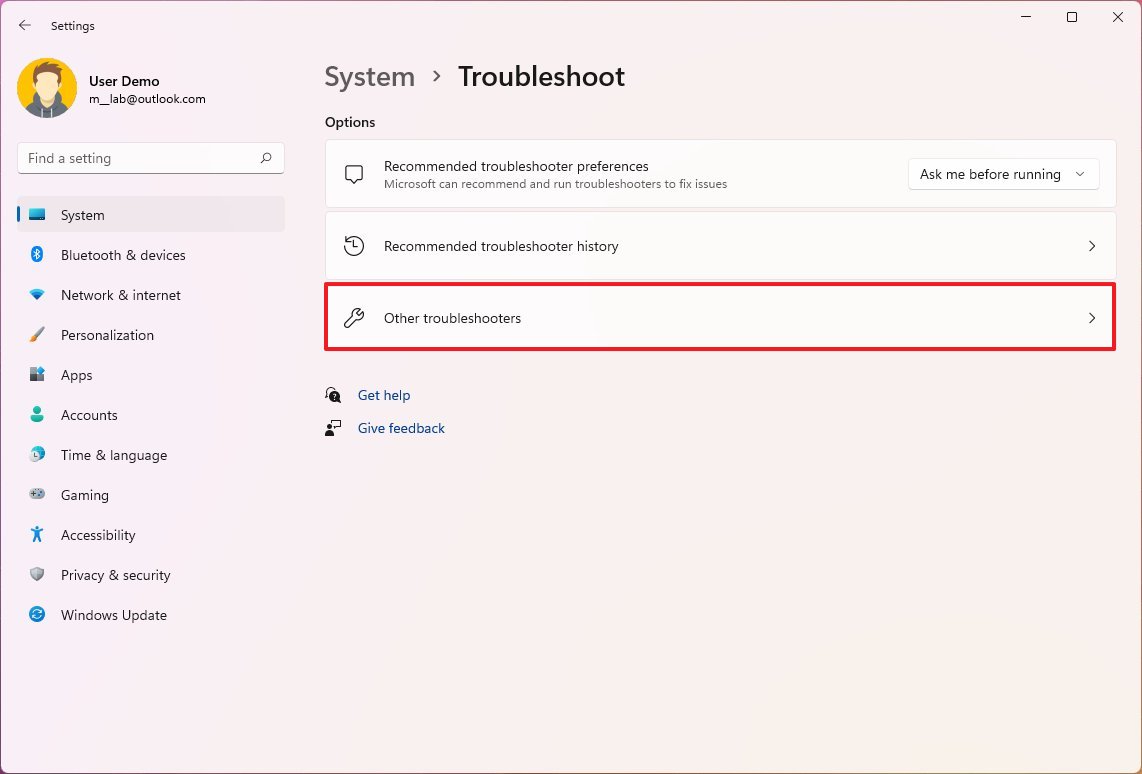
- Click the Troubleshoot page on the right side.
- Click the Other troubleshooters setting.
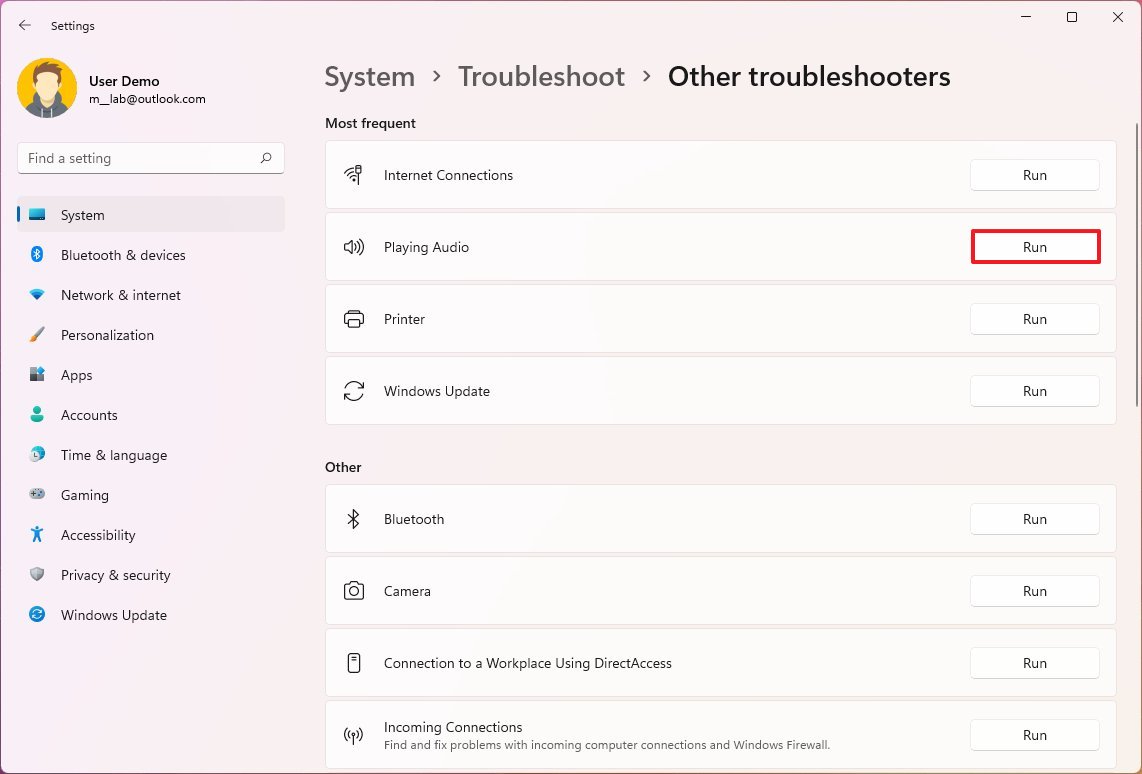
- Under the "Most frequent" section, click the Run button for the "Playing Audio" setting.
- Continue with the on-screen directions (if applicable).
Once you complete the steps, the application will run different scripts to fix the problem. If the audio issue persists, continue with the steps below.
Install system updates
Sometimes if there is a known issue with the system or driver, the latest update may include a fix for audio output devices.
To check for updates on Windows 11, use these steps:
- Open Settings.
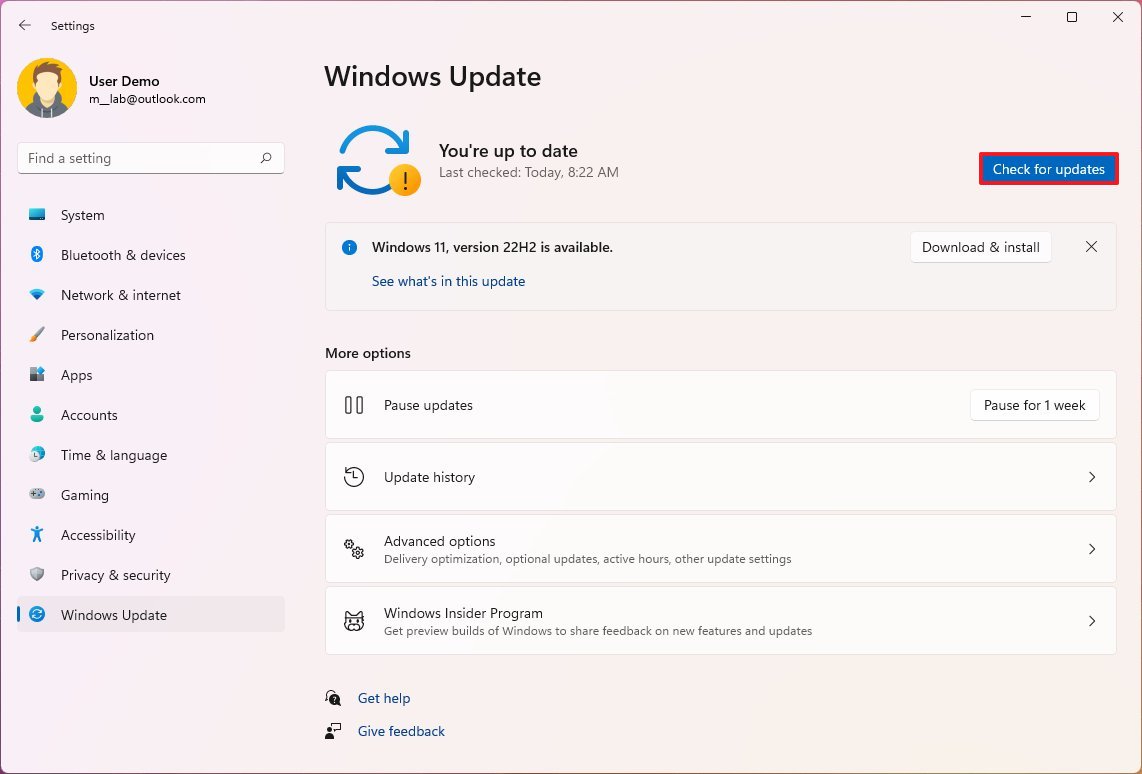
- Click on Windows Update.
- Click the Check for updates button.
- Click the Restart now button (if applicable).
After you complete the steps, test the speakers one more time to confirm whether they are working.
Fix audio adapter driver
Outdated or malfunctioning drivers can cause problems with audio devices and other hardware. When dealing with audio issues, you want to confirm that the computer has the latest driver updates. If the driver isn't working as expected, uninstalling and reinstalling it can resolve the problem. If you recently updated the audio driver, rolling back to the previous version can fix the issue.
Update audio driver
To install the latest audio driver update, use these steps:
- Open Settings.
- Click on Windows Update.
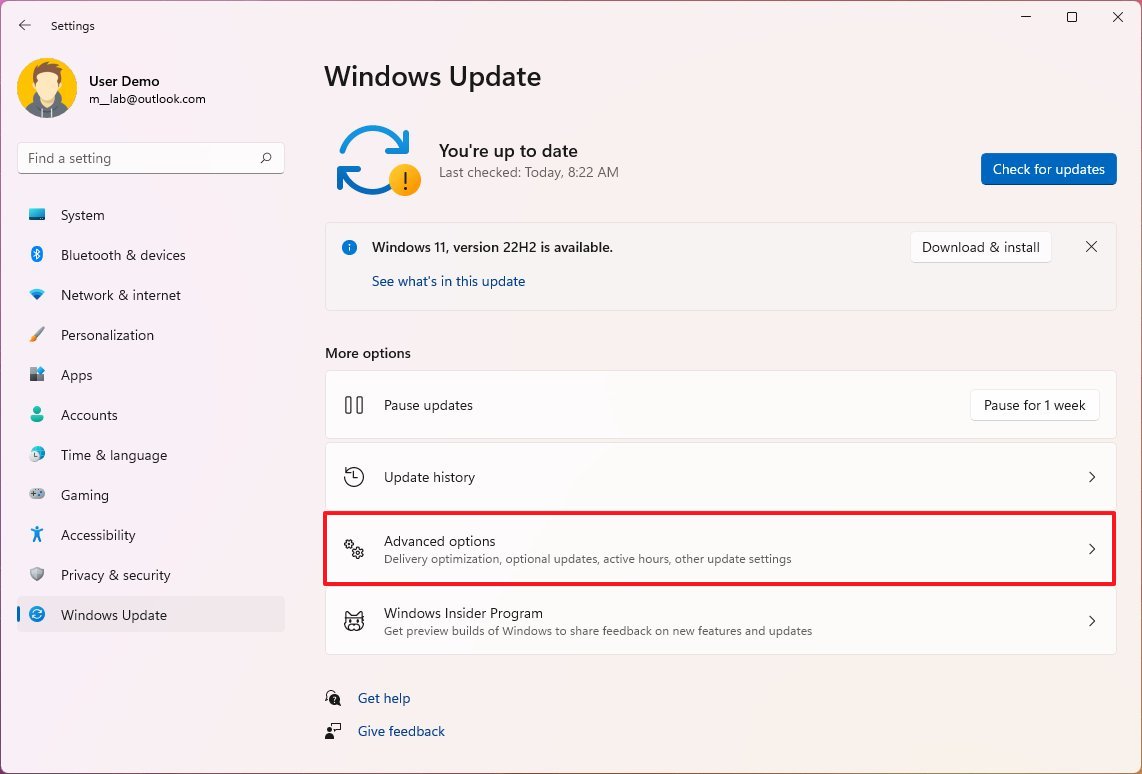
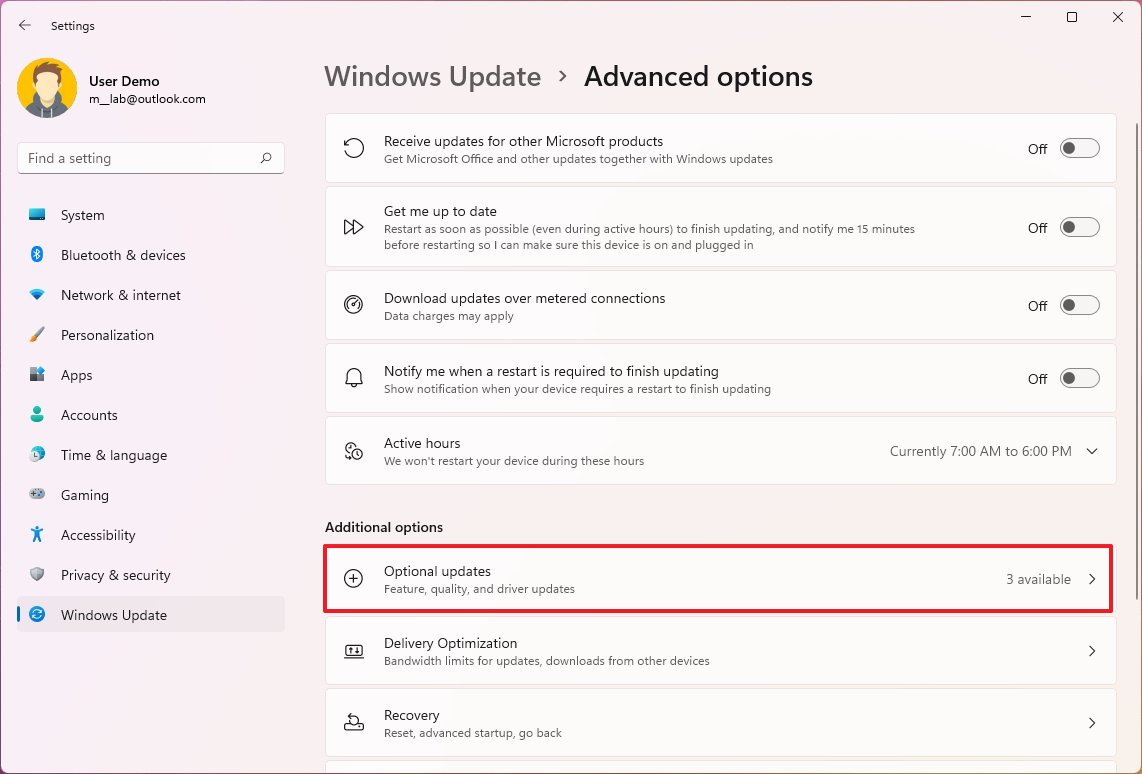
- Click the Advanced options setting.
- Under the "Additional options" section, click the Optional updates setting.
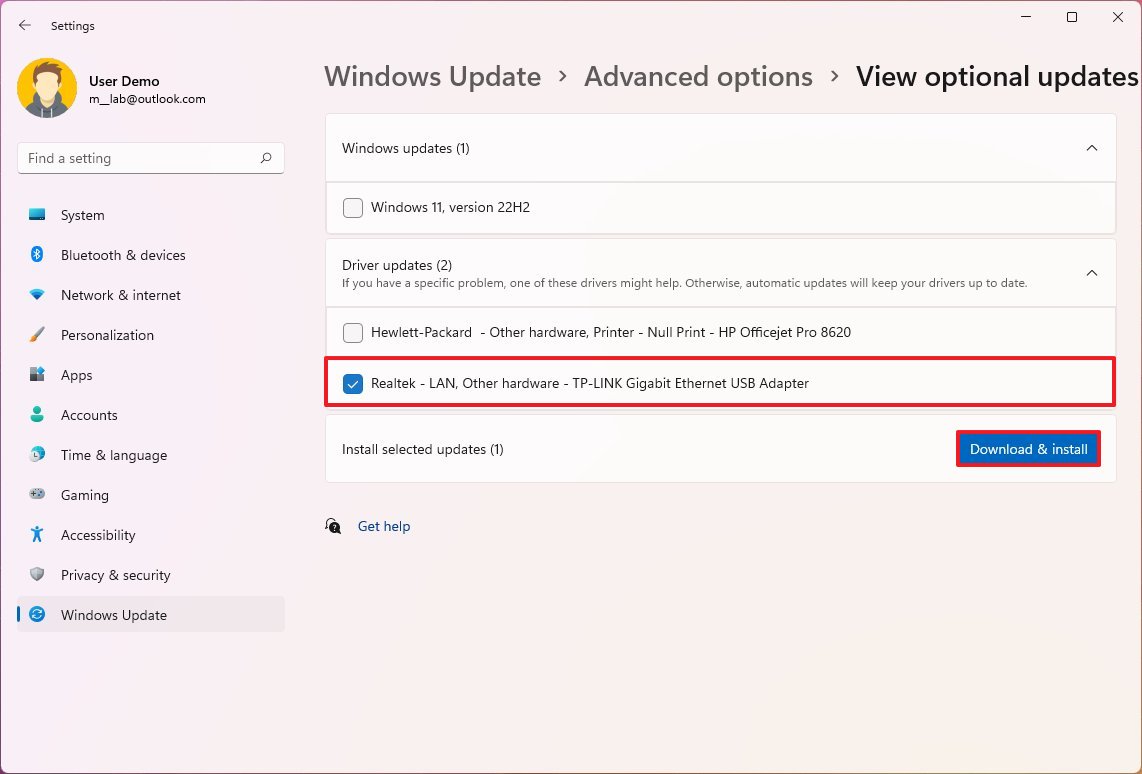
- Click the Driver updates setting.
- Select the driver update for the audio device.
- Click the Download & install button.
Once you complete the steps, the driver will update to the latest version and hopefully fix the problem.
Uninstall audio driver
To uninstall a specific audio device driver on Windows 11, use these steps:
- Open Start.
- Search for Device Manager and click the top result to open the app.
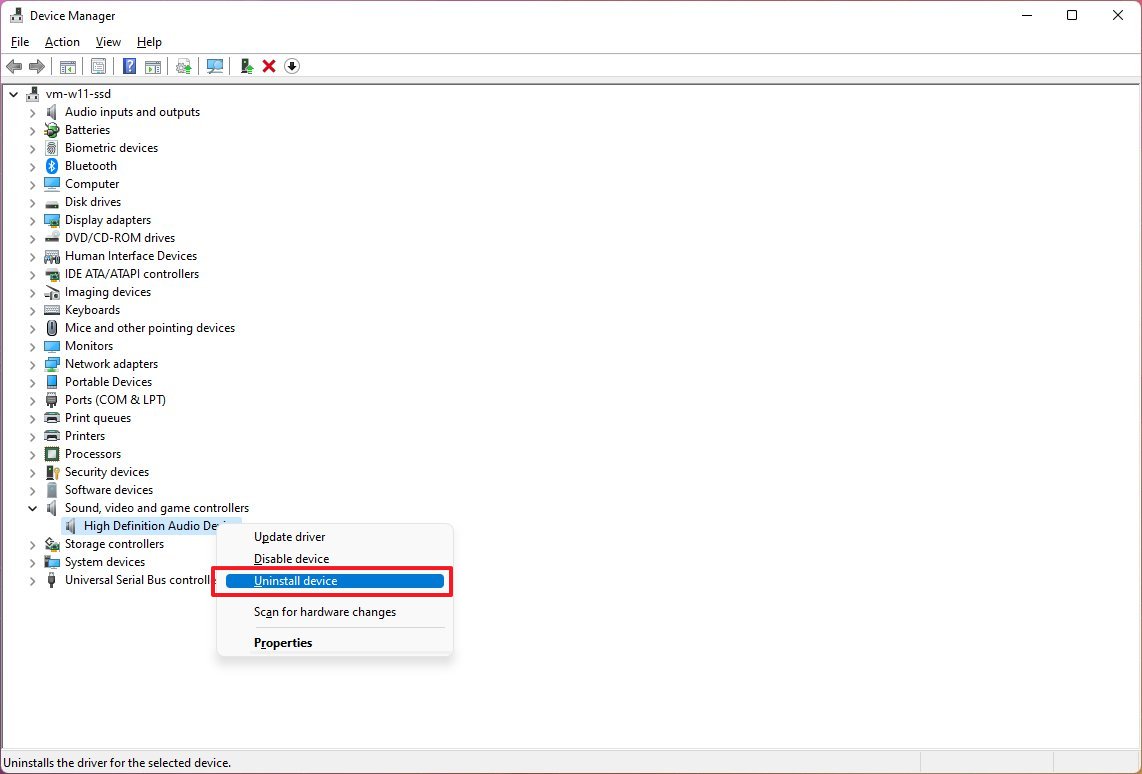
- Expand the "Sound, video and game controllers" category.
- Right-click the audio device and select the Uninstall device option.
- Click the Uninstall button again.
- (Optional) Right-click the "IDT High Definition Audio CODEC" and select the Uninstall device option.
- Quick note: Sometimes, the problem could be an issue with this particular codec, and uninstalling it will allow the system to reconfigure it to fix the sound problem.
- Click the Uninstall button.
- Restart the computer.
After you complete the steps, the system will try to reinstall the driver automatically.
If Device Manager shows that hardware isn't installed, you may need to check for driver updates with the steps outlined above. You may also need to check your manufacturer support website to download and install the latest driver update.
Roll back audio driver
To roll back the audio driver to the previous version, use these steps:
- Open Start.
- Search for Device Manager and click the top result to open the app.
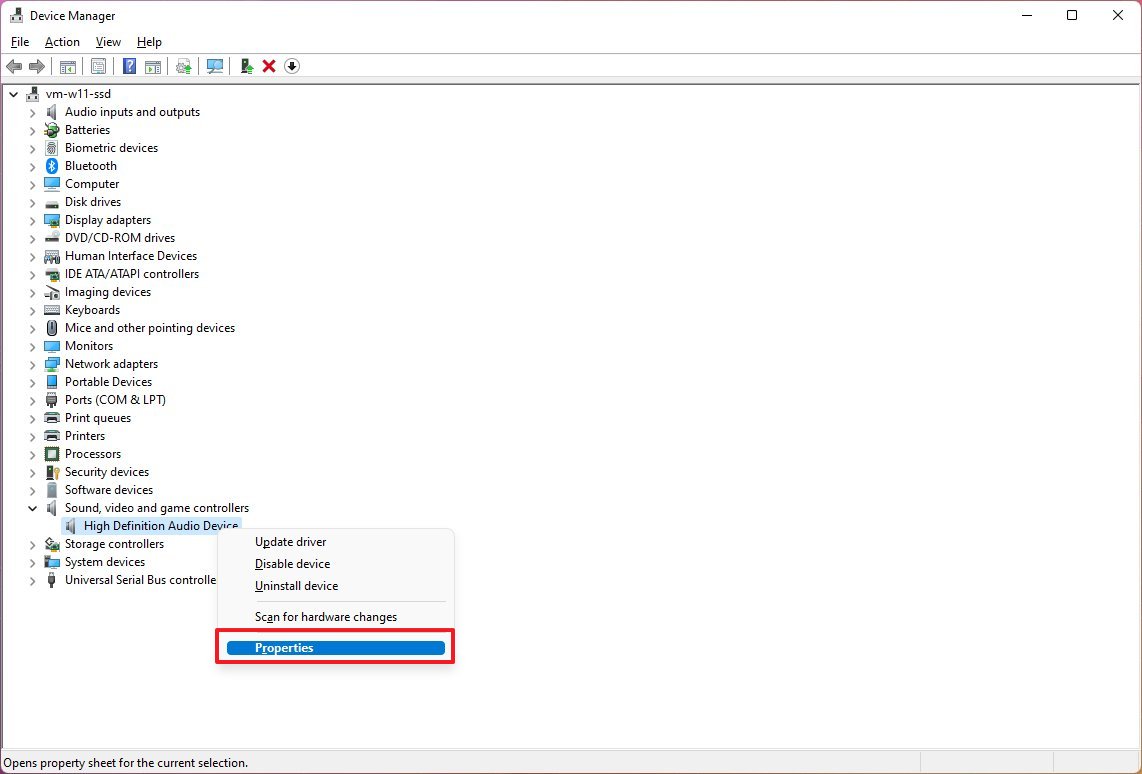
- Expand the "Sound, video and game controllers" category.
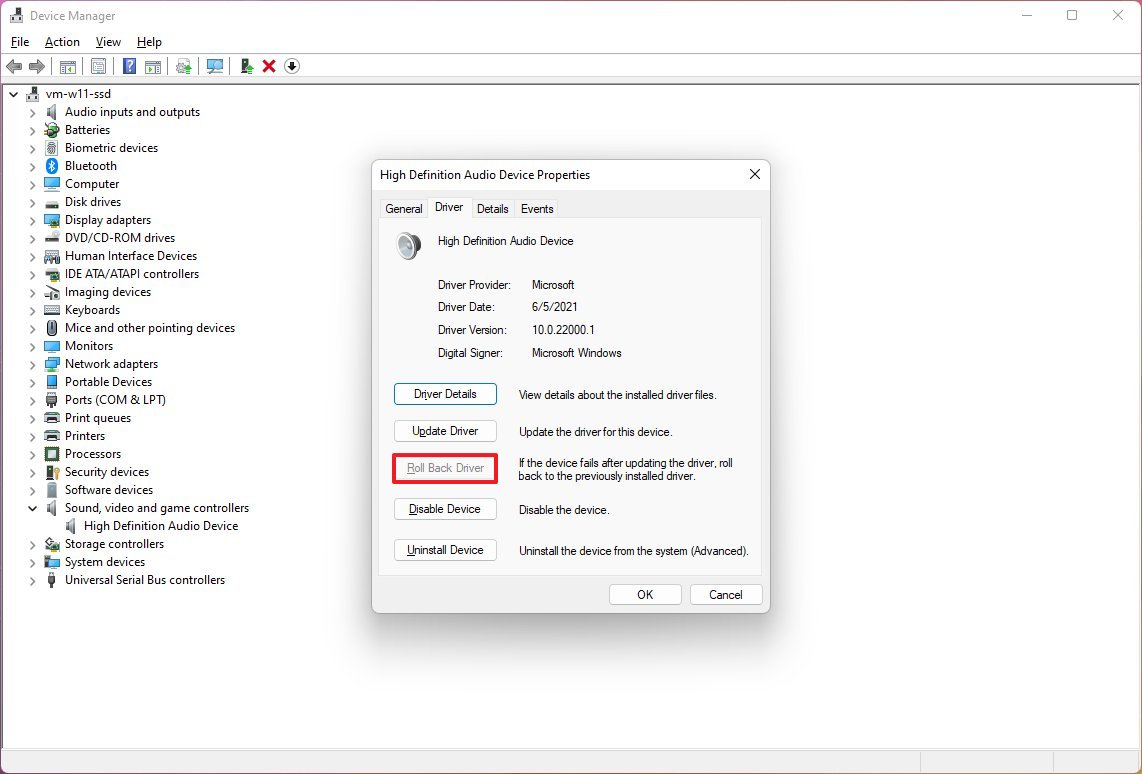
- Right-click the audio device and select the Properties option.
- Click the Driver tab.
- Click the Roll Back Driver button.
- Quick note: If the option is grayed out, the system doesn't have any versions of the previous driver.
- Continue with the on-screen directions.
- Click the Yes button.
Once you complete the steps, the driver will roll back to the previous version when the audio device was still working.
Check sound settings
If the speakers, headphones, or headsets are not outputting any sound, some settings may be misconfigured on Windows 11.
To confirm that the output adapter is enabled, the audio is not muted, and apps are configured correctly, use these steps:
- Open Settings.
- Click on System.
- Click the Sound page on the right side.
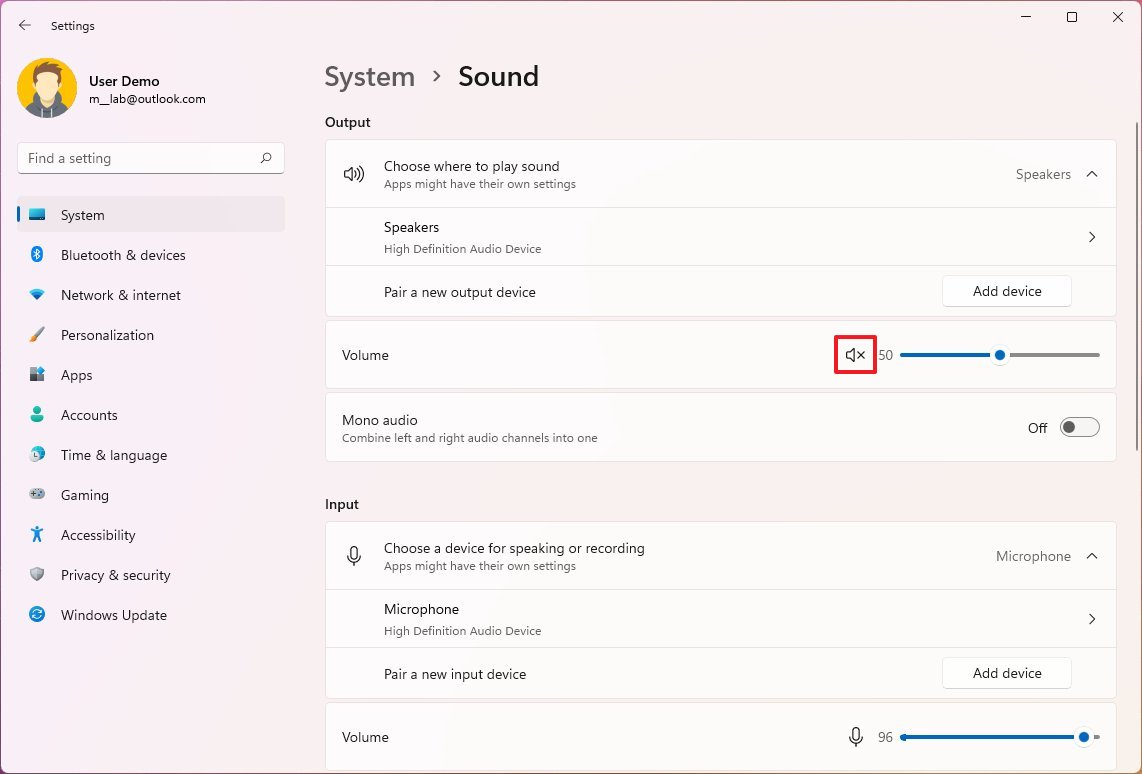
- Under the "Output" section, confirm the master audio isn't muted or very low.
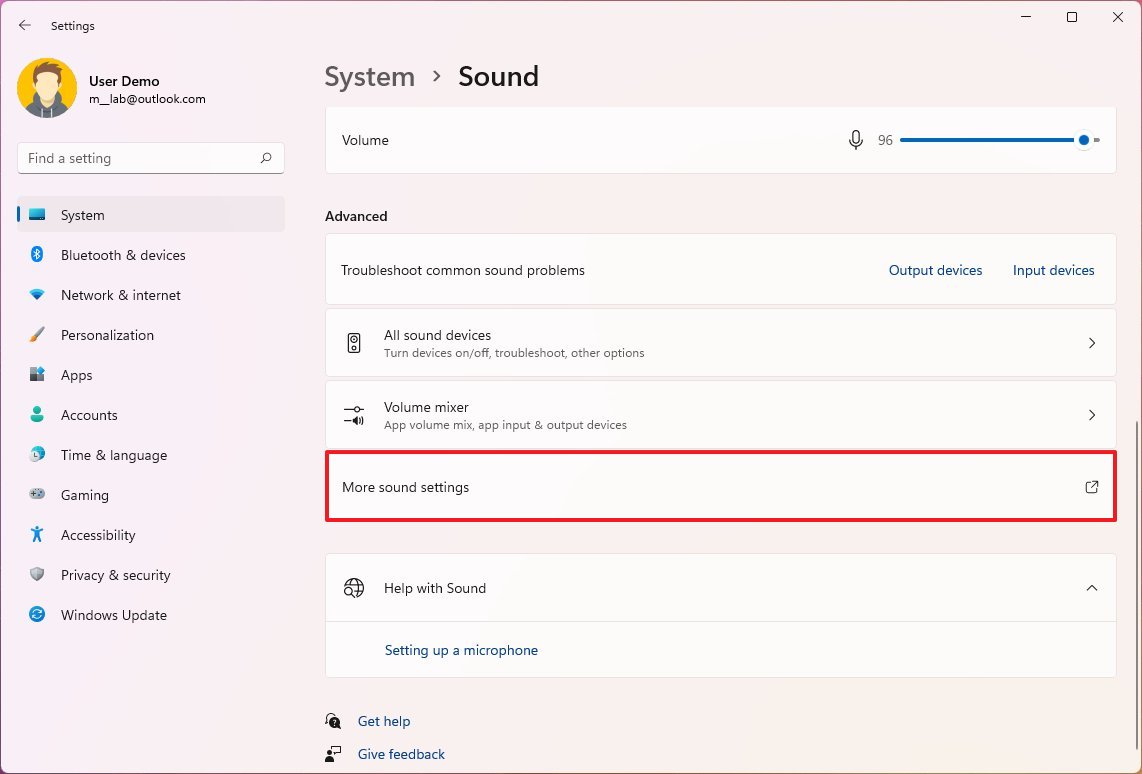
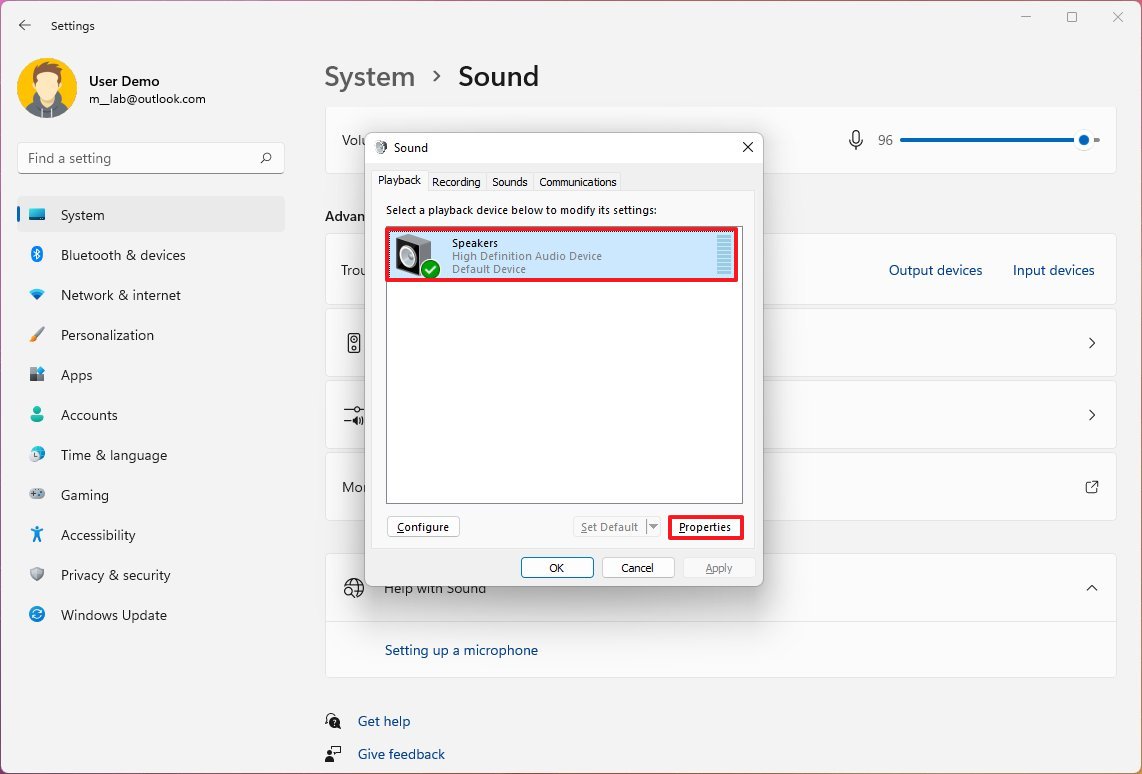
- Under the "Advanced" section, click the "More sound settings" option if the audio device is missing.
- Click the Playback tab.
- Select the audio device.
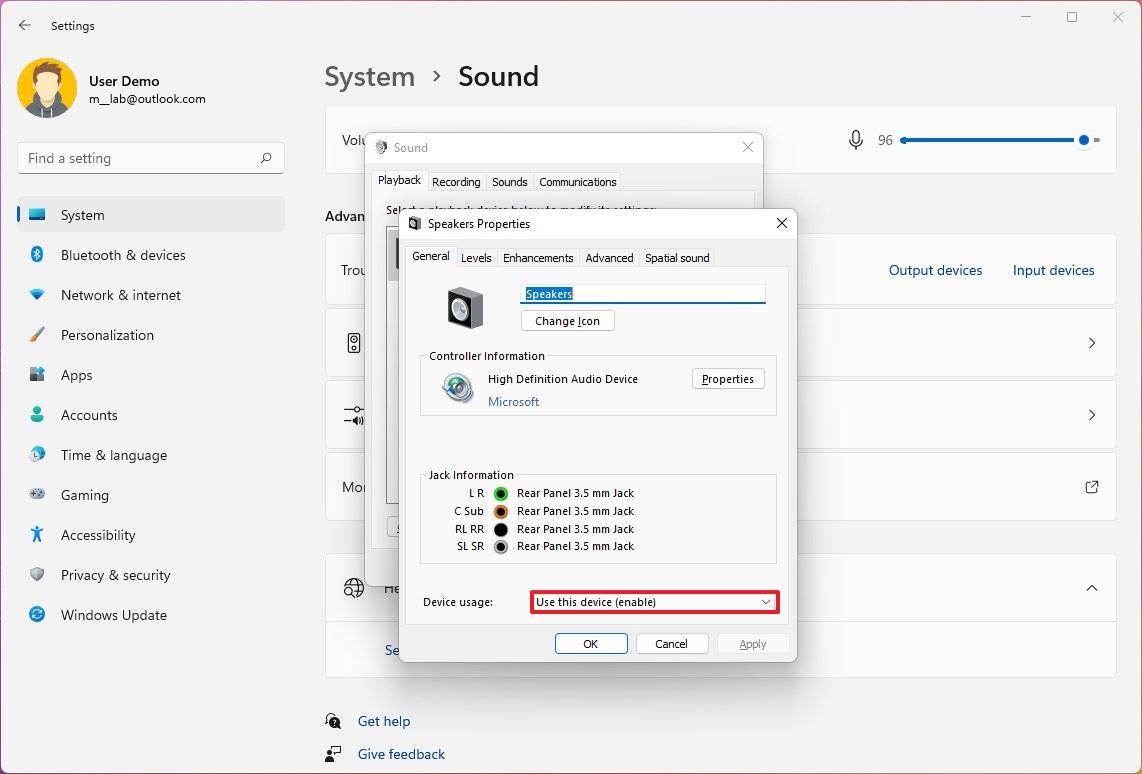
- Click the Properties button.
- Select the Use this device (enable) option in the "Device usage" setting.
- Click the Apply button.
- Click the OK button.
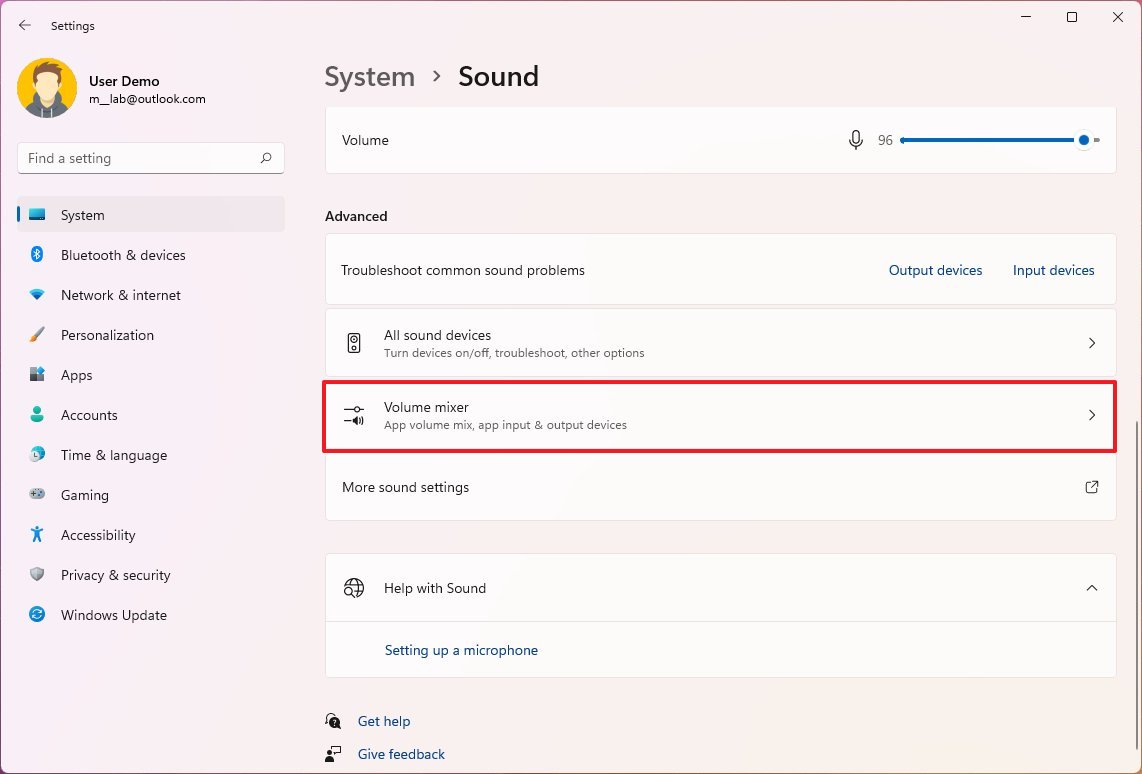
- Under the "Advanced" section, click the Volume mixer setting.
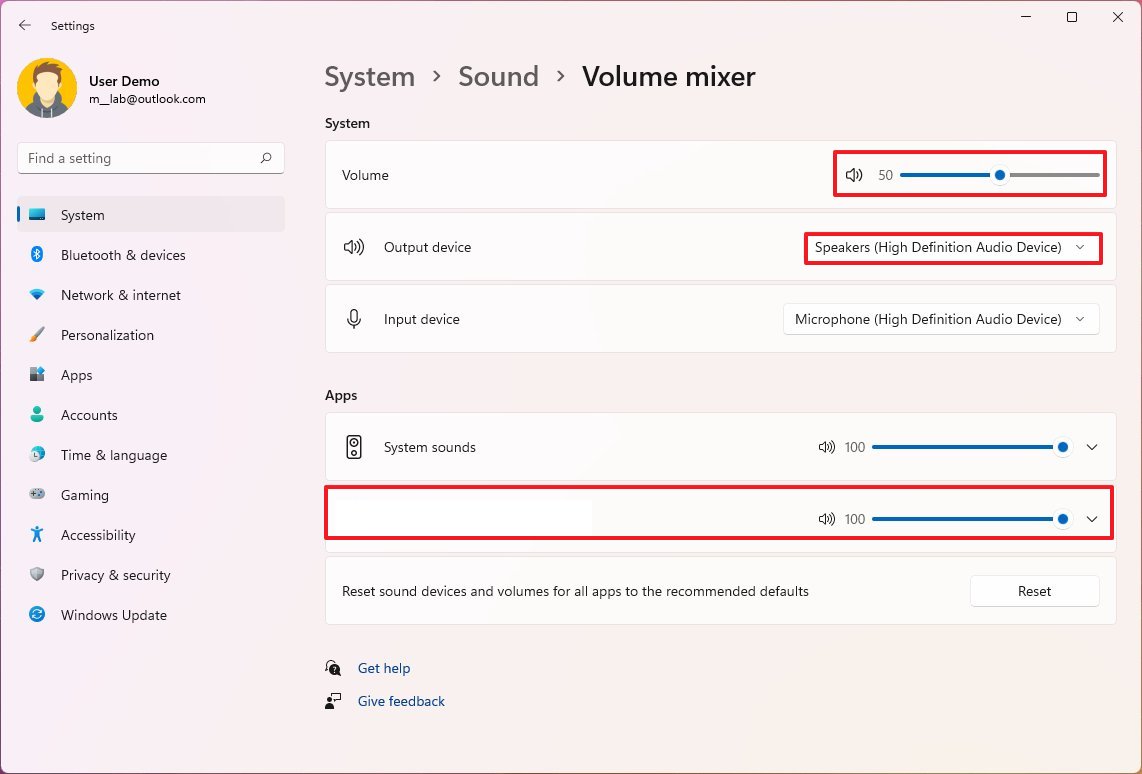
- Under the "Volume" section, confirm the audio isn't muted or very low.
- Check that the sound output is set to the correct speakers, headphones, etc., using the "Output device" setting.
- Under the "Apps" section, confirm the audio isn't muted or very low.
- (Optional) Click the Apps setting and make sure that the app is outputting the audio to the correct hardware.
After completing the steps, perform an audio test to ensure the problem has been fixed.
Disable audio enhancements
Sometimes the audio enhancements features can cause problems. If you suspect those settings are the root of the problem, you should disable these settings.
To disable audio enhancement settings on Windows 11, use these steps:
- Open Settings.
- Click on System.
- Click the Sound page on the right side.
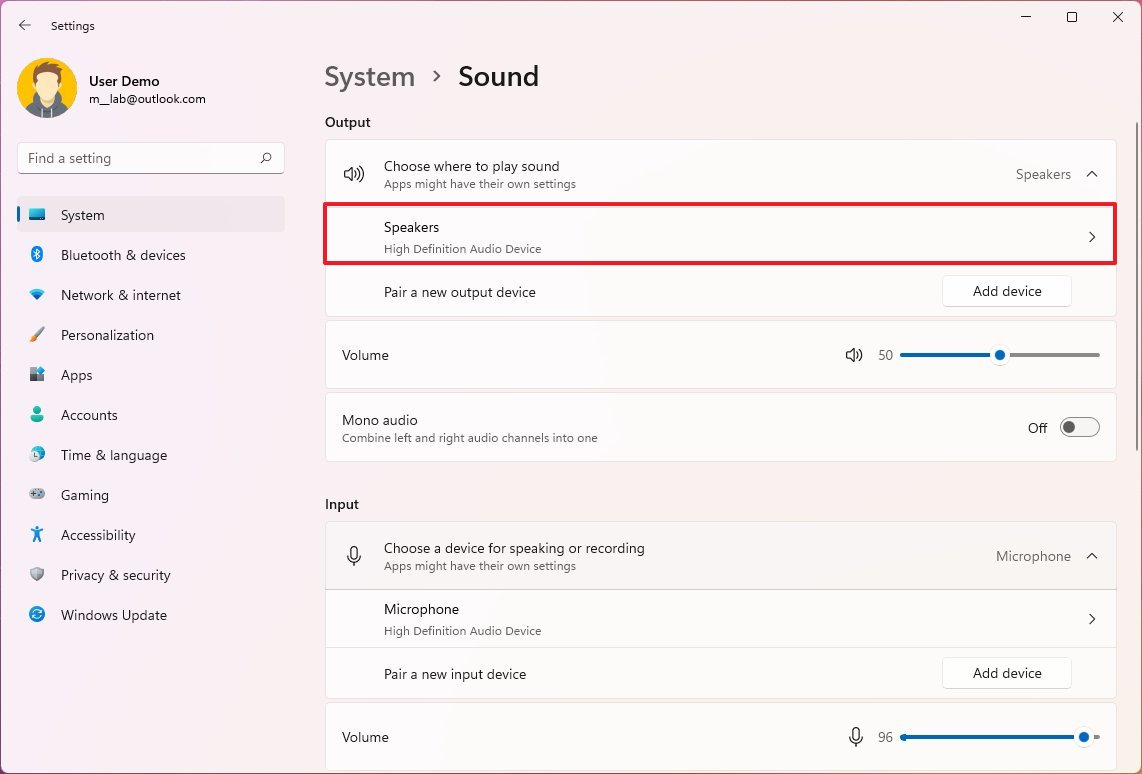
- Under the "Output" section, select the speakers setting.
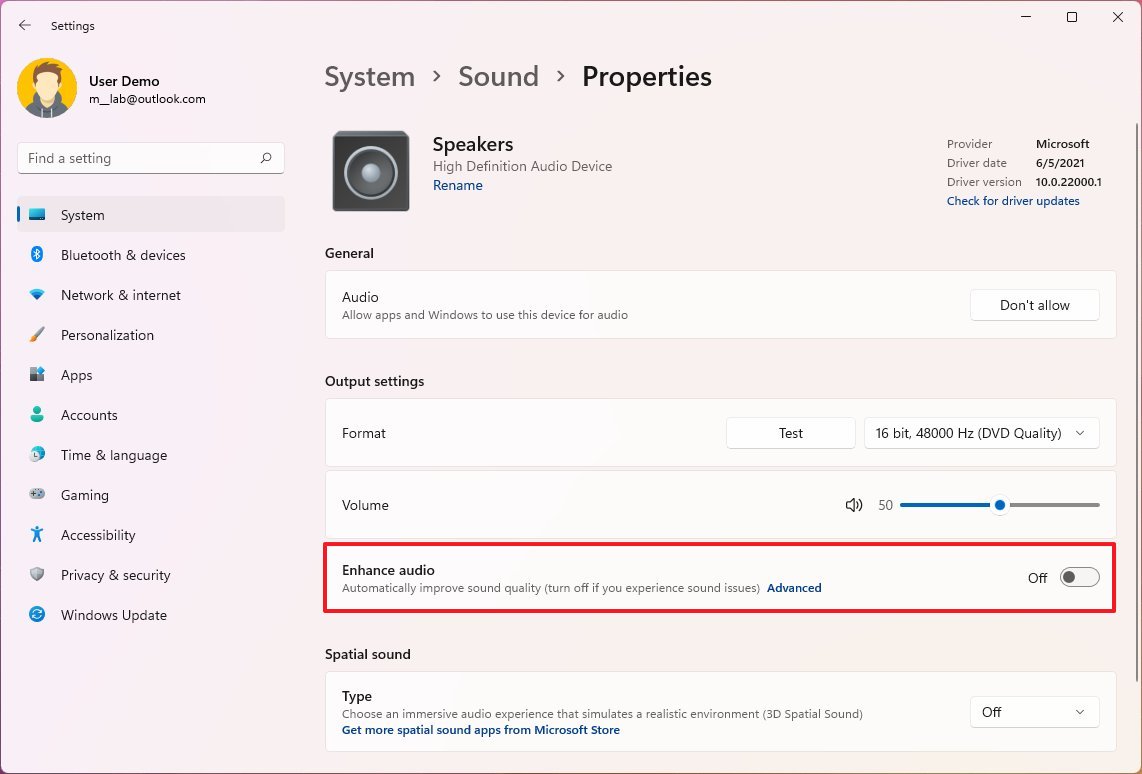
- Under the "Output settings" section, turn off the Enhance audio toggle switch.
Once you complete the steps, you may want to keep those sound settings disabled if the audio works normally.
Set a different audio format
Also, you can try to change the sample rate and bit depth settings to make sure that the current audio format is causing the problem.
To change the audio format on Windows 11, use these steps:
- Open Settings.
- Click on System.
- Click the Sound page on the right side.
- Under the "Output" section, select the speakers setting.
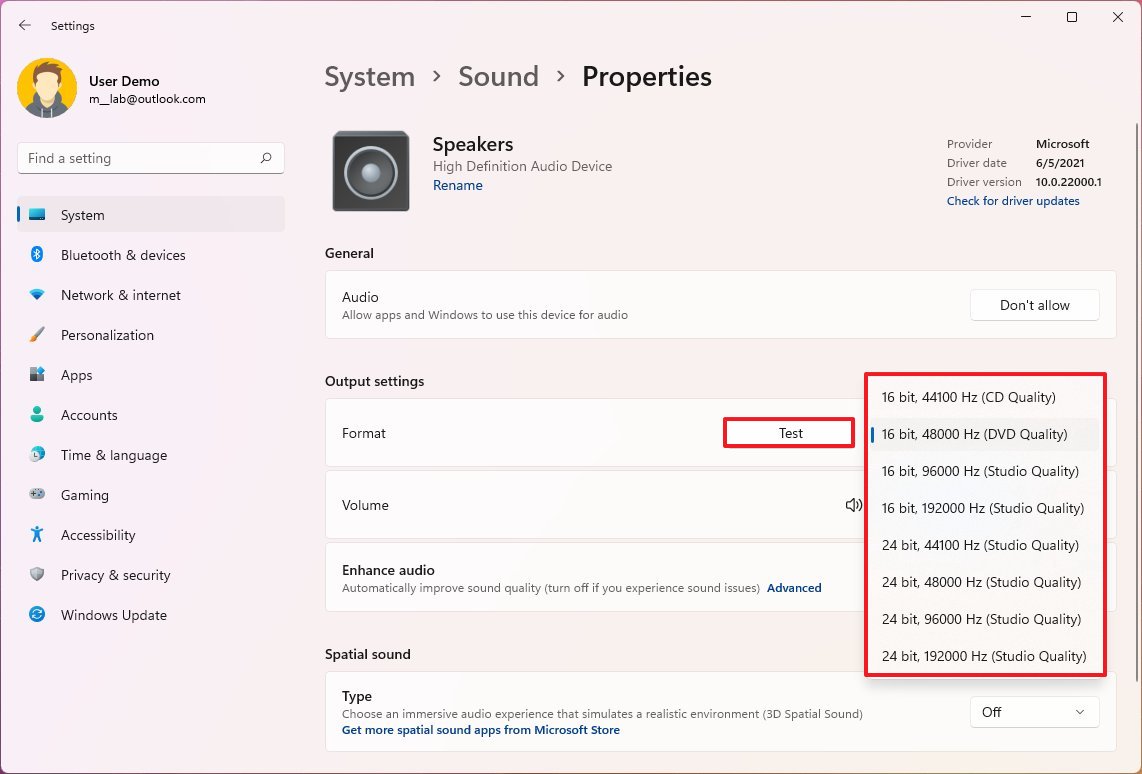
- Under the "Output settings" section, choose a different format from the drop-down menu.
- Click the Test button to confirm the sound is working.
After you complete the steps, the sound should start working again on Windows 11.
More resources
For more helpful articles, coverage, and answers to common questions about Windows 10 and Windows 11, visit the following resources:

Mauro Huculak has been a Windows How-To Expert contributor for WindowsCentral.com for nearly a decade and has over 22 years of combined experience in IT and technical writing. He holds various professional certifications from Microsoft, Cisco, VMware, and CompTIA and has been recognized as a Microsoft MVP for many years.
