How to integrate custom context menu shortcuts on Windows 11
Get faster access to apps, settings, and websites with custom context menu shortcuts.
All the latest news, reviews, and guides for Windows and Xbox diehards.
You are now subscribed
Your newsletter sign-up was successful
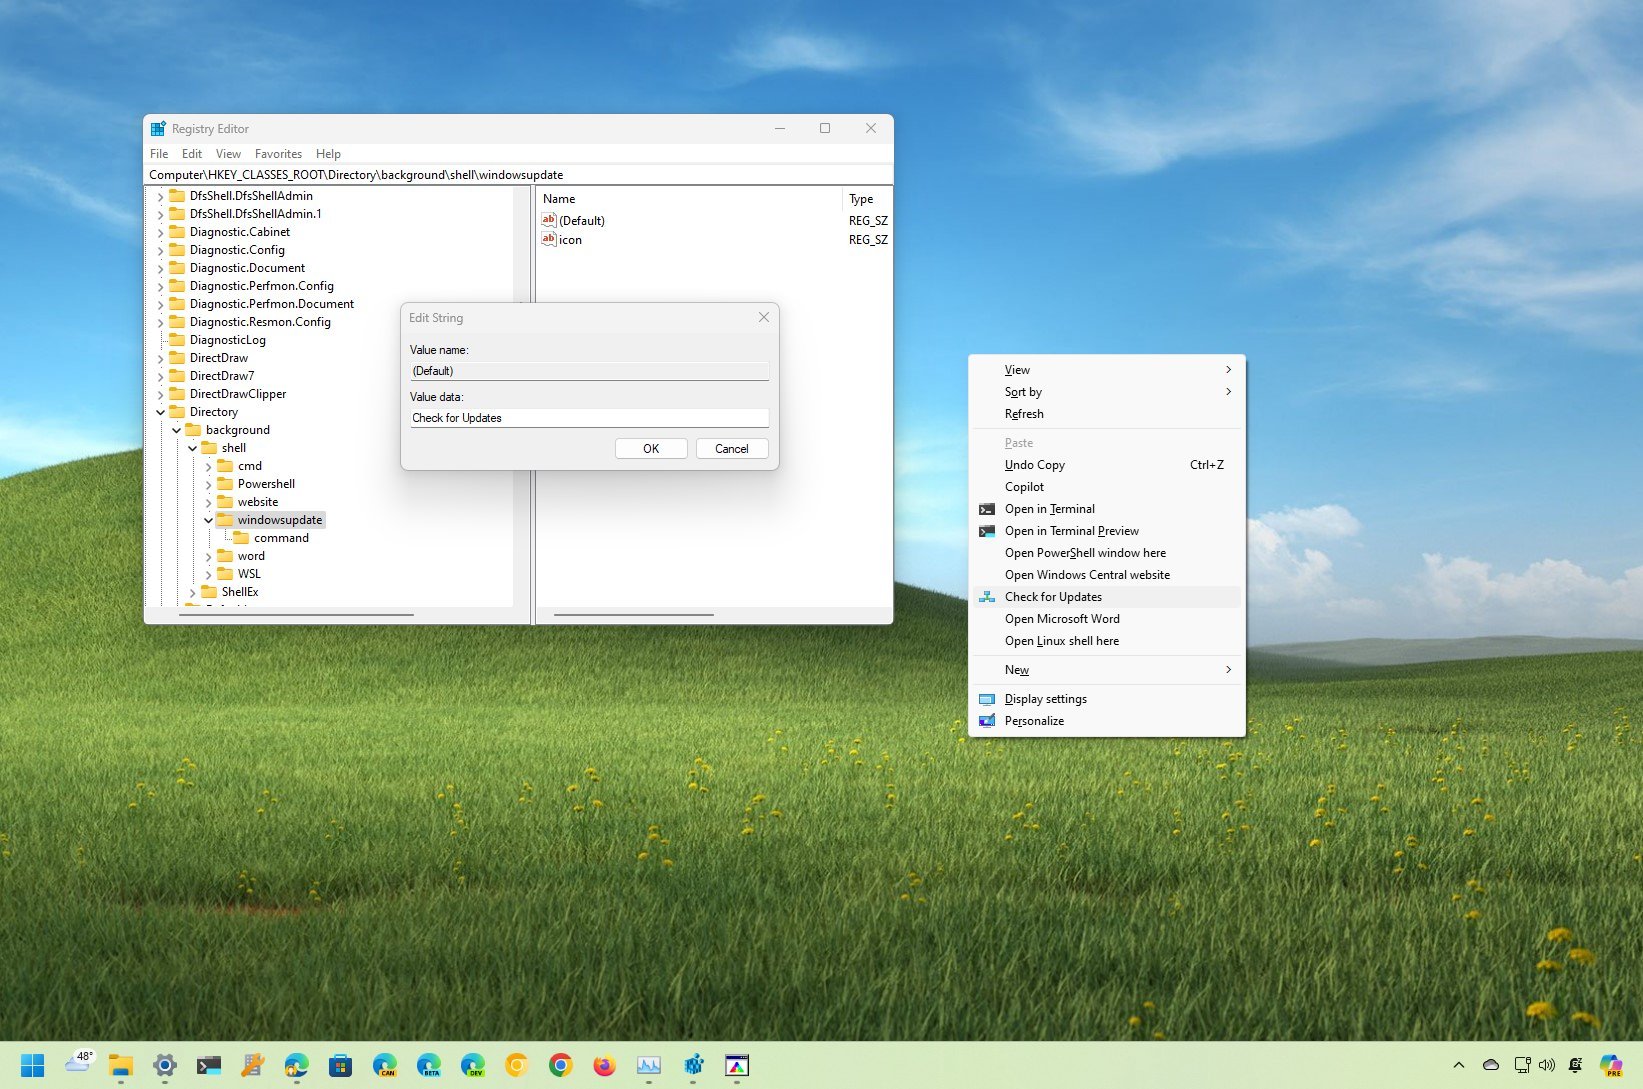
On Windows 11, you can customize the context menu to add custom shortcuts, and I will show you how in this guide. Although you can make an easy trip to the Start menu to launch an application, search the web, and open a specific feature or setting, as our sister site Tom's Hardware pointed out, it's also possible to modify the right-click context menu through the Registry to access some resources even faster since this specific menu is always one right-click away.
In the past, I have created different guides to add specific entries (such as to access Windows Update, Command Prompt, and others) to the right-click context menu. However, in these instructions, I outline the process of creating shortcuts for virtually anything.
The only caveat is that these instructions only work with the classic version of the context menu, not the modern interface. However, it's easily accessible using the "Shift + Right-click" shortcut.
In this how-to guide, I will explain the changes you have to make to the Registry to add custom shortcuts to the system's context menu on Windows 11.
How to create custom context menu shortcuts on Windows 11
Using the Registry, you can add custom shortcuts to virtually anything on Windows 11. The instructions below will give you some examples of how to add entries to launch apps and features (such as quick access to specific Settings pages) and open particular websites.
Warning: This is a friendly reminder that editing the Registry is risky and can cause irreversible damage to your installation if you don't do it correctly. It's recommended that you create a full backup of your PC before proceeding.
Launch apps shortcut
To create a context menu entry to start an app, use these steps:
All the latest news, reviews, and guides for Windows and Xbox diehards.
- Open Start.
- Search for Registry and click the top result to open the app.
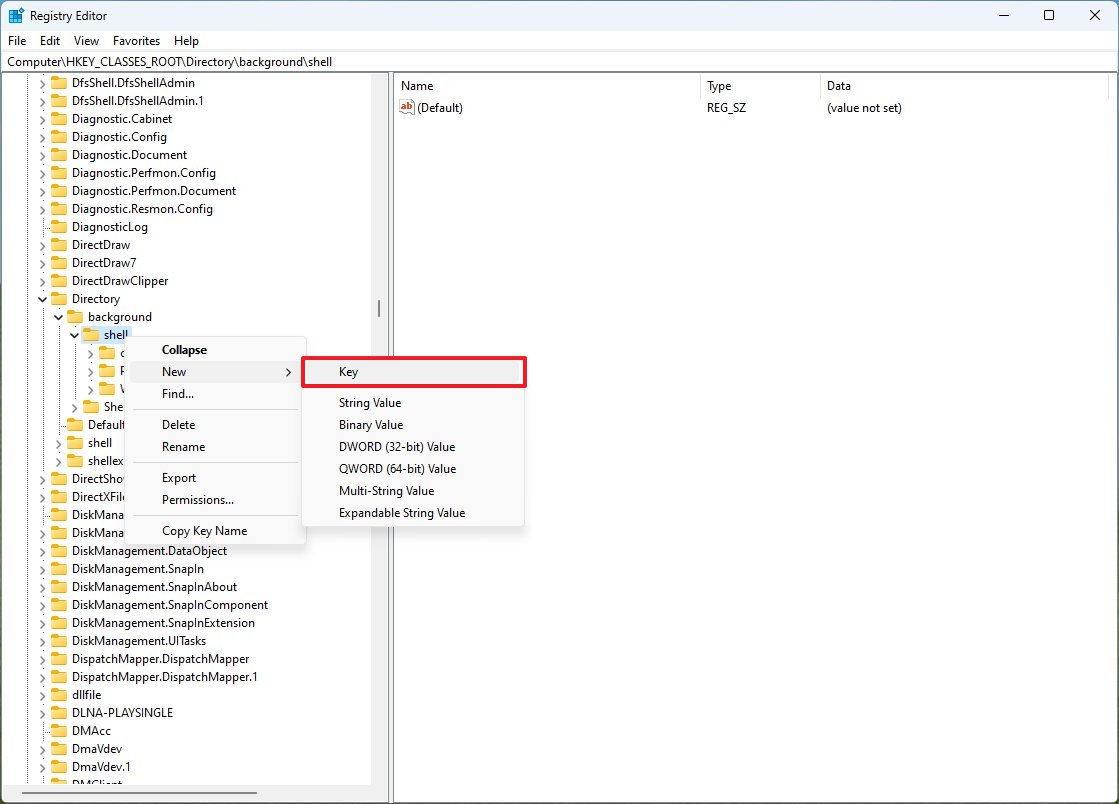
- Open the following path: HKEY_CLASSES_ROOT\Directory\Background\shell
- Right-click the Shell (folder) key, select New, and click on Key.
- Confirm a descriptive name (for example, word) and press Enter.
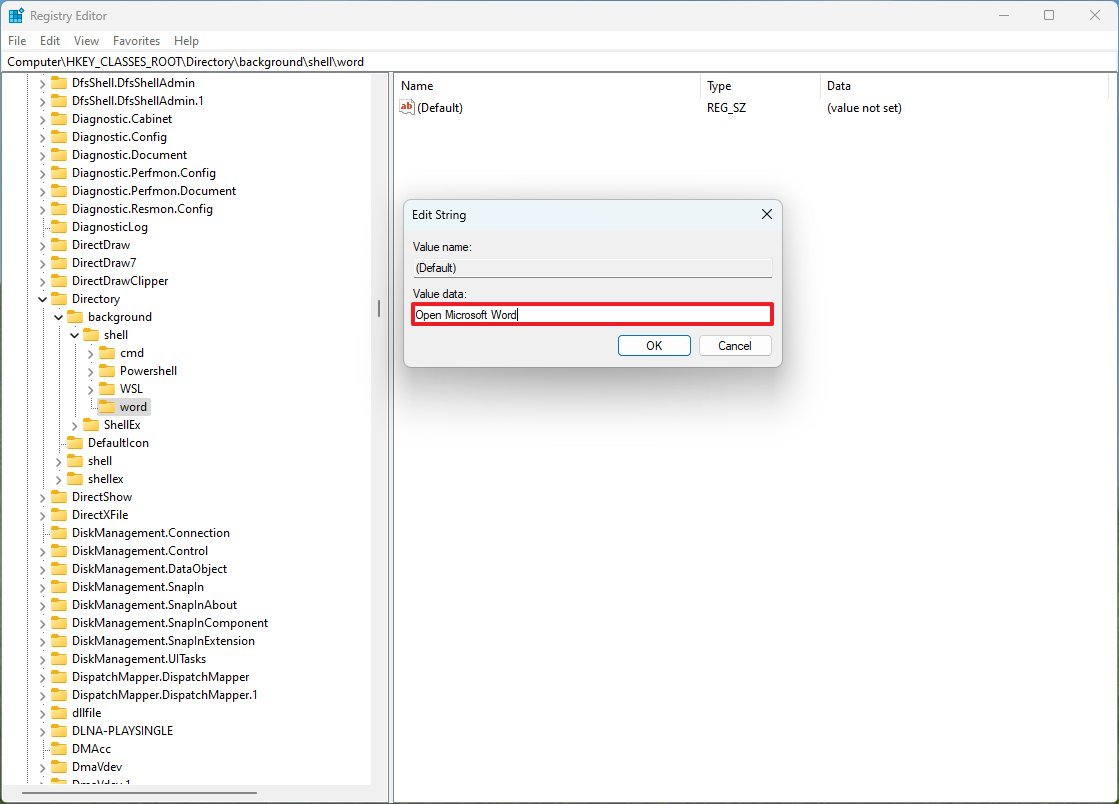
- Right-click the "(Default)" String and choose the Modify option.
- Confirm the name as you want the shortcut to appear. For example, "Open Microsoft Word. "
- Click the OK button.
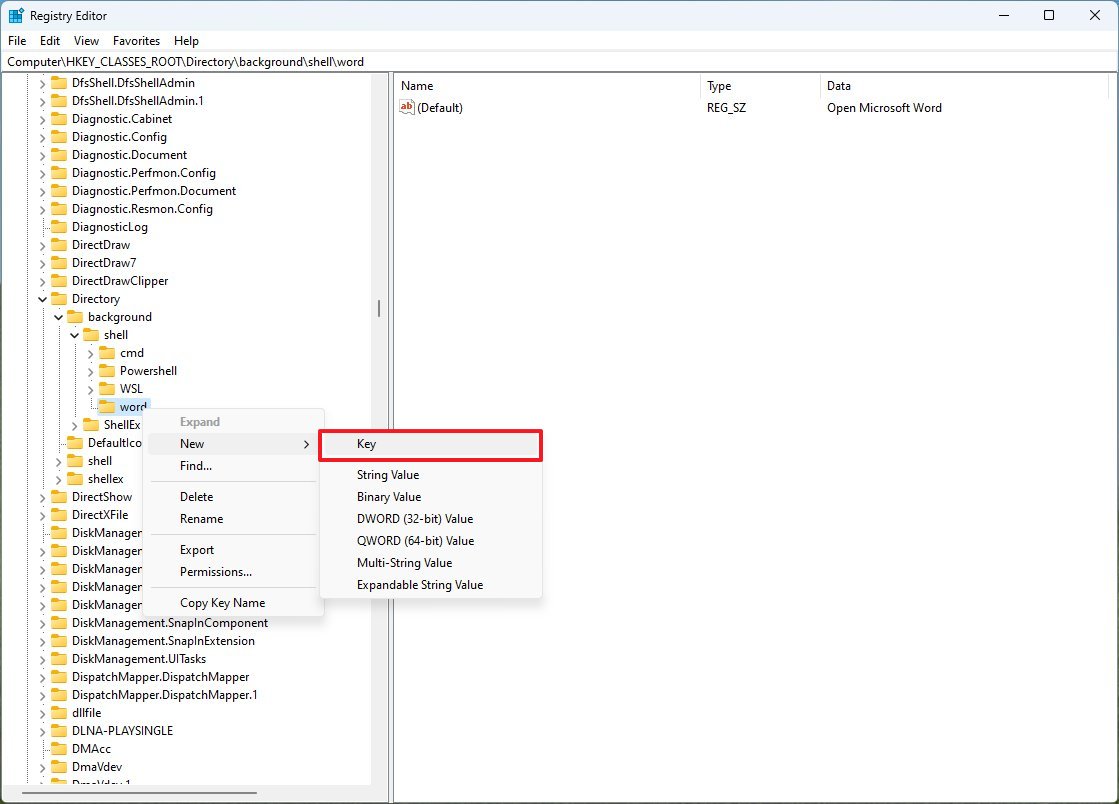
- Right-click the newly created key (from step 5), select New, and click on Key.
- Click the OK button.
- Right-click the newly created key (from step 5), select New, and click on Key.
- Name the key command and press Enter.
- Select the newly created key (from step 10).
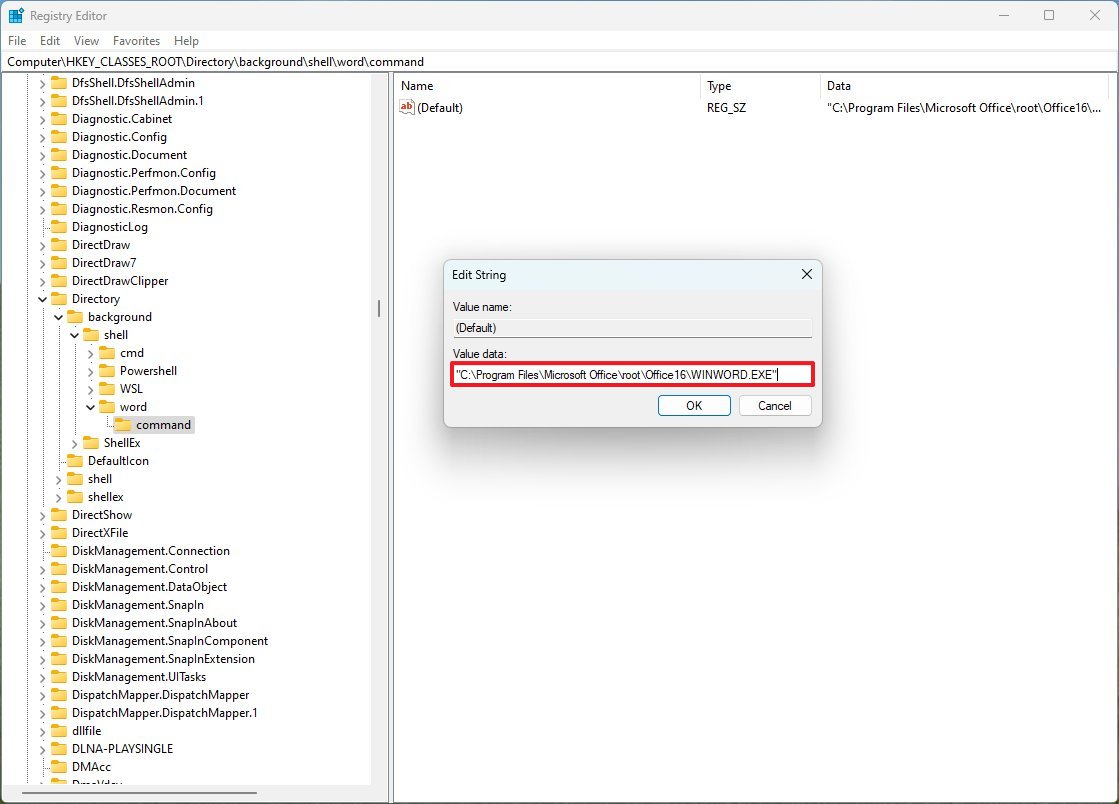
- Right-click the "(Default)" String on the right side and choose the Modify option.
- Confirm the path to the application launcher (usually the ".exe" file).
- Quick note: In this case, I'm using the path to the Microsoft Word app, which is located in "C:\Program Files\Microsoft Office\root\Office16\WINWORD.EXE"
- Click the OK button.
Once you complete the steps, you can "Shift + Right-click" on the desktop or inside of a folder on File Explorer to find the new shortcut.
You can add entries to launch virtually any app. For example, you can use these paths for common applications:
- Notepad: notepad
- Microsoft Paint: paint
- Calculator: calc
- File Explorer: explorer
- Clock: clock
You can find the paths of other Office apps in C:\Program Files\Microsoft Office\root\Office16.
Launch features shortcut
To create a context menu to launch a feature, use these steps:
- Open Start.
- Search for Registry and click the top result to open the app.
- Open the following path: HKEY_CLASSES_ROOT\Directory\Background\shell
- Right-click the Shell (folder) key, select New, and click on Key.
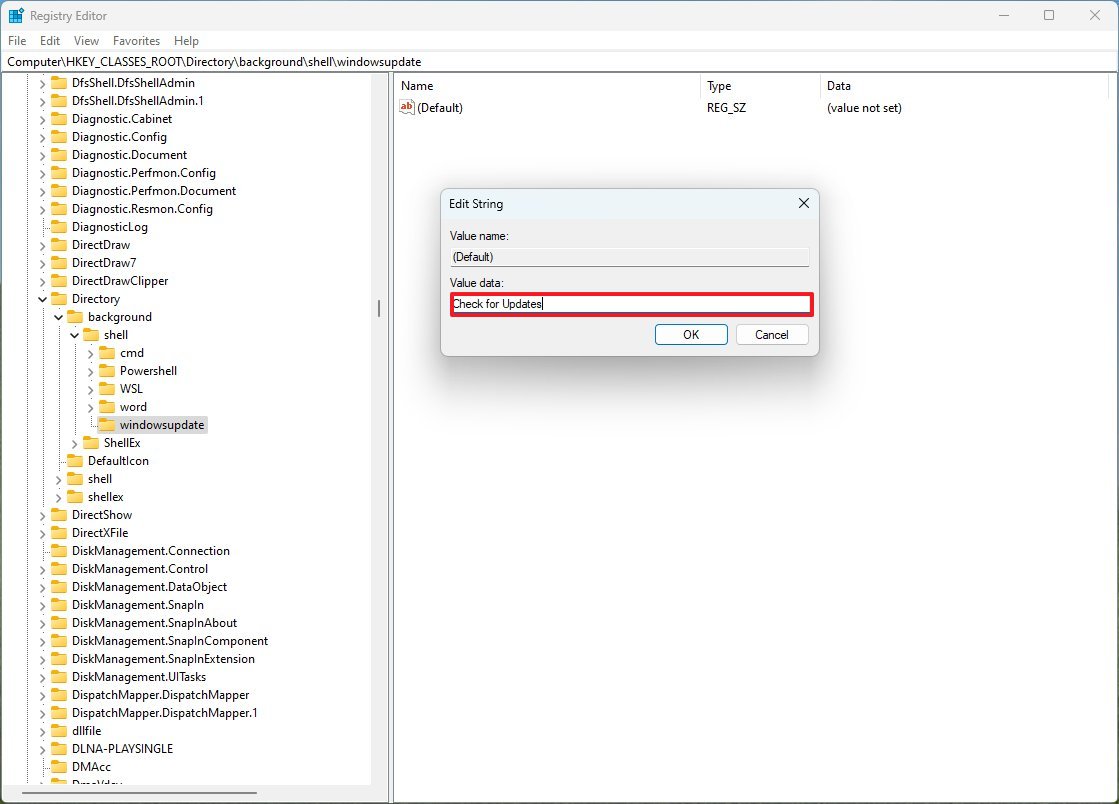
- Confirm a descriptive name (for example, windowsupdate) and press Enter.
- Right-click the "(Default)" String and choose the Modify option.
- Confirm the name as you want the shortcut to appear. For example, "Check for Updates."
- Click the OK button.
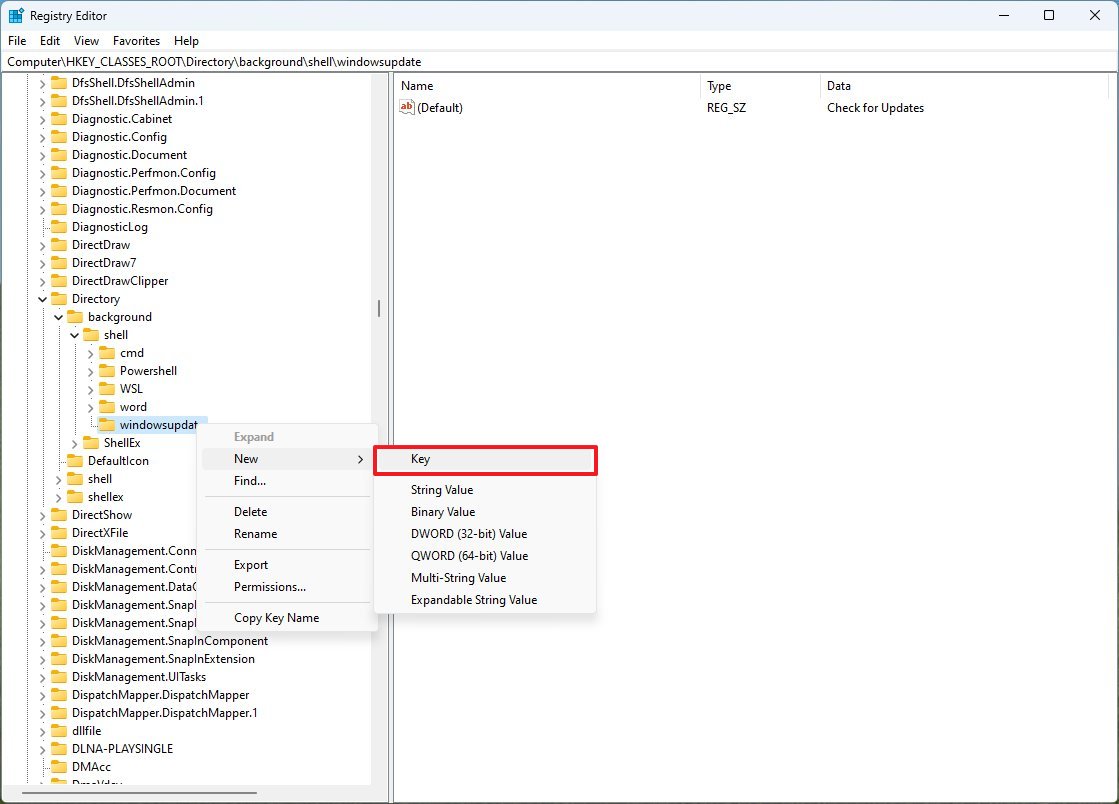
- Right-click the newly created key (from step 5), select New, and click on Key.
- Name the key command and press Enter.
- Select the newly created key (from step 10).
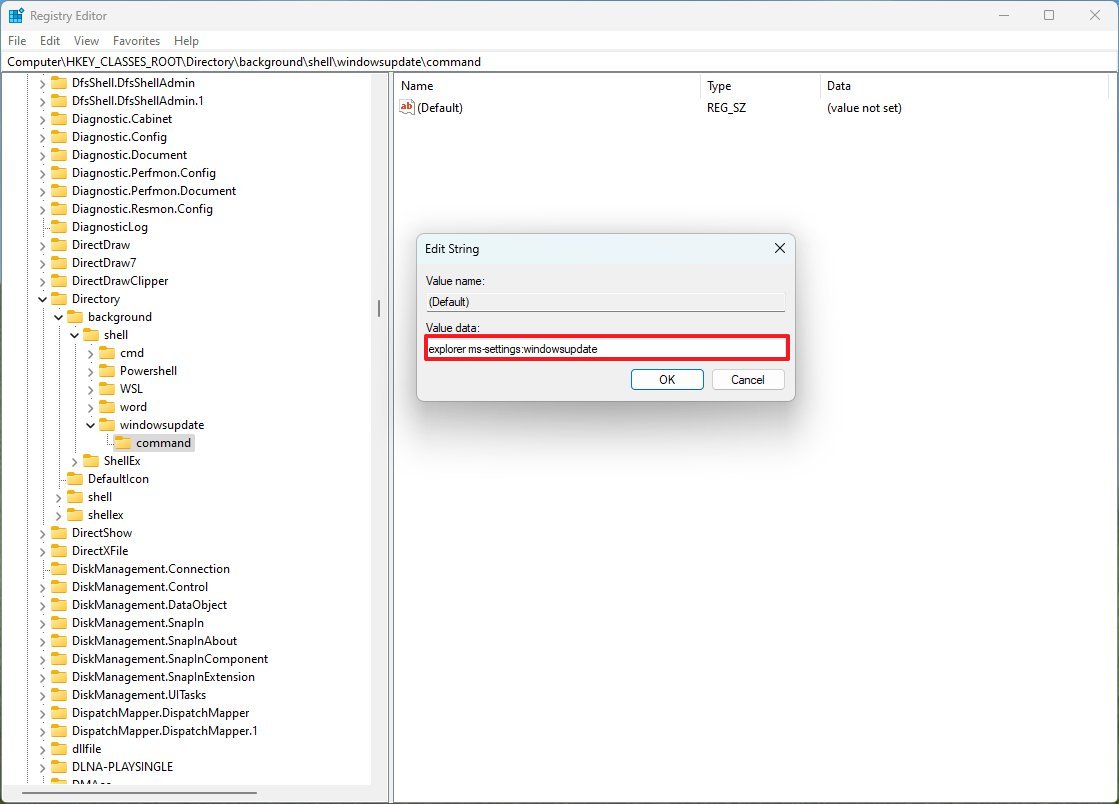
- Right-click the "(Default)" String on the right side and choose the Modify option.
- Confirm the path to launch the feature, for example, explorer ms-settings:windowsupdate
- Quick note: This command launches the Windows Update settings page. You can find more ms-settings URIs on this Microsoft website.
- Click the OK button.
After you complete the steps, the legacy context menu will show the new entry.
Some common places in the Settings app that you may consider adding to the context menu include:
- Display: ms-settings:easeofaccess-display
- Network & internet: ms-settings:network-status
- VPN: ms-settings:network-vpn
- Start: ms-settings:personalization-start
- Taskbar: ms-settings:taskbar
- Themes: ms-settings:themes
- Power & sleep: ms-settings:powersleep
- Storage: ms-settings:storagesense
Launch website shortcut
To add a shortcut to open a website from the context menu, use these steps:
- Open Start.
- Search for Registry and click the top result to open the app.
- Open the following path: HKEY_CLASSES_ROOT\Directory\Background\shell
- Right-click the Shell (folder) key, select New, and click on Key.
- Confirm a descriptive name (for example, website) and press Enter.
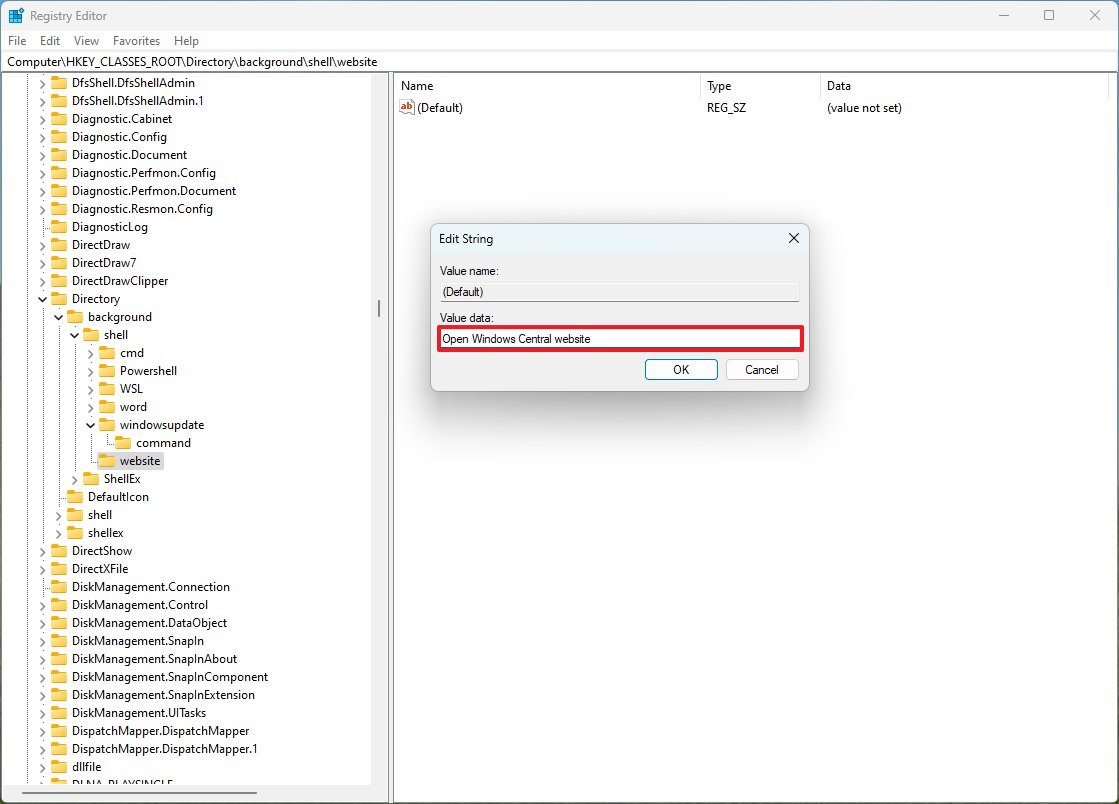
- Right-click the "(Default)" String and choose the Modify option.
- Confirm the name as you want the shortcut to appear. For example, "Open Windows Central website."
- Click the OK button.
- Right-click the newly created key (from step 5), select New, and click on Key.
- Name the key command and press Enter.
- Select the newly created key (from step 10).
- Right-click the "(Default)" String on the right side and choose the Modify option.
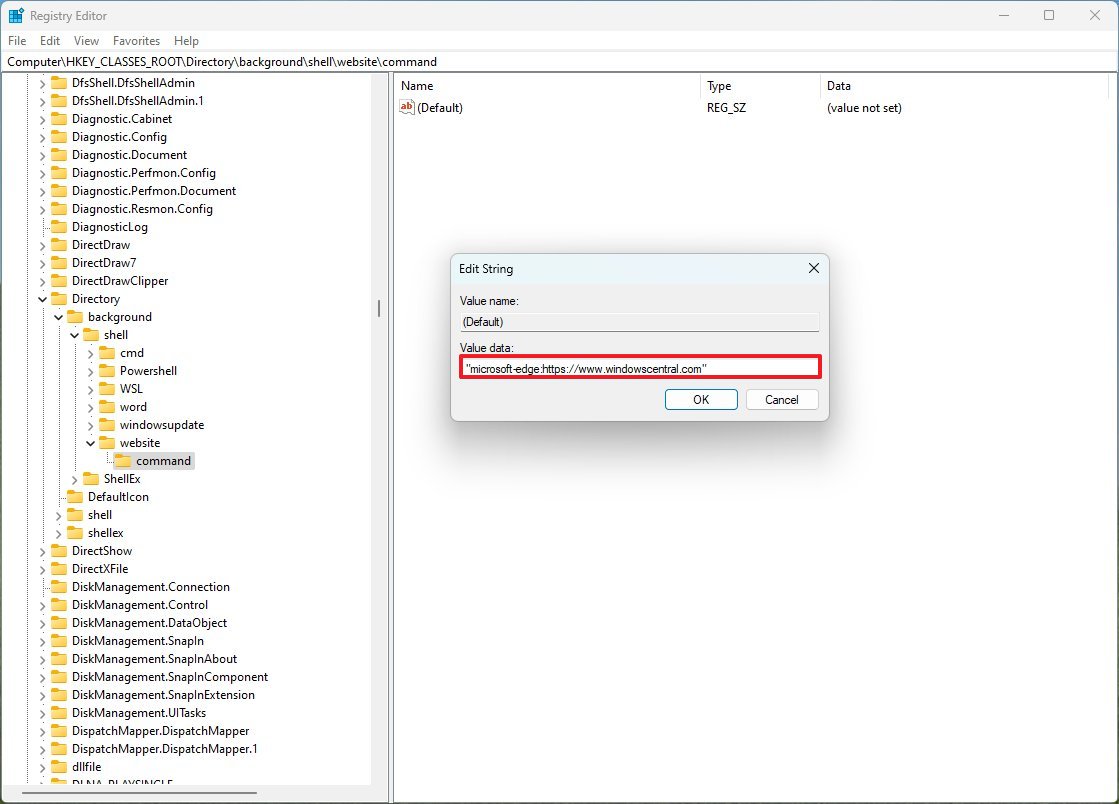
- Confirm the path to launch the feature, for example, rundll32.exe url.dll,FileProtocolHandler "microsoft-edge:https://www.windowscentral.com"
- Click the OK button.
Once you complete the steps, you will find the option to launch a specific website when you use the "Shift + Right-click" shortcut to open the classic context on Windows 11.
It's important to note that I'm choosing the "microsoft-edge" handler to open the web page with Microsoft Edge.
(Optional) Add context menu entry icon
If you want to identify the entry with an icon, use these steps:
- Open Start.
- Search for Registry and click the top result to open the app.
- Open the following path: HKEY_CLASSES_ROOT\Directory\Background\shell
- Select the key that represents the context menu entry.
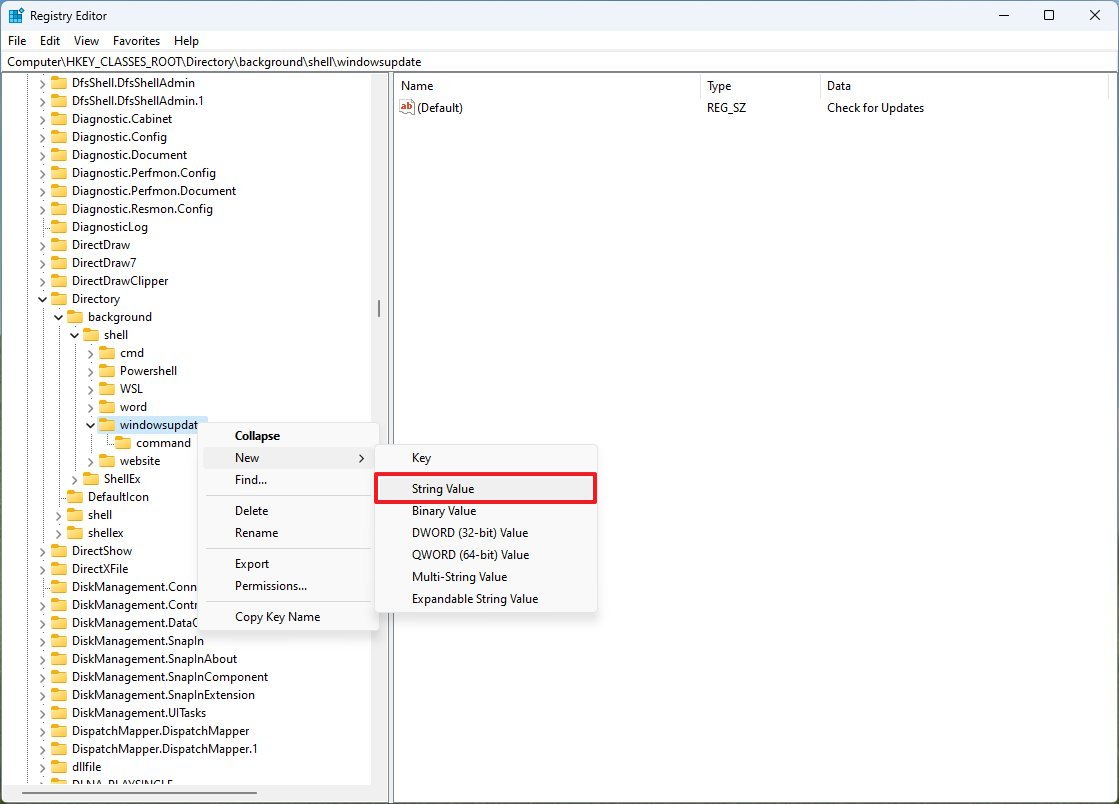
- Right-click the key (folder) key, select New, and click on String Value.
- Confirm icon as the name for the String.
- Click the OK button.
- Right-click the "(Default)" String on the right side and choose the Modify option.
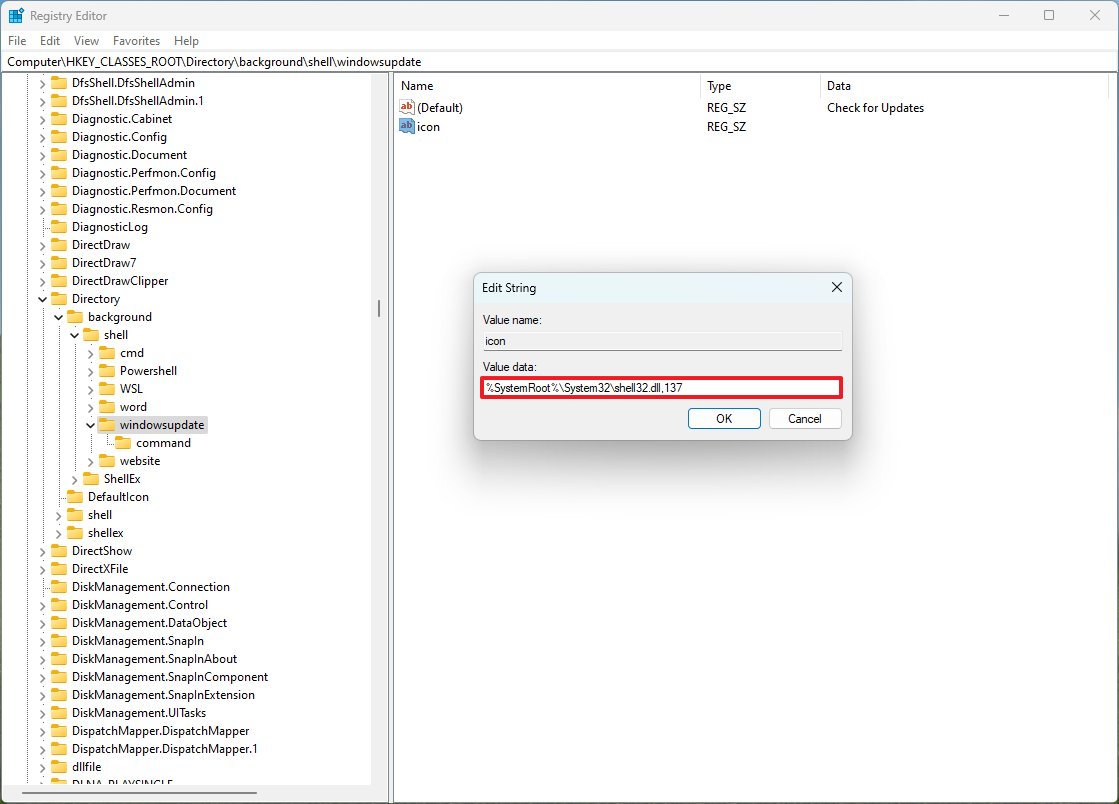
- Confirm the path of the icon.
- Quick note: You can use the path to a ".ico" file or one of the legacy icons available through the "%SystemRoot%\System32\shell32.dll" and using the "%SystemRoot%\System32\shell32.dll,ICON-NUMBER" path. Sometimes, the app executable includes one or various icons, and you can use the executable path to add an icon to the entry.
- Click the OK button.
After you complete the steps, the specified icon will appear next to the custom context menu entry.
Get icon index number
To get the icon number, you will have to use a third-party application, and here's how:
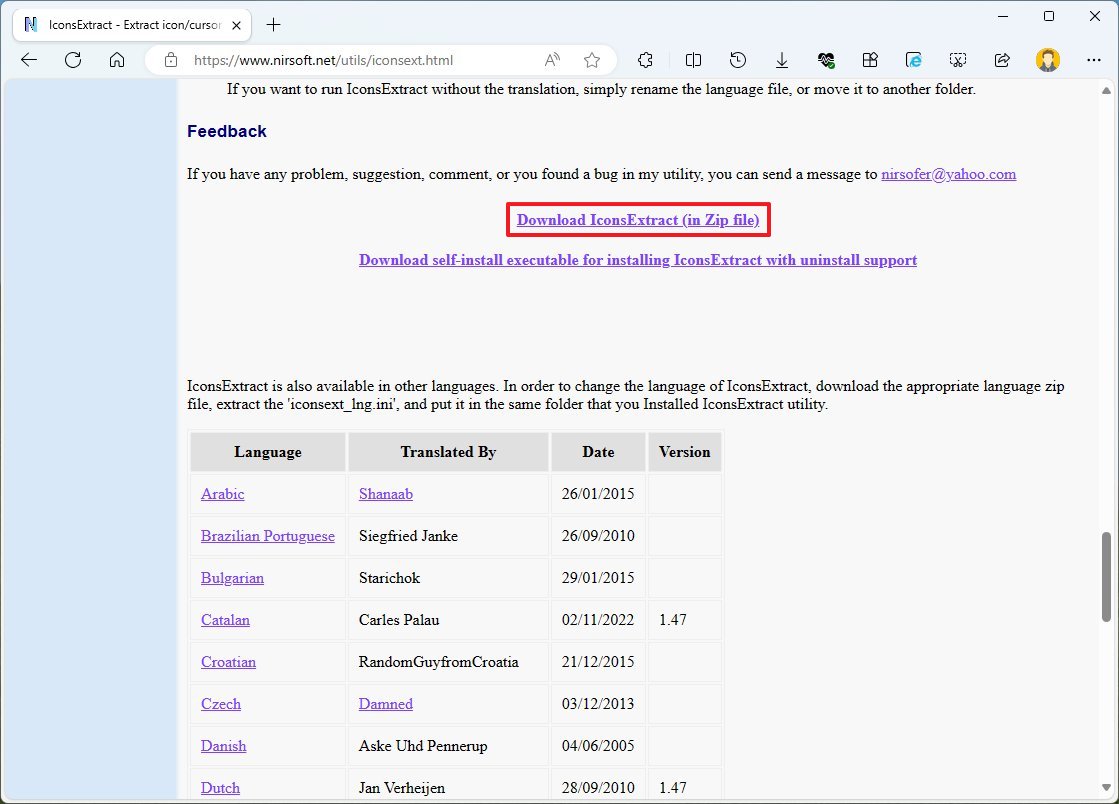
- Open NirSoft website.
- Click the "Download IconsExtract" option.
- Save the app on your computer.
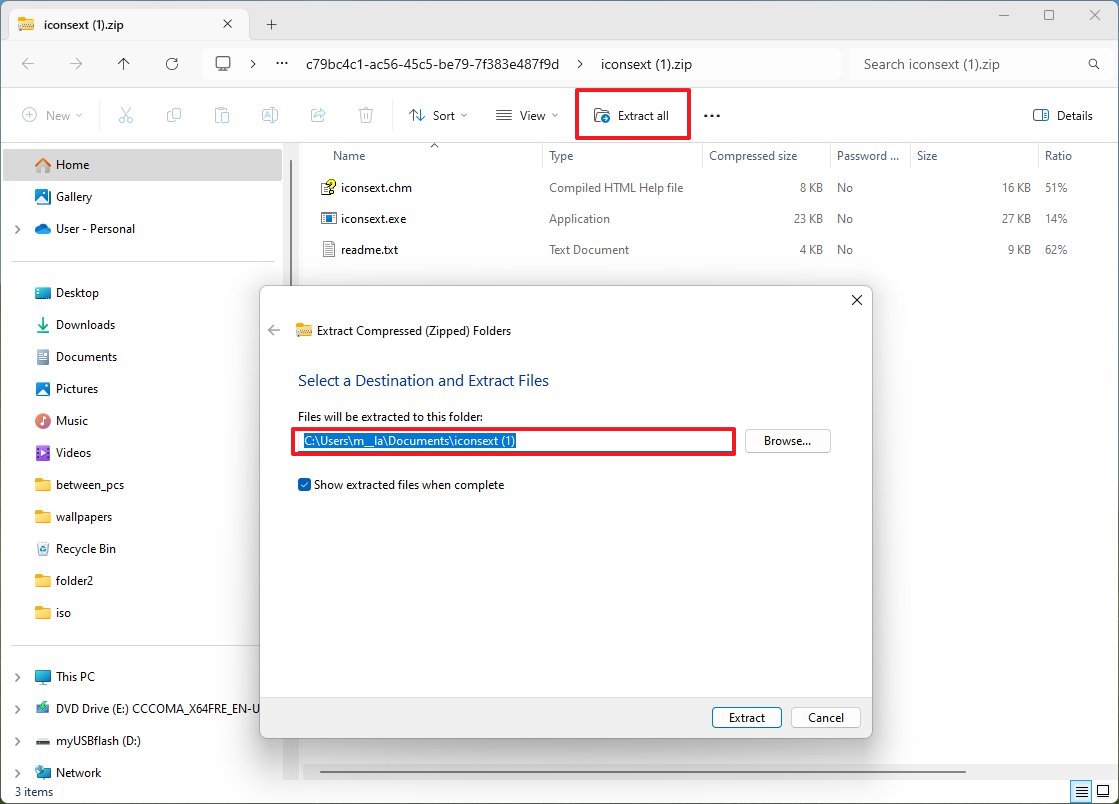
- Select the zip folder and click the Extract all button from the command bar.
- Click the Extract button.
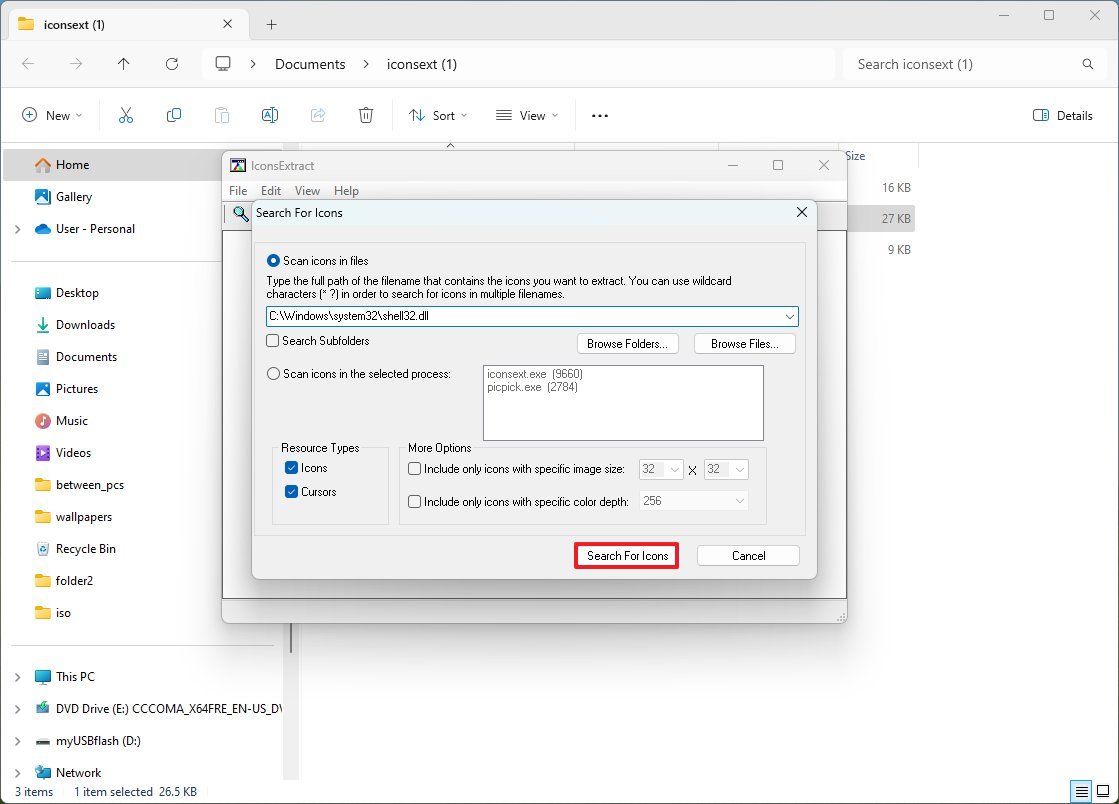
- Right-click the iconsext.exe and choose the Open option.
- Click the "Search for icons" button.
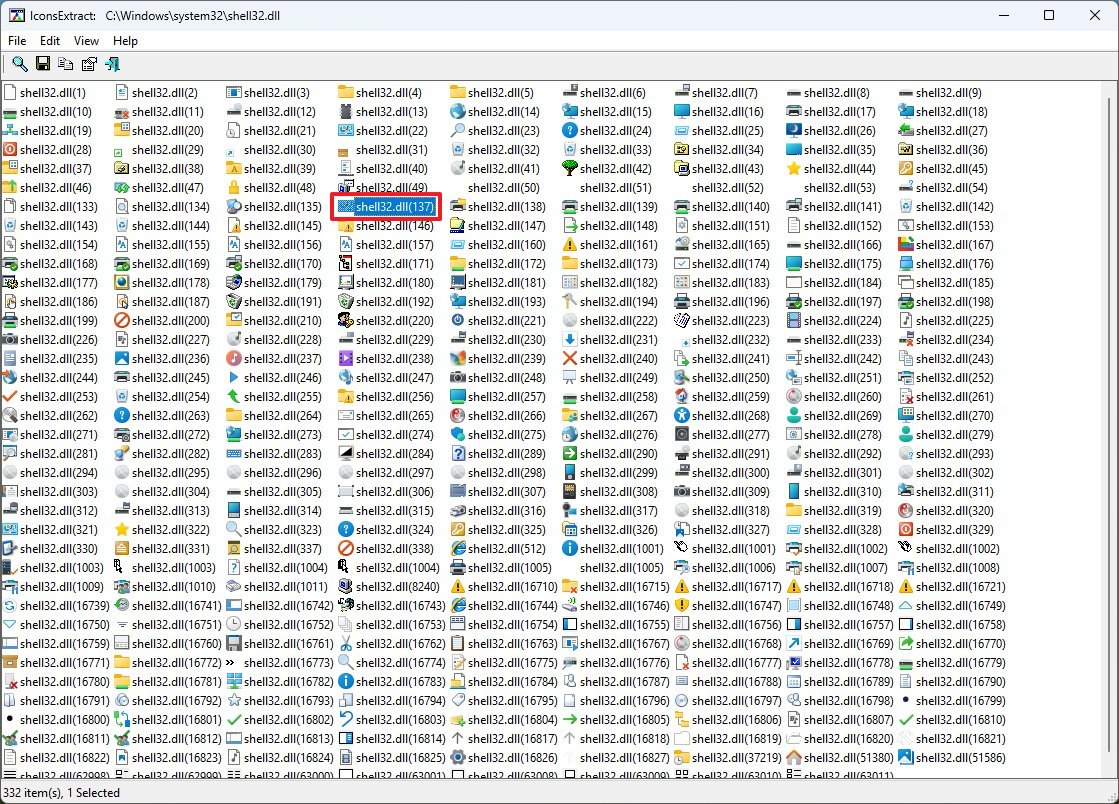
- Confirm the number of the icon (next to the name).
- Append the number to the path in the "icon" String (above on step 9). For example, "%SystemRoot%\System32\shell32.dll,137"
Once you complete the steps, you will be able to use the system icons to add icons to the custom shortcuts in your context menu.
It's important to note that while testing this configuration, for some reason, the ID numbers for icons were not correct. For example, if I used the ID "17," the system would show the ID "16." If I used the ID 21, then the system would use the ID "20." So, you may need to play around to land on the icon you want.
(Optional) Disable modern context menu
To turn off the modern context menu on Windows 11, use these steps:
- Open Start.
- Search for Registry and click the top result to open the app.
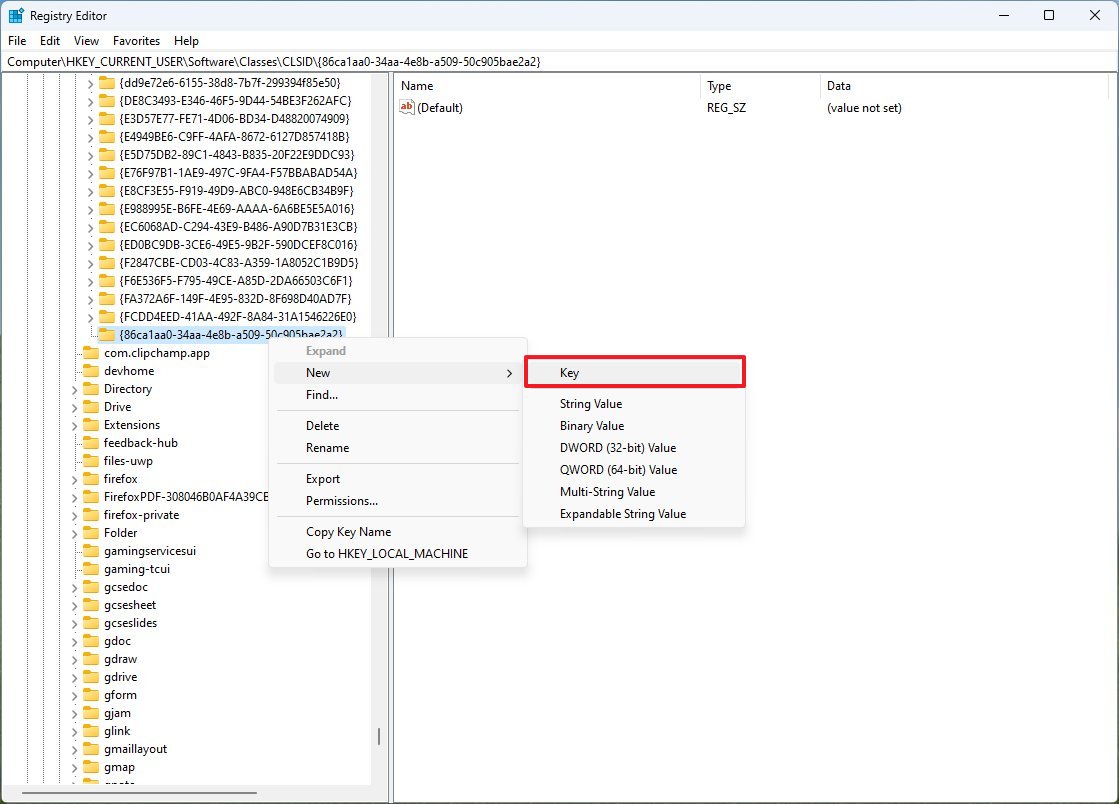
- Open the following path: HKEY_CURRENT_USER\SOFTWARE\CLASSES\CLSID
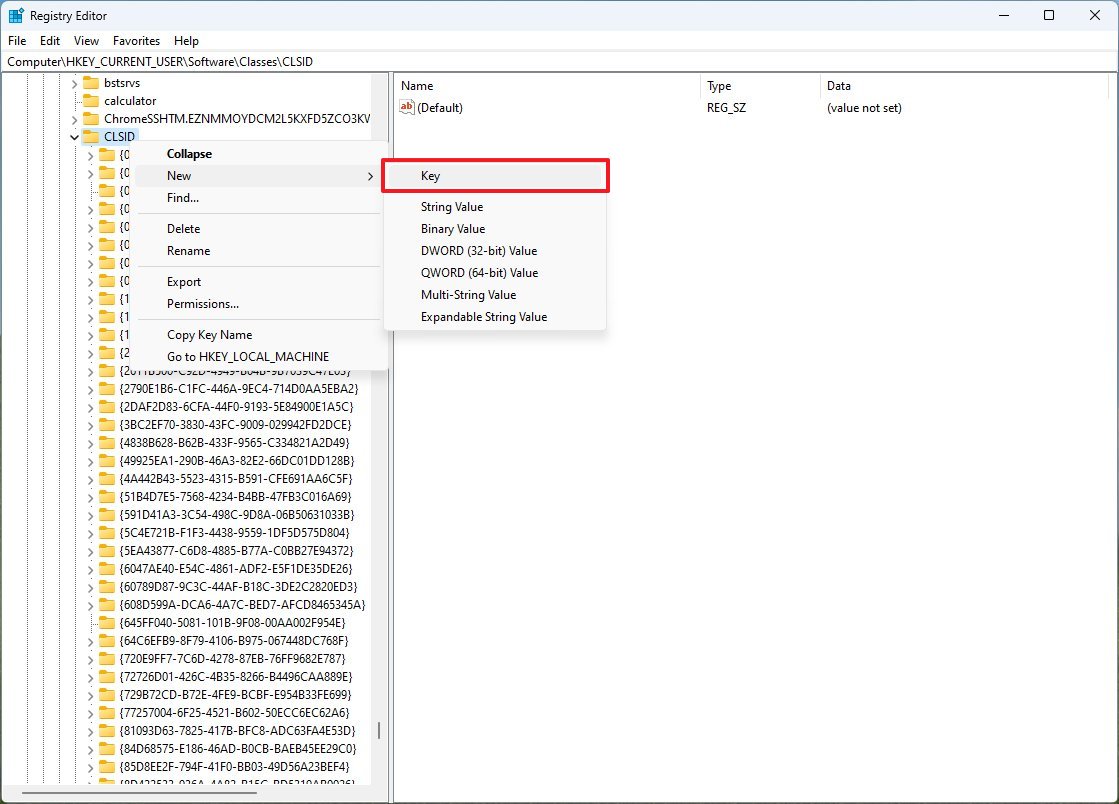
- Right-click the CLSID key (folder) key, select New, and click on Key.
- Confirm the {86ca1aa0-34aa-4e8b-a509-50c905bae2a2} name for the key and press Enter.
- Right-click the newly created key (folder), select New, and click on Key.
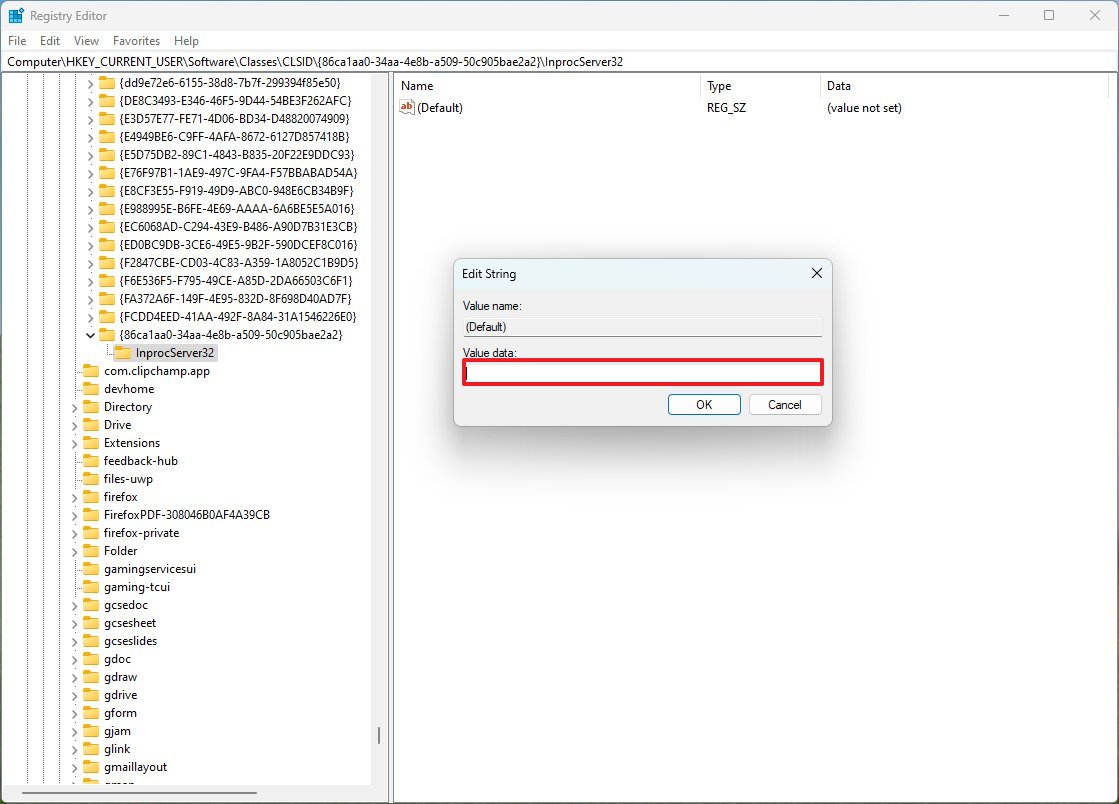
- Confirm the InprocServer32 for the key and press Enter.
- Right-click the default String and choose the Modify option.
- Click on the "Value data" field and press the space and backspace keys.
- Click the OK button.
After you complete the steps, you will have to restart the computer to have access to the classic menu and the new shortcuts without extra steps.
More resources
For more helpful articles, coverage, and answers to common questions about Windows 10 and Windows 11, visit the following resources:
- Windows 11 on Windows Central — All you need to know
- Windows 10 on Windows Central — All you need to know

Mauro Huculak has been a Windows How-To Expert contributor for WindowsCentral.com for nearly a decade and has over 22 years of combined experience in IT and technical writing. He holds various professional certifications from Microsoft, Cisco, VMware, and CompTIA and has been recognized as a Microsoft MVP for many years.
