How to securely share your laptop with school friends on Windows 11
Are you about to share your laptop in school? If so, do this first.
All the latest news, reviews, and guides for Windows and Xbox diehards.
You are now subscribed
Your newsletter sign-up was successful
If you plan to take your Windows 11 laptop to school, you shouldn't share it with your friends using your primary account. Instead, you should use a guest or secondary account, and in this guide, you will learn how to complete this task.
Although your computer is meant to be personal, sometimes, you may need to help a friend or someone inside or outside school. Usually, when this happens, you simply sign into the account and let the other person work on the device. However, this is not the proper way to share a device since you will open your account settings, browsing history, and files for others to see and change accidentally.
If you want to share your computer with other people, you should create another account. This will protect your account and files while offering a more personal space that other people can use. At any time, you can delete the account and data without affecting your configuration and files.
This how-to guide will walk through the steps to create a guest account to share your Windows 11 laptop with your school friends.
How to create a local account for guest access on Windows 11
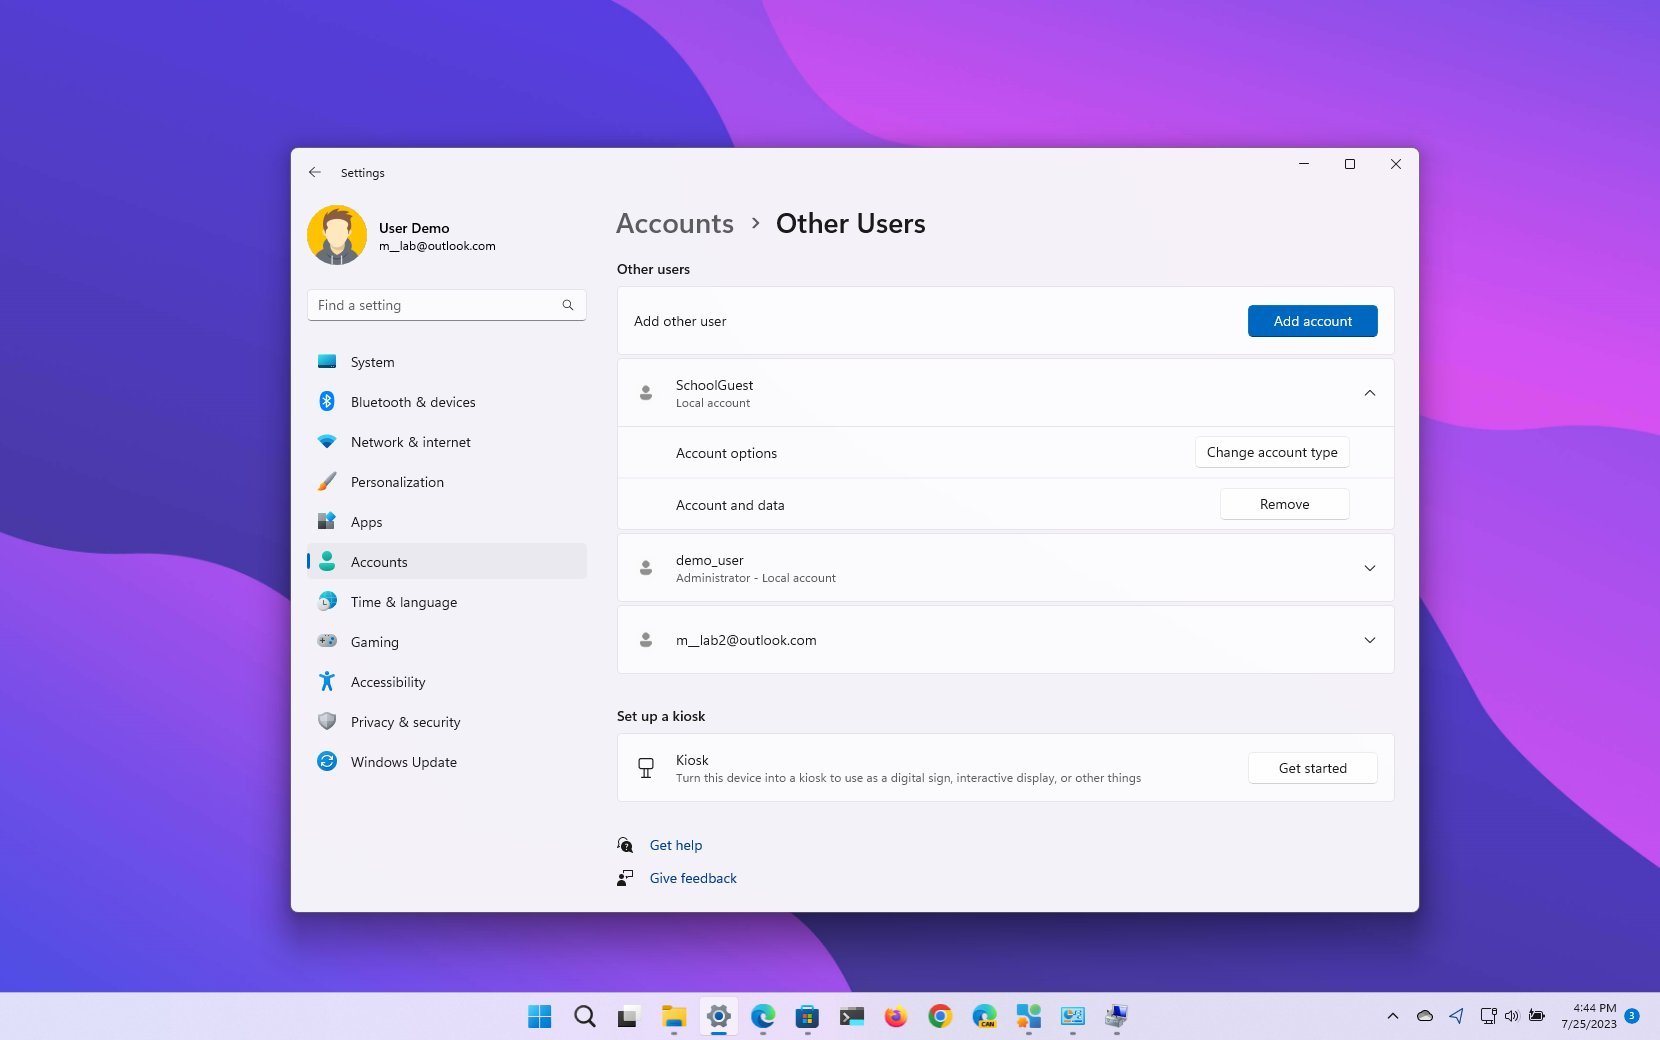
To create an account to safely share your laptop with school friends, use these steps:
- Open Settings.
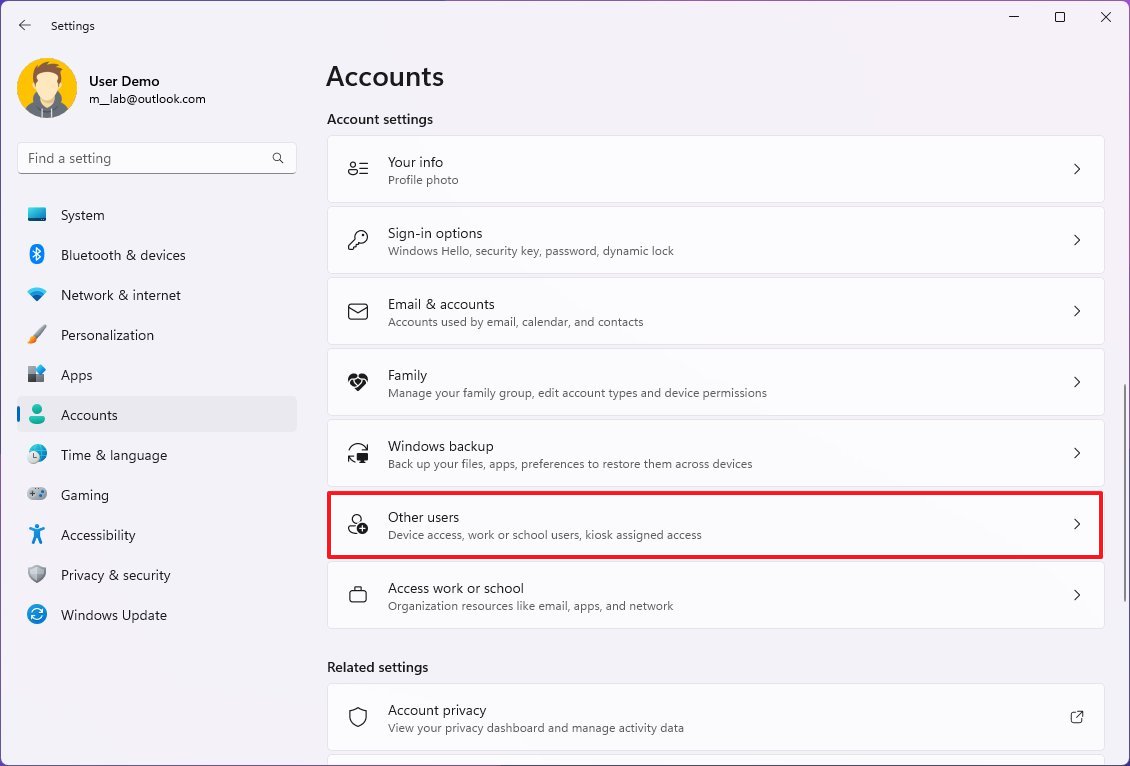
- Click on Accounts.
- Click the Other users page on the right side.
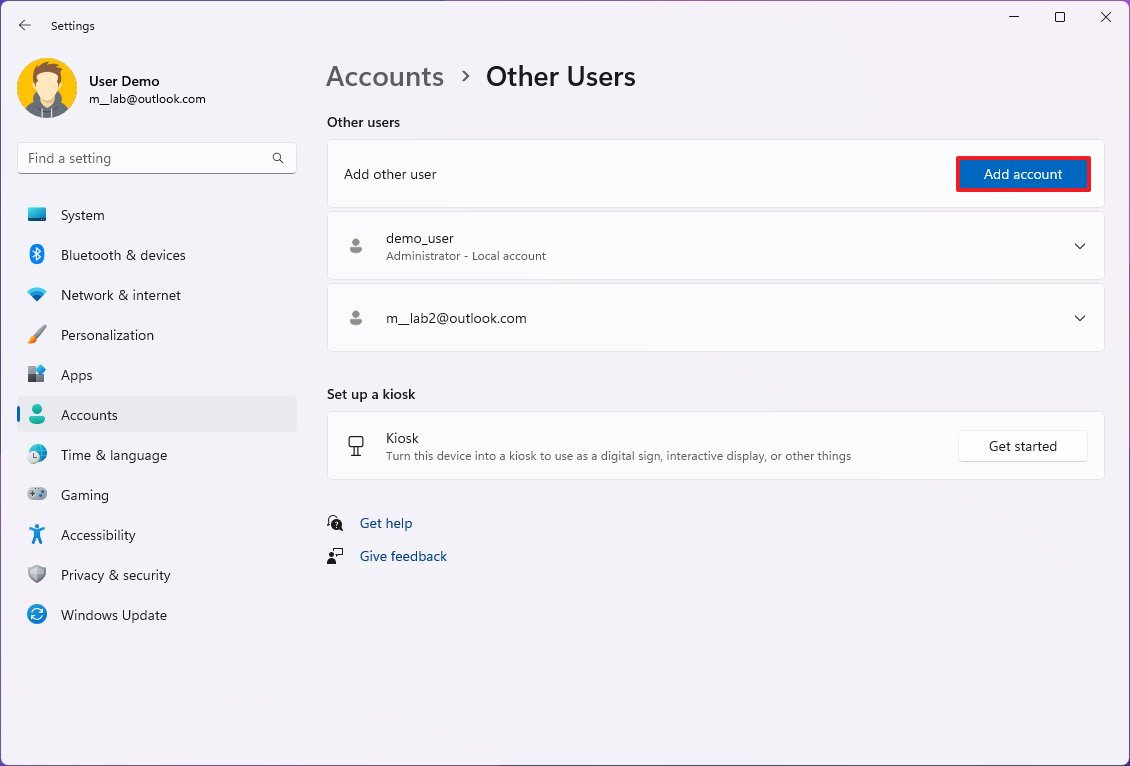
- Click the Add account button.
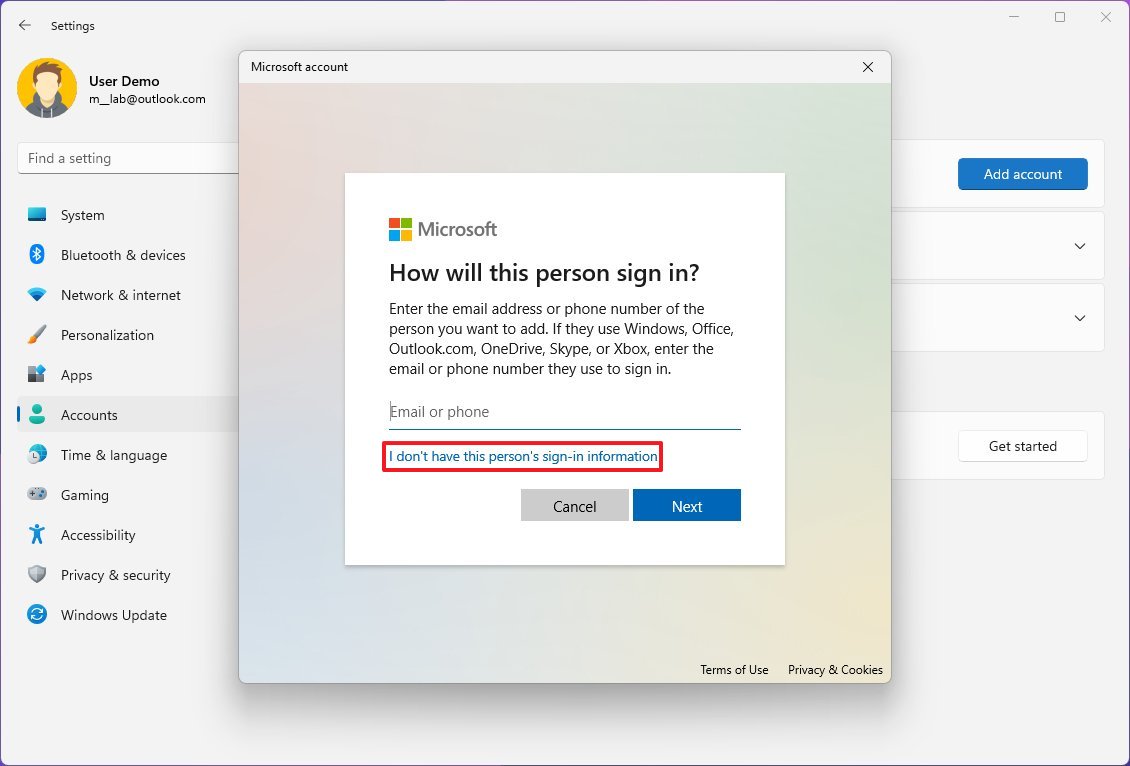
- Click the "I don't have this person's sign-in information" option.
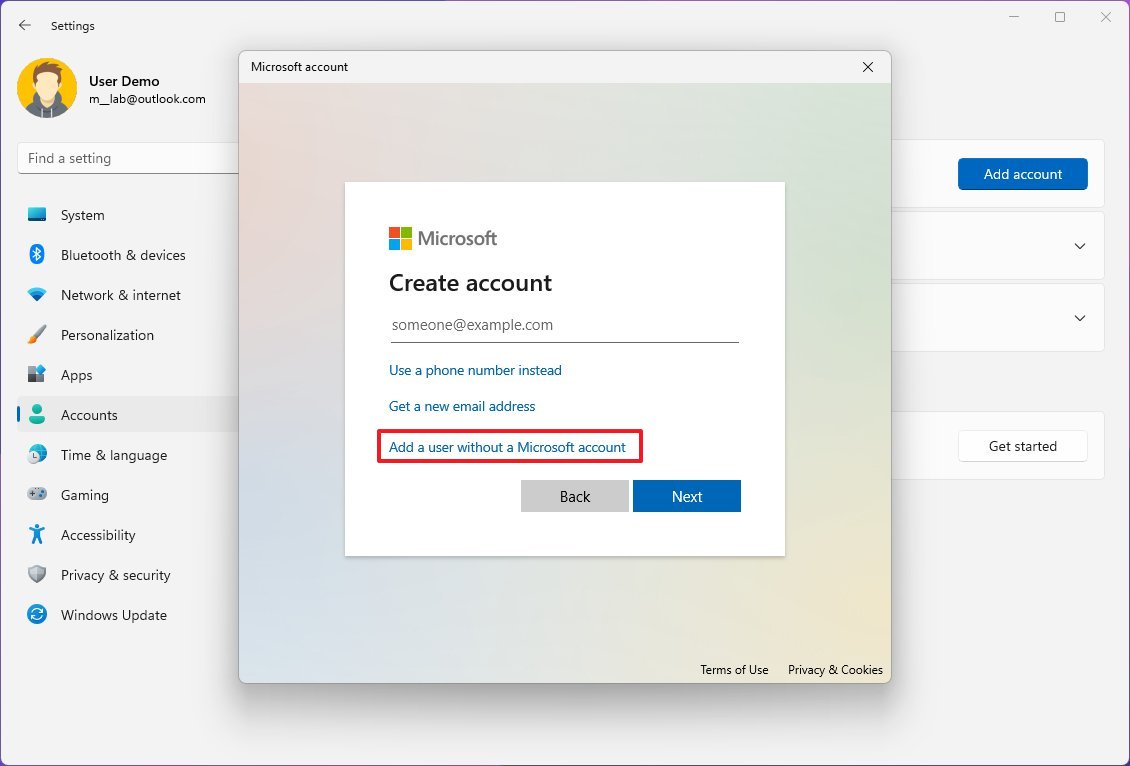
- Click the "Add a user without a Microsoft account" option.
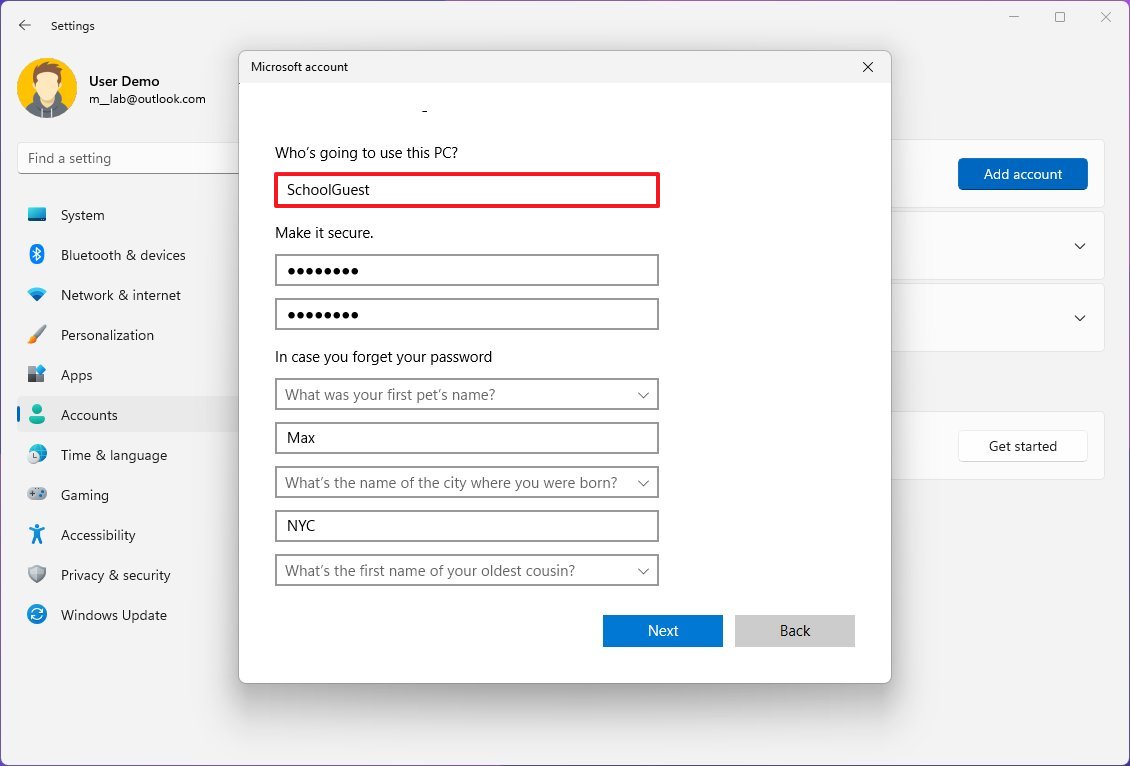
- Create a name for the guest account — for example, Friends.
- Quick note: Although the built-in "Guest" account is no longer available, it's still a reserved name, meaning you can't use the same name to create an account.
- Create a password for the account.
- Complete the security questions to enable the password recovery feature.
- Click the Next button.
- Quick note: The default configuration will create an account with standard privileges that is secure enough to share a device with others. However, you can always add the account to the "Guest" group to make it more restrictive.
- Optional) Open Start.
- Search for Computer Management and click the top result to open the app.
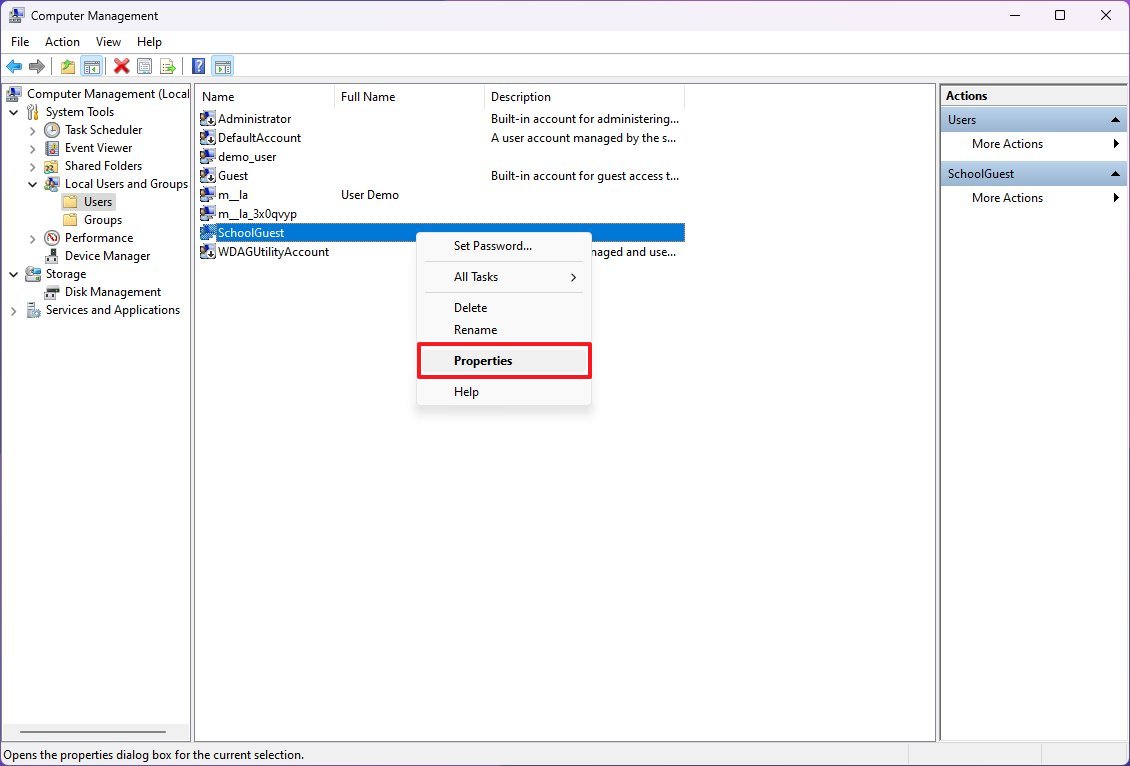
- Browse to the following path: System Tools > Local Users and Groups > Users
- Right-click the account and select the Properties option.
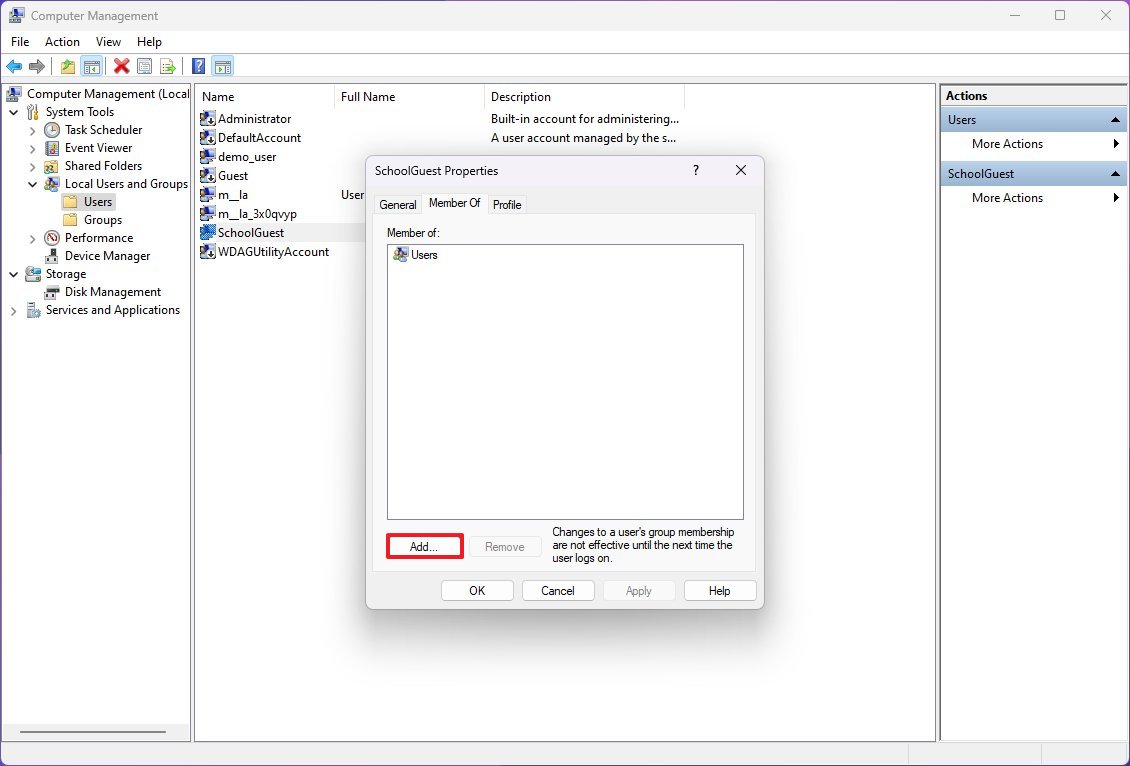
- Click the Member Of tab.
- Click the Add button.
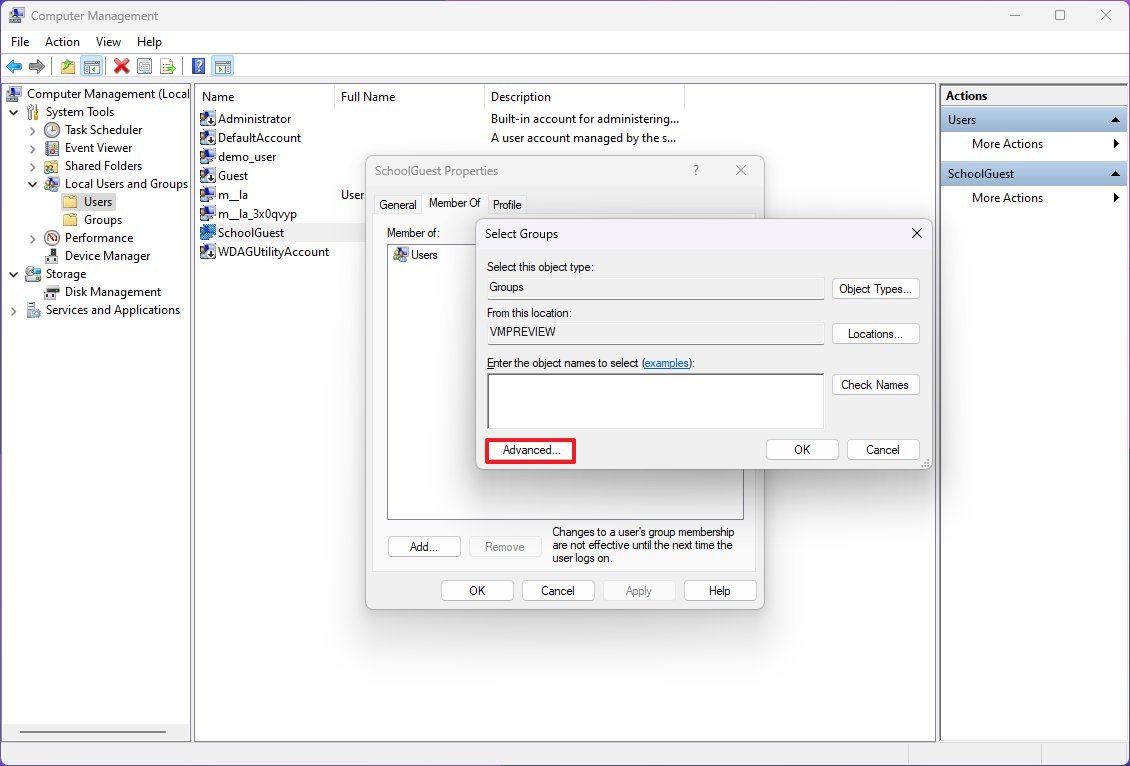
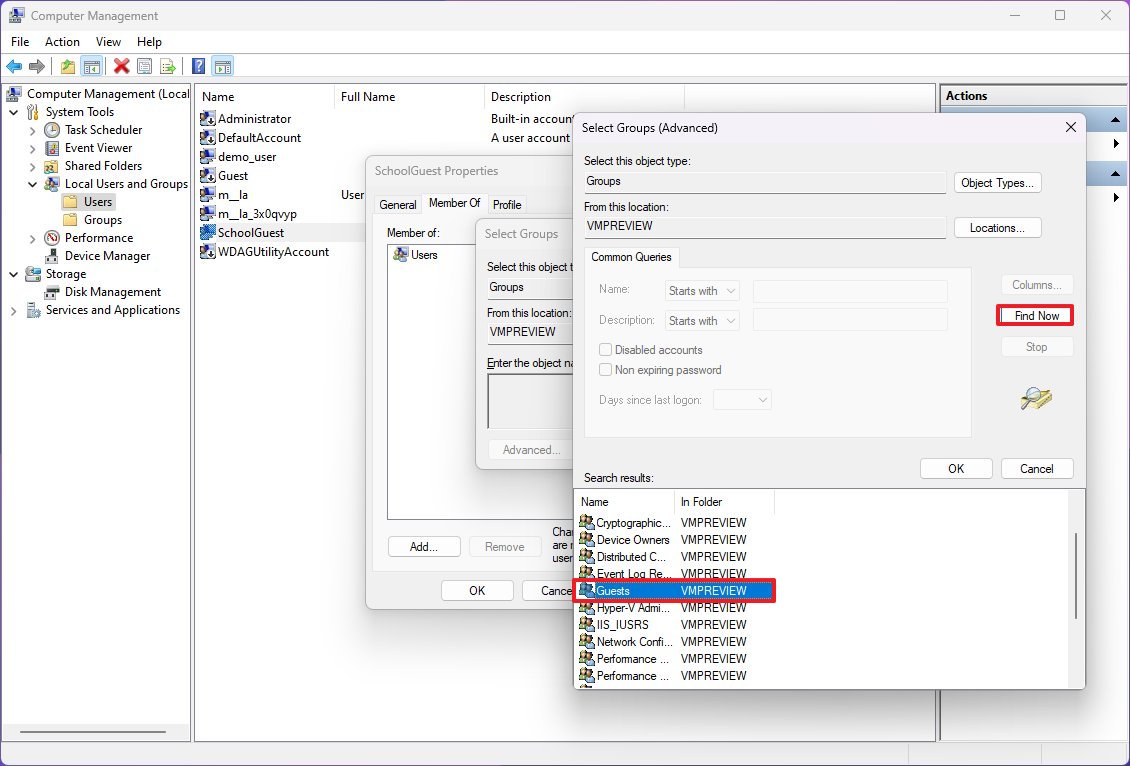
- Click the Advanced button.
- Click the Find now button.
- Select the Guests group.
- Click the OK button.
- Click the OK button again.
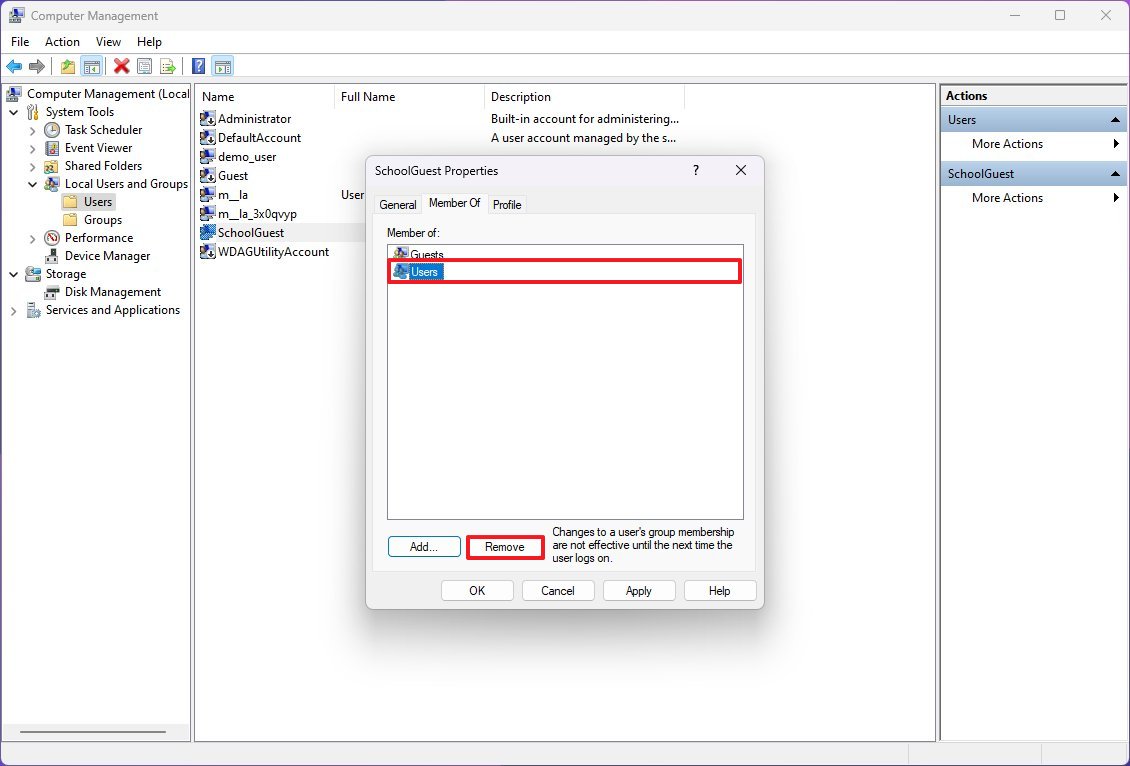
- Select the Users group.
- Click the Remove button.
- Click the Apply button.
- Click the OK button.
Once you complete the steps, the guest account will be created, and you can either lock or sign out of the account to allow the other person to sign in with the more restrictive environment.
How to create a Microsoft account for guest access on Windows 11
Alternatively, you can also share your laptop with a school friend or family member, creating a standard Microsoft account.
All the latest news, reviews, and guides for Windows and Xbox diehards.
To create another account on Windows 11 with a Microsoft account, use these steps:
- Open Settings.
- Click on Accounts.
- Click the Other users page on the right side.
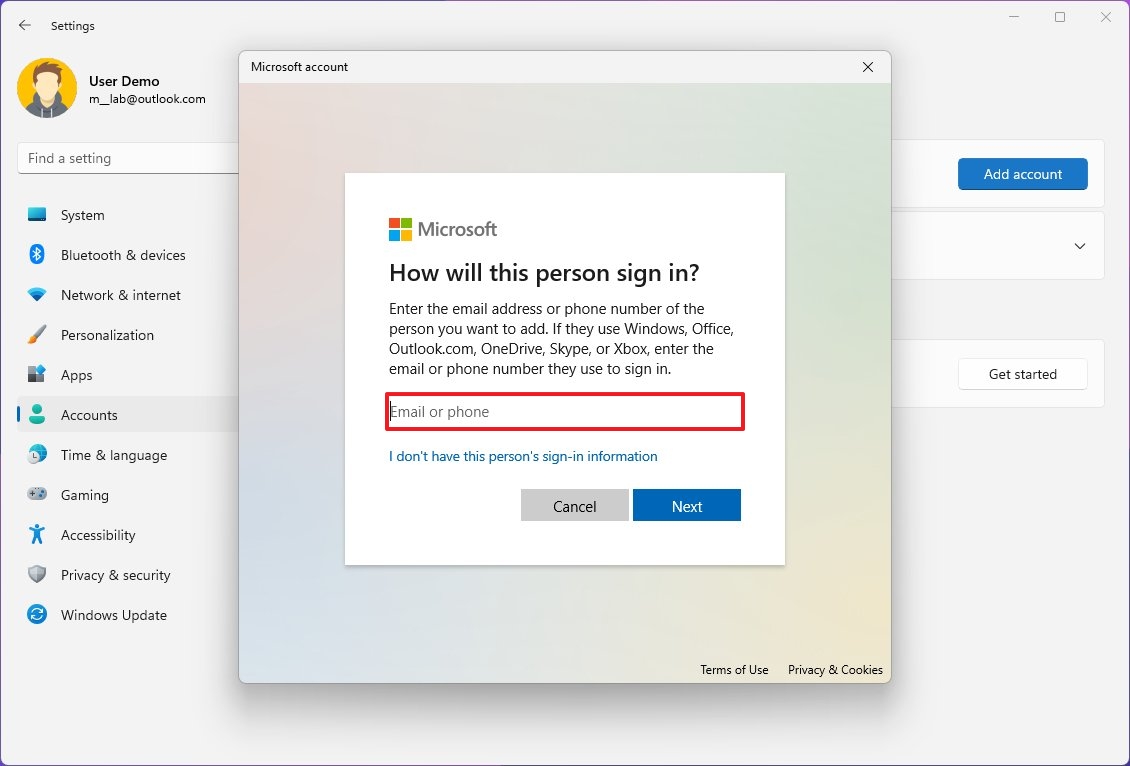
- Click the Add account button.
- Confirm the Microsoft account for your school partner.
- Click the Next button.
- Click the Finish button.
After you complete the steps, the other person will be able to sign in using their Microsoft account.
It's important to note that local account instructions are more suited to sharing the device with any person. In contrast, the Microsoft account steps will be suited to sharing the device with a specific person since they'll be signed in with their online account.
How to delete guest account on Windows 11
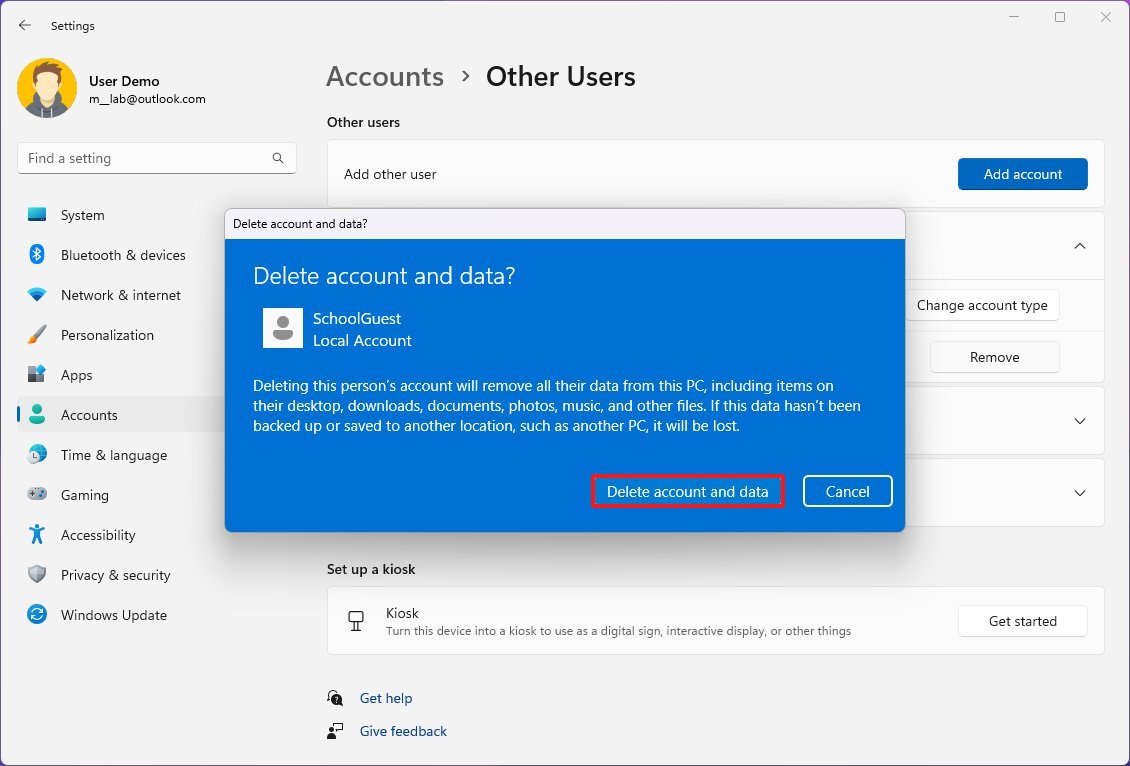
If you no longer need the guest account, you can quickly delete it and the files from your computer.
To delete an account from Windows 11, use these steps:
- Open Settings.
- Click on Accounts.
- Click the Other users page on the right side.
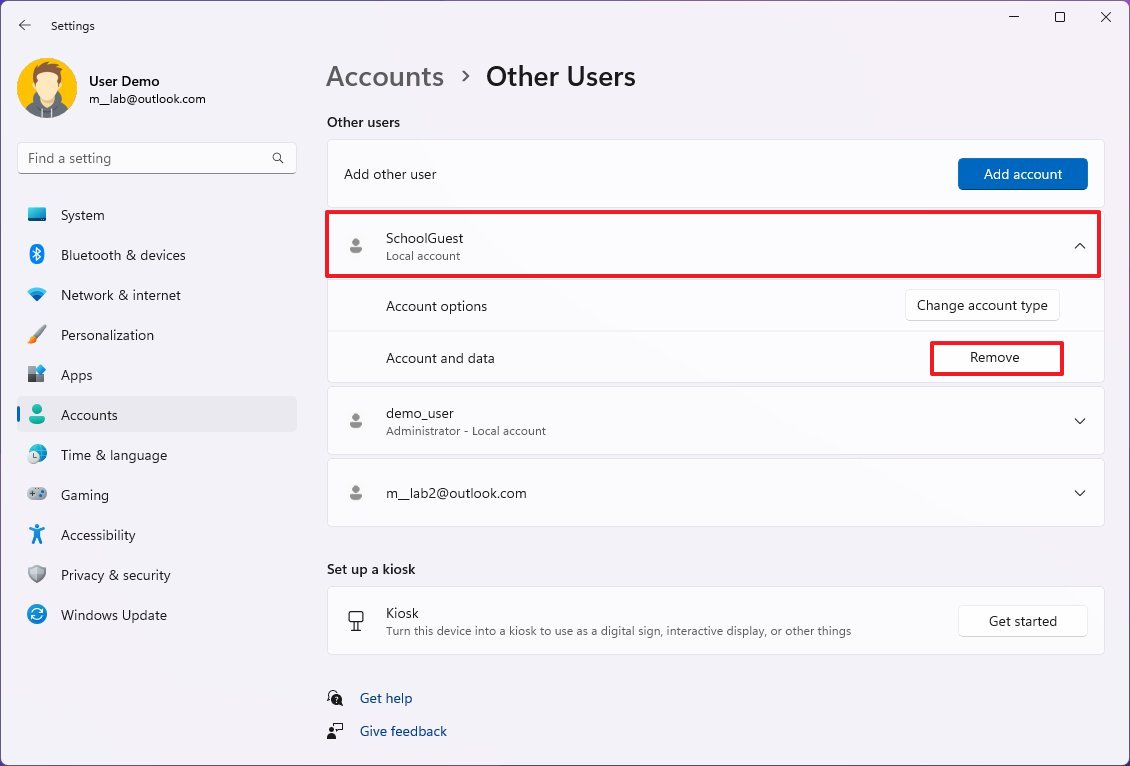
- Select the user account to remove.
- Click the Remove button.
- Click the "Delete account and data" button.
Once you complete the steps, Windows 11 will delete the profile and files without affecting your primary account.
More resources
For more helpful articles, coverage, and answers to common questions about Windows 10 and Windows 11, visit the following resources:
- Windows 11 on Windows Central — All you need to know
- Windows 10 on Windows Central — All you need to know

Mauro Huculak has been a Windows How-To Expert contributor for WindowsCentral.com for nearly a decade and has over 22 years of combined experience in IT and technical writing. He holds various professional certifications from Microsoft, Cisco, VMware, and CompTIA and has been recognized as a Microsoft MVP for many years.
