How to start using eight of the new features in Microsoft Office 2016
All the latest news, reviews, and guides for Windows and Xbox diehards.
You are now subscribed
Your newsletter sign-up was successful
Office 2016 has finally arrived on Windows. On September 22, Microsoft released the next version of the most popular apps for the office, and the suite is now available for Office 365 Home, Personal, University, Business subscribers, and for those who purchase the standalone version of the suite.
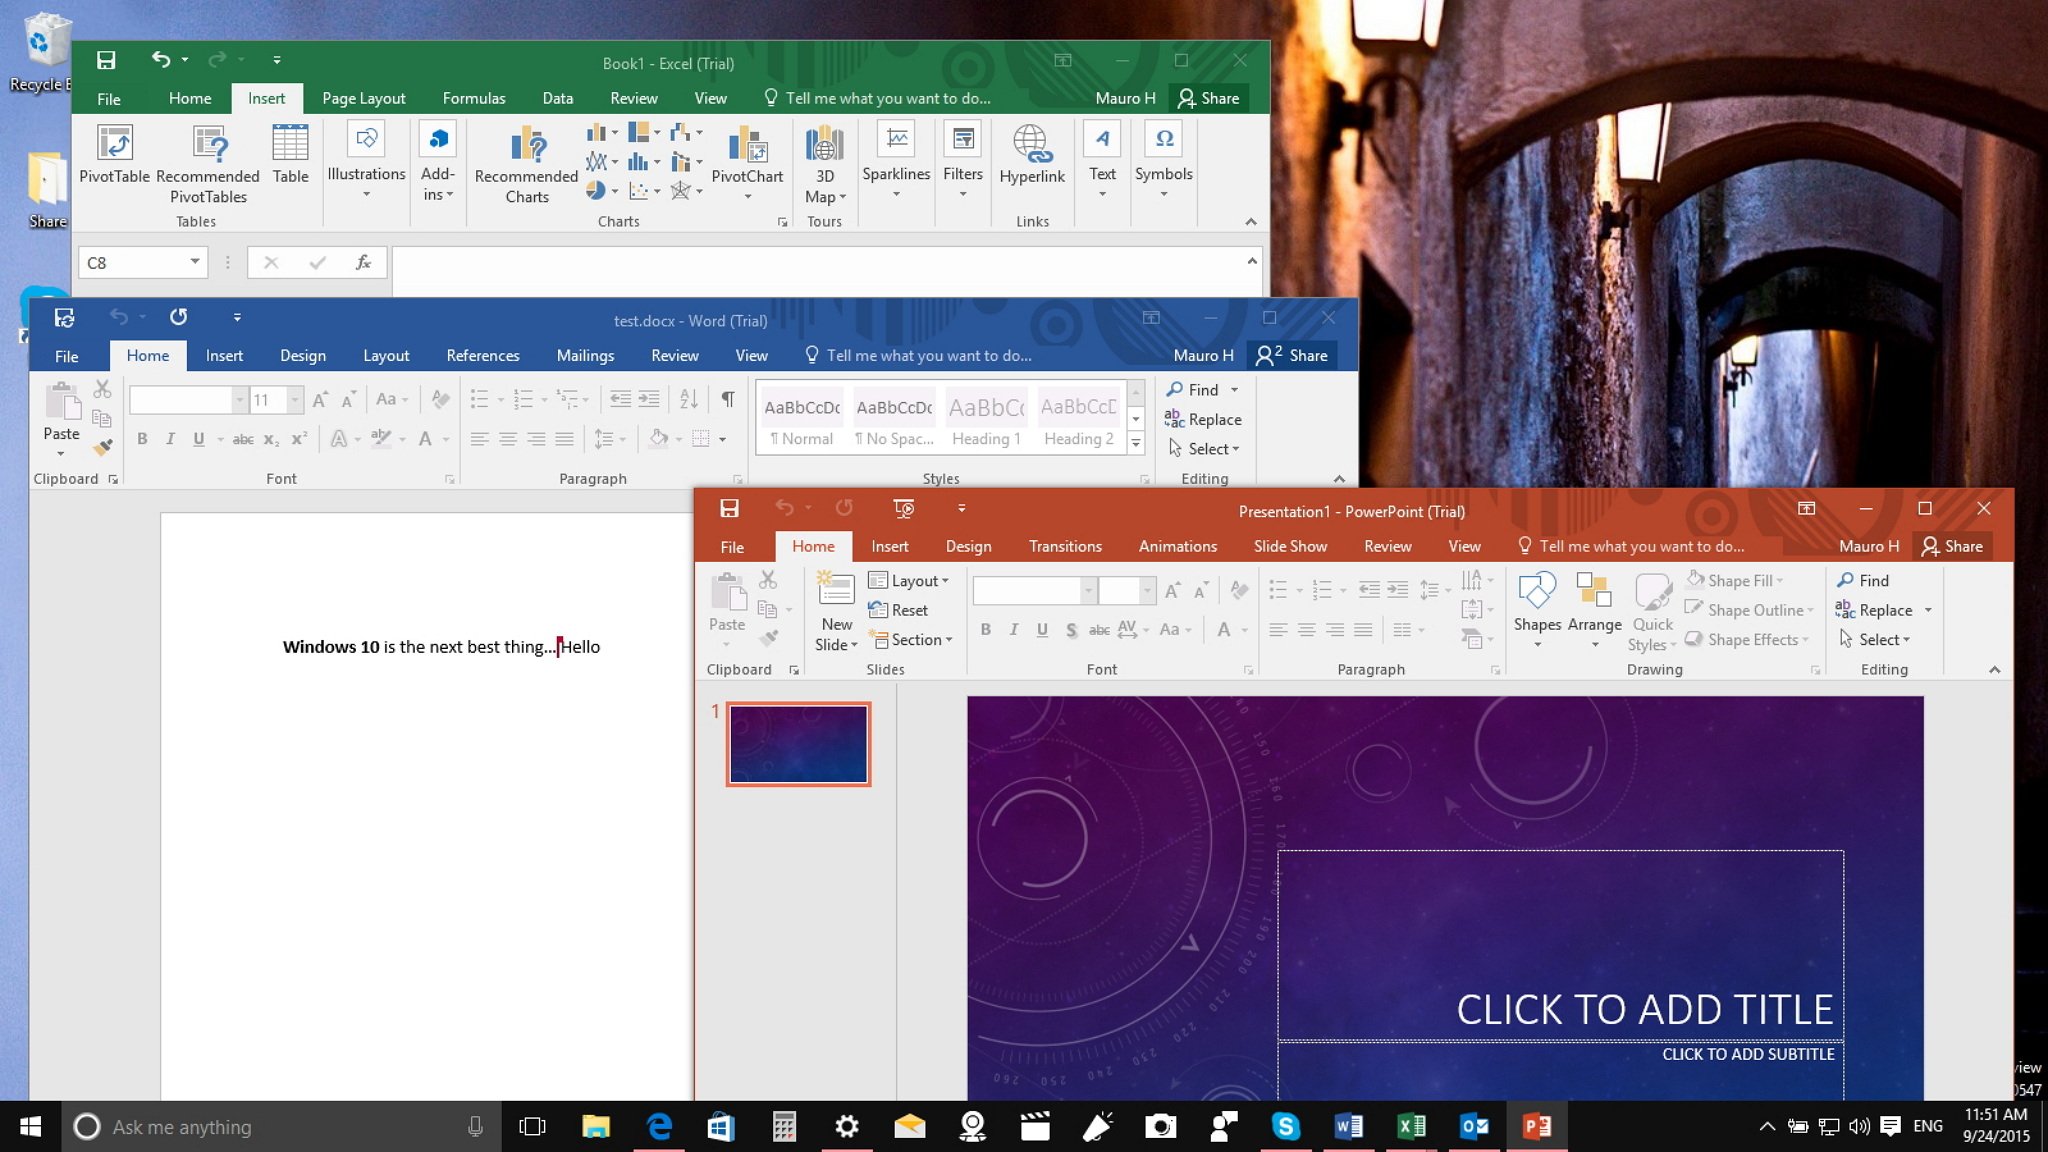
However, after installing Word, Excel, PowerPoint, OneNote, Outlook, and the other apps part of the 2016 suite, you'll notice that apps look very identical to the Office 2013 version with the exception that they now feature a new colorful theme. But, if you look closely, Microsoft is adding some new improvements and features that may change your mind and they will make you want to upgrade if you are a daily user of the apps.
For starters, Office 2016 is now moving toward the new servicing model we see with Windows 10. This change means that Office will never be considered complete. Instead, Microsoft will continue to release new updates with bug and security fixes and new features for apps as soon as they are ready. (So, if you're experiencing a known issue, be sure that it will be addressed in due time.)
Then we have the new features. Even though there are not a lot of them, there are quite a few, and in this new guide we're going to list some of them and how you can start using these new features.
Office 2016 features
1. How to share a file in Office 2016
The new version of Office is focusing on collaboration, which means that more than ever, the desktop version of Office depends on the cloud.
Before you can collaborate in real-time with other people you need to save and share your document using OneDrive and Office 2016 makes it easy -- just follow the steps below:
1- Open to edit or create a document in Word, Excel, or using any of the other apps.
All the latest news, reviews, and guides for Windows and Xbox diehards.
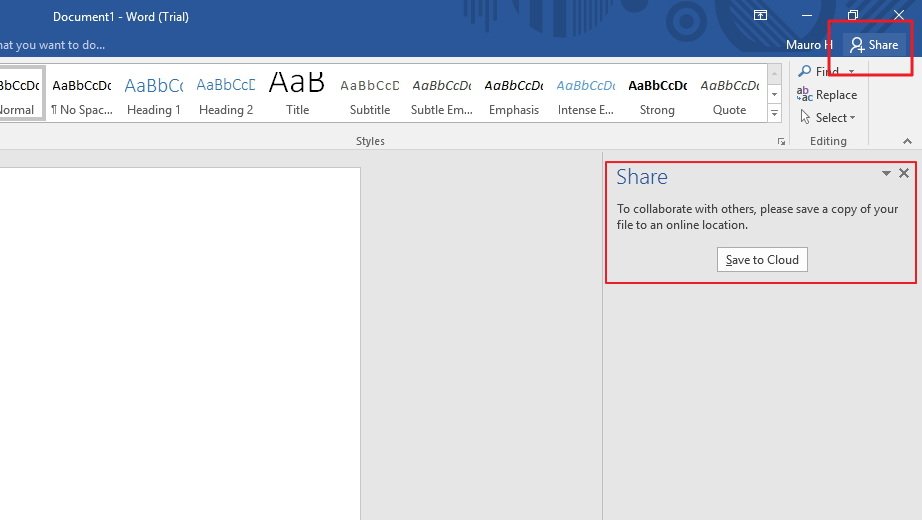
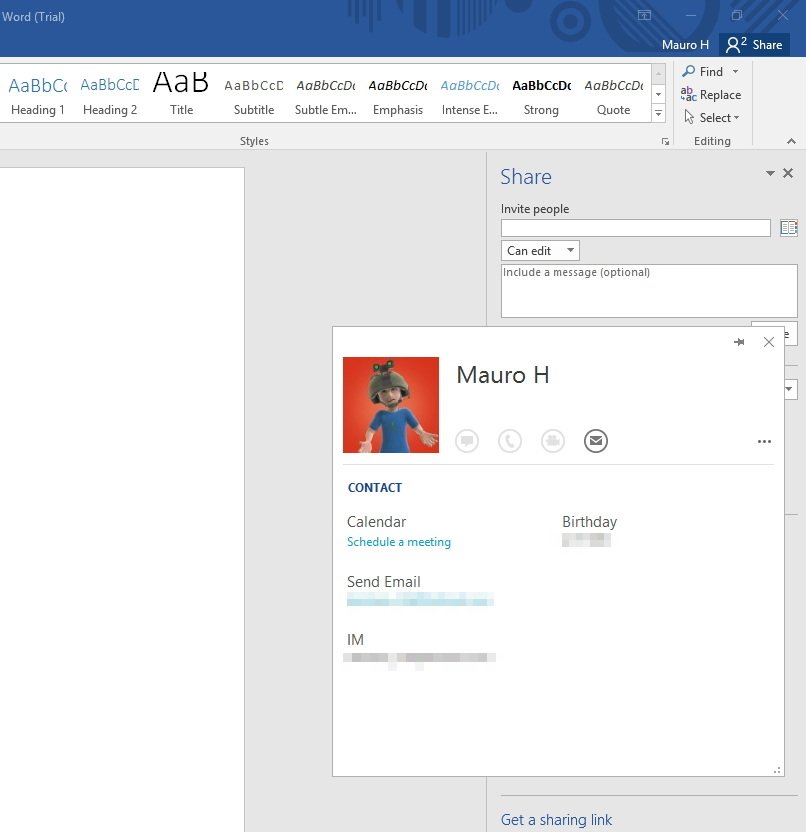
2- On the top-right corner of the app, click the new Share button. (Assuming, you're sign-in with your Microsoft account you'll see the following pane.)
3- Click Save to cloud, you'll then be redirected to the "Save As" section, pick you OneDrive account and the location to store the file.
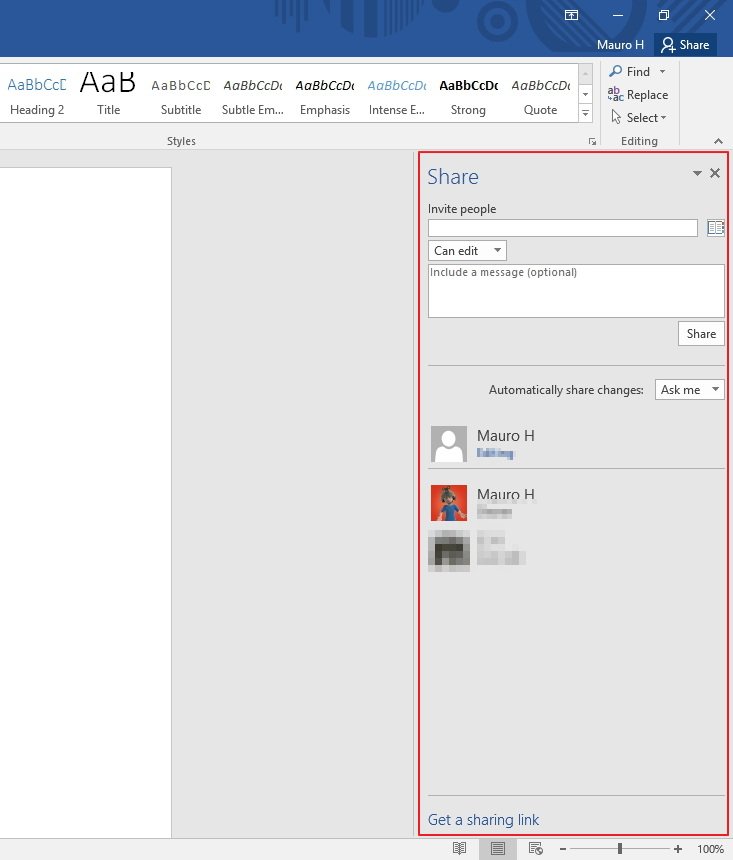
4- In the Share pane, you can invite people by simply typing their email address or accessing your contact list. You can also change the share permissions to edit or view only.
5- Then add a message describing the document or any note you want to communicate to those who can access the file, and click Share.
If you don't want to use this sharing mechanism, you can click the Get a sharing link at the bottom of the Share pane to get the edit or a view link of the file. With this link, you can copy and send it via email, IM, or by other means.
2. How to collaborate in real-time
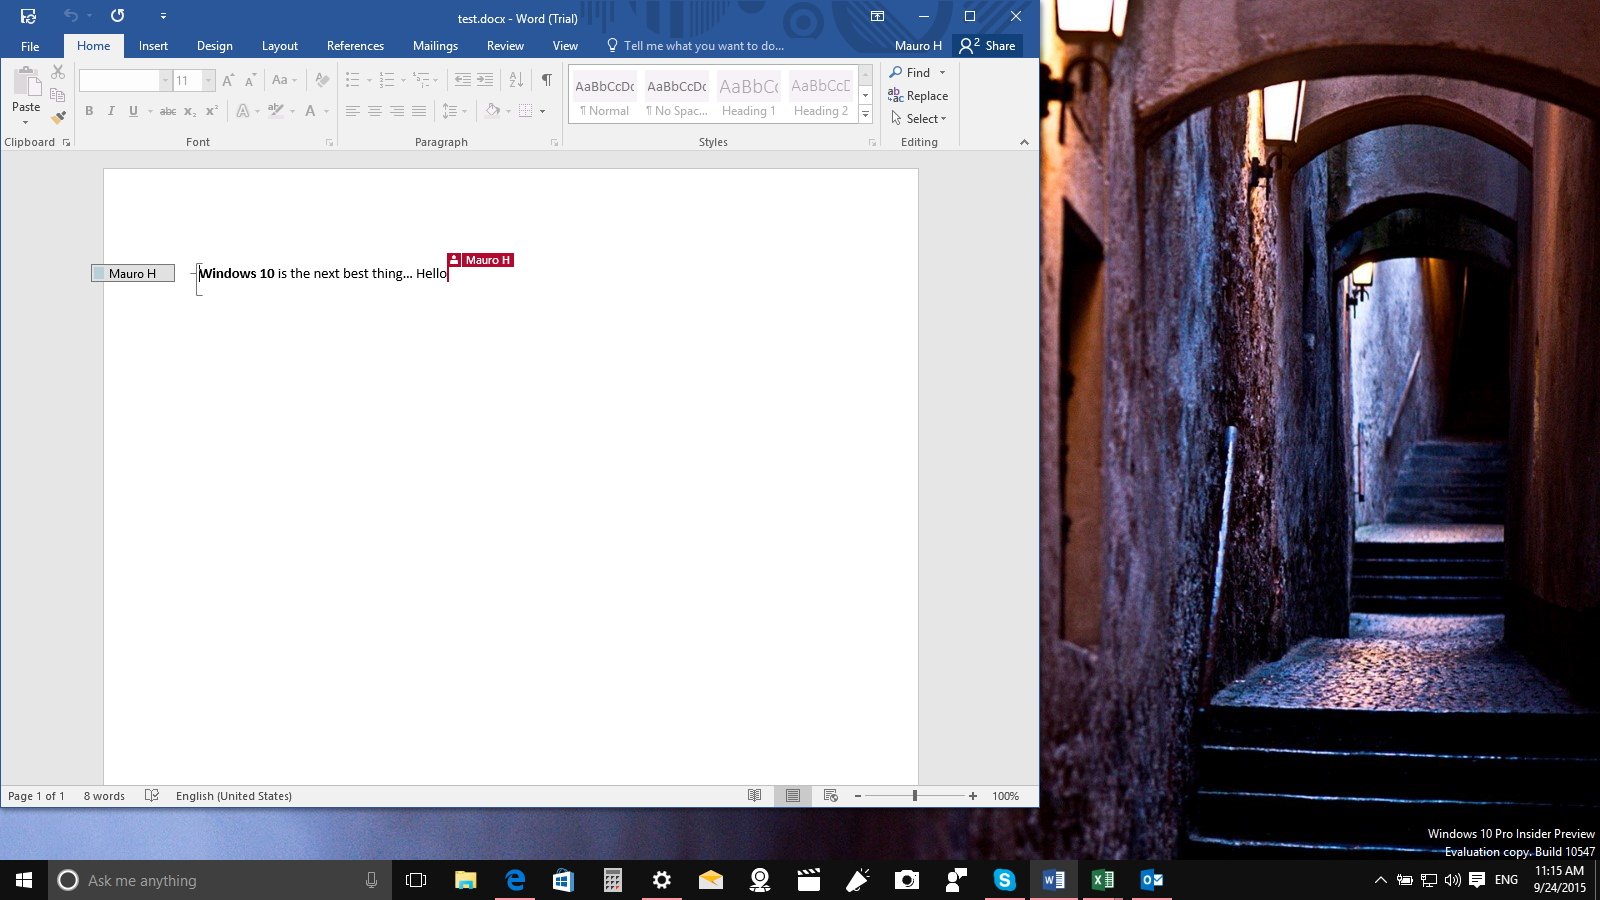
Once you have shared the document through OneDrive, people with the editing permission can simply open the file with the desktop version of Office 2016 or Office Online and start collaborating automatically -- just like that.
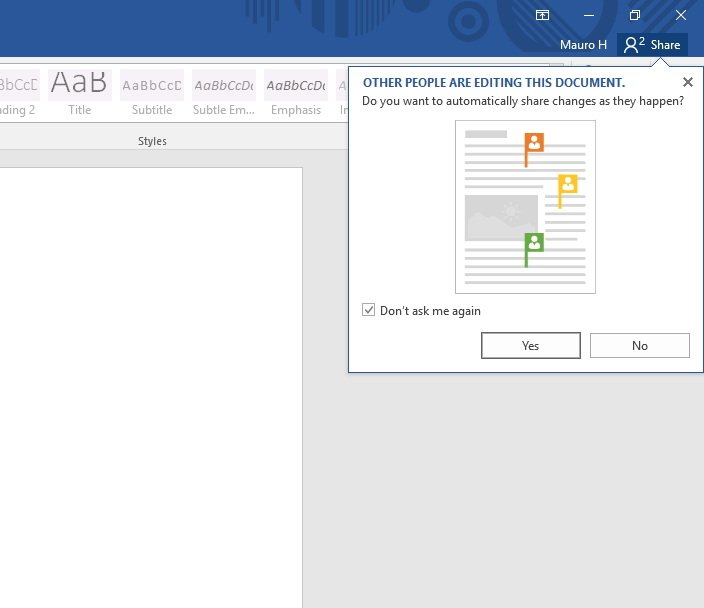
If you're the person who has created and shared the document, you'll also get a notification alerting you that other people are editing the document. You'll be prompted whether you would like to share automatically changes as they happen. If this is something you like, simply click Yes on the alert.
Yes, it's amazing that you can collaborate in real-time with other people from the desktop and web version of the apps. However, this doesn't mean you can just jump to any line and edit whatever you want.
When you're collaborating in real-time, you can only work and edit your content or any other content the other person isn't already editing. For example, if you're working on a paragraph, you can keep editing that content. But you can't edit another paragraph that is being edited by someone else until that person jumps to another new paragraph.
If there is something you need to communicate with the other person, go to the Share tab. This action will list all the people that are currently editing the file. Then hover over the person you want to contact and you'll see the choice to IM, voice, video chat, or send an email.
Note: Keep in mind that you'll need to have Skype installed and setup before you can start a conversation.
3. How to use Smart Lookup
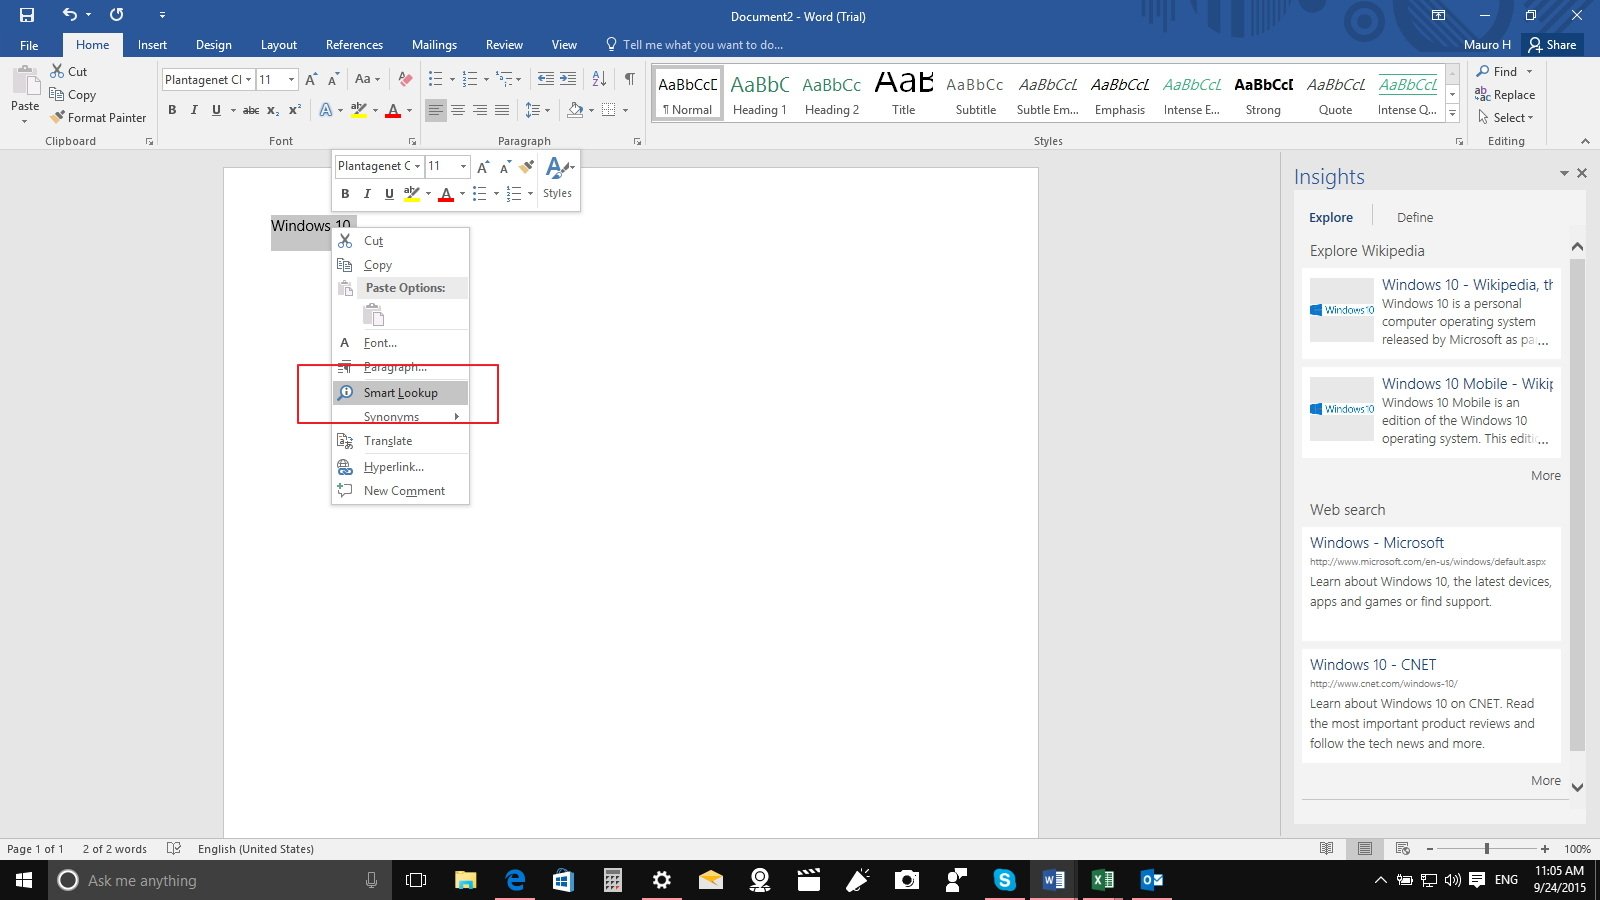
Another feature included in the Office 2016 apps is Smart Lookup. This feature is similar to the one you'll find in Microsoft Edge when you ask Cortana for assistance in the web browser. The Smart Lookup allows users to research specific content using the web information through the Insights functionality.
If you need to know the definition of a word, or you need to research a place or a person, or you simply want to know more about something specific. Instead of using the web browser and leaving the document, simply select and right-click the text you want to research, and select Smart Lookup.
4. How to use Tell Me
Although, there aren't many new features in Office 2016, over the years Microsoft has been adding a lot of new features and even has added new apps (e.g., Sway and Planner). So, today is becoming more difficult to track and remember where a feature or a button is located within the app. This is when Tell Me becomes very useful.
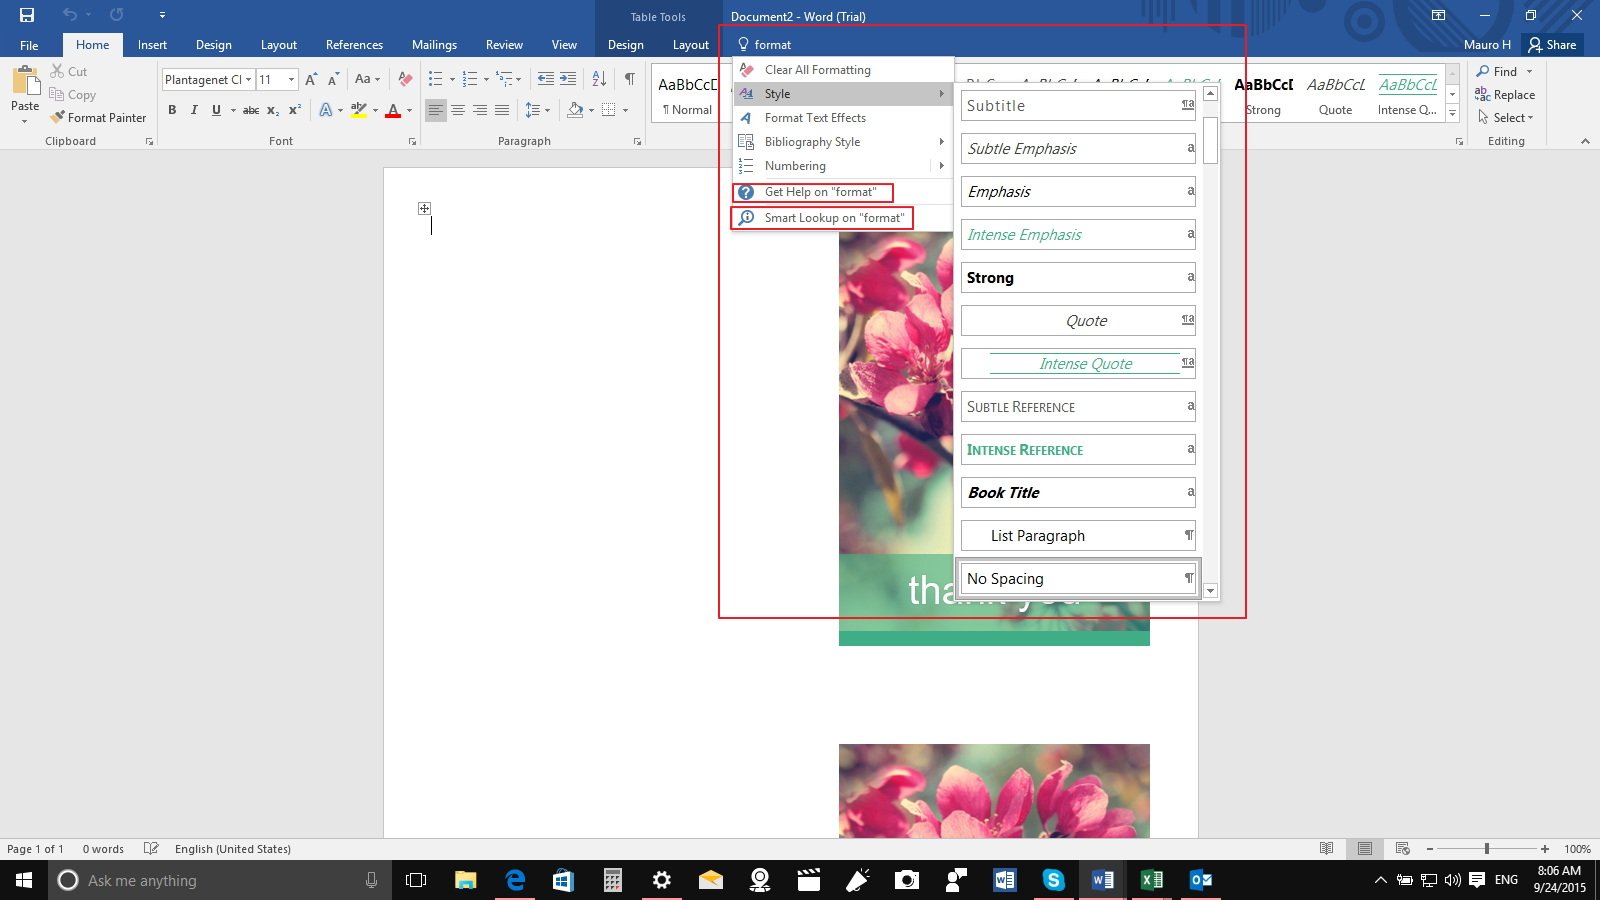
Tell Me sits on the tabs menu of every Office 2016 app. To use the feature, simply click on "Tell me what to do", and type what you want to know, such as commands you can't find or options you want to configure.
On the results, you will have instant access to the feature you're seeking. From the results, you can also get more help from the online Office documentation, and you can even jump right to Smart Lookup.
5. How to import web data into Excel
In previous versions of Excel when you needed to import data from the web, you needed to do the work manually by copying and pasting all the data and reformat everything on the document. Depending on the data, this could result in a lot of work.
In Excel 2016, Microsoft is adding an easier way to make it all happen simple and fast. If you need to grab a specific piece of data such as tablet with content, you need to follow these steps:
1- While in the web browser, visit the webpage that has the data you want, right-click and copy the link to the clipboard.
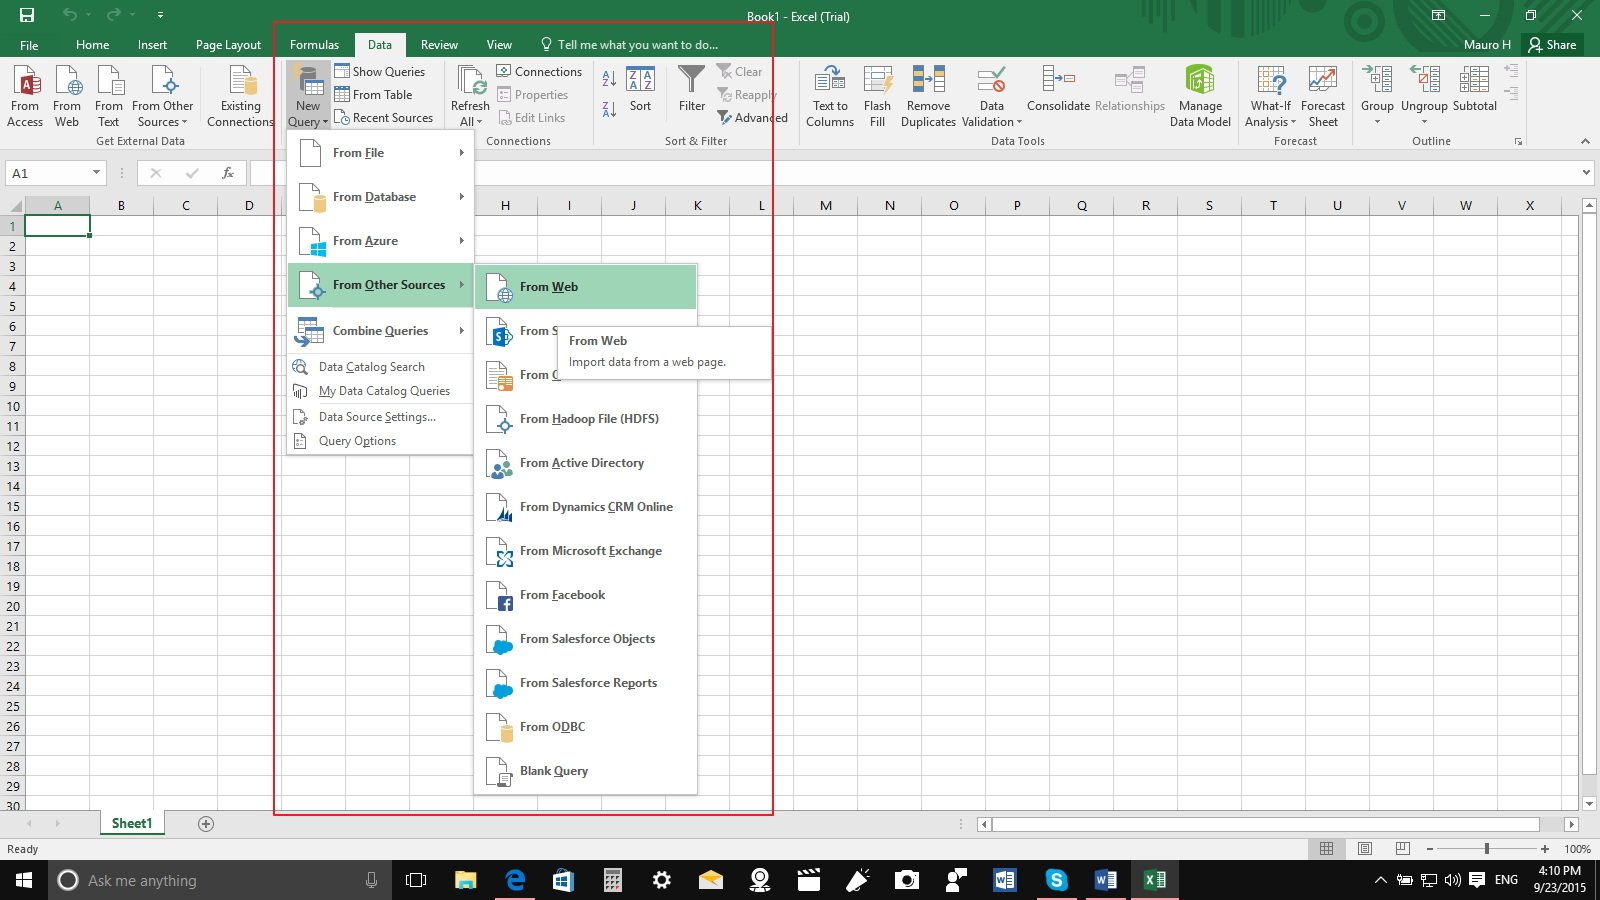
2- Open Excel and go to Data tab.
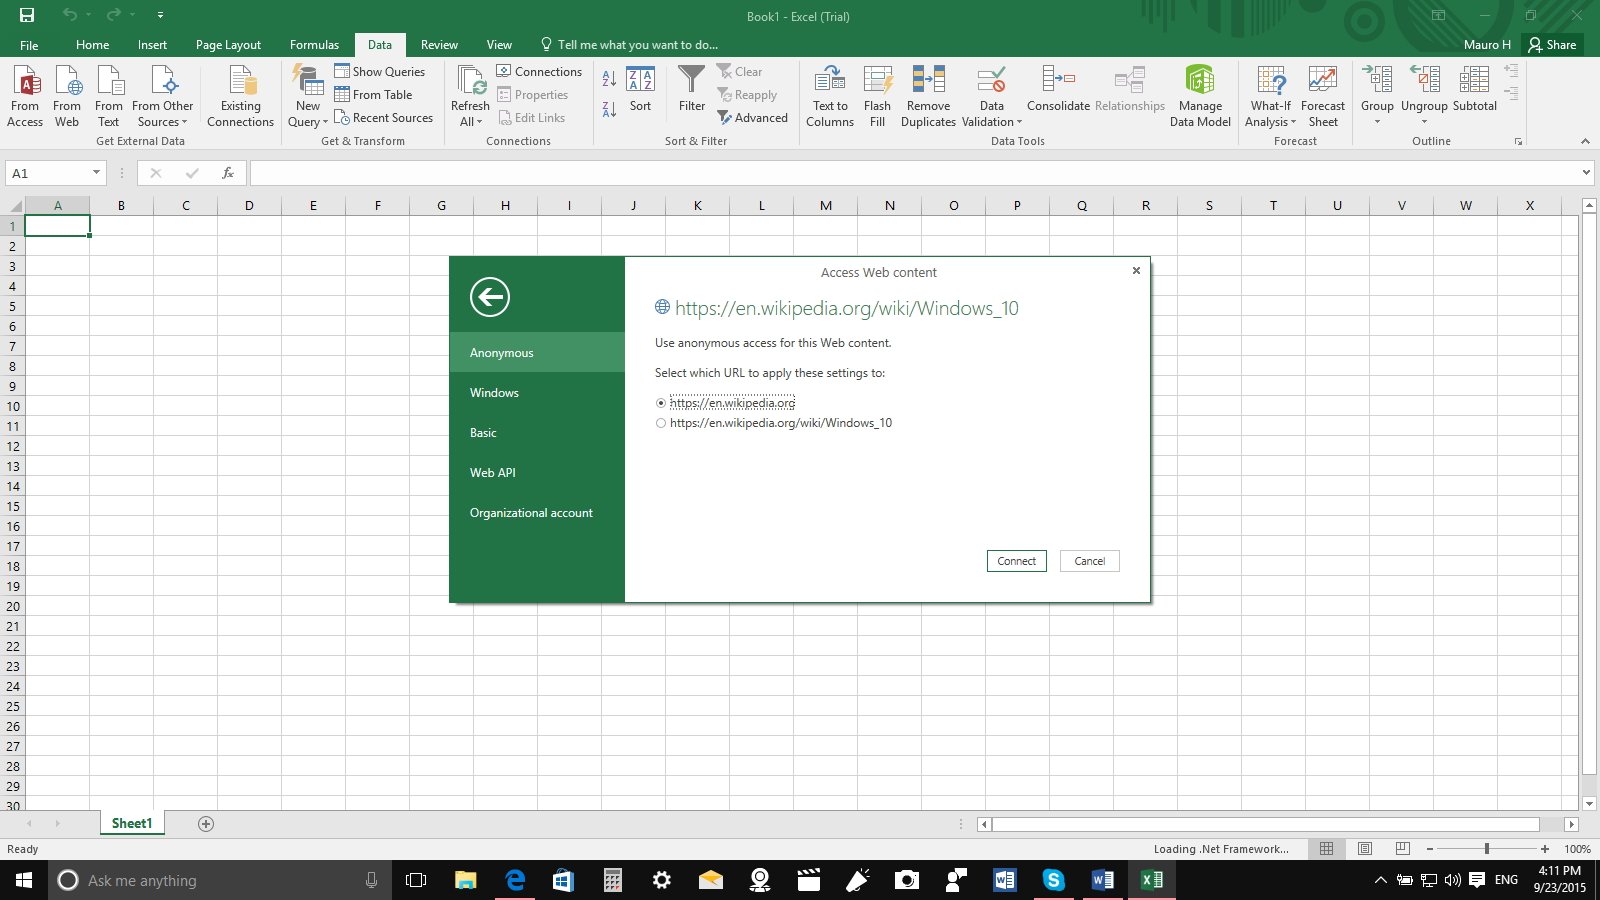
3- Click on New Query, select From other Source, and click on From Web.
4- On the next window, paste the source link and click OK, and select how you want to access the data, and click connect.
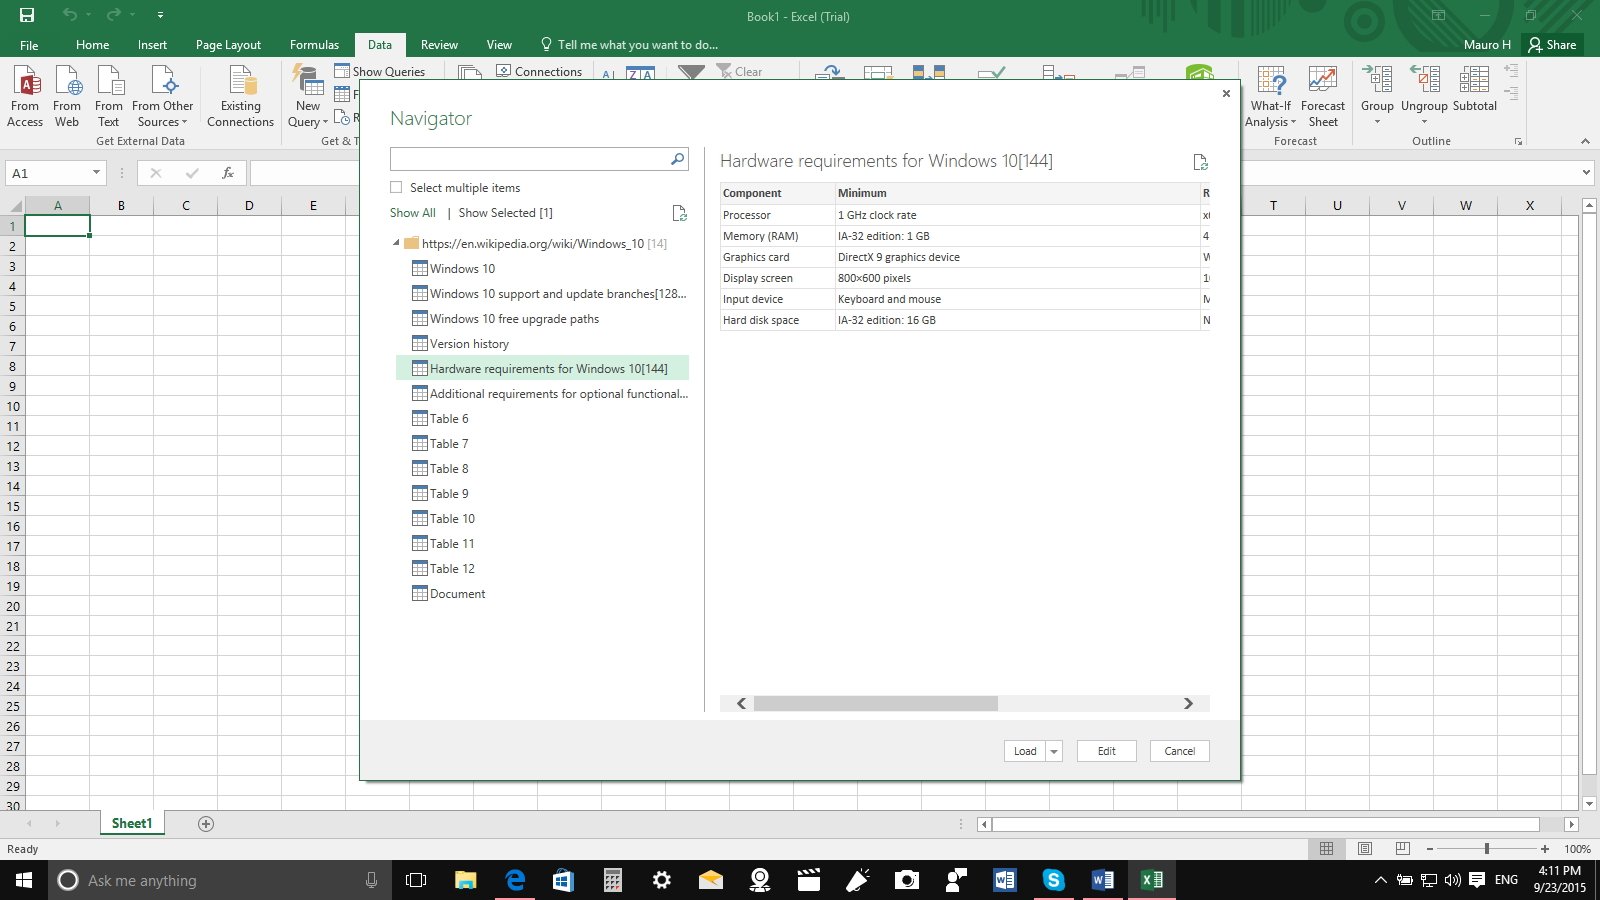
5- Excel 2016 will open the "Navigator", and it will load the data available from that web page, click on the table you would like to import, and click Edit.
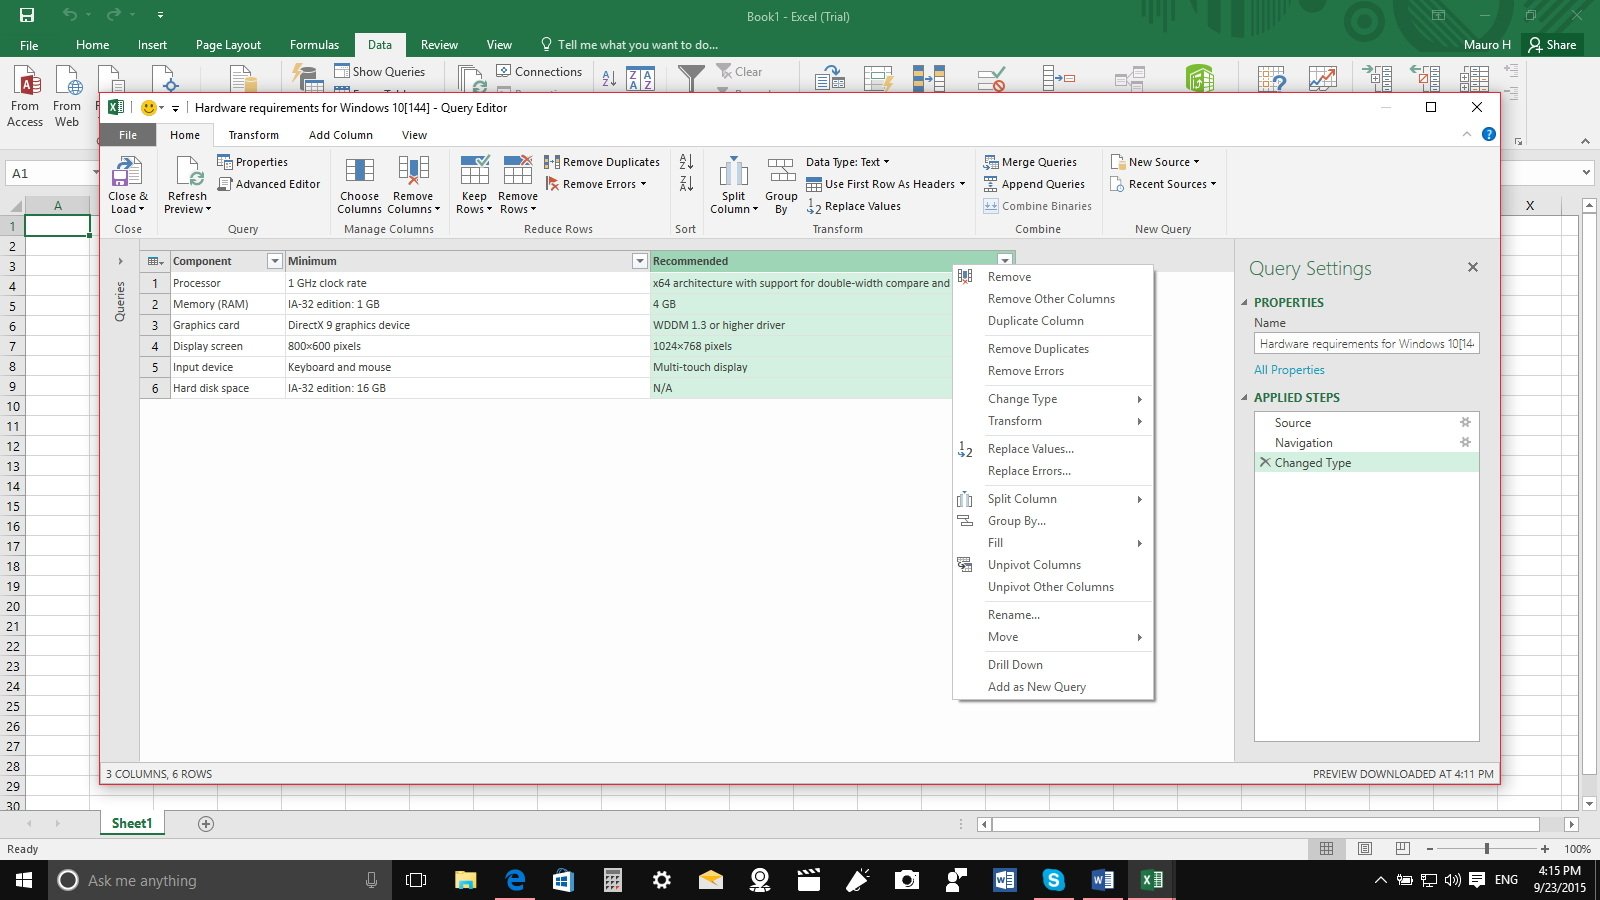
6- Now, Excel will fetch the data. Because this is an automated process, and data from the web isn't very reliable, you can easily clean up the table before inserting the data into your new document.
You can right-click on one of the columns to remove, or you can click the top-left corner of the table to convert the first row as headers, and much more. When you're satisfied with the data, click the Close & Load button.
Now that the table is in Excel 2016, you can manipulate the data any way you want by using graphs, formulas, and more.
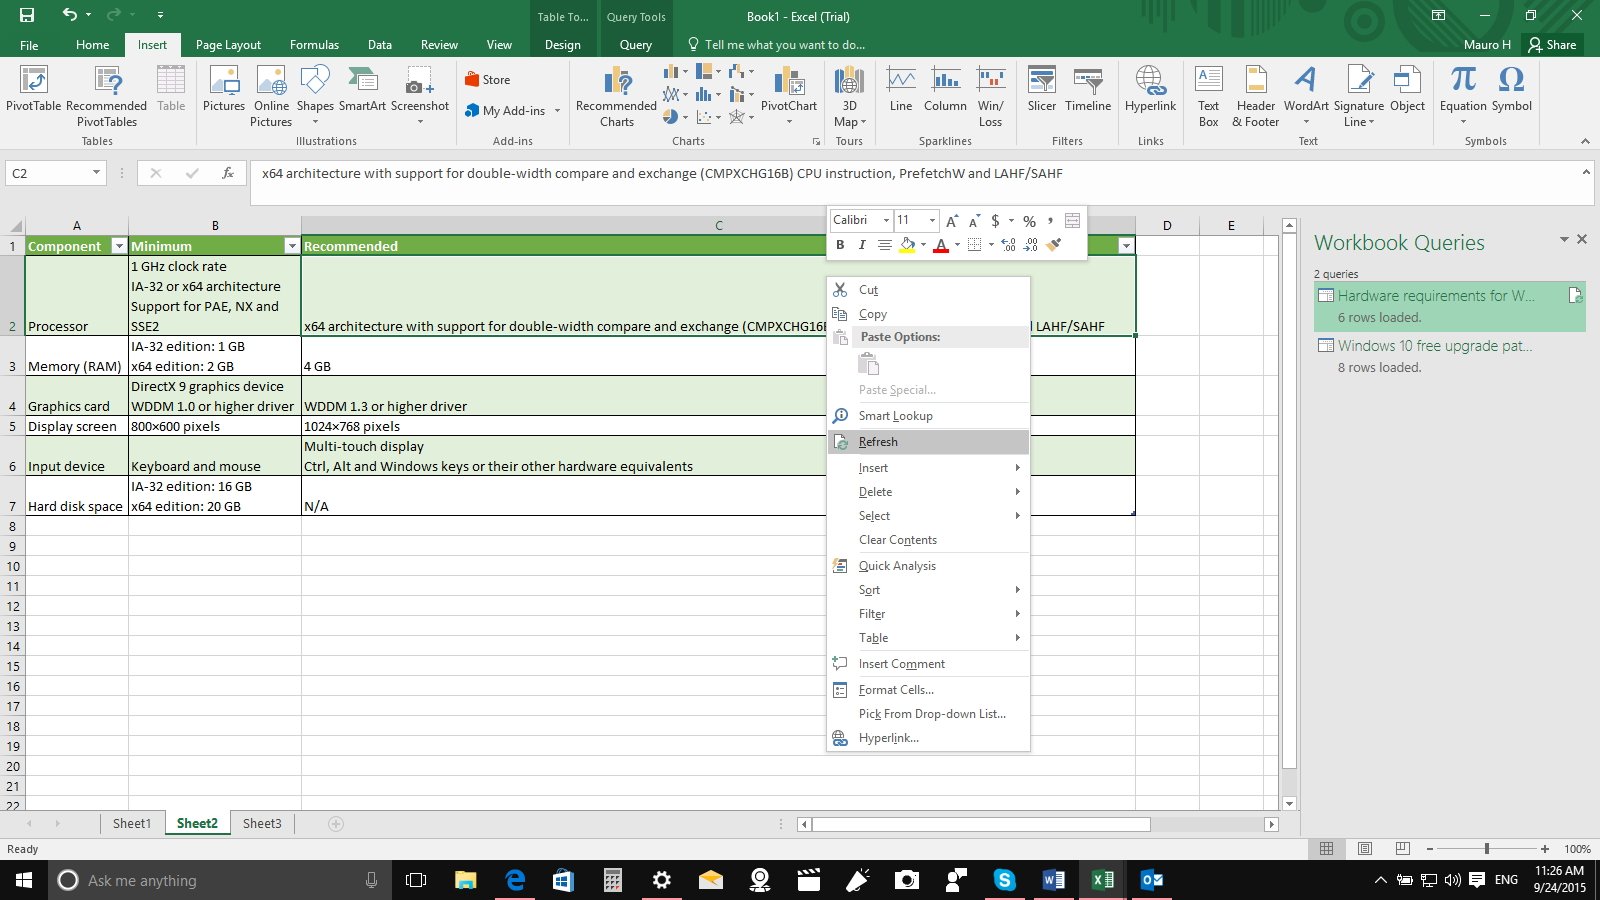
Tip: Furthermore, now that you have imported data from the web, Excel will save the source link into the file. This ability means that you can right-click the table and clicking Refresh. If the data has changed on the web, you will see the new data also updating in your table. This feature is particularly useful if you make any changes, and you want to roll back to the original data.
6. How to use new charts in Excel 2016
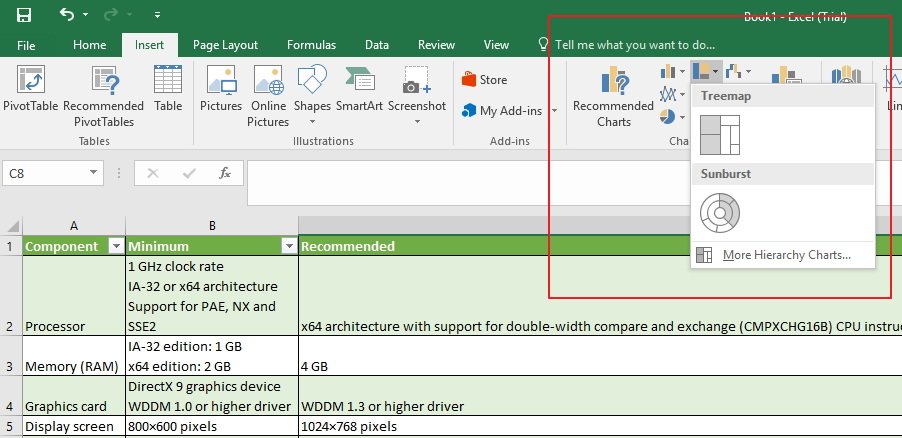
Microsoft is also adding some new charts (Waterfall, Histogram, Treemap, Pareto, Box & Whisker, and Sunburst) for Excel, Word, and PowerPoint.
If you want to analyze the data using the new charts, you need to do the following:
1- Create a table and select its content.
2- Go to the Insert tab, and choose from one of the new charts.
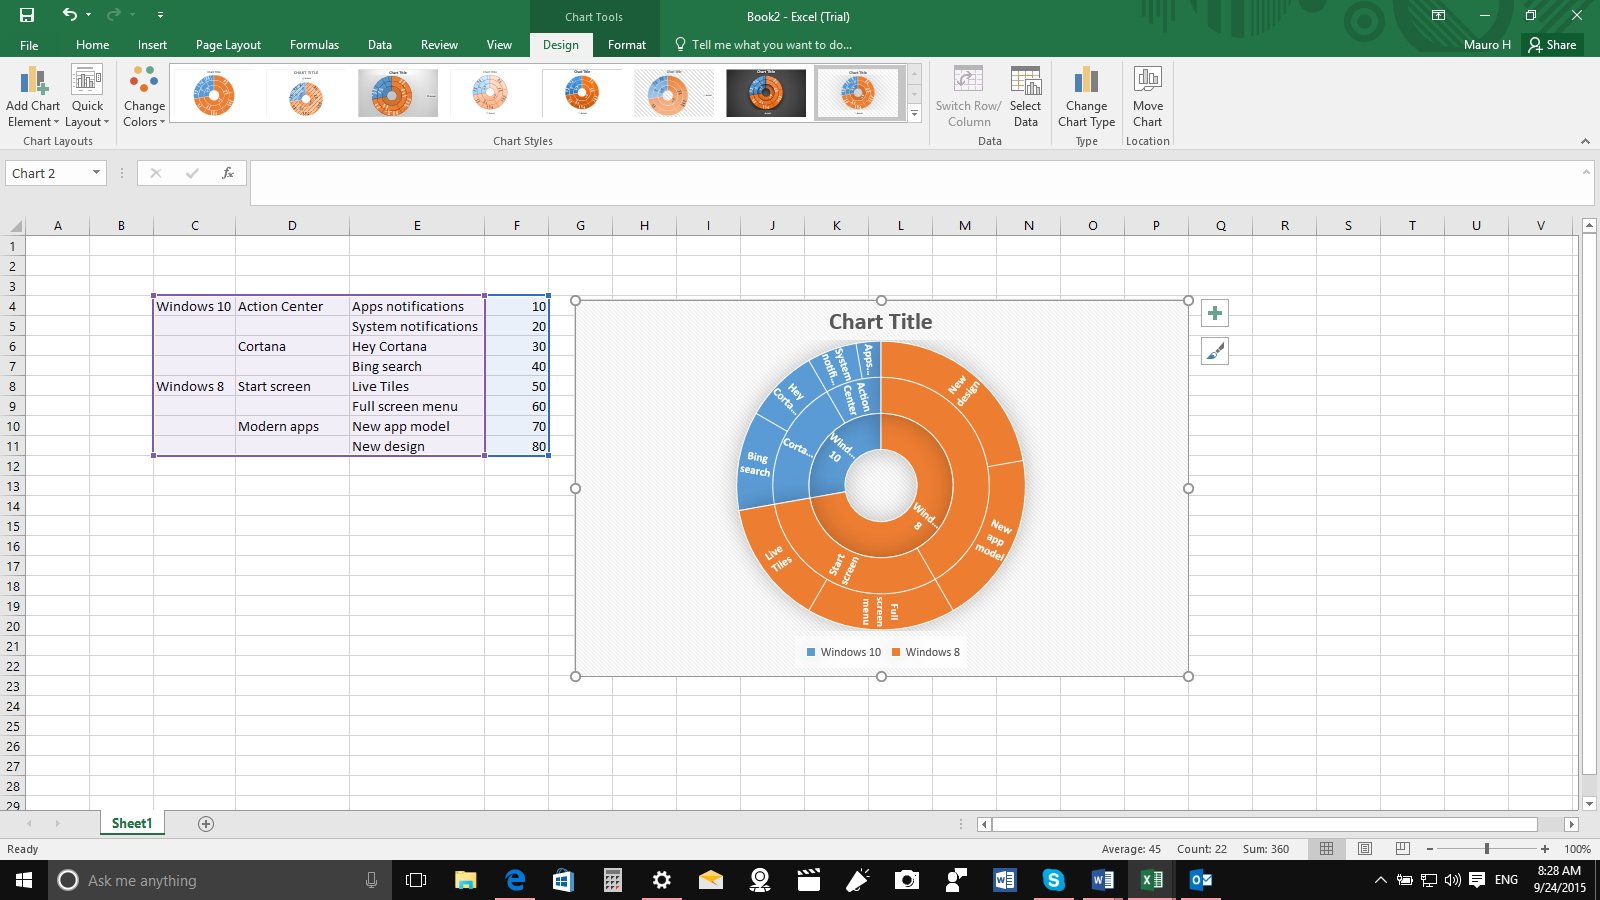
If you want to use the sunburst chart, you'll need to create a table in a hierarchy. The first column should be to enter general categories, the second column should contain subcategories, and the third column should more specific details, and a fourth column should contain numbers, such as pricing, products sold, etc. Then select the table's content and from the Insert tab, click the new Sunburst chart.
7. How to attach OneDrive files to Outlook 2016
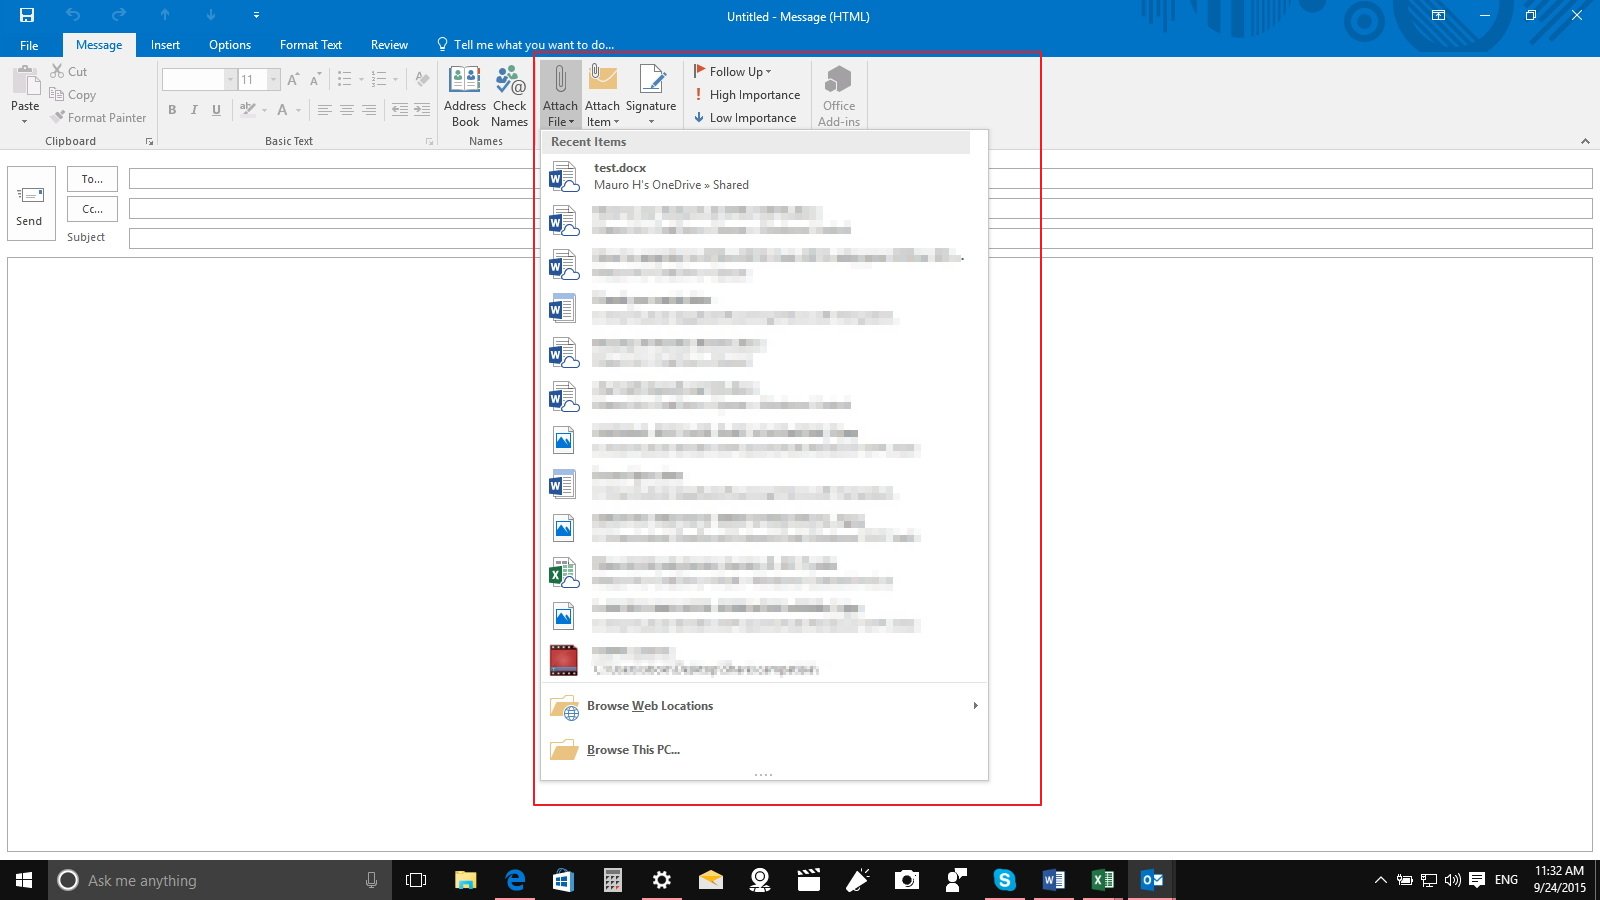
In Office 2016, Microsoft is also improving many aspects of Outlook 2016. For example, in the new version you can attach a recent file you have been working on to a new message. To do so simply click the Attach File (paperclip) button and you'll see a list with all the recent files. Then just pick the file and you're good to go -- no more spending time browsing your computer for a specific document.
Also, the software giant is making it very simple to attach OneDrive documents. The attachment works in the same way as a local file, but for OneDrive files, Outlook 2016 will create a special cloud attachment link. When the recipient double-clicks the attachment, the document won't download and open with the default app. Instead, the document will open in the web browser.
8. How to use the Groups feature in Outlook 2016
As part of Office 365, last year, Microsoft introduced Office 365 Groups, which enables users to create different types of groups to allow people to communicate easily while collaborating on new projects. Now, as part of Office 2016, the company is integrating Groups into Outlook 2016 to make it easier to group people and contact each other on an IM like environment. This ability differs from the typical back and forth emails and hunting messages on an already clutter inbox.
There is also now a Windows Phone app for Outlook Groups too.
In Groups, people can chat, share OneDrive files, calendars, and OneNote notebooks -- all you need to get your project done.
Groups on Outlook 2016 is only available for Office 365 subscribers, and you can get started by following these steps:
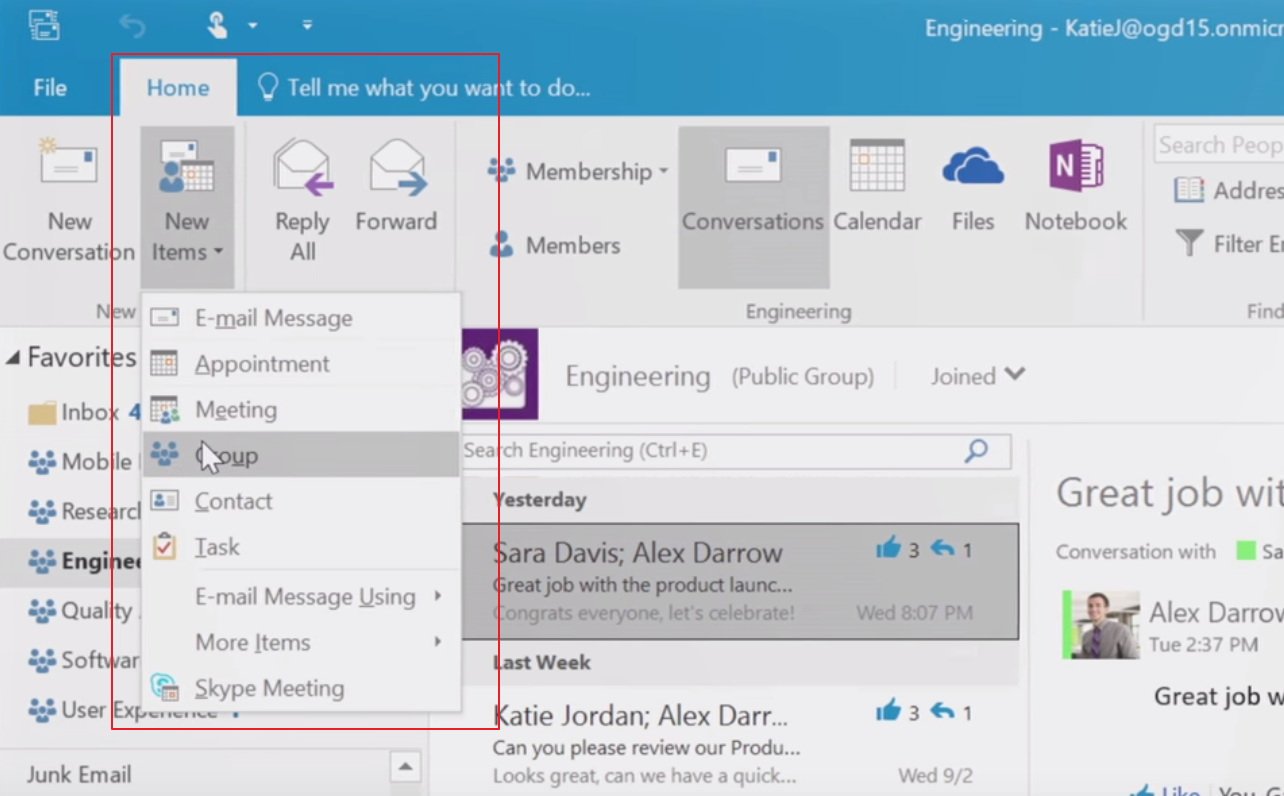
1- While in Outlook 2016 using an Office 365 subscription, click the New Items button in the "Home" tab, and click on Groups.
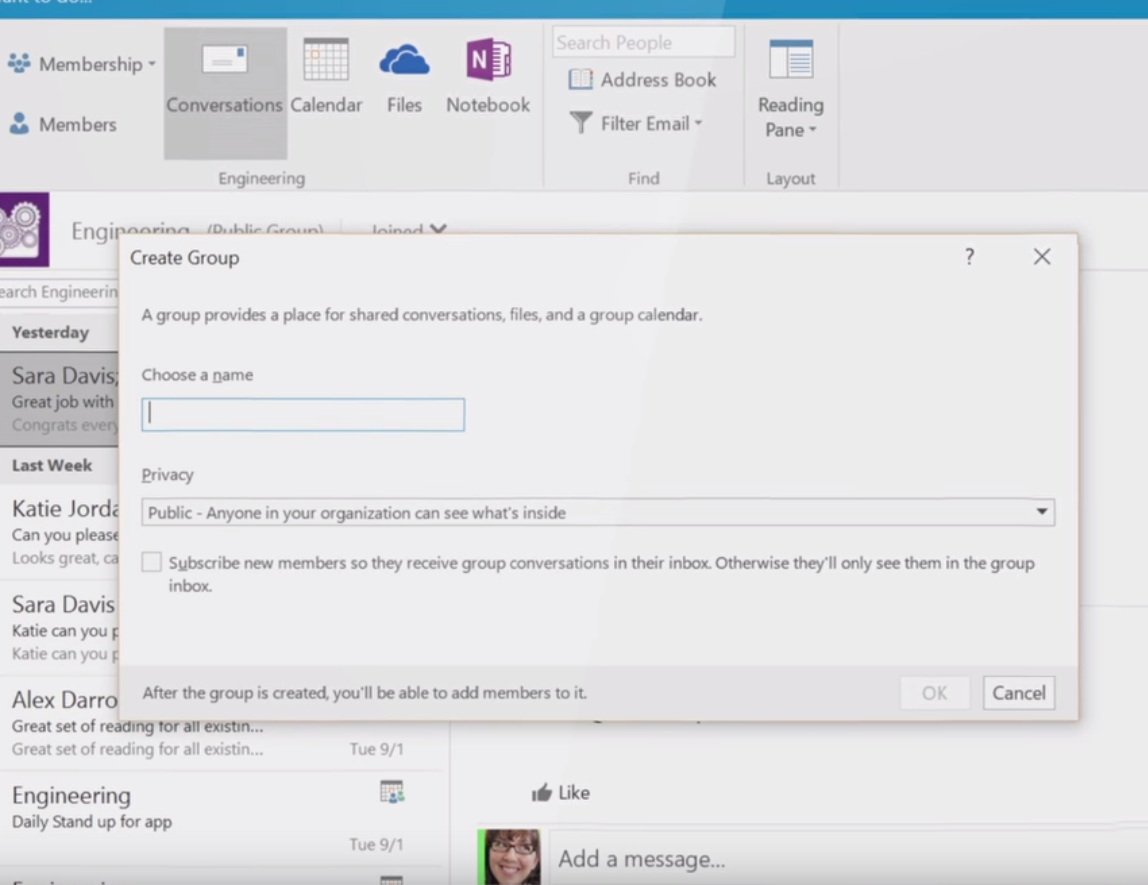
2- In the "Create Group" page, by choosing a name and group ID, and setting the groups as private or public, and then click OK.
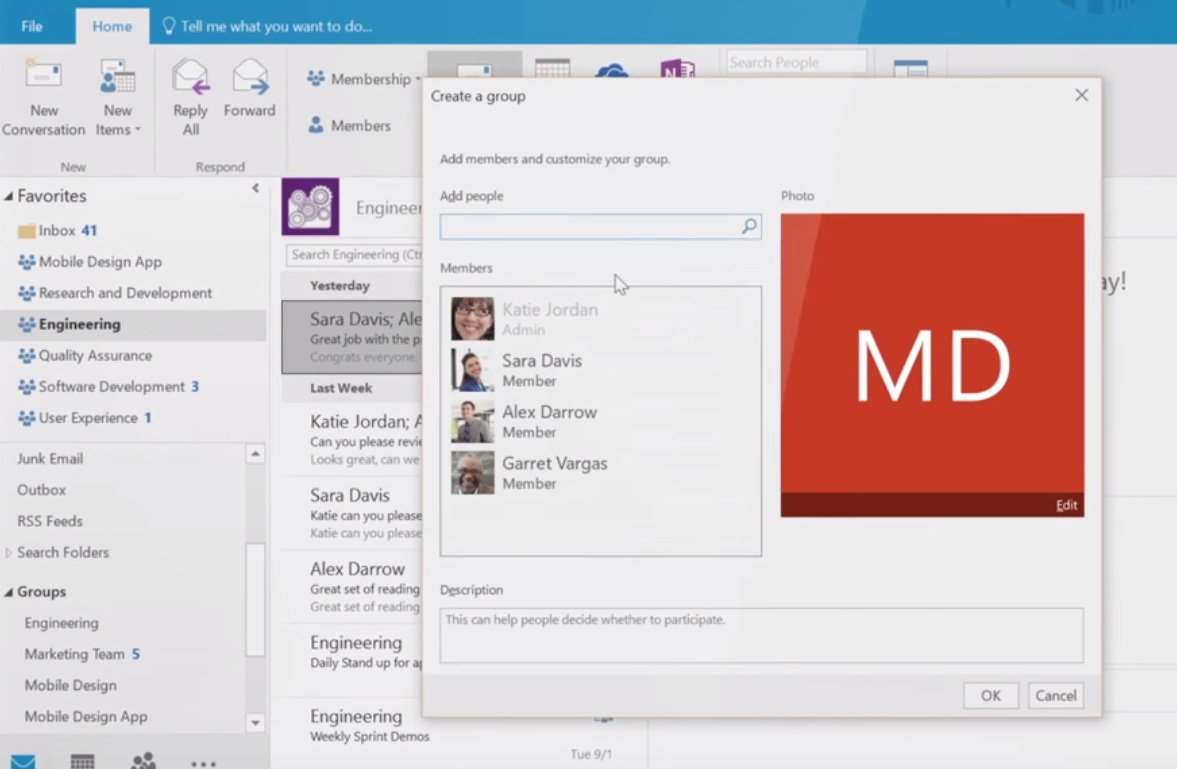
3- Find and app new members to the group and add a description as necessary and click OK to finish creating the group.
It's that easy. The newly created group have access to a shared inbox and shared calendars to view and create meetings, files hosted on OneDrive, and to the OneNote notebook for the group, right from the ribbon's menu.
If you need to send a group message, simply click the New Conversation button from the "Home" tab. Then compose the message and attach a new file as necessary, and click Send -- just like any other email you send every day.
The group members can post messages, and there is a choice to like updates for those messages that don't need replies.
Outlook Groups is available for Windows PCs and phones through the mobile app that you can download here:
Download Outlook Groups for Windows 10 Mobile / Windows Phone 8.1
Wrapping things up
While the features and changes aren't massive in Office 2016, this version of the most popular suite of apps still represents a major milestone for Microsoft. This update includes significant changes that should make work a lot easier for Office 365 subscribers and in particular for business users.
Of course, if you're a regular user that only needs a canvas to write a document or a spreadsheet to manage your household finance without sophisticated features, you can always opt for Office Online or other platforms such as Google Docs with Google Drive integration. These services are free, but the new features are a welcome addition to Office 2016 that many customers will appreciate.
If you're not an Office 365 subscriber, you can get a the Personal edition for $70 per year or Home edition $100 per year. With these versions, you can install Office on up to five devices, or Office Home & Student 2016 (one-time purchase) for $150. (For more info, visit https://www.office.com.)
Do you think it's worth the upgrade? Which feature do you like the most? Let us know in the comments below.

Mauro Huculak has been a Windows How-To Expert contributor for WindowsCentral.com for nearly a decade and has over 22 years of combined experience in IT and technical writing. He holds various professional certifications from Microsoft, Cisco, VMware, and CompTIA and has been recognized as a Microsoft MVP for many years.
