In the words of Cal Kestis' performance actor Cameron Monaghan, "Never trust a man who doesn't wear a poncho."
Ponchos were all the rage in the predecessor to Star Wars Jedi: Survivor, and while they're nowhere near as popular in this game, you can still grab a poncho if you know where to look. Follow along with my guide to find Cal's poncho, but beware. You're going to have your work cut out for you though, because just like the poncho returned, something far more sinister has also made its way into Respawn Entertainment's latest Star Wars adventure.
Star Wars Jedi: Survivor — How to find the poncho

To start, you'll need to find the Fort Kah'lin meditation point. If you haven't gotten to it yet, it's right in the center of a large Bedlam Raider fort on Koboh, located northwest of your hub at the town of Rambler's Reach. You'll get there much faster if you have a Nekko mount, but traveling by foot is fine.
Once you make your way to this meditation point, I highly recommend clearing the entire outpost at least once. This way, you'll unlock all the shortcuts and you'll understand the layout before proceeding onward. In order to find the poncho, you need to make your way on top of the large round building covered in spikes and droid parts. This building is right next to the meditation point, with a couple of bridges connecting it to towers around the base.
There are droids everywhere, but at this point, they shouldn't be too much of a problem for you to deal with. Just be mindful of the Super Battle Droids, which take a few hits to bring down.
On top of the building, you'll find a platform with a group of battle droids like in the image below. Destroy the droids from a distance, either using a blaster or deflecting shots and Force-pushing grenades back at the offending droids. Now, take a deep breath (you'll need it) and walk onto the platform.

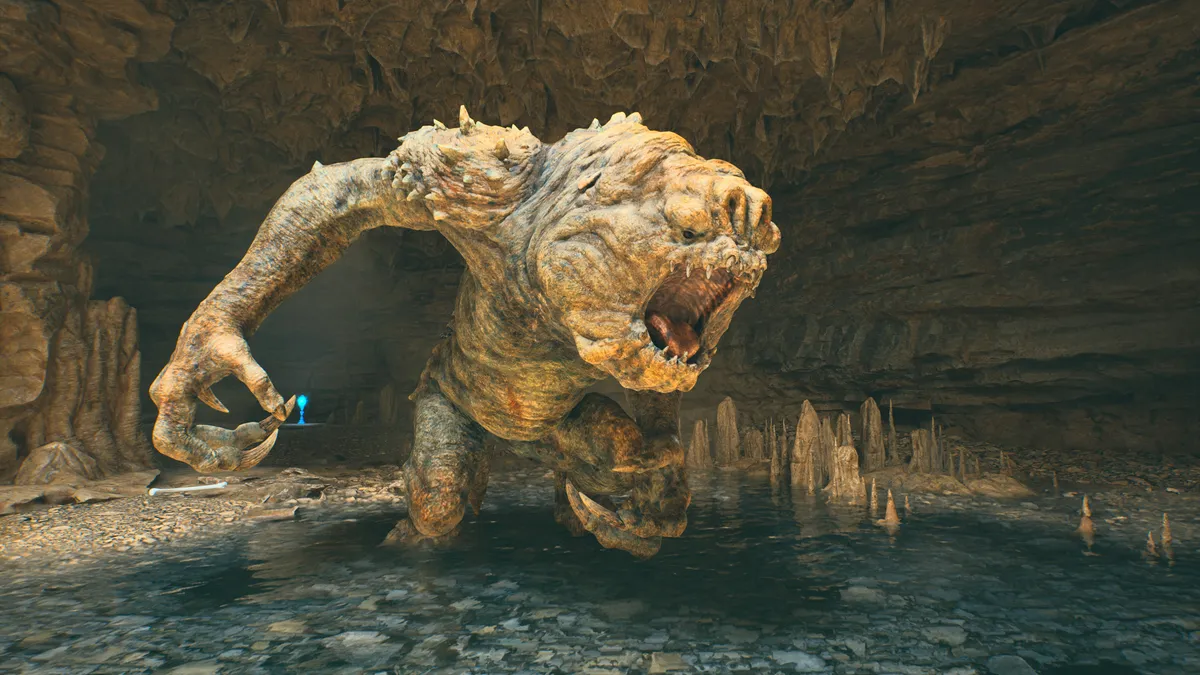
Star Wars Jedi: Survivor — How to beat Spawn of Oggdo

Veterans of Star Wars Jedi: Fallen Order may be having horrified flashbacks at this point, and I'm inclined to say that's a completely fair response. The dreaded Oggdo that terrorized players on Bogano is back, this time in the gross green guise of Spawn of Oggdo. If you want the poncho, you'll have to kill this horrifying frog first.
In order to prepare for the fight, it's important to keep in mind that this is one of the hardest boss fights in the game. Depending on your exact gameplay style, it may actually be the hardest. Spawn of Oggdo hits hard and fast with unrelenting speed and some one-hit kill attacks, making it somehow more of a menace than the violence-induced progenitor for which it is named.
You need to have found at least six of the Stims in Star Wars Jedi: Survivor before trying this fight (seven would be best) and you'll also want to have a number of upgrades across your skills, improving Cal's Life and Force meters. Even with these upgrades and even playing on lower difficulties, get ready to sweat.
Spawn of Oggdo will aggressively push forward toward you with attacks in rapid succession. Some of these can be parried, but as usual, any flashing red attacks need to be dodged. The close range and rapid attacks mean you'll have little room to maneuver. I highly recommend using the Blaster and Double-Bladed lightsaber stances in order to make this fight a bit easier.
With blaster stance equipped, you can use charged shots to interrupt Spawn of Oggdo's attacks. Study carefully for tells and when you successfully interrupt a flashing red attack, you'll have a half-second or so to quickly get a slash in. You can use this pattern to regain blaster energy over time. When you are able to stop time, switch to the double-bladed stance and use heavy attacks to deal some massive damage. These heavy attacks can also interrupt some of Spawn of Oggdo's flashing red attacks, but it's far more difficult to get the timing right.
The most dangerous attack Spawn of Oggdo has is when it rears back, flashes red, and opens its mouth to try and grab Cal with its tongue. If it connects, this is a one-hit kill, and you need to double-jump above the tongue in order to avoid losing the fight in an instant.
Spawn of Oggdo will sometimes flash red and jump up, landing back down and sending a shockwave out a short distance. Right after this attack, you'll have a brief window to get in a slash or two. Be patient and don't get greedy.
Follow all of these tips and eventually, the frog will fall. After felling the Spawn of Oggdo, collect the poncho from the chest in the slimy cave, and then make your way out.
Show your style
With your poncho in tow, it's time to keep exploring and see what else is lurking across the myriad planets of Star Wars Jedi: Survivor. Optional bosses, secrets, rewards, and more can be yours if you look.
This is one of the best Xbox games of the year, and in my review of Star Wars Jedi: Survivor, I wrote that "Star Wars Jedi: Survivor is a fantastic game, with developer Respawn Entertainment taking everything so good about Star Wars Jedi: Fallen Order and building on it to reach new heights. The result is a well-told tale with surprisingly personal yet extremely emotional stakes that asks what it means to be a Jedi and a survivor in the face of an all-consuming Empire. "