How to set up OneDrive Personal Vault storage on Windows 10
If you have sensitive files you want to store in OneDrive, then you want to use Personal Vault to keep more secure, and here's how.
All the latest news, reviews, and guides for Windows and Xbox diehards.
You are now subscribed
Your newsletter sign-up was successful
In OneDrive, Personal Vault is a feature designed to offer a protected area within your cloud account to store your more important files (such as sensitive documents, personal records, pictures, and virtually any file you want), using stronger security with two-factor authentication like fingerprint, face recognition, PIN, as well as email or phone code, in addition to the typical sign-in process to access OneDrive.
Even without Personal Vault, your files are still very secure in OneDrive; the new feature is meant to add an extra layer of security to make it more difficult for malicious individuals to access your files. For example, when Personal Vault is enabled, the folder locks after a short period of inactivity automatically, and you need to authenticate again to regain access — even if you're already signed in to OneDrive. On Windows 10, the contents within the protected area are encrypted using BitLocker, and they are never cached nor stored on your device or browser unprotected. Also, to prevent accidental sharing, this option isn't available for these files.
If you want to use this feature, you must set it up manually. Depending on the device, the process will be slightly different. Also, even though Personal Vault is available on the free tier of OneDrive, you'll need an Office 365 subscription to add more than three files.
Office 365 gives you full access to all the apps and perks, such as 1TB OneDrive storage without Personal Vault restrictions and Skype minutes. You can also install Word, Excel, PowerPoint, Outlook, and other apps on up to five devices, and depending on the subscription, you can share the account with up to five people.
In this Windows 10 guide, we'll walk you through the steps to configure and get started using the Personal Vault storage space in OneDrive.
- How to set up Personal Vault with OneDrive
- How to access Personal Vault with OneDrive
- How to disable Personal Vault settings on OneDrive
- Understanding caveats using Personal Vault on OneDrive
How to set up Personal Vault with OneDrive
Although the Personal Vault comes built into OneDrive, you need to set up the feature on every device before you can access your sensitive files.
Setting up Personal Vault on Windows 10
To set up OneDrive Personal Vault on your devices running Windows 10, use these steps:
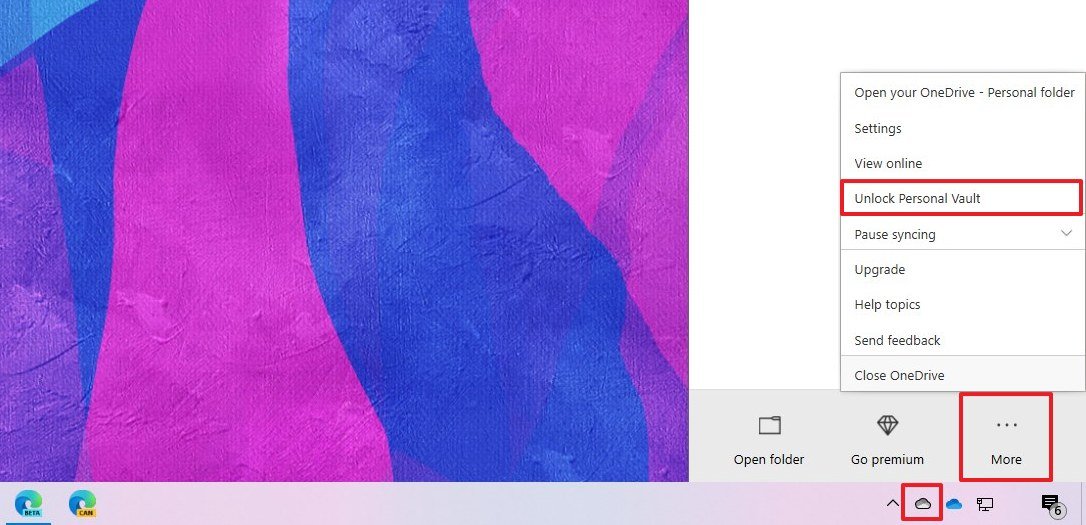
- Click the OneDrive icon from the notification area of the taskbar.
- Click the More button.
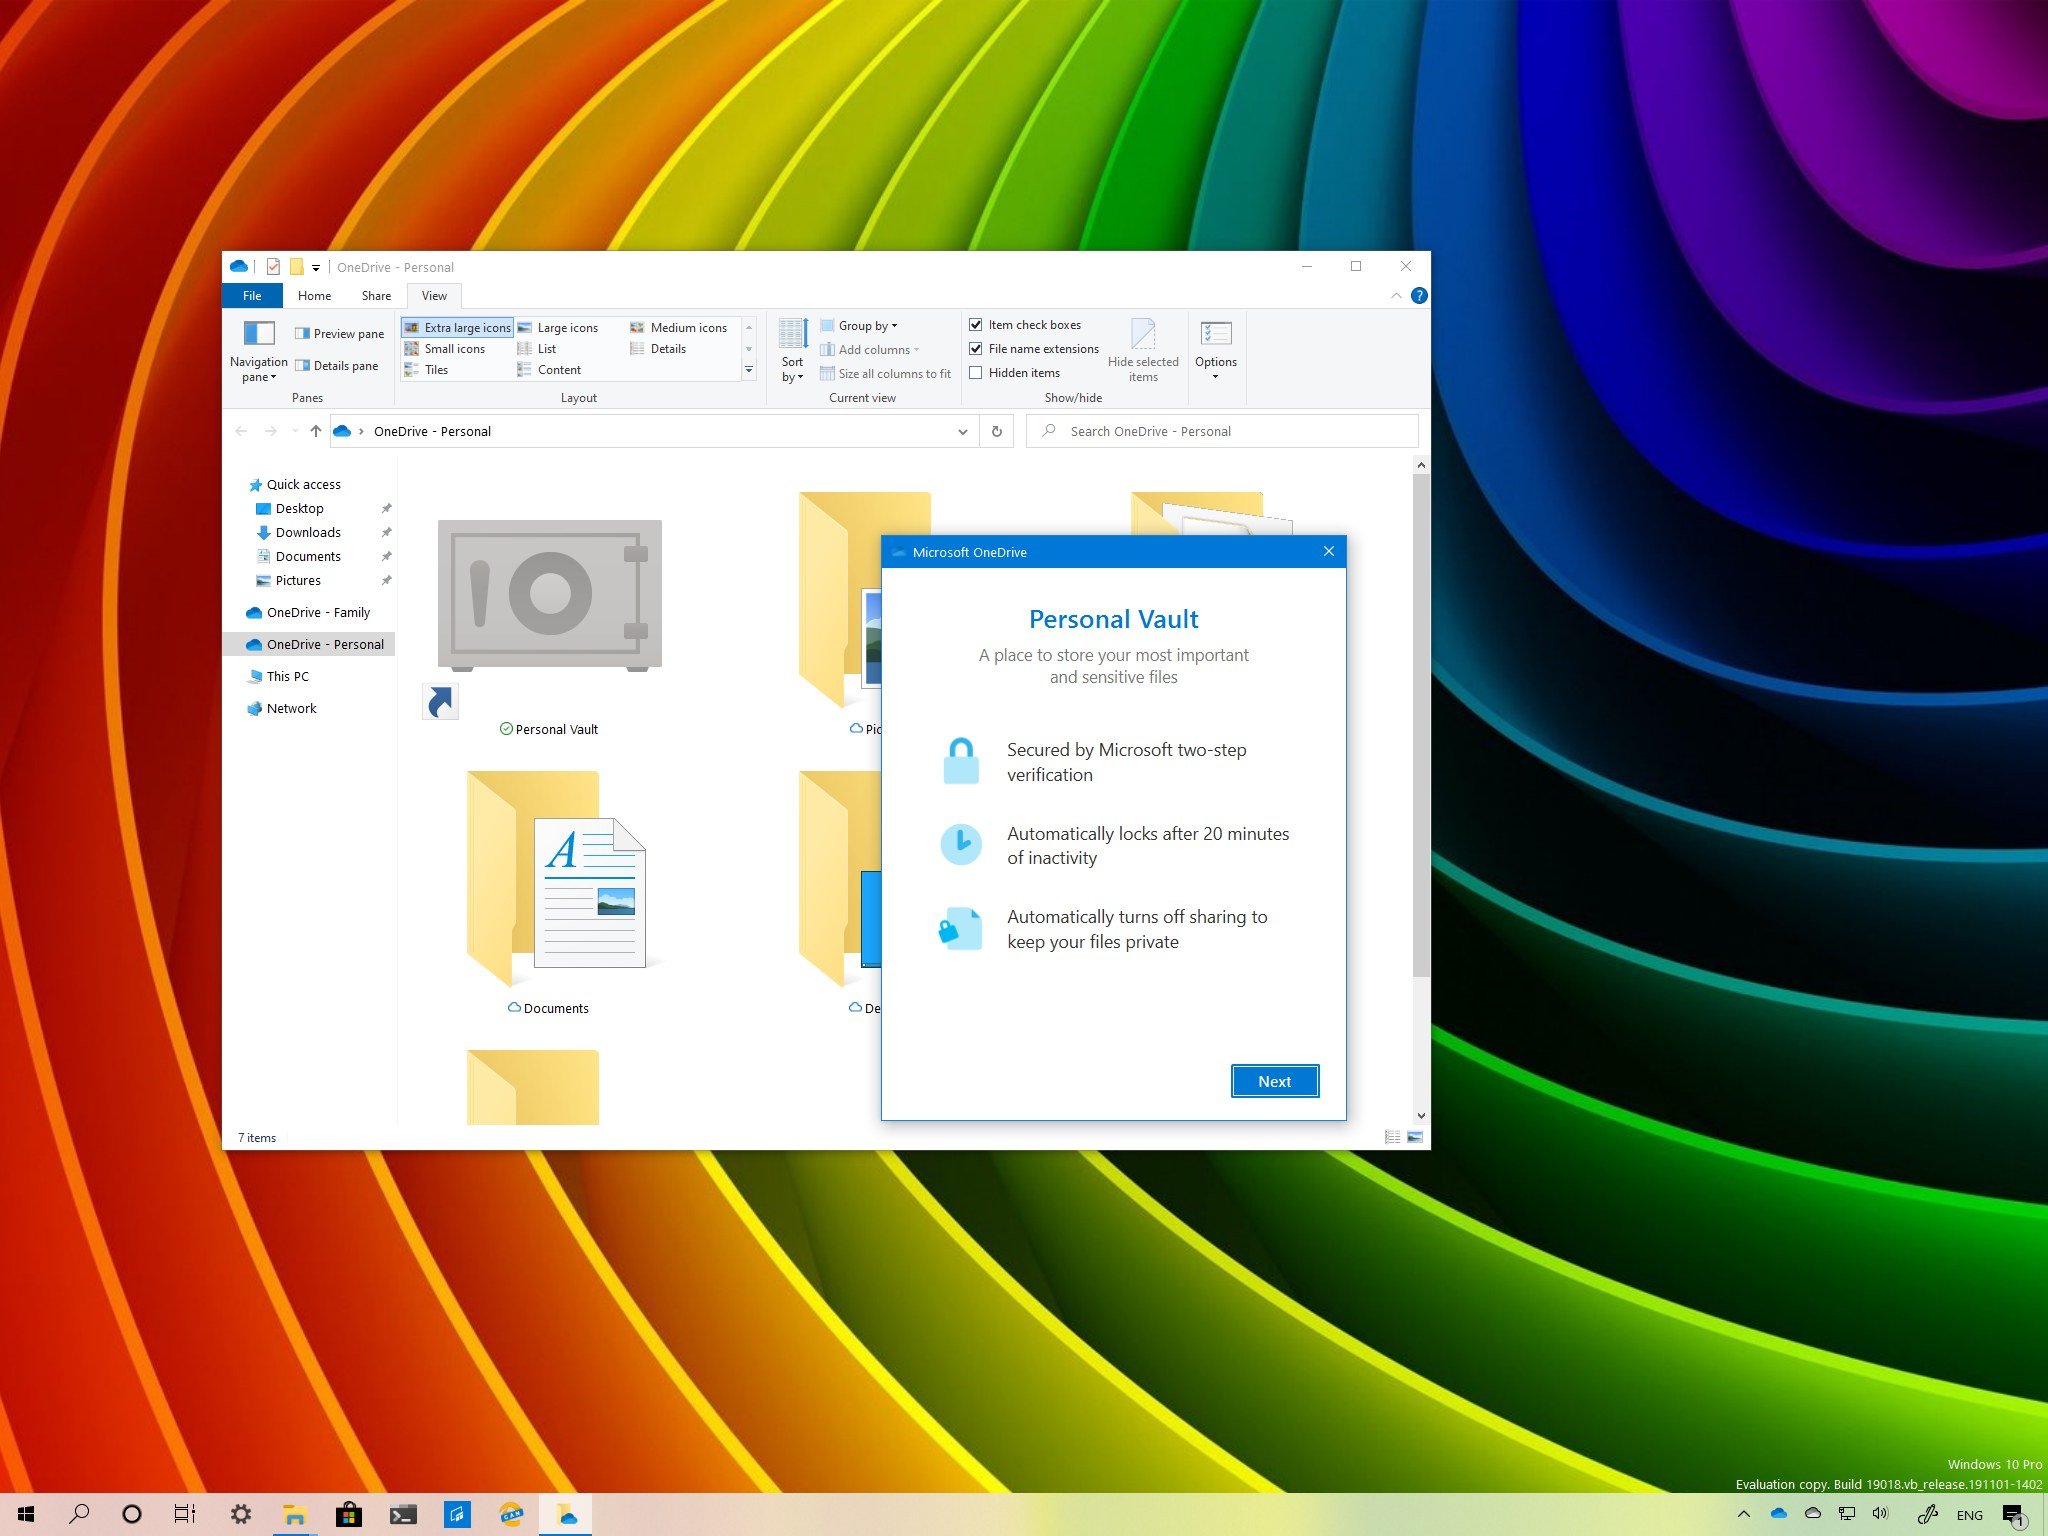
- Select the Unlock Personal Vault option.Quick note: You may also see a Get started button when opening the OneDrive app, which can also help you to set up the feature.
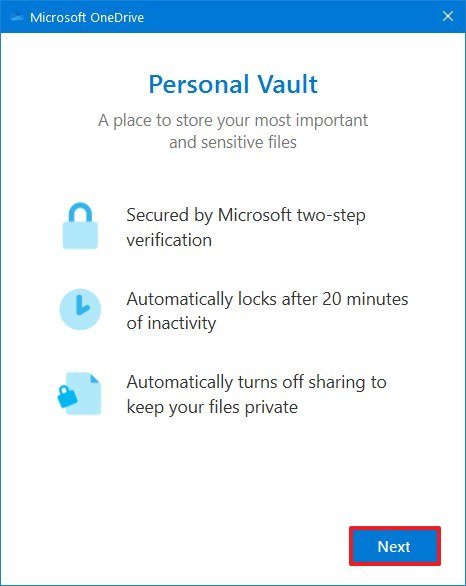
- Click the Next button.
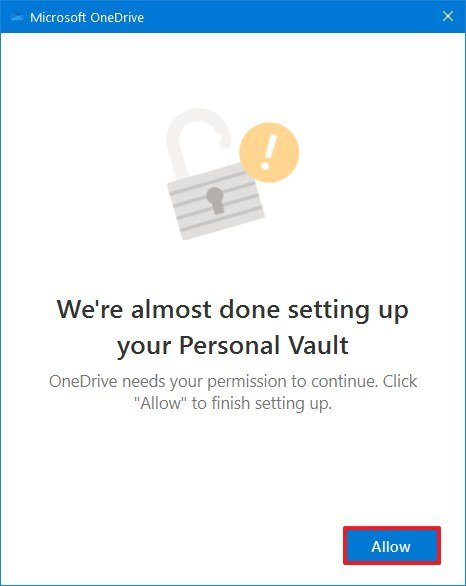
- Click the Allow button.
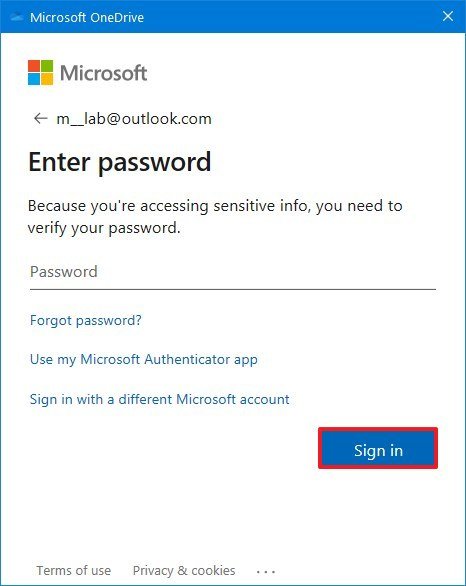
- Confirm your Microsoft account password.
- Click the Sign in button.
- Continue with the on-screen directions.
Once you complete the steps, you can start uploading and downloading to the secure area of OneDrive. If you have more devices, then you'll need to repeat the steps anywhere you want to access your files.
All the latest news, reviews, and guides for Windows and Xbox diehards.
If you don't see the option set up Personal Vault, check the Personal Vault setting page on your OneDrive account, and make sure to enable the feature.
Setting up Personal Vault on OneDrive web
If you want access to your Personal Vault files from the web, use these steps:
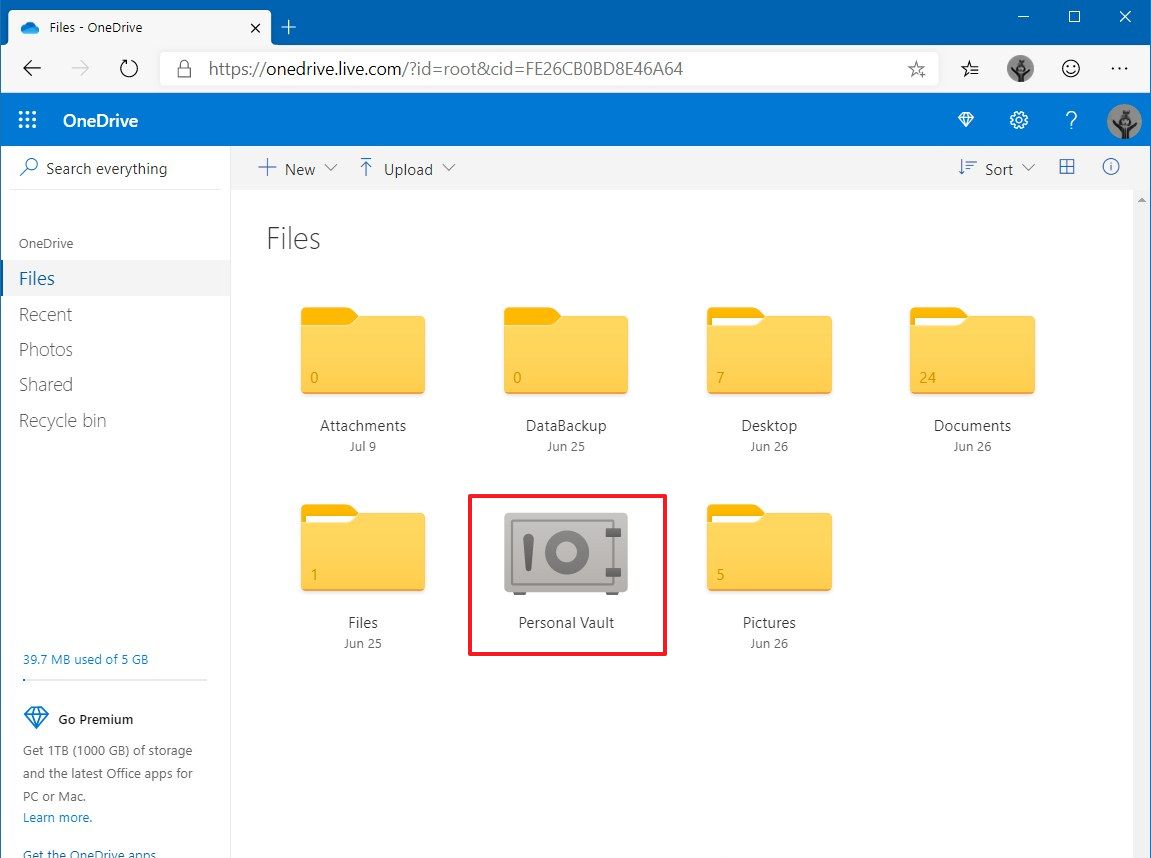
- Open OneDrive with your browser.
- Click the Personal Vault icon.
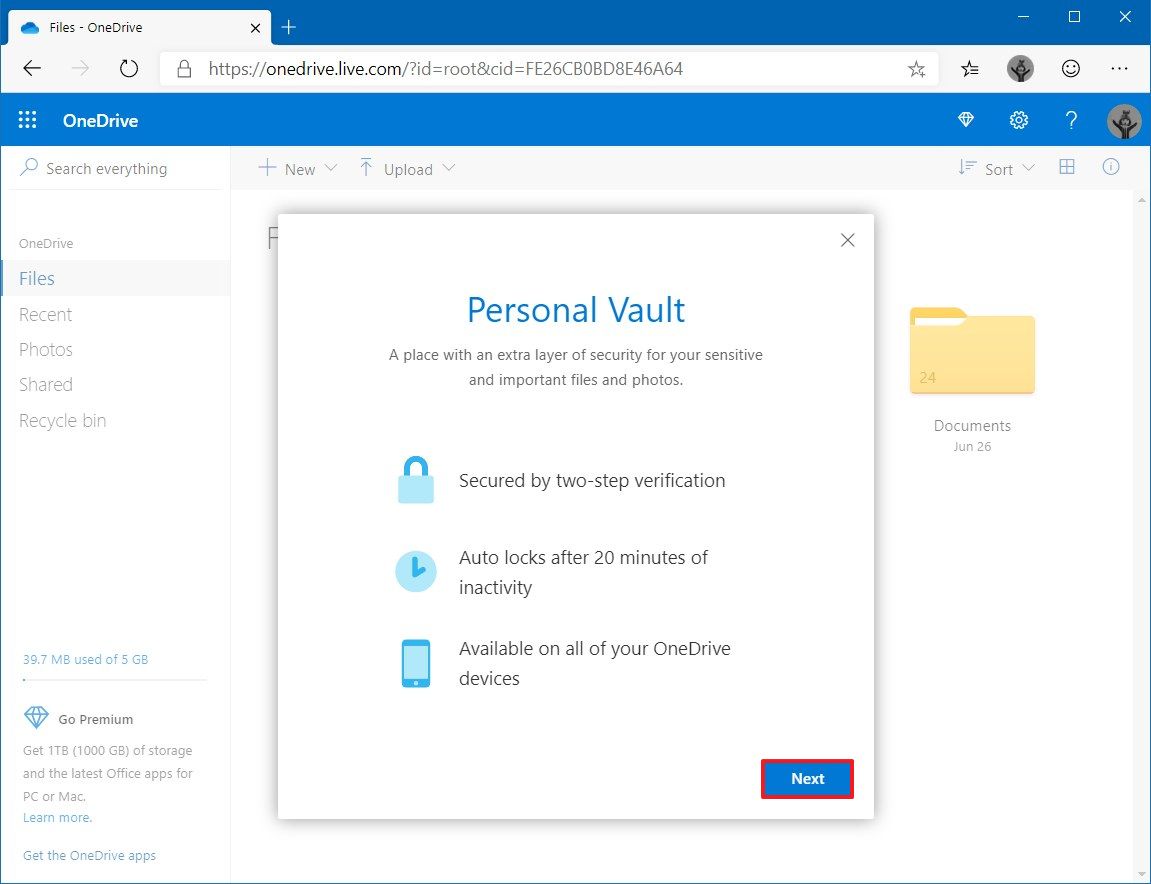
- Click the Next button.
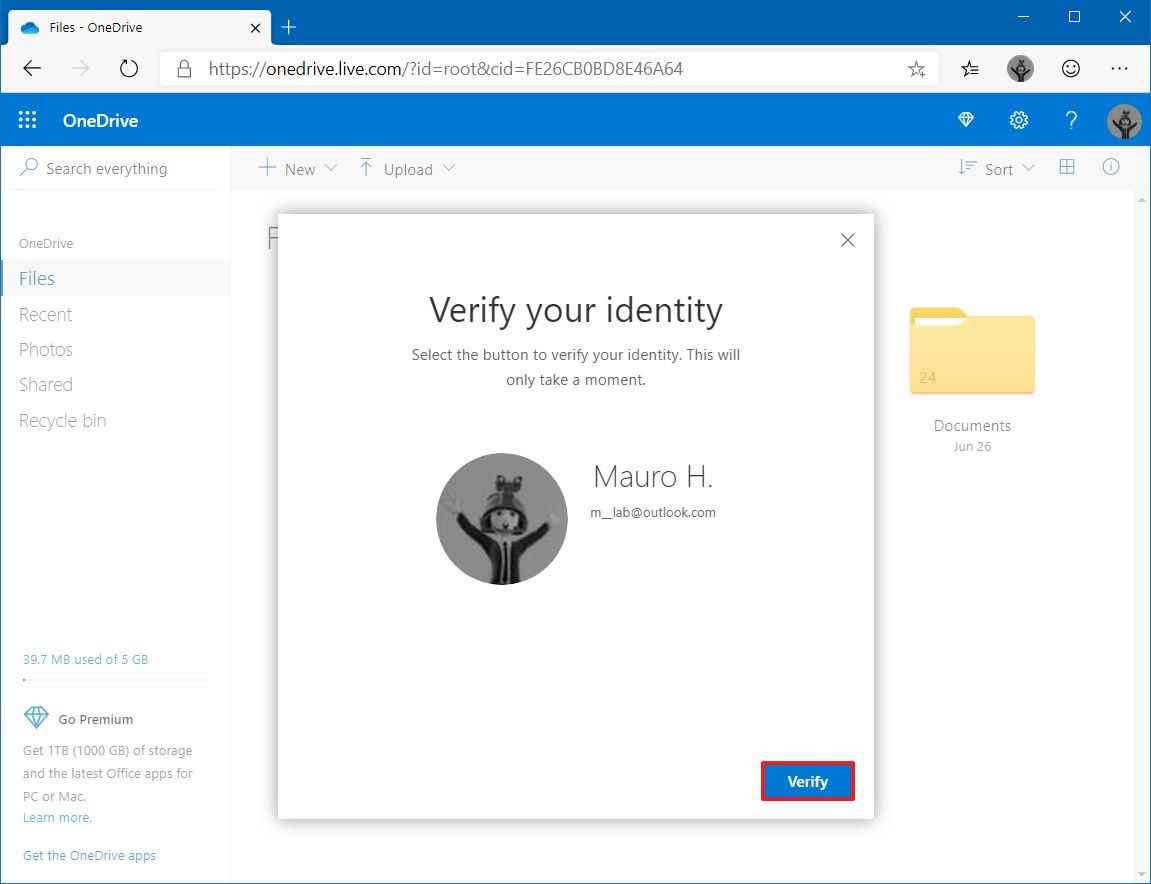
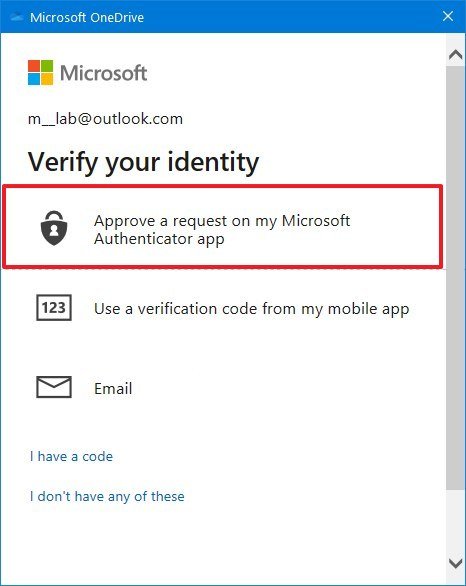
- Click the Verify button.
- Select an authentication method.
- Continue with the on-screen directions.
After you complete the steps, you can access your files as well as upload and download new sensitive documents.
Setting up Personal Vault from OneDrive mobile
You can also configure the secure area of OneDrive on your Android device using these steps:
- Open OneDrive.
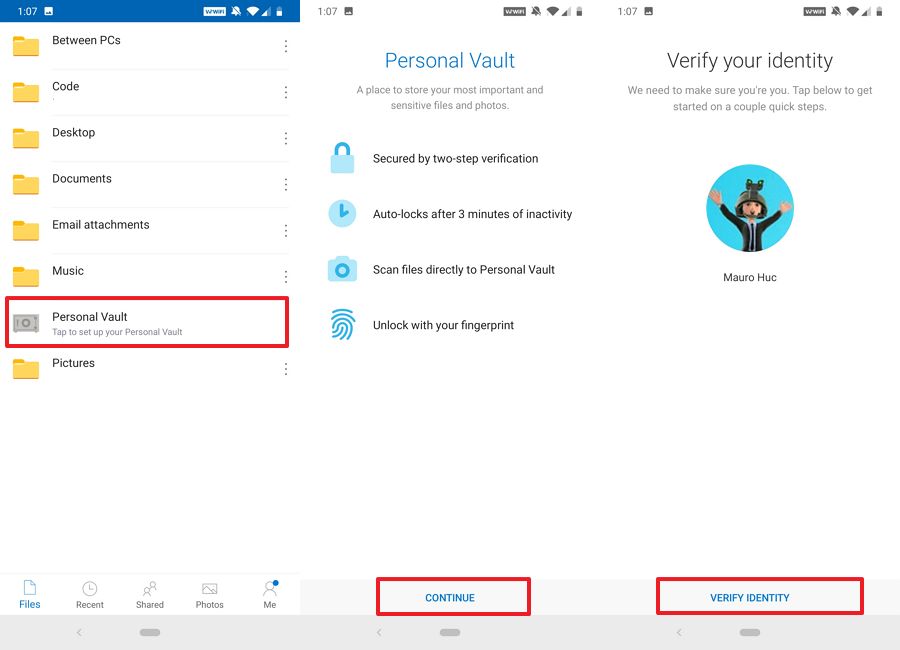
- Tap the Personal Vault icon.
- Tap the Continue button.
- Tap the Verify Identify button.
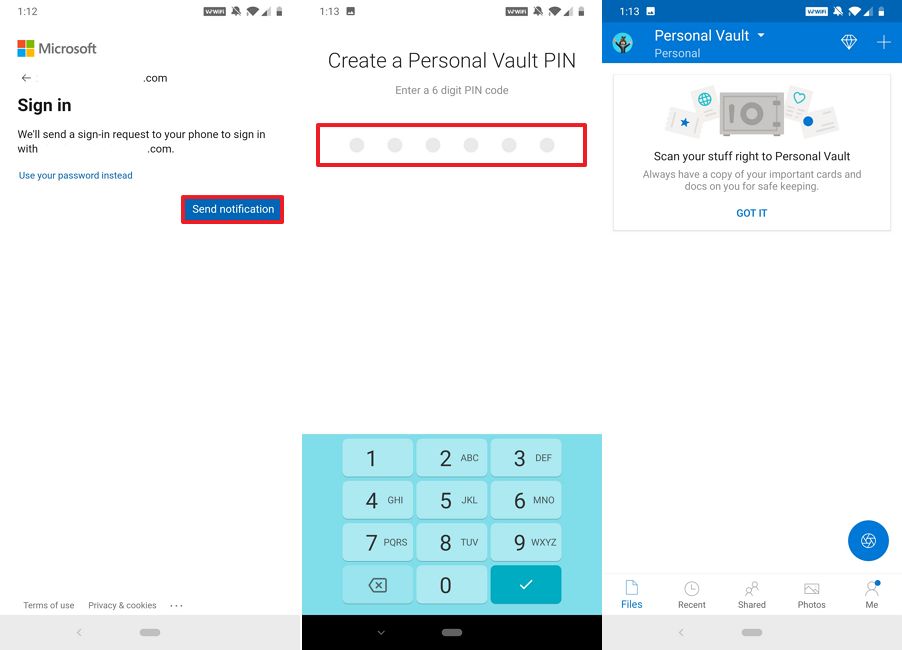
- Select an authentication method.
- Create a Personal Vault PIN.
- Continue with the on-screen directions.
Once you complete the steps, you can start using the protected folder to store more private files.
How to access Personal Vault with OneDrive
When using the Personal Vault feature, the storage remains accessible for 20 minutes on the web and desktop, and three minutes on your mobile device. After that time, the storage will lock automatically, and you'll need to go through the unlock process again, but the unlock process will also depend on the device you're using.
Unlocking Personal Vault on Windows 10
To unlock Personal Vault in File Explorer, use these steps:
- Open OneDrive folder.
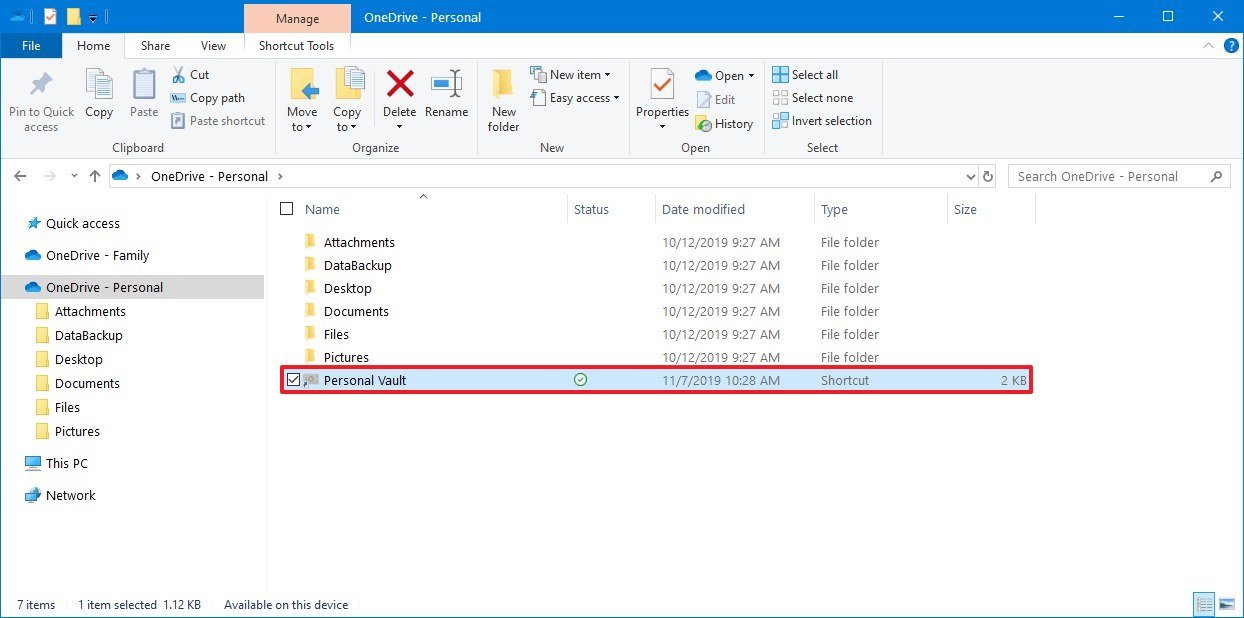
- Double-click the Personal Vault icon.
- Confirm your Microsoft account password.
- Click the Sign in button.
- Continue with the on-screen directions.
- Upload or download files to your vault.
Once you complete the steps, you can start accessing your files normally.
Alternatively, you can also unlock the secure area from the OneDrive menu available in the notification area of the taskbar.
Unlocking protected area on OneDrive web
If you're using OneDrive on the web, you can unlock the Personal Vault folder with these steps:
- Open OneDrive on the web.
- Click the Personal Vault icon.
- Select the verification method.
- Continue with the on-screen directions.
- Upload or download files to your vault.
After you complete the steps, the secure folder will remain unlocked, and after 20 minutes of inactivity, it'll lock automatically.
Unlocking protected area on OneDrive mobile
To access your secure files on your mobile device, use these steps:
- Open OneDrive.
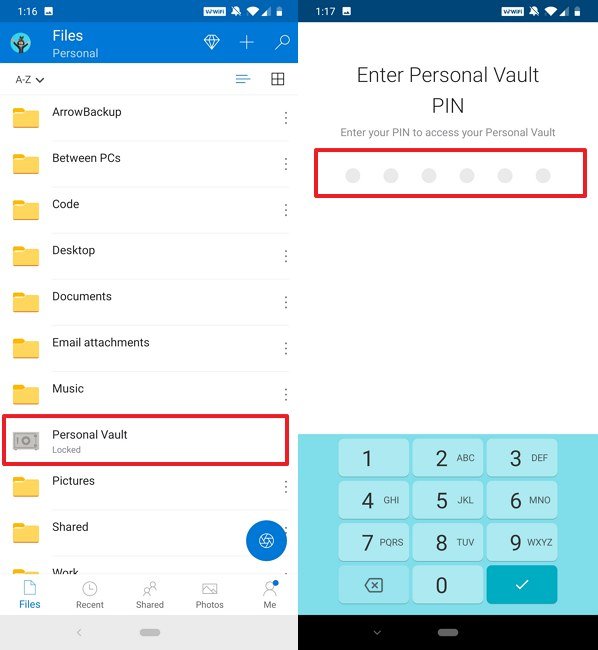
- Tap the Personal Vault icon.
- Confirm Personal Vault PIN.
Once you complete the steps, the folder will open to access your private files, and after three minutes of inactivity, the folder will lock itself automatically.
If you prefer to keep the folder open longer, open the Personal Vault menu from the top-left corner, select the Personal Vault settings option, tap the Auto-Lock option and select a different time range. Also, inside the Personal Vault settings page, you can change your PIN to unlock the folder as necessary.
Locking Personal Vault on Windows 10
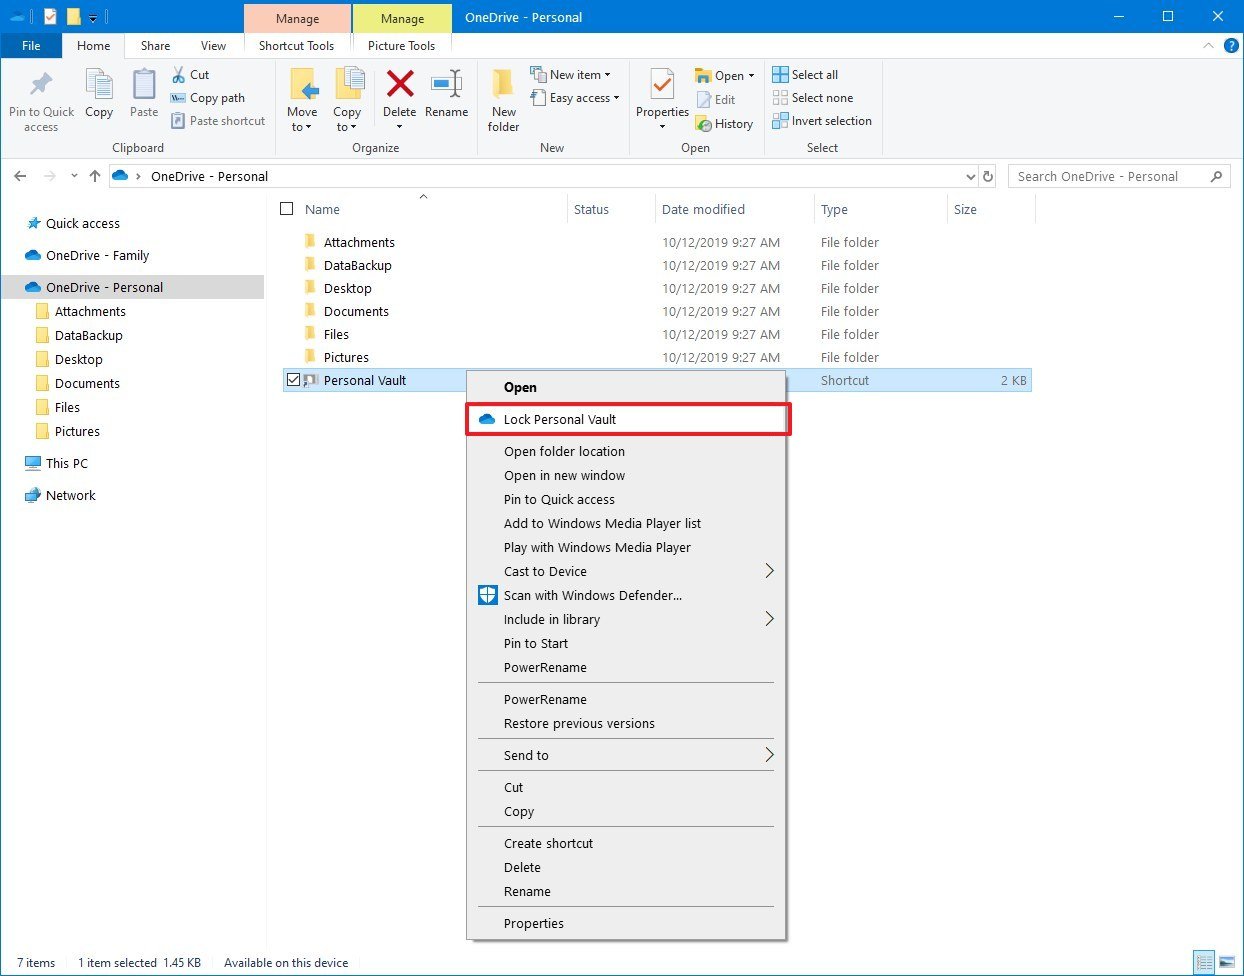
If you prefer locking the Personal Vault folder manually, use these steps:
- Open OneDrive folder.
- Right-click the Personal Vault icon.
- Select the Lock Personal Vault option.
- Click the Lock Personal Vault button (if applicable).
After you complete the steps, the protected area of OneDrive will close, and you'll need to use the unlock process to regain access.
Locking protected area on OneDrive web
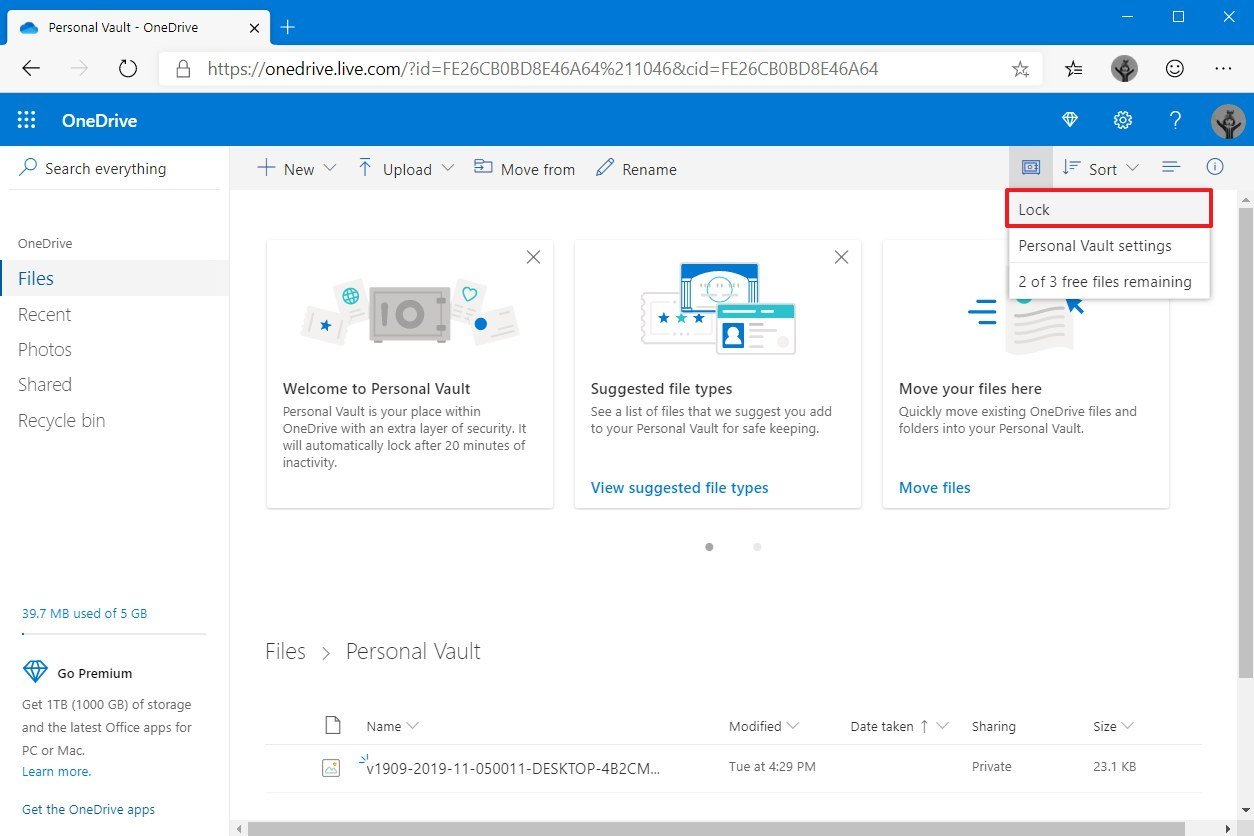
To lock Personal Vault on the web, use these steps:
- Open OneDrive on the web.
- Right-click the Personal Vault icon.
- Select the Lock option.
Once you complete the steps, OneDrive will lock down the protected folder, but unless the time expires or lock the folder manually, the Personal Vault feature will remain unlocked on your other devices.
Locking protected area on OneDrive mobile
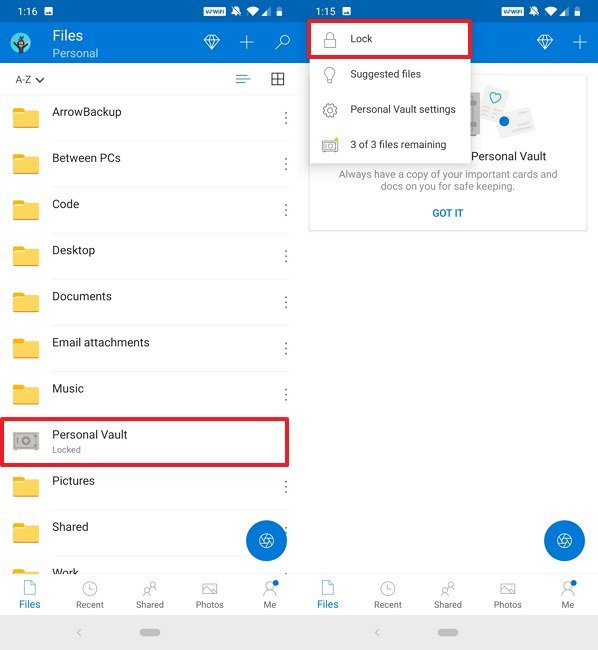
To lock Personal Vault on mobile, use these steps:
- Open OneDrive.
- Tap the Personal Vault icon.
- Tap the menu button in the top-right and select the Lock option.
After you complete the steps, the folder will lock on your mobile device.
How to disable Personal Vault on OneDrive
In the case that you no longer need Personal Vault, you can disable the feature in OneDrive. However, keep in mind that this process will delete any content within the protected area permanently, and you won't be able to recover any of the files. If you need to disable this feature, it's recommended to download the contents you want to keep before proceeding.
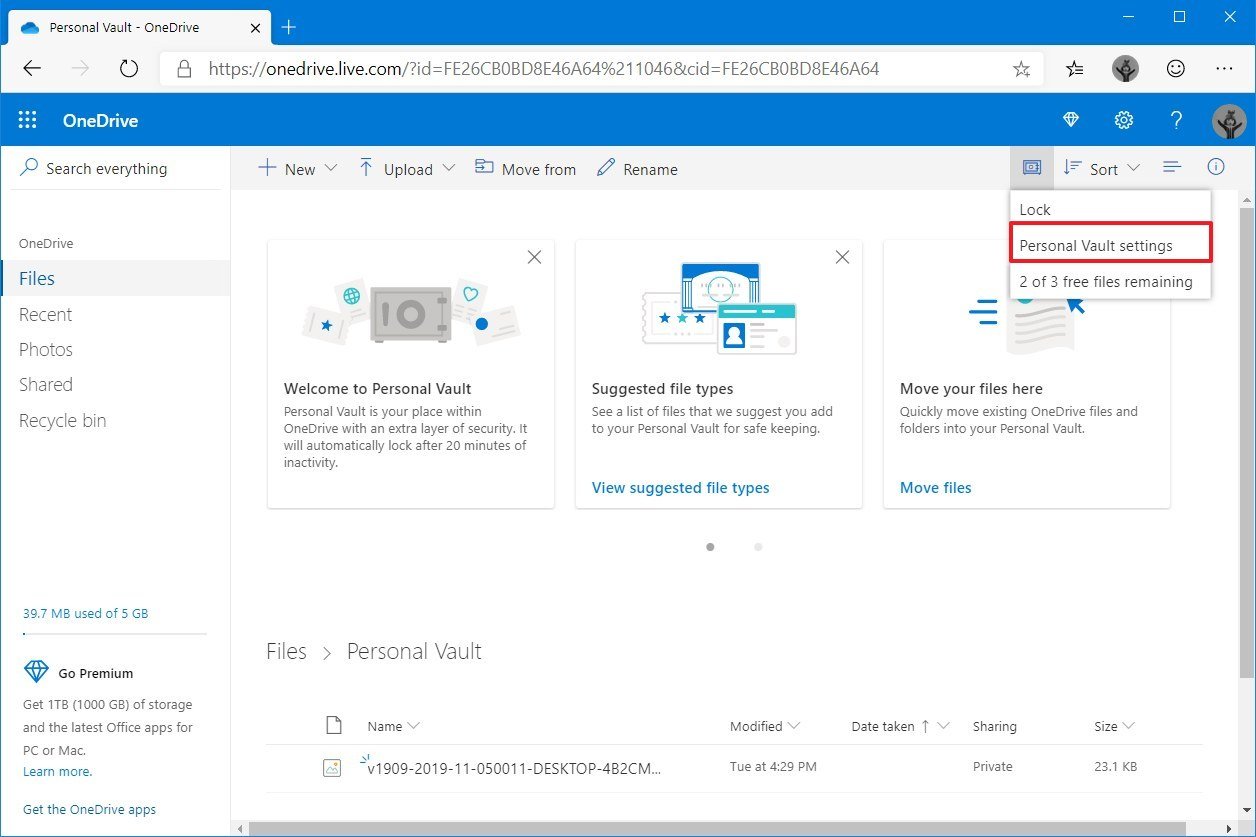
To disable the Personal Vault feature in OneDrive, use these steps:
- Open OneDrive on the web.
- Click the Personal Vault icon from the top-right corner and select the Personal Vault settings option.
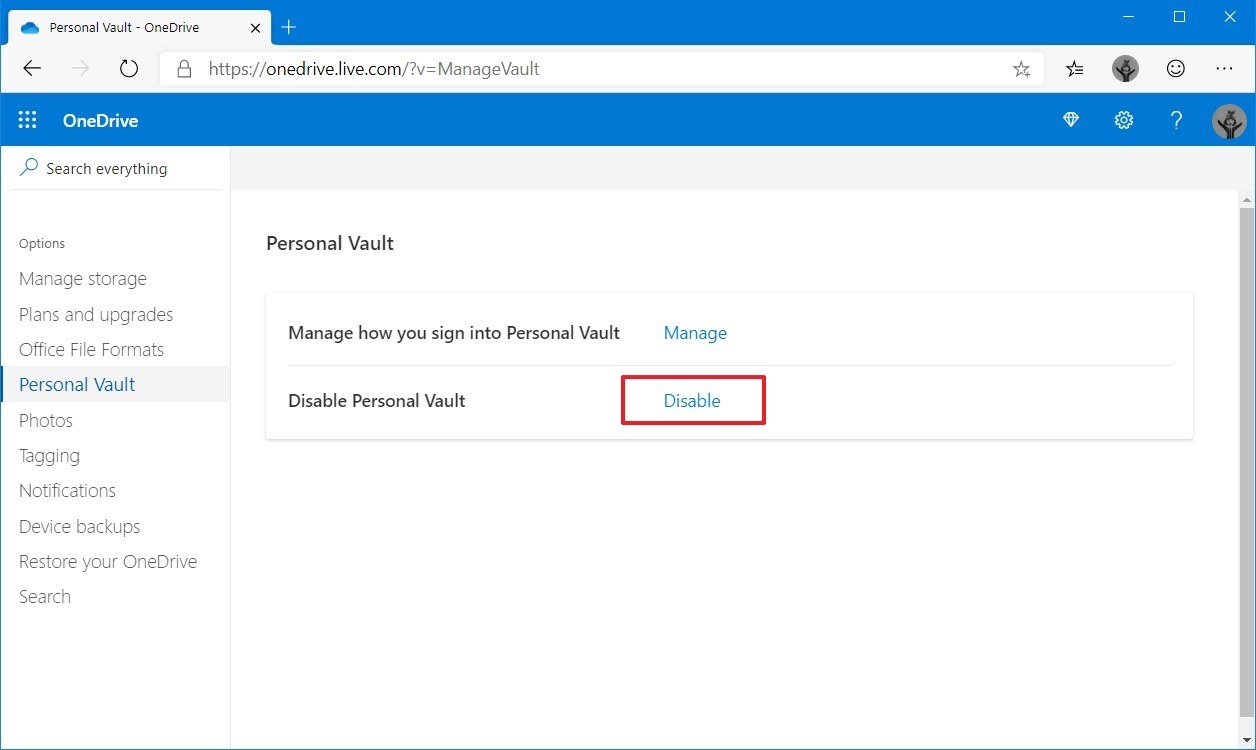
- Click the Disable option.
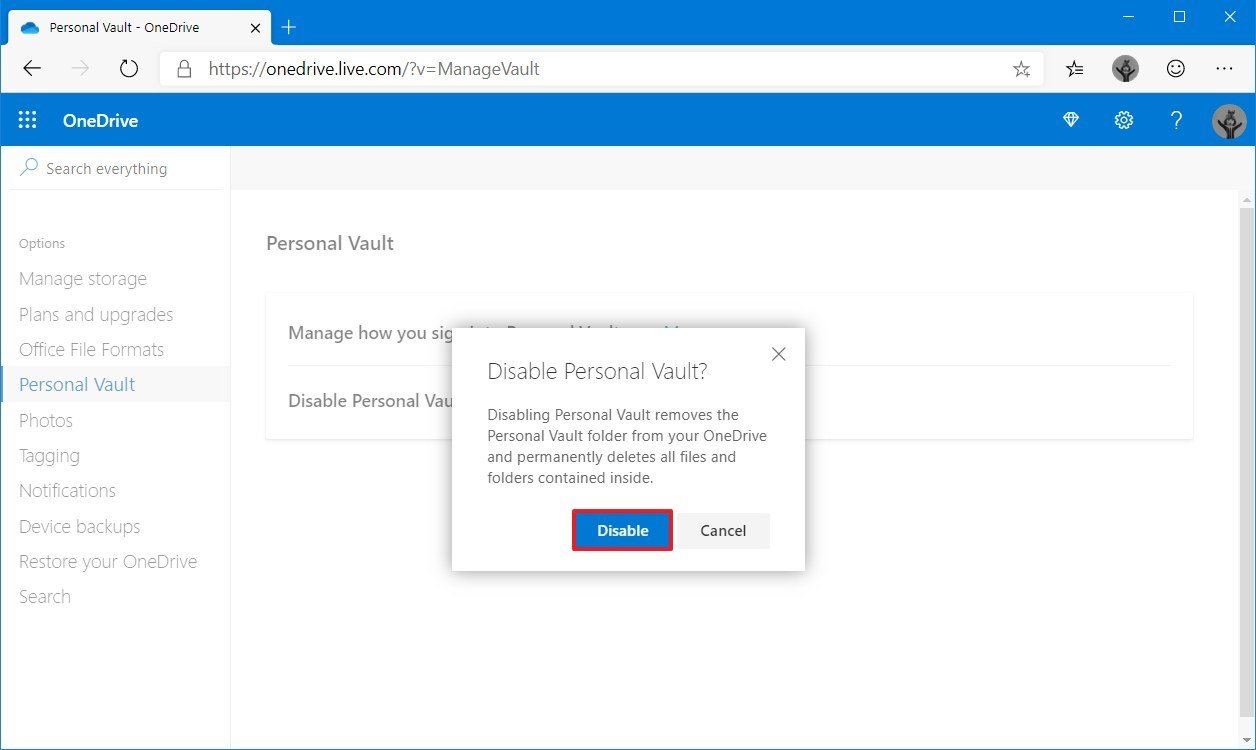
- Click the Disable button again to confirm.
- Click the Disable button one more time.
Once you complete the steps, OneDrive will remove the Personal Vault folder from your account, and it'll delete all of its contents permanently.
If you change your mind, you can always enable the feature again using the same instructions, but on step No. 3, make sure to click the Enable button, and then the Verify your identify button.
While testing the secure area of OneDrive, I've noticed that sometimes, you may run into some authentication issues, such as the app getting stuck setting up the feature or signing in. If this happens to you, start the process over. You may also need to restart your computer.
Understanding caveats using Personal Vault on OneDrive
Although Personal Vault was designed to add an extra layer of security to protect your files, there are a few limitations and information you need to know before starting using the feature.
For instance, you can only use this feature on devices running Windows 10 version 1903 or higher releases, Apple iOS version 11.3 or higher, and Android version 6 and higher. As for browser support, you can use Microsoft Edge, Mozilla Firefox, or Google Chrome, and Microsoft recommends to use this feature with In-Private or Incognito mode.
While you can upload and download files to the protected area, it's not possible to share files with other people. It's designed that way to prevent you from accidentally sharing the incorrect files. Also, you can store any file as long as it's among the file types permitted in OneDrive.
On Windows 10, protected files are not index, which means that they won't appear on searches. In File Explorer, Personal Vault will not be listed on the right pane, and this is because it's a link to a protected area of OneDrive, not a folder.
Using a Windows 10 app to open a sensitive file may list the name in the jump list of the app. If you want to prevent this from happening, then you should open files on the web with OneDrive.
When deleting files on Windows 10, they won't appear on the recycle bin, but you may still be able to access them from the recycle bin in OneDrive. (That's as long as the feature is enabled.)
Also, even though you can view documents on your mobile phone, you need to move the document to the regular OneDrive folder before you can make modifications.
Finally, if you can't find the feature, your account may still not have it. Microsoft is rolling out Personal Vault slowly, and it's expected to reach everyone before the end of the year.

Mauro Huculak has been a Windows How-To Expert contributor for WindowsCentral.com for nearly a decade and has over 22 years of combined experience in IT and technical writing. He holds various professional certifications from Microsoft, Cisco, VMware, and CompTIA and has been recognized as a Microsoft MVP for many years.
