


If you recently upgraded a modern laptop's PCIe NVMe internal solid-state storage (SSD) you may be wondering what you could do with the old one that's laying around. Turns out, you can just put into a portable enclosure and use it as a mobile, high-performance storage solution. Think of it like a USB thumb drive but with more space and significantly faster data speeds. Here's how to get the job done.
Hardware and software to get the job done
- The correct enclosure: ADWITS PCIe NVMe SSD enclosure ($57 at Amazon)
- Tools you'll need: Kingsdun 14 in1 Precision Screwdriver Kit ($12 at Amazon)
- Get rid of static: Rosewill anti-static wristband ($6 at Amazon)
How to mount your old SSD into a portable enclosure
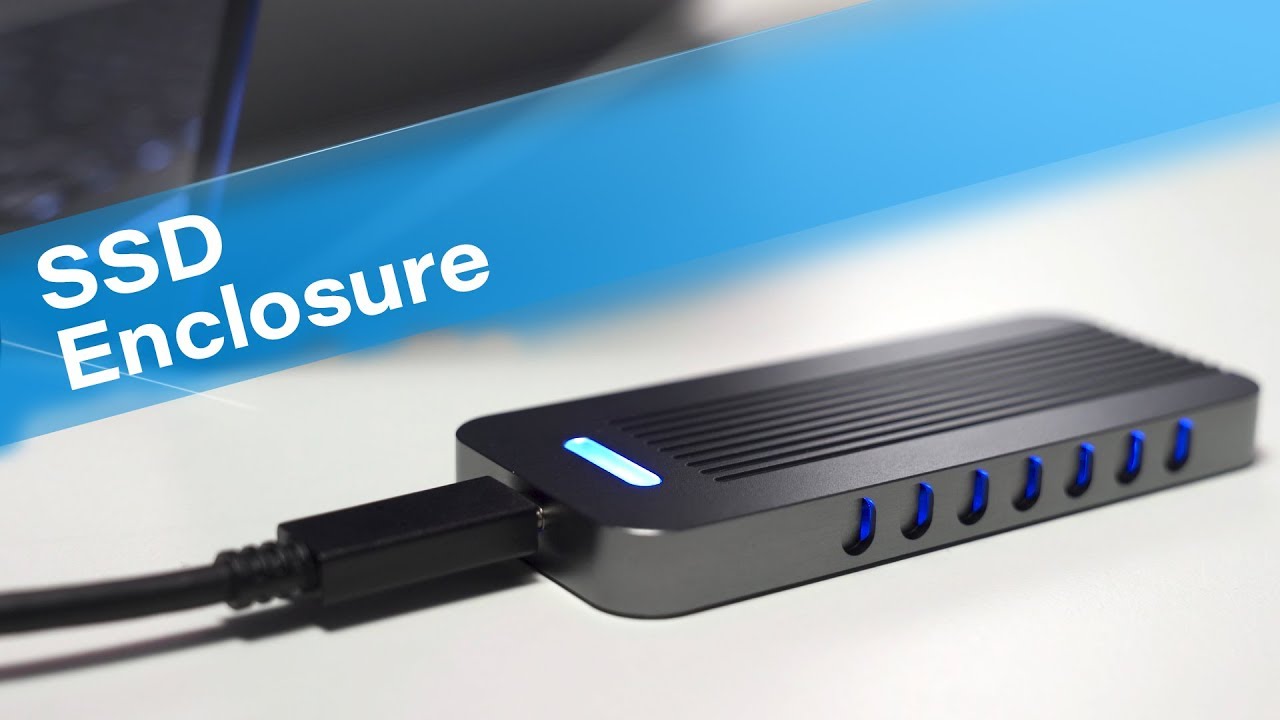
Note: This guide only applies to PCIe NVMe SSDs and not SATA SSDs, which are older, cheaper, and slower. If unsure consult your PC manufacturer or use the markings on the old SSD to identify its make, model, and type. You'll need a PCIe NVMe enclosure, which is more expensive, to make this work. While there are cheaper enclosures on the market we found the ADWITS one to be the nicest looking with activity-LEDs as well.
While most people will buy a premade option like a Samsung T5 for an external solution, there is a way to re-use the SSD from your old laptop. This, of course, assumes you have an old laptop laying around that you want to take apart or you want to upgrade your current laptop with more (or faster) storage.

This guide applies for faster PCIe NVMe drives, which are more expensive than SATA drives that many older laptops use. On a scale from price and speed from lowest to highest, it goes SATA > NVMe > Thunderbolt 3.

The PCIe NVMe enclosure we used is on the high-end — around $57 — but there are others that are as low as $40.
We liked the ADWITS enclosure because it looked the nicest with a premium build and it has 19 LEDs that sync with disk activity to let you know the drive is working.
The whole process takes less than ten minutes. If you are using an old SSD from a laptop you may need to disable Windows BitLocker, which encrypts the drive.
Finally, due to the speed requirements, the completed drive will only work with USB Type-A or USB Type-C ports that also support the USB 3.1 Gen 2 (up to 10Gbps) protocol. While it seems like the drive would just run slower on a USB 3.1 Gen 1 (up to 5Gbps), at least on our Surface Pro 6 and other laptops it just doesn't work at all. Likewise, at least on an initial test this enclosure and bandwidth requirements will not work with an Xbox One console to act as an external storage solution.
Opening the SSD enclosure
Most SSD enclosures will have two screws on the bottom that once removed give you access to the PCIe NVMe board. That board may need to be removed, which involves undoing two more screws. We then insert the old SSD and reassemble the enclosure.
- Use a small Philip's Head screwdriver to remove the screws from the bottom plate and put them safely aside.

- With the board now exposed locate two more screws that hold the board to the enclosure. Remove those and set aside.

- Using the screwdriver, gently pry the board away from the enclosure.
- Loosen the set screw on the board found near the end.

- Slide the SSD into the slot and gently lower it down. Use the set screw to secure.

- Add the included thermal pad layer to the top of the SSD to help with heat dissipation.

- Put the SSD and board back into the enclosure facing down and secure with the two set screws we removed earlier.

- Place the bottom plate back onto the enclosure and secure it with the two other screws.
- Add the included rubber strip over the screws to hide them and add a grip to the bottom of the enclosure.

Once the enclosure is all assembled you can use either the included USB-A or USB-C cable to connect it to your laptop or PC (performance won't differ between cables).
What to expect

Projected performance should fall around 1,000 MB/s for read and 900 MB/s for write speed for the now external SSD.

That may be below what the SSD is rated for, which could go as high as 3,500 MB/s for read speed, but that is due to maxing out the USB 3.1 Gen 2 bandwidth found in the adapter. Those speeds though are still massively faster than a typical USB "ultra" thumb drive with speeds around just 145 MB/s for read and 56 MB/s for write.
One way to get faster speeds would be to find a Thunderbolt 3 SSD enclosure, but there are a few downsides there too. Currently, there are barely any such options on the market and the few that do exist can cost around $200 or four times as much as a PCIe NVMe one. Also, Thunderbolt 3 is not backward compatible, meaning such a drive won't work on regular laptops and PCs without that technology severely limiting its usefulness.
The equipment you need
Putting an old SSD into an enclosure is a very simple task requiring just the enclosure and a screwdriver. If you want to be extra safe you can grab an anti-static wristband too.

It's not cheap, but it looks the best
There are a few cheaper PCIe NVMe enclosures on the market but the ADWITS has the nicest design with no less than nineteen LEDs on the board. Those LEDs not only look cool they let you know the SSD is powered and when data is active (blinking). The kit also includes thermal pads, screwdriver, and extra screws too making it a complete package.

Kingsdun 14 in1 Precision Screwdriver Kit ($12 at Amazon)
While the ADWITS SSD enclosure already has all you need if you get a different enclosure or just need some PC tools this is a great kit. It has a few screw drivers, pry tool, tweezers, and more.

Rosewill anti-static wristband ($6 at Amazon)
Static electricity can damage sensitive PC parts, so remove the risk with an anti-static wristband. Fasten it around your wrist and clip it onto your PC for peace of mind.

