How to edit image metadata on Windows 11 and Windows 10
Yes, you can always manage the metadata details of images, and here's how on Windows 11.
All the latest news, reviews, and guides for Windows and Xbox diehards.
You are now subscribed
Your newsletter sign-up was successful
When you take a photo with a digital camera, smartphone, or another device, the image that's created also includes metadata information. The information will vary depending on the settings and capabilities of the device, but usually, it contains details about the camera, date, geolocation data, color and resolution, and more.
As a result of the metadata information, applications can show you when the picture was taken, the resolution, and other important details. Also, since these details are indexable, you can use them to search images quickly with the Windows 11 search feature.
The only problem is that sometimes the metadata may include the wrong data, be missing some critical fields, or it could include personal information that you may not want to share with others. Regardless of the reason, on Windows 11, you can edit or remove metadata easily with File Explorer.
This guide will walk you through the steps to edit and remove metadata information from images on Windows 11.
How to edit image metadata on File Explorer
To view and edit the metadata information of an image file on Windows 11, use these steps:
- Open File Explorer.
- Browse to the folder with the images.
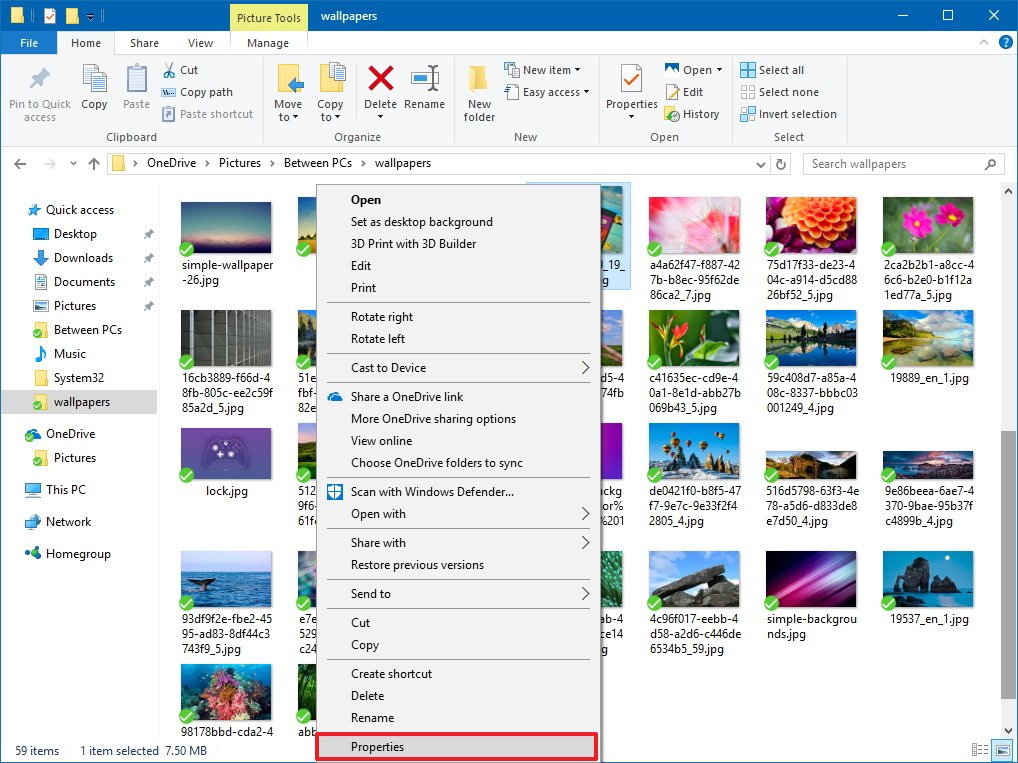
- Right-click an image and select the Properties option.
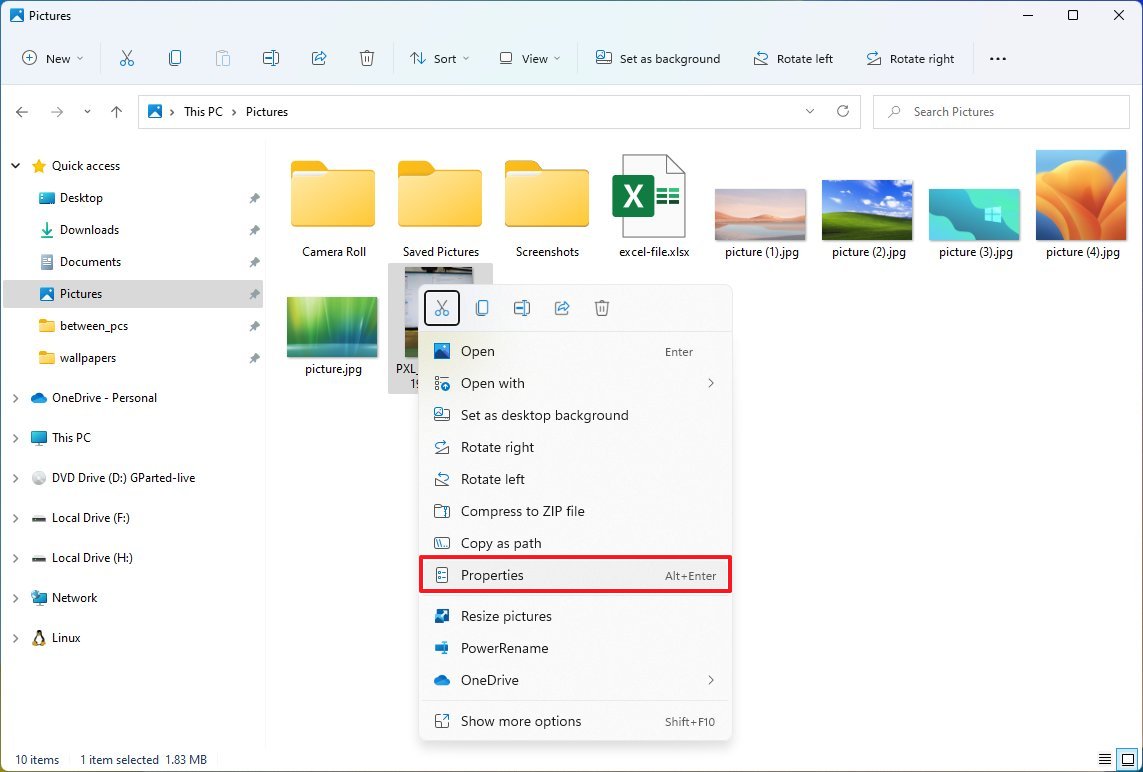
- Click the Details tab.
Every piece of information in this tab forms the metadata of the file.
You can edit the data by clicking the "Value" box of the "Property." However, depending on the file, you may be unable to change the information on each field.
All the latest news, reviews, and guides for Windows and Xbox diehards.
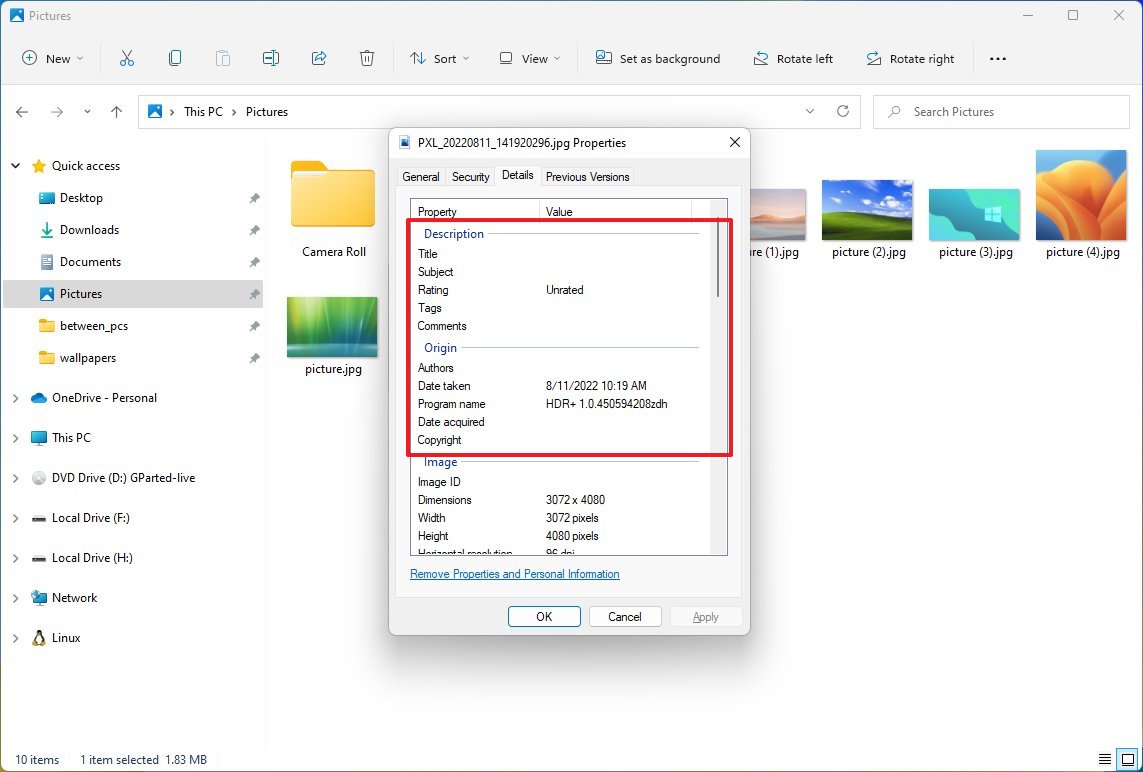
As part of the "Description" section, some of the metadata you can edit include the title, rating, tags, and comments.
In the "Origin" section, you can specify the author, date taken, and copyright information.
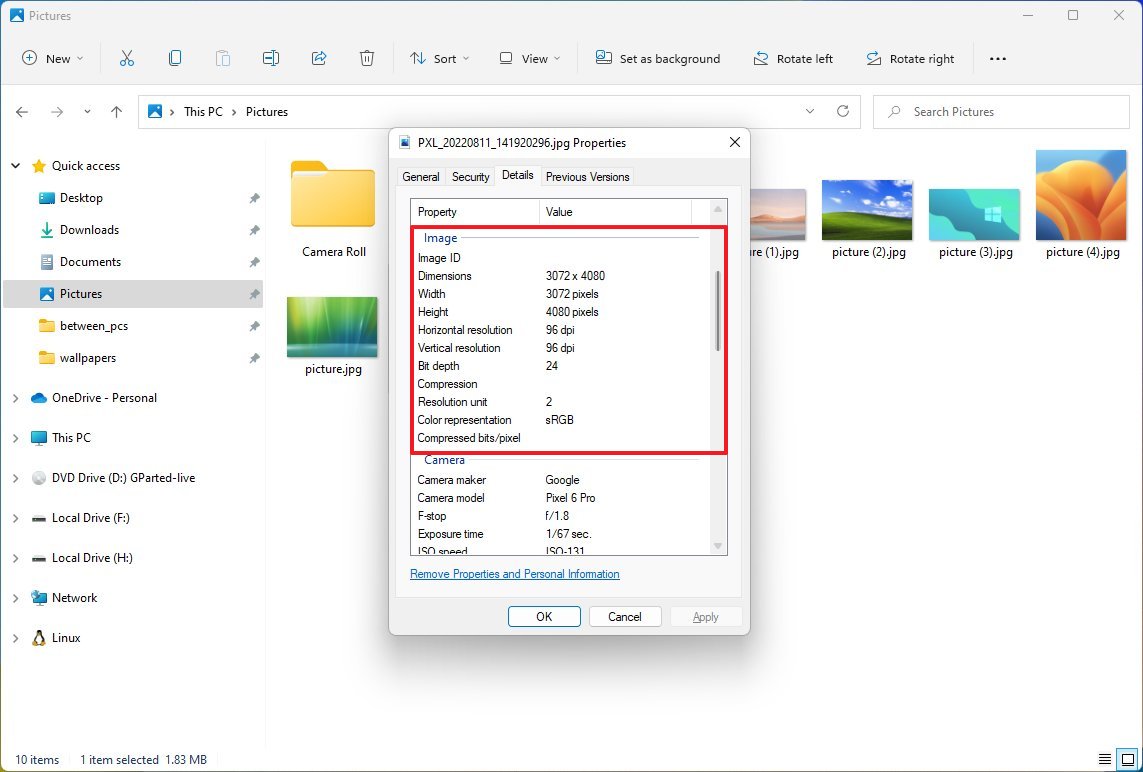
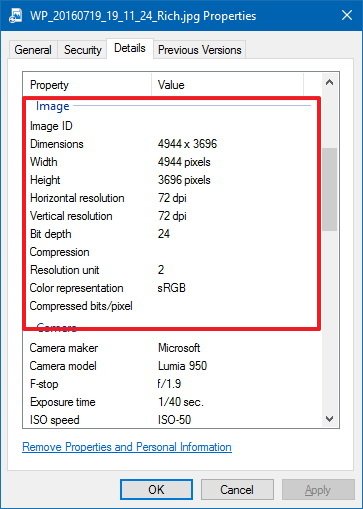
The "Image" section lets you view the information about the file, but you cannot edit this part of the metadata. For example, this section includes the dimensions, resolution, bit depth, compression, and color representation.
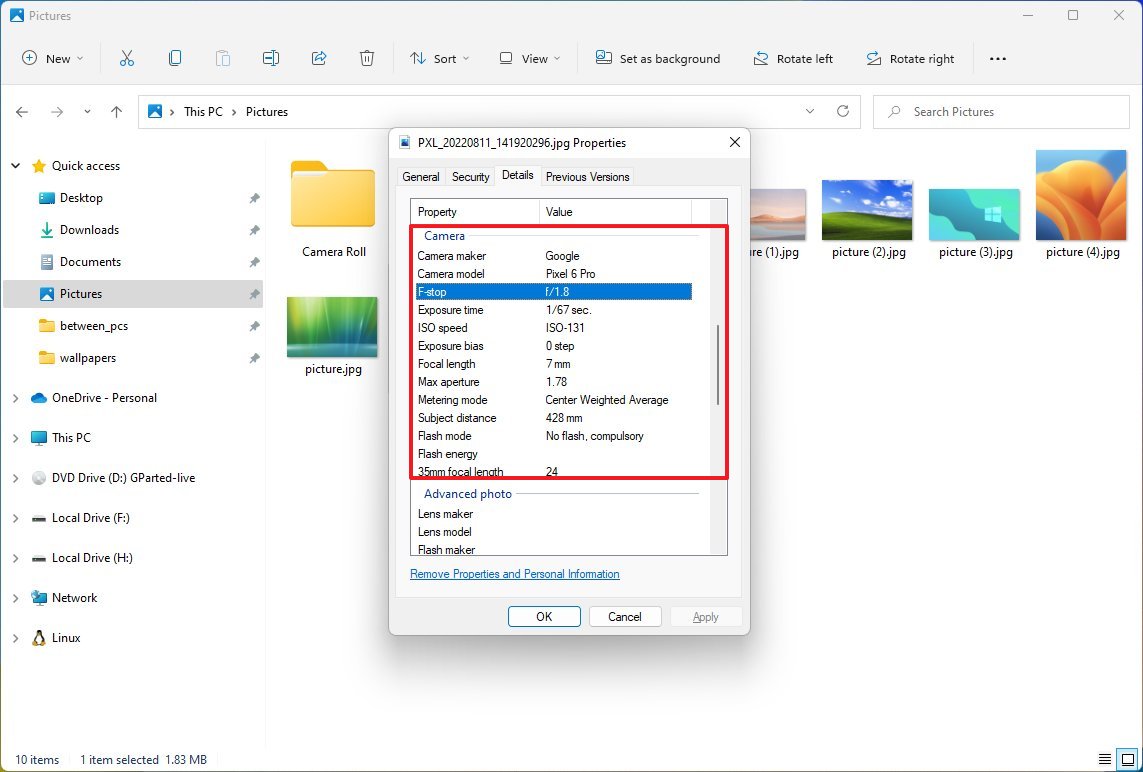
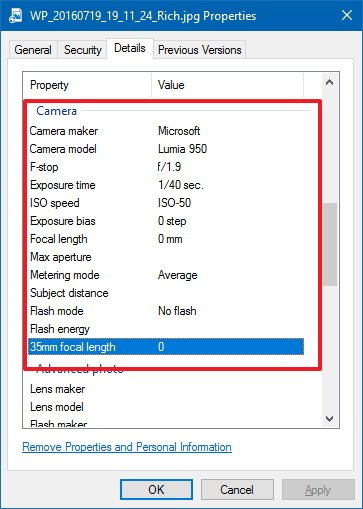
In the "Camera" section, you will find information about the camera that was used to take the picture, but only some metadata is editable. For example, you can edit the maker of the camera, model, ISO speed, metering mode, flash mode, and focal length.
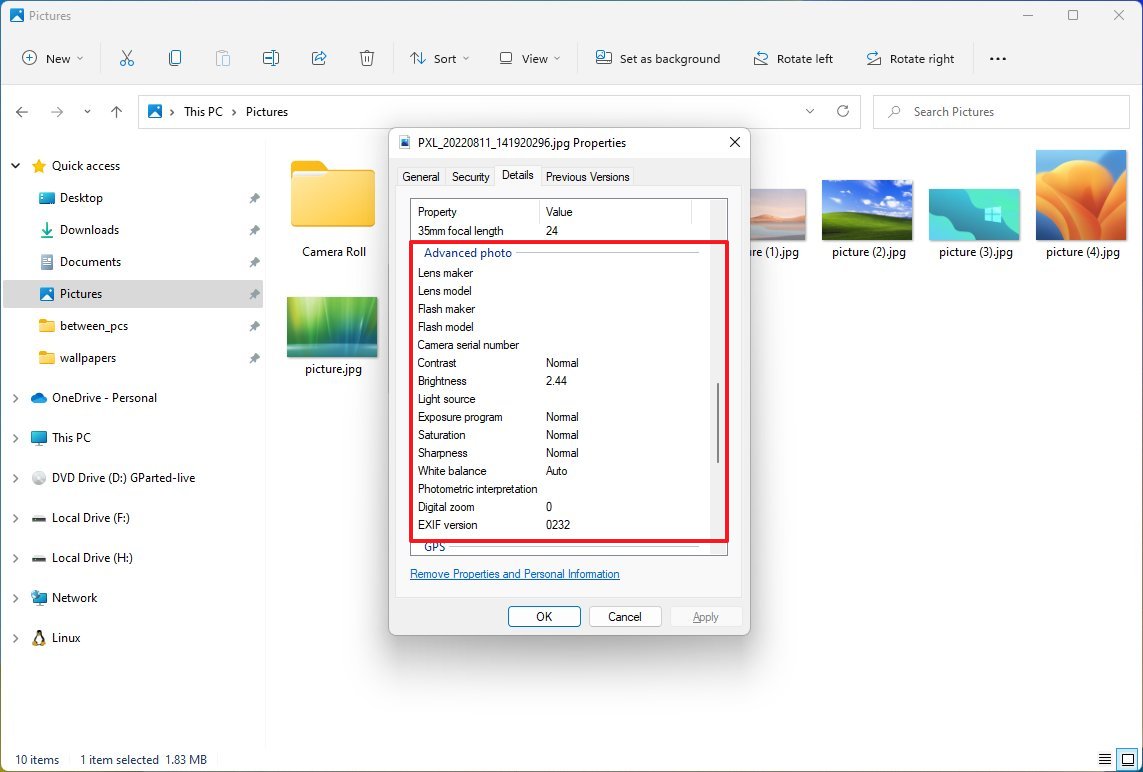
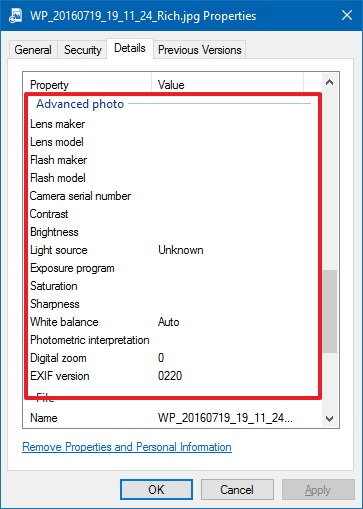
The "Advanced photo" section allows you (specifically photographers) to include specific information, such as details about the lens and flash, camera serial number, light source, exposure, white balance, digital zoom, and more.
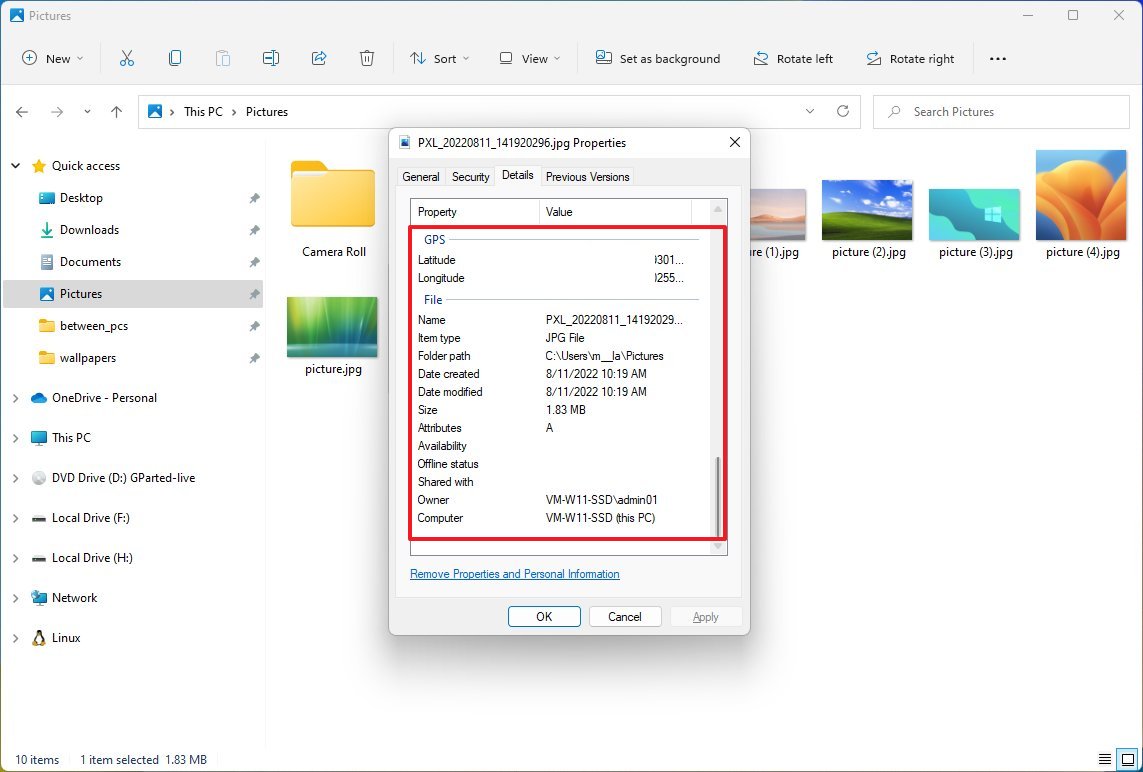
The "GPS" section will include the exact coordinates of the location where the photo was taken. This information is only available if the camera has the location feature enabled.
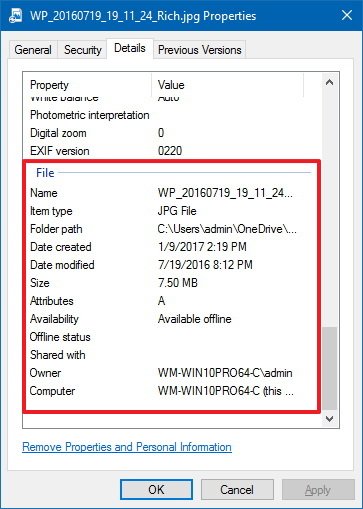
Then there's the "File" section, which includes information about the file (such as name, type, location, date, size, etc.), which you cannot edit.
Once you finish adding and reviewing the metadata information, click the OK button to save the changes.
How to delete image metadata on File Explorer
Although metadata information can come in handy, it can also include personal information many people may not want to share (such as GPS location) and can make the file take up more space.
Regardless of the reason, on Windows 11, you can also remove many pieces of metadata information. You can do this for a specific file or a selection of multiple files.
To remove personal and specific metadata information from an image, use these steps:
- Open File Explorer.
- Browse to the folder with the images.
- Right-click an image and select the Properties option.
- Click the Details tab.
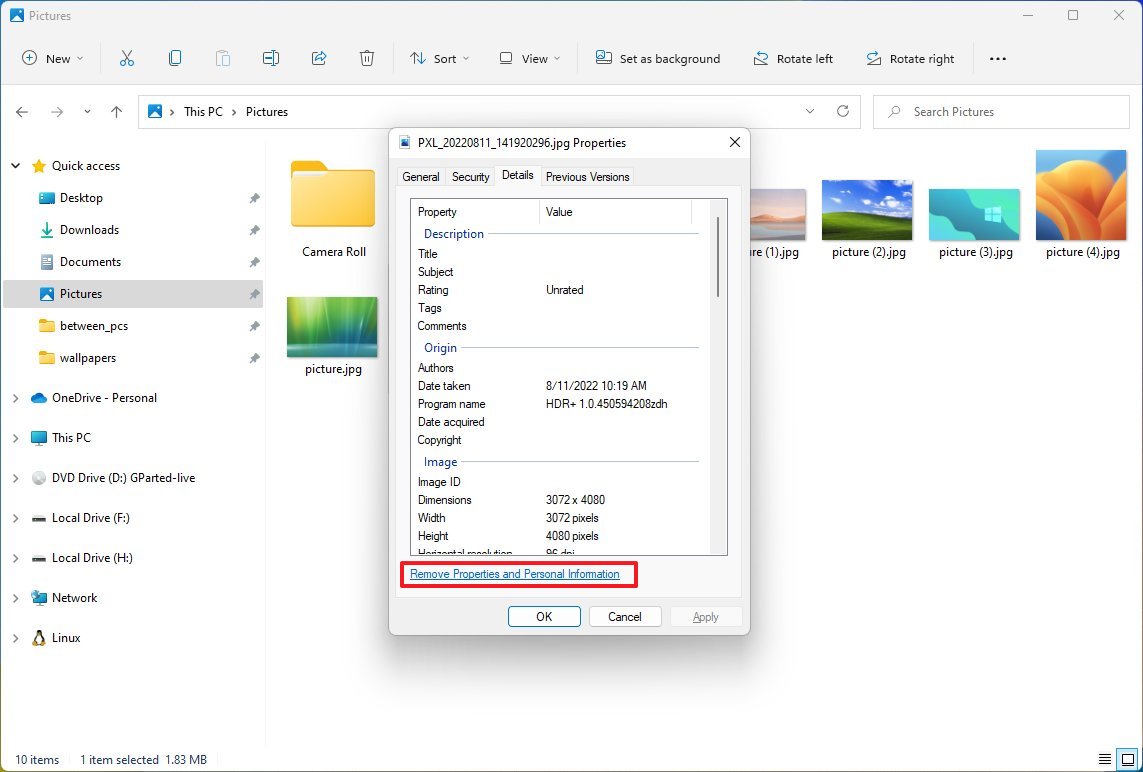
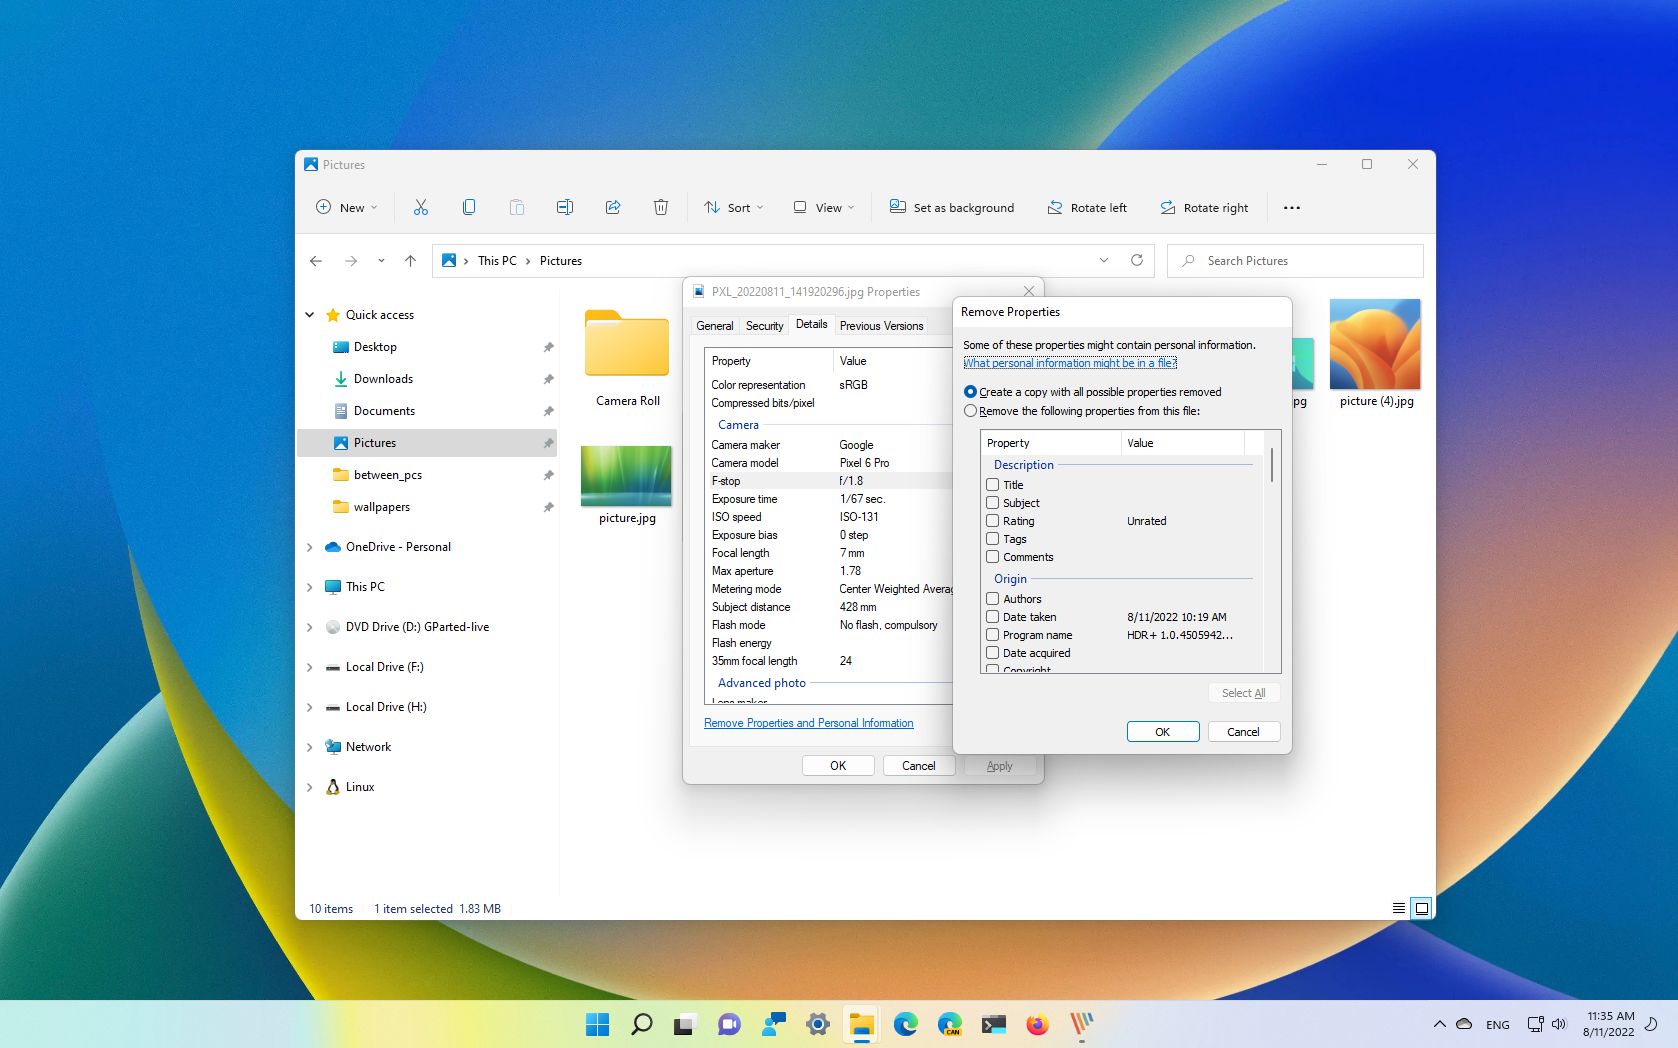
- Click the "Remove Properties and Personal Information" option.
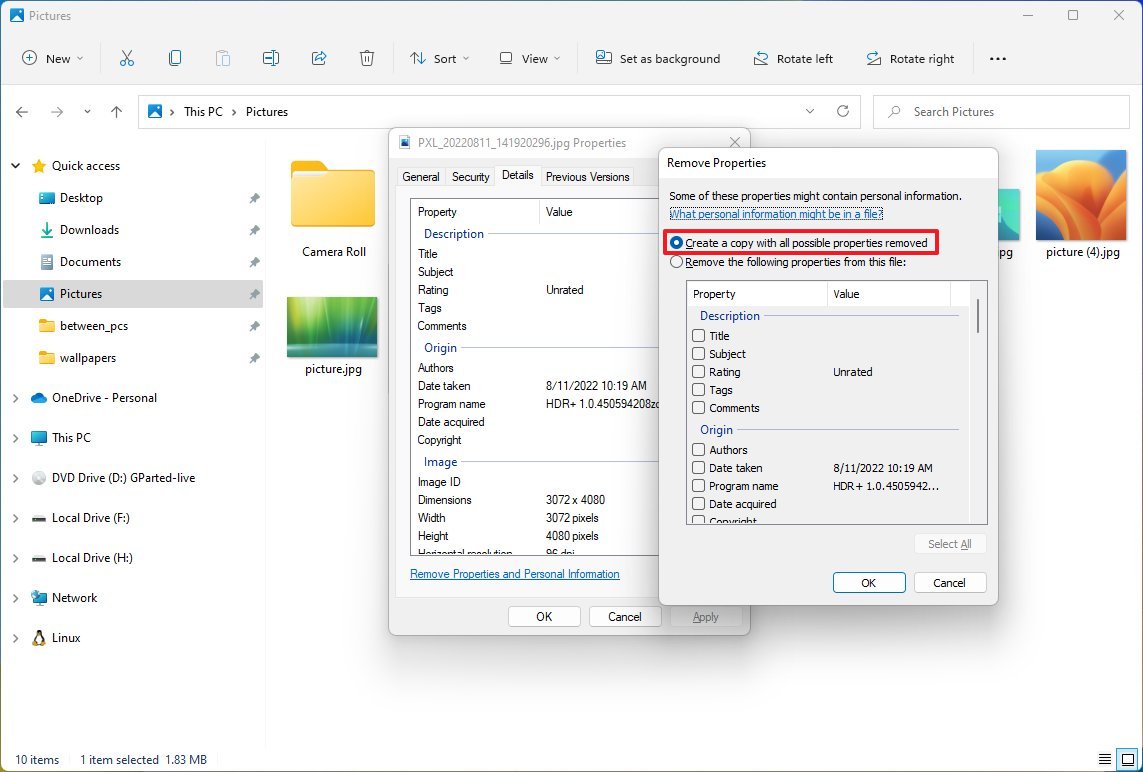
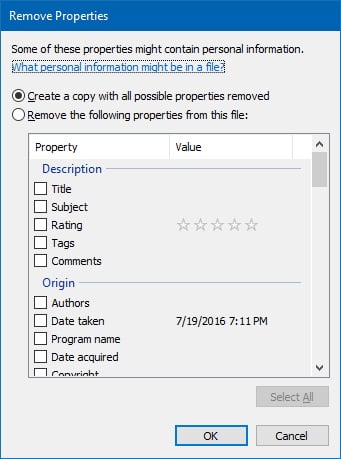
- Check the "Create a copy with all possible properties removed" option to share the image without giving away the information. Or choose the "Remove the following properties from this file" option to manually select the metadata information you want to clear from the file.
- Click the OK button.
- Click the OK button again.
After you complete the steps, the metadata information will be removed from the file.
More resources
For more helpful articles, coverage, and answers to common questions about Windows 10 and Windows 11, visit the following resources:
- Windows 11 on Windows Central — All you need to know
- Windows 10 on Windows Central — All you need to know
In this Windows 10 guide, we'll walk you through the steps to edit the metadata information on photos (but you can use the same steps to edit other type of files).
How to edit image file metadata in Windows 10
To edit the metadata on image files, do the following:
- Right-click the file and select Properties.
- In the image properties, click on the Details tab.
All the information you see in the Details tab is part of the metadata, and you can quickly edit the information by clicking the value field next to the property. However, keep in mind that some data cannot be modified.
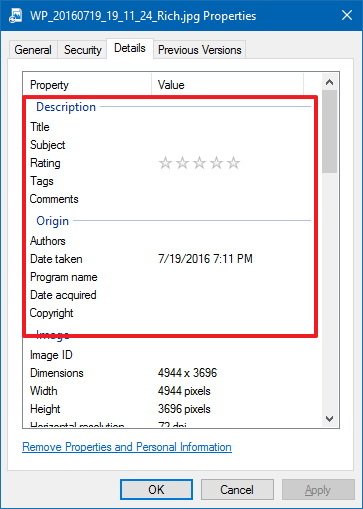
The Details tab divides metadata properties into a number of sections, which can be different in other file types. In this case, the image file is divided in six sections. The first section is called Description, and you can simply click the value field for Title, Subject, Tabs, Comments, and edit its information. You can even rate your image clicking one of the five possible stars.
In Origin, you can edit the Author, Data taken, Date acquired, and Copyright.
Then there is Image, where you can view relevant information about the image, all of which is automatically added and cannot be modified:
- Image ID
- Dimensions
- Width
- Height
- Horizontal resolution
- Vertical resolution
- Bit depth
- Compression
- Resolution unit
- Color representation
- Compressed bits/pixel
The Camera section includes the details of the camera that was used to take the picture, including:
- Camera maker and model
- F-stop
- Exposure time
- ISO speed
- Exposure bias
- Focal length
- Max aperture
- Metering mode
- Subject distance
- Flash mode and energy
- 35mm focal length
You can only edit some of these metadata fields.
The Advanced photo section includes a number of fields that will be particularly useful for photographers. You can only edit some of the fields, but things like lens, camera serial number, light source, white balance, EXIF version, and more.
The last section is File, where you can view file name and type, location path, date created and modified, owner, and computer name where the file resides. However, you can't edit any of these fields.
Once you're done editing the metadata, click Apply, and OK to close the picture properties.
How to remove picture metadata in Windows 10
While metadata can be useful, sometimes it can also be considered a security concern for many people. Thankfully, you cannot only edit metadata, but the operating system also lets you remove in bulk certain properties that might contain personal information, such as name, location, etc.
To remove your personal metadata information, do the following:
- On the Details tab of the picture, click the Remove Properties and Personal Information link.
- Select Create a copy with all possible properties removed or you can also select Remove the following properties from this file, and select the properties you want to remove.
- Click OK.
- Close the picture properties to complete the task.
More Windows 10 resources
For more help articles, coverage, and answers on Windows 10, you can visit the following resources:
- Windows 10 on Windows Central – All you need to know
- Windows 10 help, tips, and tricks
- Windows 10 forums on Windows Central

Mauro Huculak has been a Windows How-To Expert contributor for WindowsCentral.com for nearly a decade and has over 22 years of combined experience in IT and technical writing. He holds various professional certifications from Microsoft, Cisco, VMware, and CompTIA and has been recognized as a Microsoft MVP for many years.
You must confirm your public display name before commenting
Please logout and then login again, you will then be prompted to enter your display name.
