Gears 5 offers a ton of collectibles. While the franchise has always had lots of little tibits tucked tidily away for thorough players to find, Gears 5 has 90 different collectibles. These are composed of different COG tags, files, documents and more. Then, there's also a new kind of collectible item, one with impact on the gameplay: Relic weapons. In this guide, we go over the location of every single collectible in Gears 5.
Related: Gears 5 guide: List of Jack upgrades and where to find them

Bound by blood
Gears 5 promises to be the biggest Gears game yet, with five different modes and the most massive campaign of the entire series. With Campaign, Horde, Versus, Escape, and Builder all ready for players to dive in on at launch, there's never been a better time to be a Gears fan.
Relic weapons
While the Omen symbol (the Skull and Cog, the symbol of the Gears franchise) has usually been associated with COG tags, in Gears 5, seeing that symbol means that a Relic weapon is nearby. Relic weapons are unique weapons in the Gears 5 campaign that have special bonuses. There's also a few achievements tied to Relic weapons, including getting a kill with each, so they are worth hunting down. You can see the Relic weapons that we've found below:

Enforcer Relic
Most of the Relic weapons found in Act 2 can be acquired at any point in the open areas. This one is the exception - you can only grab it during Act 2, Chapter 2. When you first have to stop the Skiff, open a gate and acquire the map, take a left instead of a right into the back of the security room. There, you'll find the Enforcer Relic. You have to grab it here because once the Skiff has jumped down on to the ice below, there's no going back. Click to enlarge the images.


The Enforcer Relic does more damage and hits harder however, its rate of fire is a bit slower.
Longshot Relic
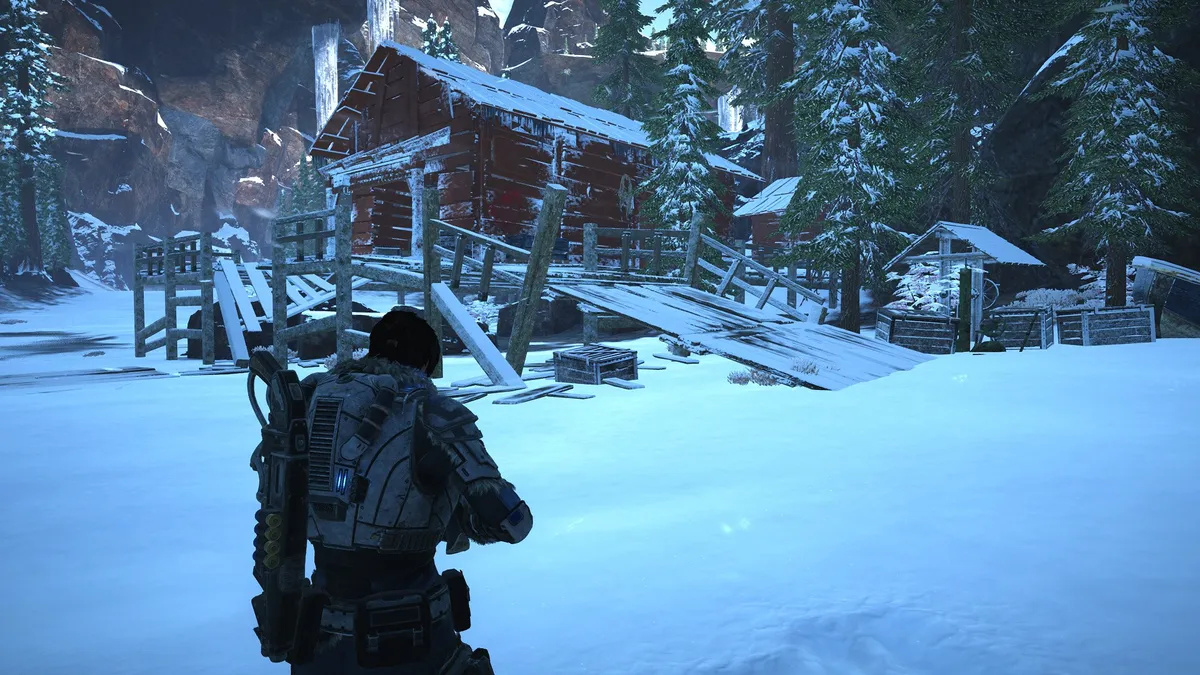
You can find the Longshot Relic at any point during Act 2 when you can freely roam and pull up your map, as early as Chapter 2. After passing through the first gate, head to the left and you'll eventually find a small shack on the ice. Inside the shack, the Longshot Relic is resting on a table, underneath a white Omen sigil. Below, you'll find images of the location on the map and what the shack looks like. Click to enlarge the images.

The Longshot Relic has an Active Reload bonus, where performing an Active Reload properly will give you two shots instead of one, which is great for rapidly dealing headshots against groups of Swarm.
Torque Bow Relic
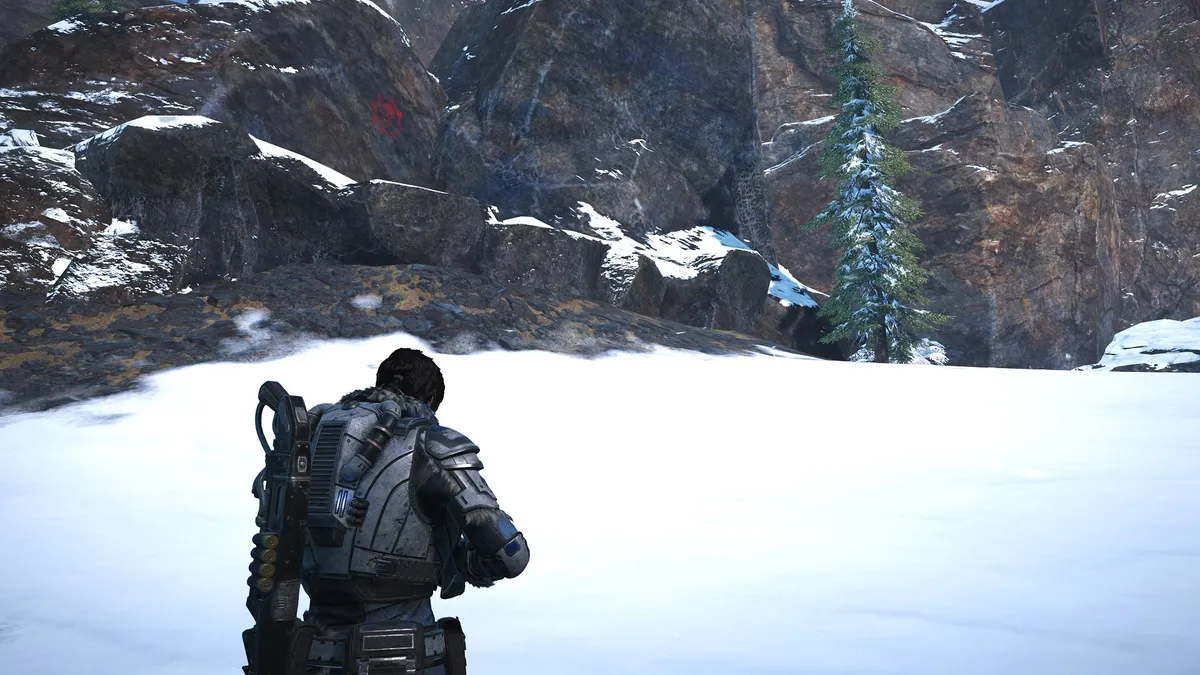
The Torque Bow Relic can be found at any point during Act 2, Chapter 4. It's at the very entrance to the mining camp. You have to visit this mine as part of the story however, you're free to grab the gun before heading in. After dismounting the Skiff and going through the entrance, head immediately to the right. You'll see a Crimson Omen on your right, as well as a small trail. Follow the trail to grab the weapon.


The Torque Bow Relic is very different from its explosive-tipped peers: it can fire non-explosive rounds and reload extremely quickly. This means you'll need to score headshots - but if you can reliably land headshots, you can rapidly decimate large groups of foes.
Boltok Relic
The Boltok Relic can be acquired during Act 2, Chapter 4. It's in the middle of the map, near a downed Condor aircraft. At the location marked on the map below, find the Crimson Omen and then look slightly to the right. The gun is leaning against a massive block of ice.


The Boltok Relic can be fired far faster than its non-Relic counterpart and can even be used accurately when hip-fired without aiming.
Retro Lancer Relic
The Retro Lancer Relic is found in Act 2, Chapter 4 at any point after opening the old, reliable COG security gate. At the location on the map below, find the Crimson Omen, then check the lone, tall tree to the right. The Retro Lancer Relic is leaning against the tree.

This is one of the most different Relic weapons, as it forgoes being an assault rifle. Instead, the Retro Lancer Relic fires off multiple grenades. This automatic grenade launcher is useful for clearing enemies out but will rapidly chew through ammo.
Dropshot Relic
The Dropshot Relic is found in Act 2, Chapter 4 (are you sensing a pattern yet?) and is extremely close to where you'll need to eventually blast through the ice to continue on to Chapter 5. At the area marked on the map below, find the Crimson Omen, then look to the left. Following the ice closely, you'll find a small pathway that leads to the Dropshot Relic.


The Dropshot Relic functions much like the regular Dropshot but with an icy twist: the explosion freezes any enemies in the blast radius. This can be used to give yourself some breathing space by freezing then shattering clustered groups of opponents.
Boomshot Relic
The Boomshot Relic is the final Relic weapon to be found in Act 2, Chapter 4 (and Act 2 as a whole). You'll find this gun at the North Tower Substation. At the station, as you face the building, turn to the right and look behind a large container with a Crimson Omen sigil. The Boomshot Relic will be right there.


The Boomshot Relic is the same as the regular Boomshot - except it holds three explosive rounds at a time and can fire them all with one long pull of the trigger (or press on the mouse button). Fantastic for dishing out high damage, it's important to be careful with how close your target is, otherwise the splash damage from the explosion will stack and kill you.
Talon Relic
The Talon Relic is the first Relic weapon you can find in Act 3, as early as Chapter 1 but you can also grab later on whenever you can freely explore with the Skiff. Once you gain access to the Skiff, you'll find it close by the airfield where you start the Act. Go slightly south to the area marked on the map, then find the hangar with the Crimson Omen. The Talon Relic is right around the corner.


This gun is pretty simple. On an Active Reload, it does more damage and is far more accurate than the regular Talon.
Gnasher Relic
The Gnasher Relic can be found during Act 3, Chapter 1 or at any point later on in Act 3 when you have free reign to explore. After leaving the airfield and traveling east in the Skiff for a short while, you'll come upon some cliffs. One of these (marked on the map below) has a Crimson Omen sigil. Look on the ground, slightly to the right of the sigil and you'll find the weapon.


The Gnasher Relic uses heavy slugs instead of regular shotgun shells. As a result, it isn't as effective at turning enemies into pulp up close, since there's no spread however, it gains a much higher range and the ability to pull off rapid headshots, rewarding a steady aim.
Lancer GL Relic
The Lancer GL Relic is located on the path leading to the Cosmonaut Training Facility. Still, you can grab it as early as Act 3, Chapter 1 if you are so inclined. At the spot on the map below, check behind the second-to-last tall pillar. You'll find the gun laying down on a concrete slab behind the pillar.

The Lancer GL Relic has a slightly different secondary fire. Instead of the mortar barrage hitting the area you targeted, it flies in a straight line, activating its payload if it encounters an enemy in its path.
Claw Relic
Continuing eastward, the Claw Relic is found in a cluster of small buildings, which you can go to at any point in the open section, as early as Act 3, Chapter 1. One of the buildings has the Crimson Omen sigil on it. Check around almost directly opposite the sigil, and you'll find the Claw Relic lying down.


When you perform an Active Reload, the Claw Relic fires much faster and much more accurately, turning what is already a powerful machine gun into a portable turret.
Markza Relic
At the Pump Station, find the entrance. Then turn around and find the Crimson Omen emblazoned on a small cliff. The Marka Relic is in the back of a ruined vehicle slightly to the right. You can do this as early at Act 3, Chapter 1.


The Markza Relic functions like its non-Relic namesake, except if you hold down the trigger (or button on PC) it is fully automatic. This is useful for stunning enemies then headshotting them through the recoil.
Hammerburst Relic
Next up is the Hammerburst Relic, found very close to the City Ruins. At the location on the map below, you'll see a Crimson Omen symbol behind a large gate. Slip through the gate and take a right, you'll see the gun lying on the ground. You can come and get this gun at any point on the Skiff, as early as Act 3, Chapter 1.


The Hammerburst Relic fires increasingly longer bursts, an effect that is pronounced upon an Active Reload. With consecutive pulls of the trigger, you can fire longer and longer bursts, easily shredding weaker enemies and even getting headshots.
Snub Relic
The Snub Relic is nearby the Rocket Hangar you'll have to visit on the main story path. As such, it's quite easy to grab in Act 3, Chapter 1 but you can do it later in the Act. At the entrance to the Rocket Hanger, keep on going right in the Skiff a short ways. You'll see the trademark Crimson Omen emblazoned on the side of the wall. Right next to it, you'll find the Snub Relic.


The Snub Relic fires a two-shot burst. While not a vast difference, it does mean less pulls of the trigger to stagger enemies or, with careful aim, pop their heads apart.
Overkill Relic
Near the Cosmonaut Training Facility, you'll see a large rock all by its lonesome with the Crimson Omen painted on it. Walk around behind the rock to find the Overkill Relic. After you grab the gun, several Rejects will pop out of the sand, so you can immediately get to testing it. While it's probably more convenient to grab this gun in Chapter 3, it can technically be done in Chapter 1.


The Overkill Relic is fully automatic, which means that instead of merely tearing your target to pieces, you'll outright liquefy it. Very good for rapidly blasting a Scion or Pouncer into pieces.
Lancer Relic
We finally come to a Relic weapon in Act 3 that can't be acquired in Chapter 1. Instead, you'll have to wait until later, when the bridge is raised and you can pass under. Shortly beyond the bridge, you'll come upon a tanker shipwreck. Circle around to the back and find the Crimson Omen. The Lancer Relic is just a short ways to the right.


The Lancer Relic allows you to bash an enemy with your rifle butt by pressing B. This attack stuns them and sets the enemy up for an execution, whether by Lancer chainsawing or by knife. Usually, you can only do this move as part of a combo: B, B, B (hold). With this gun, you can do it freely by itself.
Embar Relic
Also in Act 3 and also unavailable in Chapter 1, you can find this gun at one of the downed Condor aircraft. After making your way through the Windflare storm turning the sand to glass, check the tail end of the downed Condor, which separated from the rest of the wreckage. You'll see the Crimson Omen sigil and the gun is lying on a crate nearby.

The Embar Relic is slower to charge than the normal gun however, it does far more damage per shot. Use it carefully to vaporize targets.

The best experience
Featuring the Omen submerged in ice and snow, the Gears 5 Limited Edition Xbox One X Bundle is available for preorder today. This bundle features the limited edition console, the Kait Diaz Limited Edition controller, and past games.
Collectibles
The collectibles in Gears 5 include COG tags, UIR tags, other types of tags, documents, photos and many other items. There's a whopping 90 collectibles to find. They've been broken down by Act and Chapter, so if you're looking for specific items it'll be easy to scroll through.
Act 1 collectibles

Act 1, Chapter 1
- Weathered Spectacles
Found immediately after rappelling down into the water, just walk to the right instead of heading to the left and you'll find this item on a rock.
- Onyx Guard Challenge Coin
From the aforementioned water, head to the left but instead of going up the hill, keep going to the left and down a very short ways. You'll find this coin on a rock.
- Wellness Advisory Poster
A short way into the chapter, you'll see a waterfall (Marcus will comment that only a handful made it off Azura alive), then head into some buildings. On a wall on your left, you'll find the poster.
- COG Tags: Fallen Azura Gear
Later in the chapter, you'll have Dave open some doors as a DeeBee follows you. Go into the Infirmary (it has the word Infirmary up top, it's hard to miss) and on the right, there's a dead Gear who's been reduced to a skeleton in armor. Pick the tags up from the corpse.
- Chairman's Wristwatch
In that same area, leave the Infirmary and go upstairs. Take a right, then a left and in a small back room, there'll be a desk with the watch.
- Lightmass Missile Strike Authorization
After a fight where your remaining DeeBee is destroyed and there's a huge explosion in the middle of the room, go near the back of the room but take a left. Up a short flight of stairs, you'll find the document on an old computer terminal.
- UIR Hammer of Dawn Blueprints
Going back into the big room where the explosion went off, go up the stairs and have Jack open the door. On the table directly in front of you, you'll see the blueprints.
Act 1, Chapter 2
- Photograph of Kilo Squad
The moment the cutscene ends and you control JD, walk forward and check Baird's desk. There'll be a small photo to grab.
- Mark 3 Lancer Blueprint
From Baird's desk, walk up the short stairs and go to the right. On top of a box, you'll find this blueprint.
- Trauma Record: Marcus Fenix
Turn around and walk to the other side of the room past Baird. You'll find this white document next to a takeout box.
- Gym Notice to Trainees
After the cutscene where you're introduced to the polite and charming Fahz, check the wall directly behind the fallen training DeeBee. You'll find this amusing notice there.
- DBI Marketing Brochure
Exit the gym and go to the right. In the small lobby, turn to the left and you'll find this brochure on a small couch.
Act 1, Chapter 3
- COG Tags: Fallen Raven Pilot
Once JD has been saved from the Juvies and you can move again, check the fallen Raven pilot in front of you for some COG tags.
- The New Ephyran: 20th Anniversary Edition
Once you walk out from your burning surroundings to the next room, check a desk in front of you.
- Seditious Literature
After a brief fight with the Swarm, head upstairs then turn to your left. Check a desk against the railing and you'll see a magazine with SEDITIOUS stamped on it in bold red letters.
- Settlement 2 Welcome Package
After finding a small group of survivors and Gears huddling in a building, look towards the small area you're supposed to crouch through. Go to the left in a small room and you'll see this pamphlet on a small desk.
- Storied Embry Star
After Lizzie Carmine shows up and you've called in additional Guardian DeeBees to clear the street, check the building that Swarm snipers were previously huddled in. Go up the stairs and in the dark back of the room, find a desk with an open drawer. Look down into the drawer to grab this medal.
- COG Tags: Fallen Gear at Condor Crash
When you find the Condor gunship that's been brought down and is currently a flaming wreck, about halfway through the wreckage, you'll see a dead Gear on your left. Grab the tags on the body.
- Seran Colossus
In the street where Poppers (Juvies with grenades attached) attack you and Cole loudly voices his displeasure, check the very end of the street on the left and go in the bookstore. On a stand in the middle of the store, you'll find this book.
Act 1, Chapter 4
- Memo to Bomah Staff
When you go through the gate to the Grand Bomah Hotel, go to the left and hop up into the garage. In the garage, there'll be a table past some boxes where you can pick up the memo.
- COG Tags: Fallen Gear at Hotel
When you enter a pitch-black room and Jack provides some light, look in front of you where two Gears have been butchered. You can grab tags off the corpse leaning against the shelf.
- Lost Plush Horse
After entering a lobby with several dead civilians, check under the upper balcony near some couches to pick up this plush toy.
- Settlement 2 Summer Birth Pamphlet
Go upstairs from the lobby with the plush and check on your right to see a table with balloons behind it and baby bottles on it. Pick up the pamphlet here.
- Song Lyrics
After fighting your way through the street and entering the theater, head upstairs and find the wardrobe and makeup section. On the left in a small room, you can grab this sheet of lyrics.
- Worn Lighter
In the backstage area of the theater, there's a small mirror and bust on a desk, next to a poster advertising Jace Stratton. Grab this lighter from the desk.
- Octus Canon Scroll Prop
On the stage, in the same area where you find the control panel to lift the curtain, check opposite the controls and nab this theater prop.
Act 2 collectibles
Act 2, Chapter 1
- Hand-Carved Riftworm Flute
After the cutscene, walk down the stairs on your right and check the building on your right. This flute is on a table.
- Ilima City License Plate
As you walk towards the objective, you'll see a big building marked Infirmary on your left. There'll be a furnace on your right and right next to the furnace, you can grab this license plate.
- Lost Gear Helmet
Past the furnace, you'll see a large, decorated bone statue. Go past that and on the left in some flowers and snow is this helmet.
- Wooden Toy Lancer
After a young boy taunts you then runs away, check the corner of the building where he was standing. On a block next to the building, you'll find this toy.
- Major Howl and the Battlin' Ants
From the block, walk forward then to the left and go inside the salvage shop. On a back table you can find this poster.
- New Village Rules Mandate
Past the stable, enter the building in front of you. You'll see this sheet of rules hanging up on your left.
- Note to the Chief
When you reach the stairs where villagers are planting flowers, instead of going down the stairs, enter the building just behind them. This note is laid out on a table in the middle of the room.
- Norsko's Letter
After you can see the Village Chief working, before going to the gate on the left to talk to them, turn right and find this letter on some crates.
- Outsider Skiff Schematic
After the fight against the Swarm begins, go up some stairs and you'll find a room with a Silverback (which you can use!) on the left. On a crate next to it you can grab this schematic.
- COG Tags: Oscar Diaz
After you are in the dark room with the Skiff and need to turn the lights on, check one of the workbenches along the wall to get these COG tags.
Act 2, Chapter 2
- Grindlift Maintenance Notes
Now that the world has opened up and you can roam freely with the Skiff, find the abandoned train tunnel. After going in and fighting a Carrier, check the back of the train car for the notes. (It's worth mentioning that you'll have a second chance to grab this collectible in Act 2, Chapter 4, as you'll be openly roaming the same area again)
- Faded Photograph
Follow the tracks outside of the abandoned train tunnel a short distance and you'll come upon a single, detached train car. Enter it and you can find the photograph. (Much like the collectible before, you can grab this during Act 2, Chapter 4 as well)
- Islander's Lost Earring
A short ways in front of the Old COG gate you'll use to move on later, there's some crashed trucks covered in snow. You can nab the earring here, lying next to a corpse and Torque Bow. (Much like the collectibles before, you can grab this during Act 2, Chapter 4 as well)
- Lena's Journal
As you head to the New Hope facility main mission, you'll pass an Outsider campsite (it's impossible to miss). At this campsite, you can grab a journal, netting you a collectible and also kicking off a secondary mission. (Much like the collectibles before, you can grab this during Act 2, Chapter 4 as well)
Act 2, Chapter 3
- Intercepted Letter
In the New Hope facility lobby, go to the back right corner and you'll find this letter.
- Sovereign Directive 10345
Later, you'll find yourself having dropped down a hole into a dark hallway with lots of cells. Exit the room you dropped into and turn to the right. There'll be a locked door near the end of the hallway that Jack can open. The directive is in the back of this room.
- Patient Analysis: AX-331-2
Leave the room you found the directive in and turn to the right. Amidst a lot of medical equipment, you can find this analysis near a body covered with sheet.
- Patient Analysis: EV-184-9
After finding a special cell that clearly belonged to a child, jump through the window. The analysis is on a table to your left.
- Patient Analysis: RK-619-4
A short distance ahead, you'll find a long hallway with light coming in from openings in the ceiling. There's a door on the right, with the corpse of one of the Sires on an examination table. You can grab the analysis from next to the body.
- Timeworn Data Drive
After dropping down from some destroyed stairs, you'll enter a server room, with dozens of cables running along the floor. The data drive is on your right in the dark.
Act 2, Chapter 4
This section is very long and very open, so remember than you can backtrack and grab any collectibles from Chapter 2 you previously missed. Also, the open world sections of this can be done in any order. You'll get a notice when you're about to leave the open area behind permanently and until you get that notice, you're free to roam and explore.
- Frayed Pouncer-Tooth Necklace
One of the missions in Chapter 4 that has you leave the Skiff behind is an abandoned mine. At the abandoned mine entrance, go up the watchtower to nab this necklace lying on the floor.
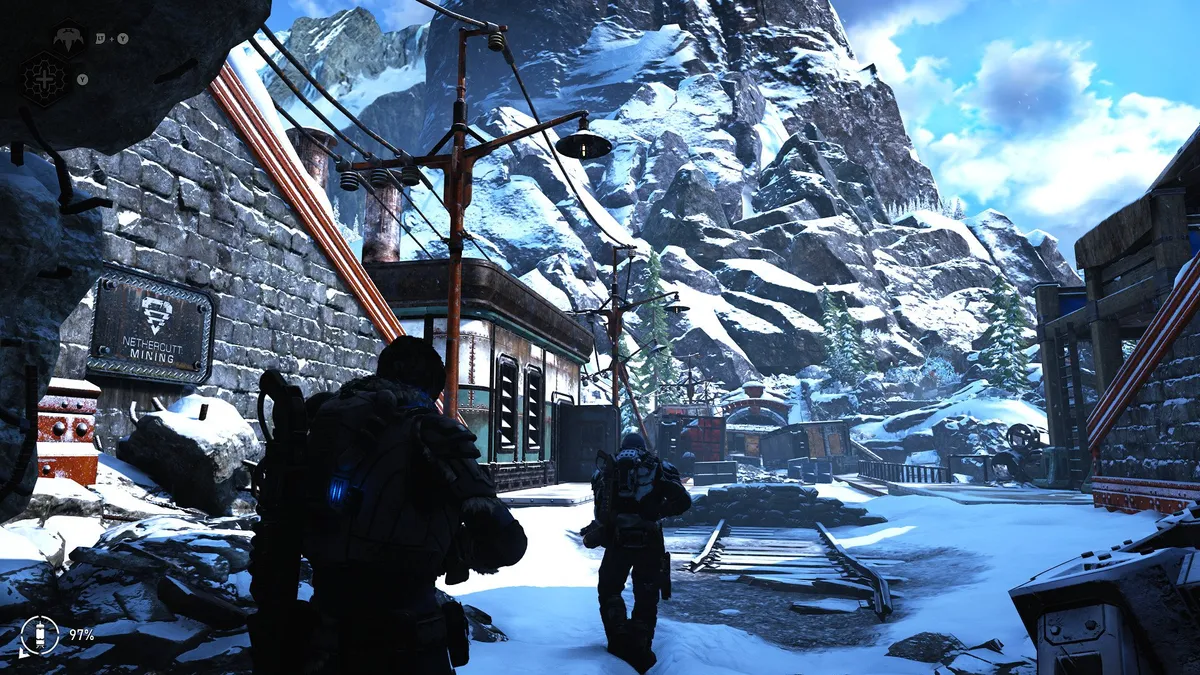
- Nethercutt Mining Poster
Inside the abandoned mine, when you make your way to the locker room, go to the right into a small room. There'll be a poster on the wall.
- Nethercutt Miner's Journal
In a large, dark room illuminated by several pods hanging from the ceiling, go to the back and to the left. A small side room has this journal on a table.
- Letter to Momma
Back out in the free-roam of the open section, you'll need to take the Skiff across a narrow bridge between icy ledges at one point. Before crossing, you'll spy a snow-covered Centaur tank on your right. Go up to it and on a crate next to the tank you can find this letter.
- Security Memorandum
At the East Tower Substation, you can go inside and find this memorandum opposite a frozen corpse. This is also part of the Outsiders secondary mission and is necessary for opening another substation.
- Krav's Locust Tag
At one of the Old Derrick Sites, you'll see a Grindlift capsule below a yellow flag. Next to the capsule is a Locust skeleton, which you can take the tag from.
- Grindlift Actuator Component
At the same Old Derrick Site as above, check the iced-over Derrick for a yellow compartment that you can open. This is also part of a secondary mission that when complete, nets you an Ultimate upgrade for Jack.
- Orders from Ketor Skorge
At the second Old Derrick Site, enter into the wreckage and you can find this document on a skeleton to your right.
- Grindlift Actuator Component
At the same Old Derrick Site as the orders were found, make your way down and over to the second iced-over Derrick. Nab this component from a yellow compartment. This is another part of a secondary mission giving you an Ultimate upgrade for Jack.
- Lena's Scribbles
As you arrive at the North Tower approach and have to dismount the Skiff, check to your right for the North Tower Substation. Before you enter the substation (which requires the Security Memorandum collectible from the previous substation) you can grab a note on the keypad.
Act 2, Chapter 5
- Nethercutt Helmet
Once you've broken through the ice, you'll make your way to a security door with laser-targeting autoturrets. Turn around but don't go back the way you came, go to the left (your right facing the security door) and walk until you see frozen corpses trapped in ice. There's a helmet on top of the ice.
- Subject Analysis: UL-119-2
After disabling the first cryo jets so you can walk through the room, go to your right up a ramp and kick down a door. At the back of this room, you'll find the document
- Subject Analysis: TE-872-3
After a dramatic cutscene that leaves you standing in a room with a giant yellow tank, grab the document off the floor directly next to you.
- Lexigram Board
After making your way through a second batch of cryo jets and disabling a generator, grab the board from next to the generator.
- Subject Analysis: EV-184-9
When chasing the Niles bot, you'll make your way through an area with several malfunctioning cryo jets. Grab this document off a table right under of the jets.
- Sketchbook
When you make your way into a room with a dead scientist and notice that the massive tank that held the Matriarch is busted open, turn to the left and go into a dark room. The document is on the floor in the dark to your left.
Act 3 collectibles
Act 3, Chapter 1
- Corisku Newspaper
When you gain control of Kait, there'll be a bar on your left. Grab the newspaper there.
- Doomed Empire, by Logan Hobbs
After going downstairs into the baggage claim area, there's a book next to some boxes. Swipe it.
- Missive to Agent 9
Go through the airport metal detectors, turn left but instead of taking another left, keep going straight ahead to a small room. The ominous document is on a table in the back
- Nomad's Creed
Past the table where some Claw machine guns are laid out, you can find this creed stabbed to another table with a knife.
- The Astounding Lightning Rangers!
Out in the open with all the different hangars, head into Hangar 4. Check to the left of the aircraft, there's a comic book to grab.
Act 3, Chapter 2
- UIR Tag: Fallen Loyalist
As you arrive at the Rocket Hangar for the main mission, stop and go to the right of the entrance. You'll see a corpse propped up against a wall with a tag to grab.
- Hammer of Dawn Command Case
After first entering the building, you'll make your way to a dark room where Fahz is complaining about the lack of lights. There's an armored skeleton with a command case for you to snatch.
- OZP-11 Termination Directive
In the vast, open hangar where you'll be spending a lot of time traversing via gurney, don't get on the gurney yet. Go down and to the right, where you'll find this document on a barrel.
- UIR Space Mission Brief
A few hallways and corridors later, there'll be a room of enemies to clear out with the floor covered in red sand and capsule in the center. Drop down but go to the left up into a hidden room with a model of a Rocket on a table. Towards the back of the room, you can find this brief.
- Loyalist Order from Major Toly
When you enter another vast room and see a chunk of a rocket to your left, go to the right and hop some sandbags. There'll be a Longshot and this orders document.
- UIR Tag: Major Toly
You'll come upon an area briefly glimpsed in the E3 2018 reveal trailer for Gears 5, with some deserted tanks. There's a UIR corpse leaning against one of the tanks, grab the tag from there.
- The Major's Speech
A short ways later, you'll have to take a left turn through a wall that's been blasted open. The document will be resting on a console directly in front of you.
- UIR Tag: Lieutenant Melich
At the turntable, in a room where you'll need to order Jack to operate the turntable controls. In the back of that room, you'll find the UIR tags.
Act 3, Chapter 3
- Nomad's Sketchbook
In the open world, go to the Watertower location, which is part of a secondary mission. Grab the sketchbook from the same room where the sole survivor of the Watertower is. (Technically, you can grab this and all the other "open area" collectibles back in Act 3, Chapter 2)
- UIR LC Circuit A1
At the City Ruins location, you'll have to hold out as you are attacked by Swarm, particularly a large number of Elite Hunters. After Jack slices through the door, go in and upstairs, the electronic part is on a countertop.
- Well-Worn Vasgari Flag
After grabbing the electronic part above, head to the right and over the damaged roof on your way out but stop and turn to the right after entering the next building. You'll see a big flag hanging on the wall to grab.
- UIR LC Circuit C1
At the Artillery Battery locale, go upstairs from the room where you rescued the podded Nomads. You'll find the circuit on a table right in front of you.
- Emergency Loyalist Radiogram
In the same room as the circuit above, on a console directly behind the table, you can snatch this document.
- Loyalist Orders to Lieutenant Melich
At a cluster of fallen tanks just south of the Harbor Docks, you'll be able to see the bridge clearly. The orders are next to one of the tanks.
- RNV Borascu Captain's Log
At the Cargo Shipwreck, drop down, then stick to the right. You'll find an open cargo container with the document next to a UIR corpse.
- UIR LC Circuit B1
On the corpse of a Nomad at the far back of the Cargo Shipwreck, you'll find the final circuit.
- Lightmass Missile Fragment
At the Cosmonaut Training Facility, before heading into the ruined building go to the far right. At a wall, you'll find this piece of scrap.
- UIR Tag: Captain Tagger
Inside the mission, at the giant training area where pilots are tested for centrifugal force (the giant thing that spins around crushing Swarm until it breaks) you'll find a tag on a body in the area that opens up once the training equipment blows apart. It'll be a few steps left of what you need to do for the main mission.
- Fallen Nomad's Visor
At the Nomad convoy you rescue, just inside the entrance and to the right you can find this visor.
Act 4 collectibles

Act 4, Chapter 1
- Encyclopedia of Tyran Military History
In a wrecked building very reminiscent of the original Gears of War, you can find this book after going down some stairs and checking a corner that is directly underneath an upstairs piano.
- Ruptured Gear Helmet
As Baird frantically yells at his AI assistant to take notes, go opposite your objective and take a right up a destroyed street. You can see this helmet at the end of the road.
- COG Tags: Minh Young Kim
As you make your way to the tomb to reinforce Paduk, take a right directly in front of the building. Wading through the swampy water, look closely to your right and you'll see these COG tags held in place with a blade.
- Restoration Notice: Tomb of the Unknowns
You'll see this notice right next to the door you have to go through to enter the tomb.
Grabbing every last item
Congratulations, you've got every collectible! There's a lot of stuff to grab in Gears 5 and The Coalition hid items away in every crack and crevice. If at any point you grab a collectible but it isn't showing up in your list on your menu, just be patient, it's likely an issue with the servers syncing and the data has been recorded.
Related: Gears 5 review: An evolved formula brings home a big win for Xbox
Bound by blood
Gears 5 promises to be the biggest Gears game yet, with five different modes and the most massive campaign of the entire series. With Campaign, Horde, Versus, Escape, and Builder all ready for players to dive in on at launch, there's never been a better time to be a Gears fan.
The best experience
Featuring the Omen submerged in ice and snow, the Gears 5 Limited Edition Xbox One X Bundle is available for preorder today. This bundle features the limited edition console, the Kait Diaz Limited Edition controller, and past games.