10 top Microsoft Excel tips to help you become a spreadsheet sorcerer
Microsoft Excel: These tips and tricks will give you the tools to become a work wizard.
All the latest news, reviews, and guides for Windows and Xbox diehards.
You are now subscribed
Your newsletter sign-up was successful
Newcomers to Microsoft Excel on Windows and beyond are often overwhelmed by the vast quantity of tools and menus available. Fear not!
Below we have a list of 10 useful tips and tools to enable you to create the spreadsheet you need (or spice up an existing sheet). Now you can wow your project team, or just make managing your personal budget clear and concise, with these simple but effective tips.
1. Autofill
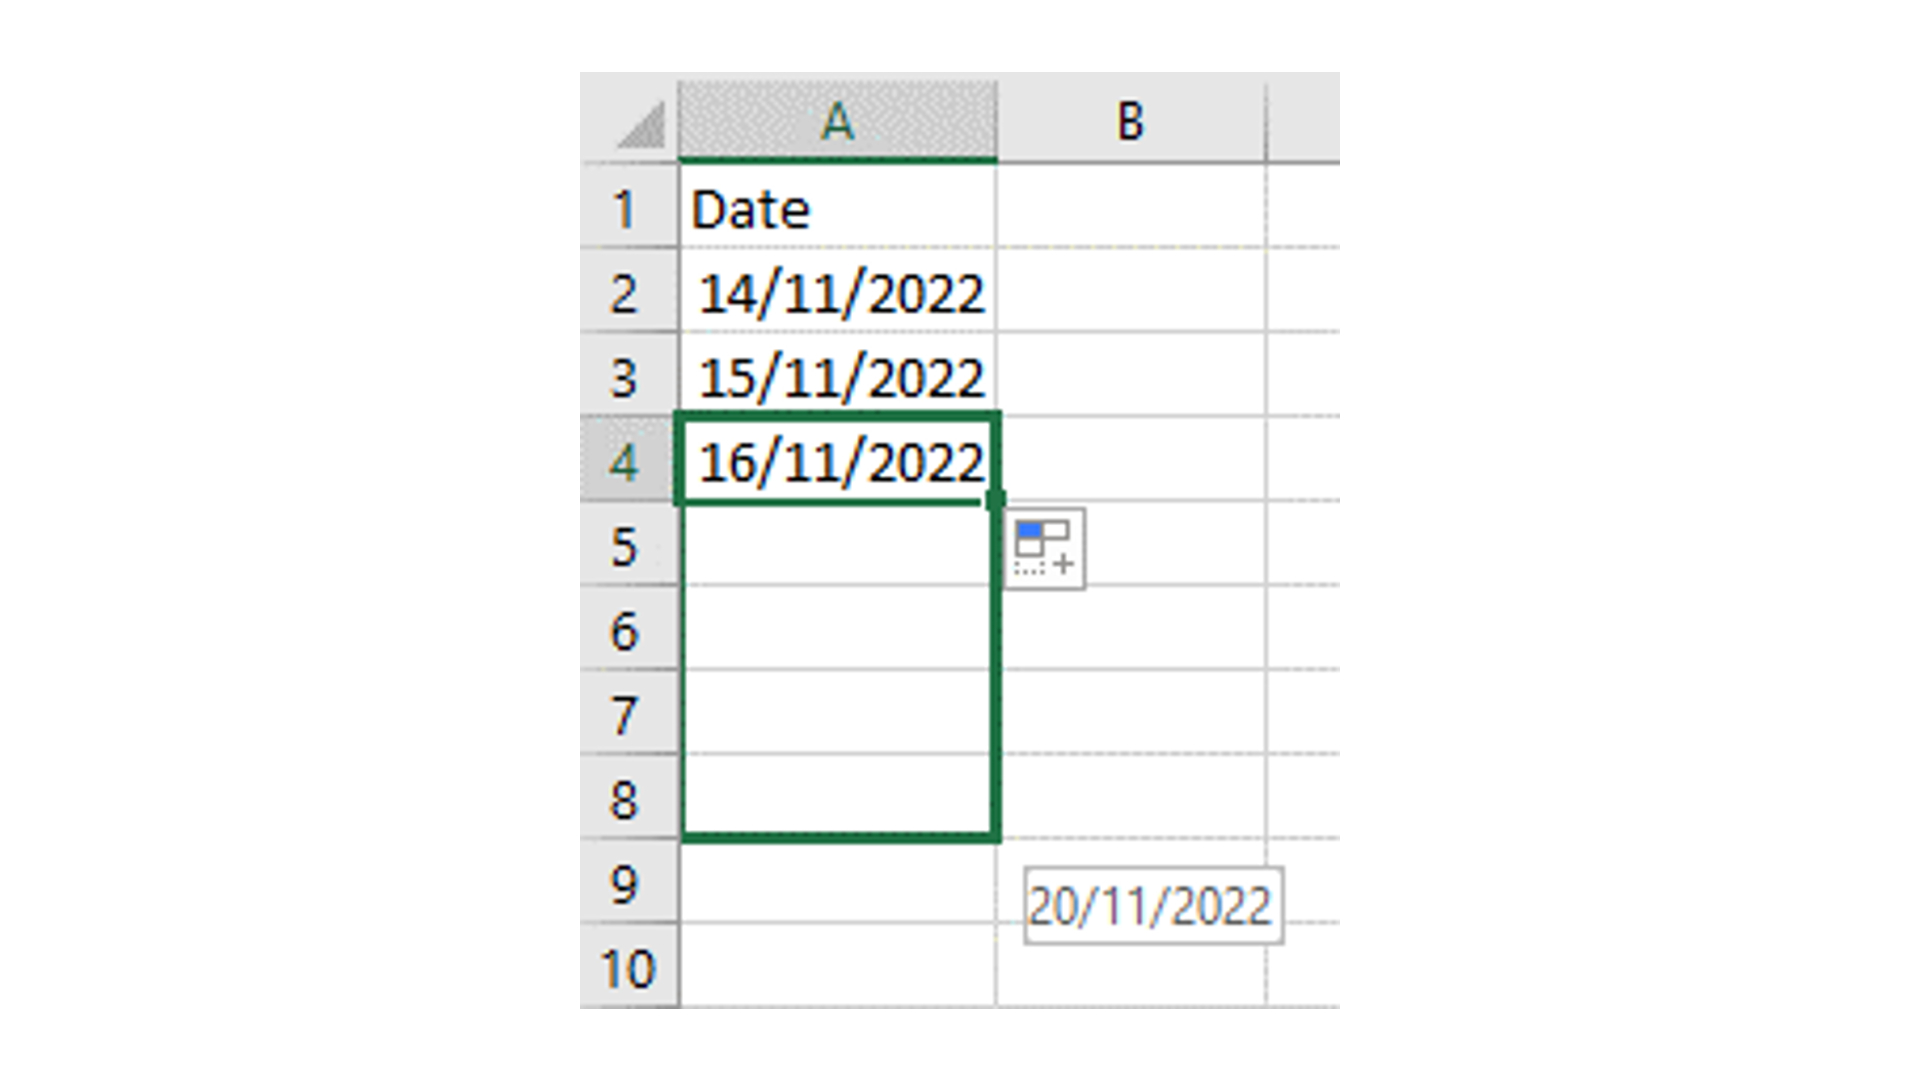
When first creating your Excel spreadsheet, you may find it very time-consuming to enter all your data. But Excel is equipped with features to help speed up the process. If entering a series of information, Excel can recognize this and autofill the data in ascending or descending order as required.
For example, if your column is a list of subsequent dates, enter the first date and left click on the small square in the bottom right corner of the cell. Still holding down your mouse button, simply drag downwards and Excel will follow the date sequence for as many cells as you drag, filling in the rest of the dates. This can save precious minutes (or even hours over the course of the year).
2. Format cells
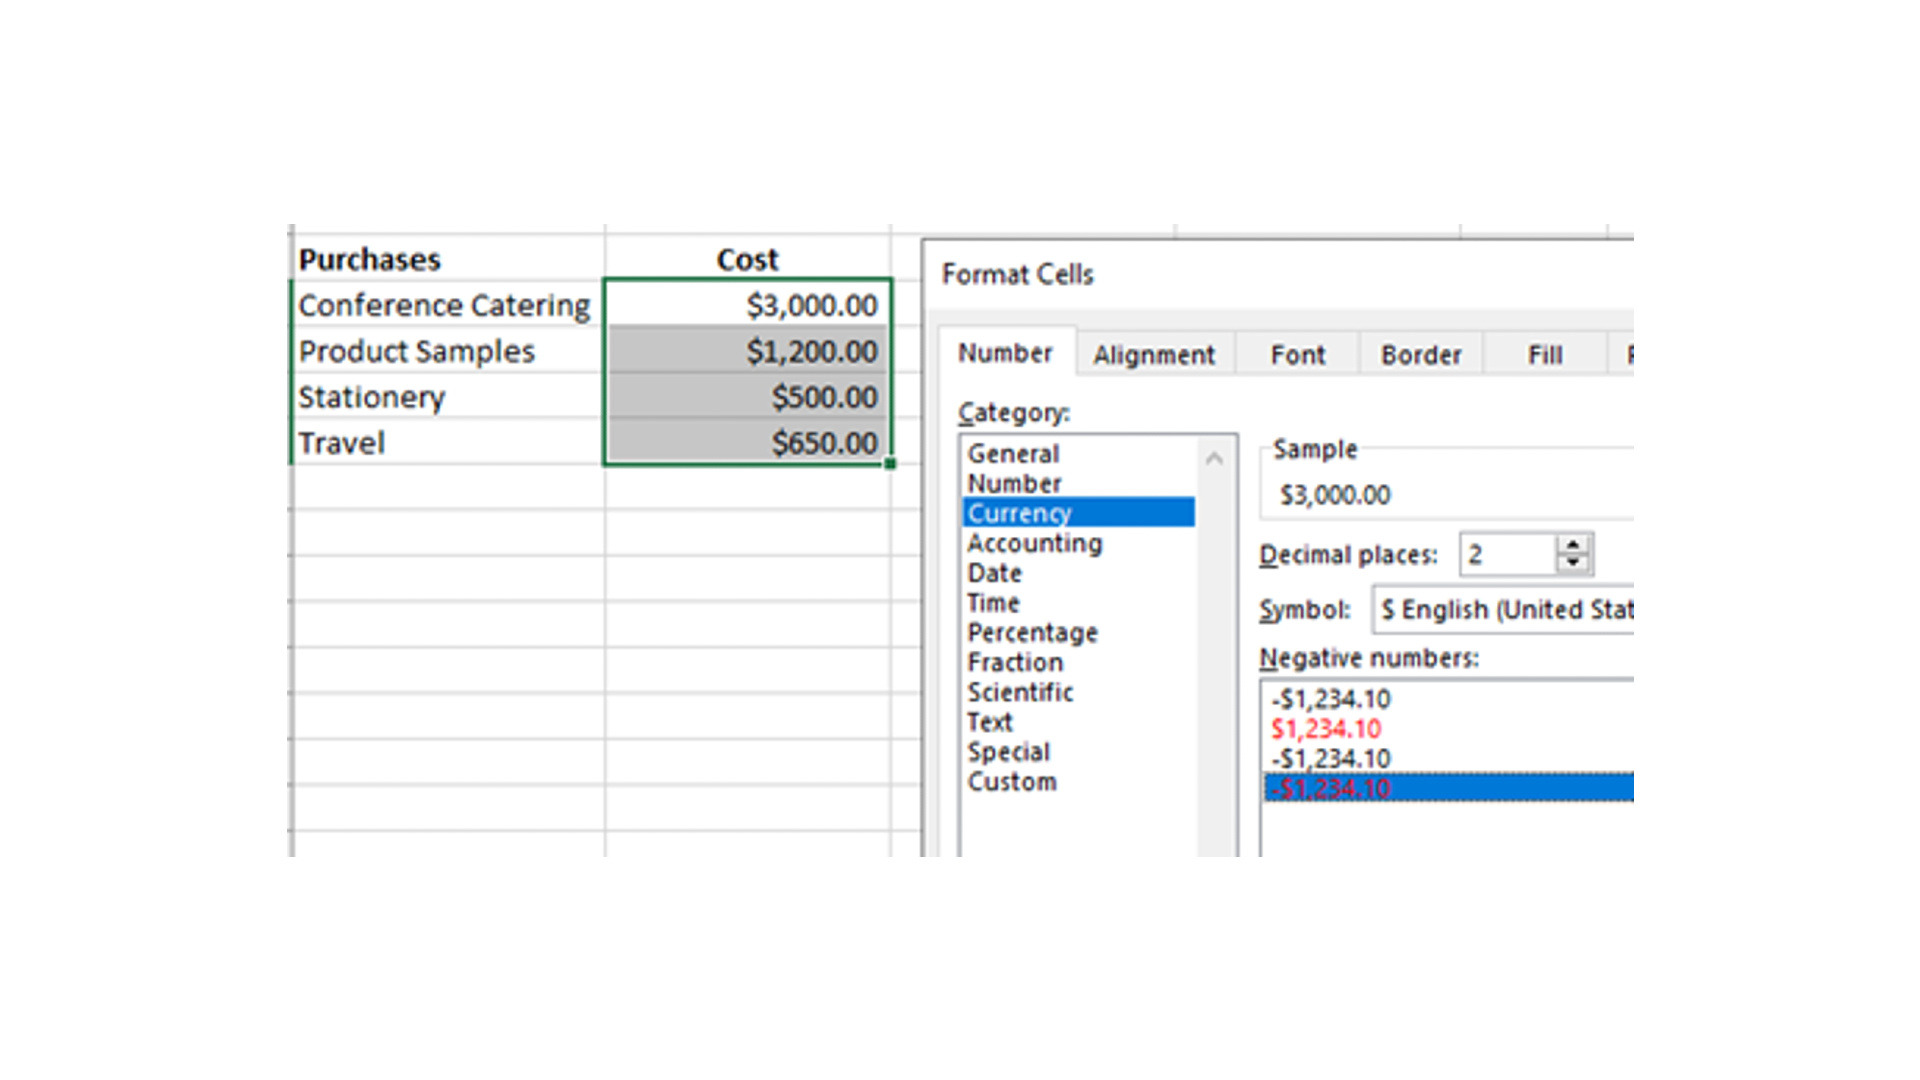
If your cells are handling currency, dates or even time, Excel can adapt and treat them as such. By right clicking on a cell (or group of cells) and clicking on ‘Format Cells’ you can apply a different format of your liking. This saves you having to manually type symbols such as $ or % depending on the type of formatting you pick, as well as keeping the data format consistent and tidy. This can also help ensure that your math formulae make sense, for example when adding or subtracting time. There are dozens of options available, so you should be able to find something to suit your needs.
3. Today
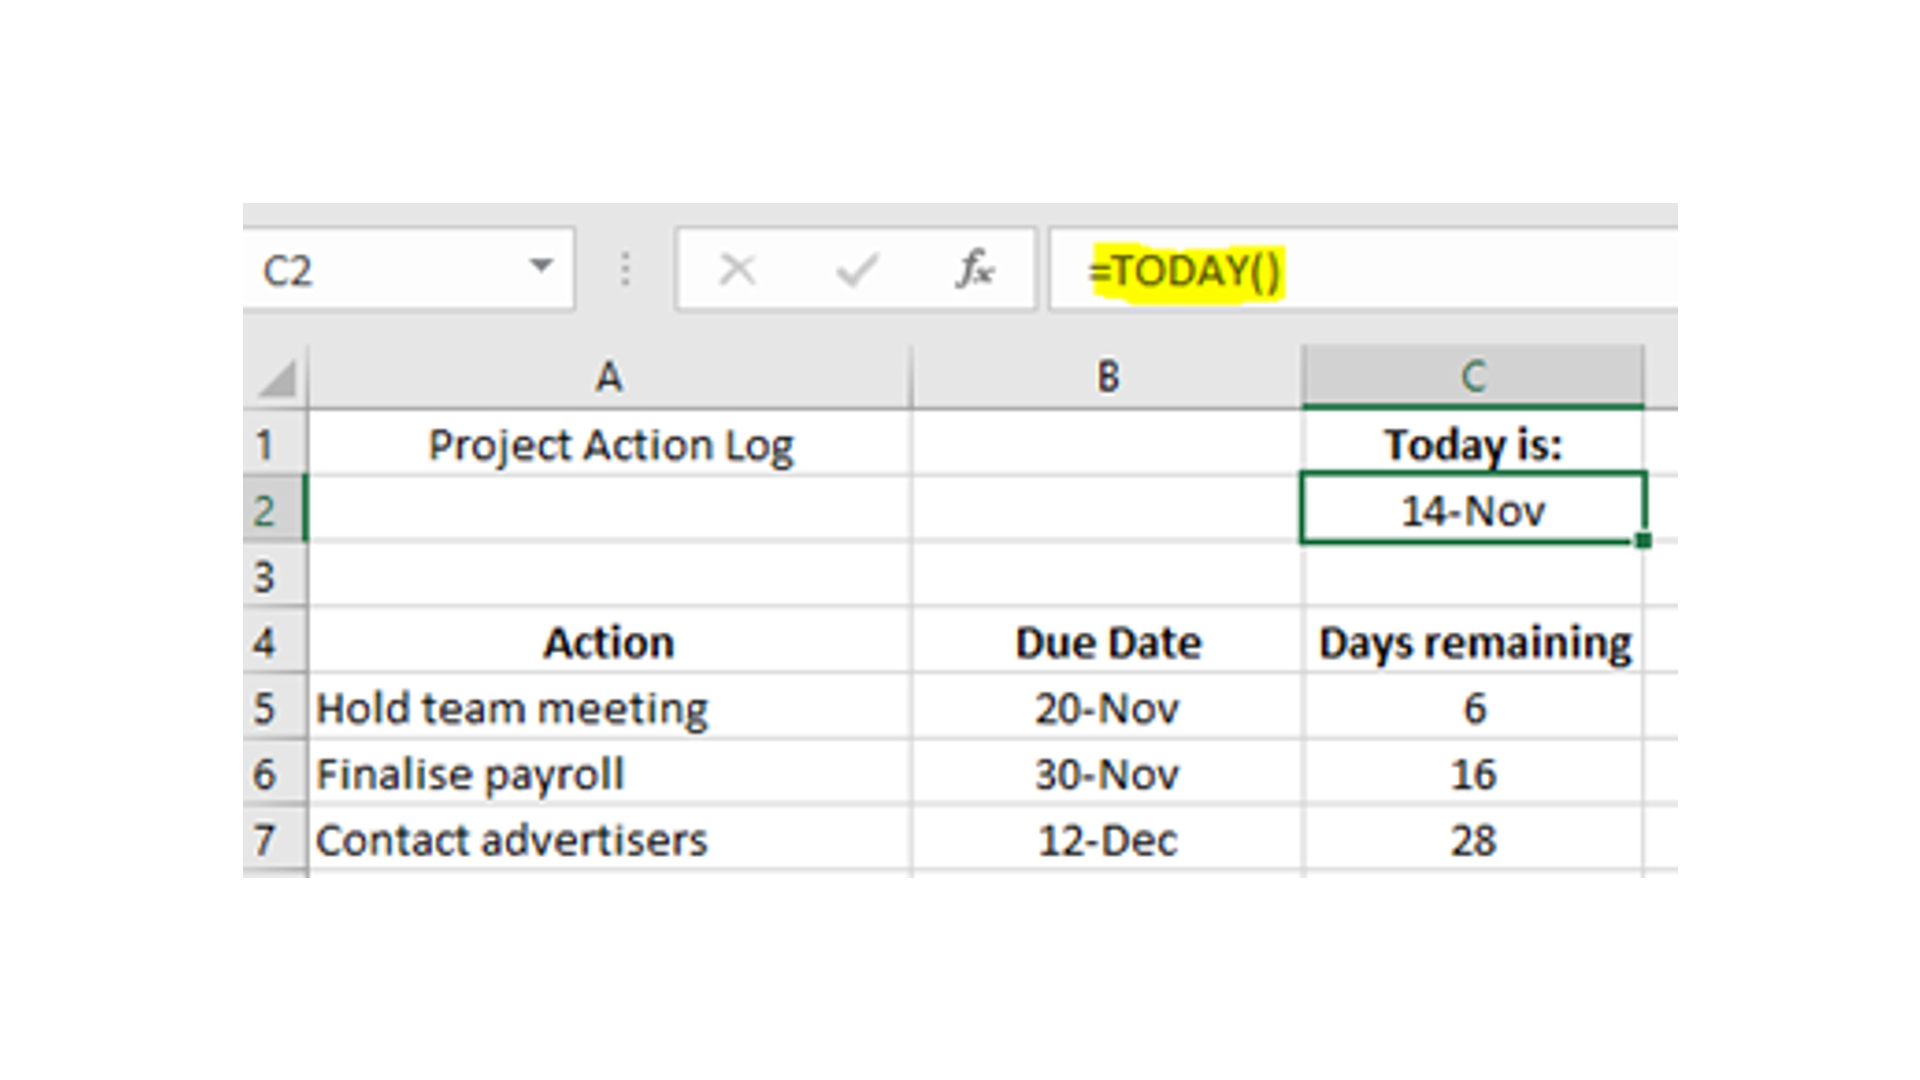
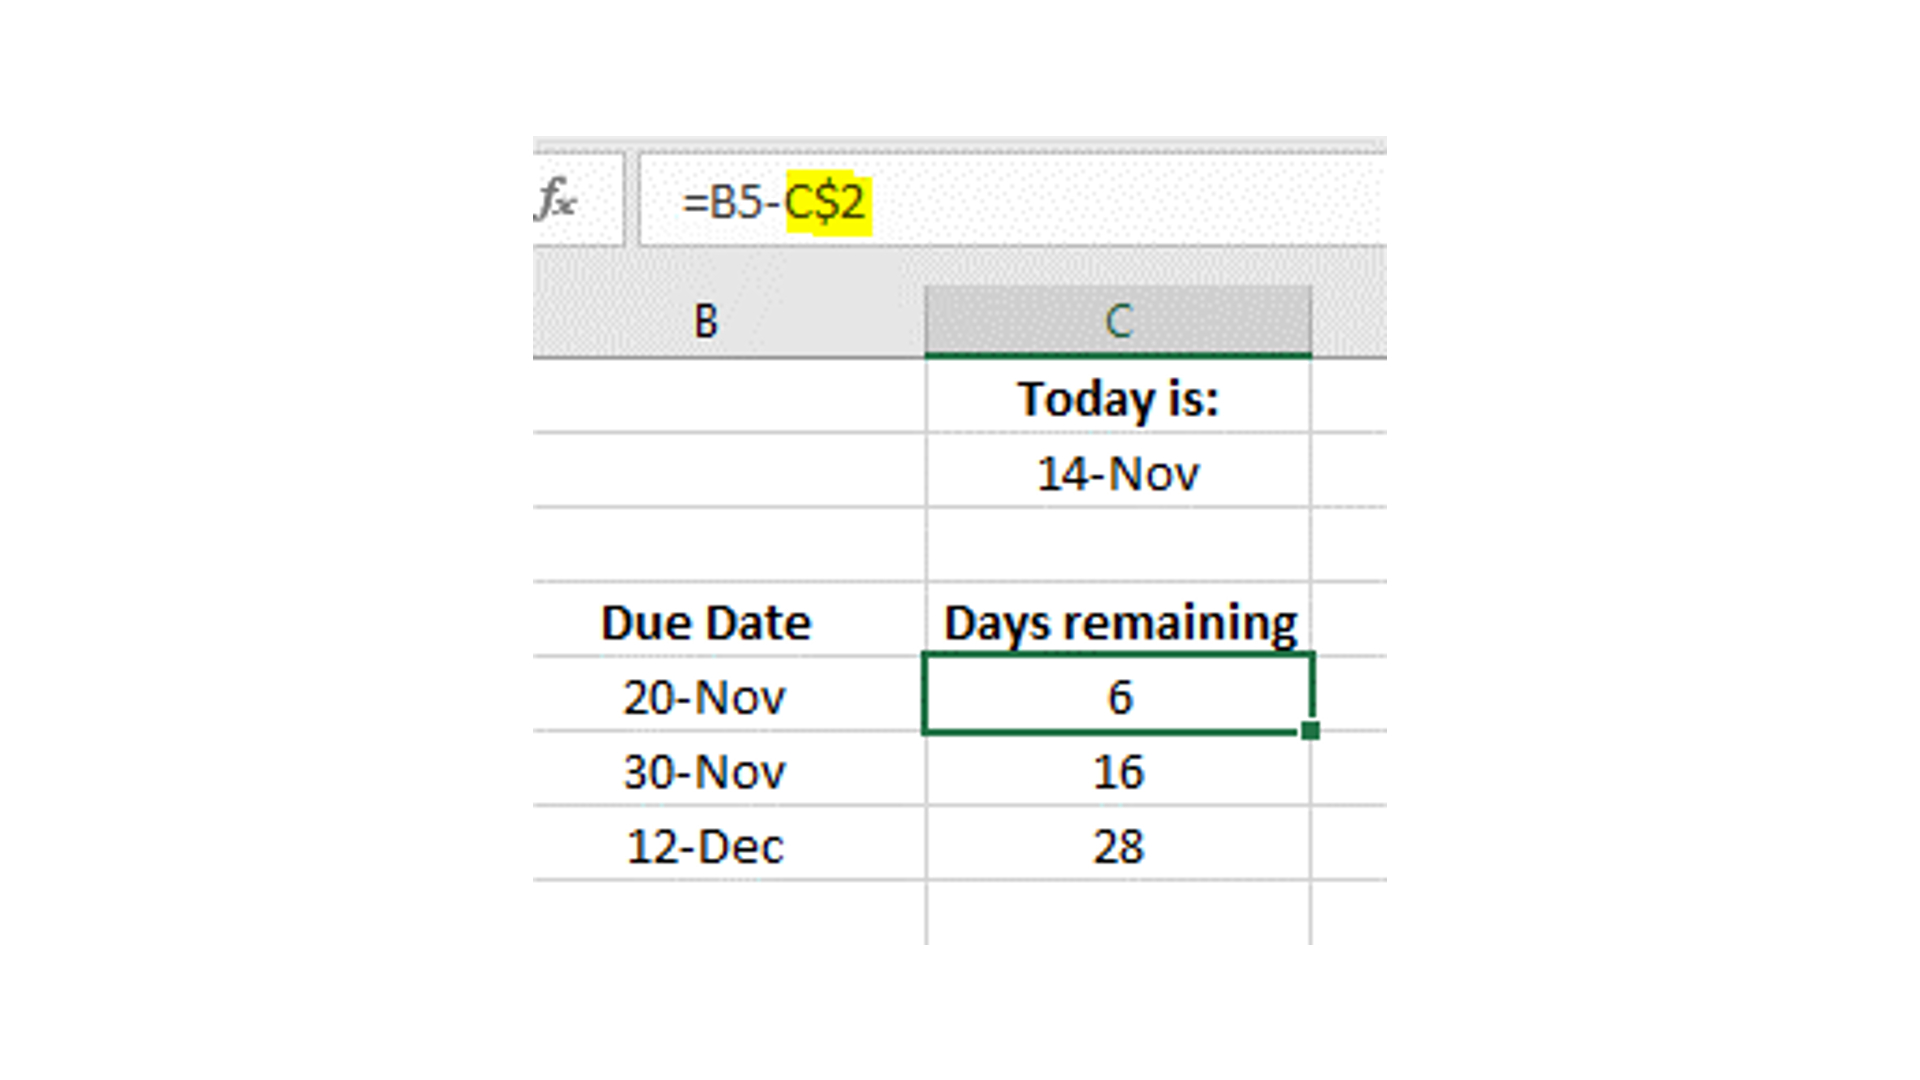
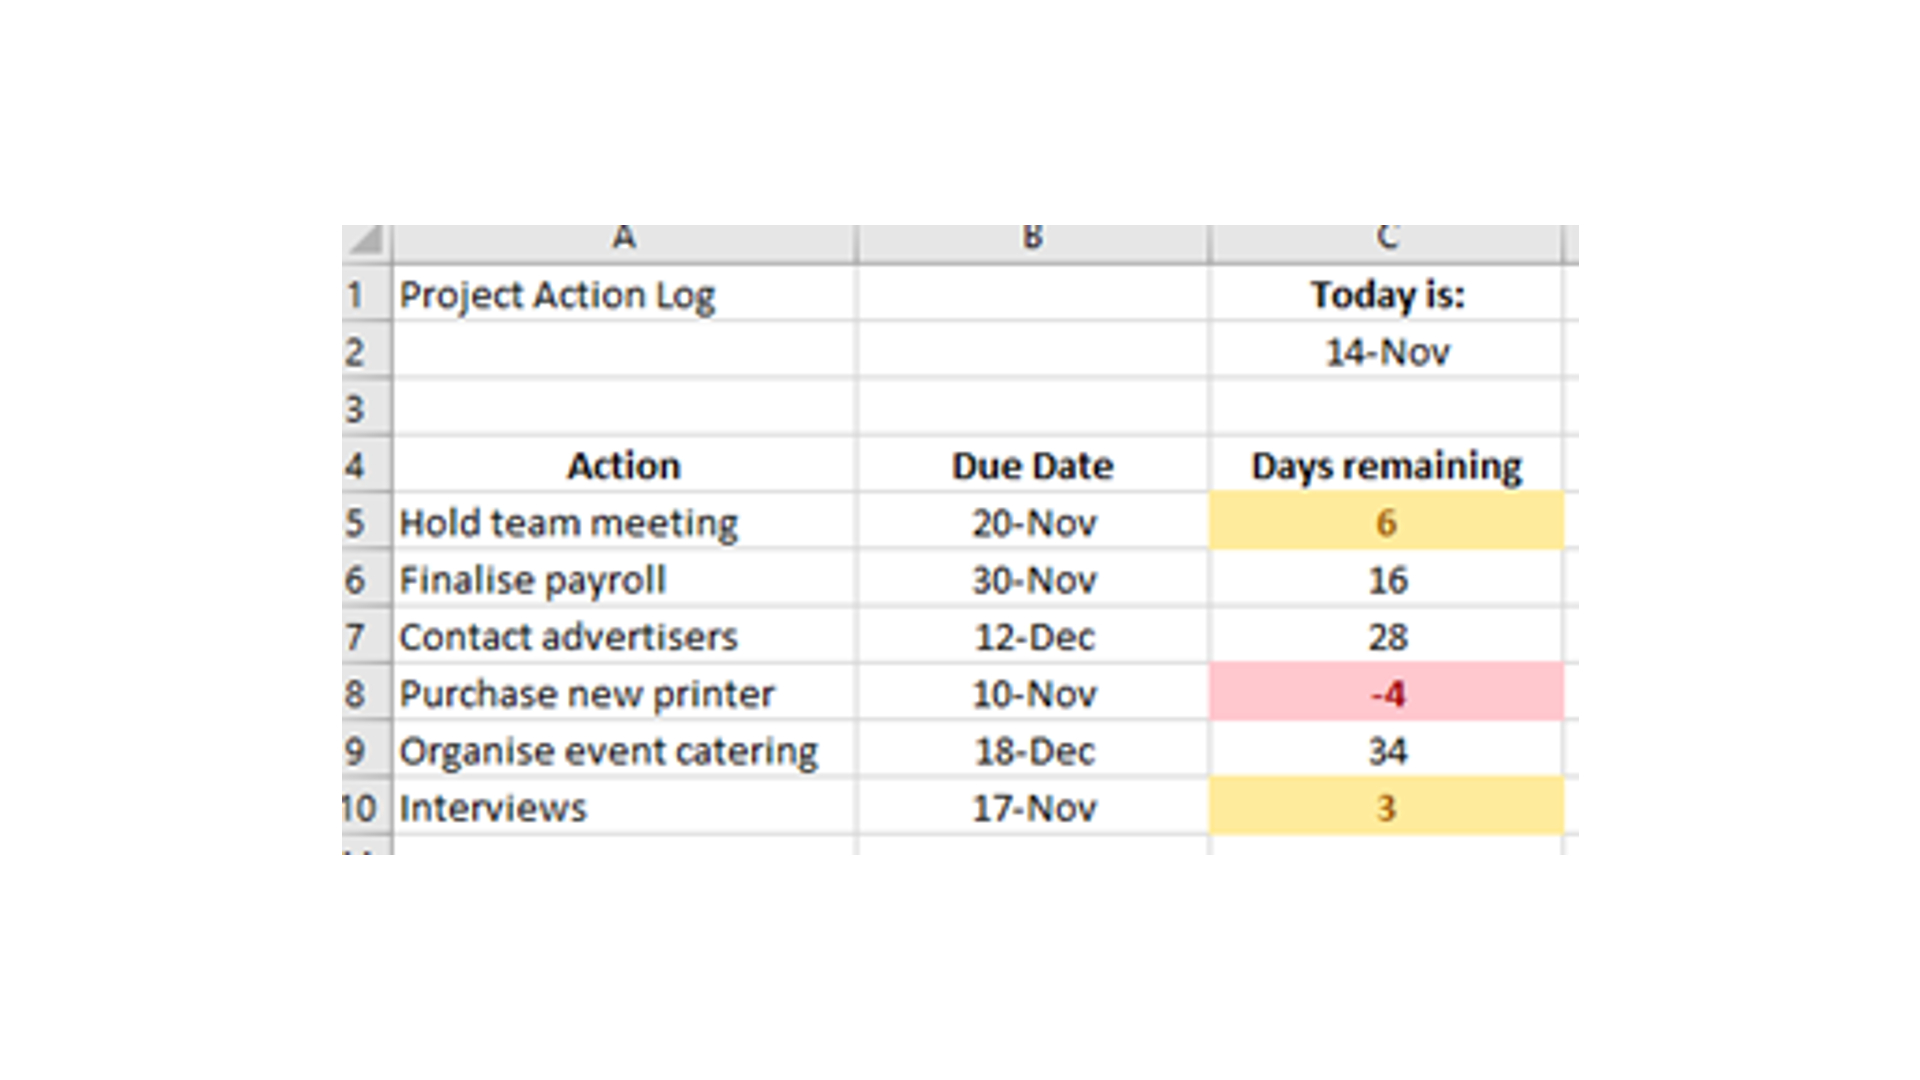
Excel spreadsheets are great for tracking actions to manage deadlines. Thankfully, the tech wizards over at Microsoft have included a simple formula to let your spreadsheet automatically populate the current date. If you type the formula “=TODAY()” into a cell, it will always show the current date. Open your Excel sheet tomorrow and it will automatically update, and so on. This can be used as a reference point for other cells to help keep track of deadlines. The above example shows a cell with ‘Today’ followed by a list of action deadlines. Just have the deadlines subtract the date from ‘Today’ and you can easily work out how much time you have left on your project deadlines.
4. Absolute data $
Sometimes when you want to autofill, you might want to keep some of the data consistent. By adding a dollar sign ‘$’ to a formula, it makes the data absolute (always the same). Keeping with the above example, when we look at the ‘Days remaining’ formula, we want to keep the ‘Today’ data absolute. So, we simply add a dollar sign ‘$’ in front of the data we want to keep locked in — it will always apply to the number/letter directly to the right of the $. When we then drag to autofill, it will change the data without a $, so the B5 will become B6 but C2 will remain unchanged.
All the latest news, reviews, and guides for Windows and Xbox diehards.
If you are dragging horizontally instead of vertically, just add the $ in front of the column letter. So C2 would become $C2 (or $C$2 if you want to keep both).
5. Conditional Formatting
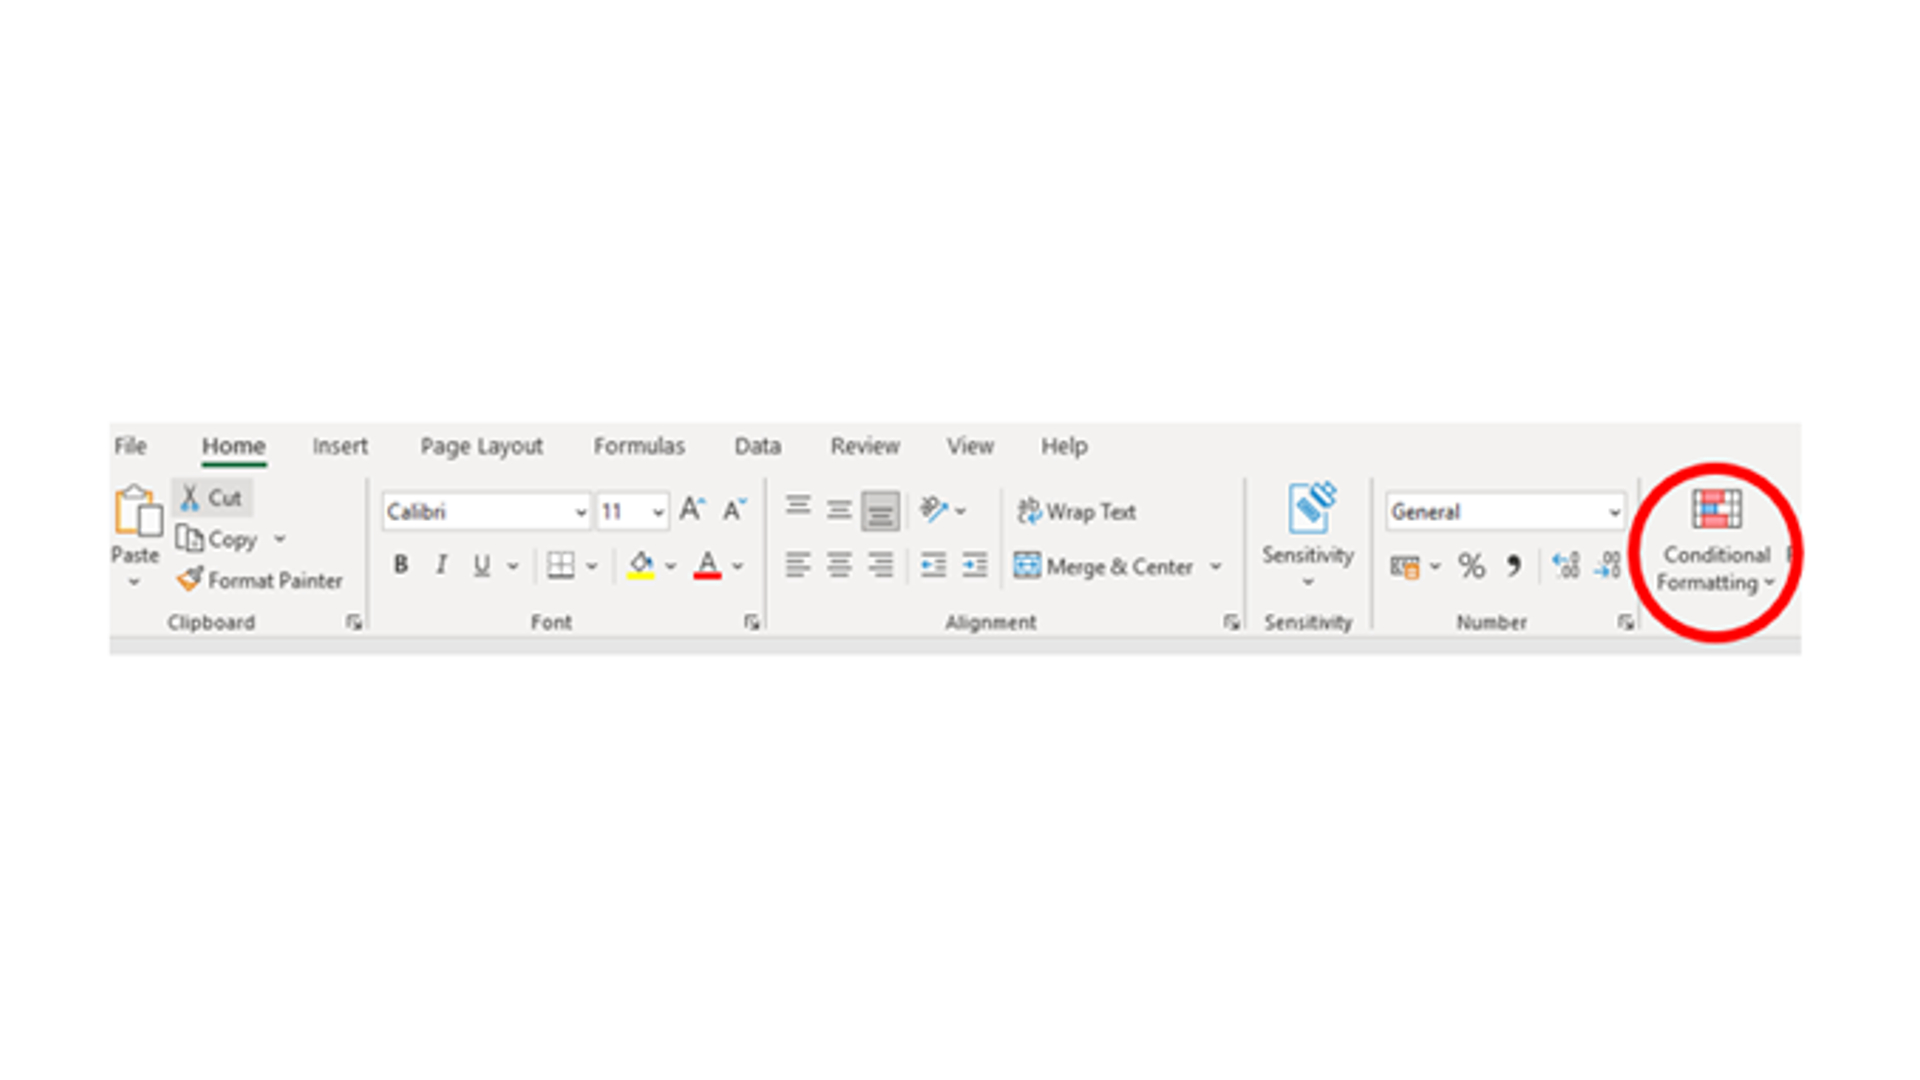
This nifty feature allows you to set rules to make cells change their appearance depending on their contents. You may want values to stand out if they are over budget, or within a certain time frame. To do so, click on the Conditional Formatting option on the Excel toolbar:
There are plenty of pre-set options to choose from, like highlighting the top 10 values, data above or below a set value or within a date range. Or, if you’re feeling brave, you can easily create your own set of rules, even changing cells which contain certain text.
In the below example, I have created conditional formatting to change dates within the next week to amber or overdue actions to red, adding a visual aspect help prioritize actions.
6. Data validation
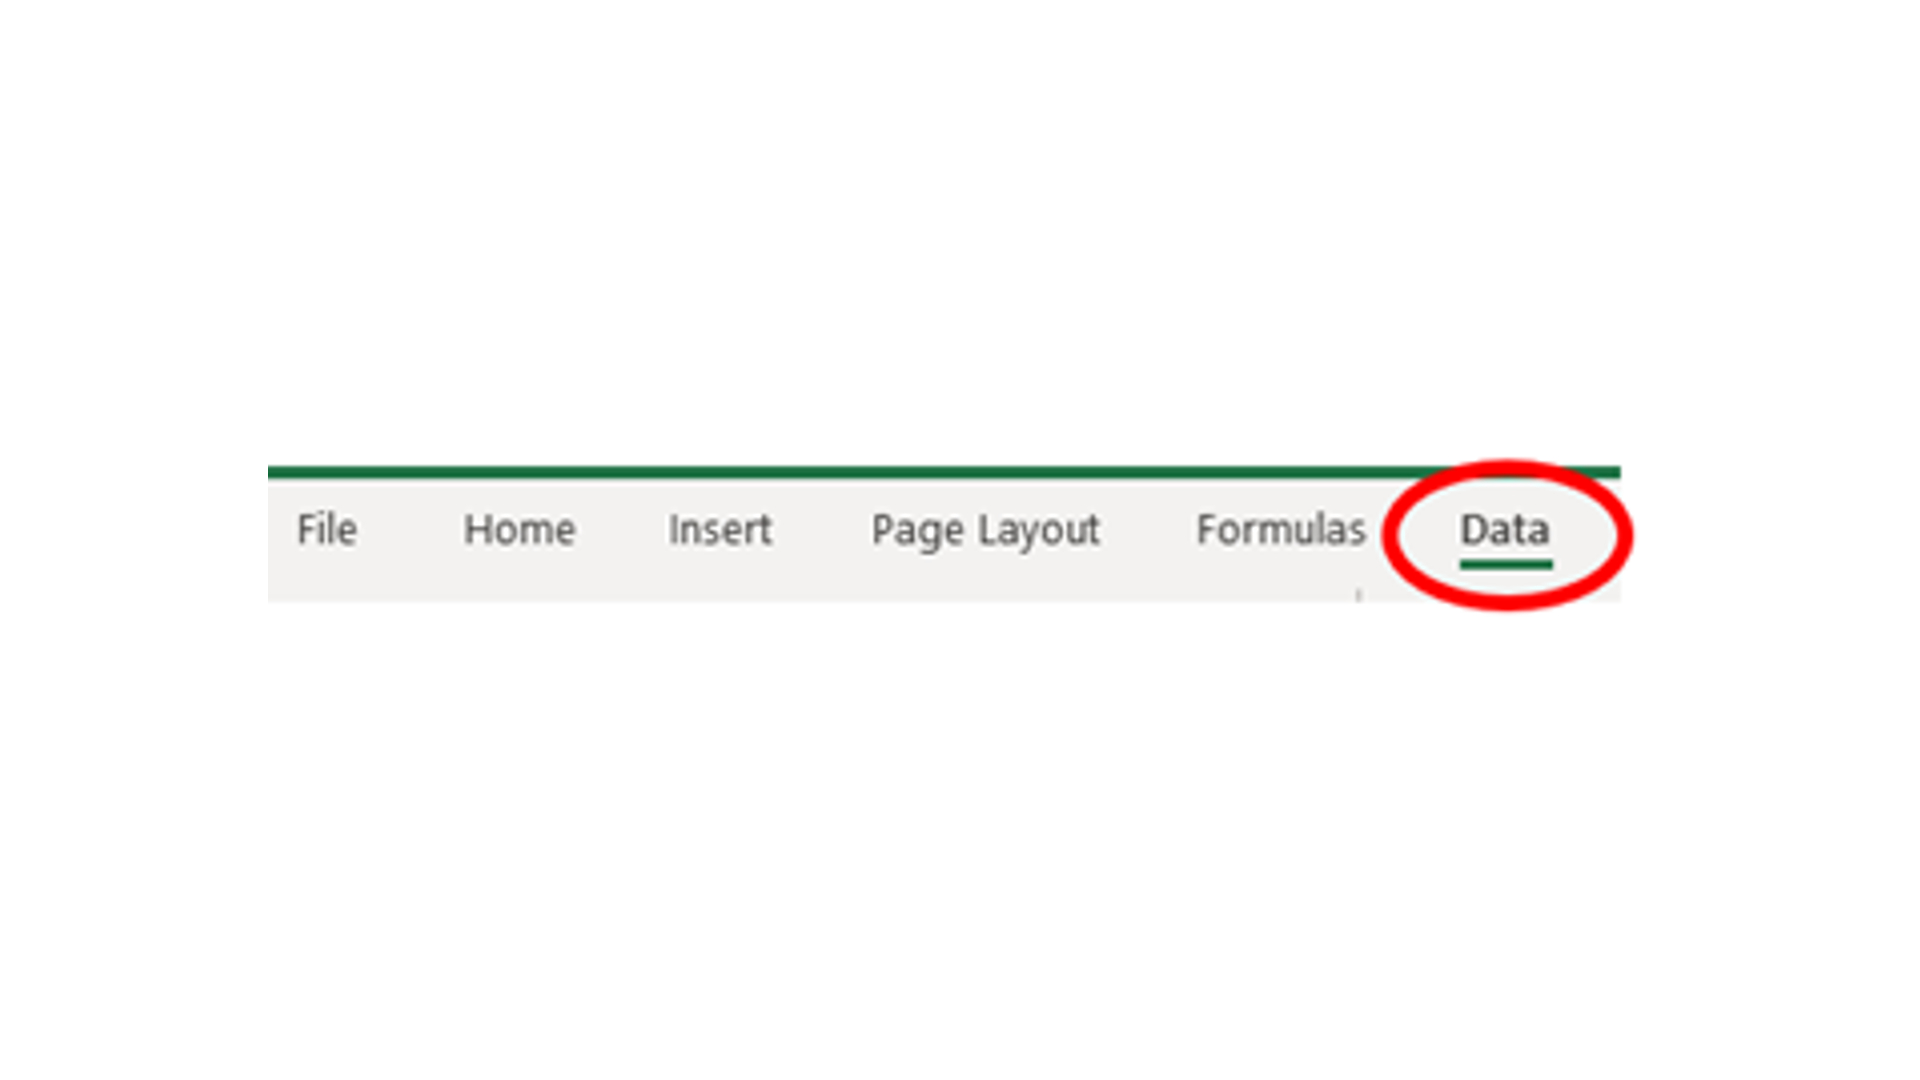
With this feature, you can help minimize potential errors in your Excel spreadsheet. Data validation allows you to limit the types of data that can be entered into a cell. The Data Validation menu can be accessed by clicking on the ‘Data’ toolbar tab, then finding the ‘Data Validation’ button:
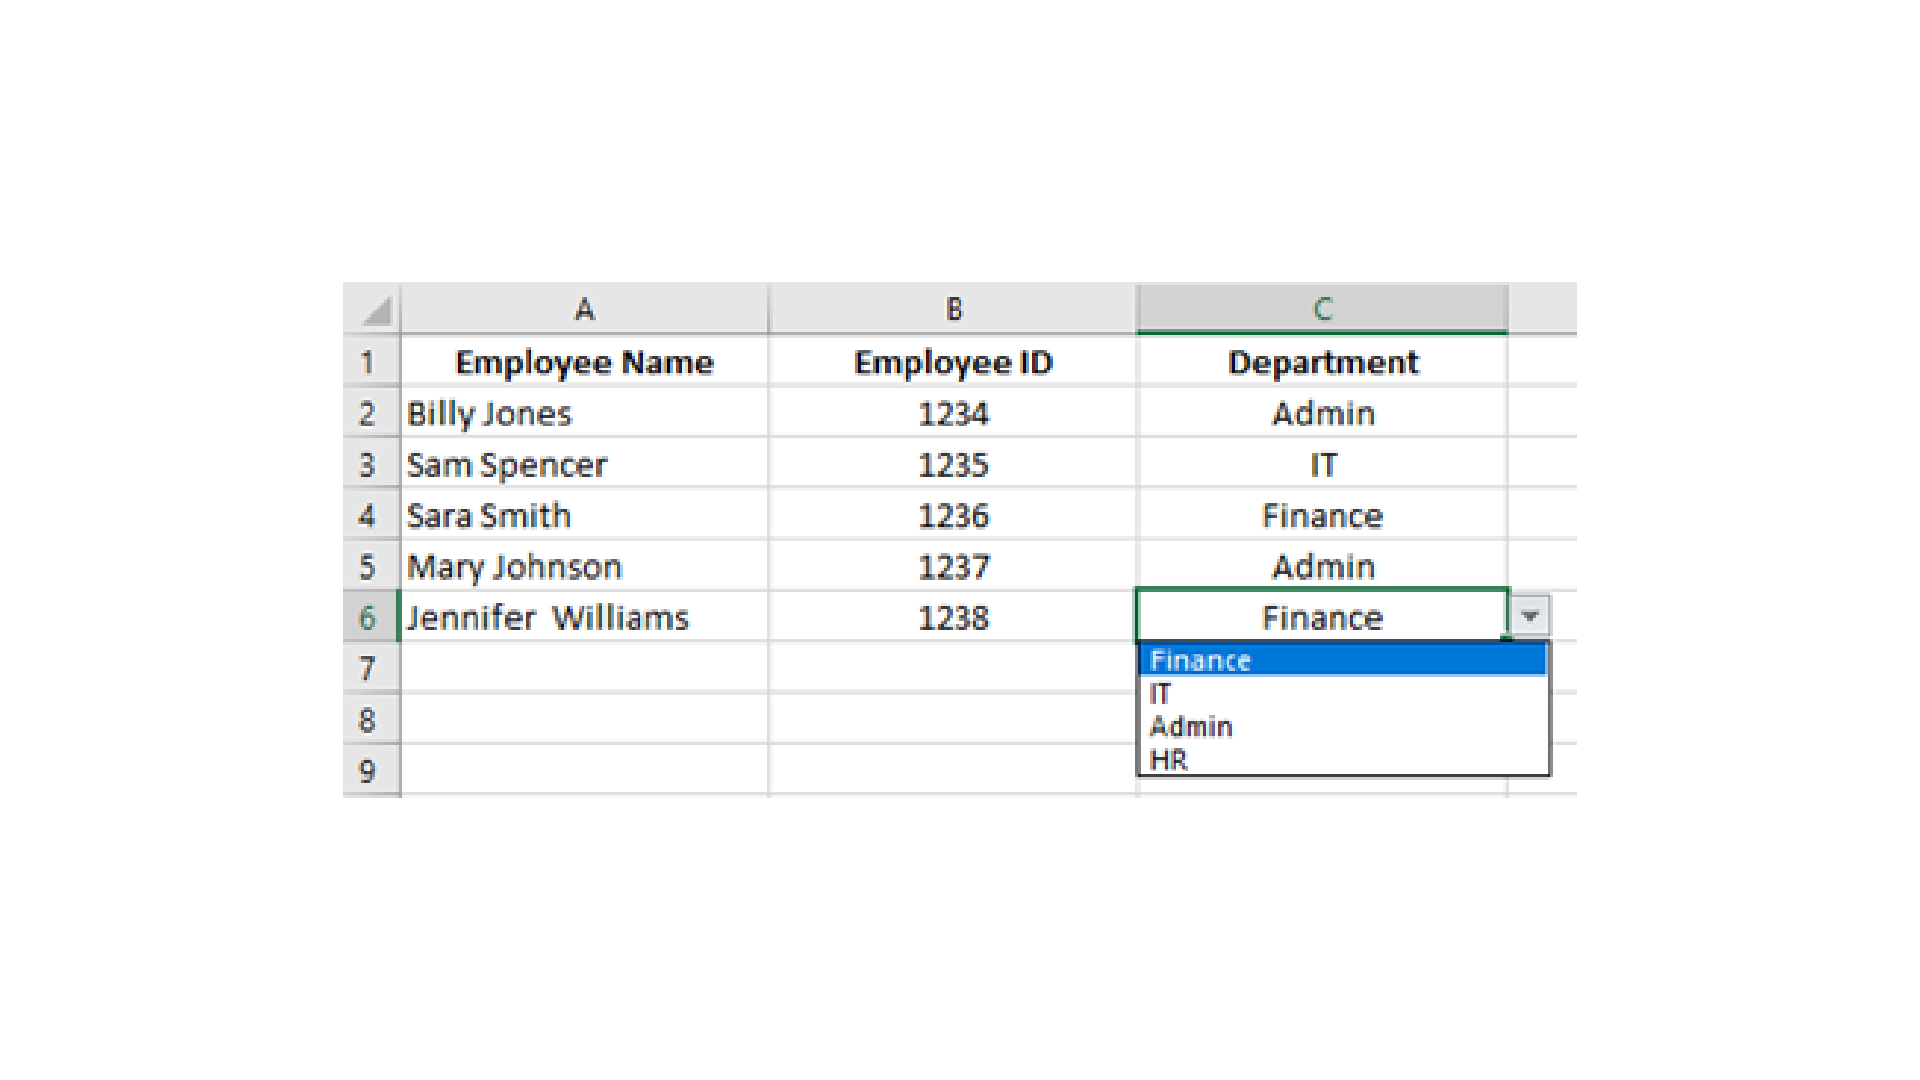
From here you can set rules to prevent the input of the wrong type of data, by specifying only dates, numbers, etcetera, or my personal favorite; creating a list of acceptable data entries which can then be selected from a dropdown list when you click on these cells. Data Validation even allows you to set your own error message if the wrong data is entered!
7. Format Painter
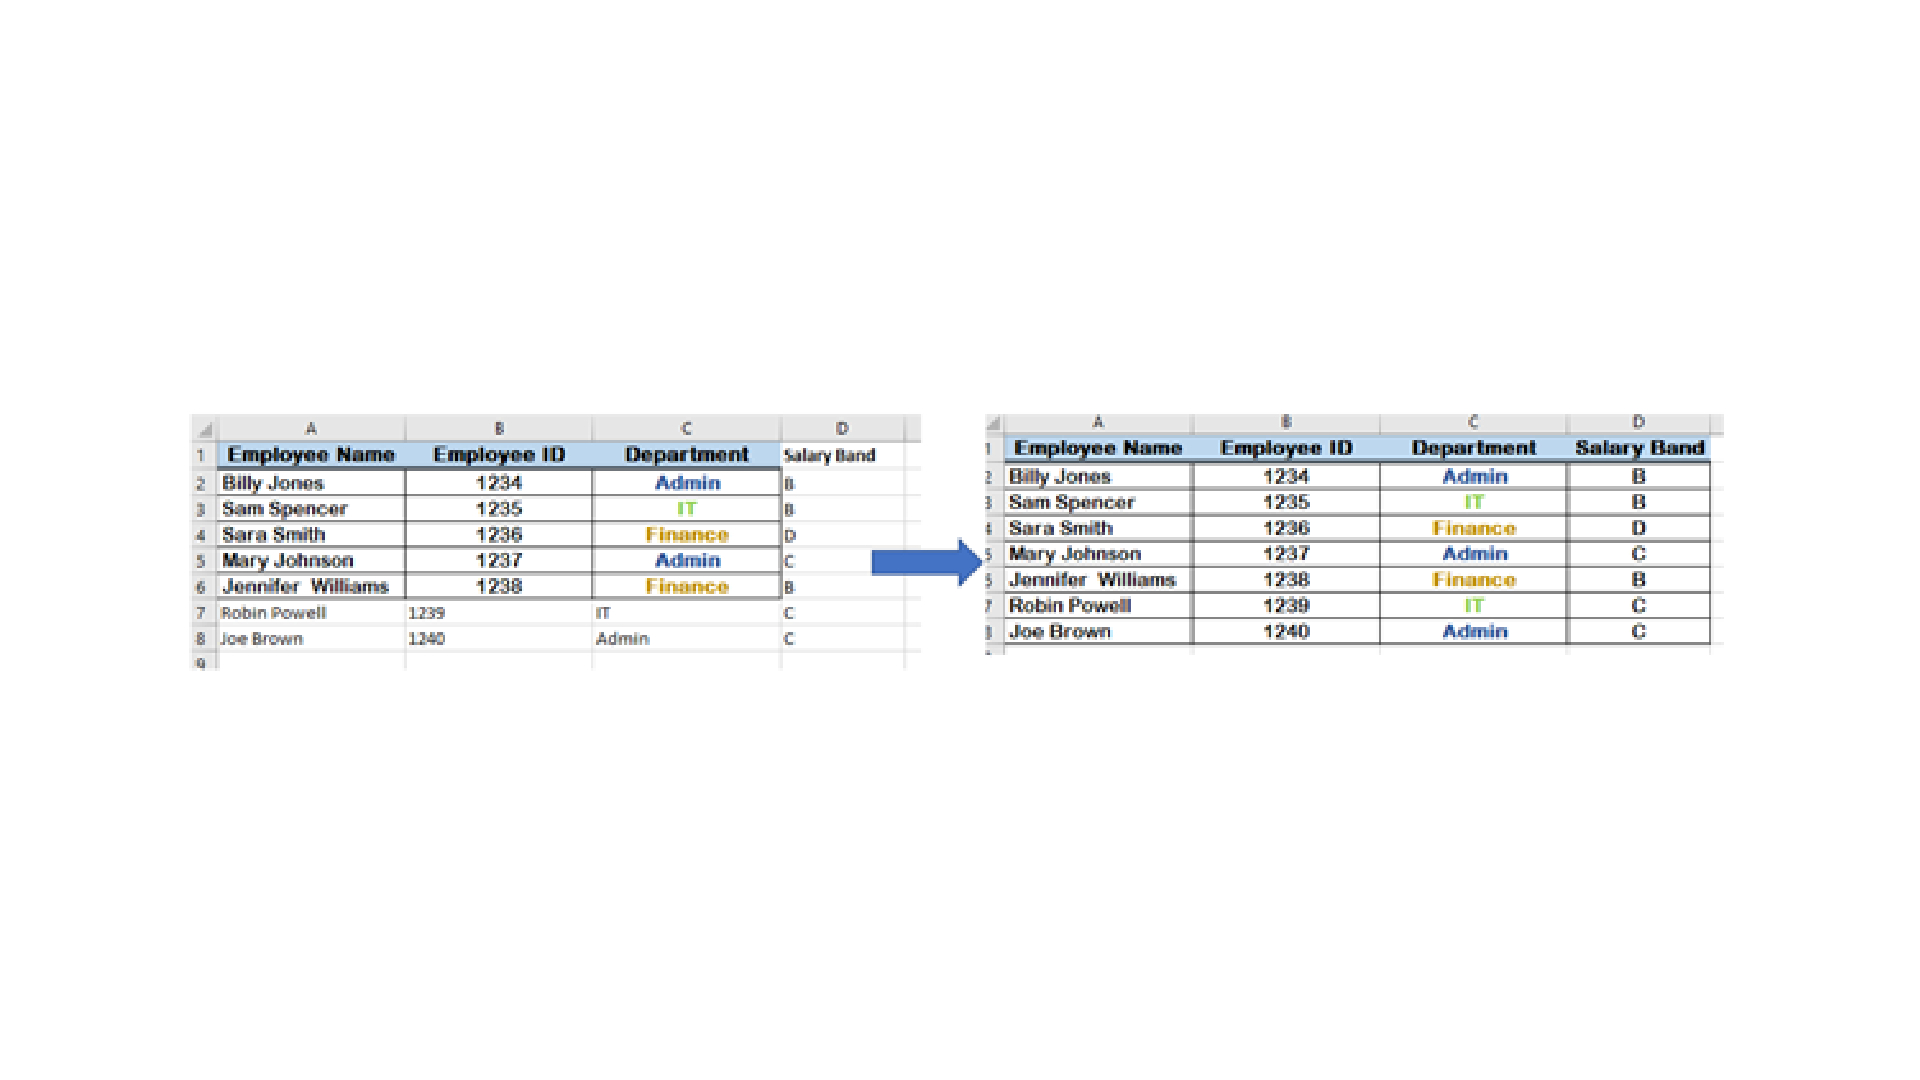
Have you ever spent what feels like forever making your spreadsheet look like an aesthetic masterpiece, only to add new bland and boring cells and feel like you’re back to square one?
Fear not, Excel has a built-in feature called the Format Painter which does exactly what it says. You can easily copy and paste your formatting from one part of your spreadsheet to another (including any number formatting or conditional formatting you might have added).
First drag your mouse around the format you wish to copy, then in the top left corner of the screen, look for the Format Painter button. Clicking this will copy the format, which you can then simply click on to the cells you wish to apply it to.
Pro tip — double click the Format Painter icon if you wish to apply the same format multiple times or to different areas.
8. Sort and Filter
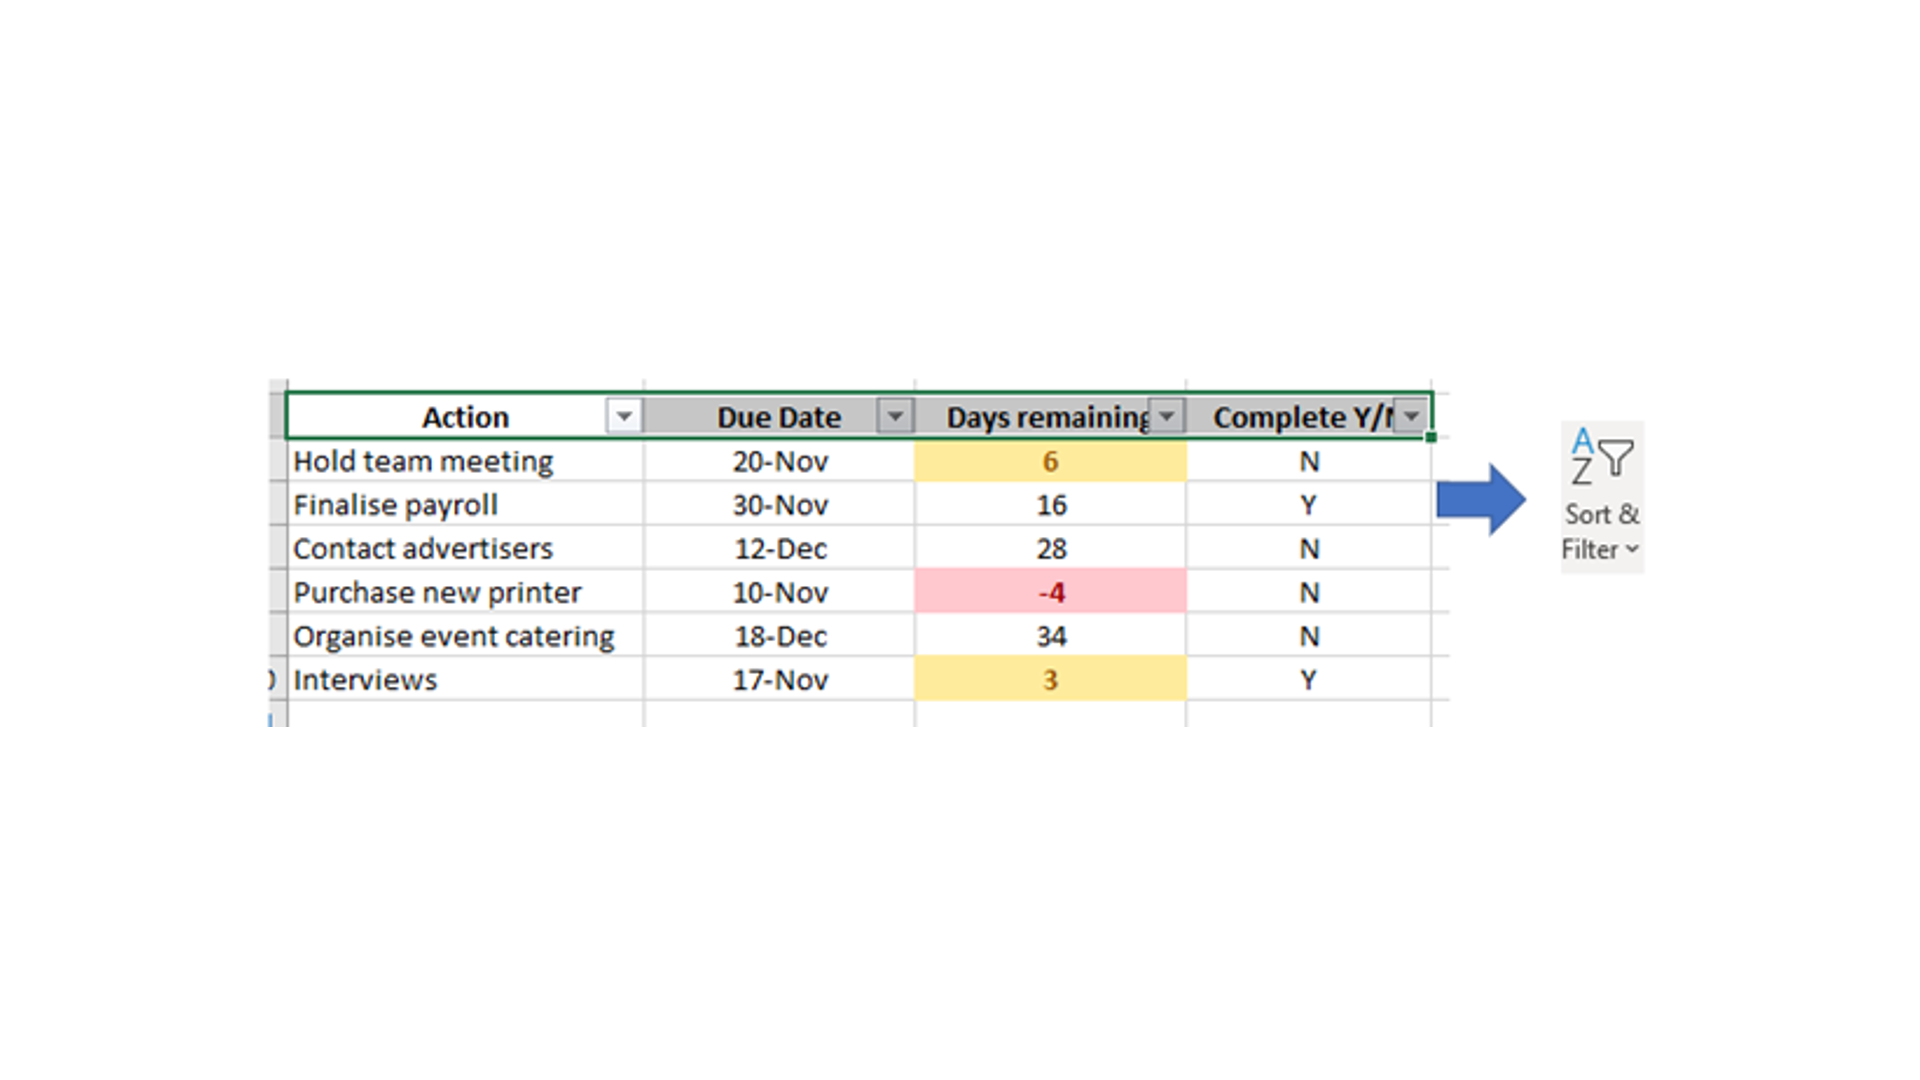
So, you’ve created a huge Excel spreadsheet with loads and loads of useful information. Now you can’t find what you’re looking for. With Excel's sort and filter features, you can easily reorganize your data to show you exactly what you need to see. To get started, highlight the top row of the columns you wish to include, then find the Sort & Filter button on your toolbar:
This applies a drop-down menu to each column header, which you can then click through and sort your data by ascending/descending based on values or alphabetically.
You can also click the filters to hide specified data, whilst keeping it matched up with its relevant rows. In the below example I have selected to only display my incomplete actions from my tracker to allow me to focus on what I still need to do. I then filtered by least time remaining:
It is useful to notice that the drop-down arrow on the column header changes to indicate that either a sort or filter has been applied (this is useful for tracking down your hidden data when you need to get it back).
9. Graphs and Charts
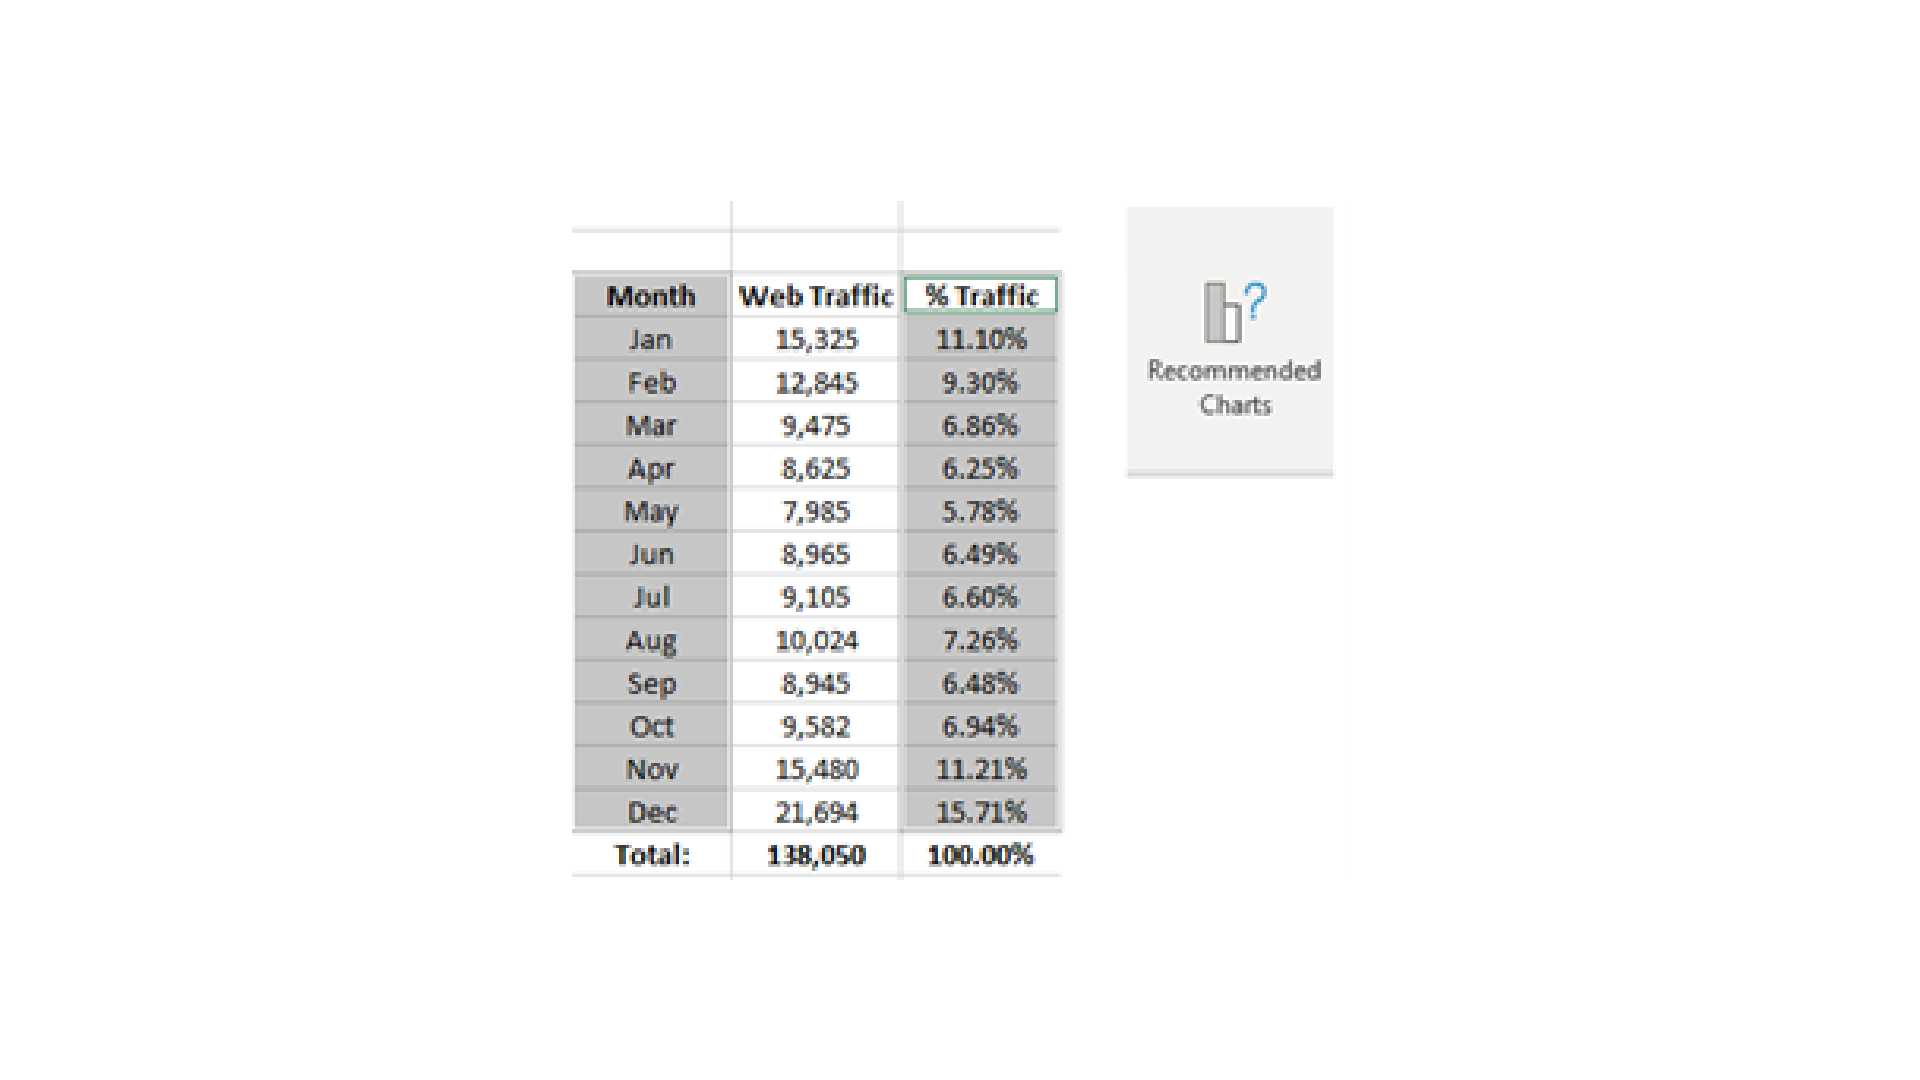
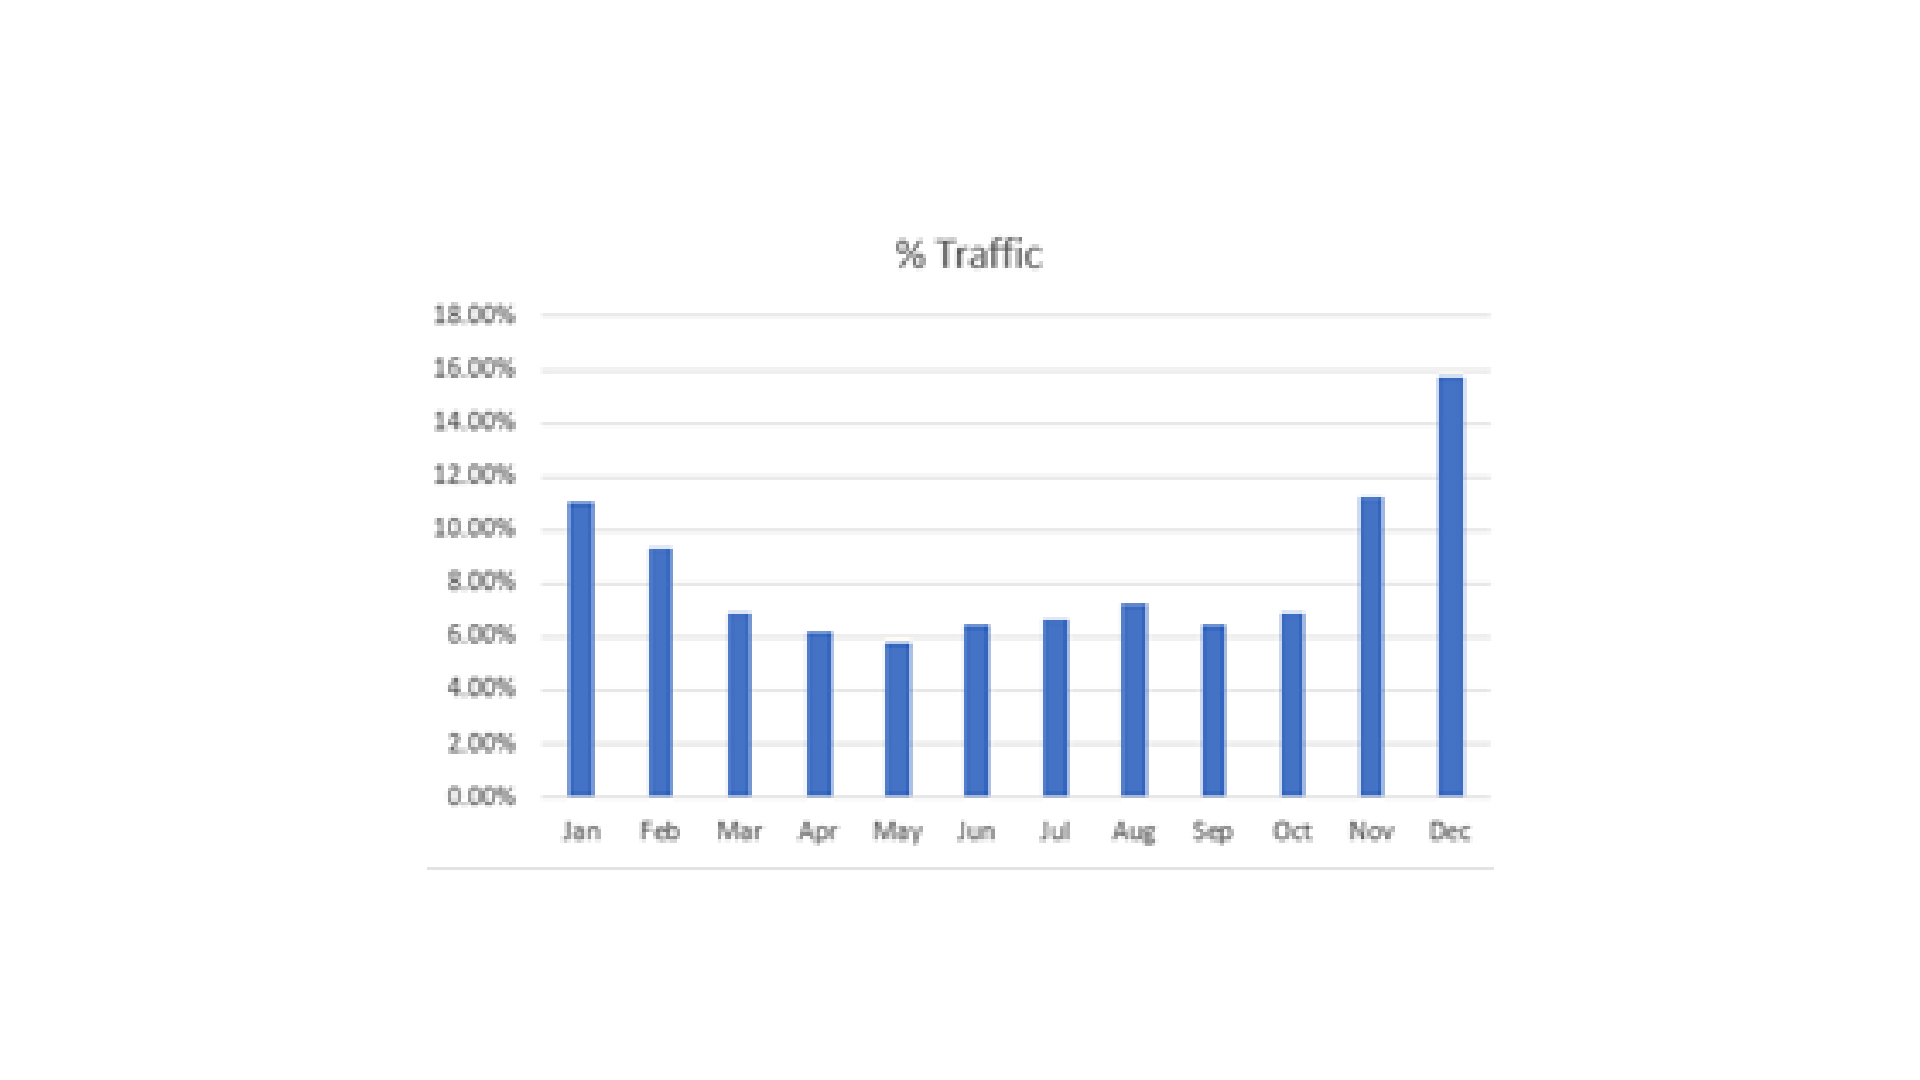
One of the most powerful tools available in Microsoft Excel is the ability to pull your data into a simple yet professional graph at the click of a button. This can make even the most mundane data look interesting and makes it much easier to spot trends in your data.
To create a graph, simply select the data you wish to include, then click on the Recommended Charts button on the ‘Insert’ toolbar tab.
This will provide you with a chart or graph which best suits the data you have provided, from bar graphs to pie charts or even the more advanced Pareto graphs. Once you become more familiar with the basics you can even play around with adding trend lines or multiple data sets to the same graph to enhance your presentations ever further.
10. Save
Save, save, and save again. It really can’t be stated enough. The most important tip on this list is to frequently save your Excel spreadsheet. We’ve all been there before… One minute you’re pumping out figures at the speed of light, producing the best results you’ve ever seen, then in the next moment it's all gone. It could be a dead laptop battery, a network error or the dreaded ‘Not responding’ message — we’ve all lost work before. The larger and more feature rich your Excel spreadsheet becomes, the higher the chance of it crashing as it crunches your numbers and draws your graphs. Often this is recovered, at least partially, by Microsoft document recovery, but you don’t want to take that risk.
The best tips to master Microsoft Excel
Follow these 10 beginners’ tips and you’ll be the envy of the office at your next presentation, with your all singing and dancing Microsoft Excel spreadsheet. These are just the tip of the iceberg when it comes to Excel, but with a little time and practice they will become second nature and you will be ready for more advanced features to make your life easier and your data smarter.

Mastering Excel using our expert guide, or the rest of Microsoft's industry-leading productivity suite, is made easier with Office 365, and all-in-one subscription service with everything you need to... excel.

Daryl is a wizard with Microsoft Excel and a Former Contributor for Windows Central, on-hand to help you become a spreadsheet sorcerer too.
