


Perhaps one of the most significant and welcomed changes to Surface Pro 8 — besides Thunderbolt 4 and a 120Hz display — is the arrival of a removable SSD. While designed primarily for security concerns, regular consumers can take matters into their hands to upgrade the SSD to a larger size and even gain some speed. It's a fantastic feature since you can save yourself hundreds of dollars if you plan your Surface Pro 8 purchase and SSD upgrade.
But what about the details around such a procedure? What tools do you need? Should you re-paste the thermal enclosure for the SSD? And how do you get Windows 11 onto the new SSD?
All these questions and more are answered in this new guide on how (and why) you want to upgrade your Surface Pro 8's SSD. And if you have a Surface Pro X, we have a separate, but similar guide for that one too.
Time estimate for actual upgrade: < 20 minutes.
Why upgrade your Surface Pro 8 SSD?
Before we begin, let us discuss why you want to upgrade the internal storage to Surface Pro 8.
There are two reasons to consider, with the first being the most obvious:
- You want more internal storage.
- You want a (slightly) faster SSD.
The first reason is self-evident. You bought a Surface Pro 8 with 128 or 256GB of storage, and you want more. Maybe you want 512GB or even 1TB.
Indeed, you could buy the 128GB Surface Pro 8 ($1,099) and, for less than $200, get to 1TB if you upgrade it yourself. If you want Microsoft to preconfigure your 1TB option, you need to drop $2,199. It even works if you want that entry-level i7/16GB/256GB model ($1,599). Tossing in a third-party 1TB SSD costs you $1,800 versus $2,199 from Microsoft.
A faster SSD is less of a reason to upgrade and should be seen as a side benefit. Typically, doubling or even quadrupling your storage also improves the read and write performance due to the parallel nature of how flash storage is accomplished. Surface Pro 8's default SSD is, at best, mid-range by today's standards. Popping in more storage could yield +500MB/s improve sequential read scores, which does make everything feel just a smidge snappier.
Which SSD to buy?

Picking which SSD to get for Surface Pro 8 is the tricky part. It's different from buying a standard laptop SSD as Surface Pro 8 (and Pro X) use M.2 2230 PCIe SSD, which are much smaller. The market for such chips is also much tinier, hence why I can't just point you to Amazon and tell you to buy a specific model.
The easiest to recommend is a Toshiba/Kioxia BG4 M.2 2230 PCIe SSD. It gets excellent performance, and it just works. But, Toshiba does not direct-sell to consumers. Instead, it is an OEM part that must be purchased through business channels like Dell or on eBay if you are savvy. The key is to use the product SKU to find the version you want:
- KBG40ZNS256G TOSHIBA BG4 256G PCI-E NVME 2230 SSD (CLASS 35)
- KBG40ZNS512G TOSHIBA BG4 512G PCI-E NVME 2230 SSD (CLASS 35)
- KBG40ZNS1T02 TOSHIBA BG4 1TB PCI-E NVME 2230 SSD (CLASS 35)
Assuming you want to increase the storage and get faster speeds, you will want to search for KBG40ZNS256G (256GB), KBG40ZNS512G (512GB) or KBG40ZNS1T02 (1TB). Pricing at the time of writing is around $30 for 256GB, $99 for 512GB and $200 for 1TB.
The good news is the 1TB option decreased from $300 at the end of 2020 to a more affordable $200 in October 2021. The bad news is that most sellers are from China or Hong Kong, so it could take many weeks to get your purchase.
But there is now another option in 2021 that wasn't available previously: Western Digital (WD).
This part gets even trickier. You could get a Western Digital 1TB drive costing between $117 and $170, making it even a better deal than the $200 Toshiba. Plus, many sellers are based in the U.S., meaning you can get the SSD in days instead of weeks.
For this guide, I bought a "new" WD 1TB CH SN530 drive on eBay for $170. I had it in my hands in three days after ordering.
The "CH" denotes something unique about these, which is they are often used in the Xbox Series X|S. That's why so many of them are listed as "refurbished" or "pre-owned."
But there's a catch with these drives — available storage — which some eBay sellers are upfront about, e.g.:
Please also note that the usable space for this drive is 867GB (rest of the space WD already allocated to overprovisioning so it is not accessible by the user. This is done to some extent on all SSDs).
The speculation here is that allocated space is used for Xbox Series X|S storage, and it can't be recovered.
A typical 1TB SSD usually has 952GB of available storage with around 913GB available after Windows 11 is installed versus the 823GB you'll have (with Windows 11) in one of these Western Digital drives. That's a loss of about 90GB.
On the flip side, if you're jumping from 128GB (available is less than 100GB) to 823GB, you're still getting a massive upgrade. Plus, you can save around $80 versus the Toshiba chip and often get it delivered faster. I can also vouch that the SSD performance is like Toshiba's, making a choice even more difficult.
Whichever route you go, you get a considerable storage upgrade and slightly faster speeds while saving money. The question is whether you need every GB and want to save even more money. The choice is yours.
Tools

There are only a few instruments needed to swap out the Surface Pro 8 SSD, but they are crucial:
- New M.2 2230 SSD
- Torx T3 screwdriver
- SIM Tool ejector
- USB Thumb Drive (Type-C, or Type-A with Type-C adapter; 16GB or larger)
- Surface Pro 8 Recovery Files
- Thermal paste (optional)
- Prying tool or X-ACTO knife (optional)
- Rubbing alcohol and Q-tips (optional)
Thermal paste, a prying tool, and rubbing alcohol are not obligatory as it depends on how detailed you want to be with the replacement. Microsoft ships its SSD in a metal enclosure for protection, functioning additionally as a heat sink. It uses a small amount of thermal paste sandwiched between the drive and the casing. SSDs typically do not produce that much heat (compared to a CPU or GPU), so the benefit is likely minimal.
Some people mount the M.2 SSD directly, but it may rattle due to the thinness without the enclosure. Users can add a shim to stop the rattle or put the new SSD into the old enclosure with (or without) adding the thermal paste.
For this tutorial, I will re-use the metal sleeve and re-paste the thermal compound.
Making a Windows 11 Recovery Drive
Since the replacement SSD does not have an OS, you will need to reinstall Windows 11 after the swap. The easiest way is to load Microsoft's official Surface Pro 8 recovery files to a USB drive, as this gives you all the necessary drivers for Surface Pro 8. Doing so restores Surface Pro 8 to its factory state.
The process is simple. We're going to wipe and configure the USB drive to be bootable and then copy over the Surface Pro 8 + Windows 11 recovery files to it. Here's how:
- Plug your 16GB+ USB drive plugged into the Surface Pro 8.
- Search for Recovery Drive and launch the application.

- Uncheck Back up system files to the recovery drive as it is not needed.

- Continue with the prompts to format and wipe the drive. This process configures the USB to be used as a bootable recovery drive for Windows 11.

- Download the 6.4GB of Surface Pro 8 Recovery Files by entering in your Surface Pro 8 serial number (you can find that serial in the Surface app on your device or printed behind the kickstand.)

- Unzip and extract all the Surface Pro 8 Recovery Files to the USB drive copying over any duplicates.

Put the thumb drive to the side for now, as it will be used after swapping the SSD.
Surface Pro 8: Swapping the SSD
Now that we have the substitute SSD and necessary tools, we can replace the Surface Pro 8's storage. Ensure you have backed up any files, photos, videos, or documents before removing the old SSD.
- Power down Surface Pro 8 (Hold the power button down.)
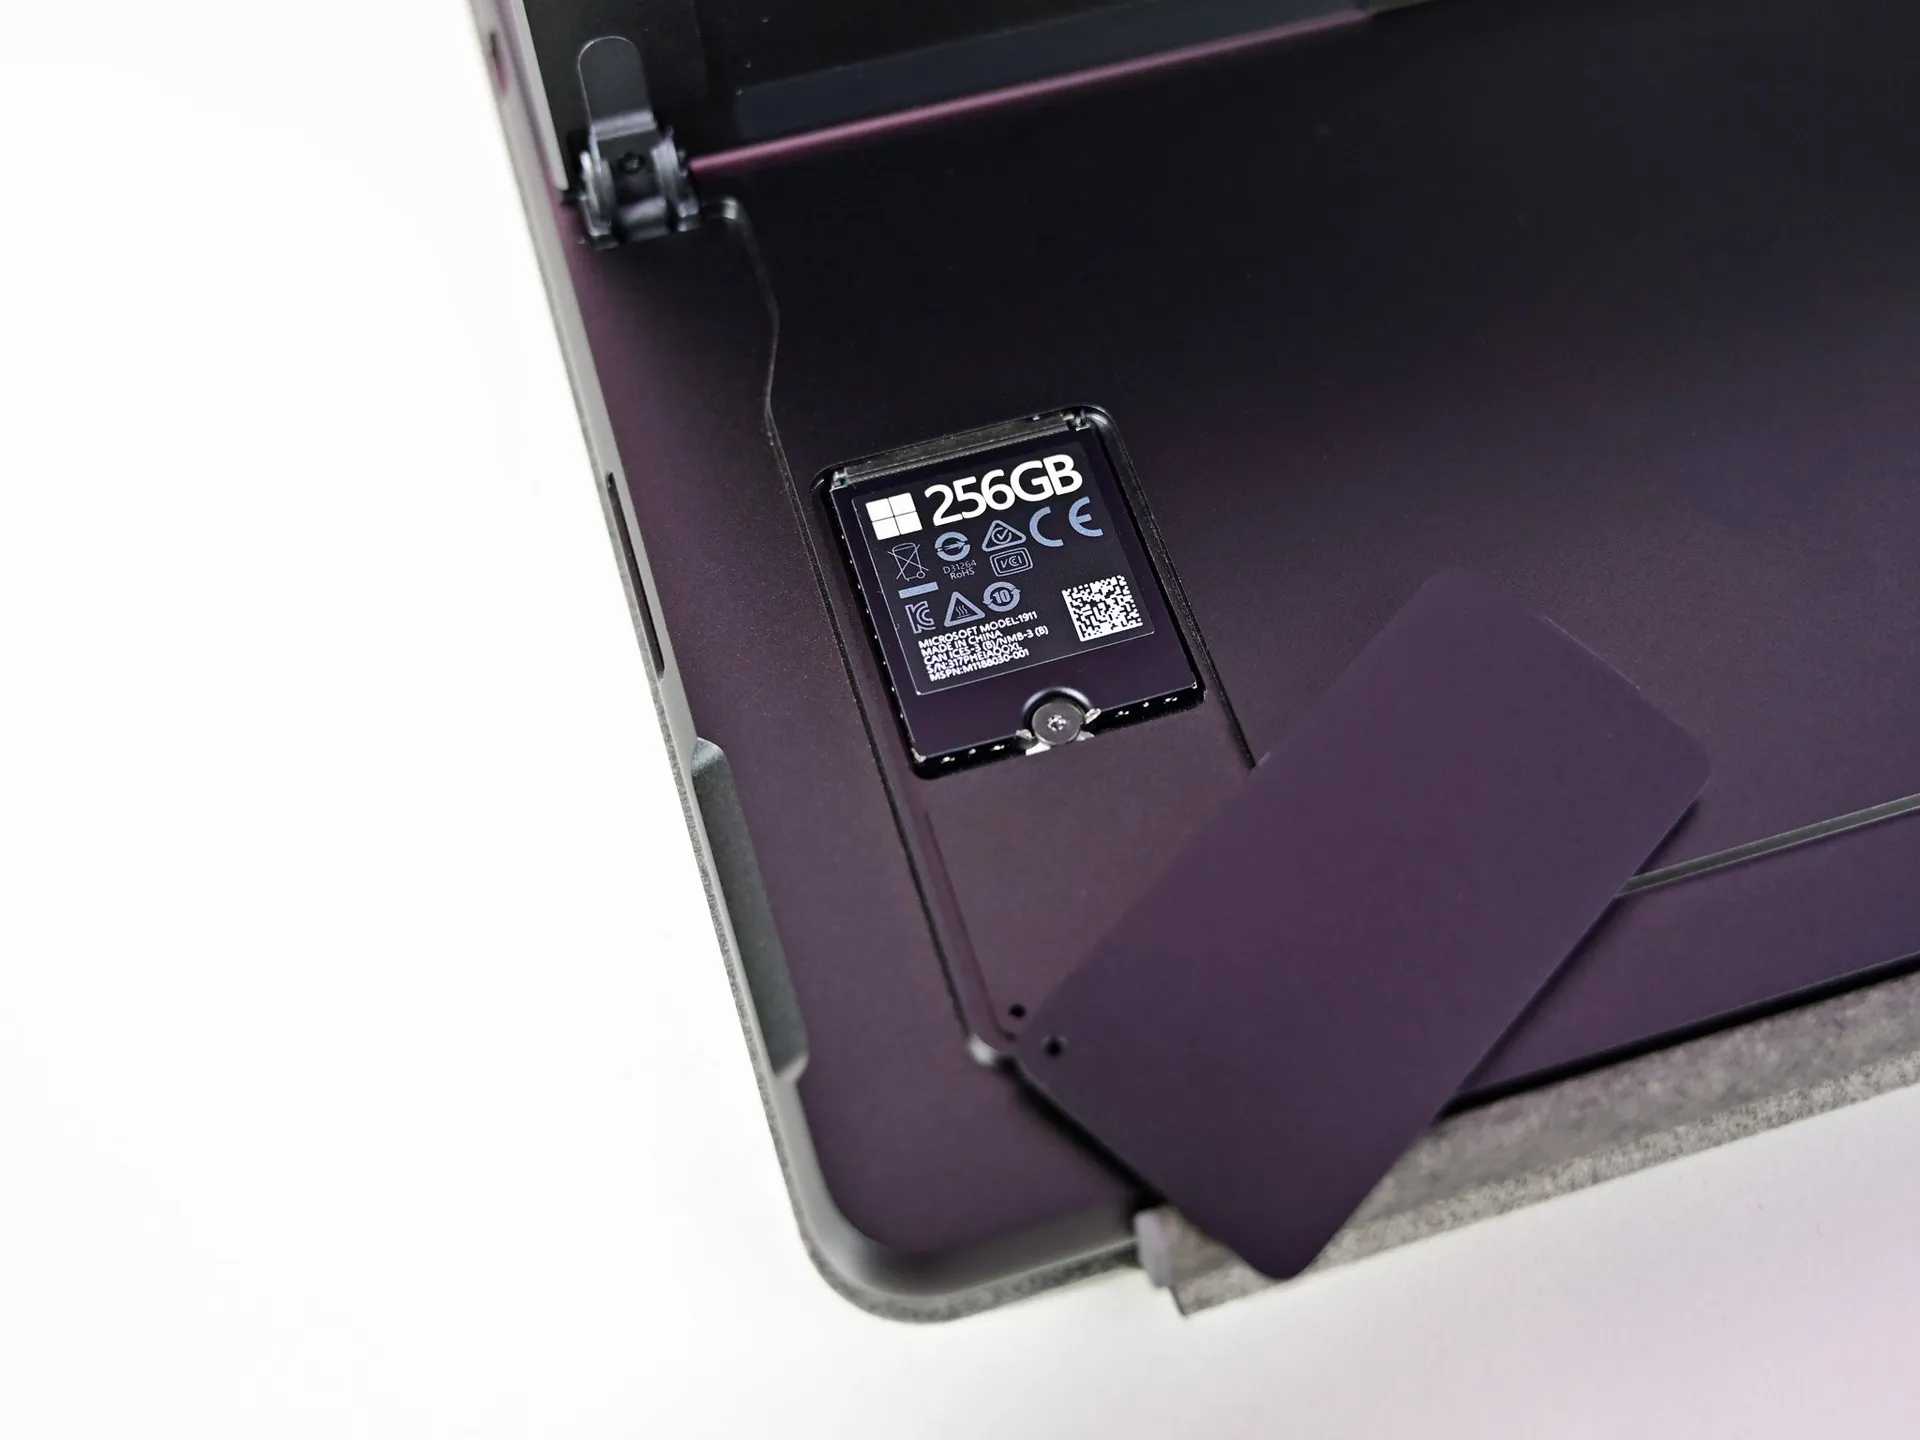
- Open the rear SIM/SSD panel found under the kickstand using a SIM tool.

- Use the T3 Torx screwdriver to remove the single screw holding in the SSD.

- Gently lift the SSD up at a slight angle and pull the SSD towards you (wiggle it back and forth.)

If you do not plan to re-use the SSD metal enclosure, you could slide in the new SSD and secure it with the holding screw. Once completed, move on to the next section on reinstalling Windows 11.
If you want to re-use the SSD enclosure (and re-paste it), continue to these steps:
- Using a thin prying tool or X-ACTO knife, gently tease apart the enclosure starting from each side. It's very thin metal.

- Remove the old SSD.

- Remove old thermal paste from the inner enclosure using rubbing alcohol and Q-Tips.

- Remove the label/sticker from the new SSD (if there is one.)

- Add a tiny drop of thermal paste to the top of the SSD (1/2 a pea.)

- Gently smooth the paste around the entire black area of the SSD.

- Put the SSD back into the enclosure and close it, lightly pressing the sides to crimp it in place.
- Reinsert SSD enclosure into Surface Pro 8, securing it with the single set screw.
- Replace rear enclosure door.
Do not add a lot of thermal paste as it is not strictly needed. Nor do you need expensive thermal paste, as this is not a high-performance CPU. You want a very thin layer when spread out, as too much paste defeats the purpose.
Once completed, you should save the old SSD. Since that SSD is just your old OS and files, it'll boot right back up, were you to reinsert it back into Surface Pro 8. If you send in your Surface Pro 8 for a Microsoft warranty claim because it breaks, you'll want to put back the original drive and keep your after-market purchase as you may not get it returned.
Surface Pro 8: Reinstalling Windows 11
Now that the new SSD is in place, you need to reinstall Windows 11. It is recommended to have Surface Pro 8 plugged in for AC power during this process (don't power it on yet until step 2 below):
- Insert the USB thumb drive into Surface Pro 8's Type-C port (either one.)
- Press and hold power and volume down (-) buttons at the same time.
- When the Surface logo appears on screen release only the power button.
- Continue to hold the volume down (-) key for 10 seconds until the recovery menu appears.
- From the blue Windows recovery menu choose your language.
- On the next screen, select Recover from a drive.

- Follow the rest of the prompts to reinstall Windows 11.
Reinstalling Windows 11 should take about ten minutes. Windows 11 now grabs the latest cumulative updates and drivers during the install. It'll be just like when you first turned on Surface Pro 8 with the entire "out-of-box experience."
Surface Pro 8 SSD Upgrade: Benchmarks

Upgrading the Surface Pro 8 with a 1TB SSD brought two enhancements. Storage size increased from ~197GB to 823GB, which is the main point of this upgrade. Additionally, storage performance increased, which is expected.
For context, read performance is what you experience when running Windows 11 and launching apps — basically, everyday OS operations. Write speed is when you write to disk to create large files, install apps/games, and transfer data, so you don't experience it as much.
My results may vary slightly from yours due to the randomization of input/output operations, but sequential read jumped from 2,390MB/s to 2,895MB/s — a net gain of 505MB per second. Sequential write also had a modest improvement going from 1,609MB/s to 1,993 MB/s — an increase of nearly 400 MB per second.

While sequential speeds did see a significant bump, random read and write did not, although they did slightly improve.
The improved performance is not earth-shattering, but the SSDs in Surface devices are never great, to begin with (Surface Laptop Studio being the single exception). So, any bit here helps.
The best part of this update is the value. If you can spare just shy of $200 for the drive and tools, you'll have made your Surface Pro 8 much more valuable as your primary PC. Good luck!

Basically perfect
Bottom line: Surface Pro 8 finally hits its full potential with the all-new redesign for 2021. This model is a worthwhile upgrade with Thunderbolt 4, optional LTE, 120Hz display, new haptic Slim Pen 2, 11th Gen Intel, and a new graphite colorway.

