


Here's how to take and manage game clips on your Xbox console!
Set up capture options
The first thing you should do is configure the resolution and default recording lengths of your game DVR. Here's how to do that.
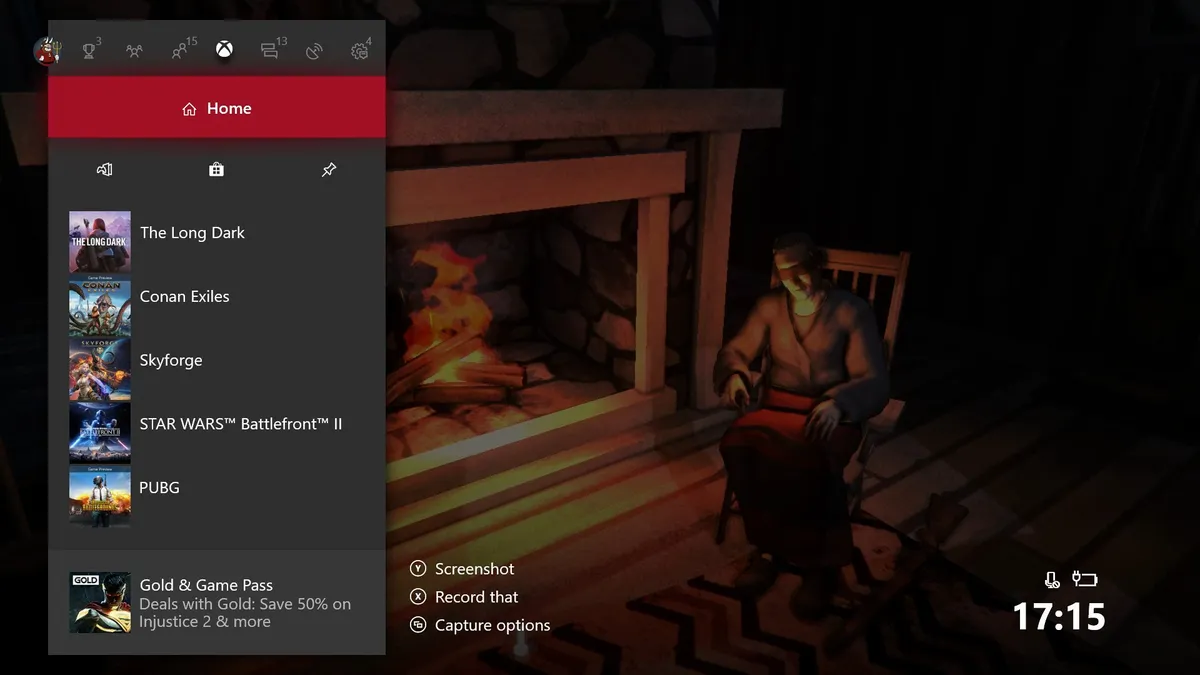
- Press the Xbox button on your controller to open the guide menu.
- Move the joystick to the right until you get to the cogwheel, and press the A button to open "Settings."

- Move the left joystick down to Preferences and then select Broadcast & Capture using the A button.
- Here, you can configure your short clip duration, automatic uploads, game clip resolution, and even set up an external HDD for game capture (which grants extra recording length, head here for more info on that).

- Once you are done, get gaming and get ready to take some clips!
How to take a short clip of recent gameplay footage Xbox One
First, you will need to be inside a game. You can't take screenshots of the dashboard or other apps, such as YouTube or Netflix. You can take video captures of your entire console, but you'll need a capture card like the Elgato HD 60. Here goes:

- When you're in a game and want to record a short clip of recent gameplay, press the Xbox button on your controller to open the guide menu.
- From the menu, press the X button on your controller to take a short clip of recent gameplay footage.
- Your game clip will now be saved to your console!
How to take a longer clip of recent gameplay footage on Xbox One
You can also configure the Xbox One to take longer clips, or even record persistently for up to an hour to an external HDD (here's how to do that). If you're recording direct to the Xbox One, though, you'll have some time limits depending on the resolution you're capturing. For example, if you have an Xbox One X set up to capture footage at 4K, you'll only be able to record up to 2 minute clips, unless you set up an external HDD for game capture.
- To record longer clips, press the Xbox button on your controller to open the guide menu when inside a game.
- Press the View button (to the bottom left of the Xbox button) to open additional capture options.
- Press the A button on a highlighted option to either start a recording, capture a screenshot, or capture the entire DVR buffer directly.

How to share clips on Xbox One
Once you have taken your game clip, there are a number of ways you can get share it. The Xbox One comes with a few gigabytes of free cloud storage just for keeping Xbox Game DVR captures and screenshots, but you can also export it either to your PC, or to your personal OneDrive cloud storage for safekeeping or editing with external software. Xbox Live clips and screenshots will upload automatically to the cloud, until your storage is full.
Here are a few ways to share and manage clips on your console.
Saving and sharing your clips via your Xbox
- Press the Xbox button on your controller to open the guide menu.
- Press the View button (to the bottom left of the Xbox button) to open "Capture options."
- Navigate down using the left joystick to Manage captures and press the A button. (This will open the Manage captures menu.)
- Find a capture you want to upload to OneDrive, and select it with the A button. (This will open the screenshot in full.)
- Select the Share icon with the A button.
- From here, you can share the clip to the following locations:
- Your Xbox Live activity feed, which friends can see (depending on your privacy settings).
- A private message.
- To an Xbox Club you're a member of.
- A Twitter link.
- To OneDrive.

- If you are signed in to your Microsoft Account on a PC or via OneDrive.com, you will be able to find the clip under OneDrive\Videos\Xbox Game DVR.
Deleting a clip from your Xbox One
- Press the Xbox button on your controller to open the guide menu.
- Press the Home button using A on your controller.
- Open the guide menu again, and hit the View button (to the bottom left of the Xbox button) to open "Recent captures."

- Navigate to a recent clip, and select it with the A button.
- From here, you can select delete to remove it from your console, from Xbox Live, or both.

- If you can't find your clip, navigate to See all at the bottom. (This will open the Manage captures menu.)
- Find a capture you want to delete, and select it with the A button. (This will open the capture in full.)

- Select the trash can icon with the A button to remove it.
- You can also delete multiple captures at a time by selecting the checkbox icon shown below.

- Using this method, simply select multiple clips for deletion navigating using the joystick and putting ticks under "Select" using the A button.
- Once you have selected all the clips you want to remove, hit delete.

Save, delete, or share Xbox clips via a Windows 10 PC
If you're using a Windows 10 PC signed in with the same account as your Xbox Live, you can access and download your screenshots quickly and easily using the pre-installed Xbox app. Here's how:
- Press the Start Menu and type "Xbox."
- Click to open the Xbox app.
- If you haven't used it before, you'll be prompted to sign in using your Microsoft Account. After you open it up, it should look something like this, with a hamburger menu on the left side.

- Open the hamburger menu in the op left corner with a mouse click.
- Select Game DVR.
- Click on On Xbox Live to see your captures saved to the internet.
- Select a preferred clip from the download list, and hit Download to save it, delete to remove it, or share to share it.

- You can then click on On this PC to see the clips and screenshots you have downloaded, and hit Open folder to find the file. By default, files save to C:\Users\UserName\Videos\Captures.
How to easily download your Xbox screenshots or clips from the web or a phone
If you have already shared your clips or screenshots publicly on Xbox Live, you can access your clips easily using XboxDVR.com on a web browser on your desktop or mobile phone.
- Open the website here.
- Enter your Gamertag in the large box at the top, there's no need to make an account.
- Find your clips or screenshots on the next screen, with easy access for viewing or downloading.

Other notes
If you have a 4K Xbox One X you can lower the resolution of captures using this method. Sometimes it might be worth lowering the resolution if you plan to share the clips and screenshots on social media, particularly Twitter, since it doesn't support 4K.
You can check the upload status of clips from the Manage clips page by selecting Upload Status from the filter. If you have issues finding your recently uploaded captures, it might still be in the upload queue.

The Xbox One doesn't have an infinite amount of cloud storage and can fill up quickly, particularly if you're recording at 4K. So be sure to store and manage clips frequently.
When not in a game, you can access and manage clips directly from the Xbox guide menu, by hitting the Xbox button on your controller, and then pressing the View key to see recent captures.
More Xbox help
For more tips and guides for Xbox One, take a look at the links below. If you have any questions, drop them in the comments!
- Record Xbox clips and screenshots to an external HDD
- Alter the recording resolution of the Xbox Game DVR
Update September 5, 2018: We've updated this article to add information on how to get your Xbox clips on the web!

