10 features everyone should try after installing the Windows 10 November update
All the latest news, reviews, and guides for Windows and Xbox diehards.
You are now subscribed
Your newsletter sign-up was successful
Windows 10 marks the departure from major releases of the operating system every several years and the end of Service Packs. Instead, Microsoft has moved to a new servicing model. A model that we now know as "Windows as a Service" (or WasS) and it means that the company will release smaller significant updates as soon as they are ready and not major releases (typically) every three years. Also, with this new servicing model, Windows will no longer be considered a complete product -- just an ongoing project that will only get better with time.
These new updates will include improvements, changes, and new features, and we already had the chance to see this new servicing model when the software giant released Windows 10 version 1511 in November.
The first major update for PCs and tablets delivers a many bug fixes, tweaks, and improvements, such as compression store feature in Windows Memory Manager. Windows 10 now allows users to run virtual machines in virtual machines, changes on activation for users upgrading from Windows 7 or Windows 8.1, improvements on performance and security for Microsoft Edge, and the list goes on.
And for the first time Microsoft is also delivering some new features through Windows Update at no extra cost.
Today, we'll be diving into these new features, and list 10 of the most interesting features users should check out after installing the new update of Windows 10.
If you like to know every little new detail in version 1511, I encourage you to read my previous roundup of everything you need to know about the Windows 10 November update.
Features you must try on Windows 10 version 1511
1. Make your sign-in experience more beautiful
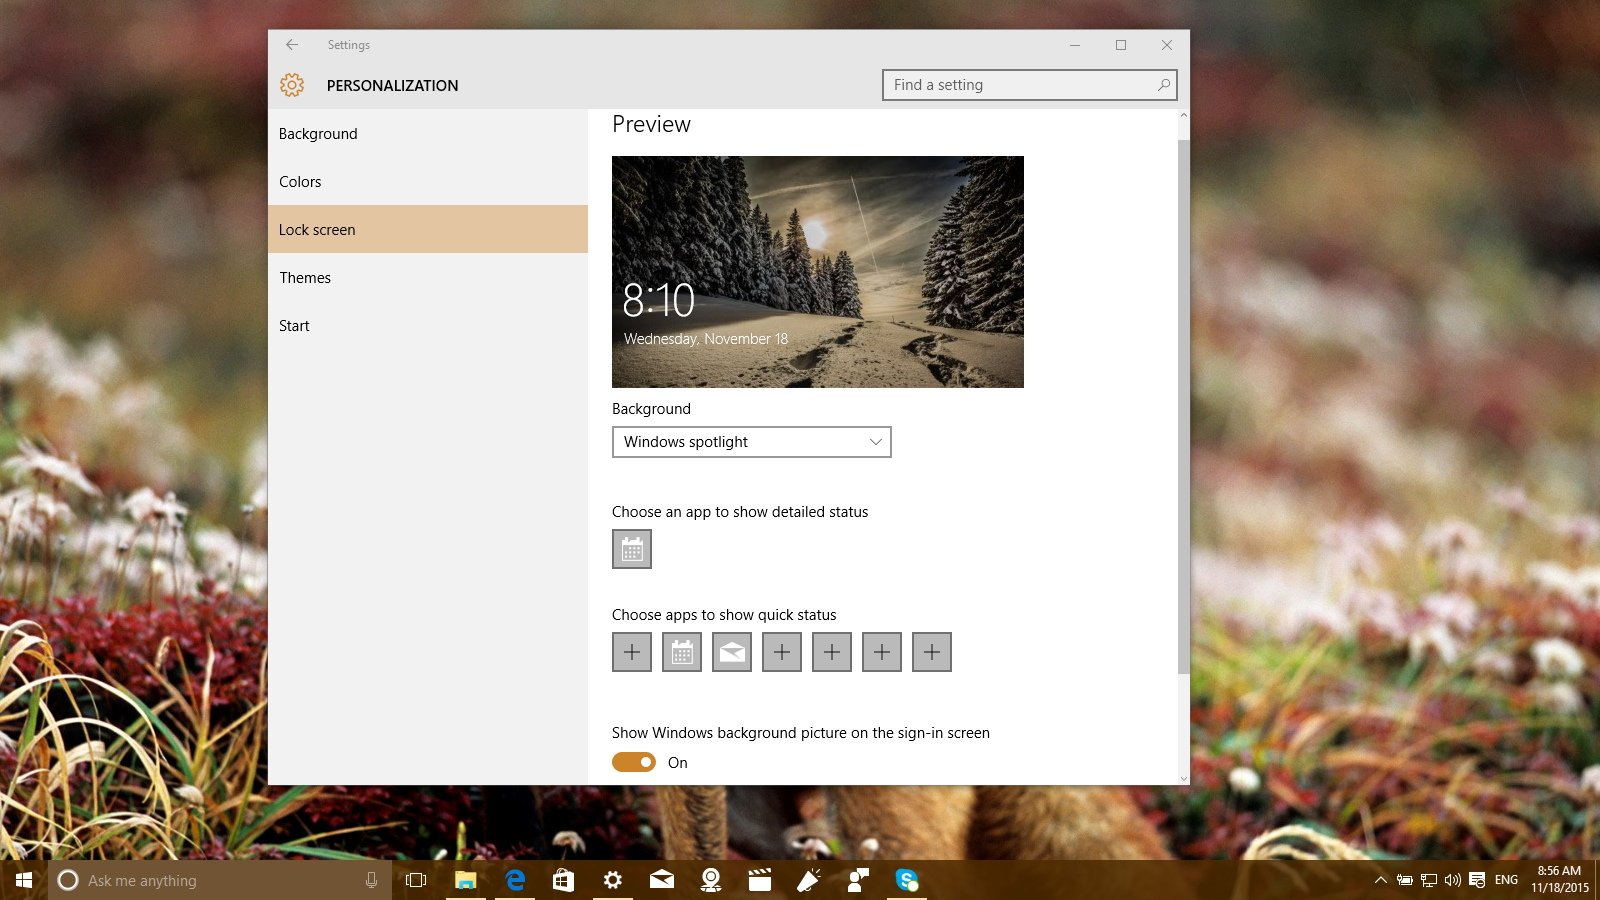
Since the software giant released its new operating system to the public on July 29th, users on Windows 10 Home had an extra feature called, "Windows Spotlight," which is the idea of having a fresh experience on the regular basis by automatically displaying a great wallpaper on your Lock screen. Starting in version 1511, Windows 10 Pro also includes this feature that can easily be enabled through the Settings app.
All the latest news, reviews, and guides for Windows and Xbox diehards.
How to configure Windows Spotlight
1- Use the Windows Key + I keyboard shortcut to open Settings.
2- Navigate to Personalization, then go to Lock screen, and from the "Background" drop-down menu choose Windows Spotlight.
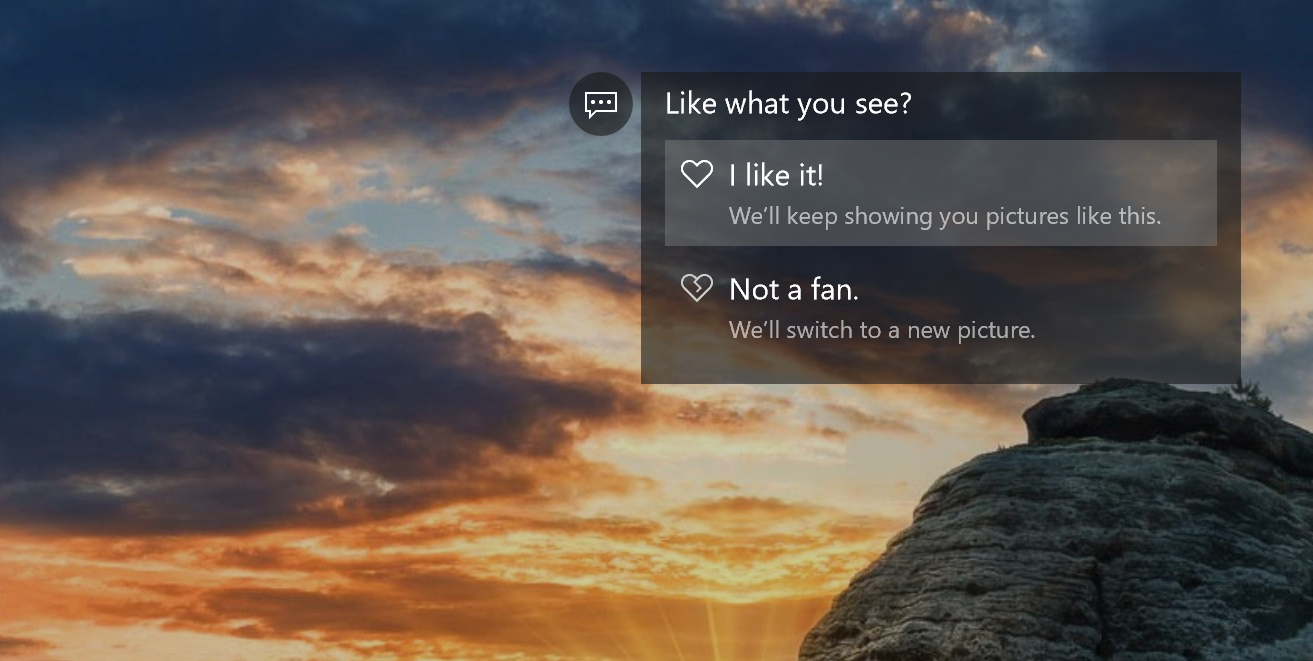
Quick Tip: You can teach Windows the kind images you like by voting whether you like to see more of the same image on the top-right corner of the Lock screen.
Alongside the new operating system, Microsoft also introduced its new default Windows logo background made out of light, which you'll see on the sign-in screen and desktop the first time you log into Windows 10. Even though, you cannot change it, if you don't like, or you simply got bored seeing the same image every day, you can disable the background on the sign-in screen and get a solid color background that matches your theme's accent color.
Here's how you do it: While in Settings > Lock screen, simply turn off the Show Windows background picture on the sign-in screen option (refer to the previous image).
2. Get more tiles on the Start menu
The Start menu has returned to the most popular operating system on the planet, and in version 1511, Microsoft continues to improve the overall experience by adding a few new tweaks to the Start menu.
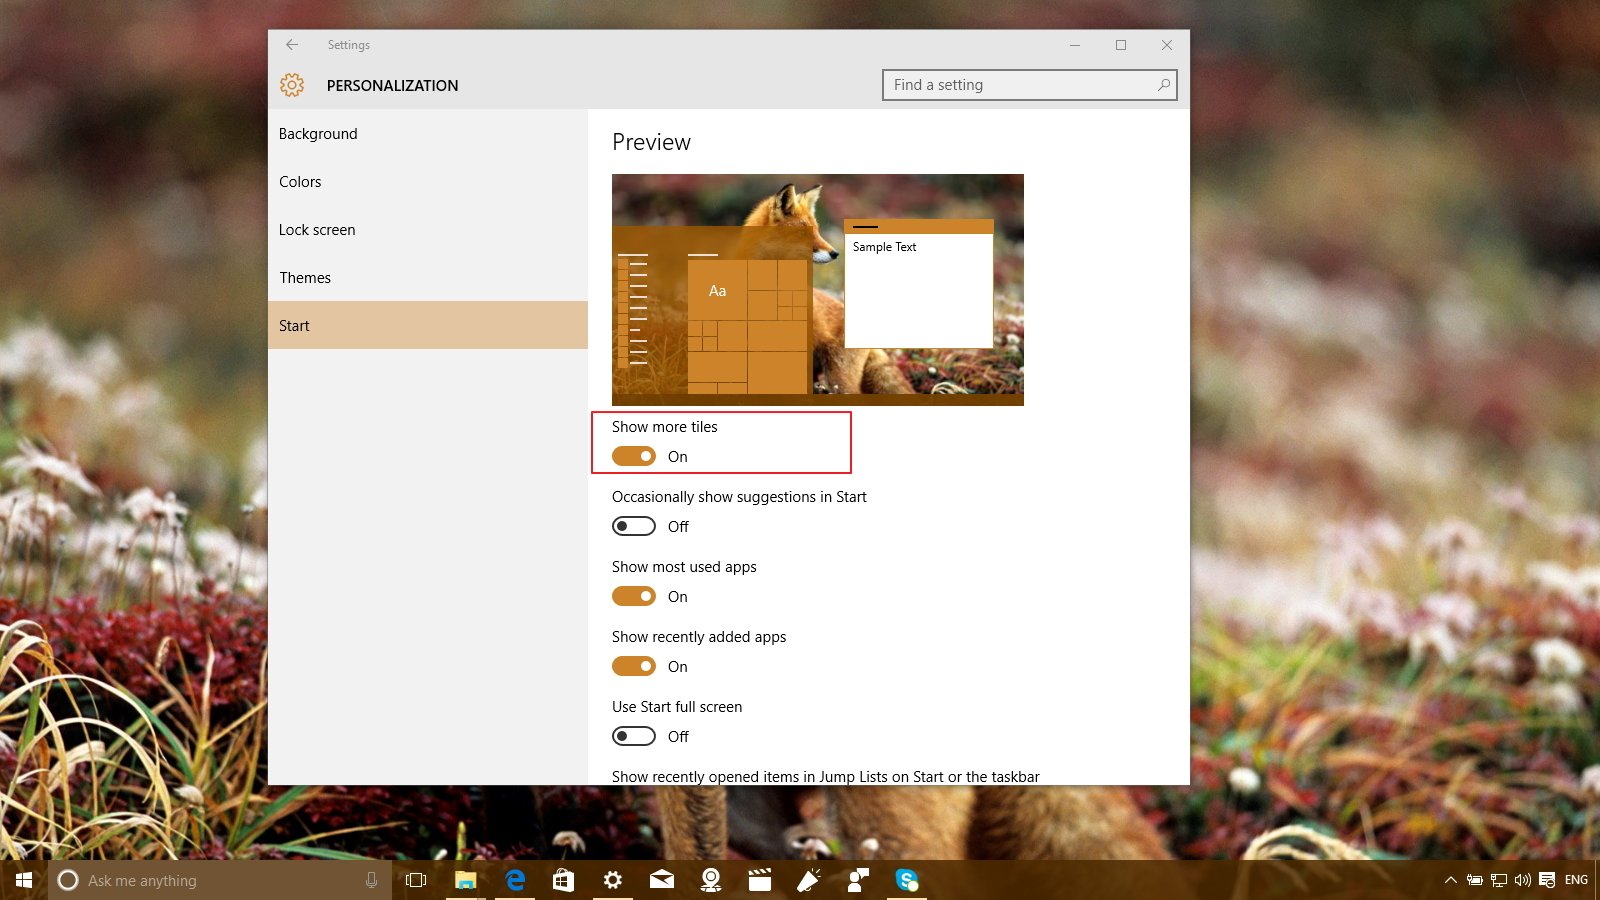
After installing the November update, users can add a fourth column of tiles, this means that you can now have four medium-sized, two large- or two wide-sized tiles per row.
Follow the steps below to fill the Start menu with more tiles.
How to add more tiles to Start
1- Use the Windows Key + I keyboard shortcut to open Settings.
2- Navigate to Personalization, then go to Start, and turn on the Show more tiles options.
Adding extra space to fit more tiles is a welcome addition to the operating system, as some users have complained of a lot of waste space between groups of tiles while in Tablet mode and when the Start menu is in full screen. Also, it's worth pointing out that Windows 10 version 1511 ups the support of pinned tiles from 512 to 2048.
3. Manage missed calls from your desktop
While Cortana comes integrated within Windows 10, it's a feature powered by the cloud and it relies on Bing to make sense of things. Microsoft has been proactively improving its personal assistant day after day, but in during the Windows 10 November update the personal digital assistant gets some important improvements. In the November update, Cortana can now alert you to calls that you missed with the ability to reply using a text message.
The feature should be enabled by default, but you have to make sure the feature is enabled on both the device you want to get the notifications and on your Windows phone.
How to configure missed call notifications
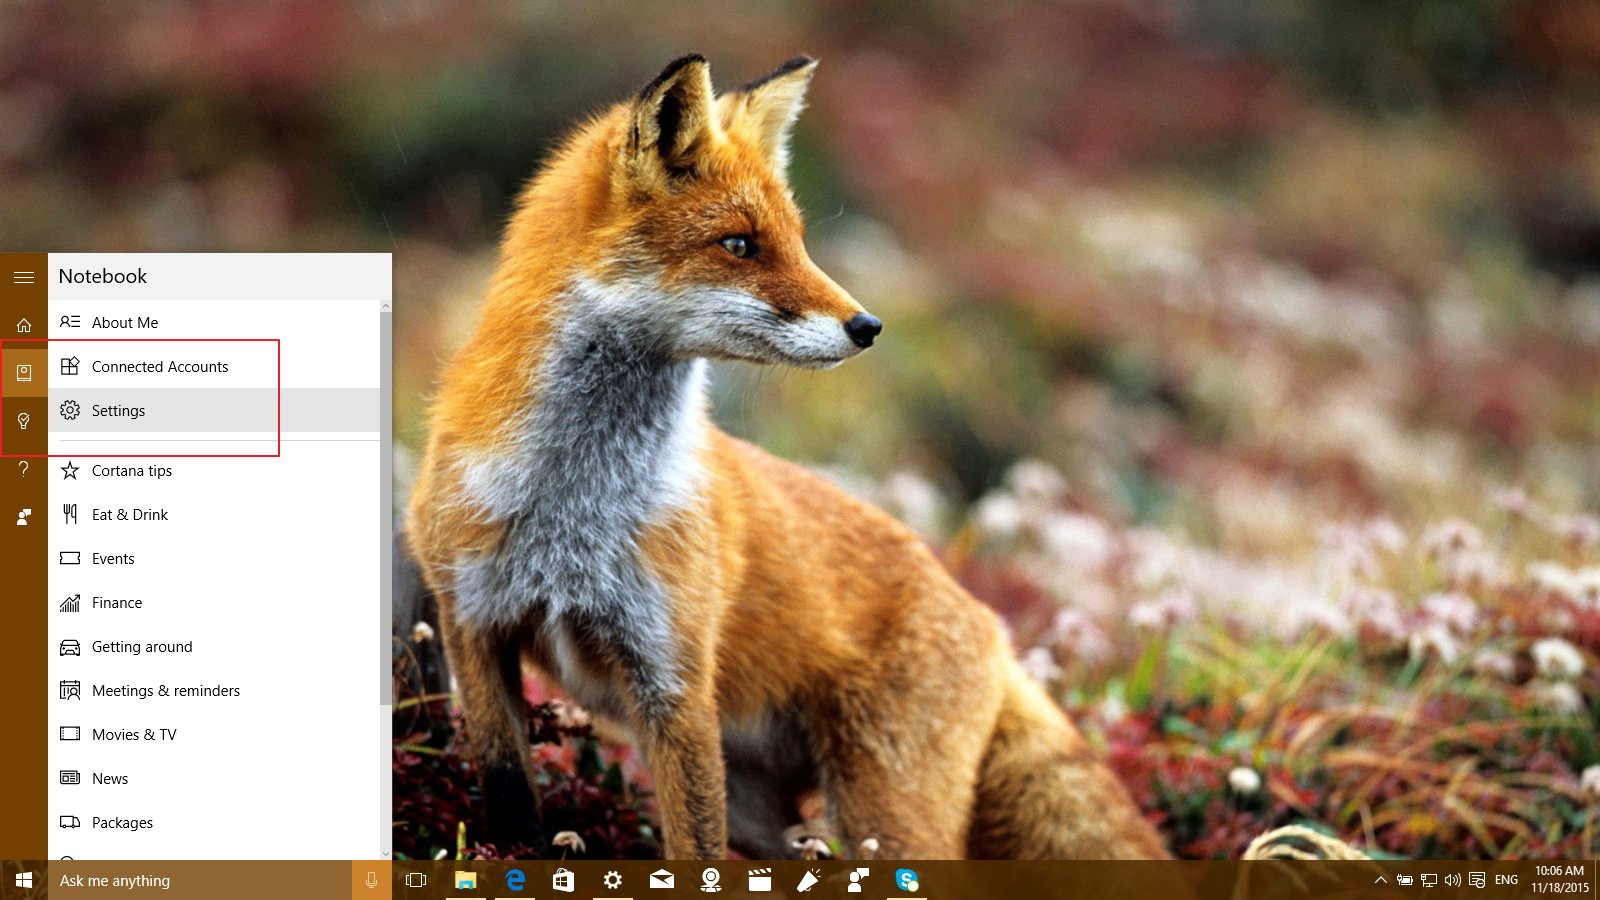
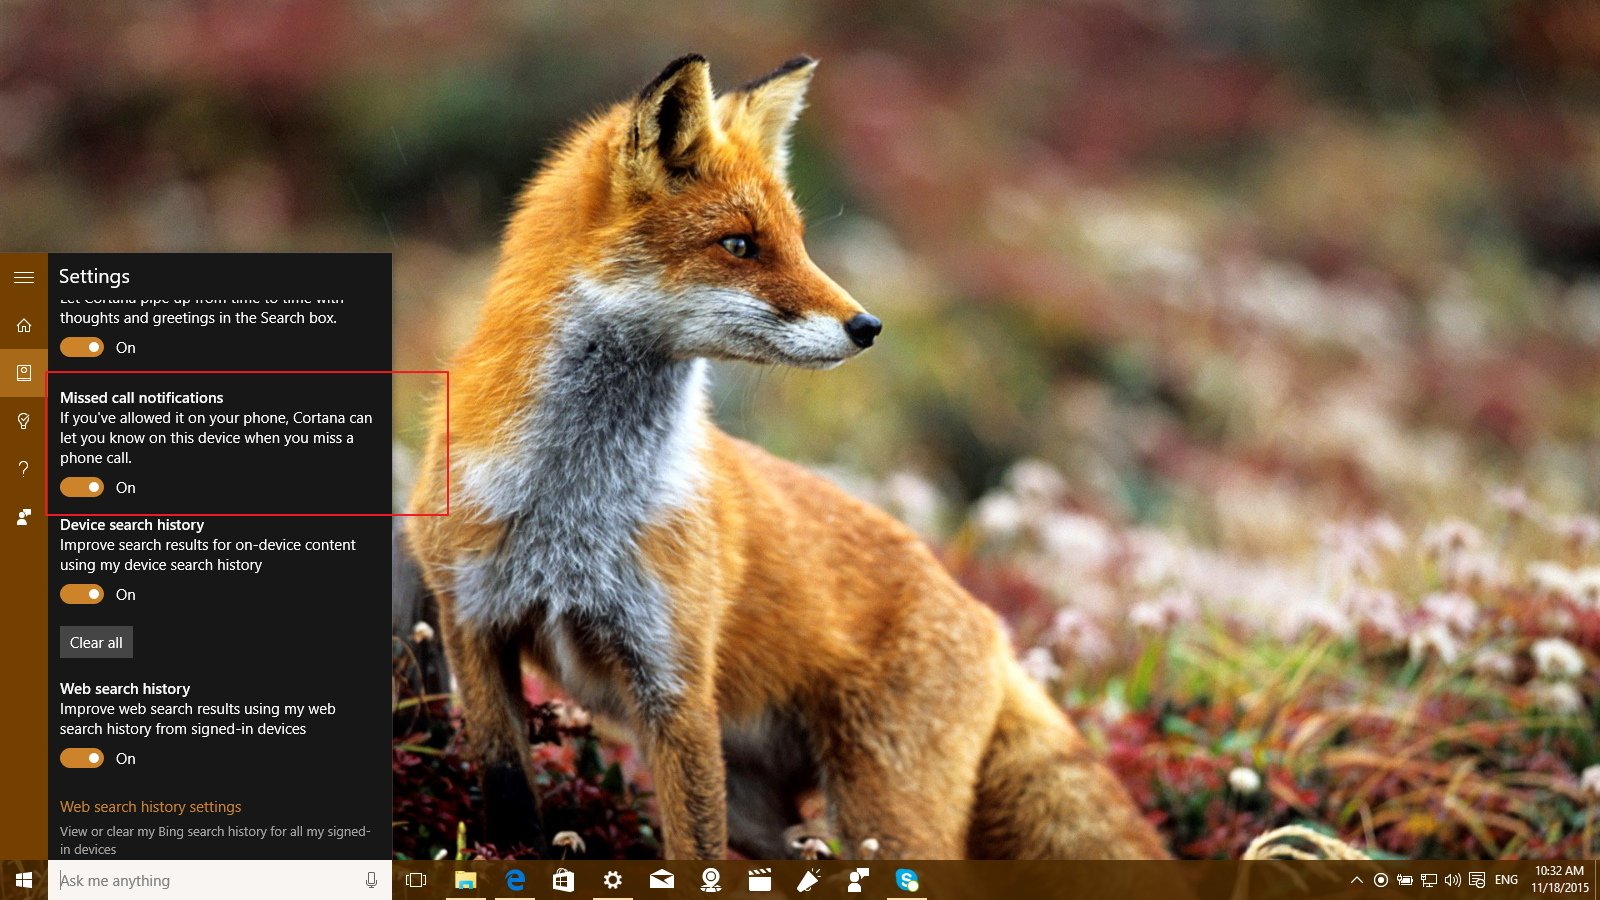
1- On your Windows 10 PC, tablet, and phone, open Cortana's settings page by going launching the search box, clicking or tapping the Notebook icon, and then going to Settings.
2- Scroll down until you find Miss call notifications and make sure the feature is enabled.
Testing if everything works, it's as easy as telling someone to call you on your Windows phone, let the phone ring, miss the call, and see the notification pop-up on your desktop.
Keep in mind that if you want to reply with a text, Windows 10 will send your message to your phone, and then your phone will send the message.
4. Quickly create reminders with a stylus
Cortana also includes handwriting recognition to allow users to create quickly reminders using a digital pen, such as the Surface Pen. The process is very straight forward, simply follow the steps below:
How to use handwriting to create a reminder
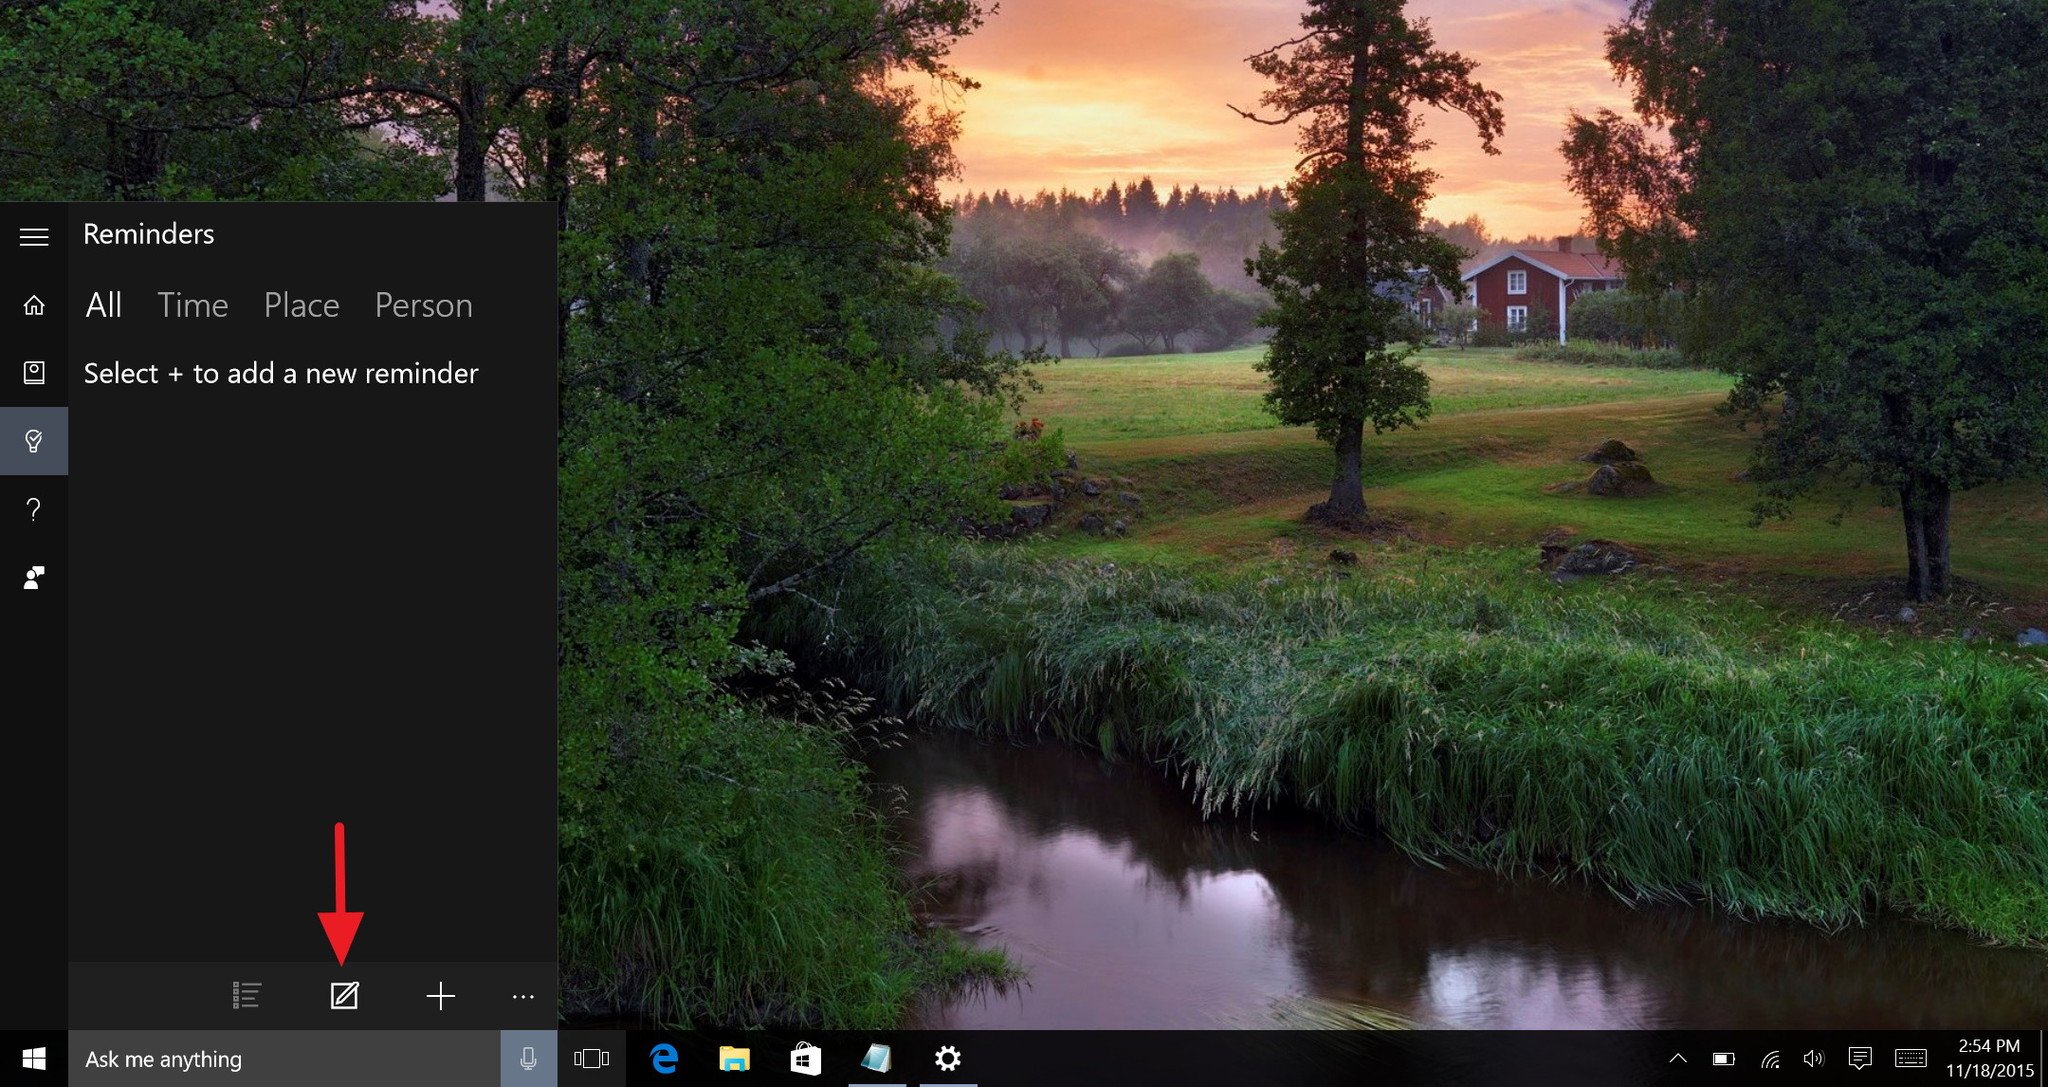
1- Open Cortana on your desktop and click the reminder icon.
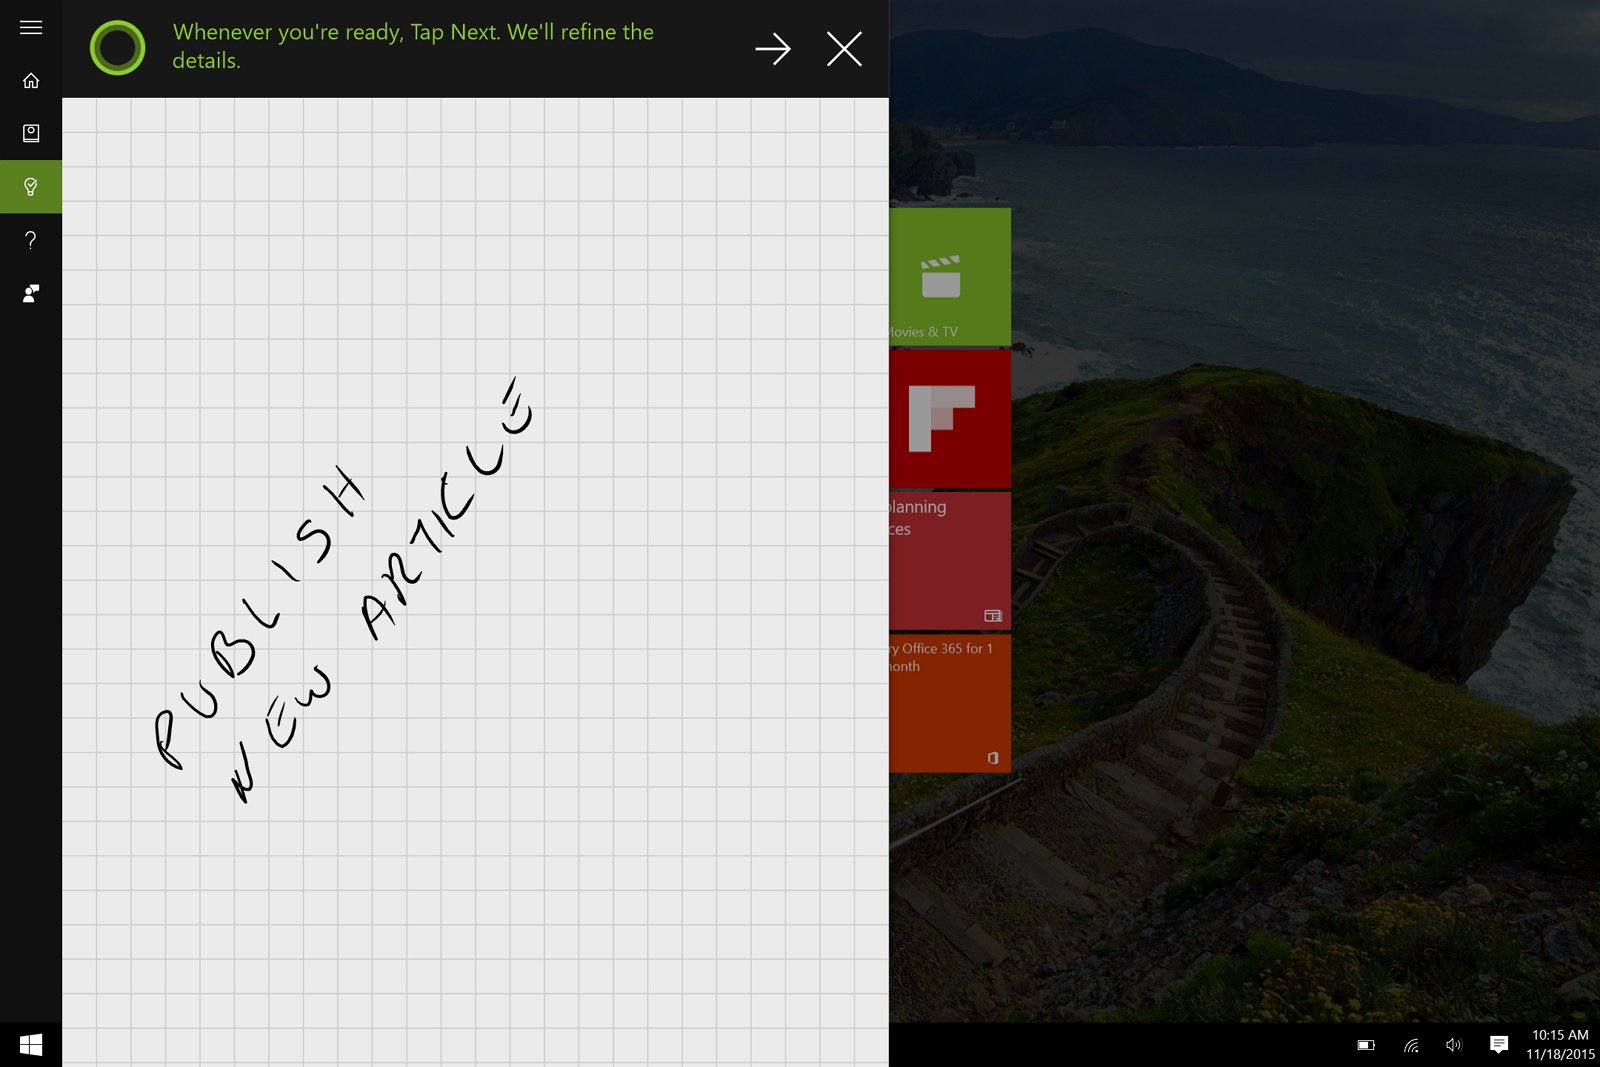
2- If your computer has a touch-enabled display with support for a stylus, you will see an annotation button, just click the button and you'll get a canvas to create your reminder.
3- Click the right-arrow from the top-right corner and complete setting up your reminder.
5. Increase your multitasking productivity
If there is one feature that I'm excited about from the Windows 10 November update is the new multitasking feature.
Snap view is an awesome option that allows users to snap up to four windows on the screen. Depending on the task, we only snap two apps side by side, but often we also need one of the apps to use more screen real-estate than the other. As such, Microsoft is adding a small tweak for snap to allow users to resize two snapped apps simultaneously, putting to an end having to waste extra time trying to resize each window individually.
How to enable multiple apps to resize
The feature should be enabled by default, but you can always check by doing the following:
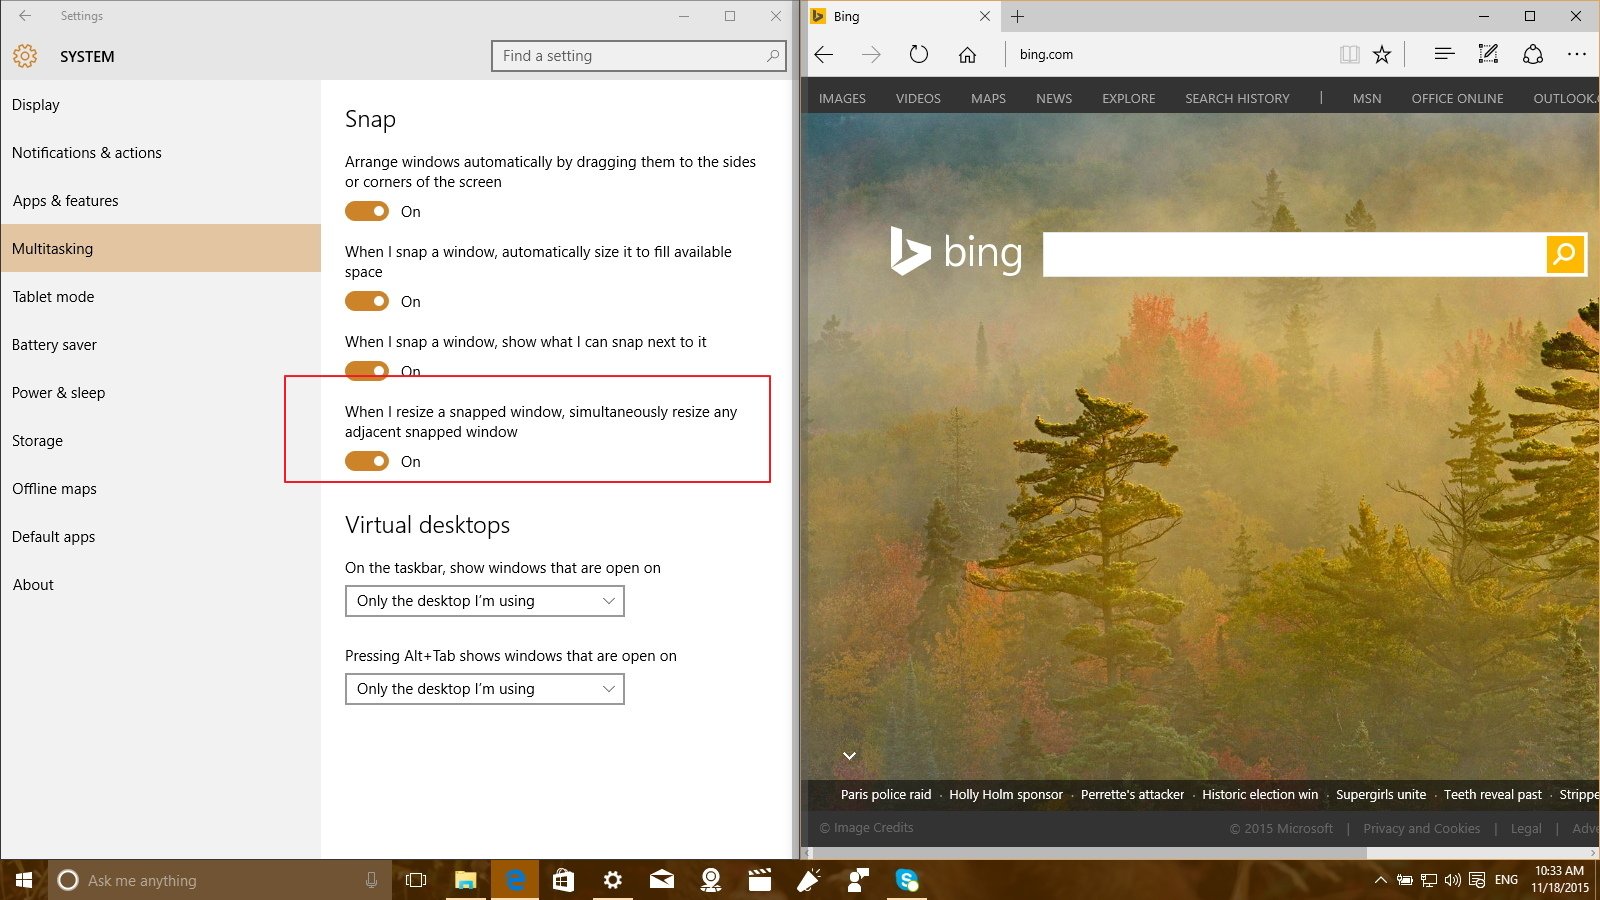
1- Use the Windows Key + I keyboard shortcut to open Settings.
2- On System go to Multitasking, and make sure to enable the When I resize a snapped window, simultaneously resize any adjacent window option.
5. Get Chromecast-like functionality
Microsoft Edge is the new default web browser for Windows 10, and the software giant is not only adding much-needed performance and security improvements, but also a few new features.
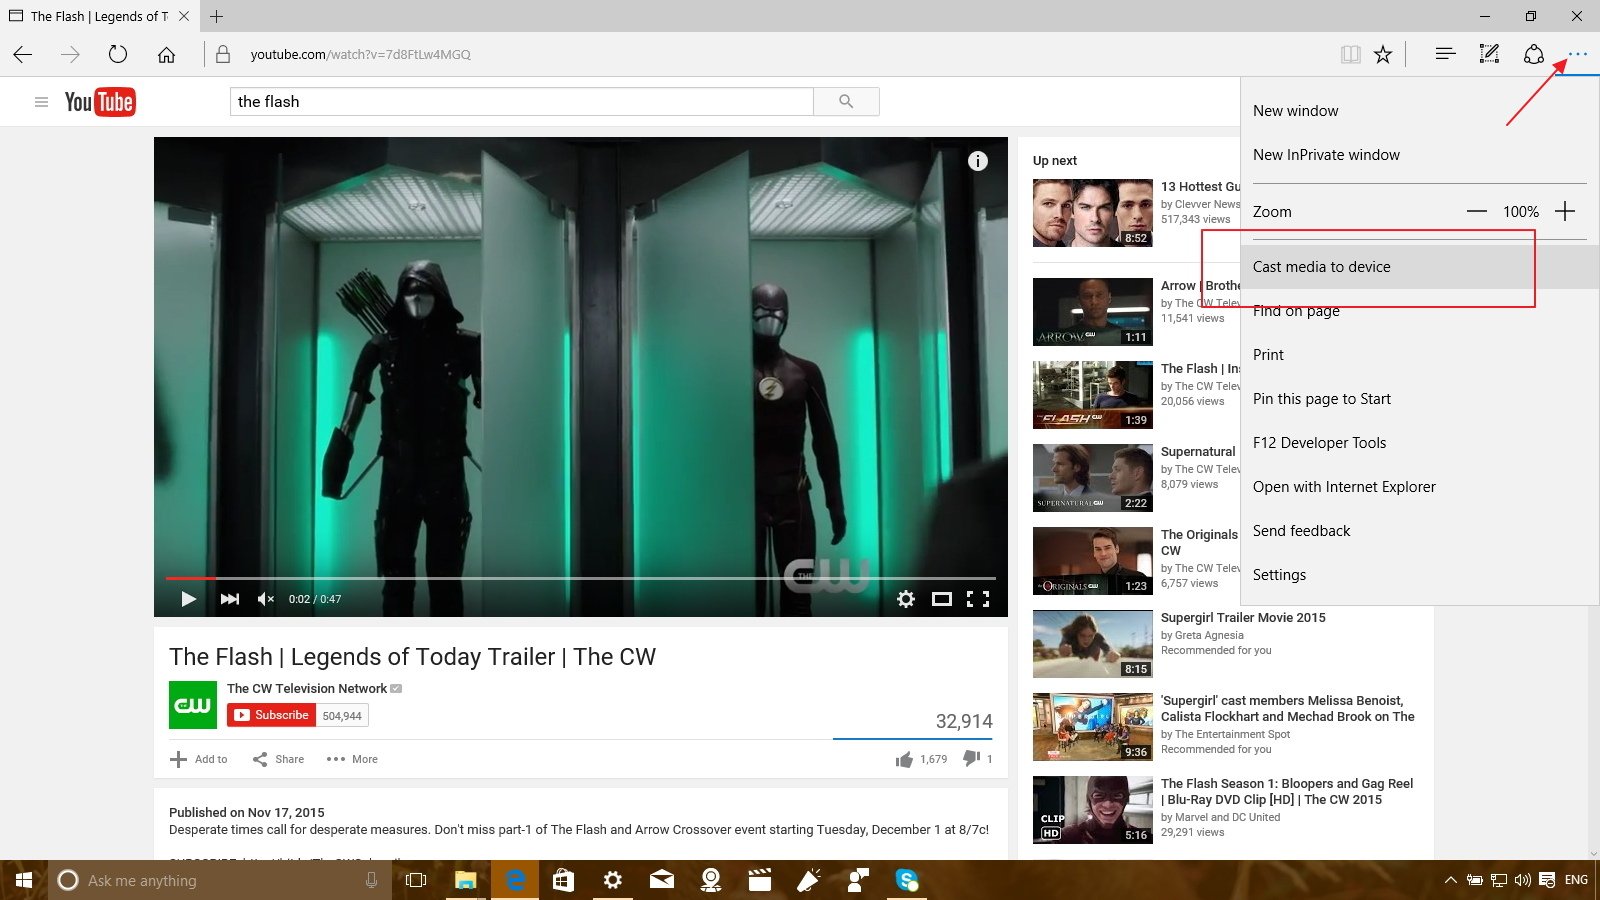
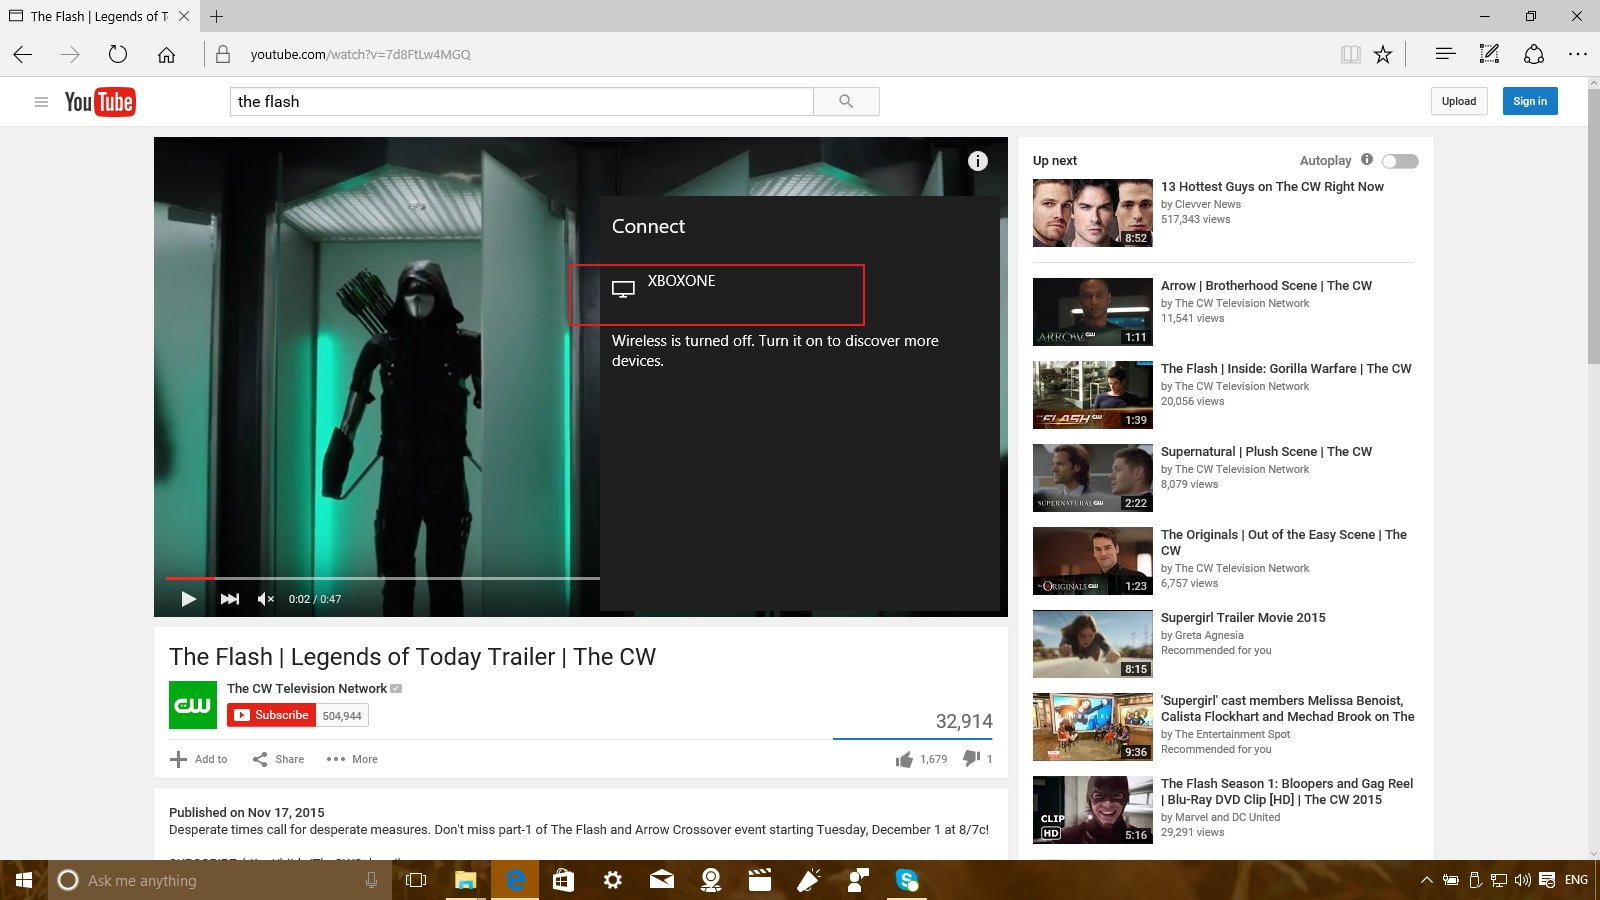
Similar to the cast feature you can add to Chrome using an extension, Microsoft Edge now includes a cast feature as well that allows users to cast videos, music, and pictures to the big screen in the house using any DLNA or Miracast compatible device.
How to cast media to devices
If you want to cast something to a device, such as Xbox One, simply do the following:
1- Open Microsoft Edge and go to the site you want cast content (e.g., Facebook, Pandora, or YouTube).
2- Click the Edge menu from the top-right corner of the app, click the Cast media to device.
3- A pop-up will appear listing the available devices, pick one and start casting.
It's important to note that protected content, such as from Hulu or Netflix, are not supported by the feature.
6. Get settings synced across devices with Microsoft Edge
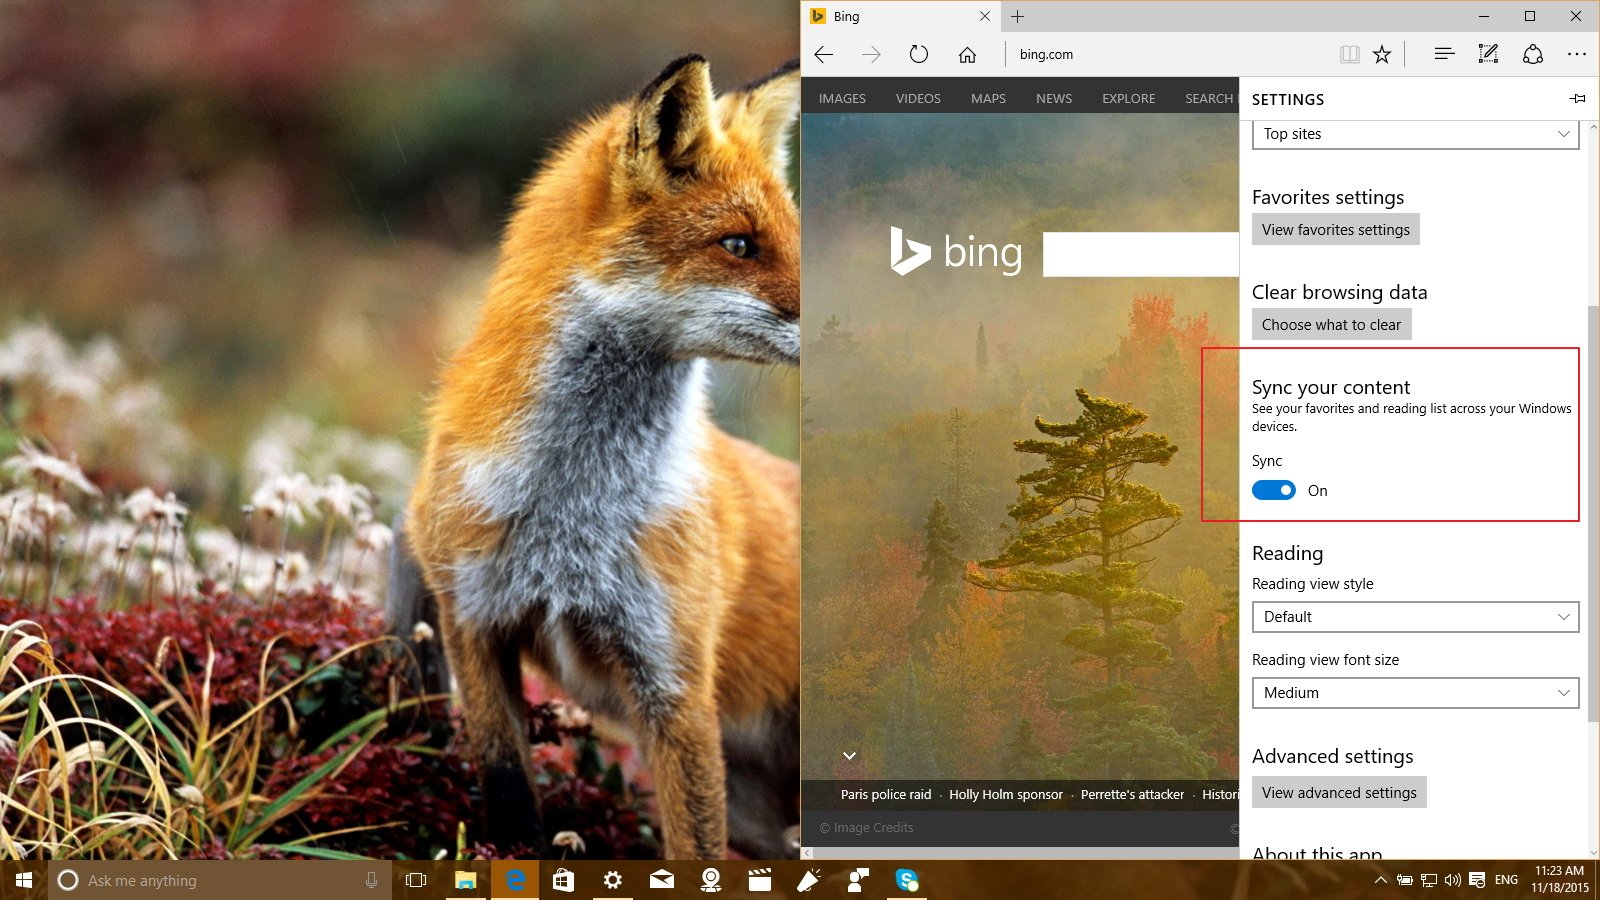
Another useful feature that Microsoft is enabling on its new web browser is the ability to sync passwords, bookmarks, and Reading List items between devices. Just remember that you need to have Sync already enabled in Settings > Accounts and you need to be using the same Microsoft Account on those devices you want to have synced content.
How to enable Microsoft Edge sync
1- Open Microsoft Edge, click the menu button on the top-right corner of the app, and click on Settings.
2- Scroll down and make sure to enable the Sync your content option.
While syncing is a welcome addition on Microsoft Edge, this is one of those things, the software giant should have added on day one. Oh, if you're wondering, you still cannot sync tabs between devices.
7. Allow Windows to take care of your default printer
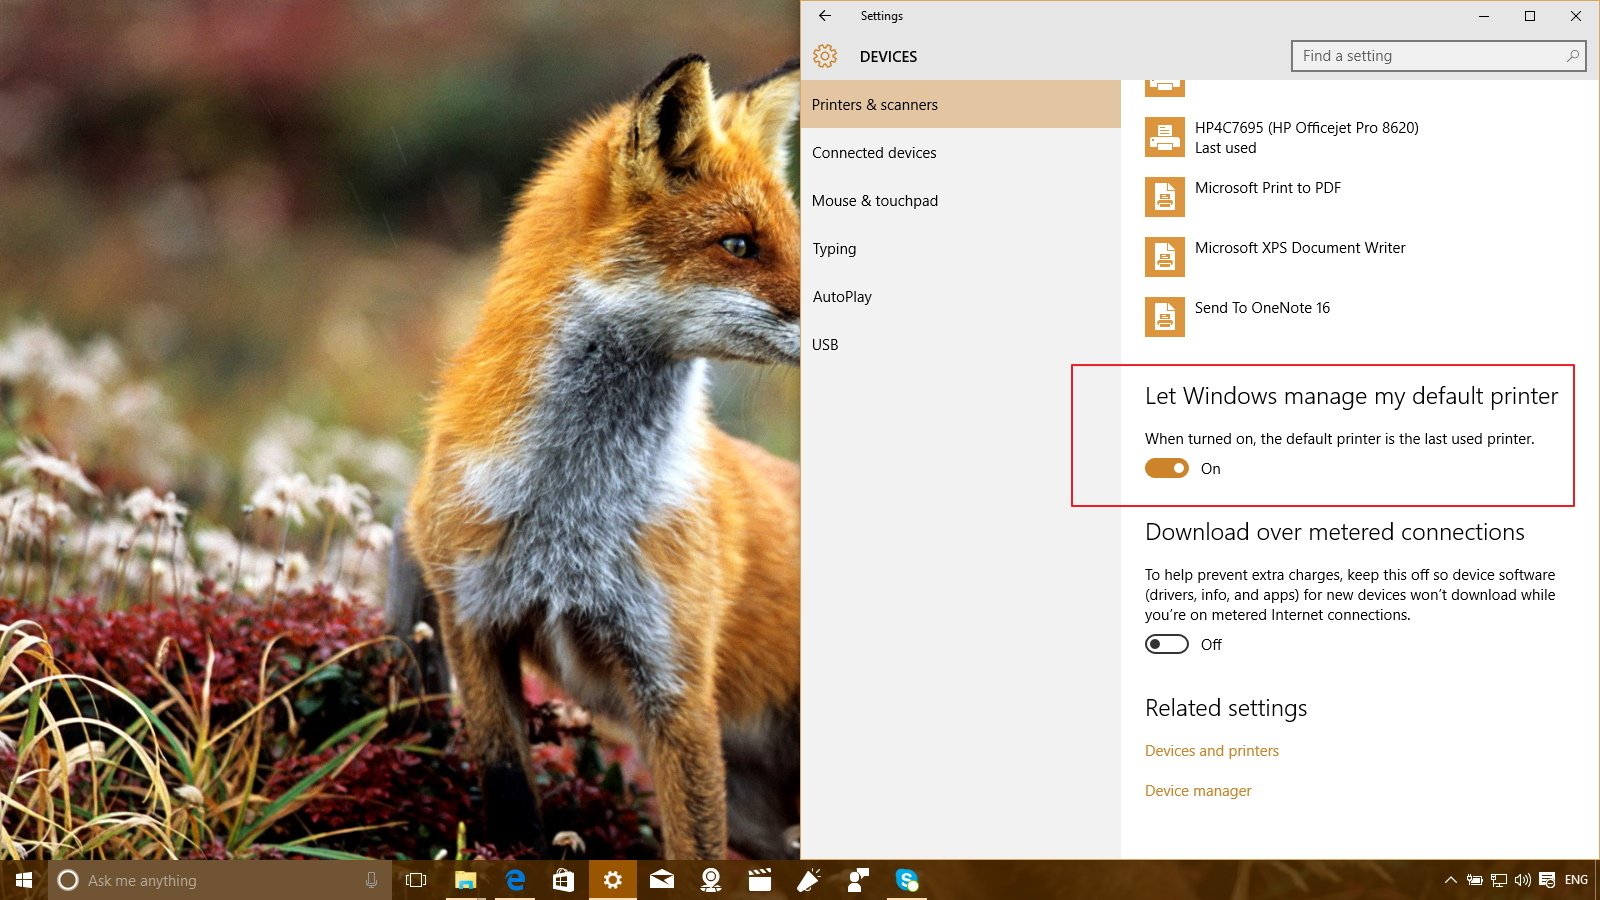
There used to be the time where you needed to tell the operating system which printer you wanted as the default for all the print jobs. However, now by default, Windows 10 controls your default printer.
If you have multiple printers configured on your computer, you can test the new functionality very easily. Simply, try to send a print job to any printer, and then test again, perhaps using another app, and the print job should now go to the printer you use the first time.
Of course, Microsoft anticipated that not everyone will like this feature, as such you can always disable the feature by doing the following:
How to disable automatic default printer manager
1- Use the Windows Key + I keyboard shortcut to open Settings.
2- Navigate to Devices, then go to Printers & scanners, and disable the Let Windows manage my default printer.
8. Ensure you can always locate your device
Windows 10 is being developed as one operating system that run across devices, including computers, tablets, Xbox, and phones and moving forward we're going to see Microsoft try to unify the experience across all devices.
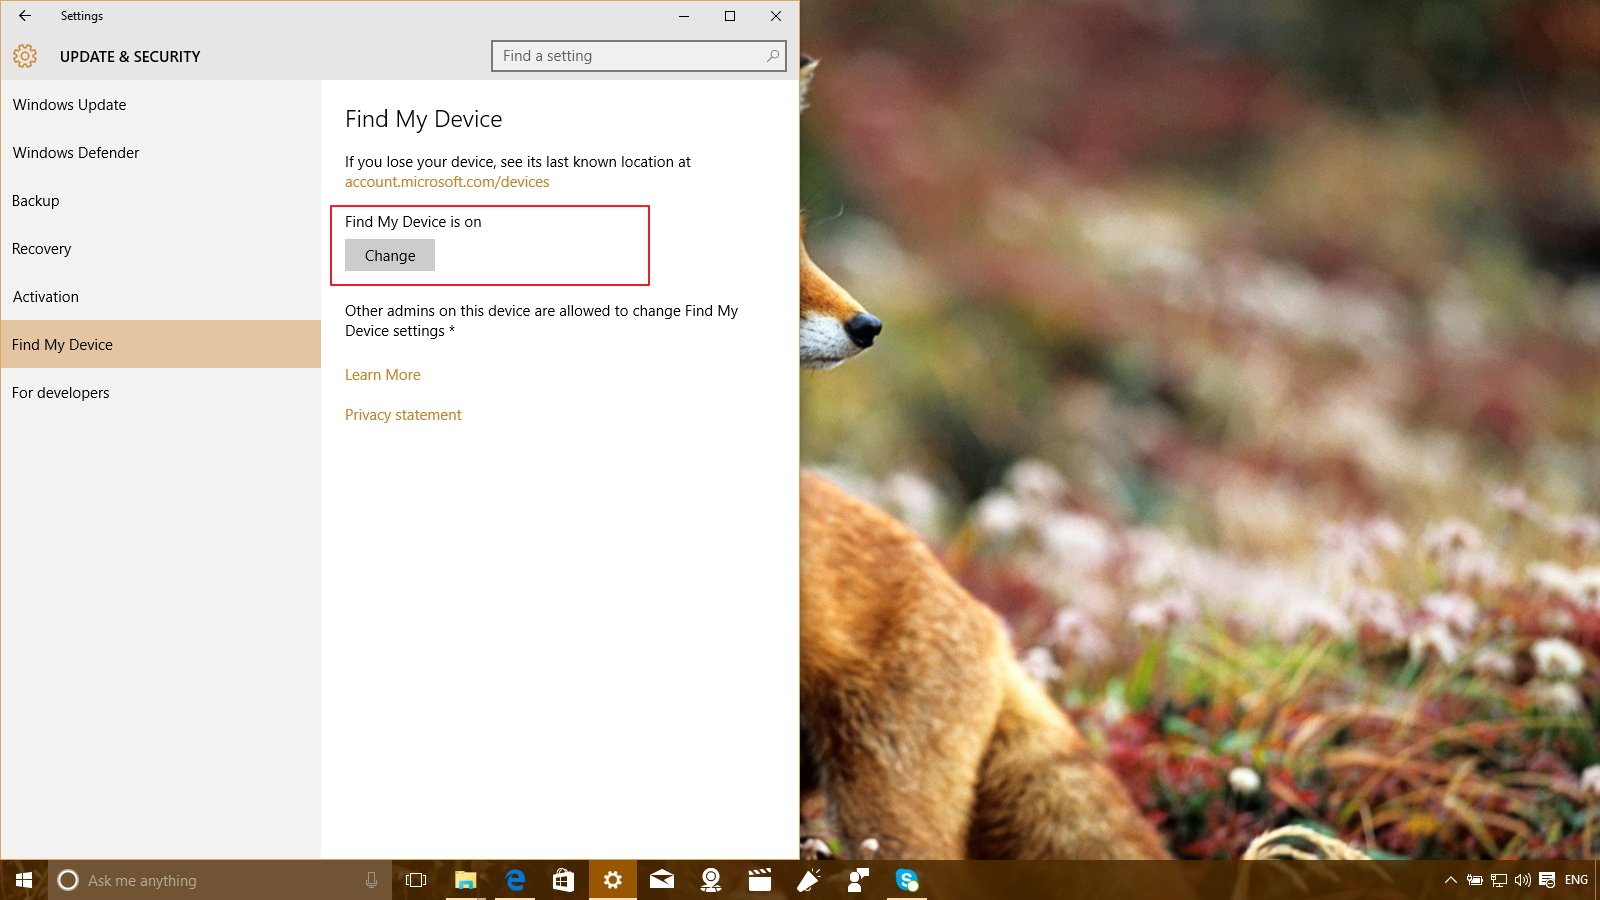
For example, "Find My Device" is a great feature that was first introduced on mobile devices to allow users locate their phone in the event it got stolen or lost by letting Microsoft periodically track the location of the device. Now the same feature is also available in Windows 10 desktop, and users can easily enable it through the Settings app.
How to configure Find My Device
1- Use the Windows Key + I keyboard shortcut to open Settings.
2- Navigate to Update & security, the go to Find My Device, and click Change and enable the Save my device's location periodically option.
Then if your computer ever gets misplaced, go to http://account.microsoft.com/devices. Browse for the device you're seeking, and click the Find my device link to get a more accurate location information and a Bing map to narrow things down.
9. Save space by installing new apps to external storage
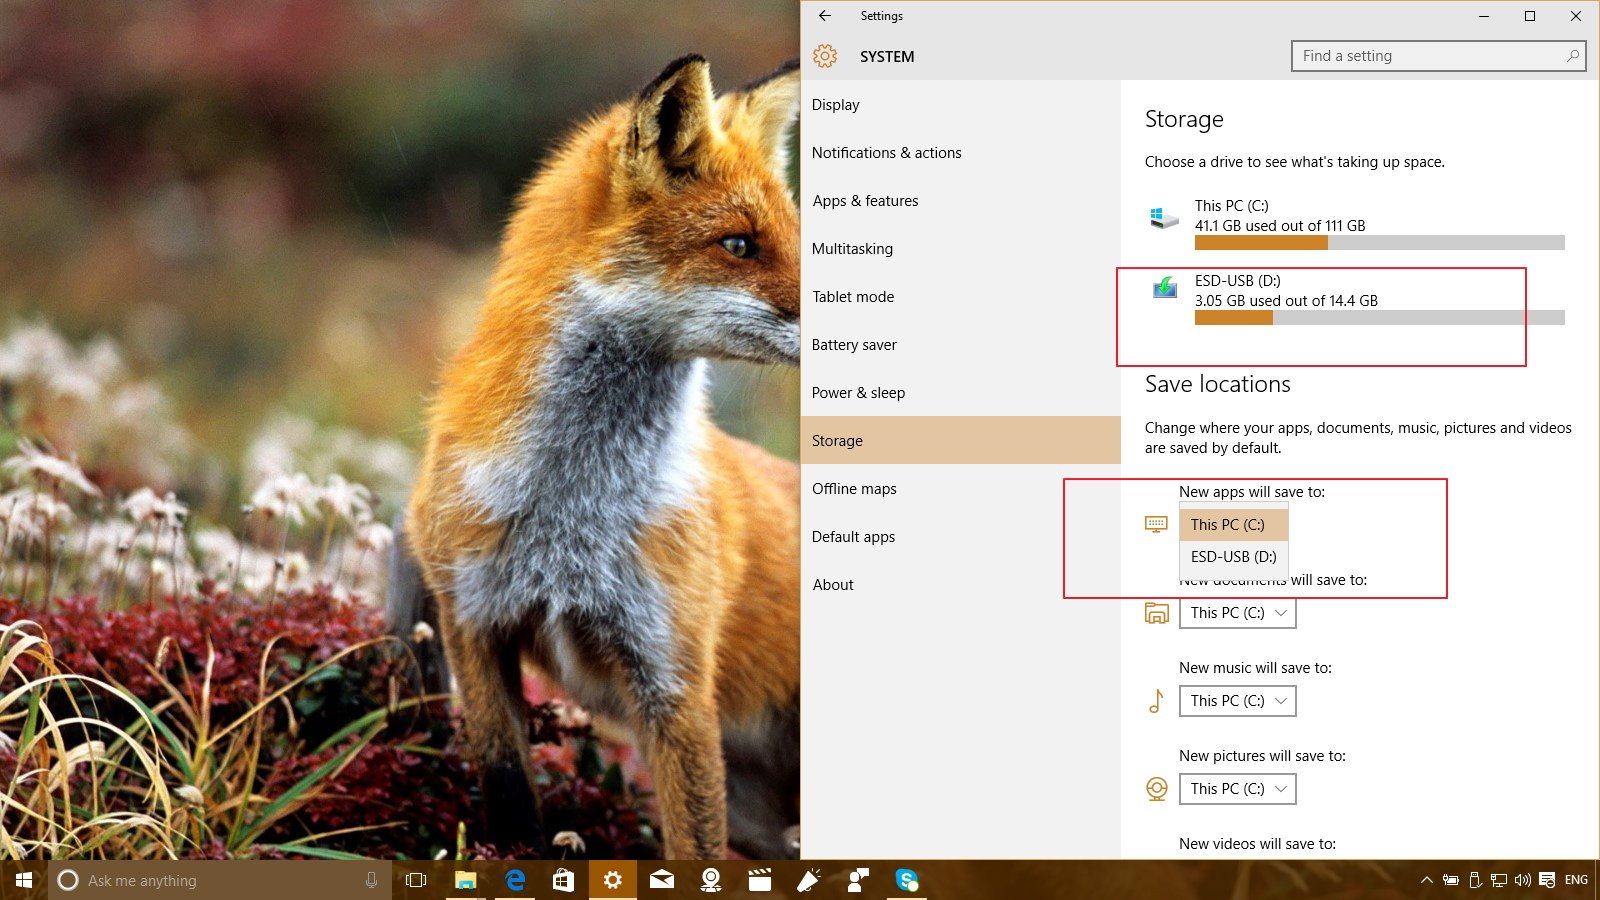
Windows 10 has yet another surprise. Now users can install apps to external storage, such on a microSD, USB drive, or secondary hard drive. We have seen this option in the past, but the software maker wasn't ready to enable it until the November update.
While not everyone will make use of this feature, it's a welcome addition that users on low-end devices with limited storage can appreciate as they can now simply connect an external storage to enable them to get more apps without wasting the available local storage.
How to install new apps on a secondary drive
1- Connect your new mass storage to your computer.
2- Use the Windows Key + I keyboard shortcut to open Settings.
3- Navigate to System, then go to Storage, and under Save locations change the settings of New apps will save to to the new external storage.
That's all there is to it.
10. New communication apps powered by Skype
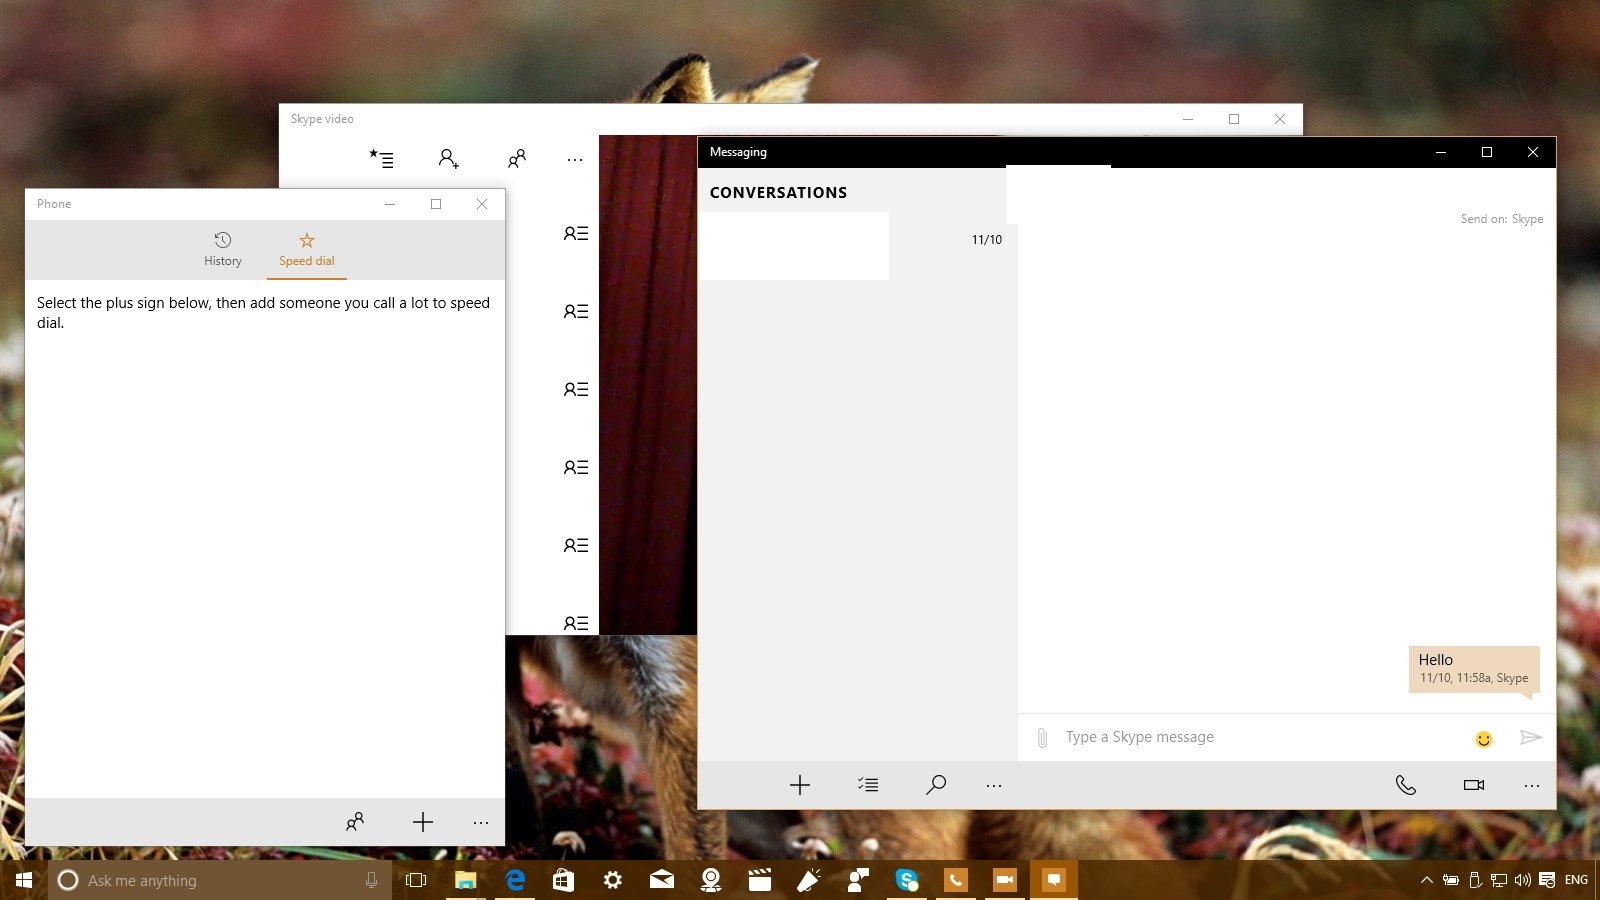
Windows 10 version 1511 also installs a few new apps, including Messaging, Phone, and Skype Video. These are now the new default communication apps users will be using in Windows 10. But don't get too excited as the apps are still in the early days, and they're very minimal, and there are a lot of things that don't work, but these are a few apps you will want to give them a try.
It's worth pointing out that Microsoft has released these apps through the Store before the release of the first major update, but now the operating system installs these by default, so they are new to version 1511.
Wrapping things up
Windows 10 version 1511 marks the first major milestone for Microsoft offering "Windows as a Service" and even though it's not perfect, the company is delivering on the promise of making the operating system better as time goes on. The November update not only brings new features and apps but a handful of improvements and changes that makes the overall experience better. Of course, there is always room for improvement.
Do you have any favorite feature from Windows 10 version 1511? Let us know in the comments below.
More resources
If you want to see about Windows 10, make sure you check these resources:
- Windows 10 on Windows Central – All you need to know
- Windows 10 help, tips, and tricks

Mauro Huculak has been a Windows How-To Expert contributor for WindowsCentral.com for nearly a decade and has over 22 years of combined experience in IT and technical writing. He holds various professional certifications from Microsoft, Cisco, VMware, and CompTIA and has been recognized as a Microsoft MVP for many years.
