How to add or remove commands from Ribbon menu in Office
You can add and remove commands from the Office Ribbon menu to organize the experience, and here's how on Windows 10.
All the latest news, reviews, and guides for Windows and Xbox diehards.
You are now subscribed
Your newsletter sign-up was successful
Whether you use Office with a Microsoft 365 subscription or Office 2019, the apps like Word, Excel, and PowerPoint come with the Ribbon menu that includes commands to work with documents, spreadsheets, and presentations.
Although the default settings include the most common commands, the Office apps also have options to add or remove items from the Ribbon and Quick Access Toolbar, which you can use to have quicker access to tools and features you need frequently to work with documents on Windows 10.
In this Windows 10 guide, we will walk you through the steps to add and remove commands from the Ribbon and Quick Access Toolbar in Office apps.
How to customize the Ribbon commands
On any Office application, including Word, Excel, and PowerPoint, you can organize the Ribbon menu to show only the items you need.
Add commands
To add new commands to the Office Ribbon, use these steps:
- Open Office app.
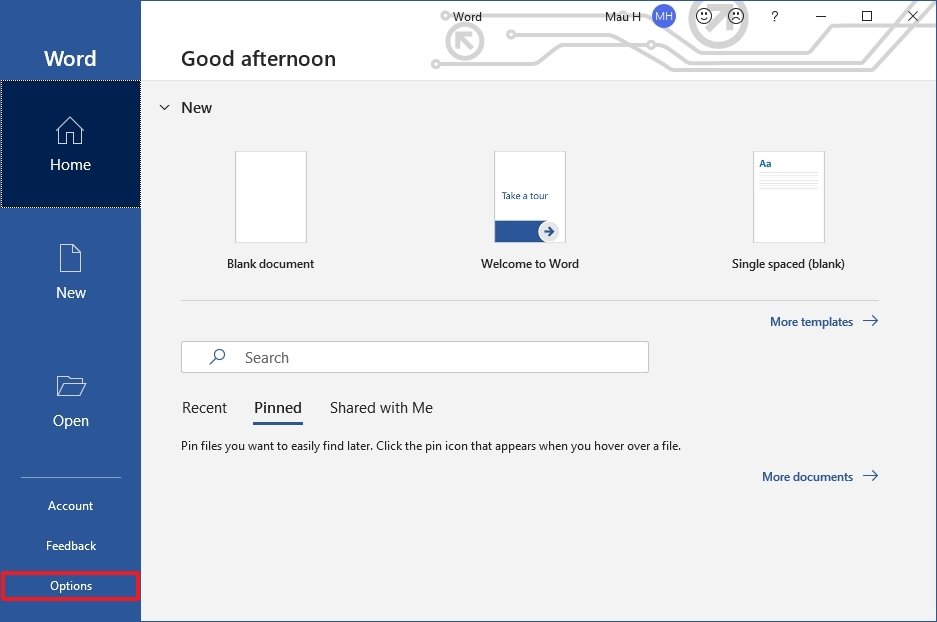
- Click on Options from the bottom-left corner.Quick note: If you have a blank document open, click the File menu to access the Options button. Alternatively, you can also right-click anywhere in the Ribbon and select the Customize the Ribbon option to access the settings.
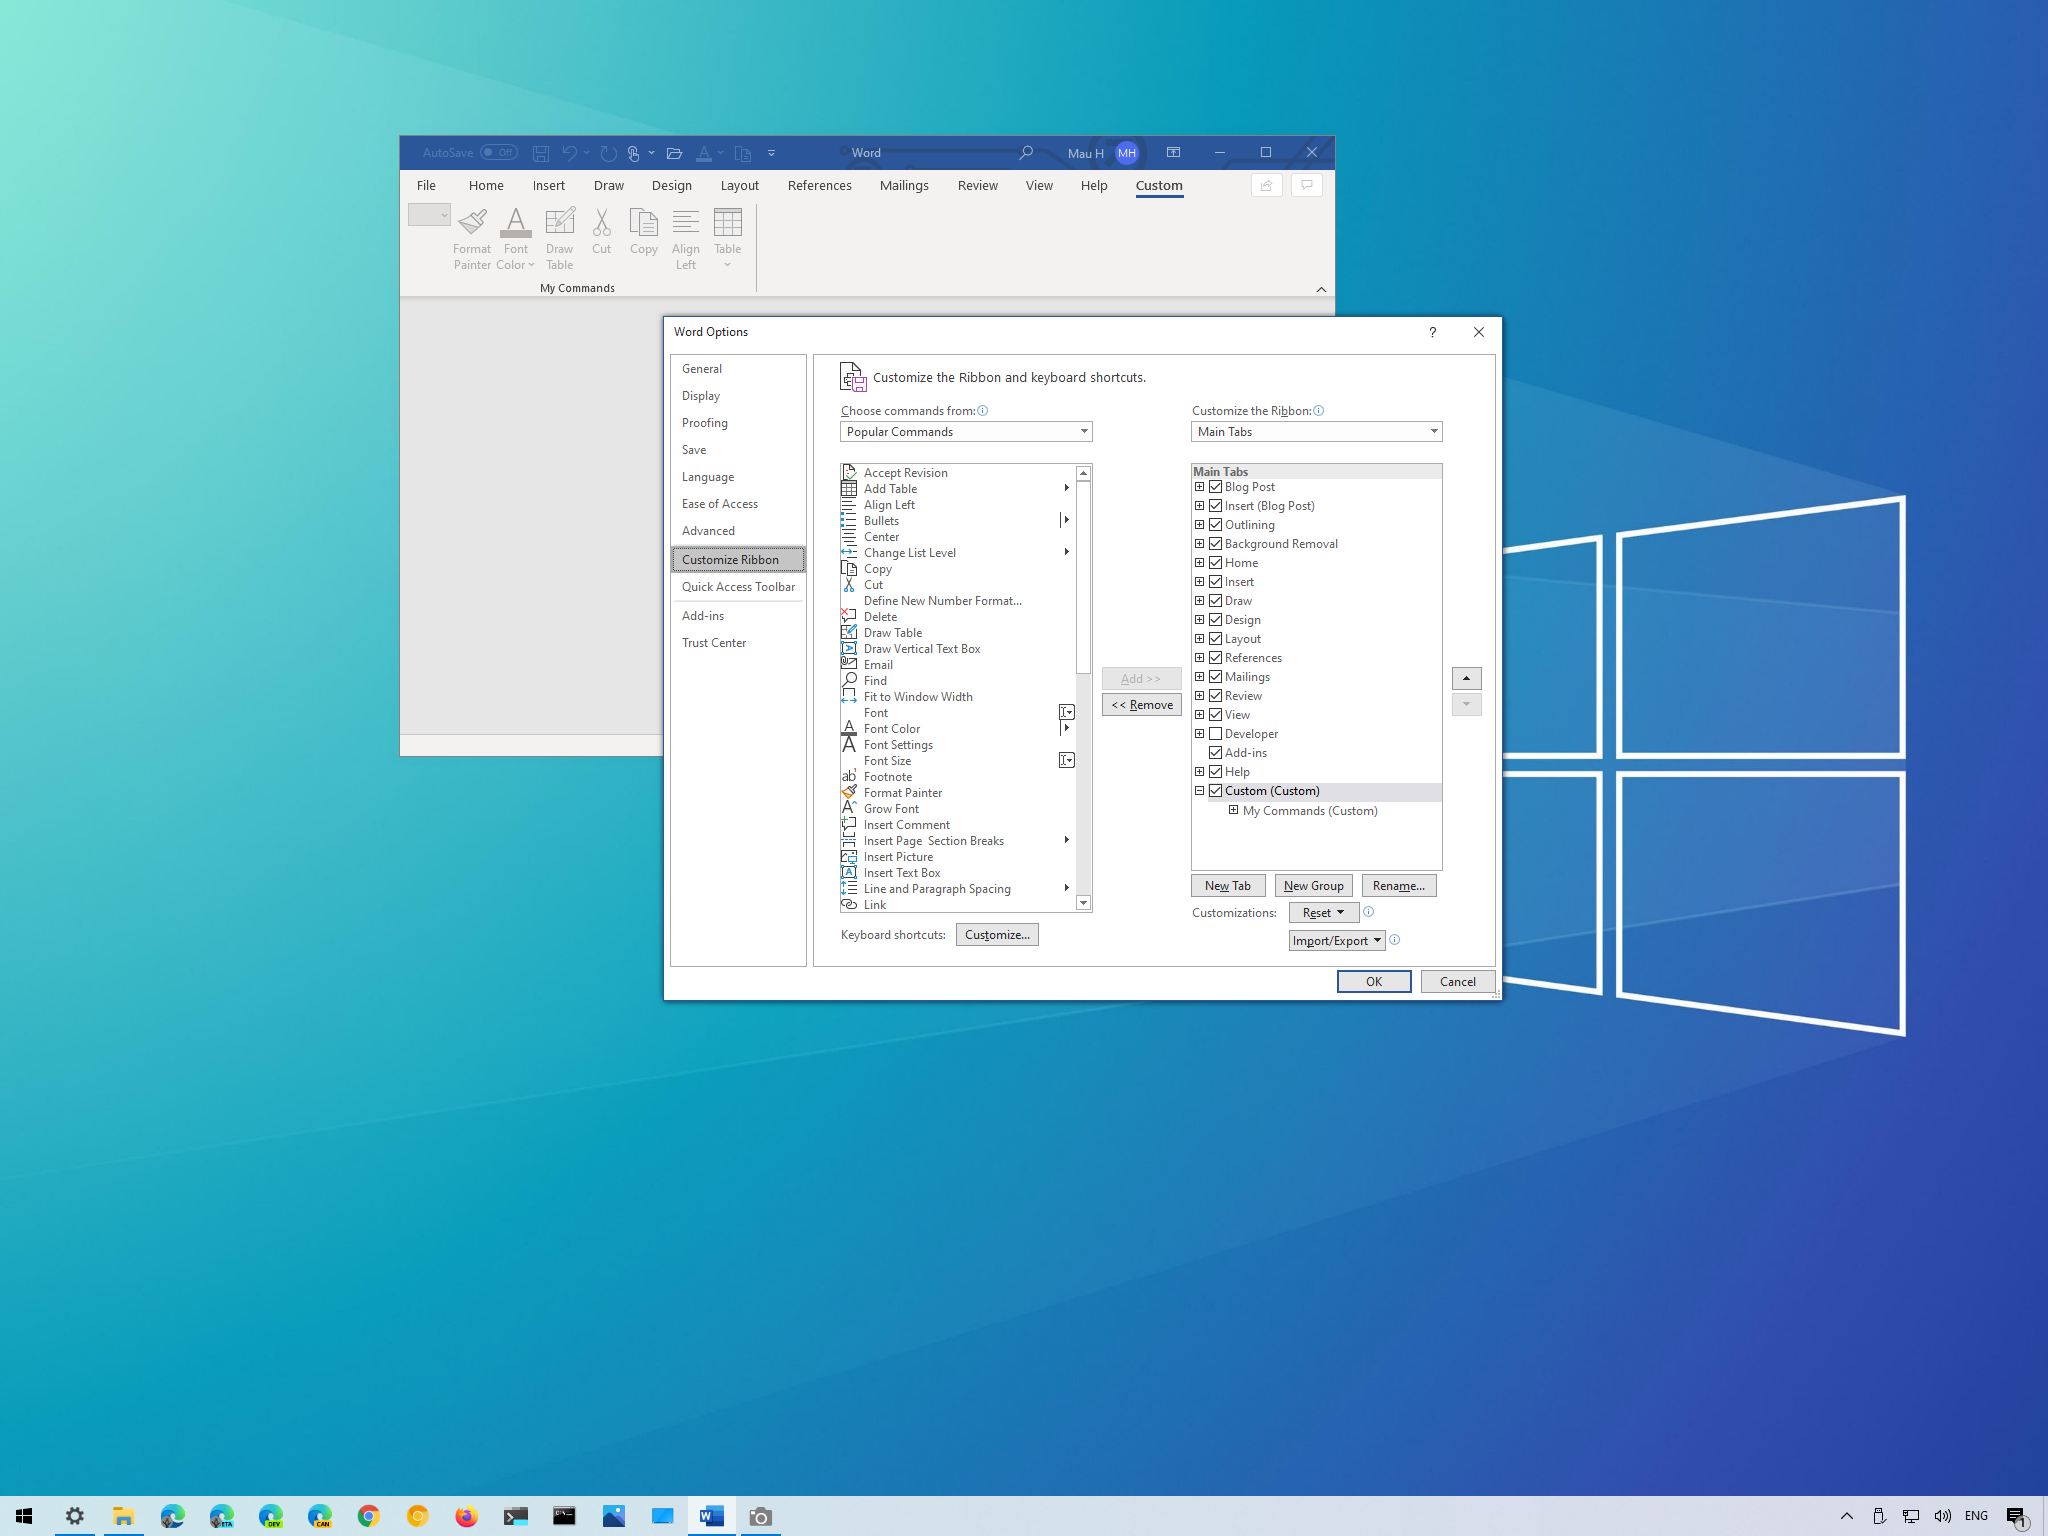
- Click on Customize Ribbon.
- Use the "Customize the Ribbon" drop-down menu and select the Main Tabs option (if applicable).
- Select the tab and then the custom group you want to add new commands.
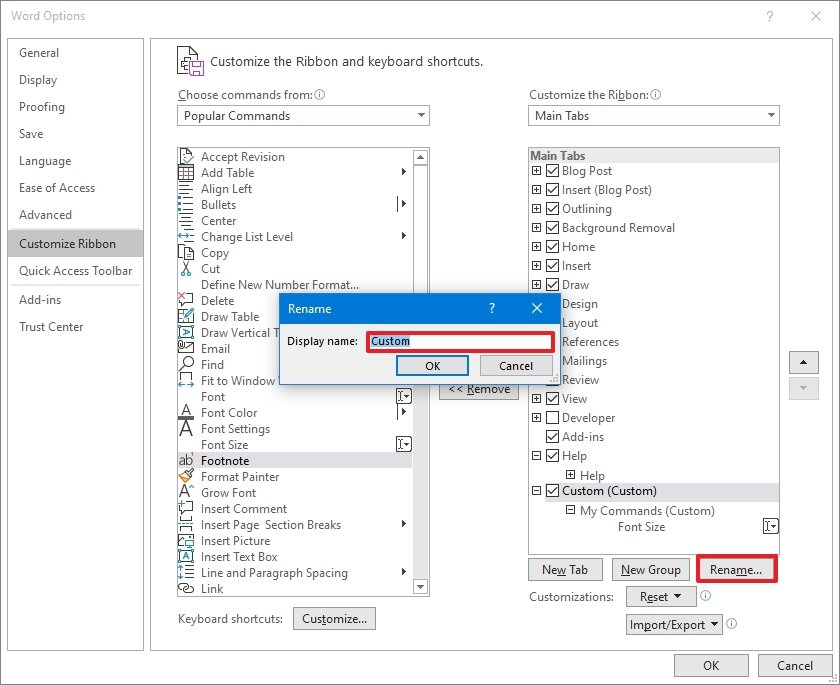
- (Optional) Click the New Tab button to add a new section to include all your custom commands.Quick note: You will also need to right-click the tab and select the Rename option to set a custom name for the tab.
- Click the Rename button.
- Confirm a name for the tab.
- Click the OK button.
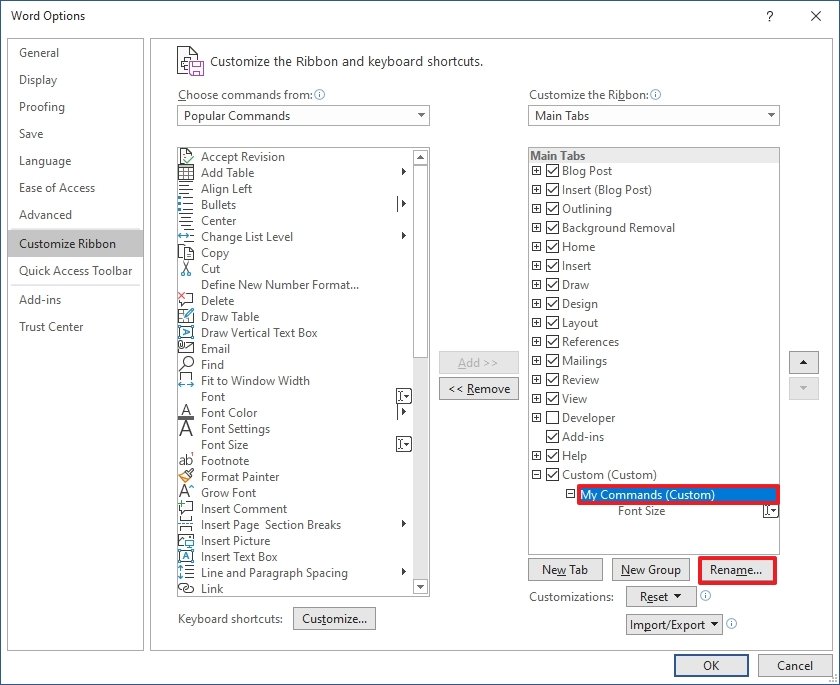
- Select the new group to add the commands.
- Click the Rename button.
- Confirm a name for the group.
- Click the OK button.
- Select the custom group. (Otherwise, you may come across and error.)
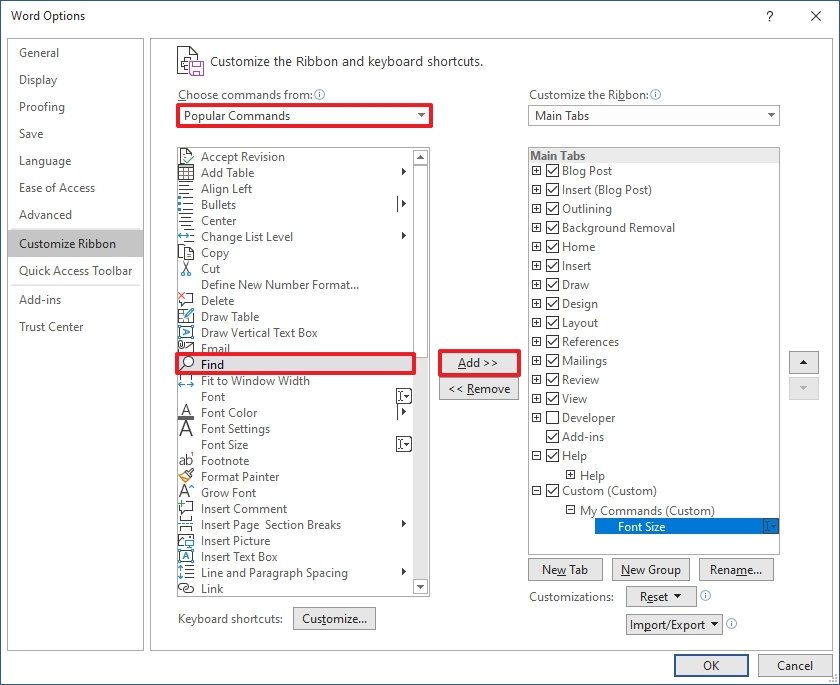
- Use the "Choose commands from" drop-down menu and select the group of commands you want to use – for example, Popular Commands.
- Select the command from the list – for example, Find.
- Click the Add button.
- Repeat steps No. 14 through 17 to add more commands to the Ribbon.
- Click the OK button.
Once you complete the steps, the commands will appear in the Ribbon menu, inside the custom group you created.
Remove commands
To remove commands from the Ribbon menu, use these steps:
All the latest news, reviews, and guides for Windows and Xbox diehards.
- Open Office app.
- Click on Options from the bottom-left corner.
- Click on Customize Ribbon.
- Use the "Customize the Ribbon" drop-down menu and select the Main Tabs option (if applicable).
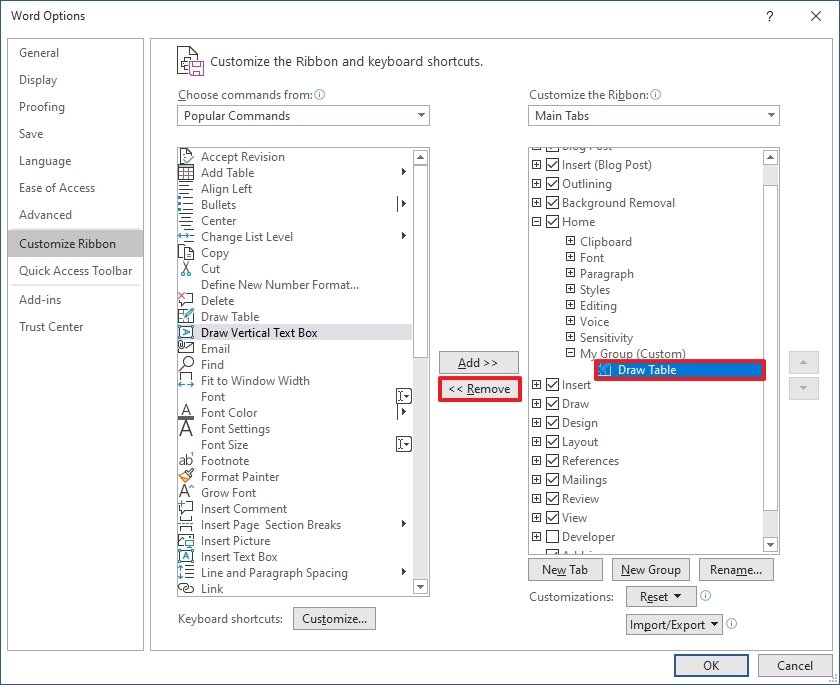
- Select the tab and then group you want to remove new commands from.Quick note: While you cannot edit items on existing tabs, you can remove items from most places, including from existing and custom tabs.
- Right-click the command and select the Remove option.
- (Optional) Right-click the empty group and select the Remove option.
- Click the OK button.
After you complete the steps, the commands you removed will no longer be available in the Office Ribbon.
If you have an older version of Office, you should consider switching to Microsoft 365. The subscription-based service provides free upgrade of the most popular office app. You also get many other benefits, such as sharing the apps with other family members and friends, and services like Microsoft Teams, Family Safety, Microsoft Editor, and 1TB of OneDrive storage.
How to customize the Quick Access Toolbar commands
Alongside the Ribbon menu, Office apps also include the Quick Access Toolbar in the titlebar to give you quick access to everyday actions, such as undo, redo, save, and print. However, you can edit this menu to show and hide any commands you need.
Add commands
To add new items to the Quick Access Toolbar, use these steps:
- Open Office app.
- Click on Options from the bottom-left corner.Quick note: If you have a blank document open, click the File menu to access the Options button. Alternatively, you can also right-click anywhere in the Ribbon and select the Customize the Ribbon option to access the settings.
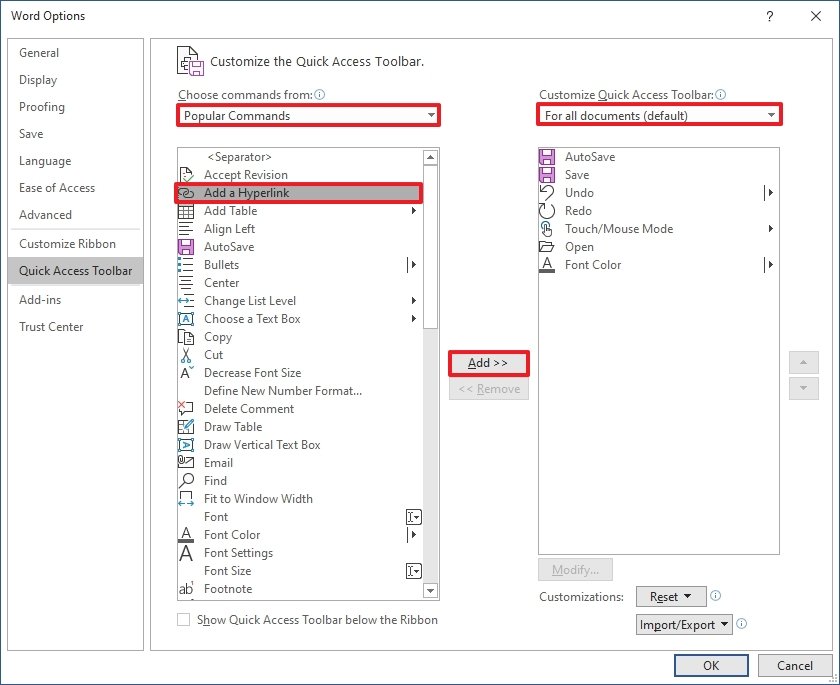
- Click on Quick Access Toolbar.
- Use the "Customize Quick Access Toolbar" drop-down menu and select the For all documents option (if applicable).
- Use the "Choose commands from" drop-down menu and select the group of commands you want to use – for example, Popular Commands.
- Select the command from the list.
- Click the Add button.
- Repeat steps No. 6 and 7 to add more commands.
- (Optional) Select the new command.
- Use the up and down buttons on the right side to change the order of the option.
- Click the OK button.
Once you complete the steps, the commands will appear in the title bar above the Ribbon menu.
Show commands in titlebar
To show more commands above the Ribbon, use these steps:
- Open Office app.
- Click on Home.
- Click on Blank document.
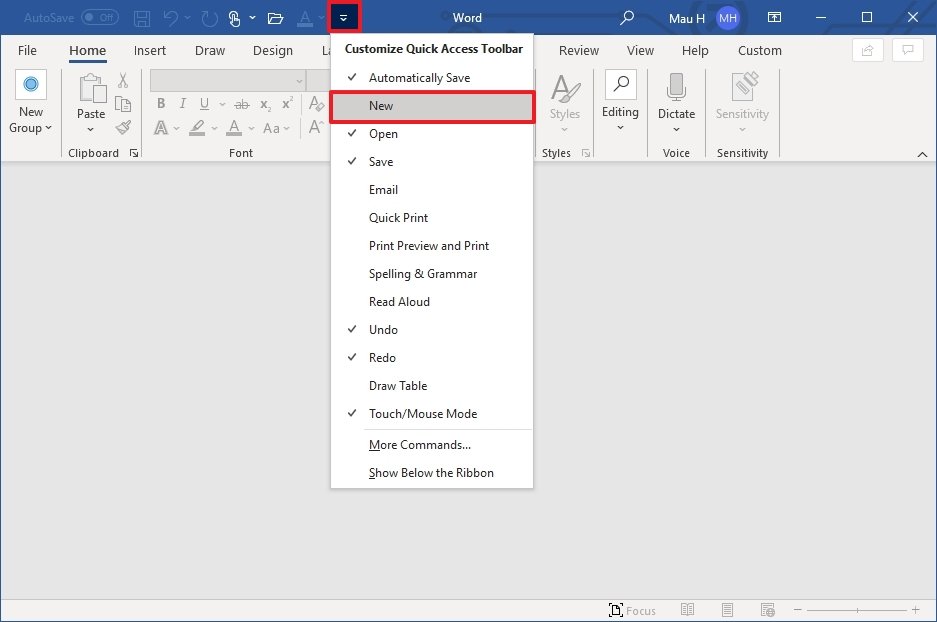
- Click the Customize Quick Access Toolbar (down-arrow) button in the title bar.
- Check the items you want to show from the toolbar.
- Repeat steps No. 4 and 5 to add other commands.
Alternatively, you can also right-click any command button from the Ribbon and select the Add to Quick Access Toolbar option.
Remove commands
To remove commands from Quick Access Toolbar, use these steps:
- Open Office app.
- Click on Options from the bottom-left corner.
- Click on Quick Access Toolbar.
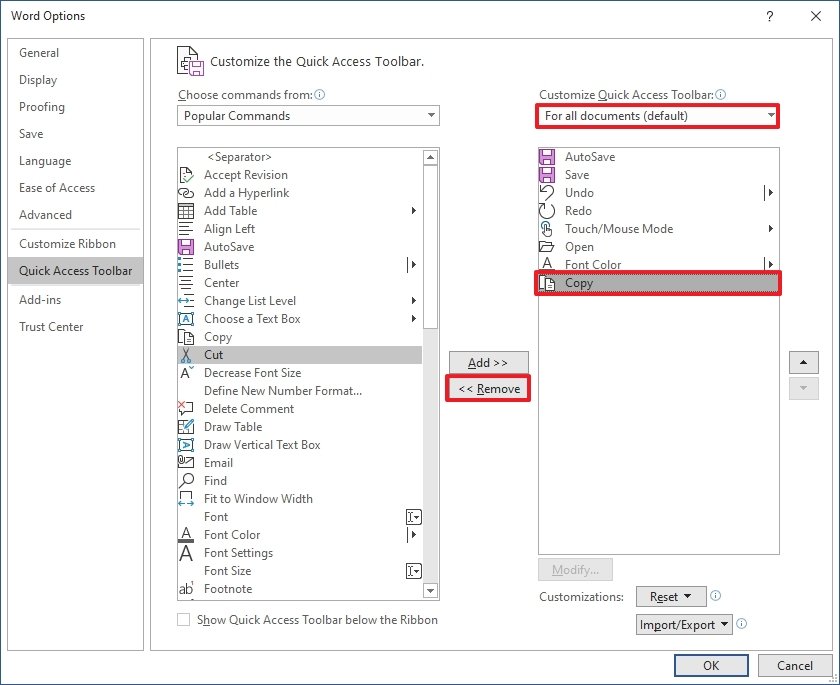
- Use the "Customize Quick Access Toolbar" drop-down menu and select the For all documents option (if applicable).
- Select the command you want to remove.
- Click the Remove button.
- Repeat steps No. 5 and 6 to continue removing other items as necessary.
- Click the OK button.
After you complete the steps, the commands will now appear in the toolbar.
Hide commands in titlebar
To hide more commands in the above the Ribbon, use these steps:
- Open Office app.
- Click on Home.
- Click on Blank document.
- Click the Customize Quick Access Toolbar (down-arrow) button in the title bar.
- Clear the items you want to remove from the toolbar.
- Repeat steps No. 4 and 5 to remove other commands.
Alternatively, you can right-click the item and select the Remove from Quick Access Toolbar option.
More Windows 10 resources
For more helpful articles, coverage, and answers to common questions about Windows 10, visit the following resources:
- Windows 10 on Windows Central – All you need to know
- Windows 10 help, tips, and tricks
- Windows 10 forums on Windows Central

Mauro Huculak has been a Windows How-To Expert contributor for WindowsCentral.com for nearly a decade and has over 22 years of combined experience in IT and technical writing. He holds various professional certifications from Microsoft, Cisco, VMware, and CompTIA and has been recognized as a Microsoft MVP for many years.
