How to prevent users from changing proxy settings on Windows 10
Yes, you can prevent users from trying to change the proxy settings on Windows 10, and in this guide, you'll learn two methods to complete the task.
All the latest news, reviews, and guides for Windows and Xbox diehards.
You are now subscribed
Your newsletter sign-up was successful
On computing, a proxy server sits between a device and the internet to retrieve web data on behalf of the user. Usually, there are three reasons to use a proxy, including privacy, speed, and traffic monitoring.
Privacy is perhaps the most important benefit because it allows you to navigate the internet anonymously since the computer will be requesting information to the proxy (not to the website directly). Then the server will retrieve the information for the client, hiding your public network address.
A proxy server can also improve internet speeds and reduce bandwidth. For example, if the organization has a proxy in the network, whenever a request is made, the server will also cache the web page in its database, and it will serve it to other users if they request the same information. Also, organizations may use this solution to monitor the websites users access and create an access list to block specific sites.
Since there are many reasons to use a proxy, depending on your environment, sometimes you may need to prevent users from changing the proxy settings on Windows 10 to properly implement the solution or prevent them from using this feature.
Whatever the reason it might be, Windows 10 includes at least two methods to disable the proxy settings using the Local Group Policy Editor and Registry.
In this Windows 10 guide, we will walk you through the steps to disable the proxy settings available in the Settings app to prevent users from modifying this feature. We will also outline the steps to enable the settings if you no longer need to use a proxy or the feature was disabled by mistake.
How to disable proxy settings on Windows 10
On Windows 10, it is possible to disable the proxy settings available through the Settings app (and Internet Options) in at least two different ways using the Group Policy Editor and Registry.
All the latest news, reviews, and guides for Windows and Xbox diehards.
Quick tip: If you want to block users from changing a custom configuration, then first configure proxy, and then disable the settings with the steps below.
Disable settings with Group Policy
If you use Windows 10 Pro (or Enterprise), the easiest way to prevent users from changing the proxy settings is using the Local Group Policy Editor.
To disable the ability to change the proxy settings on Windows 10, use these steps:
- Open Start.
- Search for gpedit.msc and click OK to open the Local Group Policy Editor.
- Browse the following path:
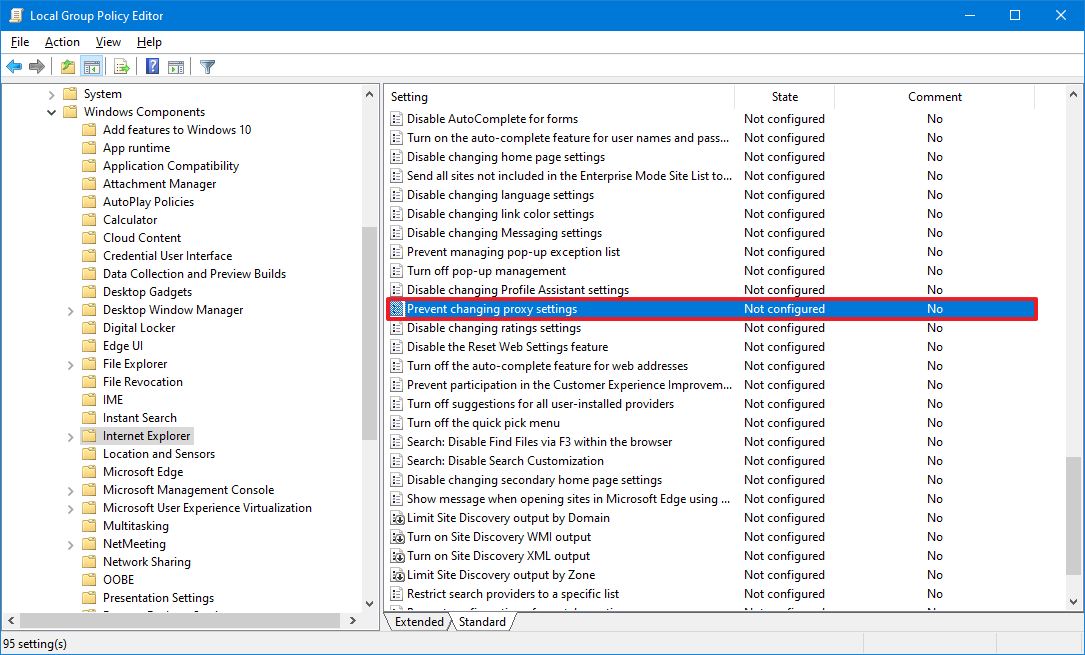
User Configuration > Administrative Templates > Windows Components > Internet Explorer - On the right side, double-click the Prevent changing proxy settings policy.
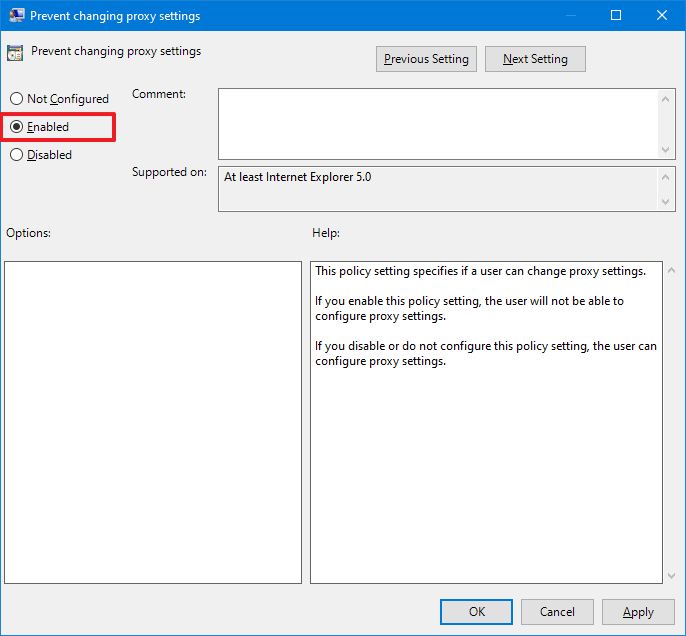
- Select the Enabled option.
- Click the Apply. button
- Click the OK button.
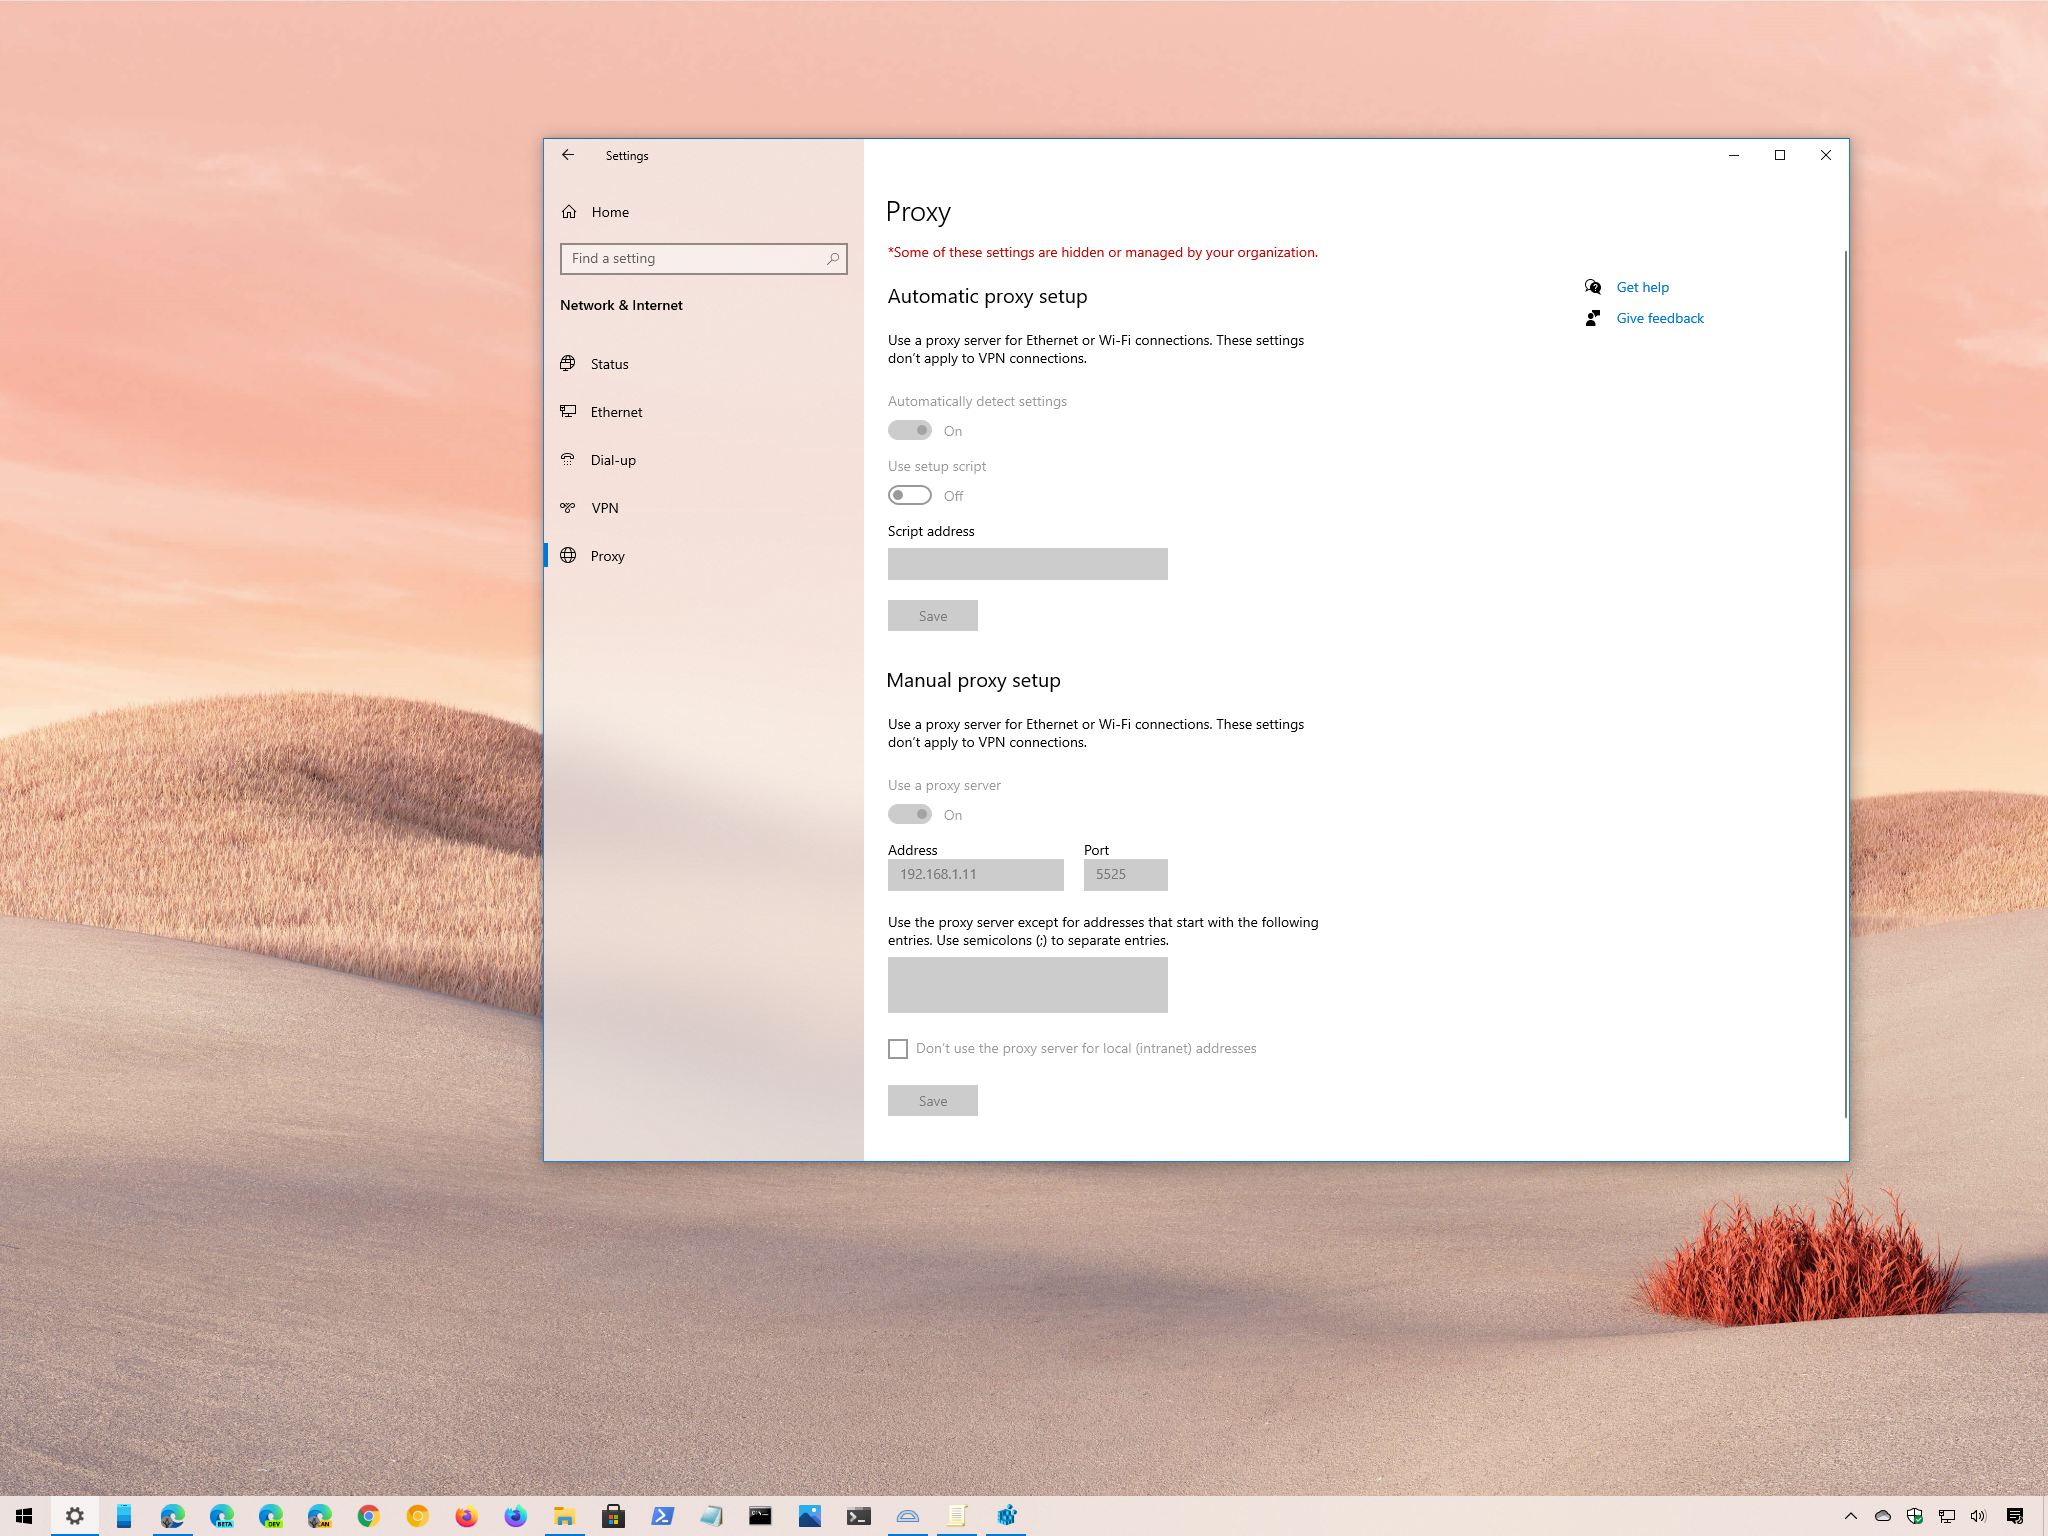
Once you complete the steps, the proxy settings available in the Settings app and through the Internet Options will no longer be available to users. If you have previously set up a custom proxy configuration, it will still be available, and users won't be able to change it.
Disable settings with Registry
In the case you use Windows 10 Home, you won't have access to the Local Group Policy Editor. However, you can still disable the "Prevent changing proxy settings" policy by modifying the Registry.
Warning: This is a friendly reminder that editing the Registry is risky, and it can cause irreversible damage to your installation if you don't do it correctly. It's recommended to make a full backup of your PC before proceeding.
To disable the settings to configure the proxy settings, use these steps:
- Open Start.
- Search for regedit and click the top result to open the Registry.
- Browse the following path:
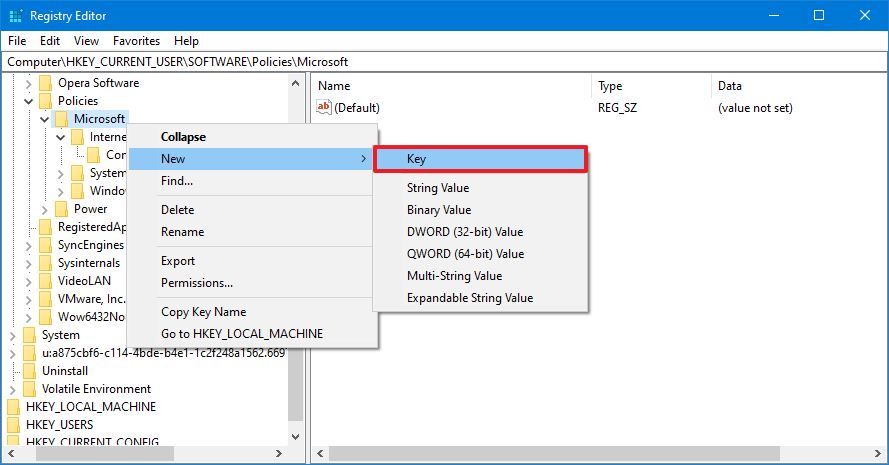
HKEY_CURRENT_USER\Software\Policies\MicrosoftQuick tip: On Windows 10, you can now copy and paste the path in the Registry's address bar to quickly jump to the key destination. - Right-click the Microsoft (folder) key, select the New submenu and choose the Key option.
- Name the key Internet Explorer and press Enter.
- Right-click the newly created key, select the New submenu, and choose the Key option.
- Name the key Control Panel and press Enter.
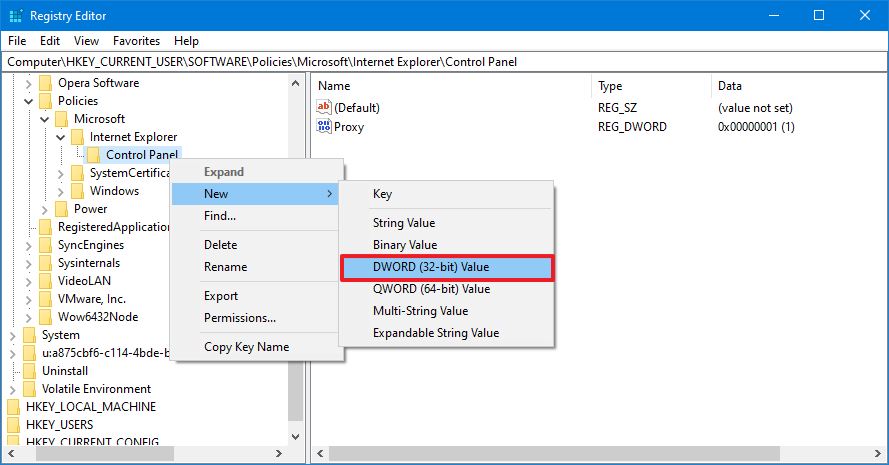
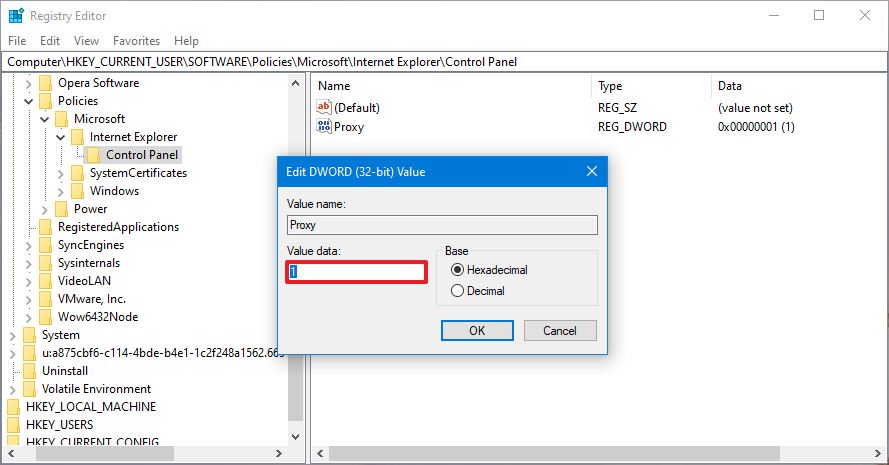
- Right-click the Control Panel (folder) key, select the New submenu, and choose the DWORD (32-bit) Value option.
- Name the key Proxy and press Enter.
- Double-click the newly created DWORD and set the value from 0 to 1.
- Click the OK button.
- Restart your computer.
After you complete the steps, the proxy settings will no longer be customizable using the Settings app or through the legacy Internet Options page. In the same way as using the Local Group Policy editor, if you previously specified custom proxy settings, they will continue to be available, and users won't be able to modify the feature.
How to enable proxy settings on Windows 10
If you want to revert the changes, or you are the administrator for the device, and the proxy settings appear grayed out in the Settings app, you can use the Local Group Policy Editor or Registry to enable the feature.
Enable settings with Group Policy
To enable the ability to change the proxy settings on Windows 10, use these steps:
- Open Start.
- Search for gpedit.msc and click OK to open the Local Group Policy Editor.
- Browse the following path:
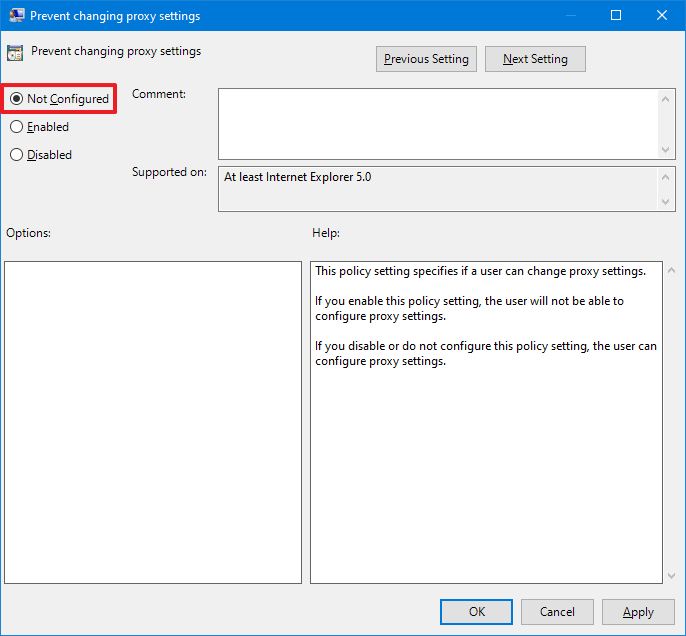
User Configuration > Administrative Templates > Windows Components > Internet Explorer - On the right side, double-click the Prevent changing proxy settings policy.
- Select the Not configured option.
- Click the Apply button.
- Click the OK button.
Once you complete the steps, the proxy settings will no longer be grayed out in the Settings app, and anyone can now customize the feature.
Enable settings with Registry
To make the proxy settings available in the Settings app (and Internet Options) with the Registry, use these steps:
- Open Start.
- Search for regedit and click the top result to open the Registry.
- Browse the following path:
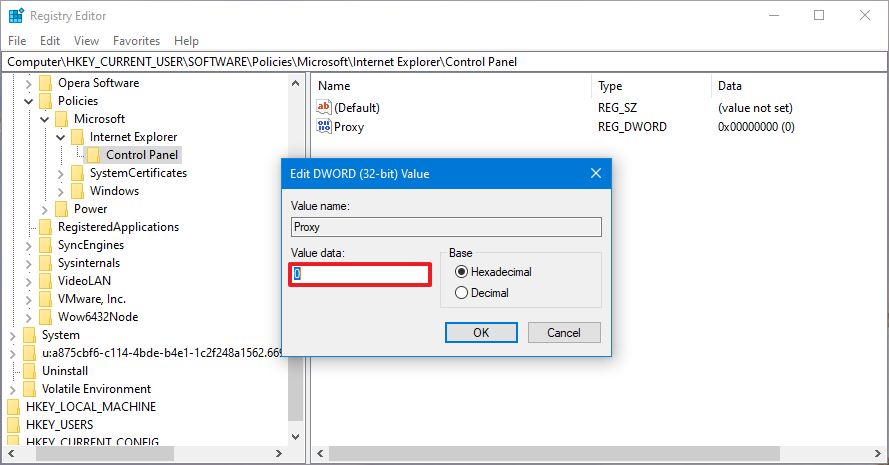
HKEY_CURRENT_USER\Software\Policies\Microsoft\Internet Explorer\Control PanelQuick tip: On Windows 10, you can now copy and paste the path in the Registry's address bar to quickly jump to the key destination. - Double-click the Proxy DWORD from the right side and set the value from 1 to 0.
- Click the OK button.
- Restart your computer.
After you complete the steps, the proxy settings will once again be available on Windows 10.

Mauro Huculak has been a Windows How-To Expert contributor for WindowsCentral.com for nearly a decade and has over 22 years of combined experience in IT and technical writing. He holds various professional certifications from Microsoft, Cisco, VMware, and CompTIA and has been recognized as a Microsoft MVP for many years.
