


The Lenovo Legion 5i 15 is a formidable mid-range gaming option with plenty of features gamers will love. It also happens to have dual M.2 solid-state drive (SSD) slots, as well as space for a 2.5-inch SATA SSD. However, not all spots can be occupied at the same time. If you're interested in upgrading your laptop's storage after purchase, we have everything you need to know right here. Though we're performing the operation on the Intel-based Legion 5i, it should be the same process for the AMD-powered Legion 5.
Hardware and software to get the job done
- M.2 PCIe SSD: Samsung 970 EVO Plus (From $75 at Amazon)
- 2.5-inch SATA SSD: Samsung 860 EVO (From $50 at Amazon)
- Cloning tool: Macrium Reflect 7 (Free at Macrium)
- SSD enclosure for cloning: SSK M.2 PCIe enclosure ($26 at Amazon)
- Prevent damage: Rosewill anti-static wristband ($7 at Amazon)
- All required tools: ORIA PC toolkit ($35 at Amazon)
- Mid-range gaming: Lenovo Legion 5i 15 (From $1,100 at Lenovo)
How to upgrade the main SSD in Lenovo's Legion 5i 15
Note: Before beginning any upgrades on a PC, it's a good idea to back up your data in the unlikely event something should go wrong. You'll also want to ensure you're not working in a static-filled environment since it can cause damage to a PC's internal hardware. Consider investing in an anti-static wristband to avoid unnecessary damage.
Lenovo's Legion 5i 15 is available in several different configurations to best fit your budget and needs. Baseline models usually ship with only an SSD, while more expensive options have both an M.2 PCIe SSD and a 2.5-inch SATA hard-disk drive (HDD). No matter what, the boot drive for Windows 10 will be the M.2 SSD for faster speeds.

The internals are laid out so that there's always a spot for an M.2 SSD, whereas the secondary storage option must be either another M.2 PCIe SSD or a 2.5-inch solution (SSD or HDD). There's no room for all three. Although a 2.5-inch SATA HDD or SSD is going to be cheaper for large storage sizes, we recommend upgrading with dual M.2 PCIe SSDs for better performance. Something like the Samsung 970 EVO Plus is an excellent option.
If you're upgrading the M.2 SSD boot drive that shipped with the Legion 5i, you might want to invest in an SSD enclosure. This will allow you to connect the new SSD to the laptop and clone any data on the boot drive over to the new drive. For cloning we've had success with Macrium Reflect; we've even written a guide to get you through the cloning process.
If you'd rather replace the M.2 boot drive entirely without cloning any data, you can start fresh with a clean Windows 10 install once the upgrade is complete. There are some steps to take care of before you begin the SSD upgrade, so be sure to head over to our guide to a clean install of Windows 10 to see what's required.
Once you've completed any cloning or have set yourself up for a clean installation of Windows 10, clear out a well-lit workspace and power down your Legion 5i 15 before proceeding with the steps below.
- Unscrew the 11 fasteners on the bottom of the laptop using a Phillips screwdriver. They back out entirely, so be sure you have a safe space to collect them. The four short screws go along the front of the chassis.

- Pry up the bottom panel with a pry tool. Start along the front edge and work your way around to the back plastic vent portion. These can be tougher to get apart; work slowly to prevent damage.

- Unscrew the three fasteners on the aluminum shield covering the primary M.2 SSD.

- Remove the aluminum shield.

- Unscrew the single fastener at the end of the M.2 SSD.

- Pull the old M.2 SSD away from the slot.

- Insert the new M.2 SSD into the slot at about a 30-degree angle. Notice it is keyed and will only fit one way.
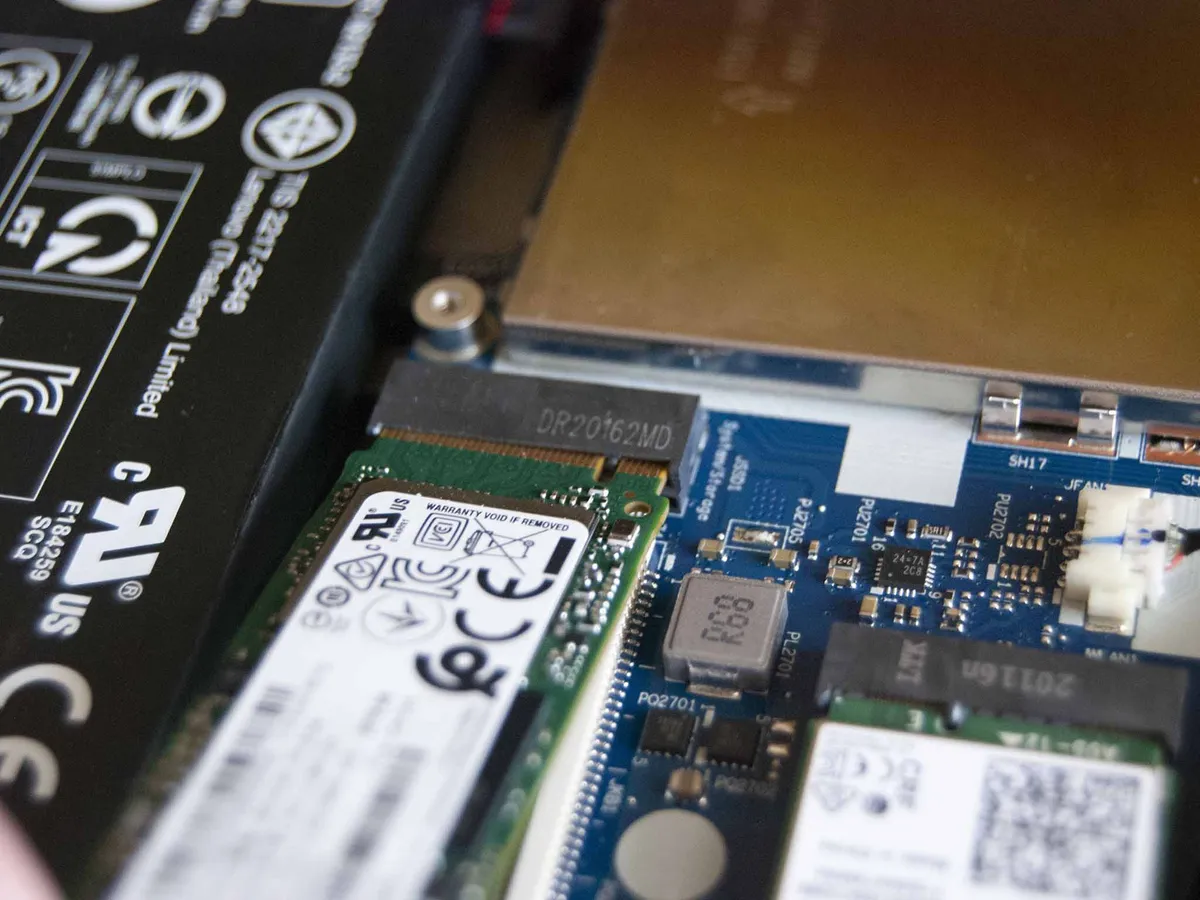
- Screw in the single fastener at the end of the new M.2 SSD.

- Replace the aluminum shield above the SSD.

- Screw in the three fasteners for the shield.

- Replace the bottom panel on the laptop. Apply pressure in one corner and work your way around until it is secured.

- Screw in the 11 fasteners on the bottom of the laptop.

You can now go ahead with a fresh install of Windows 10 or, if you cloned the drive beforehand, you can boot up the PC to see if the upgrade went according to plan.
How to add a secondary SATA SSD to the Legion 5i 15
If you're content with the boot drive in the Legion 5i 15 staying as it is, you can still add a second M.2 SSD or 2.5-inch SATA SSD for bonus storage. In a gaming laptop that deals with colossal game file sizes, this is especially important. The way the laptop is designed, you can either add an M.2 SSD or a 2.5-inch SATA SSD, so you need to choose before beginning the upgrade process. In this section, we will deal with adding a 2.5-inch SATA SSD. We recommend the Samsung 860 EVO as an excellent pick for a 2.5-inch SATA SSD.
If your laptop already has a secondary SSD and you want to keep the data, you can always go through with the same cloning process, as we explained in the preceding section. Once you're ready to upgrade, clear out a well-lit area and power down your Legion 5i 15.
- Unscrew the 11 fasteners on the bottom of the laptop using a Phillips screwdriver. They back out entirely, so be sure you have a safe space to collect them. The four short screws go along the front of the chassis.
- Pry up the bottom panel with a pry tool. Start along the front edge and work your way around to the back plastic vent portion. These can be tougher to get apart; work slowly to prevent damage.
- Unscrew the four fasteners holding the 2.5-inch enclosure in place.

- Lift the 2.5-inch enclosure from its mounts. Be careful you do not harm the SATA connector.

- Unplug the SATA connector from the enclosure.

- Remove the black filler or old SSD from the enclosure.

- Add the new 2.5-inch SATA SSD to the enclosure.

- Plug the SATA connector into the new SSD. Notice it will only fit one way.

- Place the enclosure over its mounts.

- Screw in the four fasteners that hold the enclosure in place.

- Replace the bottom panel on the laptop. Apply pressure in one corner and work your way around until it is secured.
- Screw in the 11 fasteners on the bottom of the laptop.
You're now free to boot up your PC to see if the upgrade went according to plan. If Windows 10 doesn't recognize the drive, check out our guide to formatting new storage.
How to add a secondary M.2 SSD to the Legion 5i 15
If you'd rather add a secondary M.2 PCIe SSD to the Legion 5i 15, we recommend the Samsung 970 EVO Plus as an upgrade pick. This will remove the ability to add a 2.5-inch SATA SSD. Here's how to add a second M.2 SSD by first removing the 2.5-inch SATA SSD enclosure.
- Unscrew the 11 fasteners on the bottom of the laptop using a Phillips screwdriver. They back out entirely, so be sure you have a safe space to collect them. The four short screws go along the front of the chassis.
- Pry up the bottom panel with a pry tool. Start along the front edge and work your way around to the back plastic vent portion. These can be tougher to get apart; work slowly to prevent damage.
- Unscrew the four fasteners holding the 2.5-inch enclosure in place.
- Lift the 2.5-inch enclosure from its mounts. Be careful you do not harm the SATA connector.
- Lift the white release on the end of the SATA cable that's attached to the motherboard.

- Unplug the SATA cable from the motherboard.

- Insert the secondary M.2 SSD into the slot at about a 30-degree angle. Notice it is keyed and will only fit one way.

- Screw in a single fastener at the end of the M.2 SSD.

- Replace the bottom panel on the laptop. Apply pressure in one corner and work your way around until it is secured.
- Screw in the 11 fasteners on the bottom of the laptop.
You're now free to boot up your PC to see if the upgrade went according to plan. If Windows 10 doesn't recognize the drive, check out our guide to formatting new storage.
Our top hardware and software picks
Our top pick for the best SSD for your laptop is Samsung's 970 EVO Plus. It's incredibly fast, it's long-lasting, and it's relatively cheap for the performance you're getting.

Unreal performance up to 1TB in size
Samsung's 970 EVO Plus brings blistering read and write speeds, a competitive price, and a five-year warranty, which altogether is an impressive package. Sizes start at 250GB and go up to 2TB.
If you're looking to add quantity over speed, a 2.5-inch SATA SSD like the Samsung 860 EVO will perform well and won't cost as much.

Not as fast but not as expensive
Get the Samsung 860 EVO in 250GB, 500GB, 1TB, 2TB, and 4TB sizes and enjoy read speeds up to 550MB/s.
Lenovo's Legion 5i 15 is a solid mid-range gaming laptop with upgradeable RAM and storage. Be sure to check out our collection of best Windows laptops to see how it compares to other popular options.

Unthrottled gaming performance
Get up to a 10th Gen Intel Core i7-10750H processor and NVIDIA RTX 2060 dedicated graphics card for excellent mid-range gaming power.
Additional Equipment
To make the upgrade process easier and less risky, consider investing in some of these affordable PC tools, and don't forget about Macrium Reflect and an external enclosure for those who want to clone drives.

SSK M.2 enclosure ($26 at Amazon)
This affordable aluminum enclosure works with M.2 PCIe NVMe SSDs like the Samsung 970 EVO Plus for cloning. Connect to the Legion 5i with USB-C.

Macrium Reflect 7 (Free at Macrium)
We've had success cloning drives with Macrium Reflect 7, and have even written a complete guide on how to use it properly. A free edition is available, but you can purchase a full edition with a bunch more features for those who truly take backups seriously.

ORIA PC toolkit ($35 at Amazon)
Having the proper gear to work on your PC will always make the job much more comfortable. Here you get a plethora of tools contained in a portable case.

Rosewill anti-static wristband ($7 at Amazon)
Static electricity can damage sensitive PC parts, so remove the risk with an anti-static wristband. Fasten it around your wrist and clip it onto your PC for peace of mind.

